rear view mirror TOYOTA C-HR 2023 User Guide
[x] Cancel search | Manufacturer: TOYOTA, Model Year: 2023, Model line: C-HR, Model: TOYOTA C-HR 2023Pages: 814, PDF Size: 112.62 MB
Page 272 of 814
2703-4. Adjusting the steering wheel and mirrors
C-HR_HEV_OM_Europe_OM10764E
Inside rear view mirror
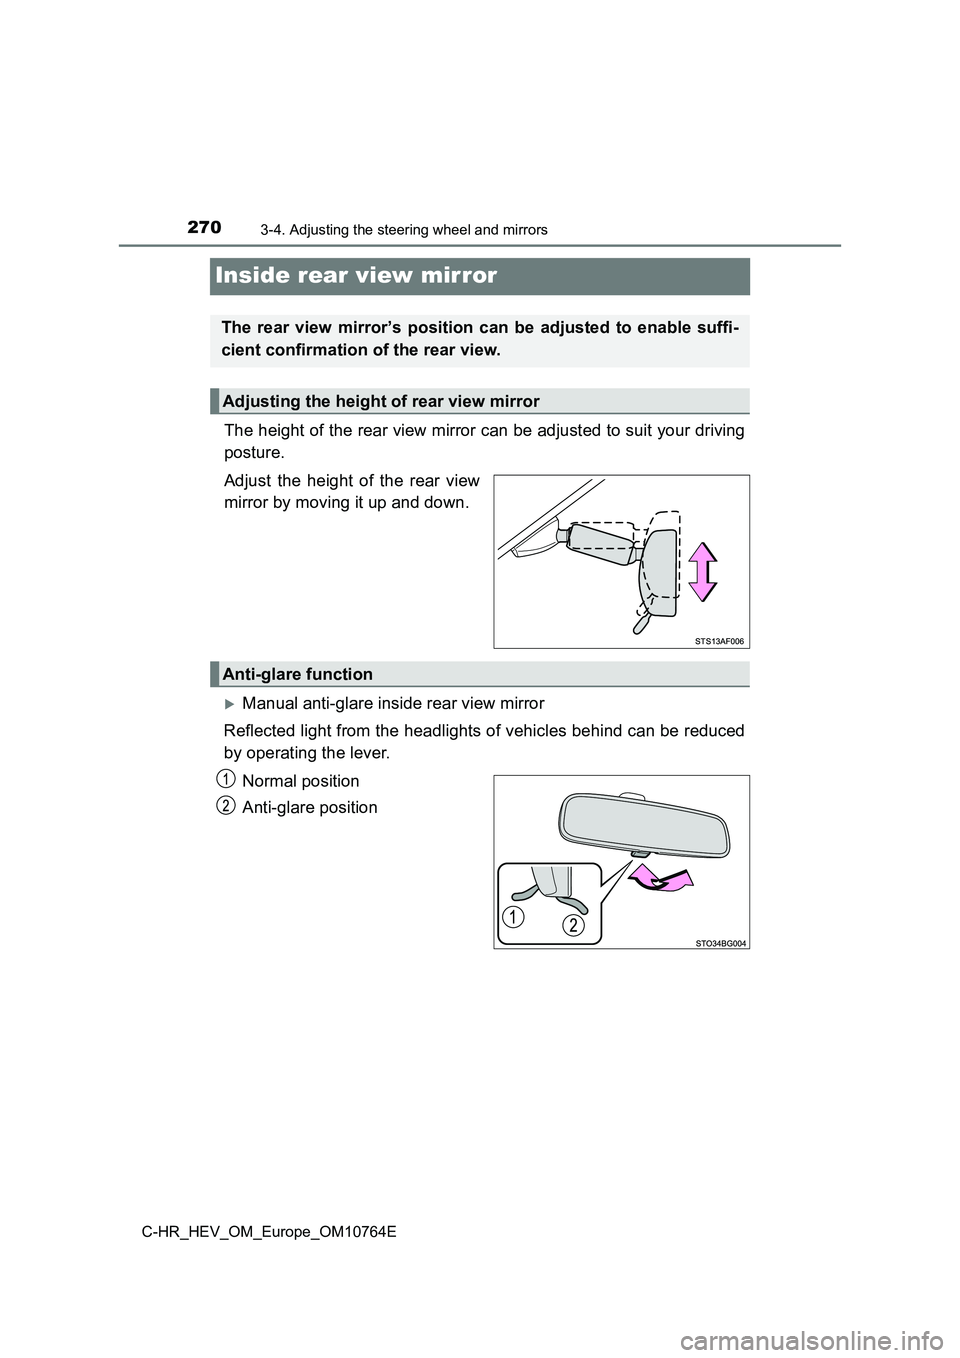
The height of the rear view mirror can be adjusted to suit your driving
posture.
Adjust the height of the rear view
mirror by moving it up and down.
Manual anti-glare inside rear view mirror
Reflected light from the headlights of vehicles behind can be r educed
by operating the lever.
Normal position
Anti-glare position
The rear view mirror’s position can be adjusted to enable suffi -
cient confirmation of the rear view.
Adjusting the height of rear view mirror
Anti-glare function
Page 273 of 814
2713-4. Adjusting the steering wheel and mirrors
3
Operation of each component
C-HR_HEV_OM_Europe_OM10764E
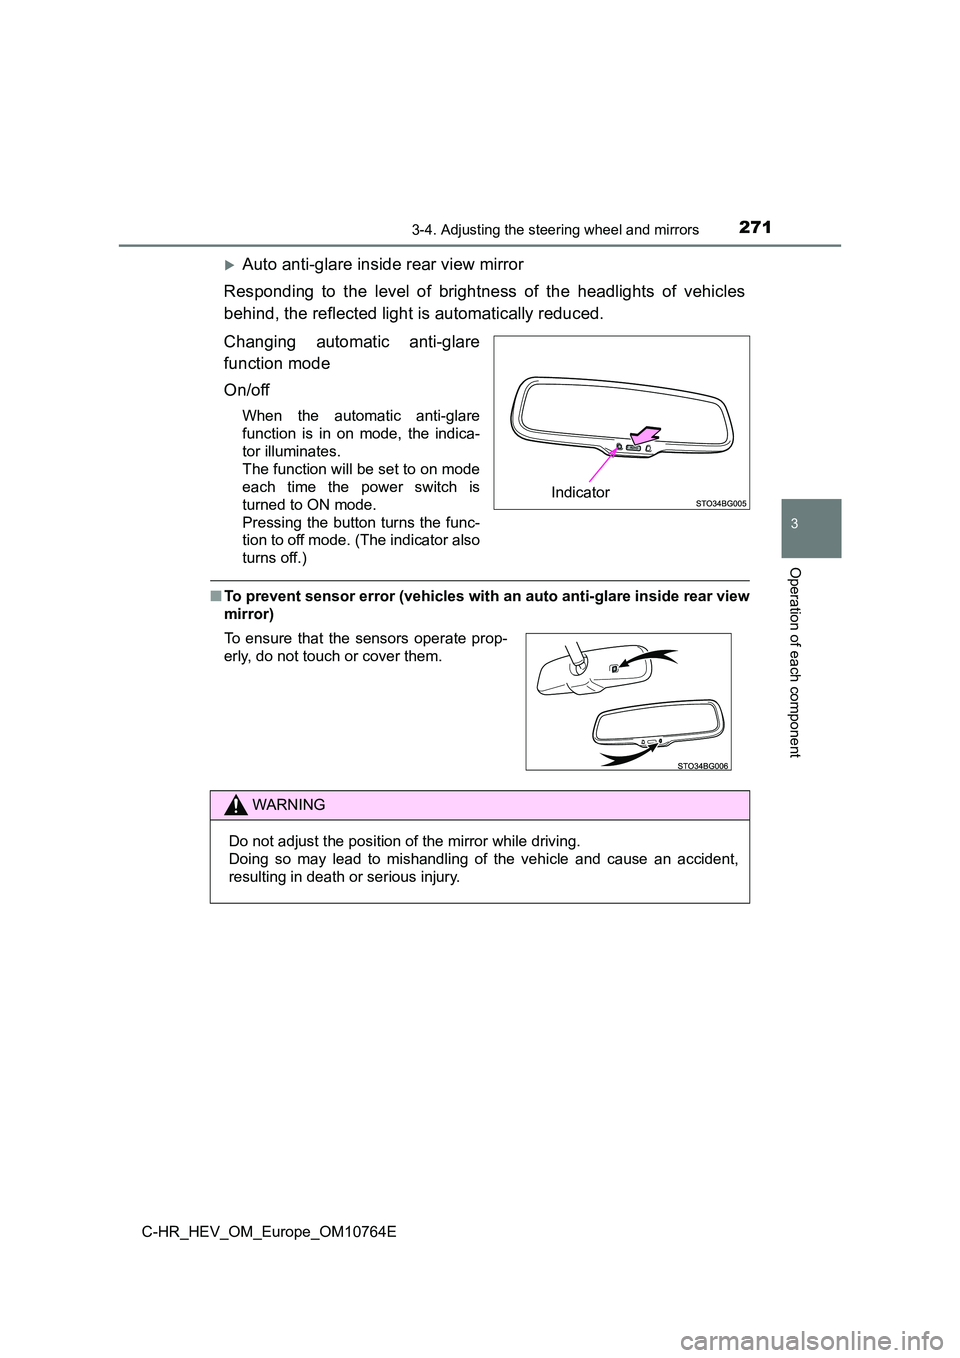
Auto anti-glare inside rear view mirror
Responding to the level of brightness of the headlights of vehi cles
behind, the reflected light is automatically reduced.
Changing automatic anti-glare
function mode
On/off
When the automatic anti-glare
function is in on mode, the indica-
tor illuminates.
The function will be set to on mode
each time the power switch is
turned to ON mode.
Pressing the button turns the func-
tion to off mode. (The indicator also
turns off.)
■ To prevent sensor error (vehicles with an auto anti-glare inside rear view
mirror)
Indicator
To ensure that the sensors operate prop-
erly, do not touch or cover them.
WARNING
Do not adjust the position of the mirror while driving.
Doing so may lead to mishandling of the vehicle and cause an ac cident,
resulting in death or serious injury.
Page 274 of 814
2723-4. Adjusting the steering wheel and mirrors
C-HR_HEV_OM_Europe_OM10764E
Outside rear view mirrors
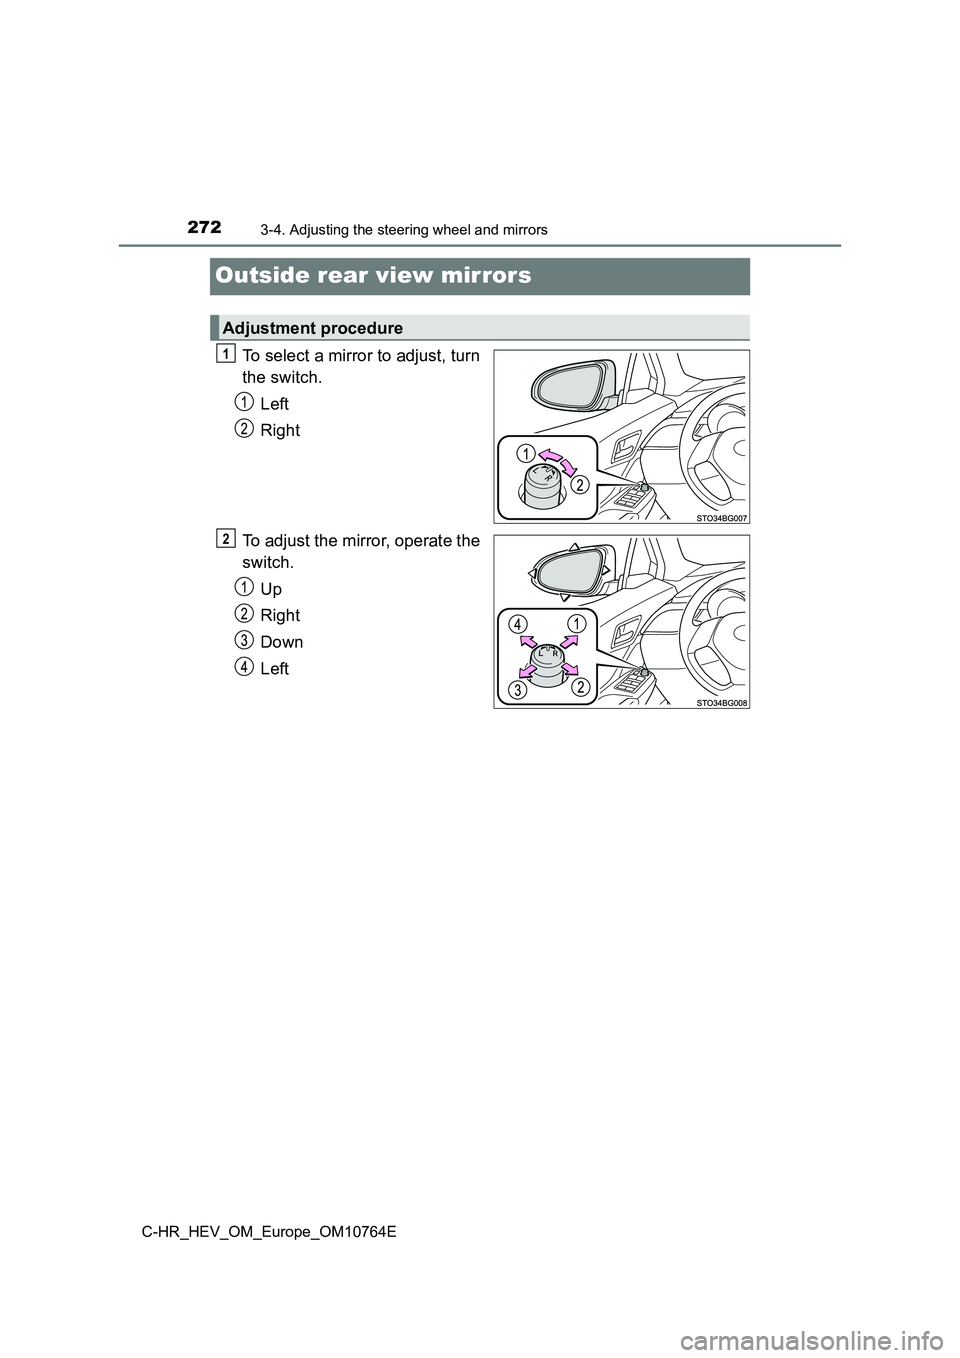
To select a mirror to adjust, turn
the switch.
Left
Right
To adjust the mirror, operate the
switch.
Up
Right
Down
Left
Adjustment procedure
1
2
Page 275 of 814
2733-4. Adjusting the steering wheel and mirrors
3
Operation of each component
C-HR_HEV_OM_Europe_OM10764E
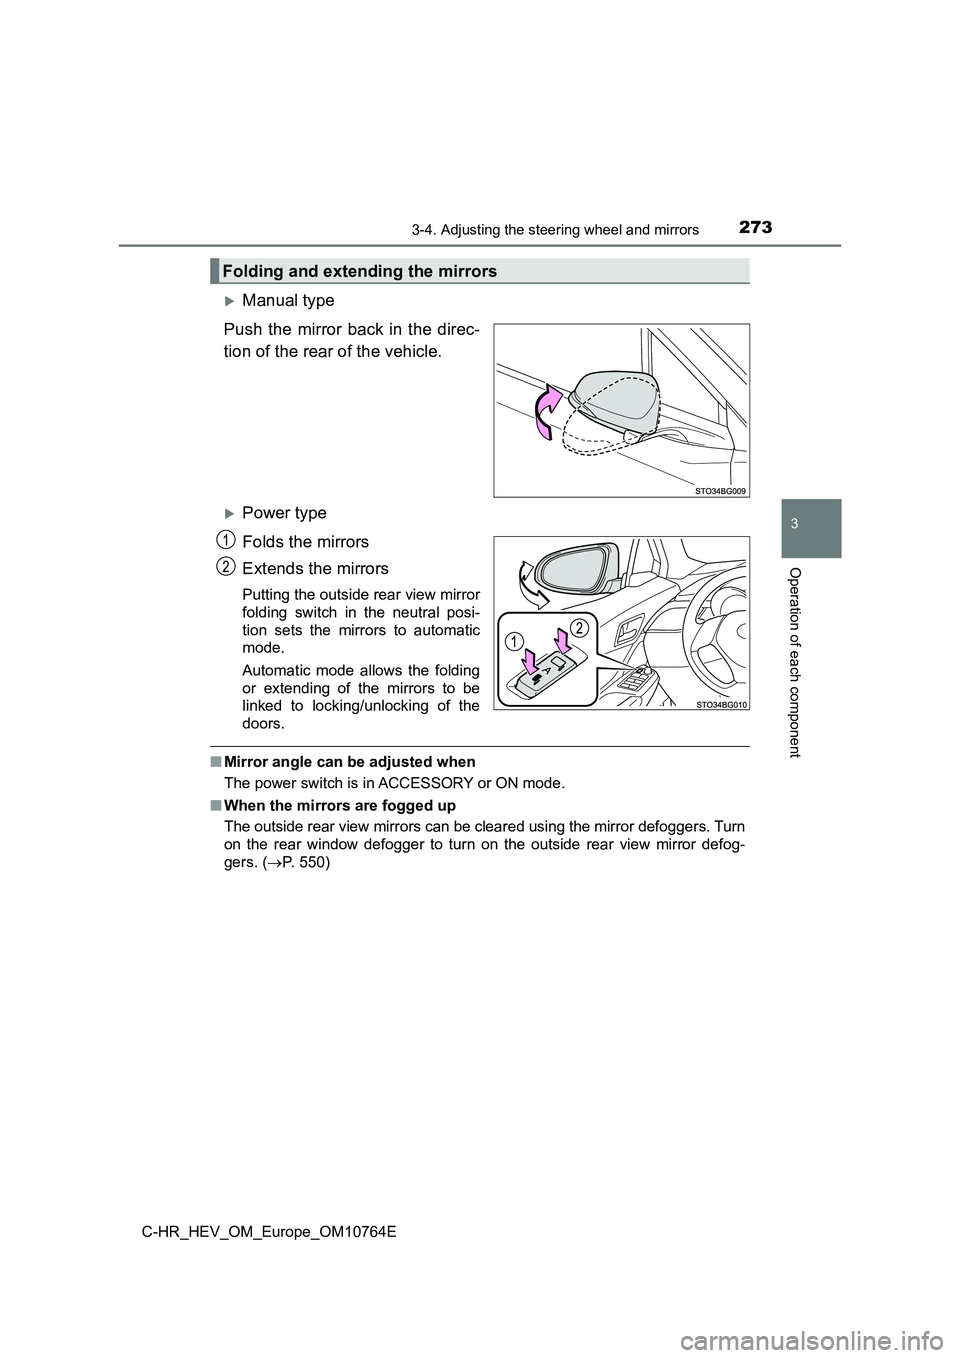
Manual type
Push the mirror back in the direc-
tion of the rear of the vehicle.
Power type
Folds the mirrors
Extends the mirrors
Putting the outside rear view mirror
folding switch in the neutral posi-
tion sets the mirrors to automatic
mode.
Automatic mode allows the folding
or extending of the mirrors to be
linked to locking/unlocking of the
doors.
■ Mirror angle can be adjusted when
The power switch is in ACCESSORY or ON mode.
■ When the mirrors are fogged up
The outside rear view mirrors can be cleared using the mirror d efoggers. Turn
on the rear window defogger to turn on the outside rear view mi rror defog-
gers. ( P. 550)
Folding and extending the mirrors
Page 276 of 814
2743-4. Adjusting the steering wheel and mirrors
C-HR_HEV_OM_Europe_OM10764E
■ Using the automatic folding/extending mirror function in cold weather (if
equipped)
When the automatic folding/ext ending mirror function is used in cold weather,
the outside rear view mirrors could freeze up and automatic fol ding and
extension may not be possible. In this event, remove any ice an d snow from
the outside rear view mirror, then operate the mirror manually by using the
mirror fold switch or moving the mirror by hand.
■ Customization
The automatic mirror folding and extending operation can be cha nged.
(Customizable features: P. 779)
WARNING
■Important points while driving
Observe the following precautions while driving.
Failure to do so may result in loss of control of the vehicle a nd cause an
accident, resulting in death or serious injury.
● Do not adjust the mirrors while driving.
● Do not drive with the mirrors folded.
● Both the driver and passenger side mirrors must be extended and properly
adjusted before driving.
■ When a mirror is moving
To avoid personal injury and mirror malfunction, be careful not to get your
hand caught by the moving mirror.
■ When the mirror defoggers are operating
Do not touch the rear view mirror surfaces, as they can become very hot
and burn you.
Page 288 of 814
2864-1. Before driving
C-HR_HEV_OM_Europe_OM10764E
WARNING
Observe the following precautions.
Failure to do so may result in death or serious injury.
■ When driving the vehicle
● Do not drive if you are unfamiliar with the location of the brake and accel-
erator pedals to avoid depressing the wrong pedal.
• Accidentally depressing the accelerator pedal instead of the b rake
pedal will result in sudden acceleration that may lead to an ac cident.
• When backing up, you may twist your body around, leading to a diffi-
culty in operating the pedals. Make sure to operate the pedals properly.
• Make sure to keep a correct driving posture even when moving t he
vehicle only slightly. This allows you to depress the brake and accelera-
tor pedals properly.
• Depress the brake pedal using your right foot. Depressing the brake
pedal using your left foot may delay response in an emergency, result-
ing in an accident.
● The driver should pay extra attention to pedestrians when the vehicle is
powered only by the electric motor (traction motor). As there i s no engine
noise, the pedestrians may misjudge the vehicle’s movement.
Even though the vehicle is equipped with the acoustic vehicle a lerting sys-
tem, drive with care as pedestrians in the vicinity may still n ot notice the
vehicle if the surrounding area is noisy.
● Do not drive the vehicle over or stop the vehicle near flammable materials.
The exhaust system and exhaust gases can be extremely hot. Thes e hot
parts may cause a fire if there is any flammable material nearb y.
● During normal driving, do not turn off the hybrid system. Turning the hybrid
system off while driving will not cause loss of steering or bra king control,
however, power assist to the steering will be lost. This will m ake it more
difficult to steer smoothly, so you should pull over and stop t he vehicle as
soon as it is safe to do so.
In the event of an emergency, such as if it becomes impossible to stop the
vehicle in the normal way: P. 669
● Use engine braking (shift lever to B) to maintain a safe speed when driving
down a steep hill.
Using the brakes continuously may cause the brakes to overheat and lose
effectiveness. ( P. 314, 318)
● Do not adjust the positions of the steering wheel, the seat, or the inside or
outside rear view mirrors while driving.
Doing so may result in a loss of vehicle control.
● Always check that all passengers’ arms, heads or other parts of their body
are not outside the vehicle.
Page 300 of 814
2984-1. Before driving
C-HR_HEV_OM_Europe_OM10764E
■Tire information
● Increase the tire inflation pressure to 20.0 kPa (0.2 kgf/cm2 or bar, 3 psi)
greater than the recommended value when towing. ( P. 774)
● Increase the air pressure of the trailer tires in accordance with the total
trailer weight and according to the values recommended by the m anufac-
turer of your trailer.
■ Trailer lights
Please consult at any authorized retailer or Toyota authorized repairer, or any
reliable repairer when installing trailer lights, as incorrect installation may
cause damage to the vehicle’s lights. Please take care to compl y with your
state’s laws when installing trailer lights.
■ Break-in schedule
Toyota recommends that vehicles fitted with new power train com ponents
should not be used for towing trailers for the first 800 km (50 0 miles).
■ Safety checks before towing
● Check that the maximum load limit for the towing hitch/bracket and hitch ball
is not exceeded. Bear in mind that the coupling weight of the t railer will add
to the load exerted on the vehicle. Also make sure that the tot al load exerted
on the vehicle is within the range of the weight limits. ( P. 295)
● Ensure that the trailer load is secure.
● Supplementary outside rear view mirrors should be added to the vehicle if
the traffic behind cannot be clearly seen with standard mirrors . Adjust the
extending arms of these mirrors on both sides of the vehicle so that they
always provide maximum visibility of the road behind.
■ Maintenance
● Maintenance must be performed more frequently when using the vehicle for
towing due to the greater weight burden placed on the vehicle c ompared to
normal driving.
● Retighten all bolts securing the hitching ball and bracket after towing for
approximately 1000 km (600 miles).
Page 358 of 814
3564-5. Using the driving support systems
C-HR_HEV_OM_Europe_OM10764E
WARNING
●If the part of the windshield in front of the front camera is fogged up or cov-
ered with condensation, or ice, use the windshield defogger to remove the
fog, condensation, or ice. ( P. 549)
● If water droplets cannot be properly removed from the area of the wind-
shield in front of the front camera by the windshield wipers, r eplace the
wiper insert or wiper blade.
● Do not attach window tint to the windshield.
● Replace the windshield if it is damaged or cracked.
After replacing the windshield, the front camera must be recali brated. Con-
tact any authorized Toyota retailer or Toyota authorized repair er, or any
reliable repairer for details.
● Do not allow liquids to contact the front camera.
● Do not allow bright lights to shine into the front camera.
● Do not dirty or damage the front camera.
When cleaning the inside of the windshield, do not allow glass cleaner to
contact the lens of the front camera. Also, do not touch the le ns.
If the lens is dirty or damaged, contact any authorized Toyota retailer or
Toyota authorized repairer, or any reliable repairer.
● Do not subject the front camera to a strong impact.
● Do not change the installation position or direction of the front camera or
remove it.
● Do not disassemble the front camera.
● Do not modify any components of the vehicle around the front camera
(inside rear view mirror, etc.) or ceiling.
● Do not attach any accessories to the hood, front grille or front bumper that
may obstruct the front camera. Contact any authorized Toyota re tailer or
Toyota authorized repairer, or any reliable repairer for details.
● If a surfboard or other long object is to be mounted on the roof, make sure
that it will not obstruct the front camera.
● Do not modify the headlights or other lights.
Page 437 of 814
435
4
4-5. Using the driving support systems
Driving
C-HR_HEV_OM_Europe_OM10764E
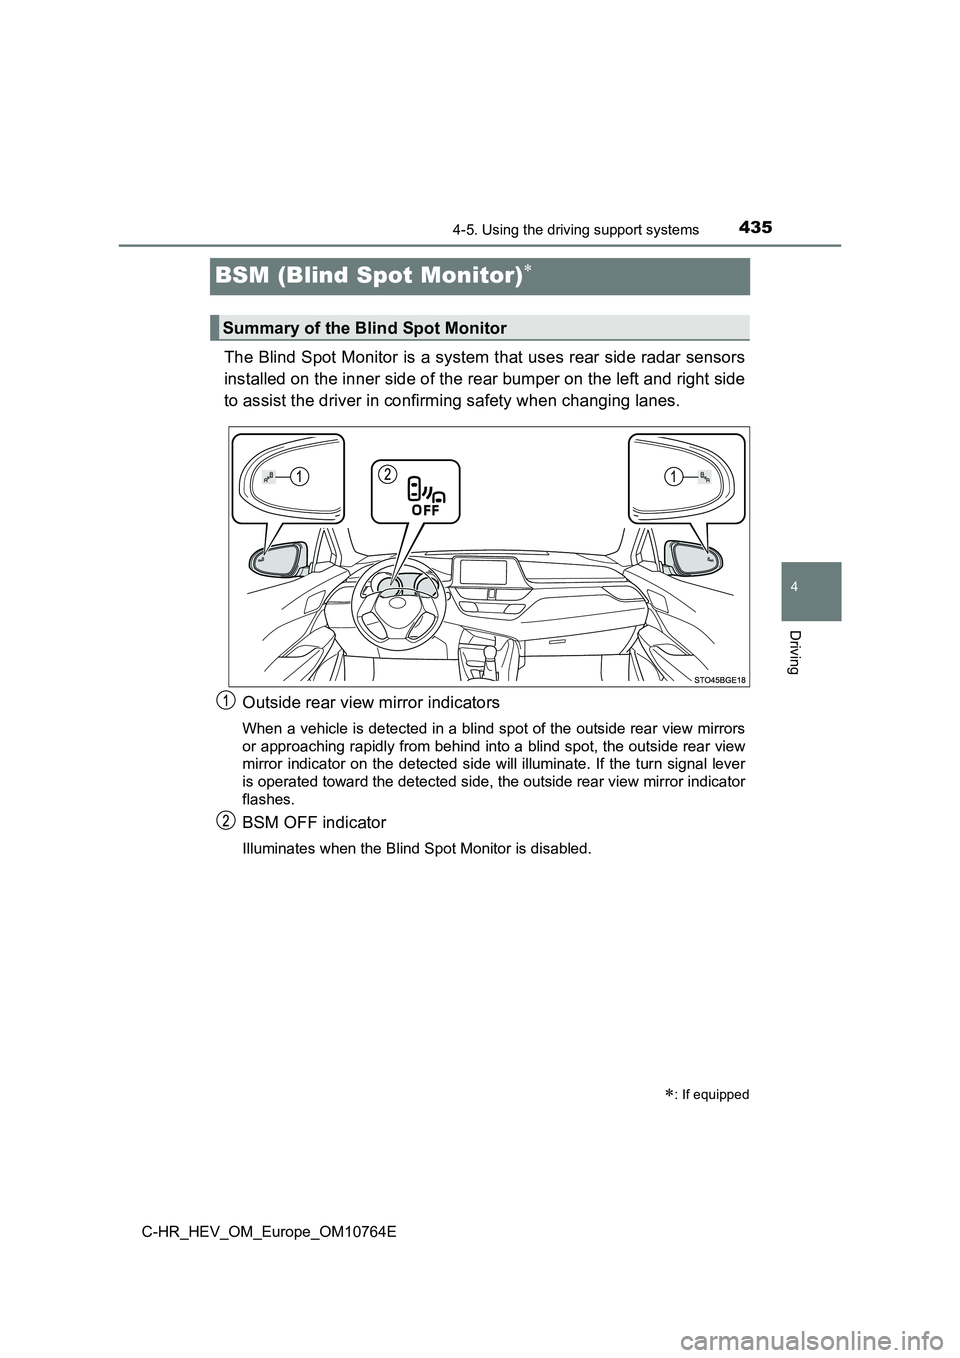
BSM (Blind Spot Monitor)
The Blind Spot Monitor is a system that uses rear side radar sensors
installed on the inner side of the rear bumper on the left and right side
to assist the driver in confirming safety when changing lanes.
Outside rear view mirror indicators
When a vehicle is detected in a blind spot of the outside rear view mirrors
or approaching rapidly from behind into a blind spot, the outsi de rear view
mirror indicator on the detected side will illuminate. If the t urn signal lever
is operated toward the detected side, the outside rear view mir ror indicator
flashes.
BSM OFF indicator
Illuminates when the Blind Spot Monitor is disabled.
: If equipped
Summary of the Blind Spot Monitor
Page 438 of 814
4364-5. Using the driving support systems
C-HR_HEV_OM_Europe_OM10764E
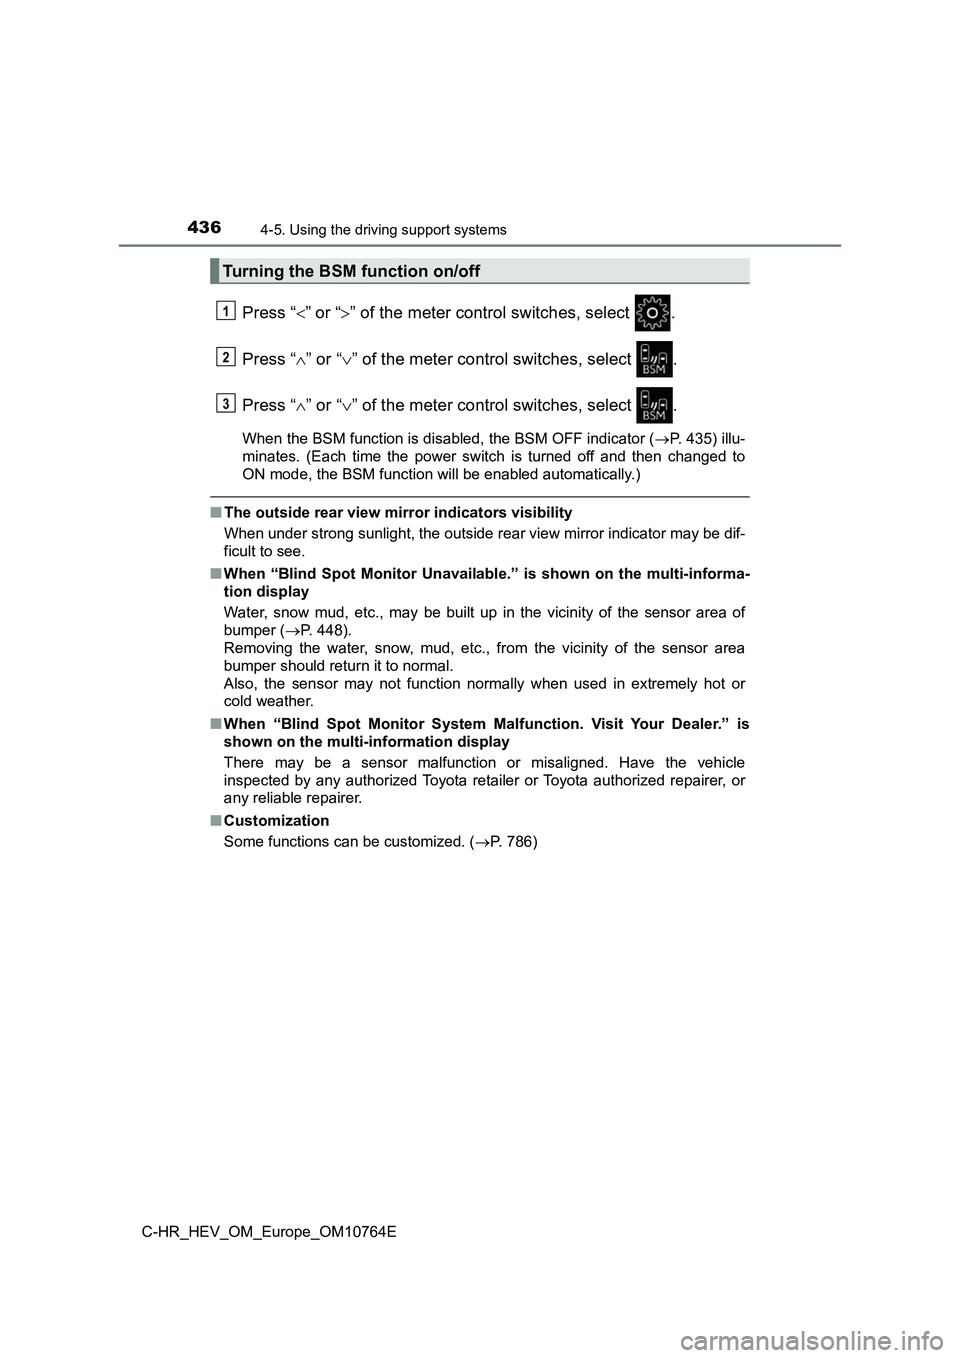
Press “” or “” of the meter control switches, select .
Press “ ” or “” of the meter control switches, select .
Press “ ” or “” of the meter control switches, select .
When the BSM function is disabled, the BSM OFF indicator (P. 435) illu-
minates. (Each time the power switch is turned off and then cha nged to
ON mode, the BSM function will be enabled automatically.)
■ The outside rear view mirror indicators visibility
When under strong sunlight, the out side rear view mirror indicator may be dif-
ficult to see.
■ When “Blind Spot Monitor Unavailable.” is shown on the multi-informa-
tion display
Water, snow mud, etc., may be built up in the vicinity of the s ensor area of
bumper ( P. 448).
Removing the water, snow, mud, etc., from the vicinity of the s ensor area
bumper should return it to normal.
Also, the sensor may not function normally when used in extreme ly hot or
cold weather.
■ When “Blind Spot Monitor System Malfunction. Visit Your Dealer.” is
shown on the multi-information display
There may be a sensor malfunction or misaligned. Have the vehic le
inspected by any authorized Toyota retailer or Toyota authorize d repairer, or
any reliable repairer.
■ Customization
Some functions can be customized. ( P. 786)
Turning the BSM function on/off
1
2
3