TOYOTA C_HR HYBRID 2017 Owners Manual
C_HR HYBRID 2017
TOYOTA
TOYOTA
https://www.carmanualsonline.info/img/14/59778/w960_59778-0.png
TOYOTA C_HR HYBRID 2017 Owners Manual
Trending: coolant temperature, radio, oil, AUX, driver seat adjustment, light, warning light
Page 611 of 712
6118-2. Steps to take in an emergency
C-HR_HV_OM_Europe_OM10538E
8
When trouble arises
■If “Shift is in Release Accelerator Before Shifting” is shown
Message is displayed when the accelerator pedal has been depressed and
the shift lever is in N.
Release the accelerator pedal and shift the shift lever to D or R.
■ If “Auto Power OFF to Conserve Battery” is shown
The power switch has been turned off by the automatic power off function.
When starting the hybrid system next time, operate the hybrid system for
approximately 5 minutes to recharge the 12-volt battery.
■ If “A New Key has been Registered Contact Your Dealer for Details” is
shown
This message will be displayed each time the driver's door is opened when
the doors are unlocked from the outside for approximately one week after a
new electronic key has been registered.
If this message is displayed but you have not had a new electronic key regis-
tered, ask any authorized Toyota retailer or Toyota authorized repairer, or any
reliable repairer to check if an unknown electronic key (other than those in
your possession) has been registered.
■ If “Front Camera Unavailable.” or “Front Camera Vision Blocked. Clean
and Demist Windshield.” is displayed.
The following systems may be suspended until the problem shown in the
message is resolved.
● PCS (Pre-Collision System)*
●LDA (Lane Departure Alert with steering control)*
●Dynamic radar cruise control with full-speed range*
●Automatic High Beam*
*: If equipped
■ Warning buzzer
P. 603
Page 612 of 712
6128-2. Steps to take in an emergency
C-HR_HV_OM_Europe_OM10538E
If you have a flat tire (vehicles with an
emergency tire puncture repair kit)
Vehicles equipped with an emergency tire puncture repair kit do
not have a spare tire equipped.
A puncture caused by a nail or screw passing through the tire
tread can be repaired temporarily with the emergency tire punc-
ture repair kit.
WARNING
■ If you have a flat tire
Do not continue driving with a flat tire.
Driving even a short distance with a flat tire can damage the tire and the
wheel beyond repair, which could result in an accident.
Driving with a flat tire may cause a circumferential groove on the side wall.
In such a case, the tire may explode when using a repair kit.
Page 613 of 712
6138-2. Steps to take in an emergency
C-HR_HV_OM_Europe_OM10538E
8
When trouble arises
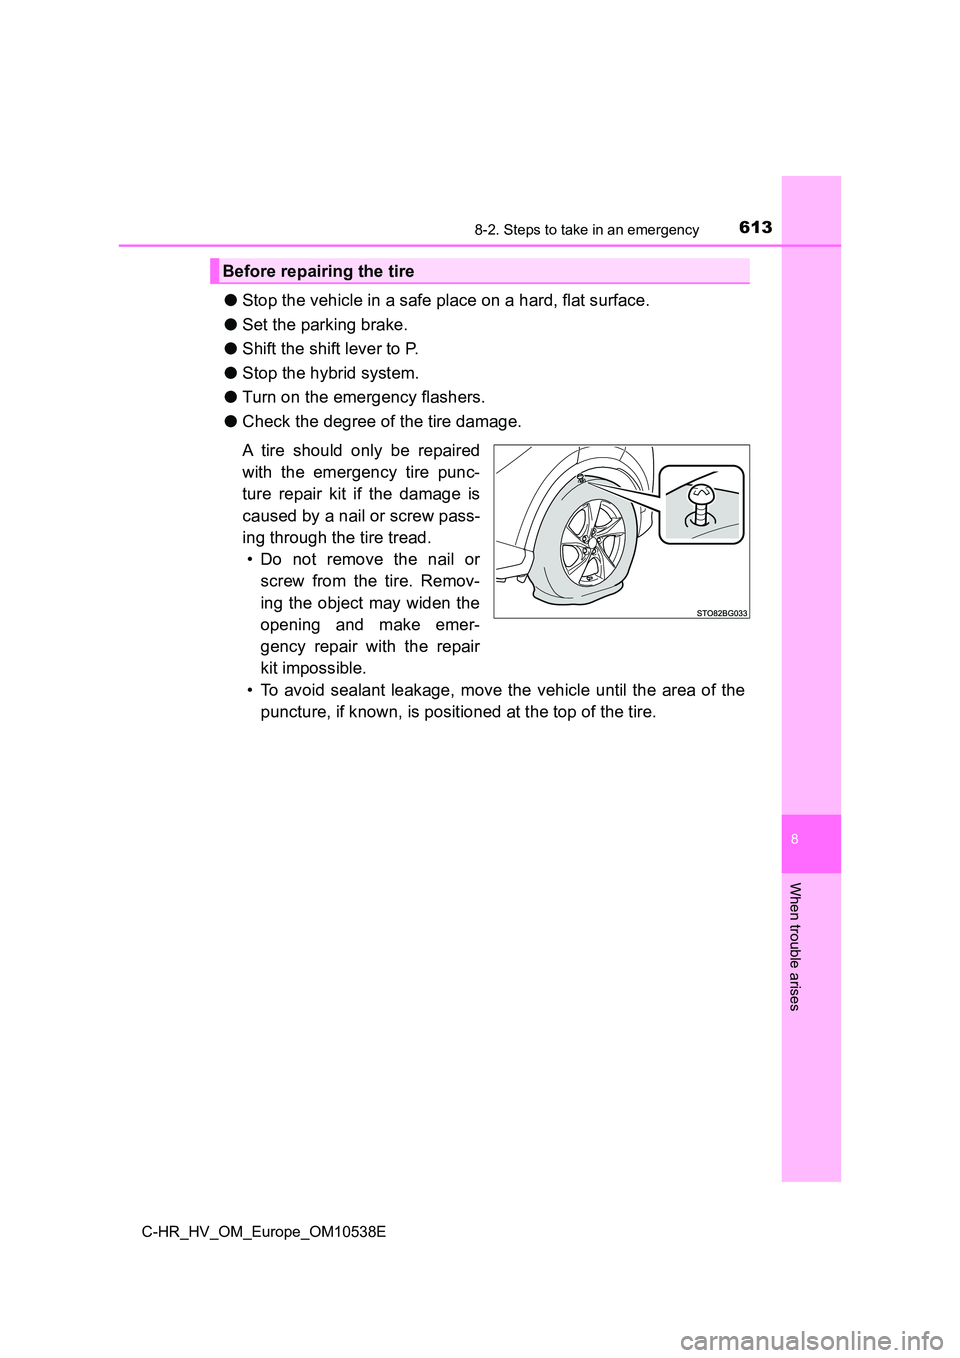
●Stop the vehicle in a safe place on a hard, flat surface.
● Set the parking brake.
● Shift the shift lever to P.
● Stop the hybrid system.
● Turn on the emergency flashers.
● Check the degree of the tire damage.
A tire should only be repaired
with the emergency tire punc-
ture repair kit if the damage is
caused by a nail or screw pass-
ing through the tire tread.
• Do not remove the nail or
screw from the tire. Remov-
ing the object may widen the
opening and make emer-
gency repair with the repair
kit impossible.
• To avoid sealant leakage, move the vehicle until the area of the
puncture, if known, is positioned at the top of the tire.
Before repairing the tire
Page 614 of 712
6148-2. Steps to take in an emergency
C-HR_HV_OM_Europe_OM10538E
■A flat tire that cannot be repaired with the emergency tire puncture repair
kit
In the following cases, the tire c annot be repaired with the emergency tire
puncture repair kit. Contact any authorized Toyota retailer or Toyota autho-
rized repairer, or any reliable repairer.
● When the tire is damaged due to driving without sufficient air pressure
● When the tire lost air pressure due to a crack or damage in the tire sidewall
● When the tire is visibly separated from the wheel
● When the cut or damage to the tread is 4 mm (0.16 in.) long or more
● When the wheel is damaged
● When two or more tires have been punctured
● When there is more than one hole or cut in the damaged tire
Page 615 of 712
6158-2. Steps to take in an emergency
C-HR_HV_OM_Europe_OM10538E
8
When trouble arises
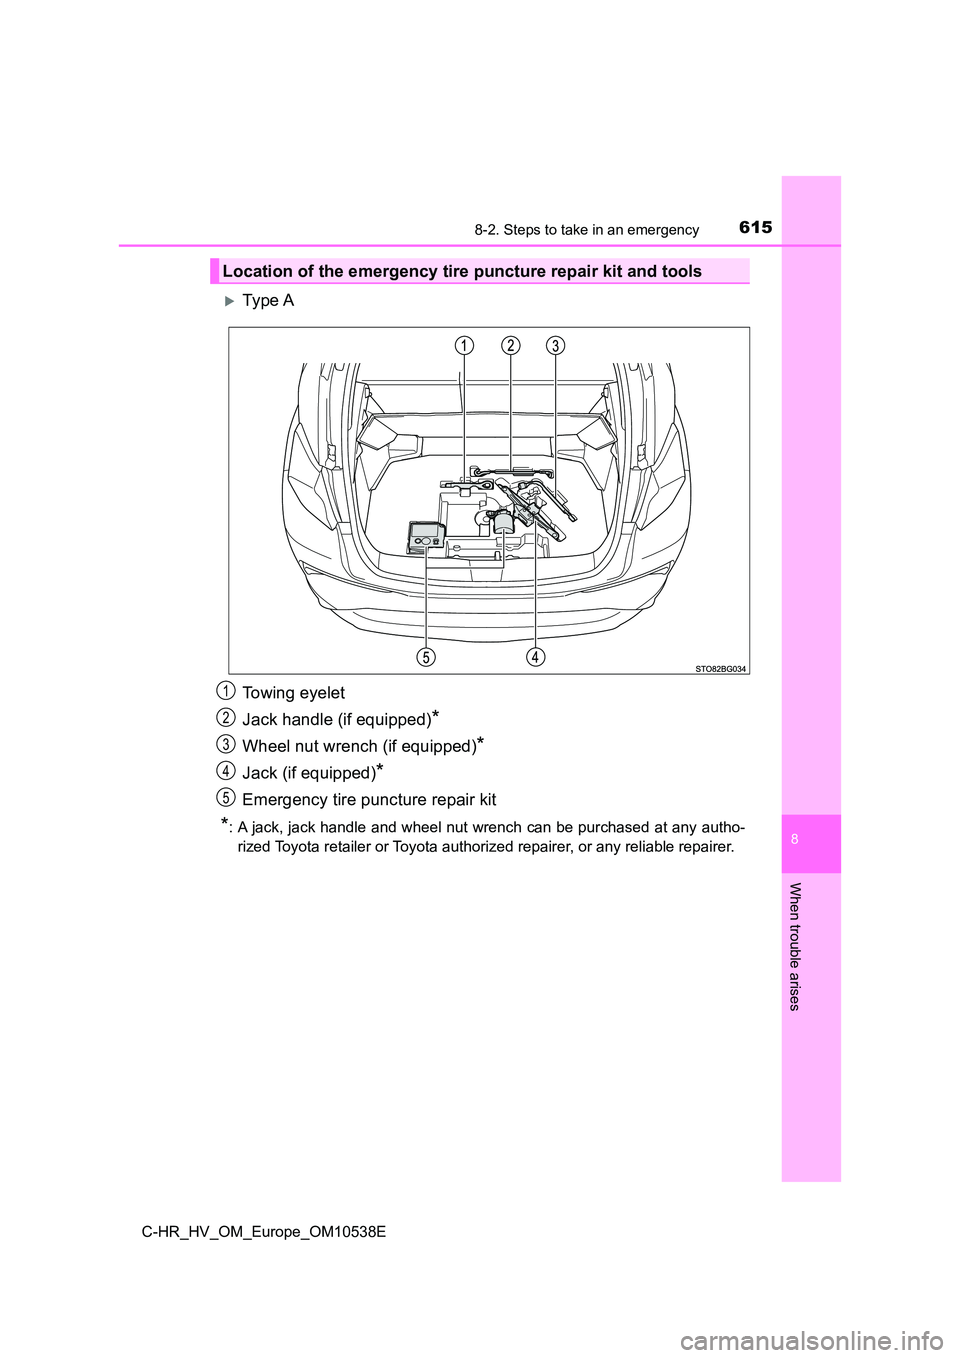
Ty pe A
Towing eyelet
Jack handle (if equipped)*
Wheel nut wrench (if equipped)*
Jack (if equipped)*
Emergency tire puncture repair kit
*: A jack, jack handle and wheel nut wrench can be purchased at any autho-
rized Toyota retailer or Toyota authorized repairer, or any reliable repairer.
Location of the emergency tire puncture repair kit and tools
1
2
3
4
5
Page 616 of 712
6168-2. Steps to take in an emergency
C-HR_HV_OM_Europe_OM10538E
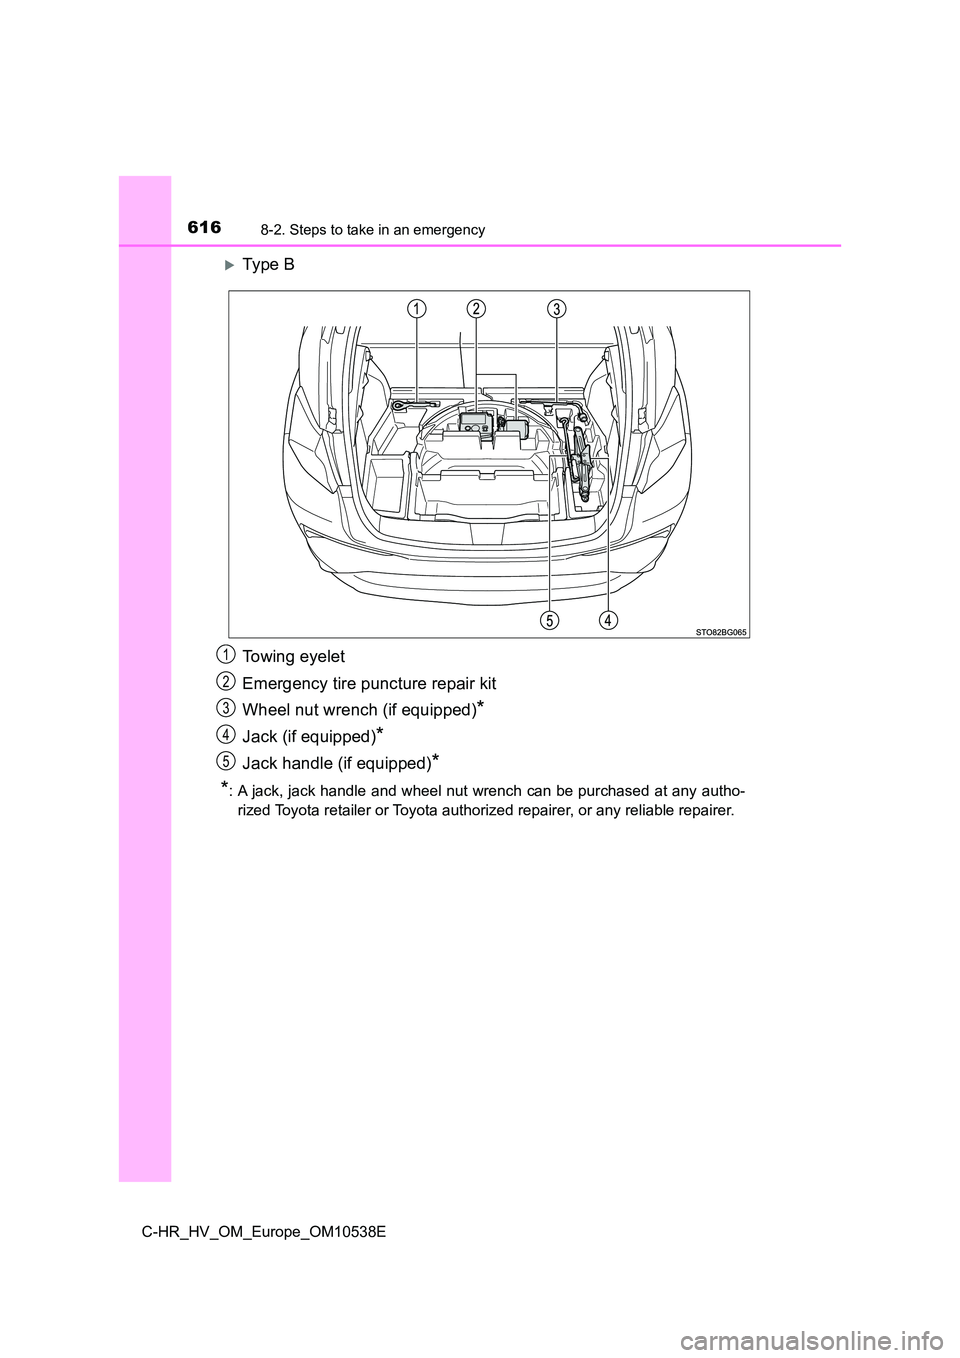
Ty pe B
Towing eyelet
Emergency tire puncture repair kit
Wheel nut wrench (if equipped)*
Jack (if equipped)*
Jack handle (if equipped)*
*: A jack, jack handle and wheel nut wrench can be purchased at any autho-
rized Toyota retailer or Toyota authorized repairer, or any reliable repairer.
1
2
3
4
5
Page 617 of 712
6178-2. Steps to take in an emergency
C-HR_HV_OM_Europe_OM10538E
8
When trouble arises
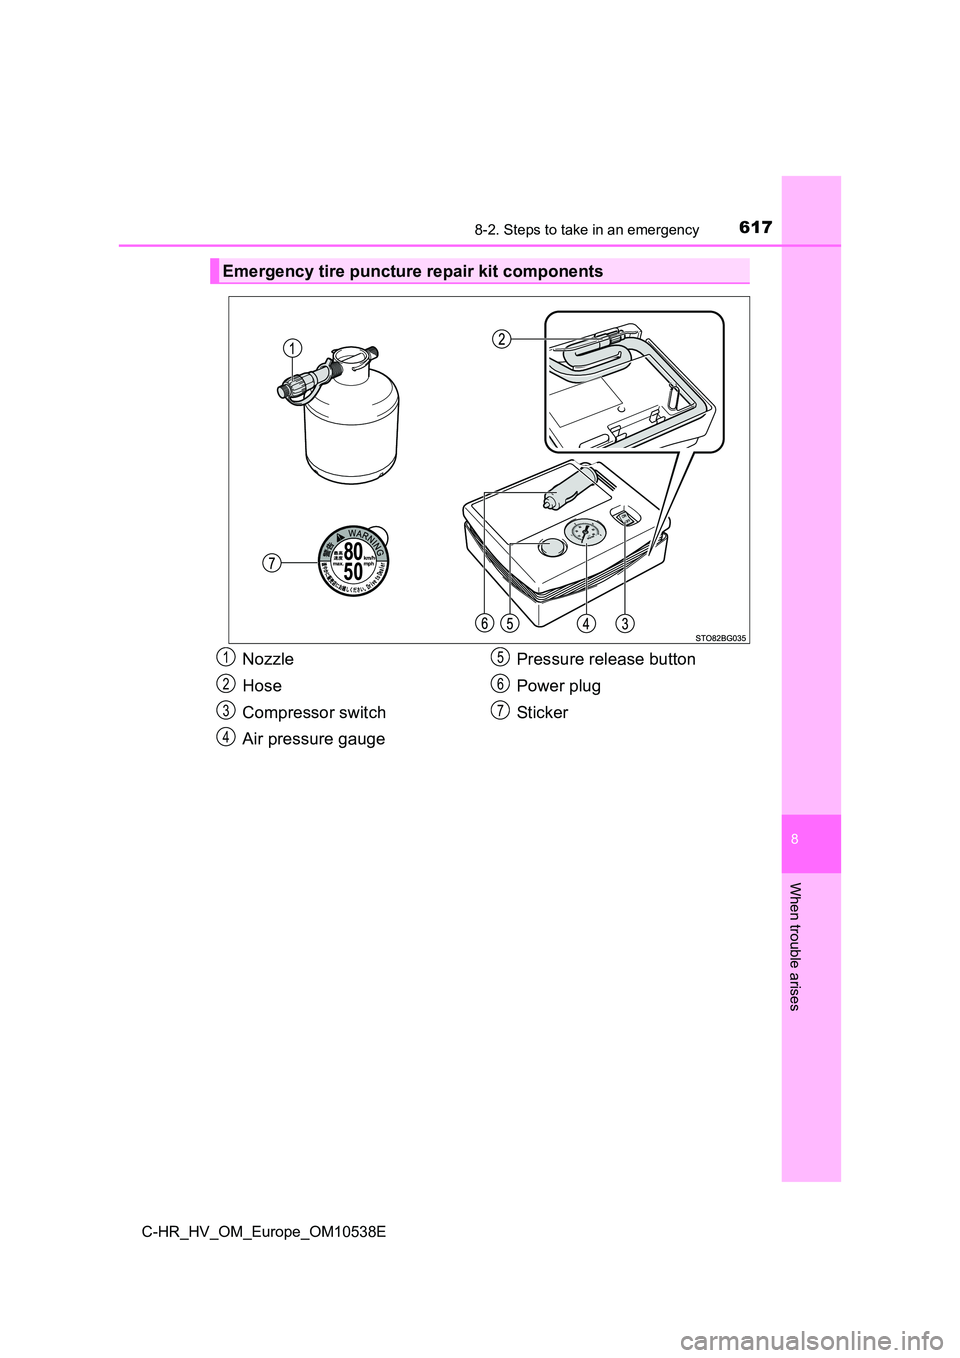
Emergency tire puncture repair kit components
Nozzle
Hose
Compressor switch
Air pressure gauge
Pressure release button
Power plug
Sticker
1
2
3
4
5
6
7
Page 618 of 712
6188-2. Steps to take in an emergency
C-HR_HV_OM_Europe_OM10538E
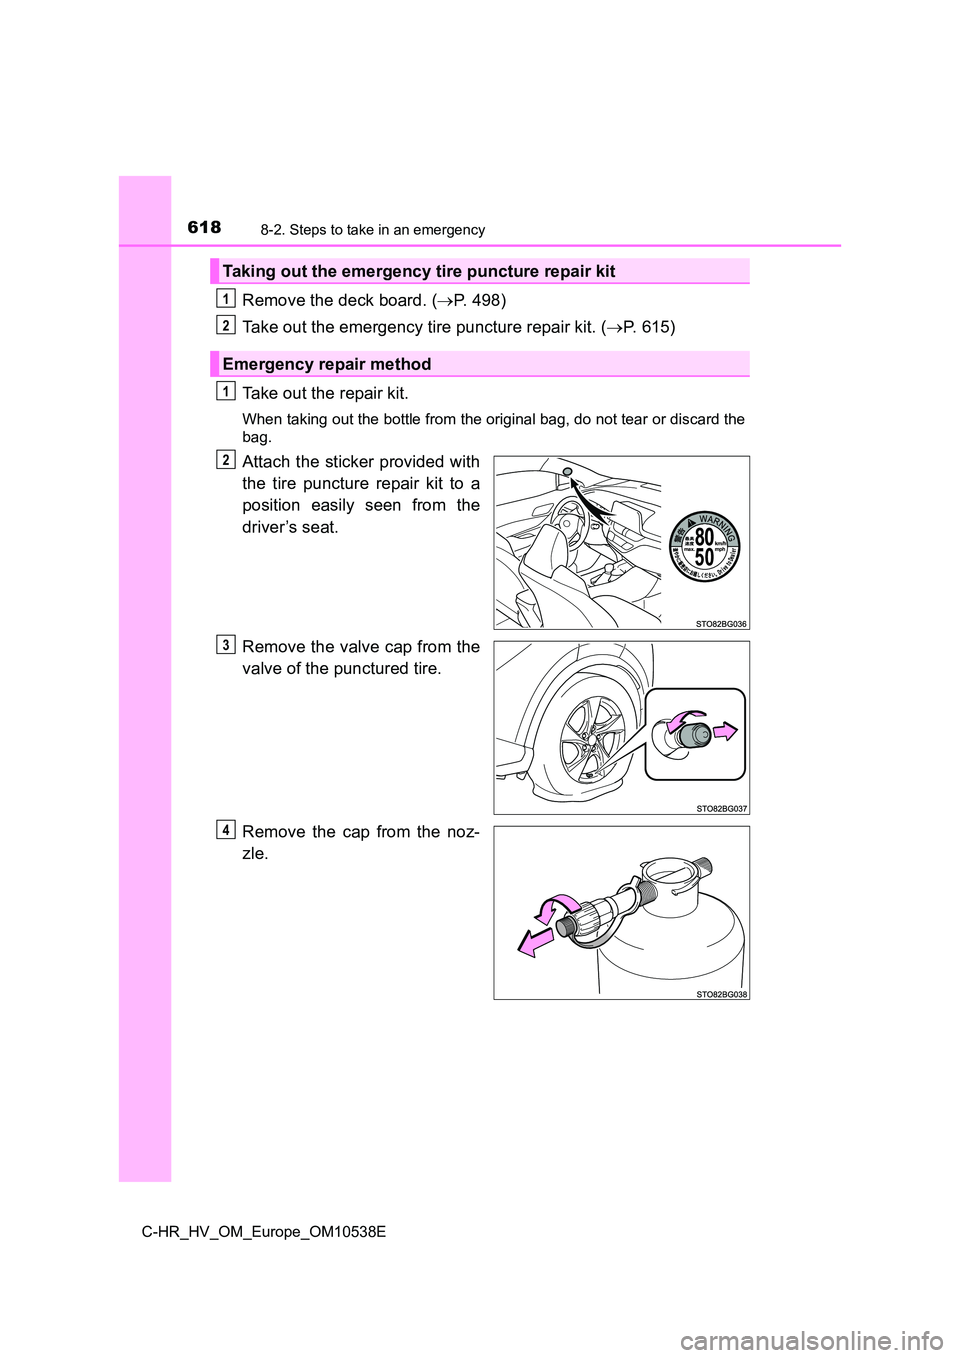
Remove the deck board. (P. 498)
Take out the emergency tire puncture repair kit. ( P. 615)
Take out the repair kit.
When taking out the bottle from the orig inal bag, do not tear or discard the
bag.
Attach the sticker provided with
the tire puncture repair kit to a
position easily seen from the
driver’s seat.
Remove the valve cap from the
valve of the punctured tire.
Remove the cap from the noz-
zle.
Taking out the emergency tire puncture repair kit
Emergency repair method
1
2
1
2
3
4
Page 619 of 712
6198-2. Steps to take in an emergency
C-HR_HV_OM_Europe_OM10538E
8
When trouble arises
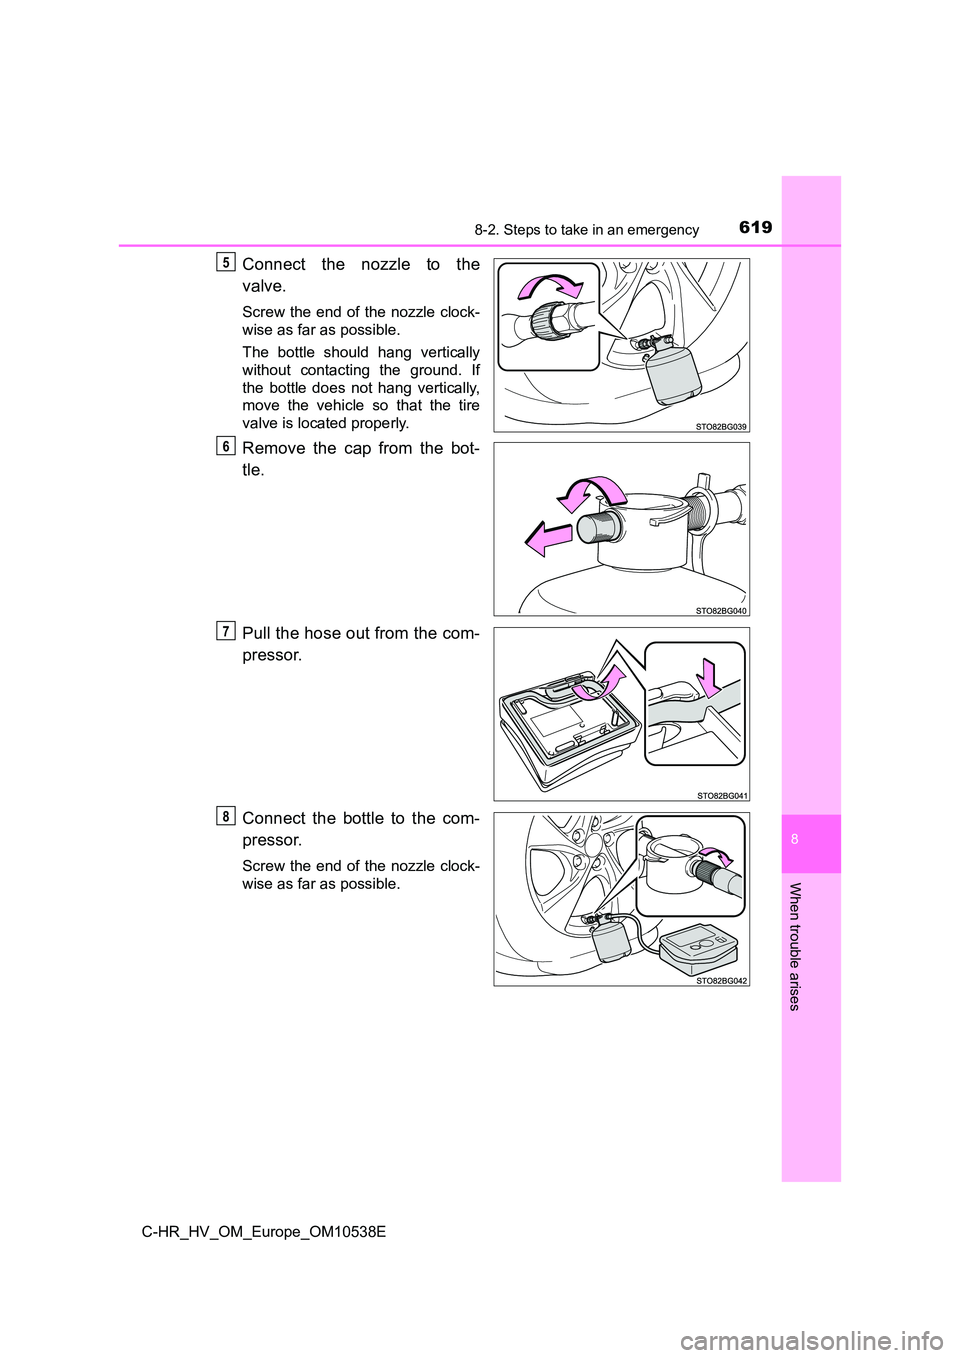
Connect the nozzle to the
valve.
Screw the end of the nozzle clock-
wise as far as possible.
The bottle should hang vertically
without contacting the ground. If
the bottle does not hang vertically,
move the vehicle so that the tire
valve is located properly.
Remove the cap from the bot-
tle.
Pull the hose out from the com-
pressor.
Connect the bottle to the com-
pressor.
Screw the end of the nozzle clock-
wise as far as possible.
5
6
7
8
Page 620 of 712
6208-2. Steps to take in an emergency
C-HR_HV_OM_Europe_OM10538E
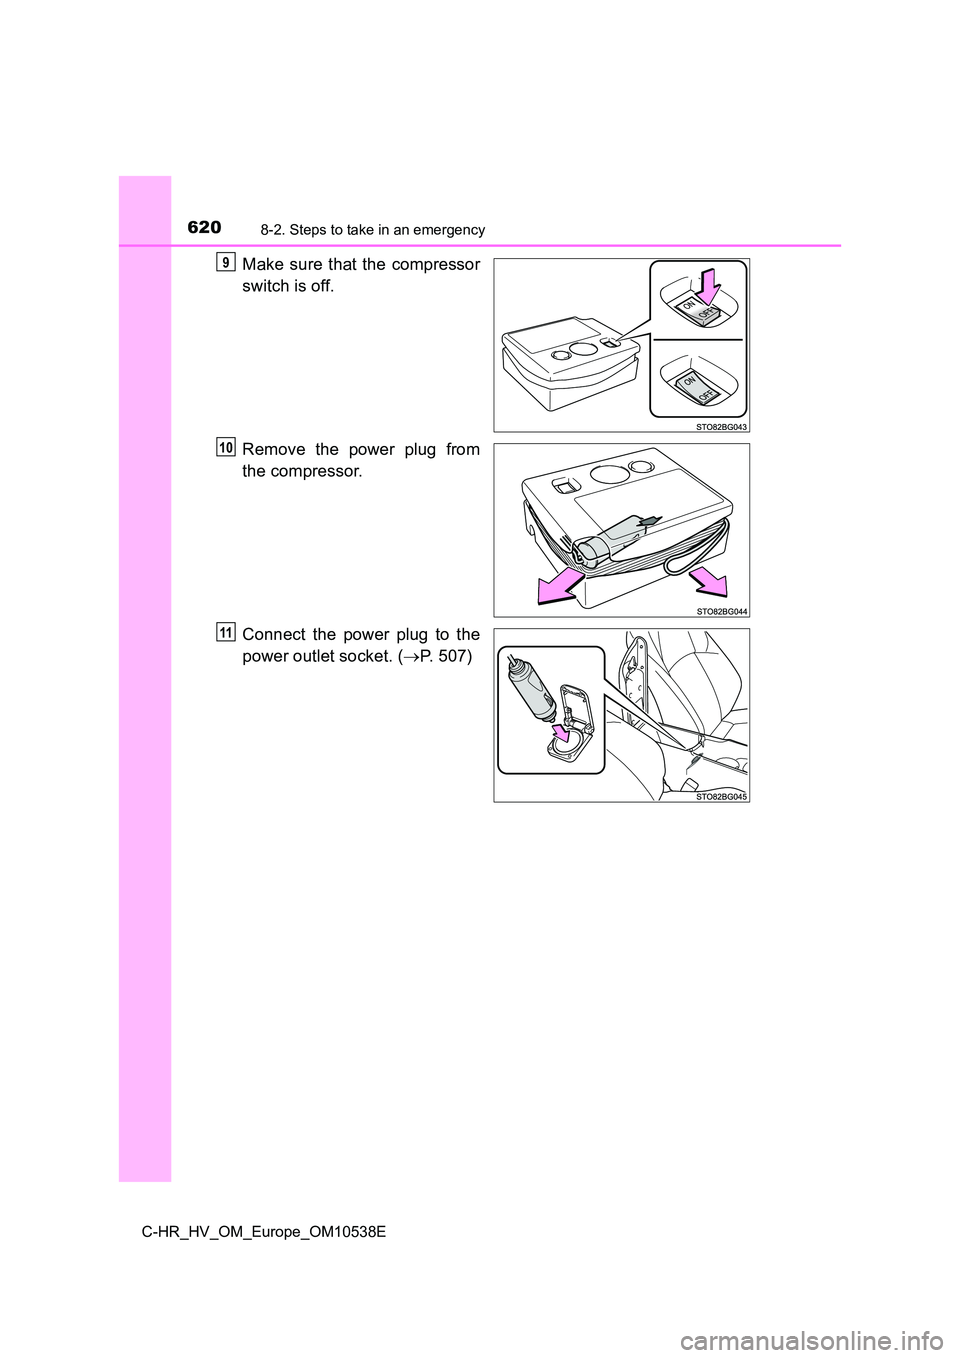
Make sure that the compressor
switch is off.
Remove the power plug from
the compressor.
Connect the power plug to the
power outlet socket. ( P. 507)
9
10
11
Trending: USB, lights, low oil pressure, instrument cluster, One, change key battery, tire pressure

