change time TOYOTA CAMRY 2012 XV50 / 9.G Navigation Manual
[x] Cancel search | Manufacturer: TOYOTA, Model Year: 2012, Model line: CAMRY, Model: TOYOTA CAMRY 2012 XV50 / 9.GPages: 328, PDF Size: 5.67 MB
Page 2 of 328

2
1. BASIC INFORMATION BEFORE OPERATION
Introduction
This manual explains the operation of the Navigation System. Please read this
manual carefully to ensure proper use. Keep this manual in your vehicle at all
times.
The screen shots in this document and the actual screens of the navigation sys-
tem differ depending on whether the functions and/or a contract existed and the
map data available at the time of producing this document.
The Navigation System is one of the most technologically advanced vehicle ac-
cessories ever developed. The system receives satellite signals from the Global
Positioning System (GPS) operated by the U.S. Department of Defense. Using
these signals and other vehicle sensors, the system indicates your present po-
sition and assists in locating a desired destination.
The navigation system is designed to select efficient routes from your present
starting location to your destination. The system is also designed to direct you
to a destination that is unfamiliar to you in an efficient manner. The system uses
DENSO maps. The calculated routes may not be the shortest nor the least traf-
fic congested. Your own personal local knowledge or “short cut” may at times
be faster than the calculated routes.
The navigation system’s database includes Point of Interest categories to allow
you to easily select destinations such as restaurants and hotels. If a destination
is not in the database, you can enter the street address or a major intersection
close to it and the system will guide you there.
The system will provide both a visual map and audio instructions. The audio in-
structions will announce the distance remaining and the direction to turn in when
approaching an intersection. These voice instructions will help you keep your
eyes on the road and are timed to provide enough time to allow you to maneu-
ver, change lanes or slow down.
Please be aware that all current vehicle navigation systems have certain limita-
tions that may affect their ability to perform properly. The accuracy of the vehi-
cle’s position depends on satellite conditions, road configuration, vehicle
condition or other circumstances. For more information on the limitations of the
system, refer to pages 116 through 117.
NAVIGATION SYSTEM OWNER’S MANUAL
NAVIGATION SYSTEM
Page 11 of 328
11
1. NAVIGATION OPERATION
1
QUICK GUIDE
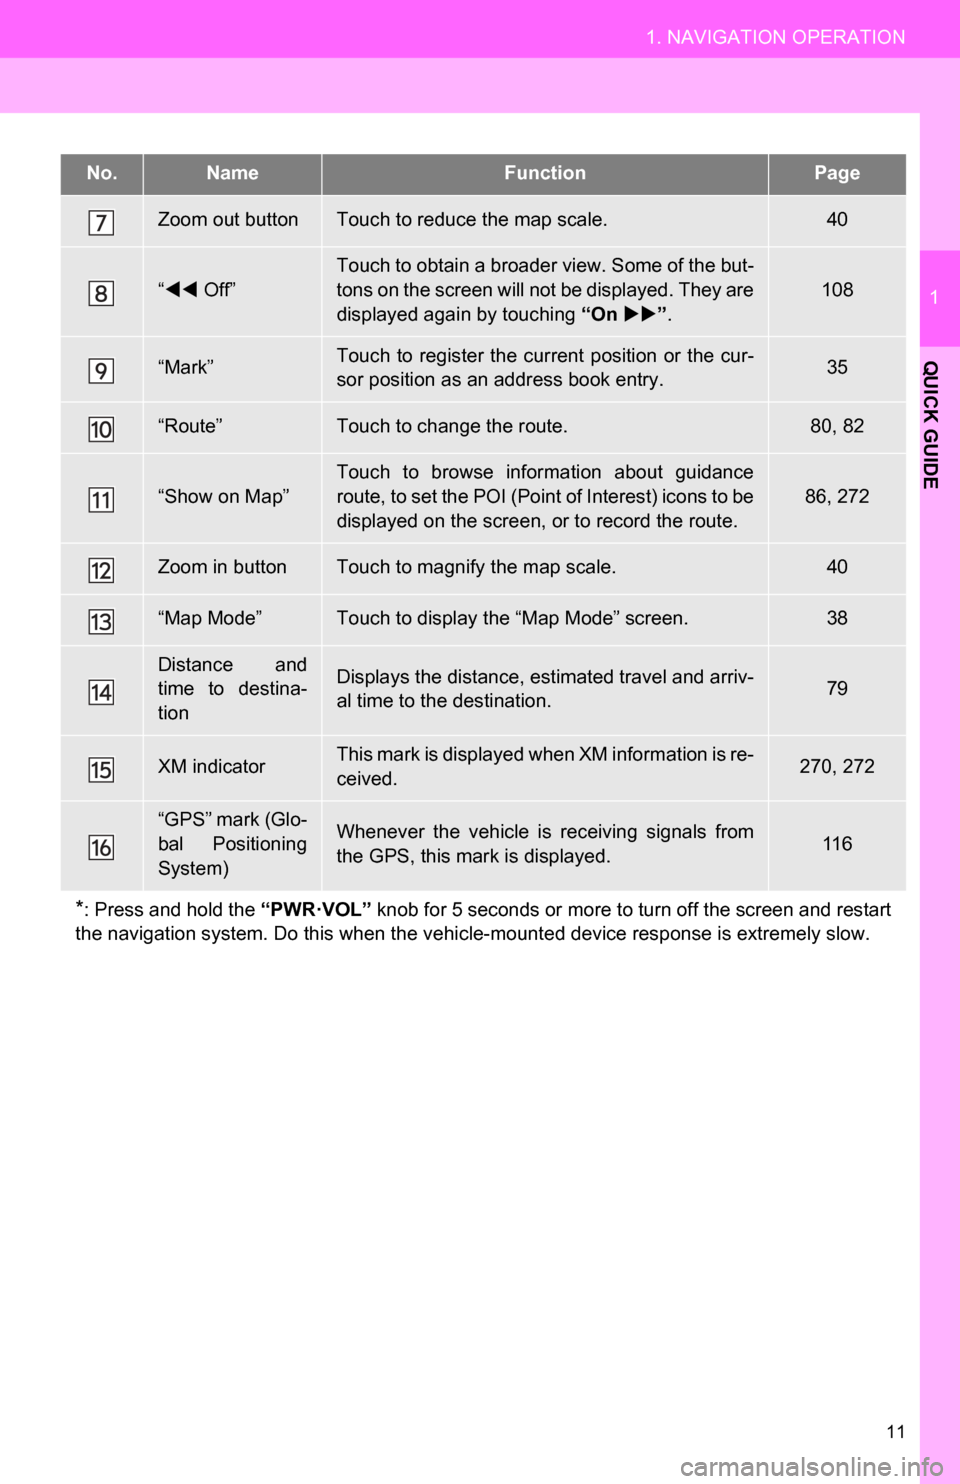
Zoom out buttonTouch to reduce the map scale.40
“ Off”Touch to obtain a broader view. Some of the but-
tons on the screen will not be displayed. They are
displayed again by touching “On ”.108
“Mark”Touch to register the current position or the cur-
sor position as an address book entry.35
“Route”Touch to change the route.80, 82
“Show on Map”
Touch to browse information about guidance
route, to set the POI (Point of Interest) icons to be
displayed on the screen, or to record the route.
86, 272
Zoom in buttonTouch to magnify the map scale.40
“Map Mode”Touch to display the “Map Mode” screen.38
Distance and
time to destina-
tionDisplays the distance, estimated travel and arriv-
al time to the destination.79
XM indicatorThis mark is displayed when XM information is re-
ceived.270, 272
“GPS” mark (Glo-
bal Positioning
System)Whenever the vehicle is receiving signals from
the GPS, this mark is displayed.11 6
*: Press and hold the “PWR·VOL” knob for 5 seconds or more to turn off the screen and restart
the navigation system. Do this when the vehi cle-mounted device response is extremely slow.
No.NameFunctionPage
Page 42 of 328
42
2. SETUP
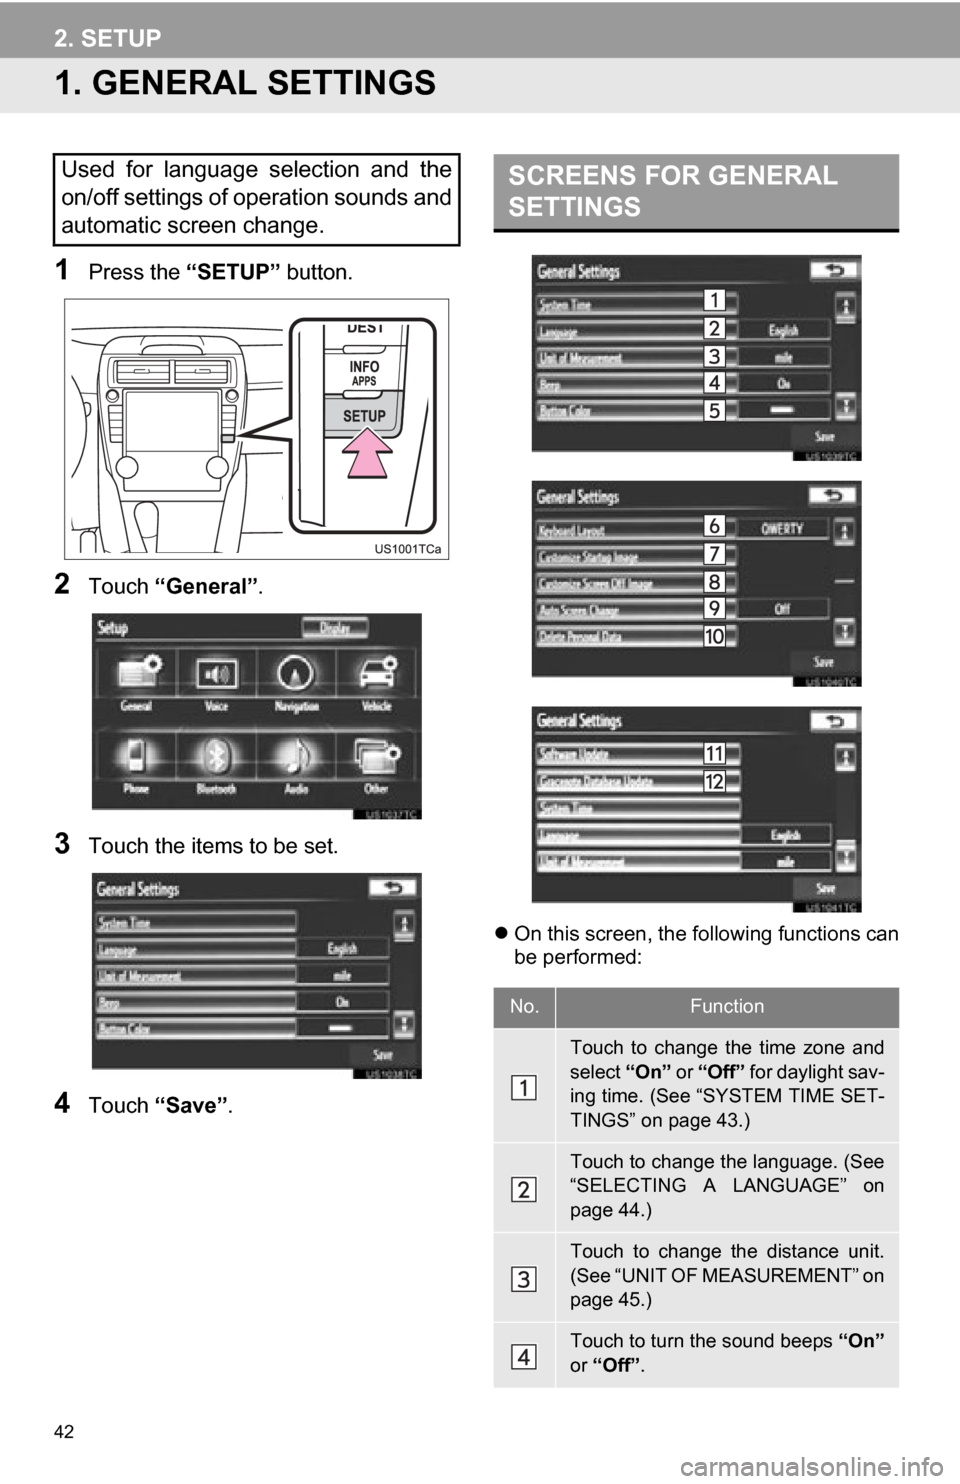
1. GENERAL SETTINGS
1Press the “SETUP” button.
2Touch “General” .
3Touch the items to be set.
4Touch “Save” .
On this screen, the following functions can
be performed:
Used for language selection and the
on/off settings of operation sounds and
automatic screen change.SCREENS FOR GENERAL
SETTINGS
No.Function
Touch to change the time zone and
select “On” or “Off” for daylight sav-
ing time. (See “SYSTEM TIME SET-
TINGS” on page 43.)
Touch to change the language. (See
“SELECTING A LANGUAGE” on
page 44.)
Touch to change the distance unit.
(See “UNIT OF MEASUREMENT” on
page 45.)
Touch to turn the sound beeps “On”
or “Off” .
Page 43 of 328
43
2. SETUP
2
BASIC FUNCTION
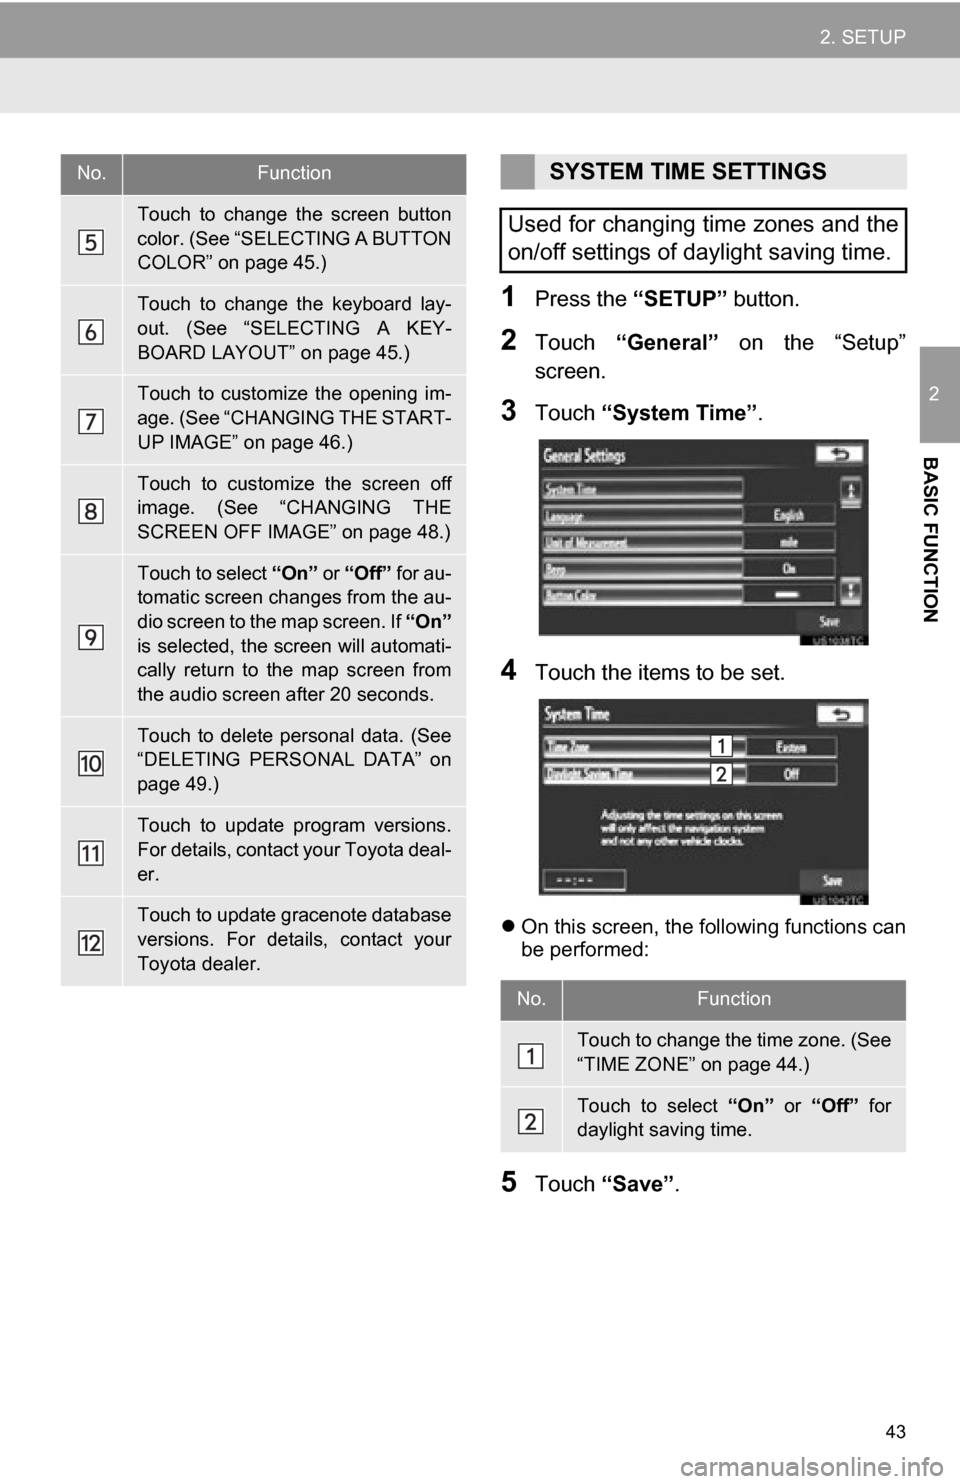
1Press the “SETUP” button.
2Touch “General” on the “Setup”
screen.
3Touch “System Time” .
4Touch the items to be set.
On this screen, the following functions can
be performed:
5Touch “Save” .
Touch to change the screen button
color. (See “SELECTING A BUTTON
COLOR” on page 45.)
Touch to change the keyboard lay-
out. (See “SELECTING A KEY-
BOARD LAYOUT” on page 45.)
Touch to customize the opening im-
age. (See “CHANGING THE START-
UP IMAGE” on page 46.)
Touch to customize the screen off
image. (See “CHANGING THE
SCREEN OFF IMAGE” on page 48.)
Touch to select “On” or “Off” for au-
tomatic screen changes from the au-
dio screen to the map screen. If “On”
is selected, the screen will automati-
cally return to the map screen from
the audio screen after 20 seconds.
Touch to delete personal data. (See
“DELETING PERSONAL DATA” on
page 49.)
Touch to update program versions.
For details, contact your Toyota deal-
er.
Touch to update gracenote database
versions. For details, contact your
Toyota dealer.
No.FunctionSYSTEM TIME SETTINGS
Used for changing time zones and the
on/off settings of daylight saving time.
No.Function
Touch to change the time zone. (See
“TIME ZONE” on page 44.)
Touch to select “On” or “Off” for
daylight saving time.
Page 44 of 328
44
2. SETUP
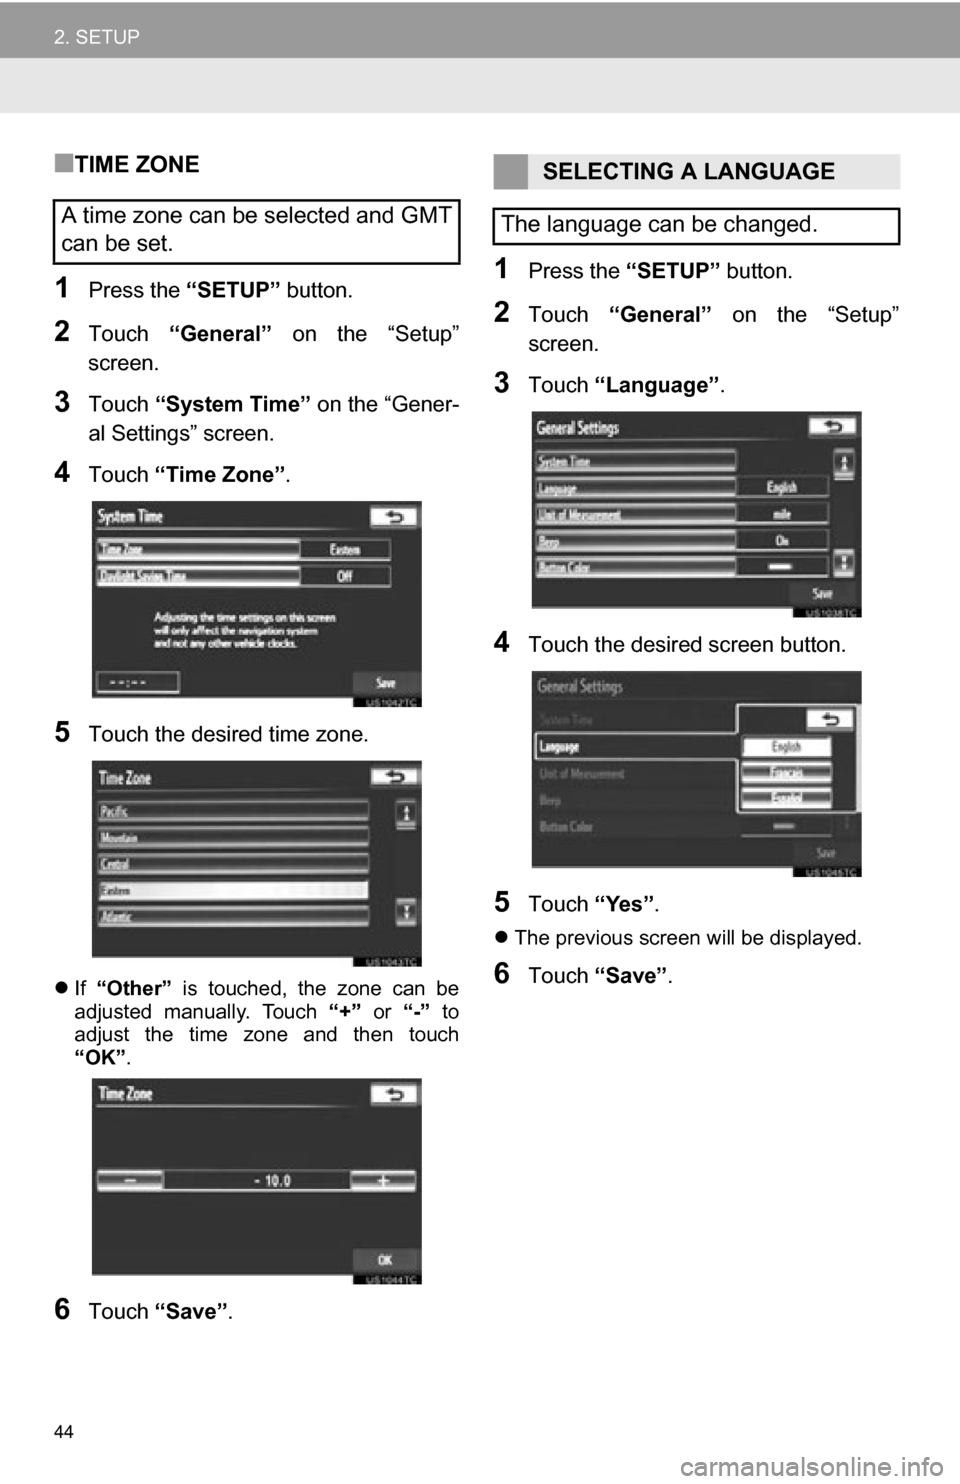
■TIME ZONE
1Press the “SETUP” button.
2Touch “General” on the “Setup”
screen.
3Touch “System Time” on the “Gener-
al Settings” screen.
4Touch “Time Zone” .
5Touch the desired time zone.
If “Other” is touched, the zone can be
adjusted manually. Touch “+” or “-” to
adjust the time zone and then touch
“OK” .
6Touch “Save” .
1Press the “SETUP” button.
2Touch “General” on the “Setup”
screen.
3Touch “Language” .
4Touch the desired screen button.
5Touch “Yes”.
The previous screen will be displayed.
6Touch “Save” .
A time zone can be selected and GMT
can be set.
SELECTING A LANGUAGE
The language can be changed.
Page 71 of 328
71
1. DESTINATION SEARCH
3
NAVIGATION SYSTEM
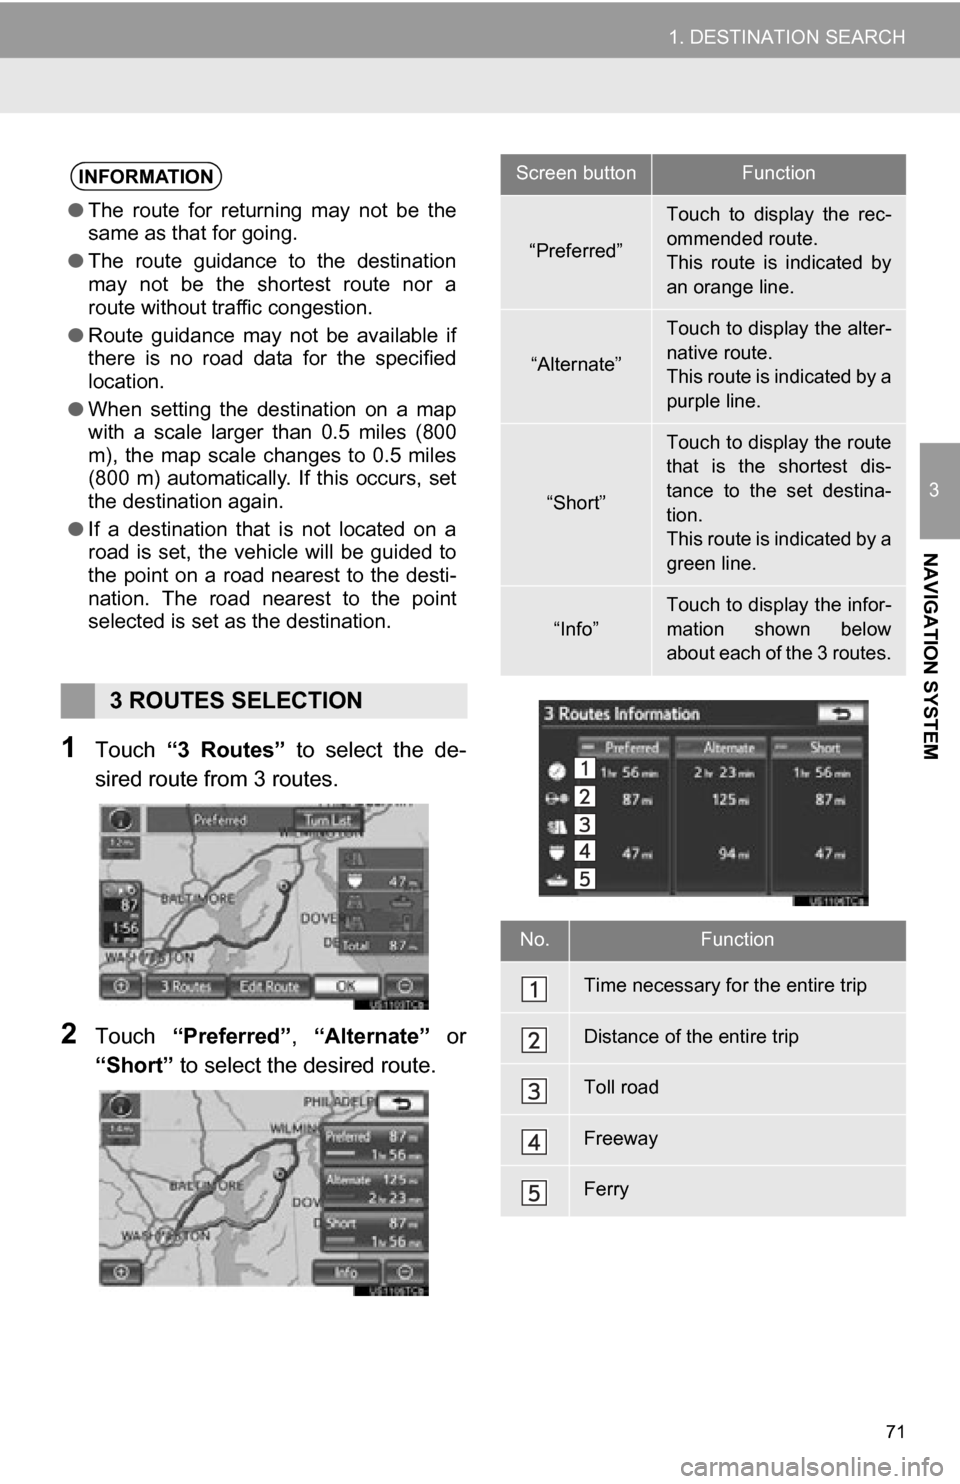
1Touch “3 Routes” to select the de-
sired route from 3 routes.
2Touch “Preferred”, “Alternate” or
“Short” to select the desired route.
INFORMATION
●The route for returning may not be the
same as that for going.
● The route guidance to the destination
may not be the shortest route nor a
route without traffic congestion.
● Route guidance may not be available if
there is no road data for the specified
location.
● When setting the destination on a map
with a scale larger than 0.5 miles (800
m), the map scale changes to 0.5 miles
(800 m) automatically. If this occurs, set
the destination again.
● If a destination that is not located on a
road is set, the vehicle will be guided to
the point on a road nearest to the desti-
nation. The road nearest to the point
selected is set as the destination.
3 ROUTES SELECTION
Screen buttonFunction
“Preferred”
Touch to display the rec-
ommended route.
This route is indicated by
an orange line.
“Alternate”
Touch to display the alter-
native route.
This route is indicated by a
purple line.
“Short”
Touch to display the route
that is the shortest dis-
tance to the set destina-
tion.
This route is indicated by a
green line.
“Info”
Touch to display the infor-
mation shown below
about each of the 3 routes.
No.Function
Time necessary for the entire trip
Distance of the entire trip
Toll road
Freeway
Ferry
Page 88 of 328
88
2. ROUTE GUIDANCE
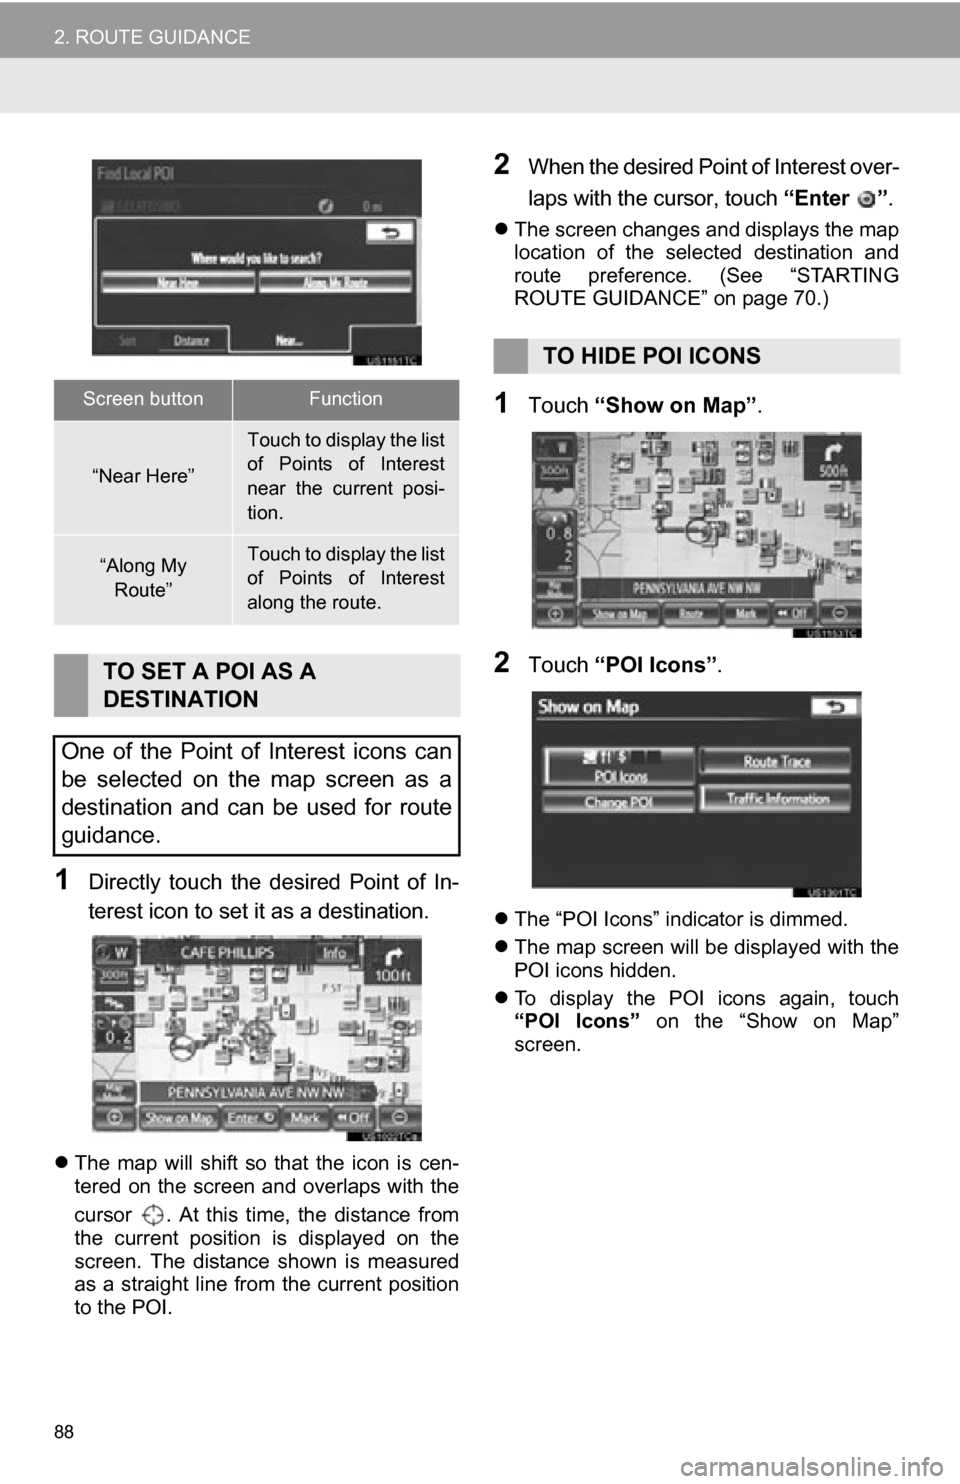
1Directly touch the desired Point of In-
terest icon to set it as a destination.
The map will shift so that the icon is cen-
tered on the screen and overlaps with the
cursor . At this time, the distance from
the current position is displayed on the
screen. The distance shown is measured
as a straight line from the current position
to the POI.
2When the desired Point of Interest over-
laps with the cursor, touch “Enter ”.
The screen changes and displays the map
location of the selected destination and
route preference. (See “STARTING
ROUTE GUIDANCE” on page 70.)
1Touch “Show on Map” .
2Touch “POI Icons” .
The “POI Icons” indicator is dimmed.
The map screen will be displayed with the
POI icons hidden.
To display the POI icons again, touch
“POI Icons” on the “Show on Map”
screen.
Screen buttonFunction
“Near Here”
Touch to display the list
of Points of Interest
near the current posi-
tion.
“Along My
Route”Touch to display the list
of Points of Interest
along the route.
TO SET A POI AS A
DESTINATION
One of the Point of Interest icons can
be selected on the map screen as a
destination and can be used for route
guidance.
TO HIDE POI ICONS
Page 105 of 328
105
4. SETUP
3
NAVIGATION SYSTEM
To reset all setup items, touch “Default”.
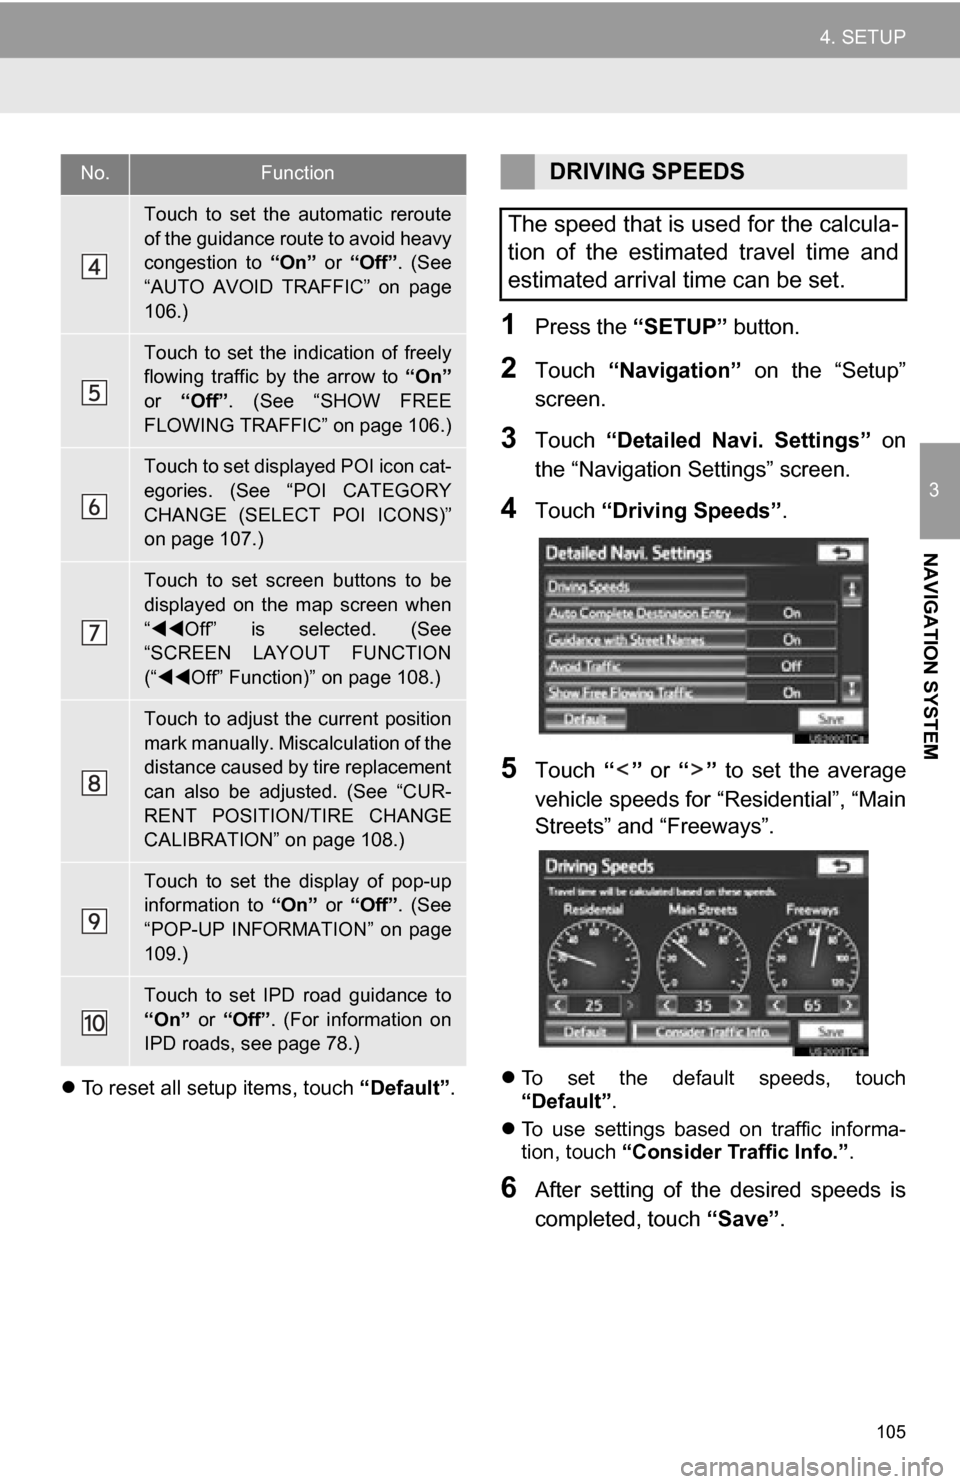
1Press the “SETUP” button.
2Touch “Navigation” on the “Setup”
screen.
3Touch “Detailed Navi. Settings” on
the “Navigation Settings” screen.
4Touch “Driving Speeds” .
5Touch “” or “” to set the average
vehicle speeds for “Residential”, “Main
Streets” and “Freeways”.
To set the default speeds, touch
“Default”.
To use settings based on traffic informa-
tion, touch “Consider Traffic Info.” .
6After setting of the desired speeds is
completed, touch “Save”.
Touch to set the automatic reroute
of the guidance route to avoid heavy
congestion to “On” or “Off”. (See
“AUTO AVOID TRAFFIC” on page
106.)
Touch to set the indication of freely
flowing traffic by the arrow to “On”
or “Off” . (See “SHOW FREE
FLOWING TRAFFIC” on page 106.)
Touch to set displayed POI icon cat-
egories. (See “POI CATEGORY
CHANGE (SELECT POI ICONS)”
on page 107.)
Touch to set screen buttons to be
displayed on the map screen when
“ Off” is selected. (See
“SCREEN LAYOUT FUNCTION
(“ Off” Function)” on page 108.)
Touch to adjust the current position
mark manually. Miscalculation of the
distance caused by tire replacement
can also be adjusted. (See “CUR-
RENT POSITION/TIRE CHANGE
CALIBRATION” on page 108.)
Touch to set the display of pop-up
information to “On” or “Off”. (See
“POP-UP INFORMATION” on page
109.)
Touch to set IPD road guidance to
“On” or “Off”. (For information on
IPD roads, see page 78.)
No.FunctionDRIVING SPEEDS
The speed that is used for the calcula-
tion of the estimated travel time and
estimated arrival time can be set.
Page 106 of 328
106
4. SETUP
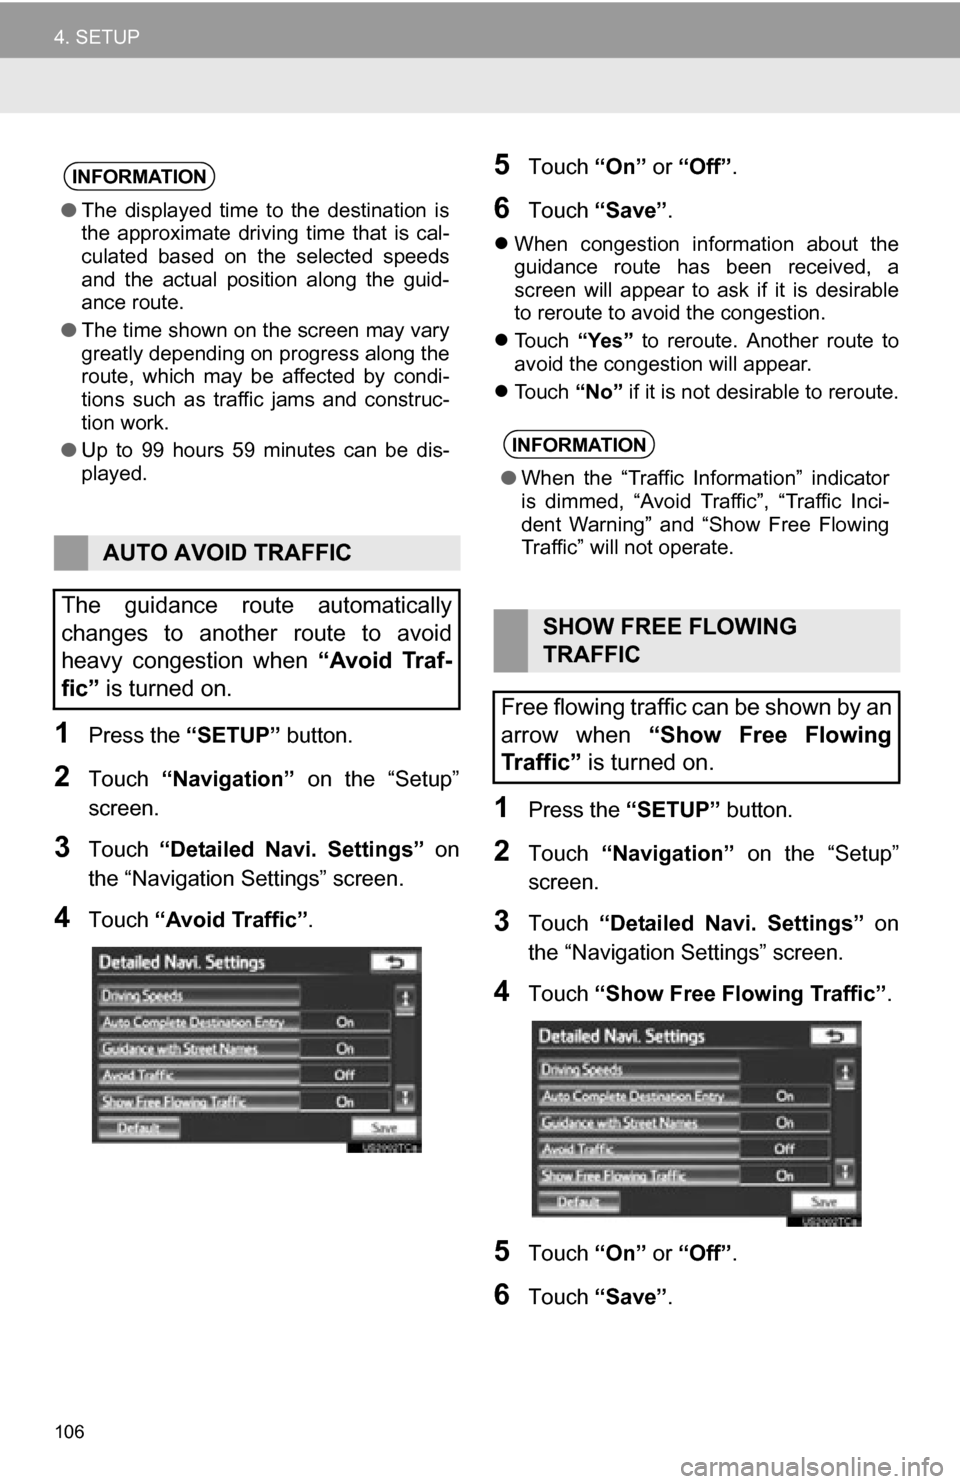
1Press the “SETUP” button.
2Touch “Navigation” on the “Setup”
screen.
3Touch “Detailed Navi. Settings” on
the “Navigation Settings” screen.
4Touch “Avoid Traffic” .
5Touch “On” or “Off” .
6Touch “Save” .
When congestion information about the
guidance route has been received, a
screen will appear to ask if it is desirable
to reroute to avoid the congestion.
Touch “Yes” to reroute. Another route to
avoid the congestion will appear.
Touch “No” if it is not desirable to reroute.
1Press the “SETUP” button.
2Touch “Navigation” on the “Setup”
screen.
3Touch “Detailed Navi. Settings” on
the “Navigation Settings” screen.
4Touch “Show Free Flowing Traffic” .
5Touch “On” or “Off” .
6Touch “Save” .
INFORMATION
●The displayed time to the destination is
the approximate driving time that is cal-
culated based on the selected speeds
and the actual position along the guid-
ance route.
● The time shown on the screen may vary
greatly depending on progress along the
route, which may be affected by condi-
tions such as traffic jams and construc-
tion work.
● Up to 99 hours 59 minutes can be dis-
played.
AUTO AVOID TRAFFIC
The guidance route automatically
changes to another route to avoid
heavy congestion when “Avoid Traf-
fic” is turned on.
INFORMATION
● When the “Traffic Information” indicator
is dimmed, “Avoid Traf fic”, “Traffic Inci-
dent Warning” and “Show Free Flowing
Traffic” will not operate.
SHOW FREE FLOWING
TRAFFIC
Free flowing traffic can be shown by an
arrow when “Show Free Flowing
Traffic” is turned on.
Page 111 of 328
111
4. SETUP
3
NAVIGATION SYSTEM
2. VEHICLE SETTINGS
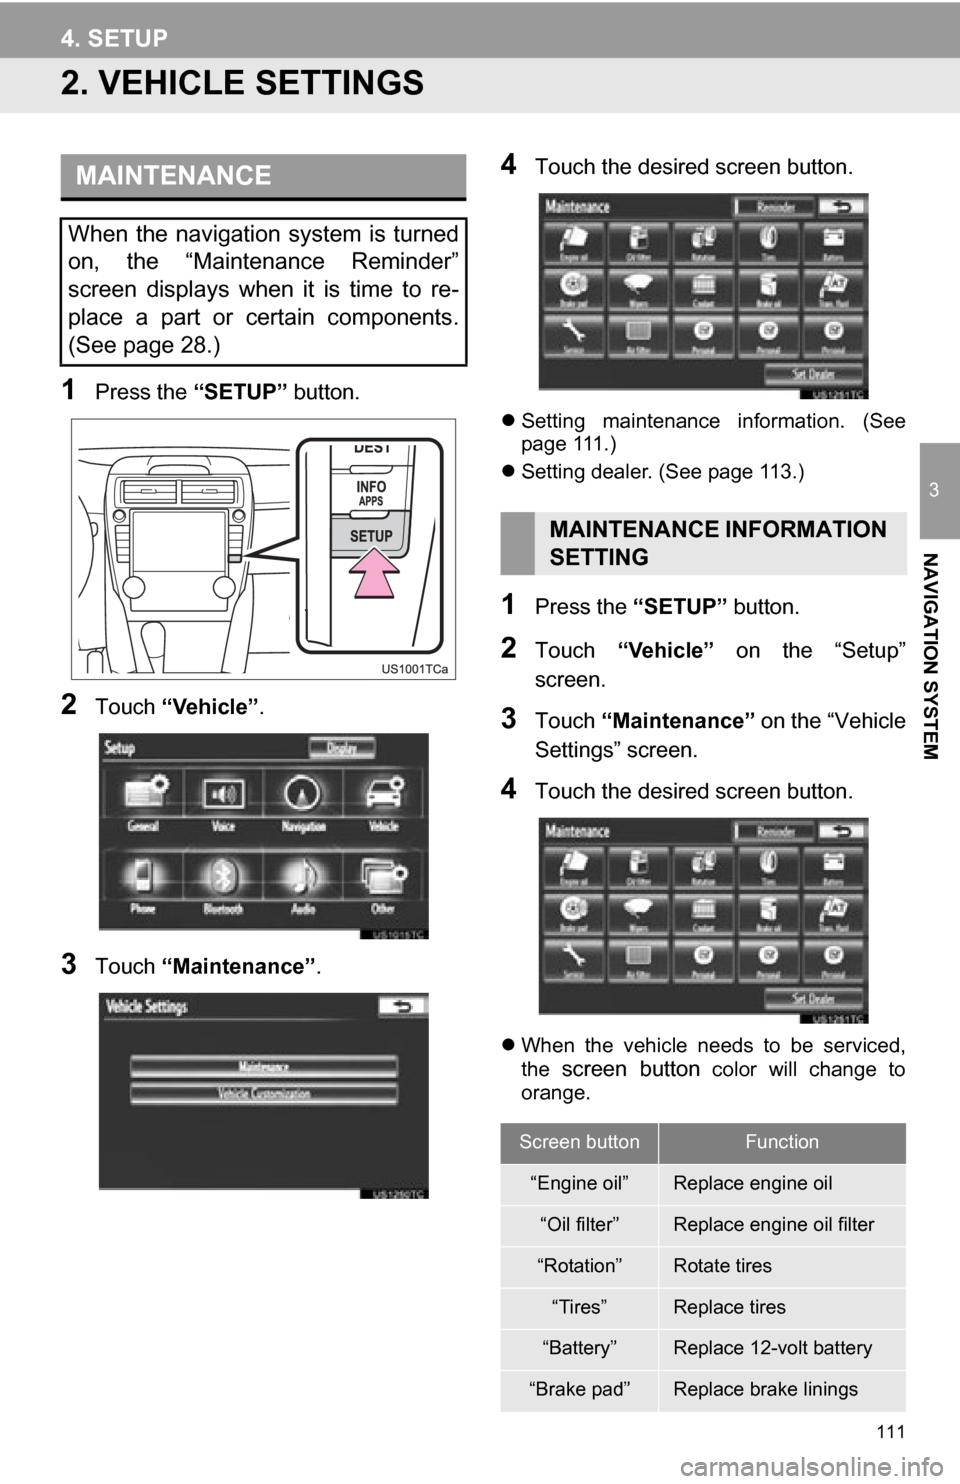
1Press the “SETUP” button.
2Touch “Vehicle”.
3Touch “Maintenance” .
4Touch the desired screen button.
Setting maintenance information. (See
page 111.)
Setting dealer. (See page 113.)
1Press the “SETUP” button.
2Touch “Vehicle” on the “Setup”
screen.
3Touch “Maintenance” on the “Vehicle
Settings” screen.
4Touch the desired screen button.
When the vehicle needs to be serviced,
the screen button color will change to
orange.
MAINTENANCE
When the navigation system is turned
on, the “Maintenance Reminder”
screen displays when it is time to re-
place a part or certain components.
(See page 28.)
MAINTENANCE INFORMATION
SETTING
Screen buttonFunction
“Engine oil”Replace engine oil
“Oil filter”Replace engine oil filter
“Rotation”Rotate tires
“Tires”Replace tires
“Battery”Replace 12-volt battery
“Brake pad”Replace brake linings