buttons TOYOTA CAMRY 2012 XV50 / 9.G Owners Manual
[x] Cancel search | Manufacturer: TOYOTA, Model Year: 2012, Model line: CAMRY, Model: TOYOTA CAMRY 2012 XV50 / 9.GPages: 532, PDF Size: 6.44 MB
Page 30 of 532

30 1-1. Key information
■When required to leave the vehic le’s key with a parking attendant
Lock the glove box as circumstances demand. ( P. 290)
Vehicles without a smart key system: Carry the master key for your own use
and provide the attendant with the valet key.
Vehicles with a smart key system: Remove the mechanical key for your own
use and provide the attendant with the electronic key only.
■ Key number plate
Keep the plate in a safe place such as your wallet, not in the vehicle. In the
event that a key (without a smart key system) or mechanical key (with a
smart key system) is lost, a new key can be made by your Toyota dealer
using the key number plate. ( P. 450)
■ When riding in an aircraft (veh icles with a wireless remote control)
When bringing a key with wireless remote control function onto an aircra\
ft,
make sure you do not press any buttons on the key while inside the aircraft
cabin. If you are carrying the key in your bag etc., ensure that the buttons
are not likely to be pressed accidentally. Pressing a button may cause the
key to emit radio waves that could interfere with the operation of the aircraft.
Page 38 of 532
38 1-2. Opening, closing and locking the doors and trunk
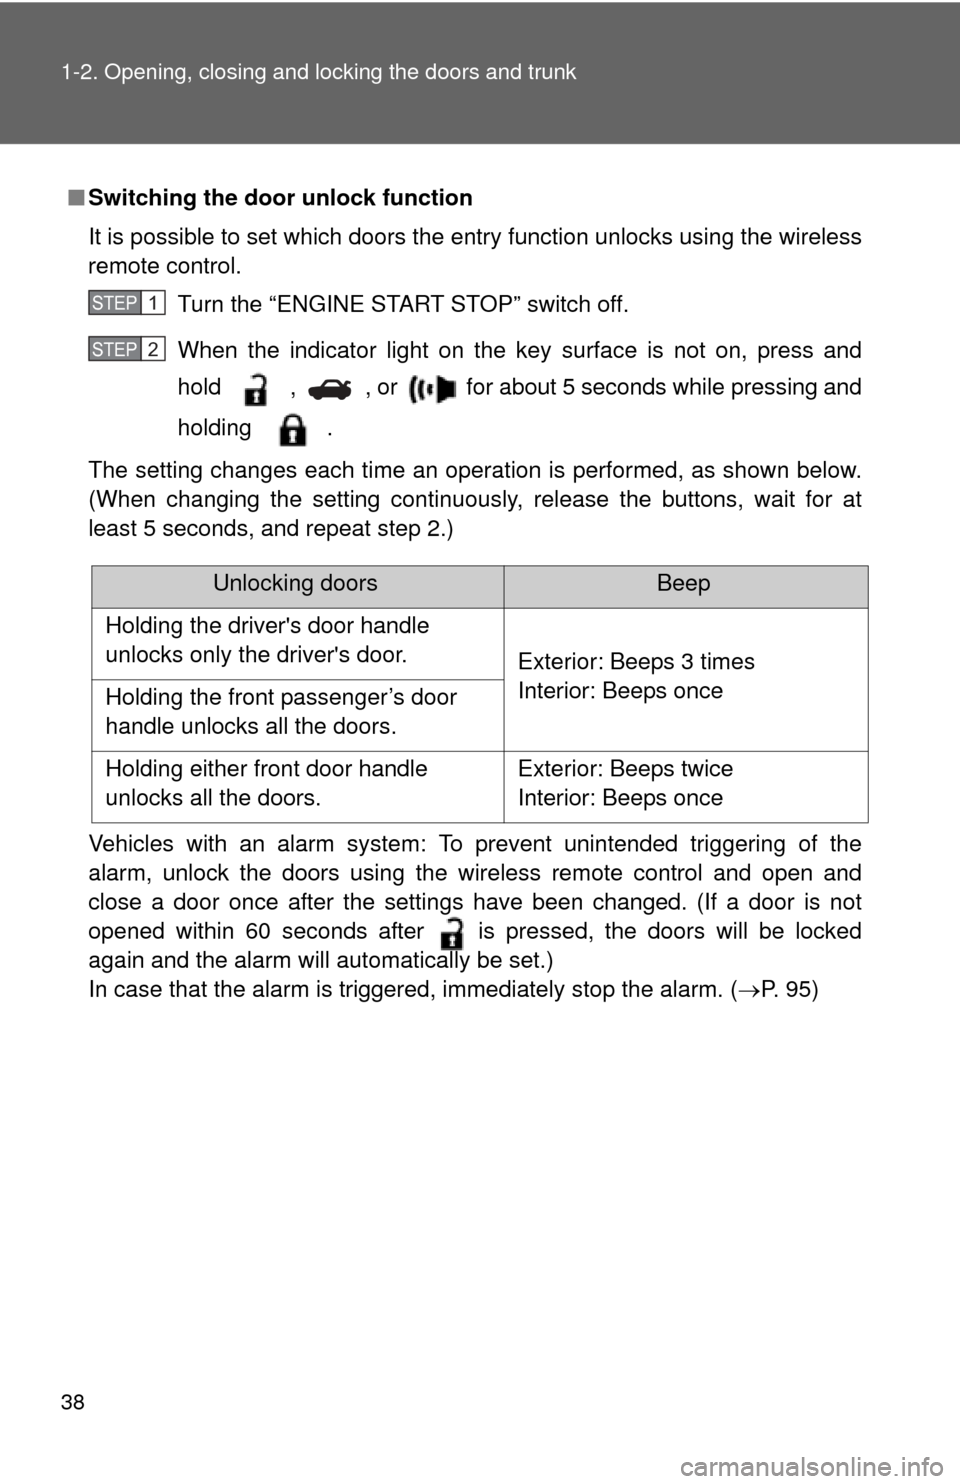
■Switching the door unlock function
It is possible to set which doors the entry function unlocks using the wireless
remote control.
Turn the “ENGINE START STOP” switch off.
When the indicator light on the key surface is not on, press and
hold , , or for about 5 seconds while pressing and
holding .
The setting changes each time an operation is performed, as shown below.
(When changing the setting continuously, release the buttons, wait for at
least 5 seconds, and repeat step 2.)
Vehicles with an alarm system: To prevent unintended triggering of the
alarm, unlock the doors using the wireless remote control and open and
close a door once after the settings have been changed. (If a door is not
opened within 60 seconds after is pressed, the doors will be locked
again and the alarm will automatically be set.)
In case that the alarm is triggered, immediately stop the alarm. (P. 95)
STEP1
STEP2
Unlocking doorsBeep
Holding the driver's door handle
unlocks only the driver's door. Exterior: Beeps 3 times
Interior: Beeps once
Holding the front passenger’s door
handle unlocks all the doors.
Holding either front door handle
unlocks all the doors. Exterior: Beeps twice
Interior: Beeps once
Page 39 of 532
39
1-2. Opening, closing and locking the doors and trunk
1
Before driving
■
Battery-saving function
The battery-saving function will be activated in order to prevent the elec-
tronic key battery and the vehicle battery from being discharged while the
vehicle is not in operation for a long time.
●In the following situations, the smart key system may take some time to
unlock the doors.
• The electronic key has been left in an area of approximately 6 ft. (2 m)
of the outside of the vehicle for 10 minutes or longer.
• The smart key system has not been used for 5 days or longer.
● If the smart key system has not been used for 14 days or longer, the
doors cannot be unlocked at any doors except the driver’s door. In this
case, take hold of the driver’s door handle, or use the wireless remote
control or the mechanical key, to unlock the doors.
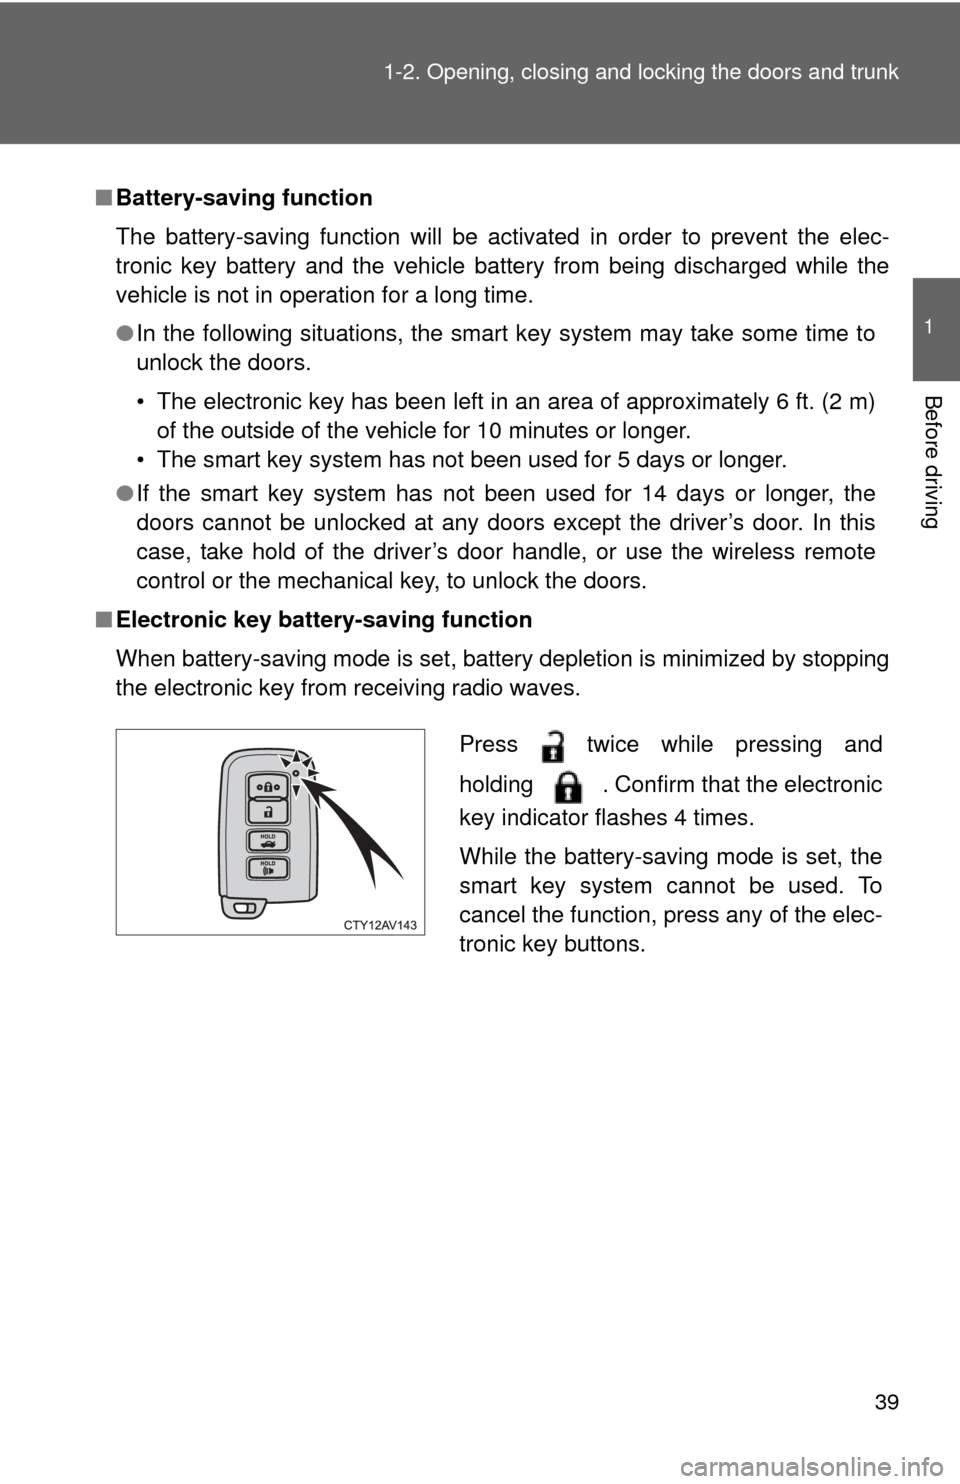
■ Electronic key battery-saving function
When battery-saving mode is set, battery depletion is minimized by stopping
the electronic key from receiving radio waves.
Press twice while pressing and
holding . Confirm that the electronic
key indicator flashes 4 times.
While the battery-saving mode is set, the
smart key system cannot be used. To
cancel the function, press any of the elec-
tronic key buttons.
Page 53 of 532
53
1-2. Opening, closing and locking the doors and trunk
1
Before driving
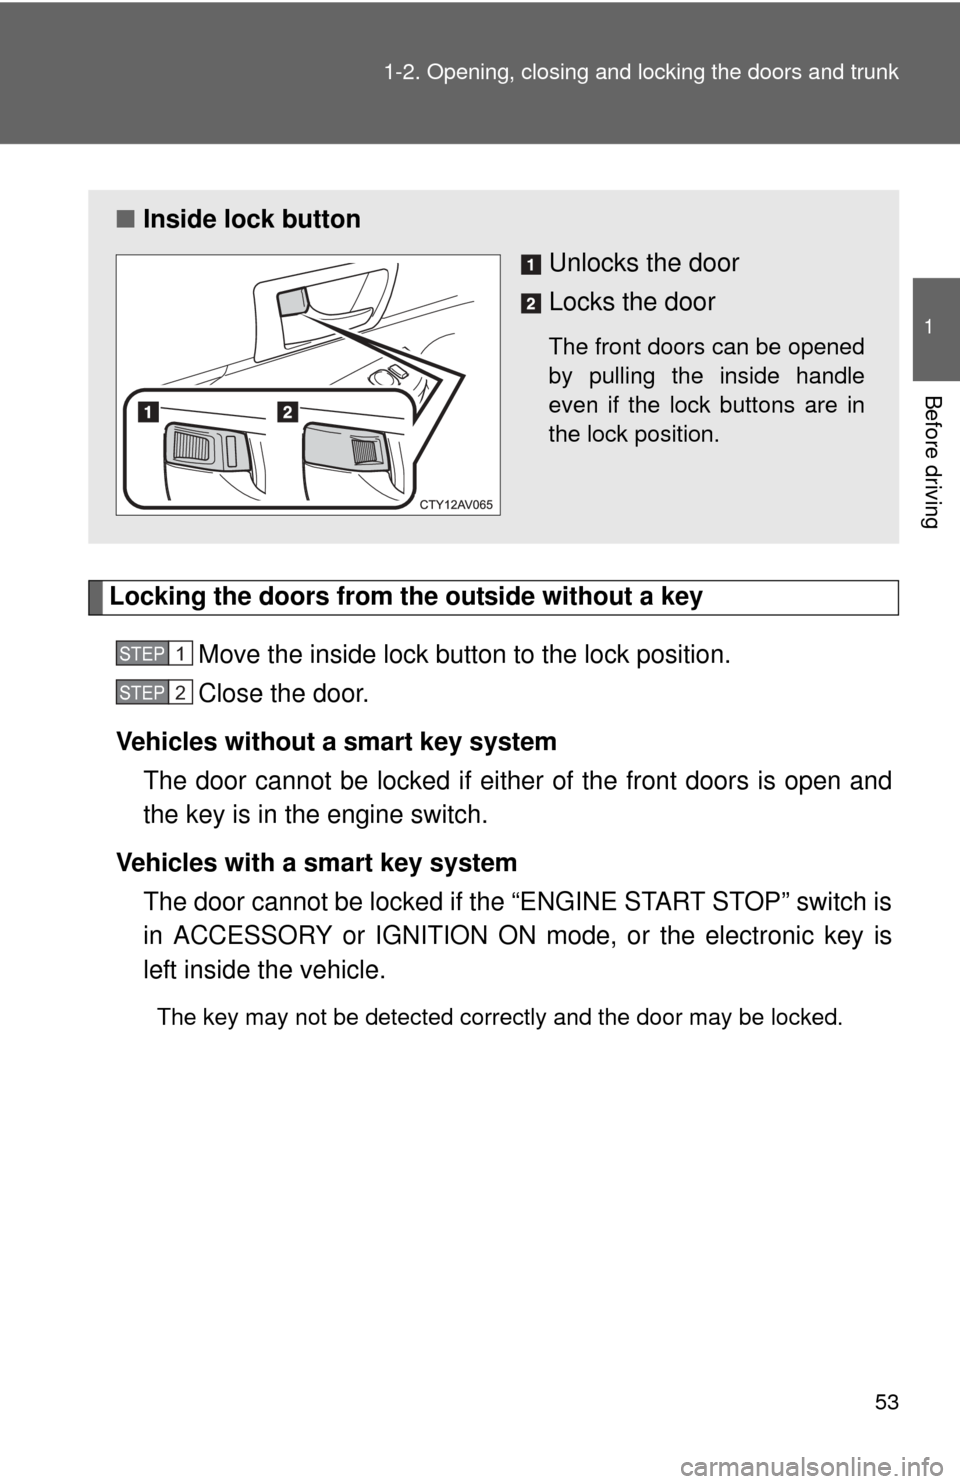
Locking the doors from the outside without a key
Move the inside lock button to the lock position.
Close the door.
Vehicles without a smart key system The door cannot be locked if either of the front doors is open and
the key is in the engine switch.
Vehicles with a smart key system The door cannot be locked if the “ENGINE START STOP” switch is
in ACCESSORY or IGNITION ON mode, or the electronic key is
left inside the vehicle.
The key may not be detected correctly and the door may be locked.
■ Inside lock button
Unlocks the door
Locks the door
The front doors can be opened
by pulling the inside handle
even if the lock buttons are in
the lock position.
STEP1
STEP2
Page 57 of 532

57
1-2. Opening, closing and locking the doors and trunk
1
Before driving
■
If a wrong key is used (veh icles with a smart key system)
The key cylinder rotates freely to isolate inside mechanism.
■ If the smart key system has been d eactivated in a customized setting
(vehicles with a smart key system)
Use the wireless remote control or mechanical key. ( P. 46, 451)
■ Customization that can be co nfigured at Toyota dealer
Settings (e.g. unlocking function using a key) can be changed.
(Customizable features P. 493)
CAUTION
■To prevent an accident
Observe the following precautions while driving the vehicle.
Failure to do so may result in a door opening and an occupant falling out,
resulting in death or serious injury.
●Always use a seat belt.
● Always lock all the doors.
● Ensure that all doors are properly closed.
● Do not pull the inside handle of the doors while driving.
The doors may be opened and the passengers are thrown out of the vehi-
cle and it may result in serious injury or death.
Be especially careful for the front doors, as the doors may be opened even
if the inside lock buttons are in locked position.
● Set the rear door child-protector locks when children are seated in the rear
seats.
Page 315 of 532
315
3-5. Other interior features
3
Interior features
Garage door opener
The garage door opener (HomeLink Universal Transceiver) is manufac-
tured under license from HomeLink.
Programming HomeLink (for U.S. owners)
The HomeLink
compatible transceiver in your vehicle has 3 buttons
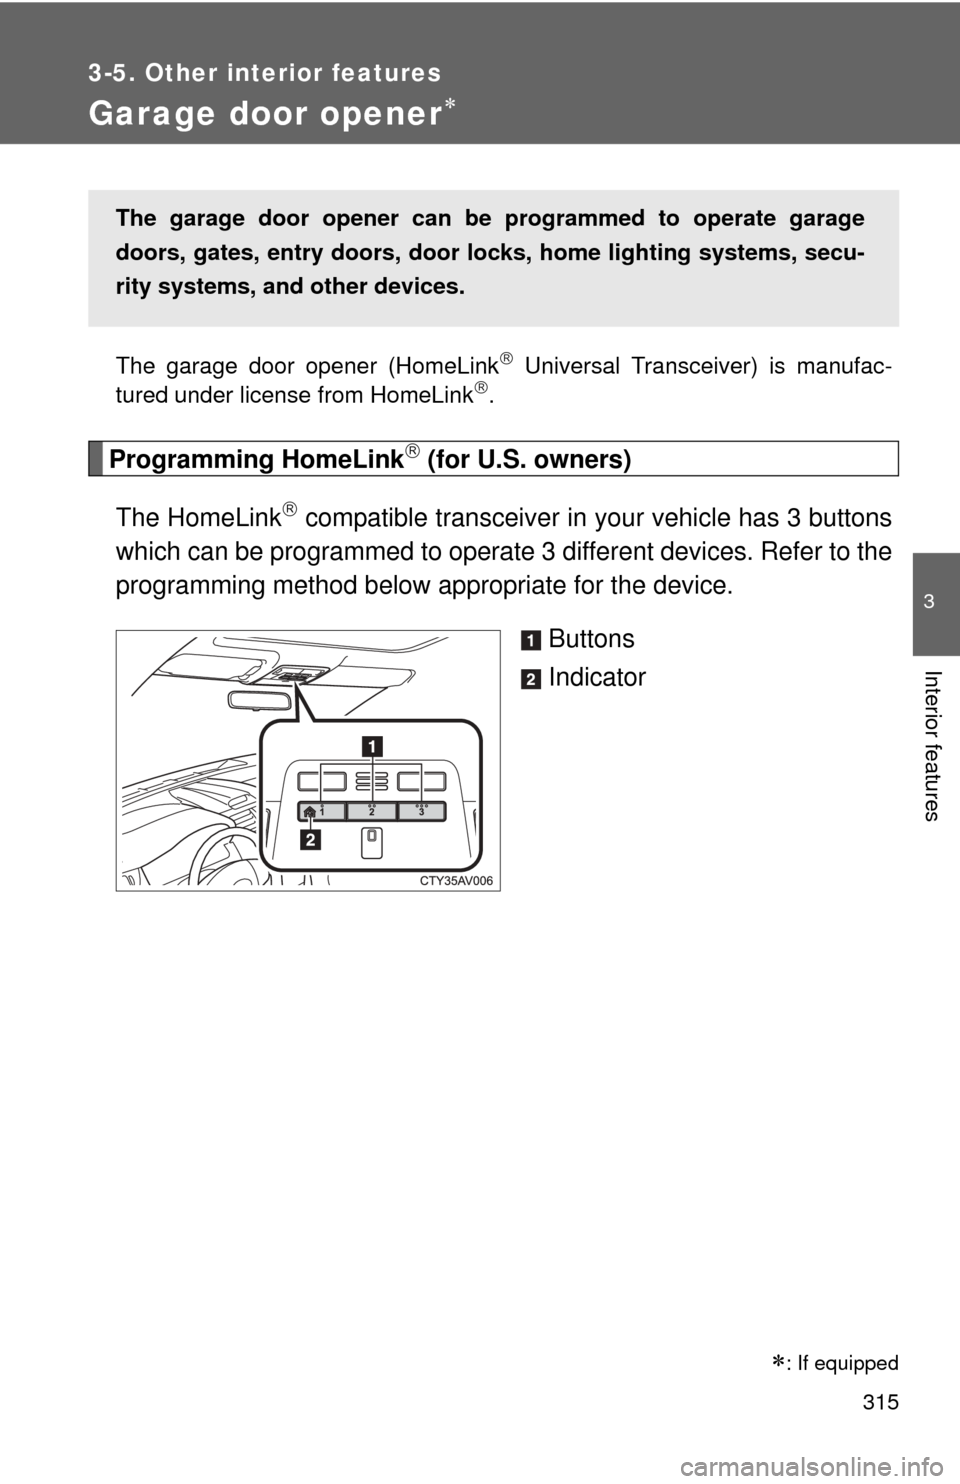
which can be programmed to operate 3 different devices. Refer to the
programming method below appropriate for the device.
Buttons
Indicator
The garage door opener can be programmed to operate garage
doors, gates, entry doors, door locks, home lighting systems, secu-
rity systems, and other devices.
: If equipped
Page 316 of 532
316 3-5. Other interior features
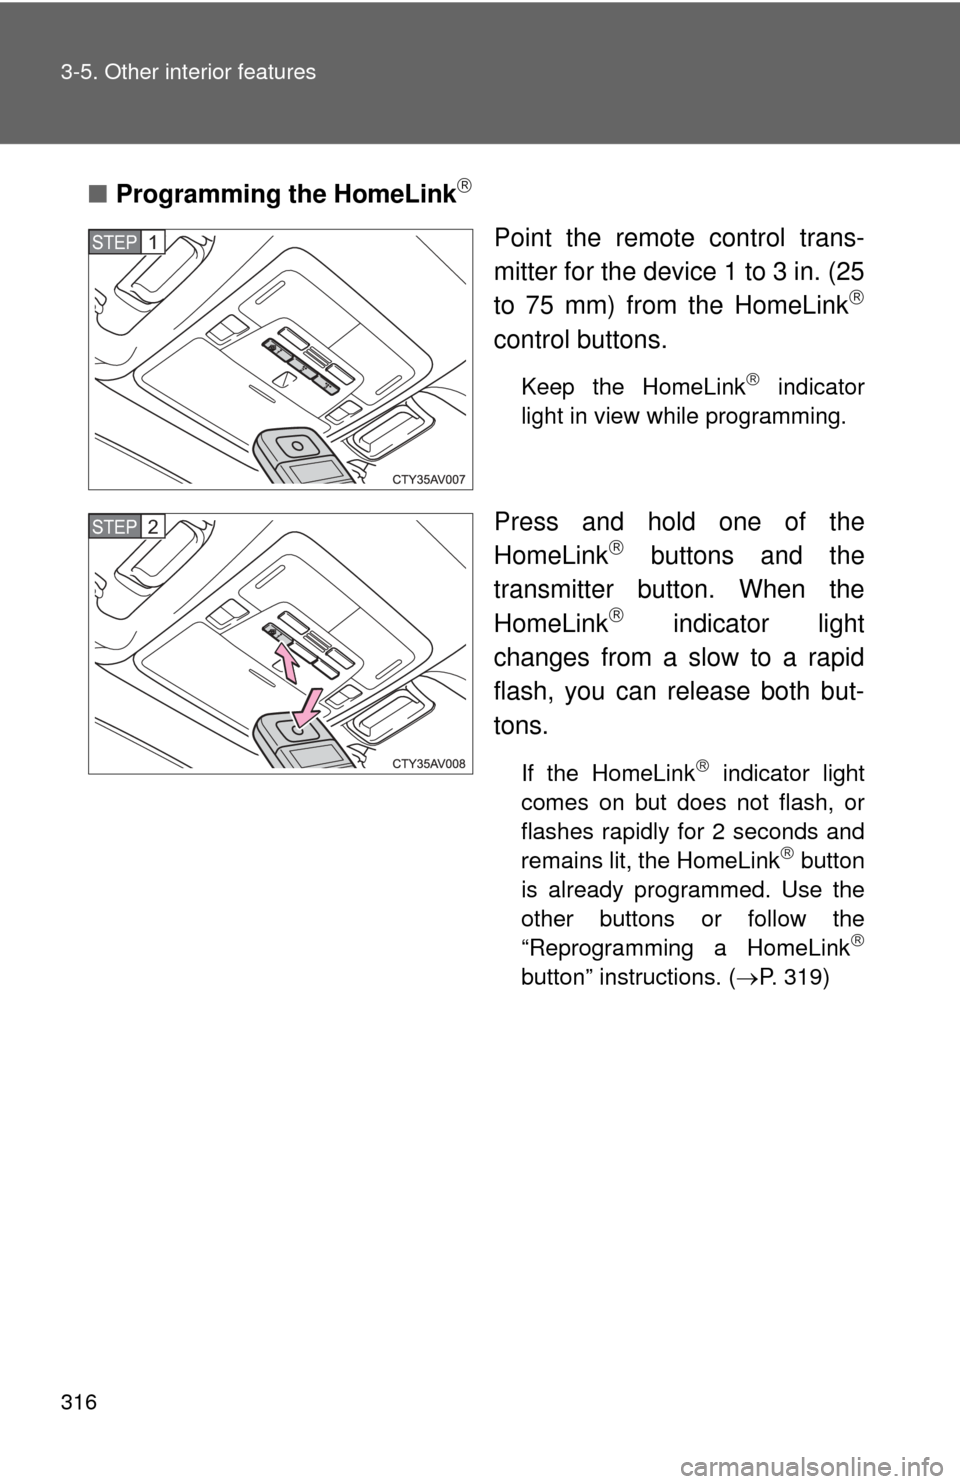
■Programming the HomeLink
Point the remote control trans-
mitter for the device 1 to 3 in. (25
to 75 mm) from the HomeLink
control buttons.
Keep the HomeLink indicator
light in view while programming.
Press and hold one of the
HomeLink buttons and the
transmitter button. When the
HomeLink
indicator light
changes from a slow to a rapid
flash, you can release both but-
tons.
If the HomeLink indicator light
comes on but does not flash, or
flashes rapidly for 2 seconds and
remains lit, the HomeLink
button
is already programmed. Use the
other buttons or follow the
“Reprogramming a HomeLink
button” instructions. ( P. 319)
STEP1
STEP2
Page 317 of 532
317
3-5. Other interior features
3
Interior features
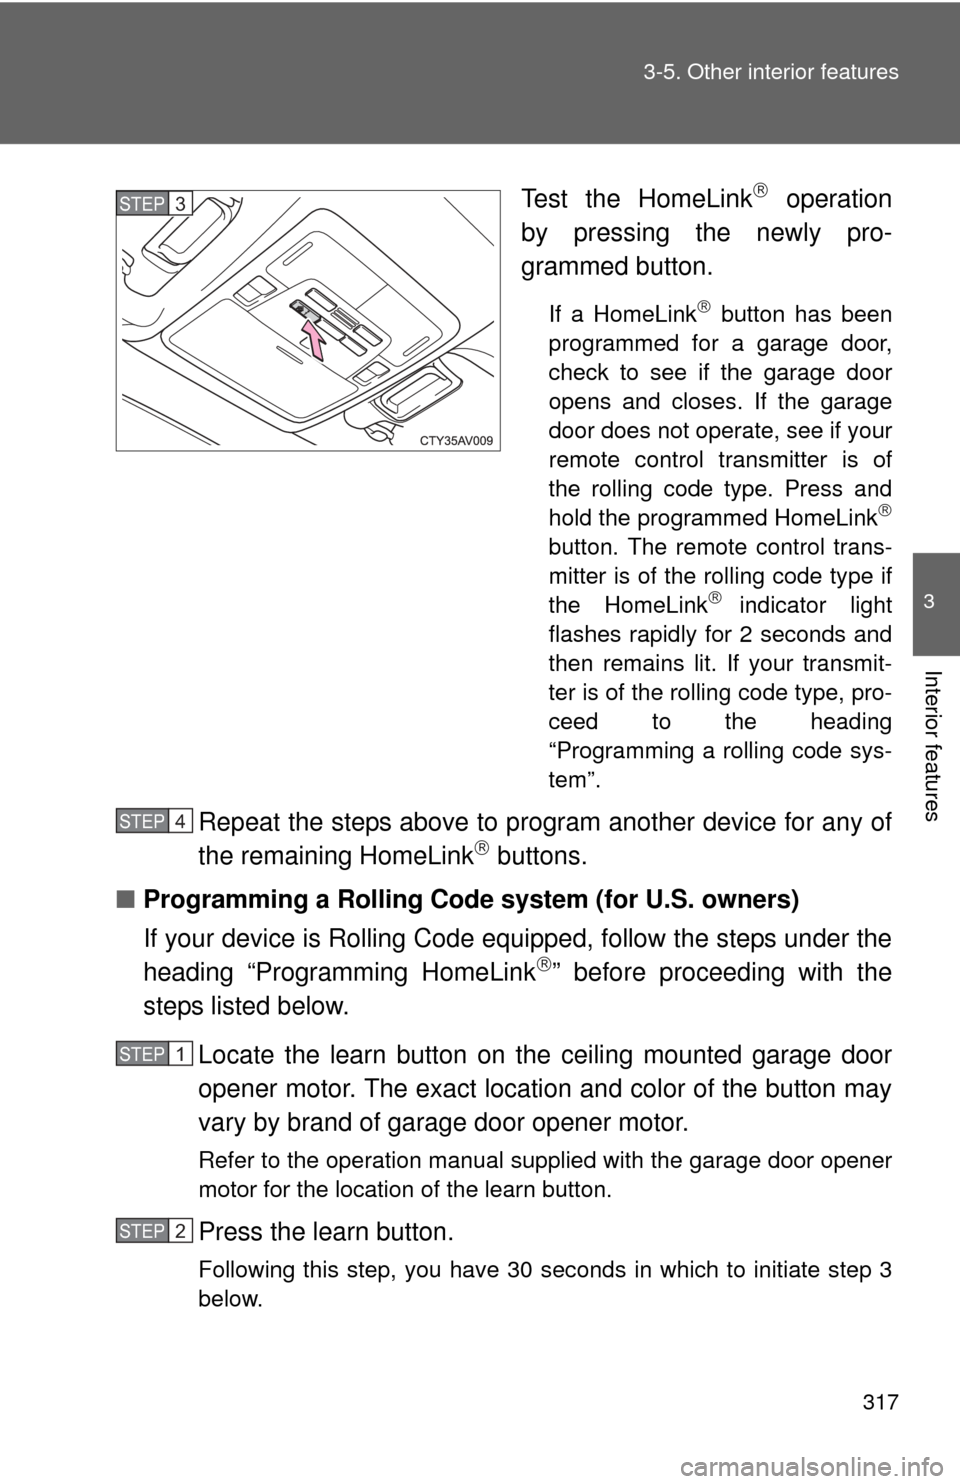
Test the HomeLink operation
by pressing the newly pro-
grammed button.
If a HomeLink button has been
programmed for a garage door,
check to see if the garage door
opens and closes. If the garage
door does not operate, see if your
remote control transmitter is of
the rolling code type. Press and
hold the programmed HomeLink
button. The remote control trans-
mitter is of the rolling code type if
the HomeLink
indicator light
flashes rapidly for 2 seconds and
then remains lit. If your transmit-
ter is of the rolling code type, pro-
ceed to the heading
“Programming a rolling code sys-
tem”.
Repeat the steps above to program another device for any of
the remaining HomeLink buttons.
■ Programming a Rolling Code system (for U.S. owners)
If your device is Rolling Code equipped, follow the steps under the
heading “Programming HomeLink
” before proceeding with the
steps listed below.
Locate the learn button on t he ceiling mounted garage door
opener motor. The exact location and color of the button may
vary by brand of garage door opener motor.
Refer to the operation manual supplied with the garage door opener
motor for the location of the learn button.
Press the learn button.
Following this step, you have 30 seconds in which to initiate step 3
below.
STEP3
STEP4
STEP1
STEP2
Page 318 of 532

318 3-5. Other interior features
Press and hold the vehicle’s programmed HomeLink button
for 2 seconds and then releas e it. Repeat this step once
again. The garage door may open.
If the garage door opens, the programming process is complete. If
the door does not open, press and release the button a third time.
This third press and release will complete the programming process
by opening the garage door.
The ceiling mounted garage door opener motor should now recog-
nize the HomeLink
signal and operate the garage door.
Repeat the steps above to prog ram another rolling code sys-
tem for any of the remaining HomeLink buttons.
■ Programming an entry gate (for U.S. owners)/Programming a
device in the Canadian market
Place the remote control transmitter 1 to 3 in. (25 to 75 mm)
away from the HomeLink
buttons.
Keep the HomeLink indicator light in view while programming.
Press and hold the selected HomeLink button.
Repeatedly press and release (cycle) the remote control
transmitter for 2 seconds each until step 4 is completed.
When the HomeLink
indicator light starts to flash rapidly,
release the buttons.
Test the HomeLink
operation by pressing the newly pro-
grammed button. Check to see if the gate/device operates
correctly.
Repeat the steps above to program another device for any of
the remaining HomeLink
buttons.
■ Programming other devices
To program other devices such as home security systems, home
door locks or lighting, contact y our Toyota dealer for assistance.
■ Reprogramming a button
The individual HomeLink
buttons cannot be erased but can be
reprogrammed. To reprogram a button, follow the “Reprogramming
a HomeLink
button” instructions.
STEP3
STEP4
STEP1
STEP2
STEP3
STEP4
STEP5
STEP6
Page 319 of 532
319
3-5. Other interior features
3
Interior features
Operating HomeLink
Press the appropriate HomeLink button. The HomeLink indicator
light should come on.
The HomeLink compatible transceiver in your vehicle continues to send
a signal for up to 20 seconds as long as the button is pressed.
Reprogramming a HomeLink button
Press and hold the desired HomeLink
button. After 20 seconds, the
HomeLink indicator light will start flas hing slowly. Keep pressing the
HomeLink button and press and hold the transmitter button until the
HomeLink indicator light changes from a slow to a rapid flash.
Release the buttons.
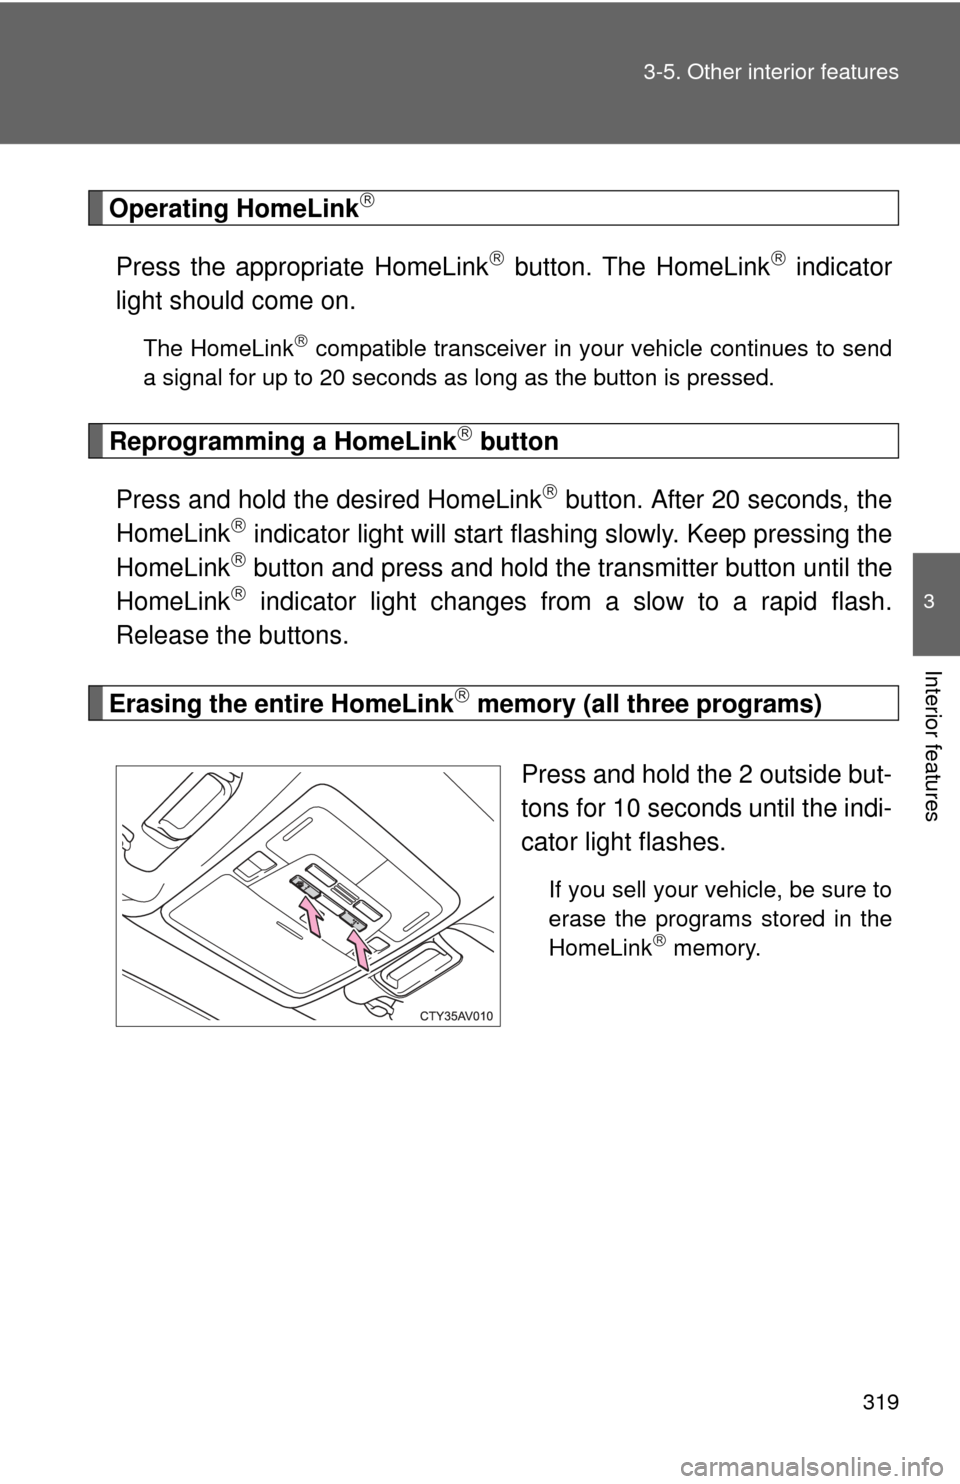
Erasing the entire HomeLink memory (all three programs)
Press and hold the 2 outside but-
tons for 10 seconds until the indi-
cator light flashes.
If you sell your vehicle, be sure to
erase the programs stored in the
HomeLink
memory.