lock TOYOTA CAMRY 2018 Owners Manual (in English)
[x] Cancel search | Manufacturer: TOYOTA, Model Year: 2018, Model line: CAMRY, Model: TOYOTA CAMRY 2018Pages: 612, PDF Size: 10.63 MB
Page 435 of 612
4356-3. Do-it-yourself maintenance
CAMRY_U (01999-06139)
6
Maintenance and care
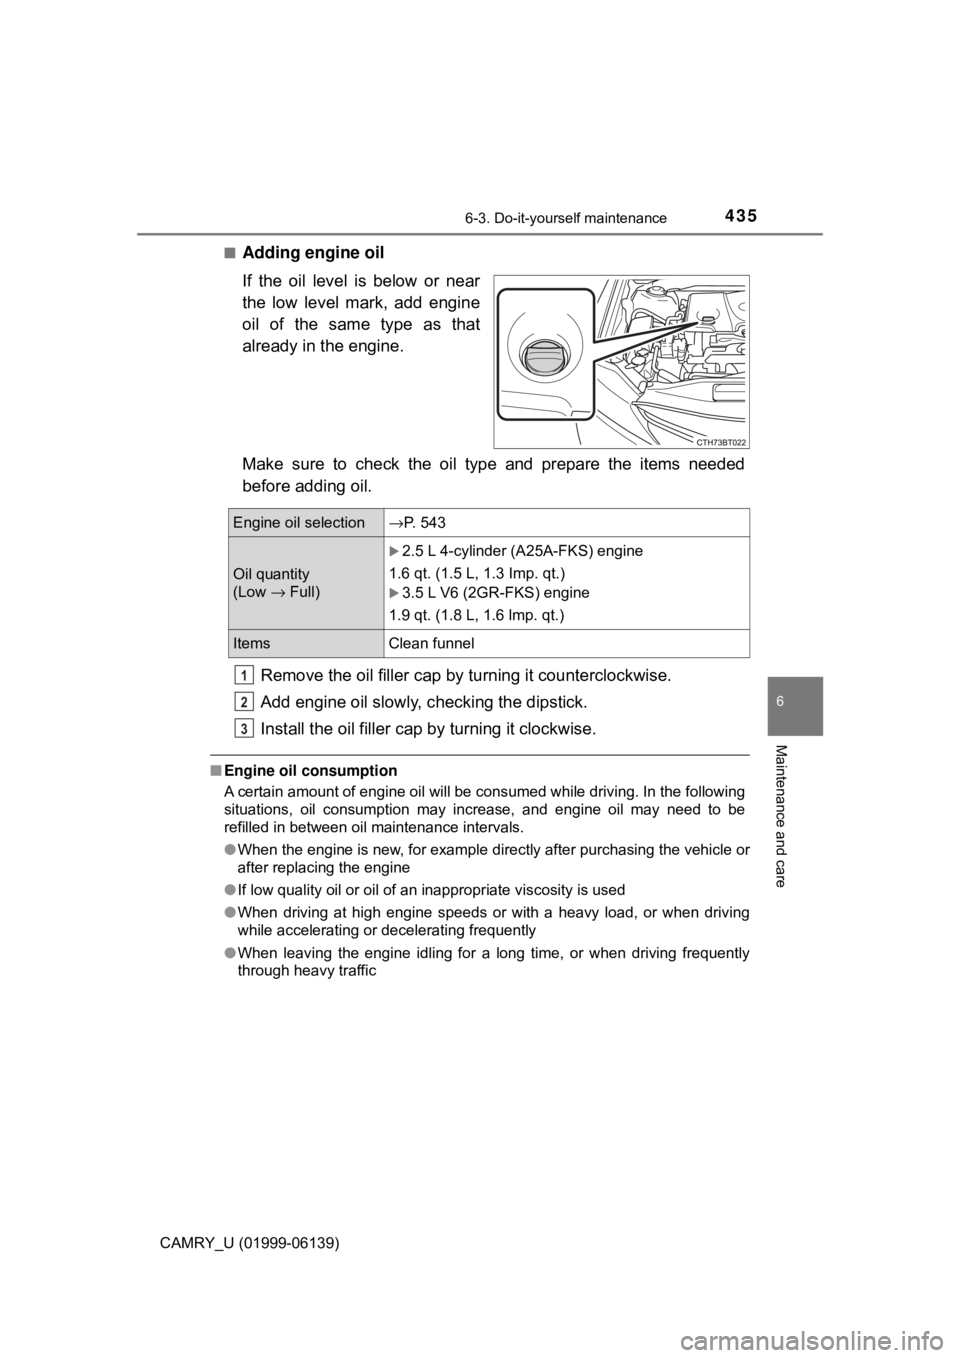
■Adding engine oil
If the oil level is below or near
the low level mark, add engine
oil of the same type as that
already in the engine.
Make sure to check the oil type and prepare the items needed
before adding oil.Remove the oil filler cap by turning it counterclockwise.
Add engine oil slowly, c hecking the dipstick.
Install the oil filler cap by turning it clockwise.
■Engine oil consumption
A certain amount of engine oil will be consumed while driving. In the following
situations, oil consumption may increase, and engine oil may need to be
refilled in between oil maintenance intervals.
●When the engine is new, for example directly after purchasing the vehicle or
after replacing the engine
● If low quality oil or oil of an inappropriate viscosity is used
● When driving at high engine speeds or with a heavy load, or when driving
while accelerating or decelerating frequently
● When leaving the engine idling for a long time, or when driving frequently
through heavy traffic
Engine oil selection →P. 543
Oil quantity
(Low → Full)
2.5 L 4-cylinder (A25A-FKS) engine
1.6 qt. (1.5 L, 1.3 Imp. qt.)
3.5 L V6 (2GR-FKS) engine
1.9 qt. (1.8 L, 1.6 lmp. qt.)
Items Clean funnel
1
2
3
Page 441 of 612
4416-3. Do-it-yourself maintenance
CAMRY_U (01999-06139)
6
Maintenance and care
■Before recharging
When recharging, the battery produces hydrogen gas which is flammable and
explosive. Therefore, observe the following before recharging:
●If recharging with the battery installed on the vehicle, be sure to disconnect
the ground cable.
● Make sure the power switch on the charger is off when connecting and dis-
connecting the charger cables to the battery.
■ After recharging/reconnecting the ba ttery (vehicles with a smart key sys-
tem)
● Unlocking the doors using the smart key system may not be possible imme-
diately after reconnecting the battery. If this happens, use the wireless
remote control or the mechanical key to lock/unlock the doors.
● Start the engine with the engine switch in ACCESSORY mode. The engine
may not start with the engine switch turned off. However, the engine will
operate normally from the second attempt.
● The engine switch mode is recorded by the vehicle. If the battery is recon-
nected, the vehicle will return the engine switch mode to the status it was in
before the battery was disconnected. Make sure to turn off the engine
before disconnecting the battery. Take extra care when connecting the bat-
tery if the engine switch mode prior to discharge is unknown.
If the system will not start even after multiple attempts, contact your Toyota
dealer.
WARNING
■ Chemicals in the battery
Batteries contain poisonous and corrosive sulfuric acid and may produce
hydrogen gas which is flammable and explosive. To reduce the risk of death
or serious injury, take the following precautions while working on or near the
battery:
● Do not cause sparks by touching the battery terminals with tools.
● Do not smoke or light a match near the battery.
● Avoid contact with eyes, skin and clothes.
● Never inhale or swallow electrolyte.
● Wear protective safety glasses when working near the battery.
● Keep children away from the battery.
■ Where to safely charge the battery
Always charge the battery in an open area. Do not charge the battery in a
garage or closed room where there is insufficient ventilation.
Page 452 of 612

4526-3. Do-it-yourself maintenance
CAMRY_U (01999-06139)●
Performance may be affected in the following situations.
• When driving near a TV tower, electric power plant, gas station, radio
station, large display, airport or other facility that generates strong
radio waves or electrical noise
• When carrying a portable radio, cellular phone, cordless phone or
other wireless communication device
Vehicles with a tire inflation pressure display function: If tire position
information is not correctly displayed due to the radio wave conditions,
the display may be corrected by changing the location of the vehicle as
the radio wave conditions may change.
●When the vehicle is stopped, the time taken for the warning to start or
turn off may be longer.
●When the inflation pressure of a tire drops rapidly, for example when a
tire has burst, the warning may not operate.
■Initialization procedure
●Make sure to perform the initialization procedure after adjusting the tire
inflation pressure.
Also, make sure the tires are cold before performing the initialization
procedure or adjusting the tire inflation pressure.
●If the engine switch is turned to the “LOCK” position (vehicles without a
smart key system) or of f (vehicles with a smart key system) during ini-
tialization, it is not necessary to restart the initialization procedure from
the beginning as it will begin automat ically when the engine switch is
turned back to the “ON” position (vehicles without a smart key system)
or IGNITION ON mode (vehicles with a smart key system).
●If initialization has accidentally been started when it is not necessary,
adjust the tire inflation pressure to the specified level when the tires are
cold and then perform the initialization procedure again.
●Vehicles with a tire inflation pressure display function: While the position
of each tire is being determined and the inflation pressures are not being
displayed on the multi-information displa y, if the inflation pressure of a
tire drops, the ti re pressure warnin g light will come on.
■Warning performance of the ti re pressure warning system
The warning of the tire pressure warning system will change in accor-
dance with the conditions under which it was initialized. For this reason,
the system may give a warning even if the tire pressure does not reach a
low enough level, or if the pressure is higher than the pressure that was
adjusted to when the system was initialized.
Page 464 of 612
4646-3. Do-it-yourself maintenance
CAMRY_U (01999-06139)
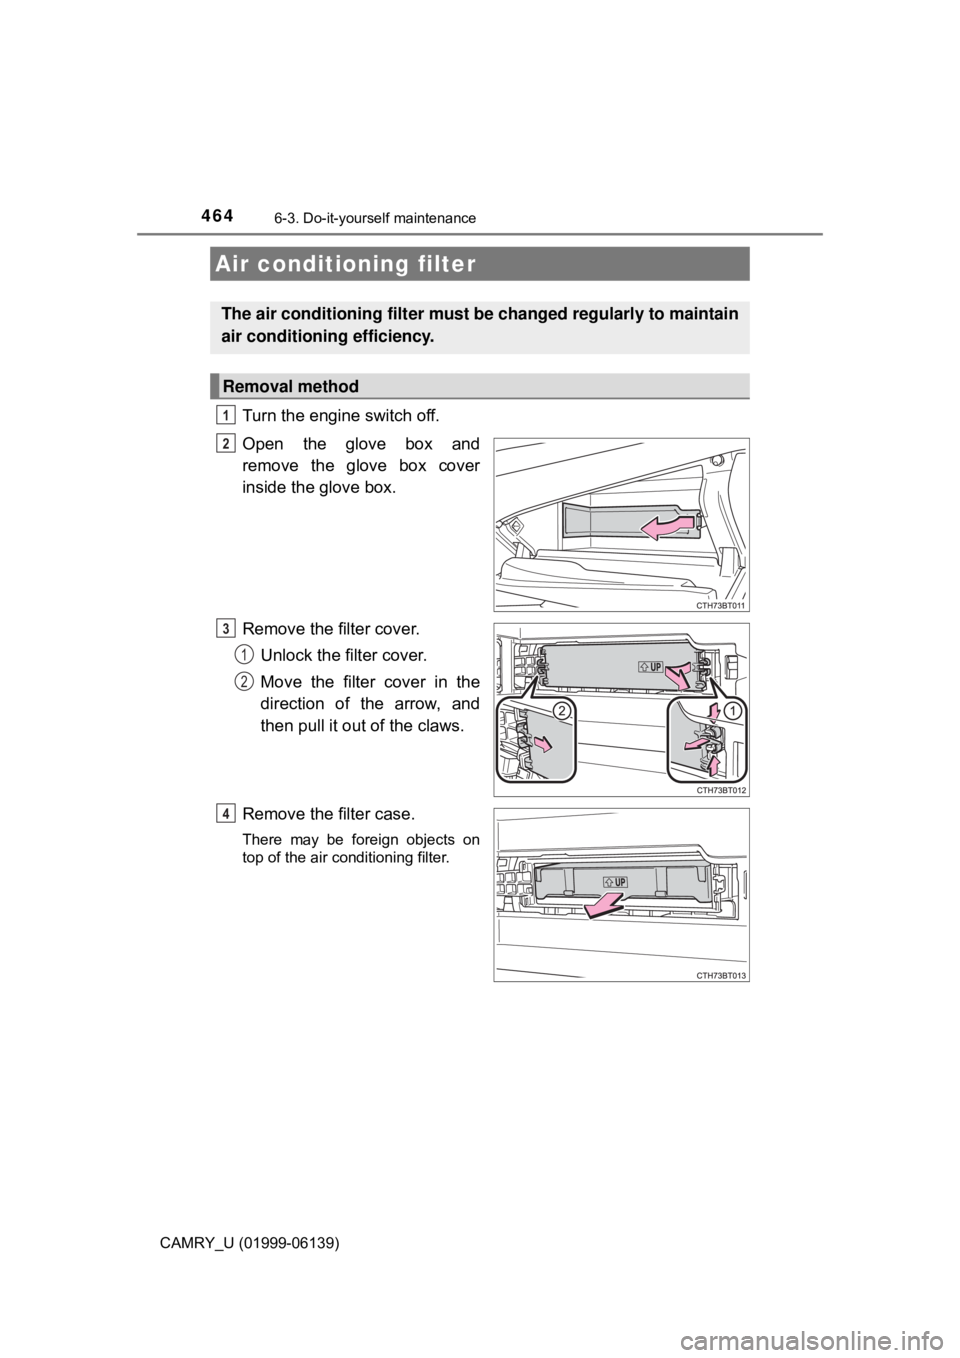
Turn the engine switch off.
Open the glove box and
remove the glove box cover
inside the glove box.
Remove the filter cover.Unlock the filter cover.
Move the filter cover in the
direction of the arrow, and
then pull it out of the claws.
Remove the filter case.
There may be foreign objects on
top of the air conditioning filter.
Air conditioning filter
The air conditioning filt er must be changed regularly to maintain
air conditioning efficiency.
Removal method
1
2
3
1
2
4
Page 467 of 612
4676-3. Do-it-yourself maintenance
CAMRY_U (01999-06139)
6
Maintenance and care
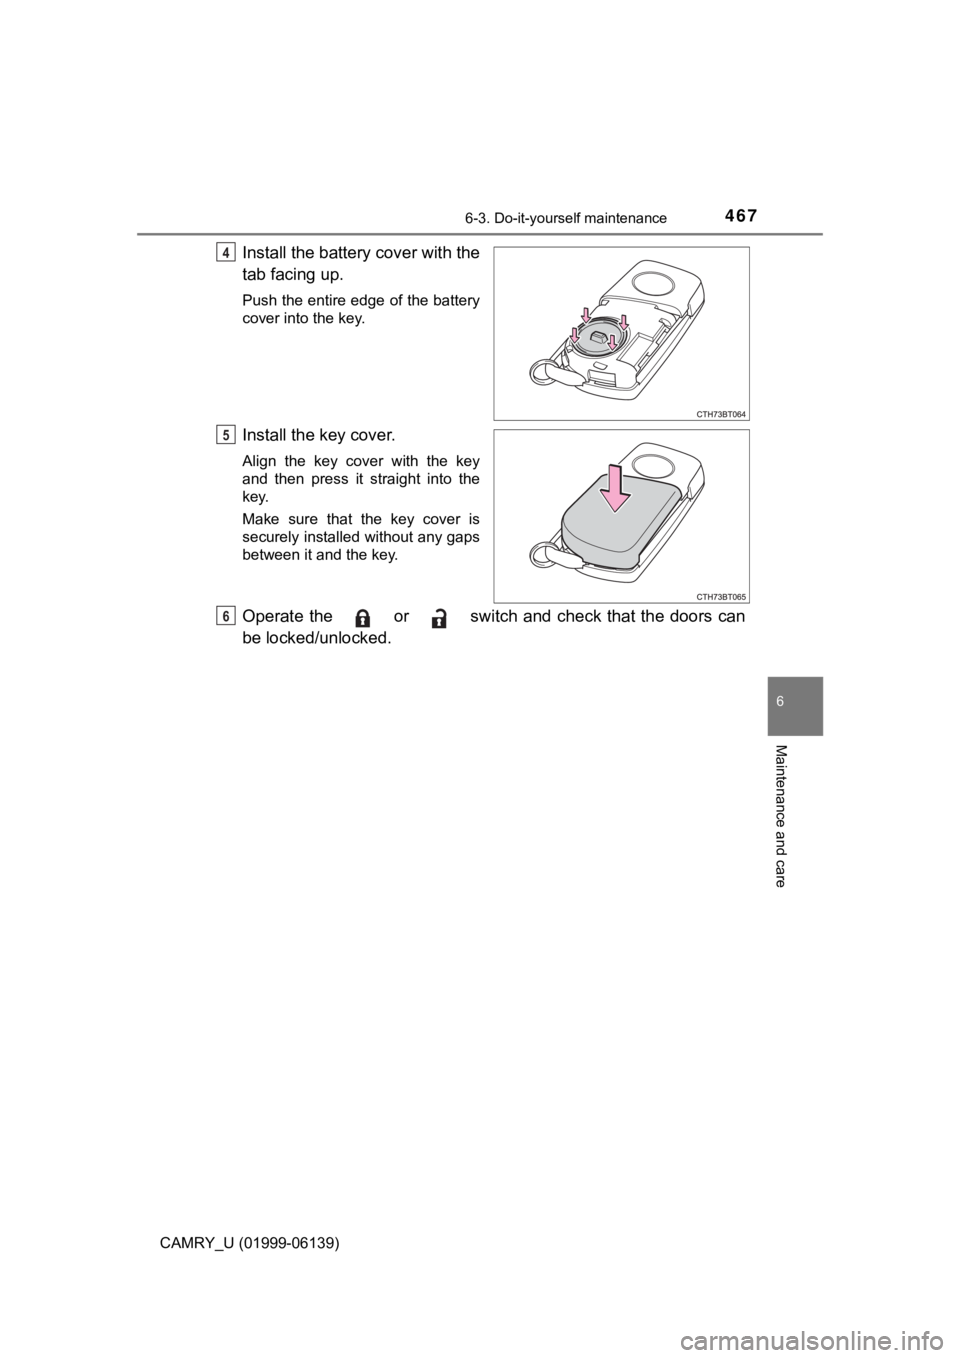
Install the battery cover with the
tab facing up.
Push the entire edge of the battery
cover into the key.
Install the key cover.
Align the key cover with the key
and then press it straight into the
key.
Make sure that the key cover is
securely installed without any gaps
between it and the key.
Operate the or switch and check that the doors can
be locked/unlocked.
4
5
6
Page 468 of 612
4686-3. Do-it-yourself maintenance
CAMRY_U (01999-06139)
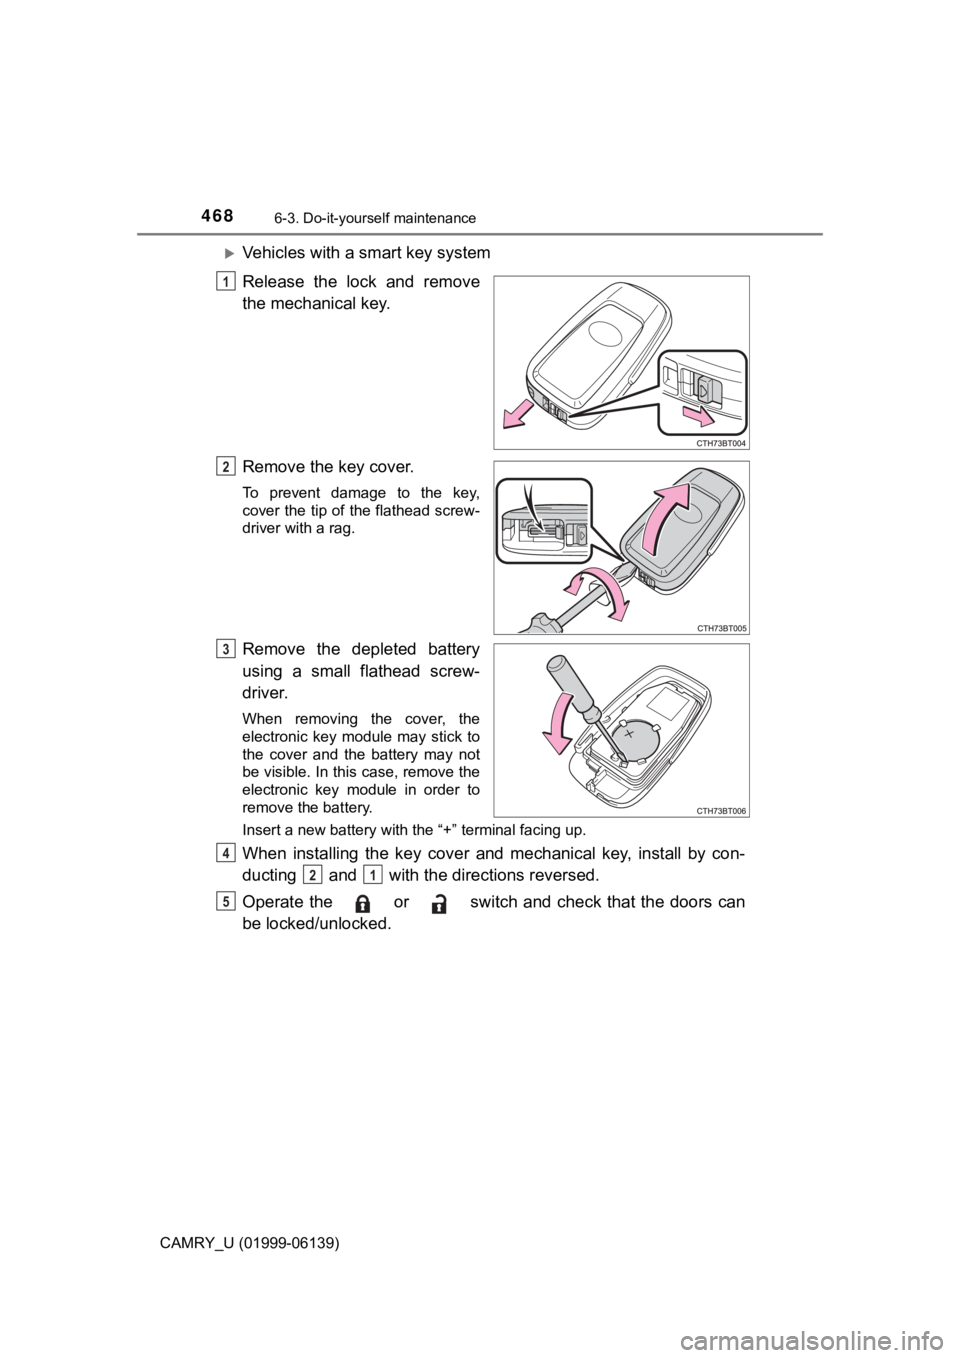
Vehicles with a smart key system
Release the lock and remove
the mechanical key.
Remove the key cover.
To prevent damage to the key,
cover the tip of the flathead screw-
driver with a rag.
Remove the depleted battery
using a small flathead screw-
driver.
When removing the cover, the
electronic key module may stick to
the cover and the battery may not
be visible. In this case, remove the
electronic key module in order to
remove the battery.
Insert a new battery with the “+” terminal facing up.
When installing the key cover and mechanical key, install by con-
ducting and with the directions reversed.
Operate the or switch and check that the doors can
be locked/unlocked.
1
2
3
4
21
5
Page 474 of 612
4746-3. Do-it-yourself maintenance
CAMRY_U (01999-06139)■
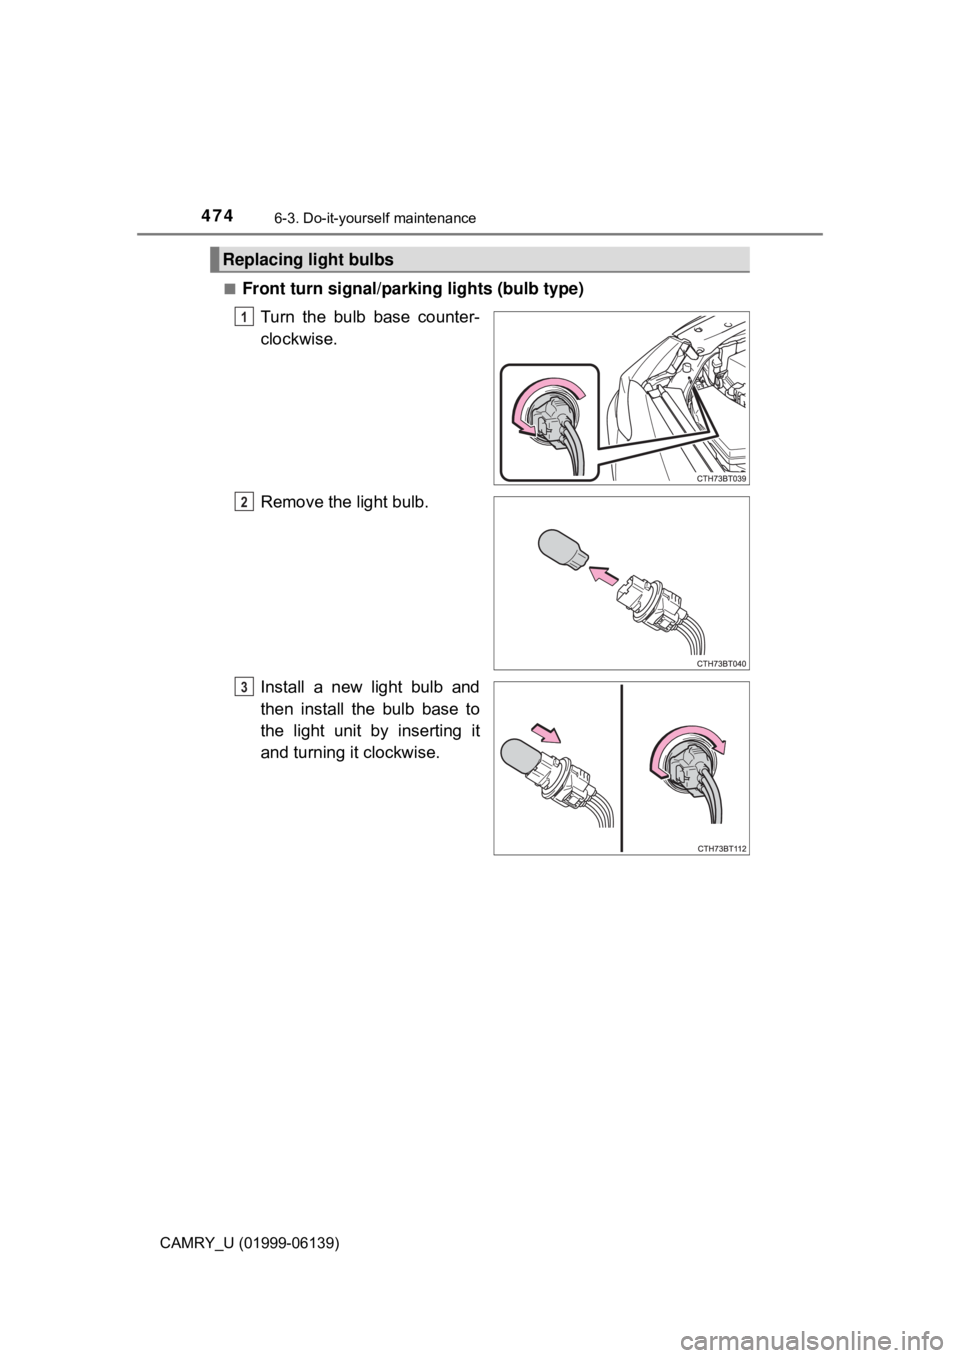
Front turn signal/parking lights (bulb type)
Turn the bulb base counter-
clockwise.
Remove the light bulb.
Install a new light bulb and
then install the bulb base to
the light unit by inserting it
and turning it clockwise.
Replacing light bulbs
1
2
3
Page 476 of 612
4766-3. Do-it-yourself maintenance
CAMRY_U (01999-06139)
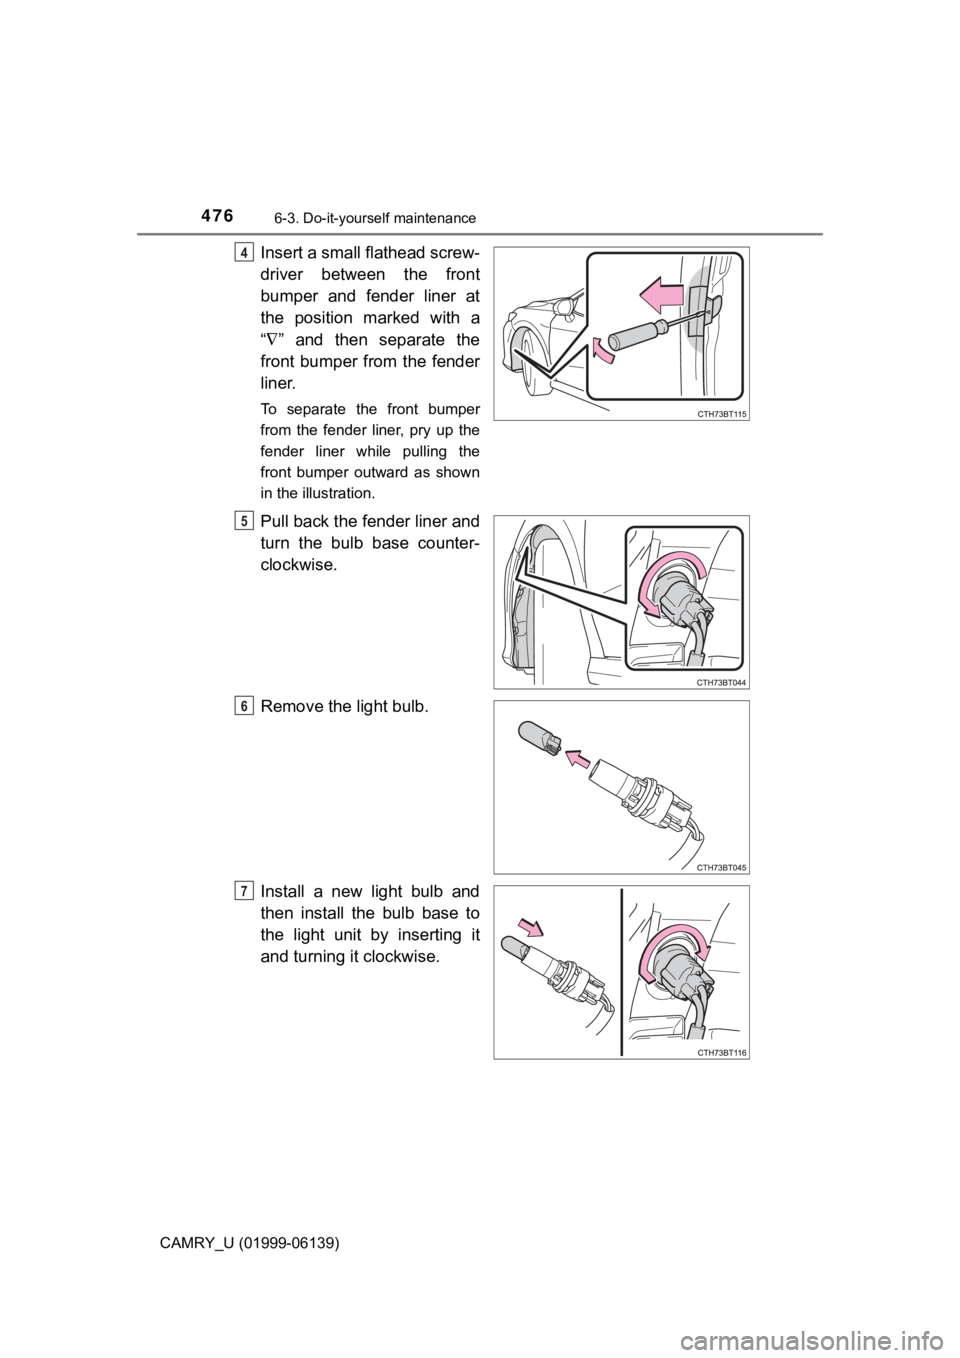
Insert a small flathead screw-
driver between the front
bumper and fender liner at
the position marked with a
“∇ ” and then separate the
front bumper from the fender
liner.
To separate the front bumper
from the fender liner, pry up the
fender liner while pulling the
front bumper outward as shown
in the illustration.
Pull back the fender liner and
turn the bulb base counter-
clockwise.
Remove the light bulb.
Install a new light bulb and
then install the bulb base to
the light unit by inserting it
and turning it clockwise.
4
5
6
7
Page 478 of 612
4786-3. Do-it-yourself maintenance
CAMRY_U (01999-06139)■
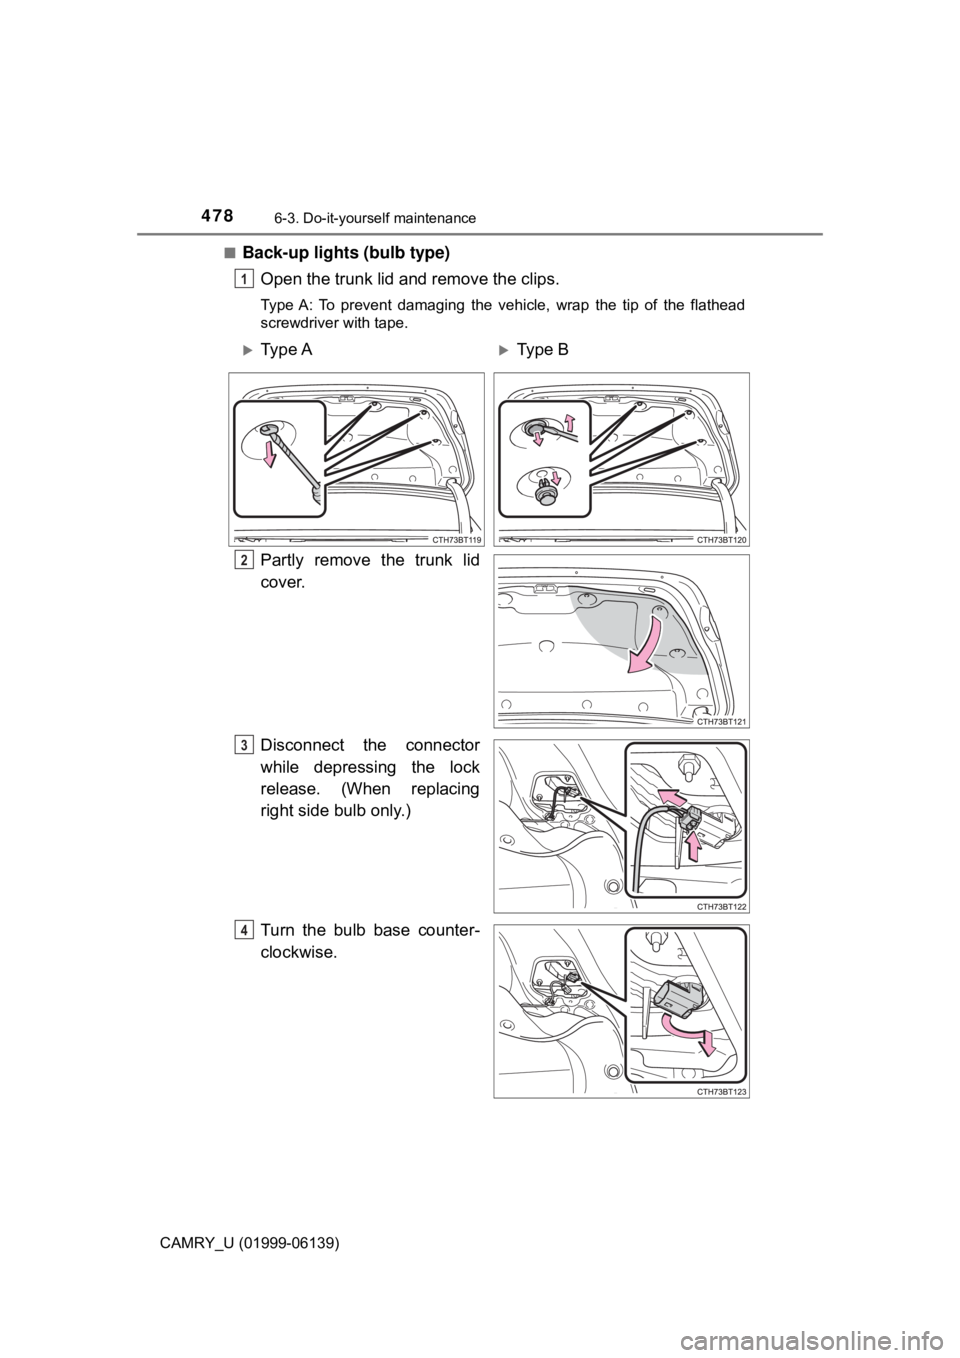
Back-up lights (bulb type)
Open the trunk lid and remove the clips.
Type A: To prevent damaging the vehicle, wrap the tip of the flathead
screwdriver with tape.
Partly remove the trunk lid
cover.
Disconnect the connector
while depressing the lock
release. (When replacing
right side bulb only.)
Turn the bulb base counter-
clockwise.
1
Ty p e AType B
2
3
4
Page 479 of 612
4796-3. Do-it-yourself maintenance
CAMRY_U (01999-06139)
6
Maintenance and care
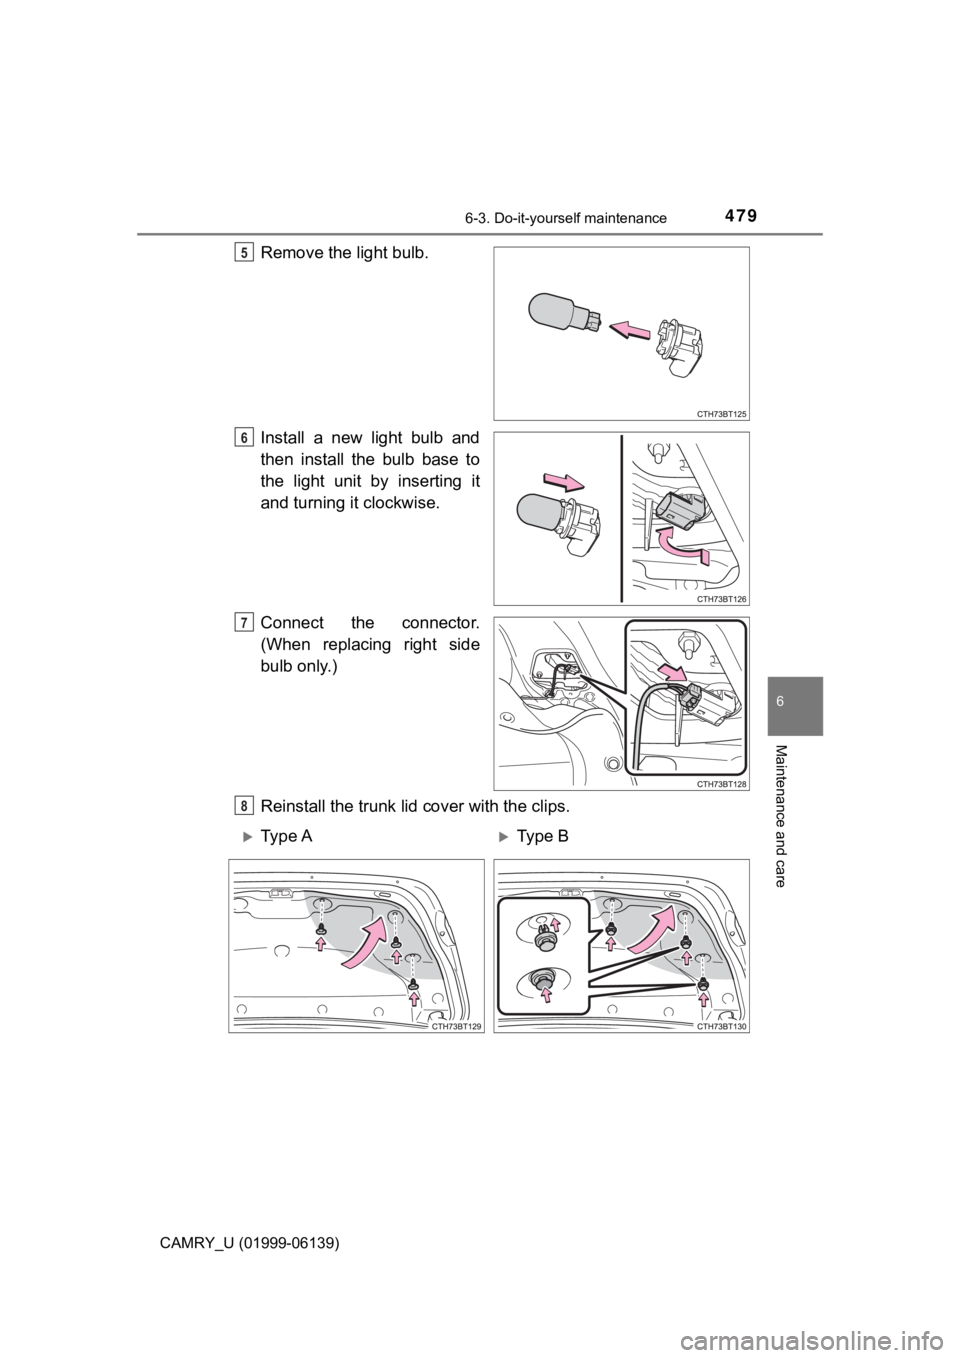
Remove the light bulb.
Install a new light bulb and
then install the bulb base to
the light unit by inserting it
and turning it clockwise.
Connect the connector.
(When replacing right side
bulb only.)
Reinstall the trunk lid cover with the clips.5
6
7
8
Ty p e AType B