display TOYOTA CAMRY HYBRID 2018 Accessories, Audio & Navigation (in English)
[x] Cancel search | Manufacturer: TOYOTA, Model Year: 2018, Model line: CAMRY HYBRID, Model: TOYOTA CAMRY HYBRID 2018Pages: 340, PDF Size: 7.43 MB
Page 192 of 340
192
3. PANORAMIC VIEW MONITOR
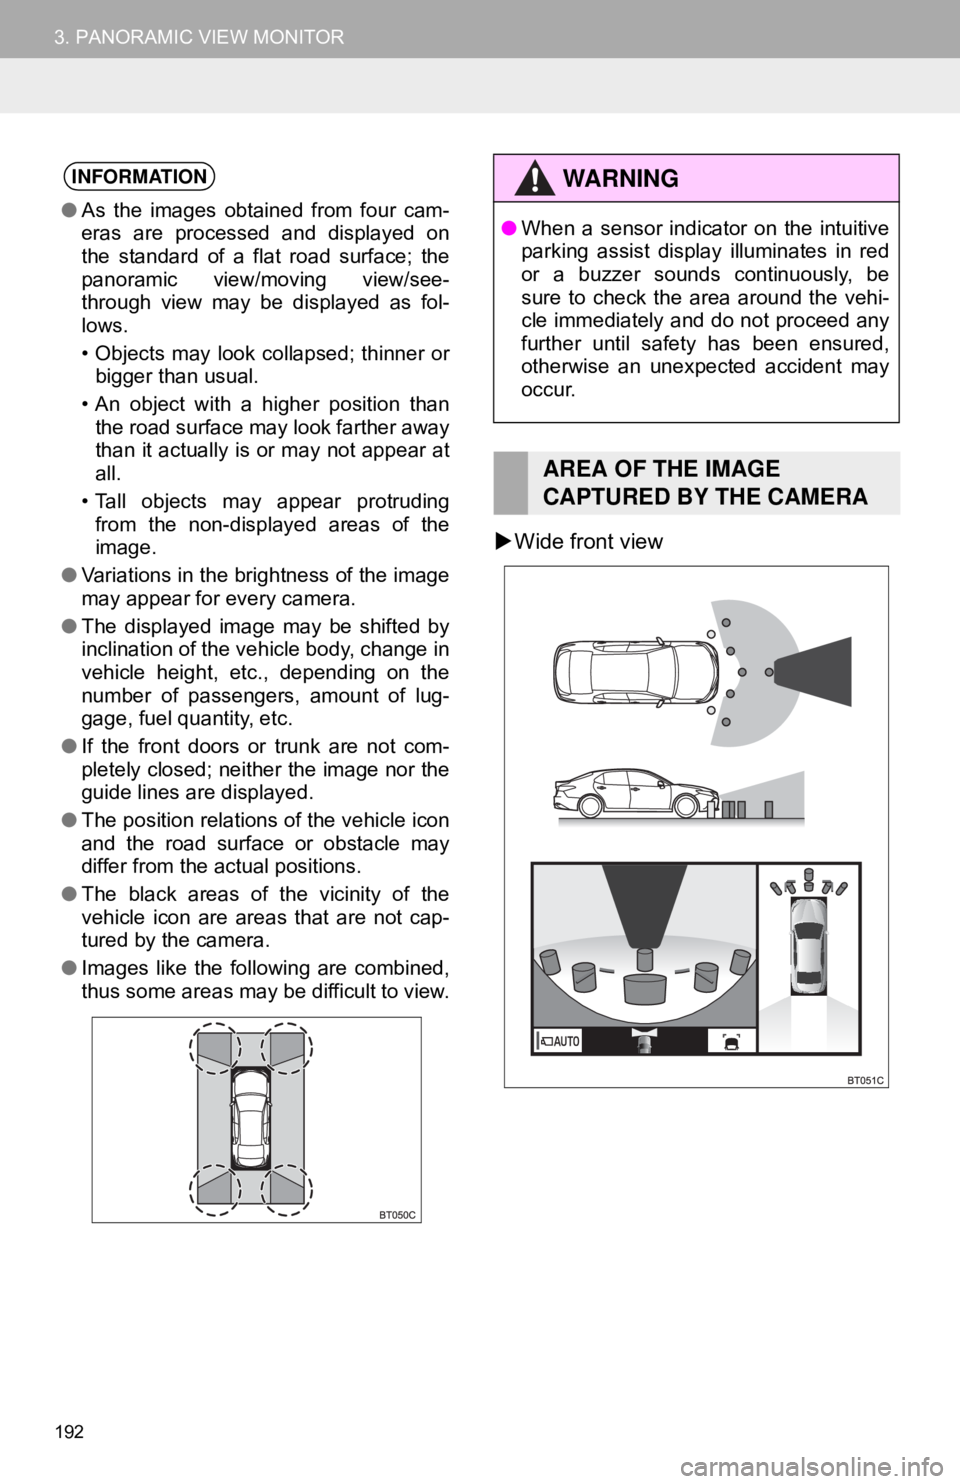
Wide front view
INFORMATION
● As the images obtained from four cam-
eras are processed and displayed on
the standard of a flat road surface; the
panoramic view/moving view/see-
through view may be displayed as fol-
lows.
• Objects may look collapsed; thinner or
bigger than usual.
• An object with a higher position than the road surface may look farther away
than it actually is or may not appear at
all.
• Tall objects may appear protruding from the non-displayed areas of the
image.
● Variations in the brightness of the image
may appear for every camera.
● The displayed image may be shifted by
inclination of the vehicle body, change in
vehicle height, etc., depending on the
number of passengers, amount of lug-
gage, fuel quantity, etc.
● If the front doors or trunk are not com-
pletely closed; neither the image nor the
guide lines are displayed.
● The position relations of the vehicle icon
and the road surface or obstacle may
differ from the actual positions.
● The black areas of the vicinity of the
vehicle icon are areas that are not cap-
tured by the camera.
● Images like the following are combined,
thus some areas may be difficult to view.
WA R N I N G
●When a sensor indicator on the intuitive
parking assist display illuminates in red
or a buzzer sounds continuously, be
sure to check the area around the vehi-
cle immediately and do not proceed any
further until safety has been ensured,
otherwise an unexpected accident may
occur.
AREA OF THE IMAGE
CAPTURED BY THE CAMERA
Page 193 of 340
193
3. PANORAMIC VIEW MONITOR
PERIPHERAL MONITORING SYSTEM
6
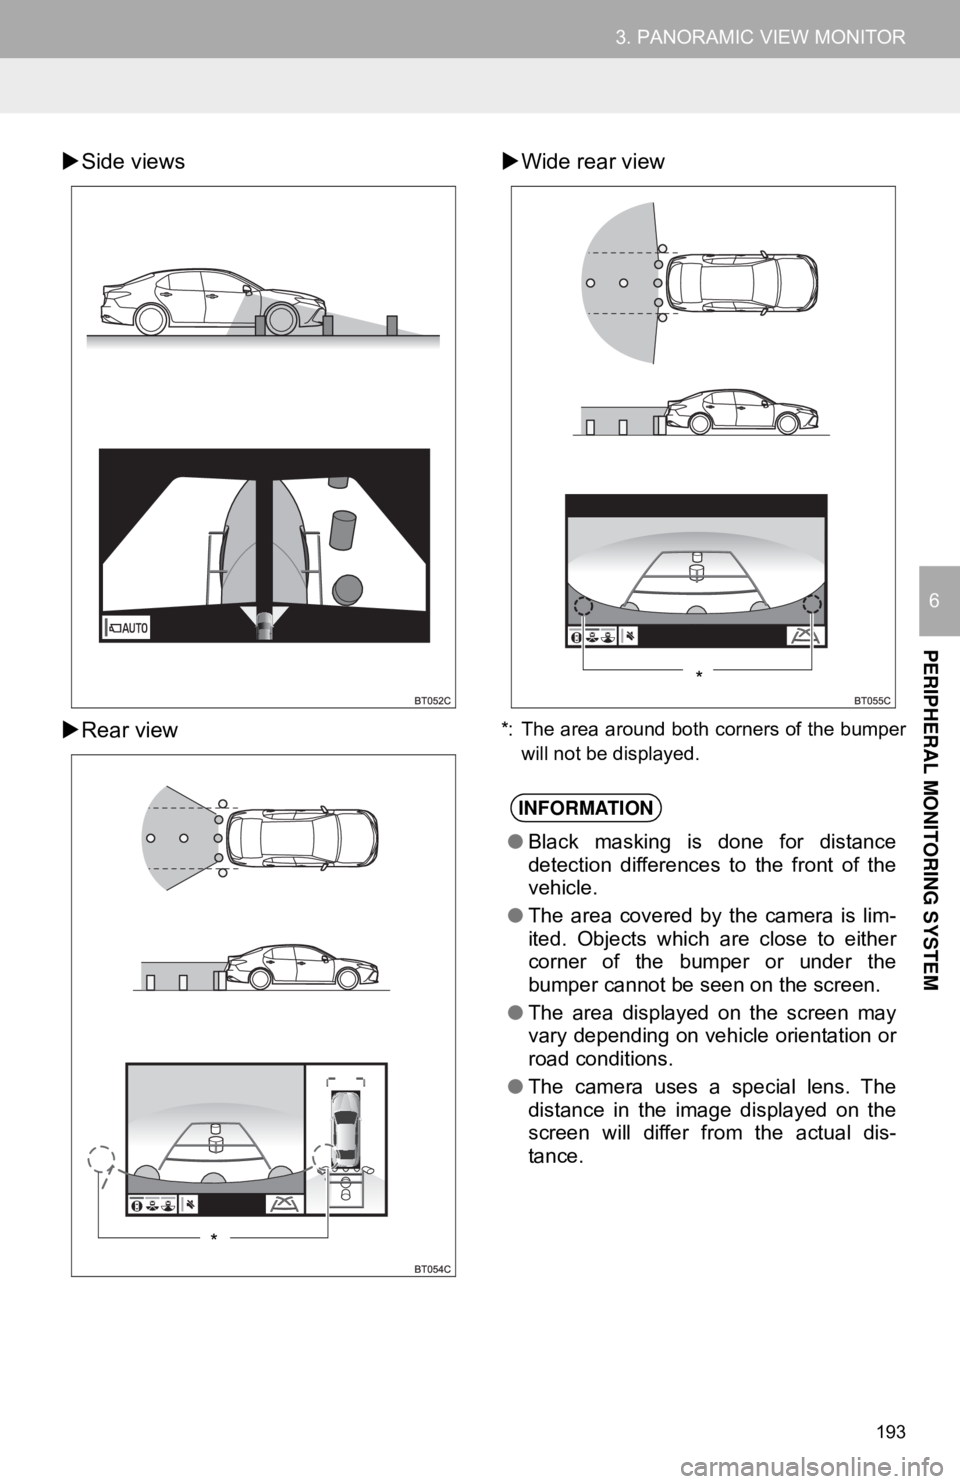
Side views
Rear view
Wide rear view
*: The area around both corners of the bumper
will not be displayed.
*
INFORMATION
●Black masking is done for distance
detection differences to the front of the
vehicle.
● The area covered by the camera is lim-
ited. Objects which are close to either
corner of the bumper or under the
bumper cannot be seen on the screen.
● The area displayed on the screen may
vary depending on vehicle orientation or
road conditions.
● The camera uses a special lens. The
distance in the image displayed on the
screen will differ from the actual dis-
tance.
*
Page 197 of 340
197
3. PANORAMIC VIEW MONITOR
PERIPHERAL MONITORING SYSTEM
6
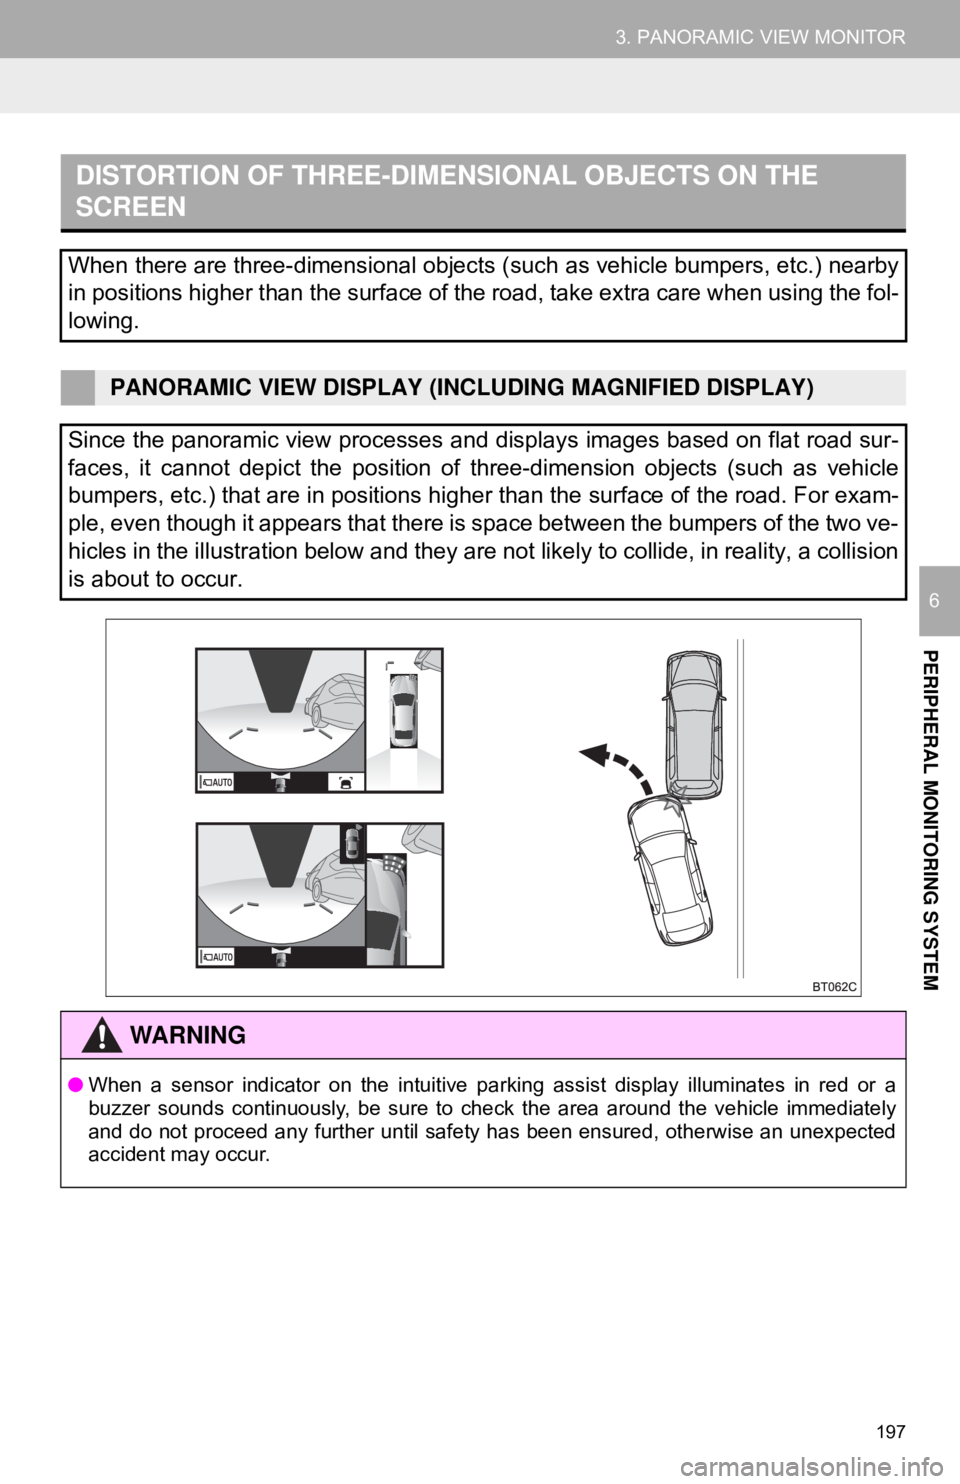
DISTORTION OF THREE-DIMENSIONAL OBJECTS ON THE
SCREEN
When there are three-dimensional objects (such as vehicle bumpers, etc.) nearby
in positions higher than the surface of the road, take extra care when using the fol-
lowing.
PANORAMIC VIEW DISPLAY (INCLUDING MAGNIFIED DISPLAY)
Since the panoramic view processes and displays images based on flat road sur-
faces, it cannot depict the position of three-dimension objects (such as vehicle
bumpers, etc.) that are in positions higher than the surface of the road. For exam-
ple, even though it appears that there is space between the bumpers of the two ve-
hicles in the illustration below and they are not likely to collide, in reality, a collision
is about to occur.
WA R N I N G
● When a sensor indicator on the intuitive parking assist display illuminates in red or a
buzzer sounds continuously, be sure to check the area around the vehicle immediately
and do not proceed any further until safety has been ensured, otherwise an unexpected
accident may occur.
Page 198 of 340
198
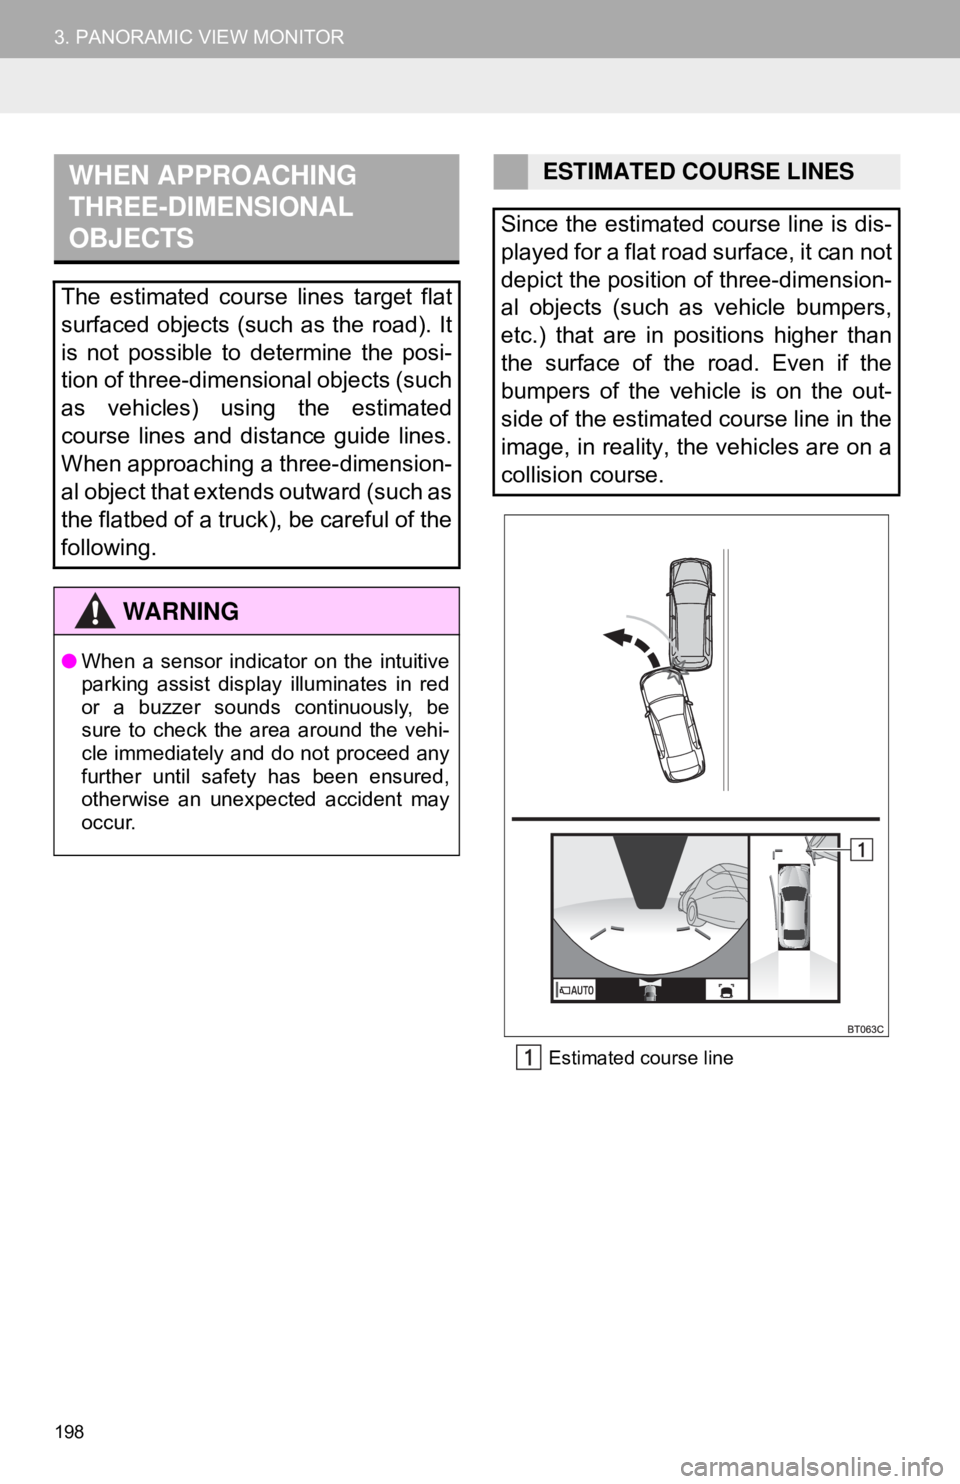
3. PANORAMIC VIEW MONITOREstimated course line
WHEN APPROACHING
THREE-DIMENSIONAL
OBJECTS
The estimated course lines target flat
surfaced objects (such as the road). It
is not possible to determine the posi-
tion of three-dimensional objects (such
as vehicles) using the estimated
course lines and distance guide lines.
When approaching a three-dimension-
al object that extends outward (such as
the flatbed of a truck), be careful of the
following.
WA R N I N G
●When a sensor indicator on the intuitive
parking assist display illuminates in red
or a buzzer sounds continuously, be
sure to check the area around the vehi-
cle immediately and do not proceed any
further until safety has been ensured,
otherwise an unexpected accident may
occur.
ESTIMATED COURSE LINES
Since the estimated course line is dis-
played for a flat road surface, it can not
depict the position of three-dimension-
al objects (such as vehicle bumpers,
etc.) that are in positions higher than
the surface of the road. Even if the
bumpers of the vehicle is on the out-
side of the estimated course line in the
image, in reality, the vehicles are on a
collision course.
Page 200 of 340
200
3. PANORAMIC VIEW MONITOR
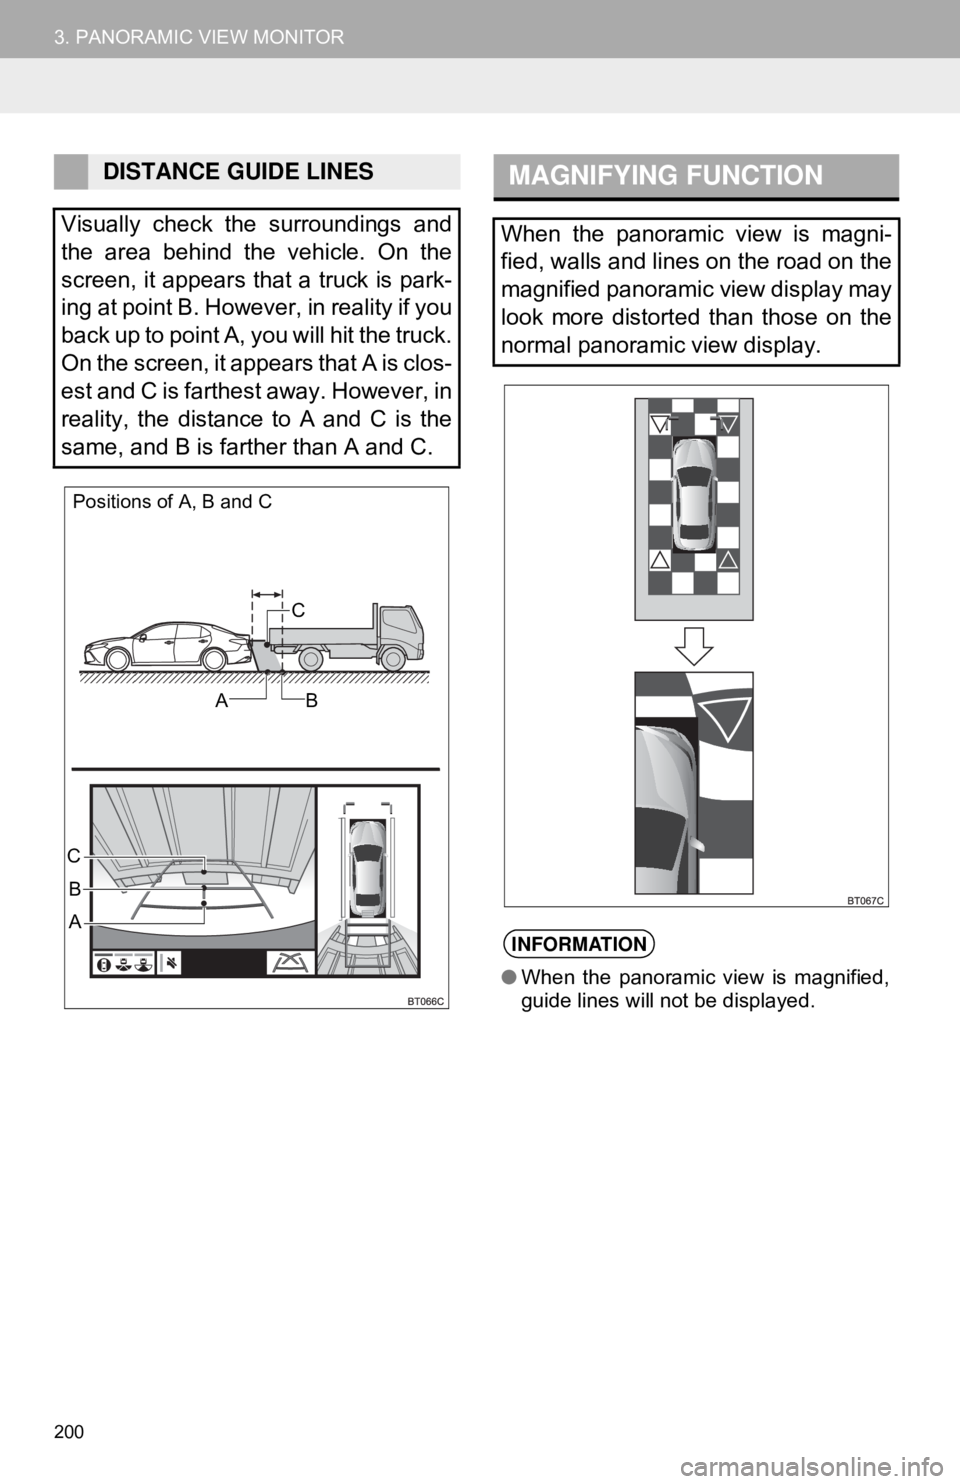
DISTANCE GUIDE LINES
Visually check the surroundings and
the area behind the vehicle. On the
screen, it appears that a truck is park-
ing at point B. However, in reality if you
back up to point A, you will hit the truck.
On the screen, it appears that A is clos-
est and C is farthest away. However, in
reality, the distance to A and C is the
same, and B is farther than A and C.
Positions of A, B and C
C
AB
B
A
C
MAGNIFYING FUNCTION
When the panoramic view is magni-
fied, walls and lines on the road on the
magnified panoramic view display may
look more distorted than those on the
normal panoramic view display.
INFORMATION
● When the panoramic view is magnified,
guide lines will not be displayed.
Page 202 of 340

202
3. PANORAMIC VIEW MONITOR
Guide lines are not displayedThe trunk is open.
Close the trunk.
If this does not resolve the
symptom, have the vehicle in-
spected by your Toyota deal-
er.
The estimated course lines
are not displayed
•12-volt battery has been
reinstalled.
• The steering wheel has been
moved while the 12-volt
battery was being reinstalled.
• 12-volt battery power is low.
• The steering sensor has
been reinstalled.
• There is a malfunction in
the signals being output by
the steering sensor.
Have the vehicle inspected by
your Toyota dealer.
The panoramic view display
cannot be magnifiedThe Intuitive parking assist
may be malfunctioning or
dirty.Follow the correction proce-
dures for malfunctions of the
Intuitive parking assist. (Refer
to “Owner’s Manual”)
The See-through view/Mov-
ing view cannot be displayed
PRODUCT LICENSE
SymptomLikely causeSolution
Page 203 of 340
7
203
4
5
6
8
9
1
2
3
7
1. QUICK REFERENCE ................... 204
2. SOME BASICS ............................ 205
REGISTERING/CONNECTING A Bluetooth® PHONE ........................... 206
USING THE PHONE SWITCH/ MICROPHONE ................................. 206
VOICE COMMAND SYSTEM .............. 207
ABOUT THE CONTACTS IN THE CONTACT LIST ................................ 208
WHEN SELLING OR DISPOSING OF THE VEHICLE............................. 208
3. PLACING A CALL USING THE Bluetooth® HANDS-FREE
SYSTEM..................................... 209
BY CALL HISTORY ............................. 209
BY FAVORITES LIST .......................... 210
BY CONTACTS LIST .......................... 210
BY KEYPAD ........................................ 212
BY HOME SCREEN ............................ 212
4. RECEIVING A CALL USING THE Bluetooth® HANDS-FREE
SYSTEM..................................... 213
INCOMING CALLS .............................. 213
5. TALKING ON THE Bluetooth®
HANDS-FREE SYSTEM ............ 214
INCOMING CALL WAITING ................ 215
6. Bluetooth® PHONE MESSAGE
FUNCTION ...... ....................... ... 216
DISPLAYING THE MESSAGE
SCREEN ........................................... 216
RECEIVING A MESSAGE ................... 216
CHECKING RECEIVED MESSAGES ...................................... 217
REPLYING TO A MESSAGE (DICTATION REPLY) ........................ 218
REPLYING TO A MESSAGE (QUICK REPLY) ................................ 218
CALLING THE MESSAGE SENDER ........................................... 219
1. PHONE SETTINGS ..................... 221
PHONE SETTINGS SCREEN ............. 221
SOUND SETTINGS SCREEN ............. 221
NOTIFICATION SETTINGS SCREEN ........................................... 222
CONTACT/CALL HISTORY SETTINGS SCREEN......................... 223
MESSAGE SETTINGS SCREEN ........ 230
1. TROUBLESHOOTING ................ 231
1
PHONE OPERATION
(HANDS-FREE SYSTEM FOR
CELLULAR PHONES)
2SETUP
3WHAT TO DO IF...
PHONE
Page 206 of 340

206
1. PHONE OPERATION (HANDS-FREE SYSTEM FOR CELLULAR PHONES)
Registering an additional device
1Display the phone top screen.
(→P.204)
2Select “Select Device” .
3Select “Add Device” .
When another Bluetooth® device is con-
nected, a confirmation screen will be dis-
played. To disconnect the Bluetooth
®
device, select “Yes”.
4Follow the steps in “REGISTERING A
Bluetooth
® PHONE FOR THE FIRST
TIME” from “STEP 5”. ( →P.42)
Selecting a registered device
1Display the phone top screen.
(→P.204)
2Select “Select Device” .
3Select the desired device to be con-
nected.
4Check that a confirmation screen is
displayed when the connection is com-
plete.
If an error message is displayed, follow
the guidance on the screen to try again. Phone switch
Press the switch to
display the phone top
screen.
If the switch is pressed during a call, the
call will end.
If the switch is pressed when an incoming
call is received, the call will be answered.
If the switch is pressed when a call waiting
call is received, the waiting call will be
answered.
Volume control switch
Press the “+” side to increase the volume.
Press the “-” side to decrease the vol-
ume.
REGISTERING/CONNECTING
A Bluetooth® PHONE
To use the hands-free system for cellu-
lar phones, it is necessary to register a
cellular phone with the system.
( → P.42)
CONNECTING A Bluetooth®
DEVICE
Bluetooth® PHONE CONDITION
DISPLAY
The condition of the Bluetooth
® phone
appears on the upper right side of the
screen. ( →P.18)
USING THE PHONE SWITCH/
MICROPHONE
STEERING SWITCH
By pressing the phone switch, a call
can be received or ended without tak-
ing your hands off the steering wheel.
Page 209 of 340
209
1. PHONE OPERATION (HANDS-FREE SYSTEM FOR CELLULAR PHONES)
PHONE
7
3. PLACING A CALL USING THE Bluetooth® HANDS-FREE SYSTEM
1Display the phone top screen.
(→P.204)
2Select “History” and select the de-
sired contact.
When the unknown contact screen is dis-
played, select the number.
The icons of call type are displayed.
: Missed call
: Incoming call
: Outgoing call
3Check that the “Dialing...” screen is
displayed.
After a Bluetooth® phone has been
registered, a call can be made using
the hands-free system. There are sev-
eral methods by which a call can be
made, as described below.
How to make a call listPage
By call history209
By favorites list210
By contacts list*1210
By keypad*1212
By home screen212
By e-mail/SMS/MMS219
By POI call*2245
By voice command system126
*
1: The operation cannot be performed while driving.
*
2: Entune Premium Audio only
BY CALL HISTORY
Up to 30 of the latest call history items
(missed, incoming and outgoing) can
be selected.
INFORMATION
● When making a call to the same number
continuously, only the most recent call is
listed in call history.
● When a phone number registered in the
contact list is received, the name is dis-
played.
● Number-withheld calls are also memo-
rized in the system.
● International phone calls may not be
made depending on the type of cellular
phone you have.
● The list should group together consecu-
tive entries with the same phone number
and same call type. For example, two
calls from Kay Rowles’s mobile would
be displayed as follows: Kay Rowles (2)
Page 210 of 340
210
1. PHONE OPERATION (HANDS-FREE SYSTEM FOR CELLULAR PHONES)
1Press the switch on the steering
wheel to display the phone top screen.
2Press the switch on the steering
wheel to display the call history screen.
3Press the switch on the steering
wheel to call the latest history item.
4Check that the “Dialing...” screen is
displayed.
1Display the phone top screen.
(→P.204)
2Select “Favorites” and select the de-
sired contact.
3Select the desired number.
4Check that the “Dialing...” screen is
displayed.
1Display the phone top screen.
(→ P.204)
2Select “Contacts” and select the de-
sired contact.
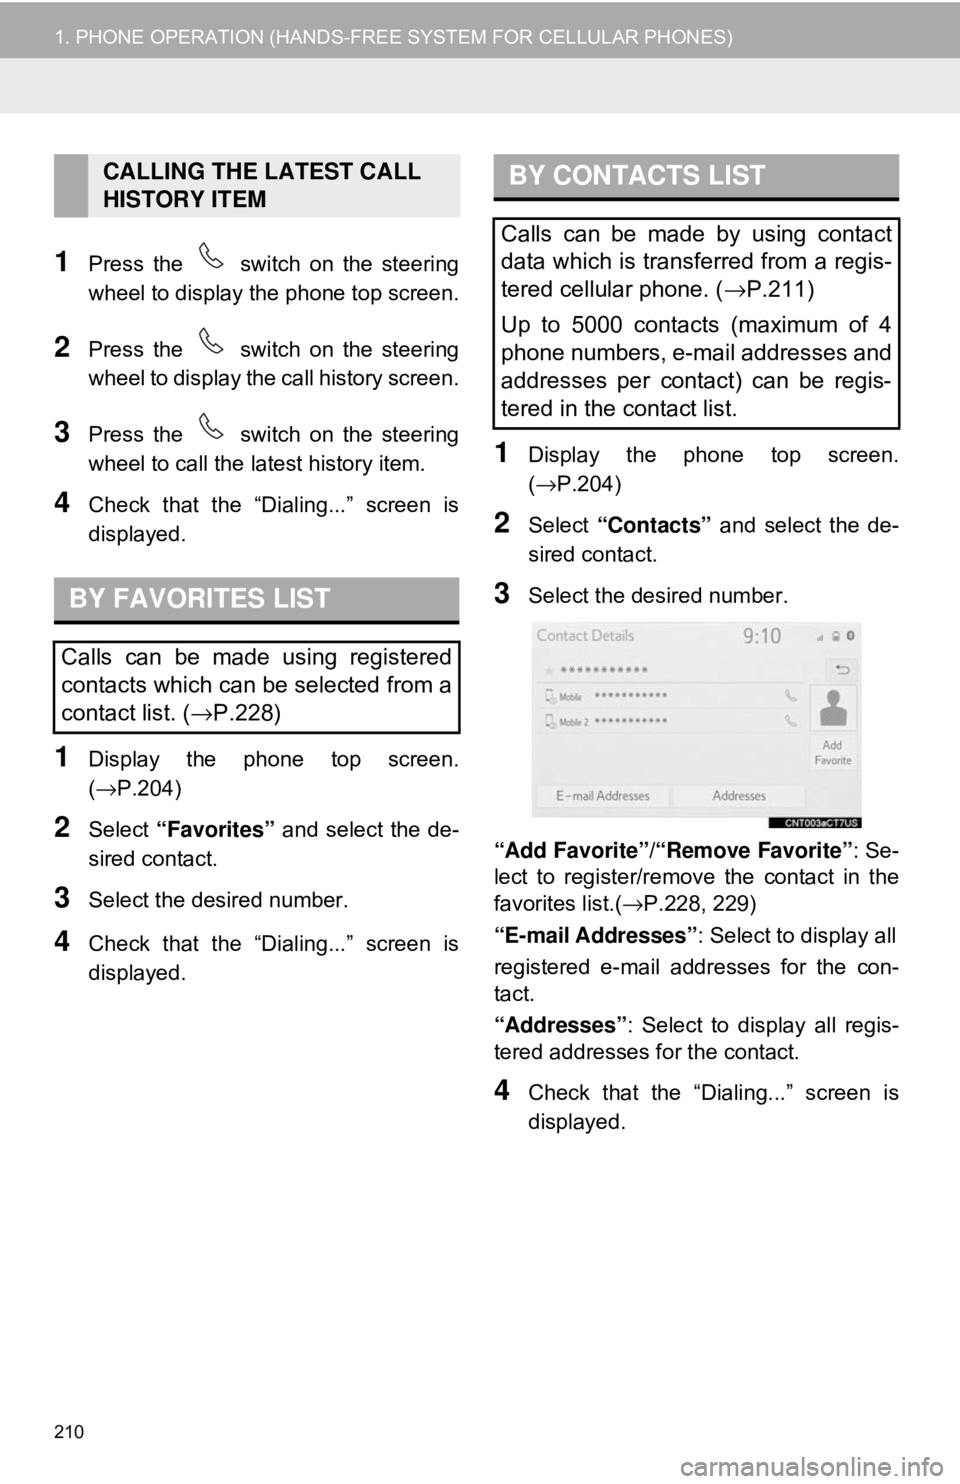
3Select the desired number.
“Add Favorite” /“Remove Favorite” : Se-
lect to register/remov e the contact in the
favorites list.( →P.228, 229)
“E-mail Addresses” : Select to display all
registered e-mail addresses for the con-
tact.
“Addresses” : Select to display all regis-
tered addresses for the contact.
4Check that the “Dialing...” screen is
displayed.
CALLING THE LATEST CALL
HISTORY ITEM
BY FAVORITES LIST
Calls can be made using registered
contacts which can be selected from a
contact list. ( →P.228)
BY CONTACTS LIST
Calls can be made by using contact
data which is transferred from a regis-
tered cellular phone. ( →P.211)
Up to 5000 contacts (maximum of 4
phone numbers, e-mail addresses and
addresses per contact) can be regis-
tered in the contact list.