change time TOYOTA COROLLA 2019 (in English) User Guide
[x] Cancel search | Manufacturer: TOYOTA, Model Year: 2019, Model line: COROLLA, Model: TOYOTA COROLLA 2019Pages: 608, PDF Size: 10.15 MB
Page 191 of 608
1914-2. Driving procedures
4
Driving
COROLLA_TMMMS_TMMC_U
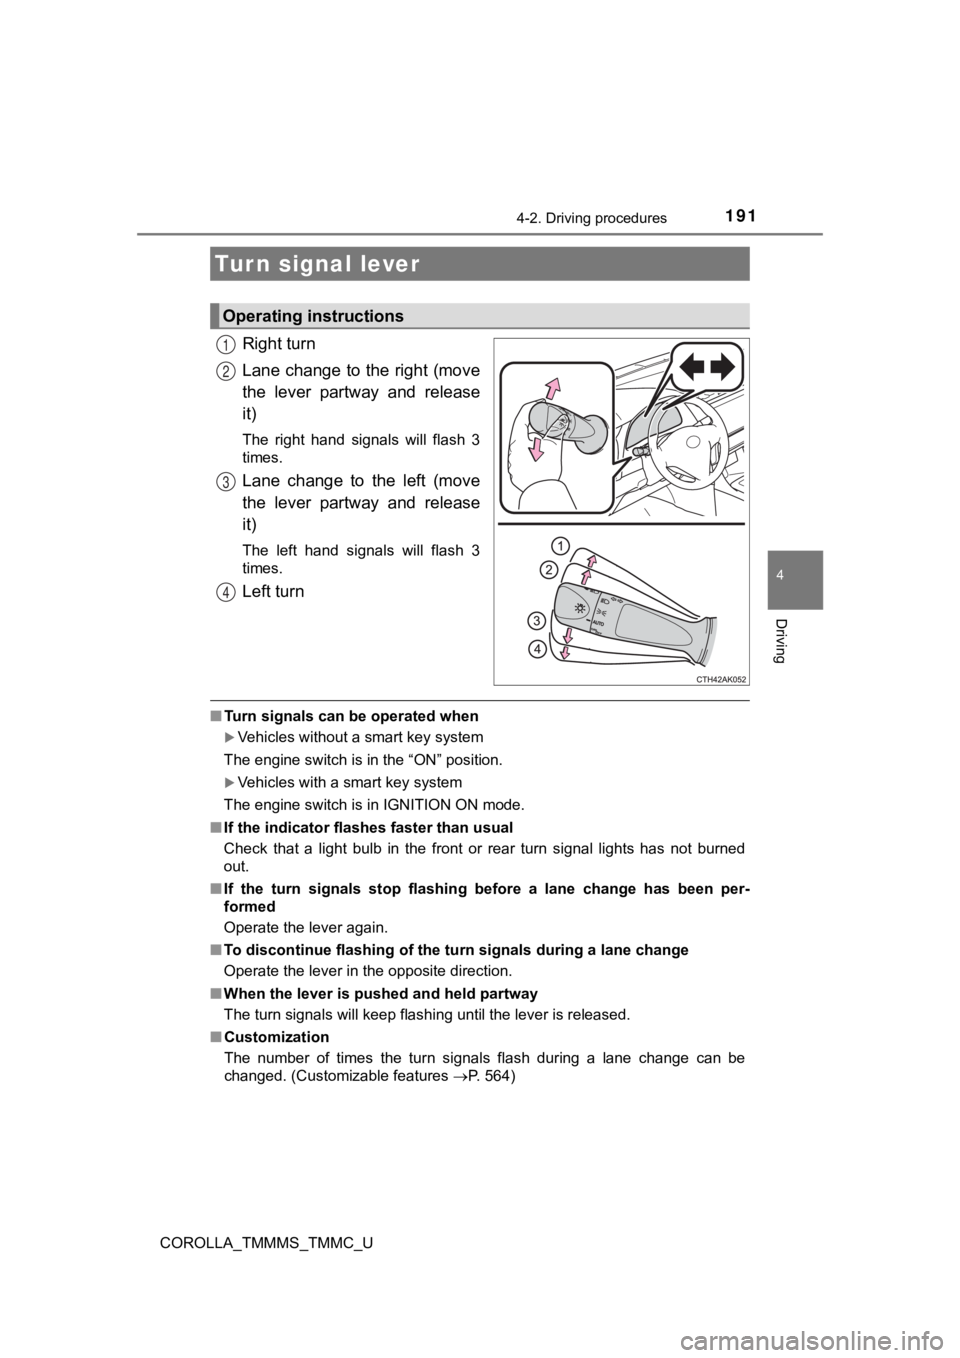
Right turn
Lane change to the right (move
the lever partway and release
it)
The right hand signals will flash 3
times.
Lane change to the left (move
the lever partway and release
it)
The left hand signals will flash 3
times.
Left turn
■Turn signals can be operated when
Vehicles without a smart key system
The engine switch is in the “ON” position.
Vehicles with a smart key system
The engine switch is in IGNITION ON mode.
■ If the indicator flashes faster than usual
Check that a light bulb in the front or rear turn signal lights has not burned
out.
■ If the turn signals stop flashing before a lane change has been per-
formed
Operate the lever again.
■ To discontinue flashing of the turn signals during a lane chang e
Operate the lever in the opposite direction.
■ When the lever is pushe d and held partway
The turn signals will keep flashing until the lever is released .
■ Customization
The number of times the turn signals flash during a lane change can be
changed. (Customizable features P. 564)
Turn signal lever
Operating instructions
1
2
3
4
Page 200 of 608

2004-3. Operating the lights and wipers
COROLLA_TMMMS_TMMC_U■
Camera sensor detection information
●The high beams may not be automatically turned off in the follo wing situa-
tions:
• When a vehicle suddenly appears from around a curve
• When the vehicle is cut in front of by another vehicle
• When vehicles ahead cannot be detected due to repeated curves, road
dividers or roadside trees
• When vehicles ahead appear in a faraway lane on a wide road
• When the lights of vehicles ahead are not on
● The high beams may be turned off if a vehicle ahead that is usi ng fog lights
without its headlights turned on is detected.
● House lights, street lights, traffic signals, and illuminated billboards or signs
and other reflective objects may cause the high beams to change to the low
beams, or the low beams to remain on.
● The following factors may affect the amount of time taken for t he high
beams to turn on or off:
• The brightness of the headlights, fog lights, and tail lights of vehicles
ahead
• The movement and direction of vehicles ahead
• When a vehicle ahead only has operational lights on one side
• When a vehicle ahead is a two-wheeled vehicle
• The condition of the road (gradient, curve, condition of the r oad surface,
etc.)
• The number of passengers and amount of luggage in the vehicle
● The high beams may turn on or off unexpectedly.
● Bicycles or similar vehicles may not be detected.
● In the following situations the system may not be able to corre ctly detect the
surrounding brightness level. This may cause the low beams to r emain on
or the high beams to flash or dazzle pedestrians or vehicles ah ead. In such
a case, it is necessary to manually switch between the high and low beams.
• When driving in inclement weather (heavy rain, snow, fog, sand storms,
etc.)
• When the windshield is obscured by fog, mist, ice, dirt, etc.
• When the windshield is cracked or damaged
• When the camera sensor is deformed or dirty
• When the temperature of the camera sensor is extremely high
• When the surrounding brightness level is equal to that of head lights, tail
lights or fog lights
• When headlights or tail lights of vehicles ahead are turned off, dirty, changing color, or not aimed properly
• When the vehicle is hit by water, snow, dust, etc. from a prec eding vehi-
cle
Page 201 of 608
2014-3. Operating the lights and wipers
4
Driving
COROLLA_TMMMS_TMMC_U• When driving through an area of intermittently changing brightness and
darkness
• When frequently and repeatedly driving ascending/descending roads, or roads with rough, bumpy or uneven surfaces (such as stone-paved
roads, gravel roads, etc.)
• When frequently and repeatedly taking curves or driving on a w inding
road
• When there is a highly reflective object ahead of the vehicle, such as a sign or mirror
• When the back of a preceding vehicle is highly reflective, suc h as a con-
tainer on a truck
• When the vehicle's headlights are damaged or dirty, or are not aimed
properly
• When the vehicle is listing or titling due to a flat tire, a trailer being towed, etc.
• When the headlights are changed between the high beams and low
beams repeatedly in an abnormal manner
• When the driver believes that the high beams may be flashing or dazzling pedestrians or other drivers
■ Temporarily lowering sensor sensitivity
The sensitivity of the sensor can be temporarily lowered.
Turn the engine switch off while the following conditions are m et.
• The headlight switch is in .
• The headlight switch lever is in the high beam position.
Turn the engine switch to the “ON” position (vehicles without a smart key
system) or IGNITION ON mode (vehicles with a smart key system).
Within 30 seconds after , repeat pulling the headlight switch l ever to the
original position then pushing it to the high beam position qui ckly 10 times,
then leave the lever in the high beam position.
If the sensitivity is changed, the Automatic High Beam indicato r will turn on
and off 3 times.
Automatic High Beam (headlights) may turn on even the vehicle i s stopped.
1
2
32
4
Page 217 of 608
2174-5. Using the driving support systems
4
Driving
COROLLA_TMMMS_TMMC_U■
Enabling/disabling th
e pre-collision system
The pre-collision system can be enabled/disabled on the settings
display ( P. 93) of the multi-information display.
The system is automatically enabled each time the engine switch is
turned to the “ON” position (vehicles without a smart key syste m) or
IGNITION ON mode (vehicles with a smart key system).
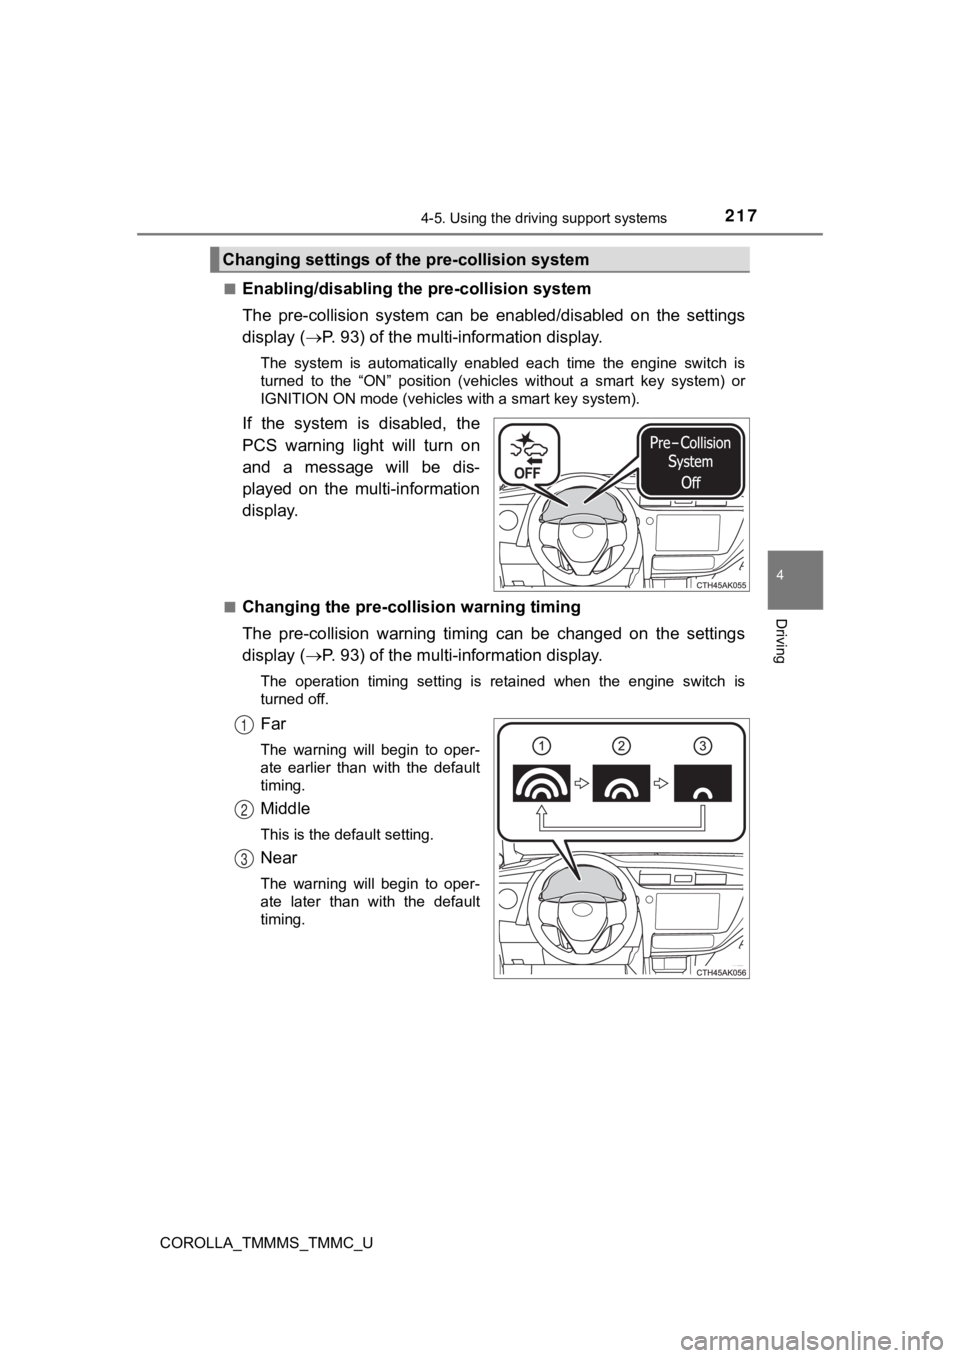
If the system is disabled, the
PCS warning light will turn on
and a message will be dis-
played on the multi-information
display.
■Changing the pre-colli sion warning timing
The pre-collision warning timing can be changed on the settings
display ( P. 93) of the multi-information display.
The operation timing setting is retained when the engine switch is
turned off.
Far
The warning will begin to oper-
ate earlier than with the default
timing.
Middle
This is the default setting.
Near
The warning will begin to oper-
ate later than with the default
timing.
Changing settings of the pre-collision system
1
2
3
Page 223 of 608
2234-5. Using the driving support systems
4
Driving
COROLLA_TMMMS_TMMC_U• When driving in inclement weather such as heavy rain, fog, snow or a
sandstorm
• When the vehicle is hit by water, snow, dust, etc. from a vehicle ahead
• When driving through steam or smoke
• When driving in a place where the surrounding brightness changes sud- denly, such as at the entrance or exit of a tunnel
• When a very bright light, such as the sun or the headlights of oncoming
traffic, shines directly into the camera sensor
• When the surrounding area is dim, such as at dawn or dusk, or while at
night or in a tunnel
• After the engine has started the vehicle has not been driven for a certain amount of time
• While making a left/right turn and for a few seconds after mak ing a left/
right turn
• While driving on a curve and for a few seconds after driving o n a curve
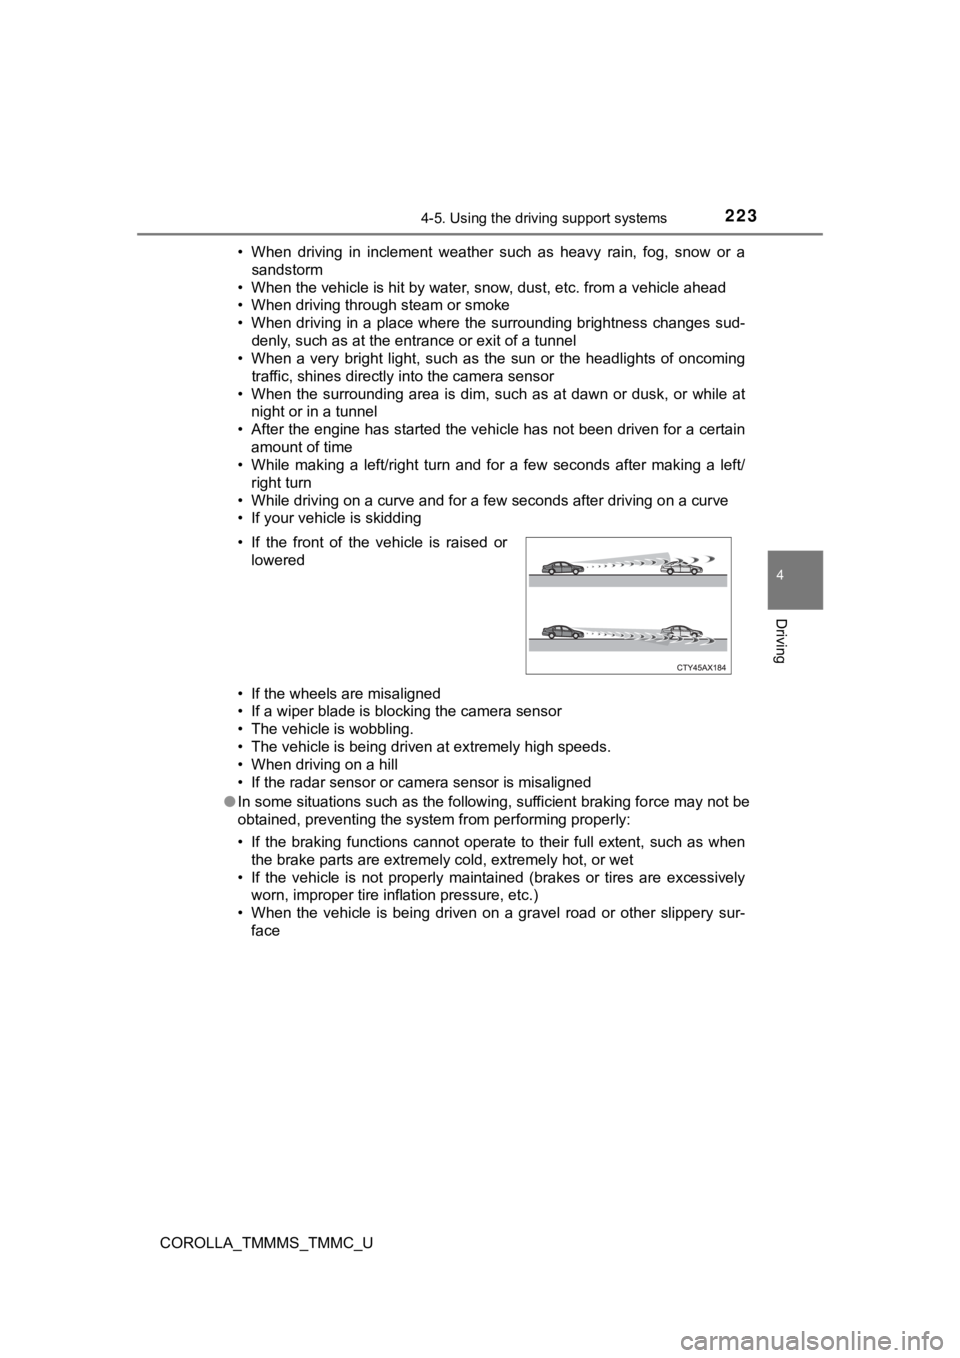
• If your vehicle is skidding
• If the wheels are misaligned
• If a wiper blade is blocking the camera sensor
• The vehicle is wobbling.
• The vehicle is being driven at extremely high speeds.
• When driving on a hill
• If the radar sensor or camera sensor is misaligned
● In some situations such as the following, sufficient braking fo rce may not be
obtained, preventing the system from performing properly:
• If the braking functions cannot operate to their full extent, such as when
the brake parts are extremely cold, extremely hot, or wet
• If the vehicle is not properly maintained (brakes or tires are excessively
worn, improper tire inflation pressure, etc.)
• When the vehicle is being driven on a gravel road or other sli ppery sur-
face
• If the front of the vehicle is raised or
lowered
Page 238 of 608
2384-5. Using the driving support systems
COROLLA_TMMMS_TMMC_U
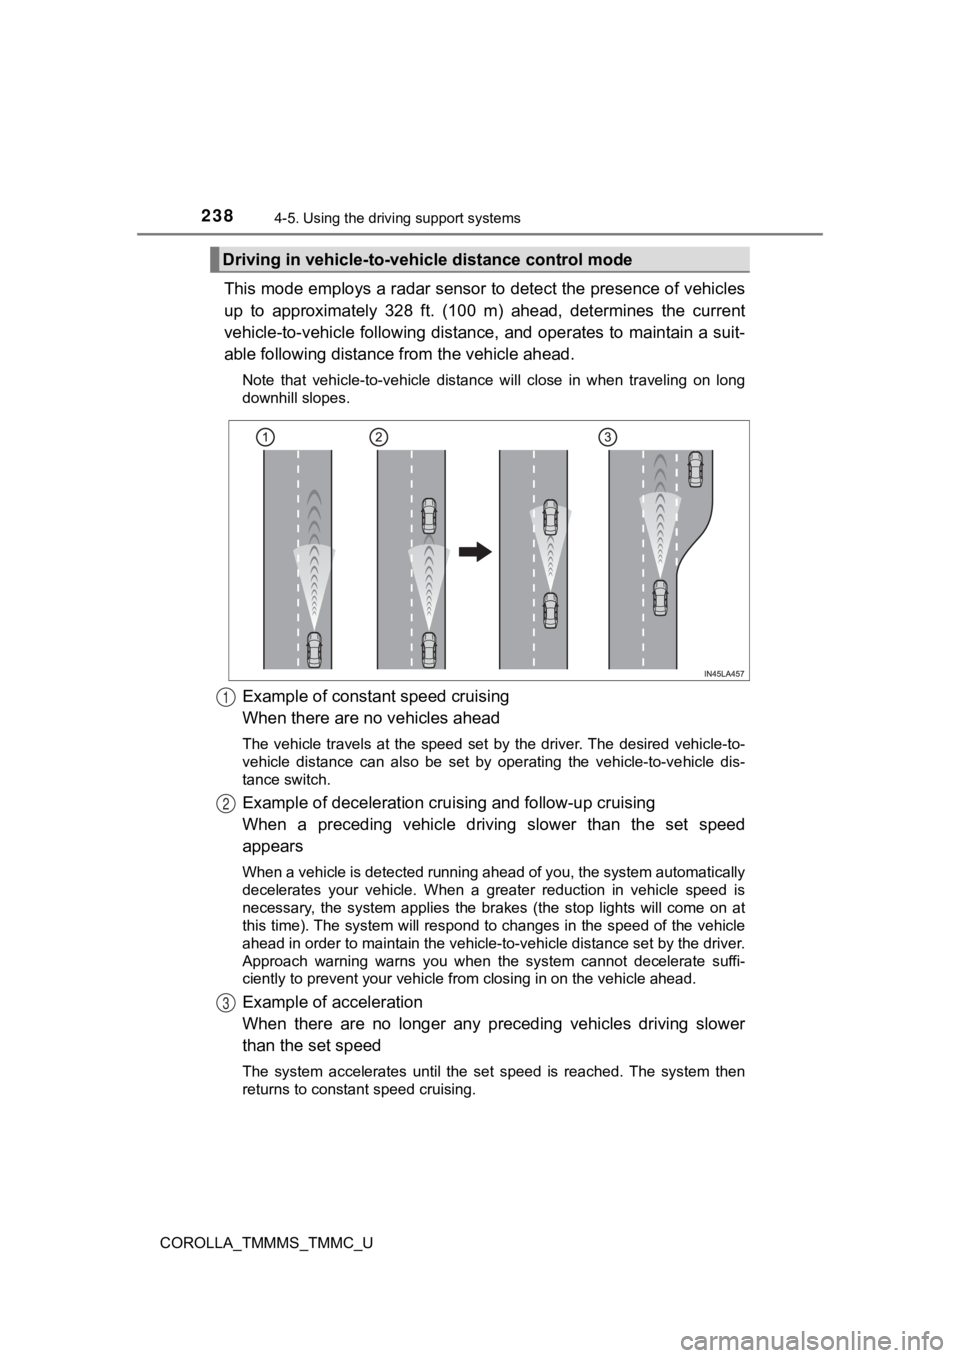
This mode employs a radar sensor to detect the presence of vehi cles
up to approximately 328 ft. (100 m) ahead, determines the curre nt
vehicle-to-vehicle following distance, and operates to maintain a suit-
able following distance from the vehicle ahead.
Note that vehicle-to-vehicle distance will close in when traveling on long
downhill slopes.
Example of constant speed cruising
When there are no vehicles ahead
The vehicle travels at the speed set by the driver. The desired vehicle-to-
vehicle distance can also be set by operating the vehicle-to-ve hicle dis-
tance switch.
Example of deceleration crui sing and follow-up cruising
When a preceding vehicle driving slower than the set speed
appears
When a vehicle is detected running ahead of you, the system automatically
decelerates your vehicle. When a greater reduction in vehicle s peed is
necessary, the system applies the brakes (the stop lights will come on at
this time). The system will respond to changes in the speed of the vehicle
ahead in order to maintain the vehicle-to-vehicle distance set by the driver.
Approach warning warns you when the system cannot decelerate su ffi-
ciently to prevent your vehicle fr om closing in on the vehicle ahead.
Example of acceleration
When there are no longer any preceding vehicles driving slower
than the set speed
The system accelerates until the set speed is reached. The syst em then
returns to constant speed cruising.
Driving in vehicle-to-vehi cle distance control mode
1
2
3
Page 240 of 608
2404-5. Using the driving support systems
COROLLA_TMMMS_TMMC_U
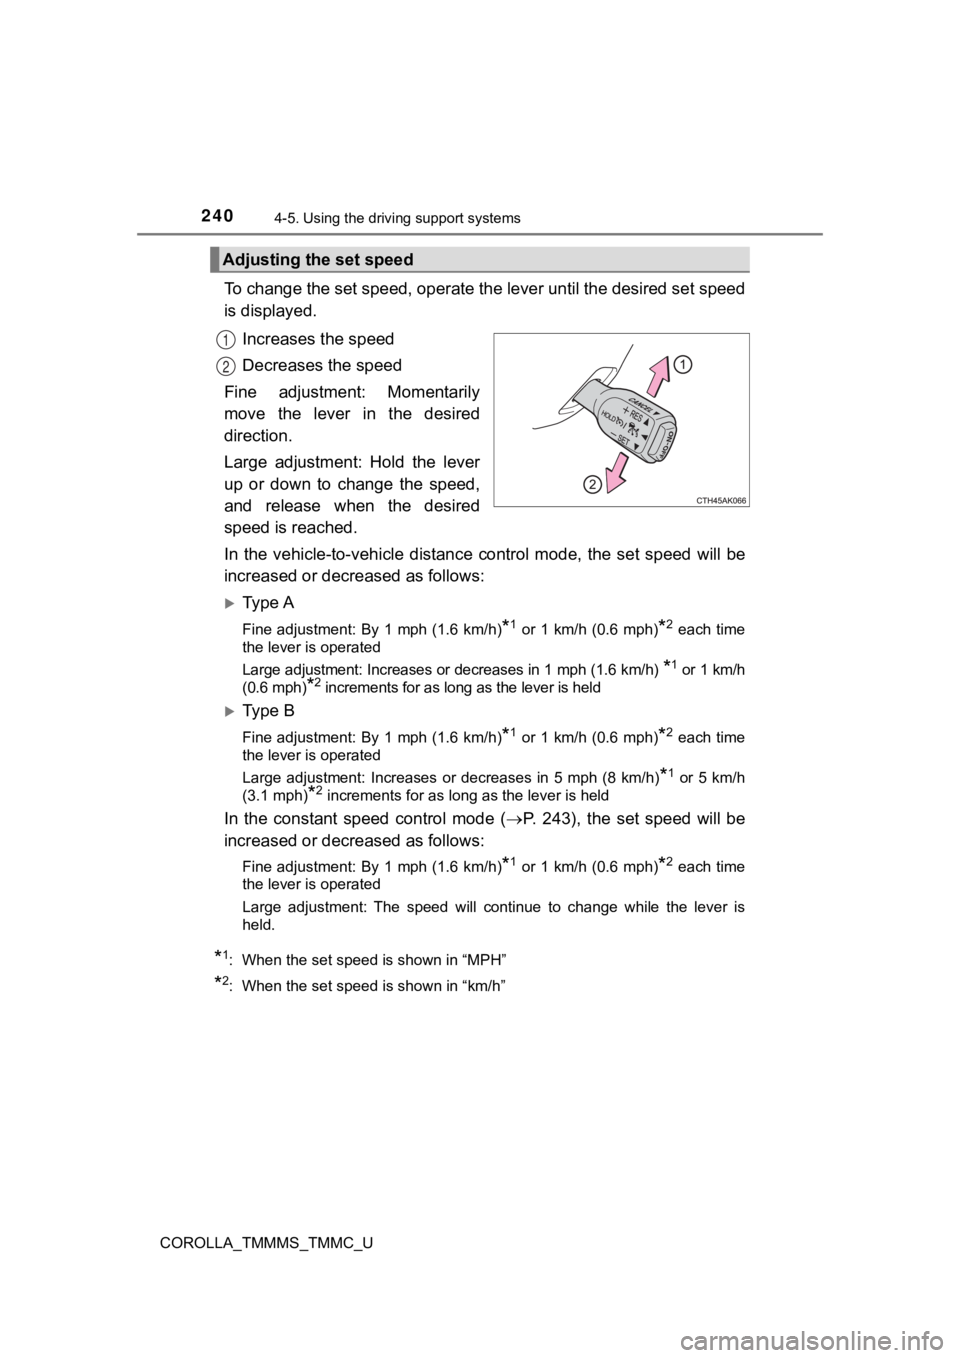
To change the set speed, operate the lever until the desired se t speed
is displayed.
Increases the speed
Decreases the speed
Fine adjustment: Momentarily
move the lever in the desired
direction.
Large adjustment: Hold the lever
up or down to change the speed,
and release when the desired
speed is reached.
In the vehicle-to-vehicle distance control mode, the set speed will be
increased or decreased as follows:
Ty p e A
Fine adjustment: By 1 mph (1.6 km/h)*1 or 1 km/h (0.6 mph)*2 each time
the lever is operated
Large adjustment: Increases or decreases in 1 mph (1.6 km/h)
*1 or 1 km/h
(0.6 mph)
*2 increments for as long as the lever is held
Ty p e B
Fine adjustment: By 1 mph (1.6 km/h)*1 or 1 km/h (0.6 mph)*2 each time
the lever is operated
Large adjustment: Increases or decreases in 5 mph (8 km/h)
*1 or 5 km/h
(3.1 mph)
*2 increments for as long as the lever is held
In the constant speed control mode ( P. 243), the set speed will be
increased or decreased as follows:
Fine adjustment: By 1 mph (1.6 km/h)*1 or 1 km/h (0.6 mph)*2 each time
the lever is operated
Large adjustment: The speed will continue to change while the l ever is
held.
*1: When the set speed is shown in “MPH”
*2: When the set speed is shown in “km/h”
Adjusting the set speed
1
2
Page 274 of 608

2745-1. Basic Operations
COROLLA_TMMMS_TMMC_U
By touching the screen with your finger, you can control Entune Audio,
etc.
■Drag*
Touch the screen with your finger, and move the screen to the
desired position.
● Scrolling the lists
■Flick*
Touch the screen with your finger and quickly move the screen b y
flicking your finger.
● Scrolling the main screen page
*: The above operations may not be performed on all screens.
■Capacitive touch switches
The control panel uses capacitive touch sensors.
●In the following cases, incorrect operation or non-response may occur.
• If the operating section is dirty or has liquid attached to it, incorrect opera- tion or non-response may occur.
• If the operating section receives electromagnetic waves, incor rect opera-
tion or non-response may occur.
• If wearing gloves during operation, non-response may occur.
• If fingernails are used to operate the system, non-response ma y occur.
• If a touch pen is used to operate the system, non-response may occur.
• If the palm of your hand touches the operating section during operation,
incorrect operation may occur.
• If the palm of your hand touches the operating section, incorr ect opera-
tion may occur.
• If operations are performed quickly, non-response may occur.
● Please do not reach your hand to the part of button when Entune Audio turn
on. Because the button may become unresponsive for a while. But it will be
back to normal for a given time even if Entune Audio turned on under the
condition.
■ When using the touch screen
●If the screen is cold, the display may be dark, or the system may seem to be
operating slightly slower than normal.
● The screen may seem dark and hard to see when viewed through su n-
glasses. Change your angle of viewing, adjust the display on th e “Display
Settings” screen ( P. 282) or remove your sunglasses.
● Flick operations may not be performed smoothly in high altitude s.
Operating the touch screen
Page 284 of 608
284
COROLLA_TMMMS_TMMC_U
5-3. Using Entune Audio
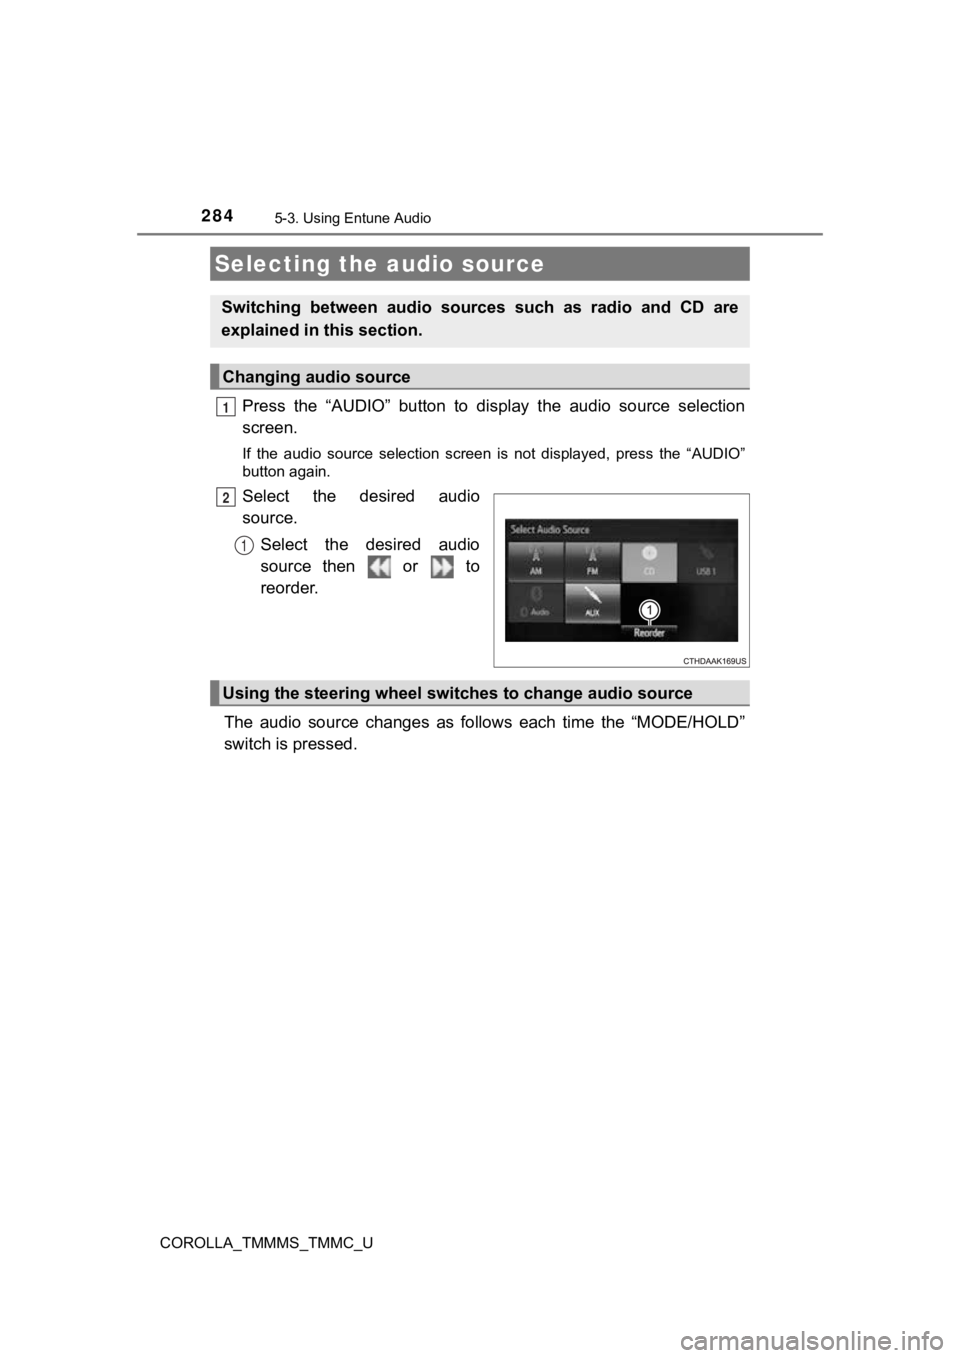
Press the “AUDIO” button to display the audio source selection
screen.
If the audio source selection screen is not displayed, press the “AUDIO”
button again.
Select the desired audio
source.
Select the desired audio
source then or to
reorder.
The audio source changes as follows each time the “MODE/HOLD”
switch is pressed.
Selecting the audio source
Switching between audio sources such as radio and CD are
explained in t his section.
Changing audio source
1
2
1
Using the steering wheel switches to change audio source
Page 289 of 608

2895-4. Using the radio
5
Audio system
COROLLA_TMMMS_TMMC_U
Search for desired stations by turning the “TUNE·SCROLL” knob or
pressing the “ ” or “” button on “SEEK·TRACK”.
Select “(add new)”.
To change the preset station to a different one, select and hol d the preset
station.
Select “Yes”.
Select “OK” after setting the new preset station.
■Refreshing the station list
Select “Refresh” on the “Station List” screen.
To cancel the refresh, select “Cancel Refresh”.
■Reception sensitivity
●Maintaining perfect radio reception at all times is difficult d ue to the continu-
ally changing position of the antenna, differences in signal strength and sur-
rounding objects, such as trains, transmitters, etc.
● The radio antenna is mounted inside the rear window. To maintai n clear
radio reception, do not attach metallic window tinting or other metallic
objects to the antenna wire mounted inside the rear window.
Setting station presets
1
2
3
4
1