light TOYOTA COROLLA HATCHBACK 2022 (in English) Service Manual
[x] Cancel search | Manufacturer: TOYOTA, Model Year: 2022, Model line: COROLLA HATCHBACK, Model: TOYOTA COROLLA HATCHBACK 2022Pages: 758, PDF Size: 155.26 MB
Page 104 of 758
1022-1. Instrument cluster
be updated.
When refueling, turn the engine switch
off. If the vehicle is refueled without
turning the engine switch off, the dis-
play may not be updated.
The average fuel economy display
can be changed in . ( P.104)
Average fuel economy (after
start)
Displays the average fuel consumption
since engine start.
Average fuel economy (after
refuel)
Displays the average fuel consumption
since the vehicle was refueled.
■Eco Driving Indicator/Driving
range (if equipped)
Eco Driving Indicator
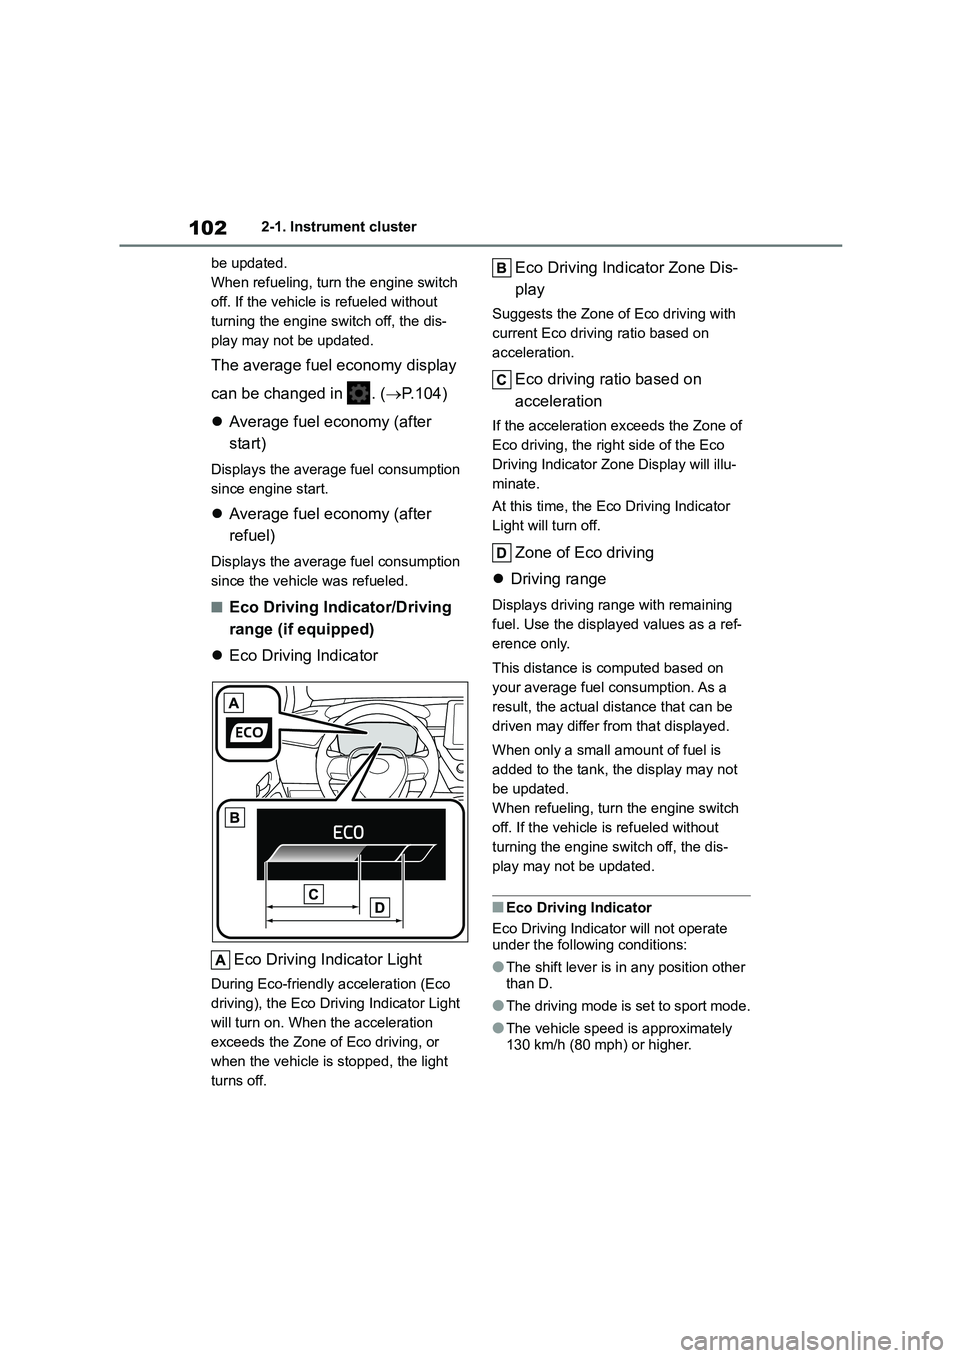
Eco Driving Indicator Light
During Eco-friendly acceleration (Eco
driving), the Eco Driving Indicator Light
will turn on. When the acceleration
exceeds the Zone of Eco driving, or
when the vehicle is stopped, the light
turns off.
Eco Driving Indicator Zone Dis-
play
Suggests the Zone of Eco driving with
current Eco driving ratio based on
acceleration.
Eco driving ratio based on
acceleration
If the acceleration exceeds the Zone of
Eco driving, the right side of the Eco
Driving Indicator Zone Display will illu-
minate.
At this time, the Eco Driving Indicator
Light will turn off.
Zone of Eco driving
Driving range
Displays driving range with remaining
fuel. Use the displayed values as a ref-
erence only.
This distance is computed based on
your average fuel consumption. As a
result, the actual distance that can be
driven may differ from that displayed.
When only a small amount of fuel is
added to the tank, the display may not
be updated.
When refueling, turn the engine switch
off. If the vehicle is refueled without
turning the engine switch off, the dis-
play may not be updated.
■Eco Driving Indicator
Eco Driving Indicator will not operate
under the following conditions:
●The shift lever is in any position other
than D.
●The driving mode is set to sport mode.
●The vehicle speed is approximately 130 km/h (80 mph) or higher.
Page 106 of 758
1042-1. Instrument cluster
• Average vehicle speed: Displays the
average vehicle speed since the dis-
play was reset*
*: To reset, display the desired item and
press and hold the meter control
switch.
■Meter display settings that can
be changed
Clock setting (vehicles without
navigation/multimedia system)
P.91, 97
Language
Select to change the language dis-
played.
Units
Select to change the units of measure
displayed.
Speedometer display (7-inch dis-
play)
Select to set the display of the speed-
ometer to analog/digital/digital+ (if
equipped).
Eco Driving Indicator Light (if
equipped)
Select to enable/disable the Eco Driv-
ing Indicator Light.
• Fuel economy display
Select to change the average fuel con-
sumption display between after
start/after reset. ( P.101)
(if equipped)
Select to display/not display the audio
system linked display.
Select to change the displayed content
of the following:
• Drive information type
Select to change the drive information
type display between after start/after
reset.
• Drive information items
Select to set the first and second items
of the drive information display to any of
the following: average vehicle
speed/distance/elapsed time.
Pop-up display
Select to enable/disable pop-up dis-
plays for each relevant system.
Multi-information display off
(when analog/digital speedome-
ter is displayed)
Select to turn the multi-information dis-
play off.
To turn the multi-information display on
again, press any of the following meter
control sw itches
//// /.
Analog clock (when digital+
speedometer is displayed) (if
equipped)
Display the analog clock.
To turn the multi-information display on
again, press any of the following meter
control sw itches
//// /.
Default setting
Select to reset the meter display set-
tings to the default setting.
Settings display
Page 113 of 758
111
2
2-1. Instrument cluster
Vehicle status information and indicators
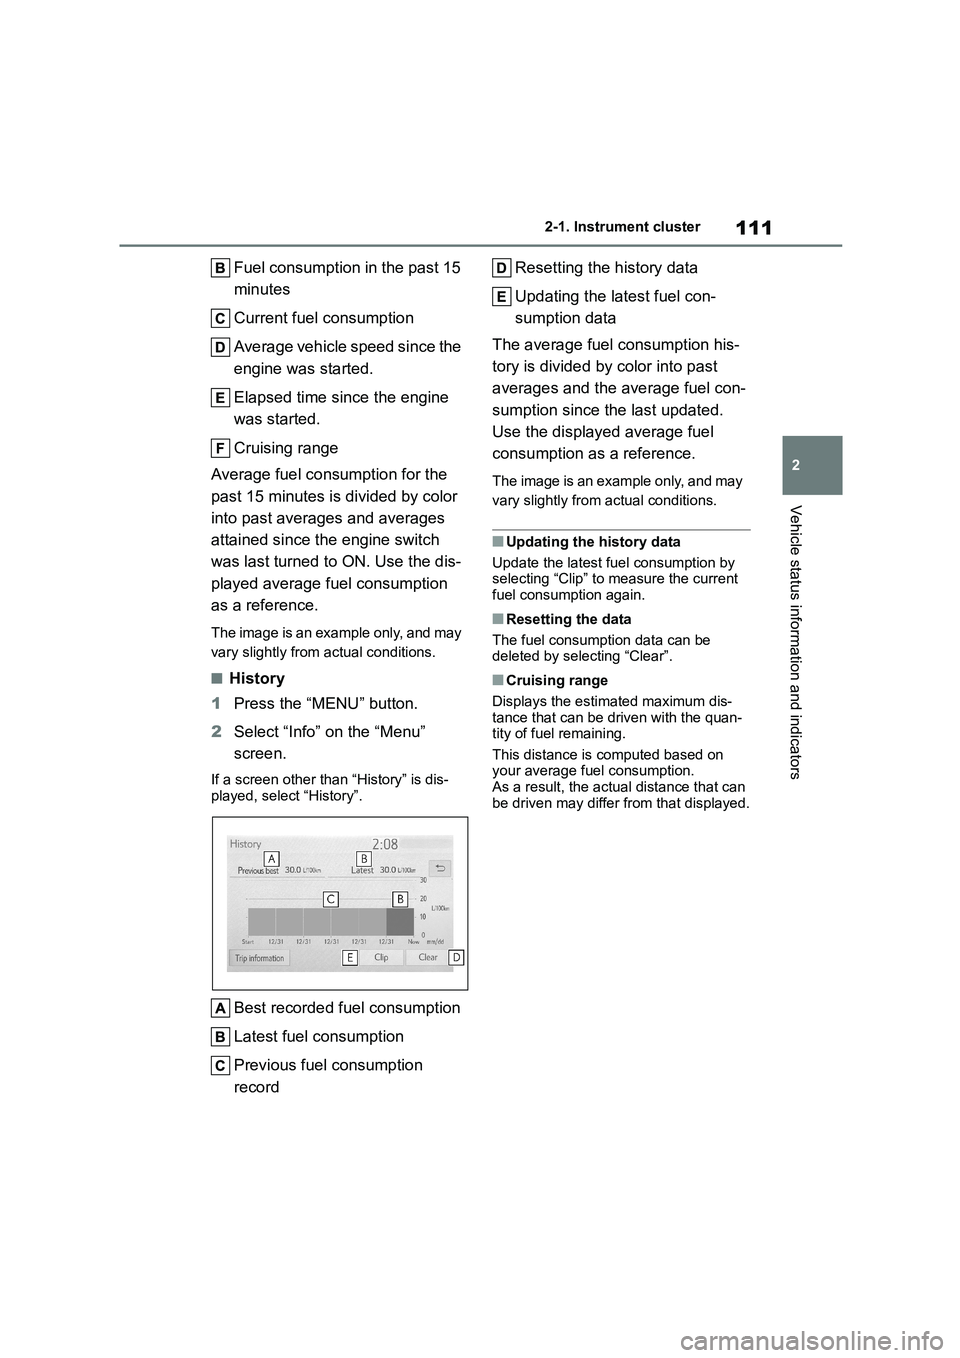
Fuel consumption in the past 15
minutes
Current fuel consumption
Average vehicle speed since the
engine was started.
Elapsed time since the engine
was started.
Cruising range
Average fuel consumption for the
past 15 minutes is divided by color
into past averages and averages
attained since the engine switch
was last turned to ON. Use the dis-
played average fuel consumption
as a reference.
The image is an example only, and may
vary slightly from actual conditions.
■History
1 Press the “MENU” button.
2 Select “Info” on the “Menu”
screen.
If a screen other than “History” is dis-
played, select “History”.
Best recorded fuel consumption
Latest fuel consumption
Previous fuel consumption
record
Resetting the history data
Updating the latest fuel con-
sumption data
The average fuel consumption his-
tory is divided by color into past
averages and the average fuel con-
sumption since the last updated.
Use the displayed average fuel
consumption as a reference.
The image is an example only, and may
vary slightly from actual conditions.
■Updating the history data
Update the latest fuel consumption by
selecting “Clip” to measure the current
fuel consumption again.
■Resetting the data
The fuel consumption data can be deleted by selecting “Clear”.
■Cruising range
Displays the estimated maximum dis-
tance that can be driven with the quan- tity of fuel remaining.
This distance is computed based on
your average fuel consumption. As a result, the actual distance that can
be driven may differ from that displayed.
Page 122 of 758
1203-2. Opening, closing and locking the doors
any authorized Toyota retailer or
Toyota authorized repairer, or any
reliable repairer.
*2: If equipped
■Key
Turning the key operates the doors
as follows:
Vehicles without a smart entry &
start system
1 Unlocks all the doors
Turn and hold to open the win-
dows*1and panoramic moon roof.*1, 2
2 Locks all the doors
Turn and hold to close the win-
dows*1and panoramic moon roof.*1, 2
*1: This setting must be customized at
any authorized Toyota retailer or
Toyota authorized repairer, or any
reliable repairer.
*2: If equipped
Vehicles with a smart entry &
start system
The doors can also be locked and
unlocked with the mechanical key.
( P.555)
■Switching the door unlock function
(vehicles with a smart entry & start
system)
It is possible to set which doors the entry
function unlocks using the wireless
remote control.
1 Turn the engine switch off.
2 When the indicator light on the key
surface is not on, press and hold
or (if equipped) for approxi-
mately 5 seconds while pressing and
holding .
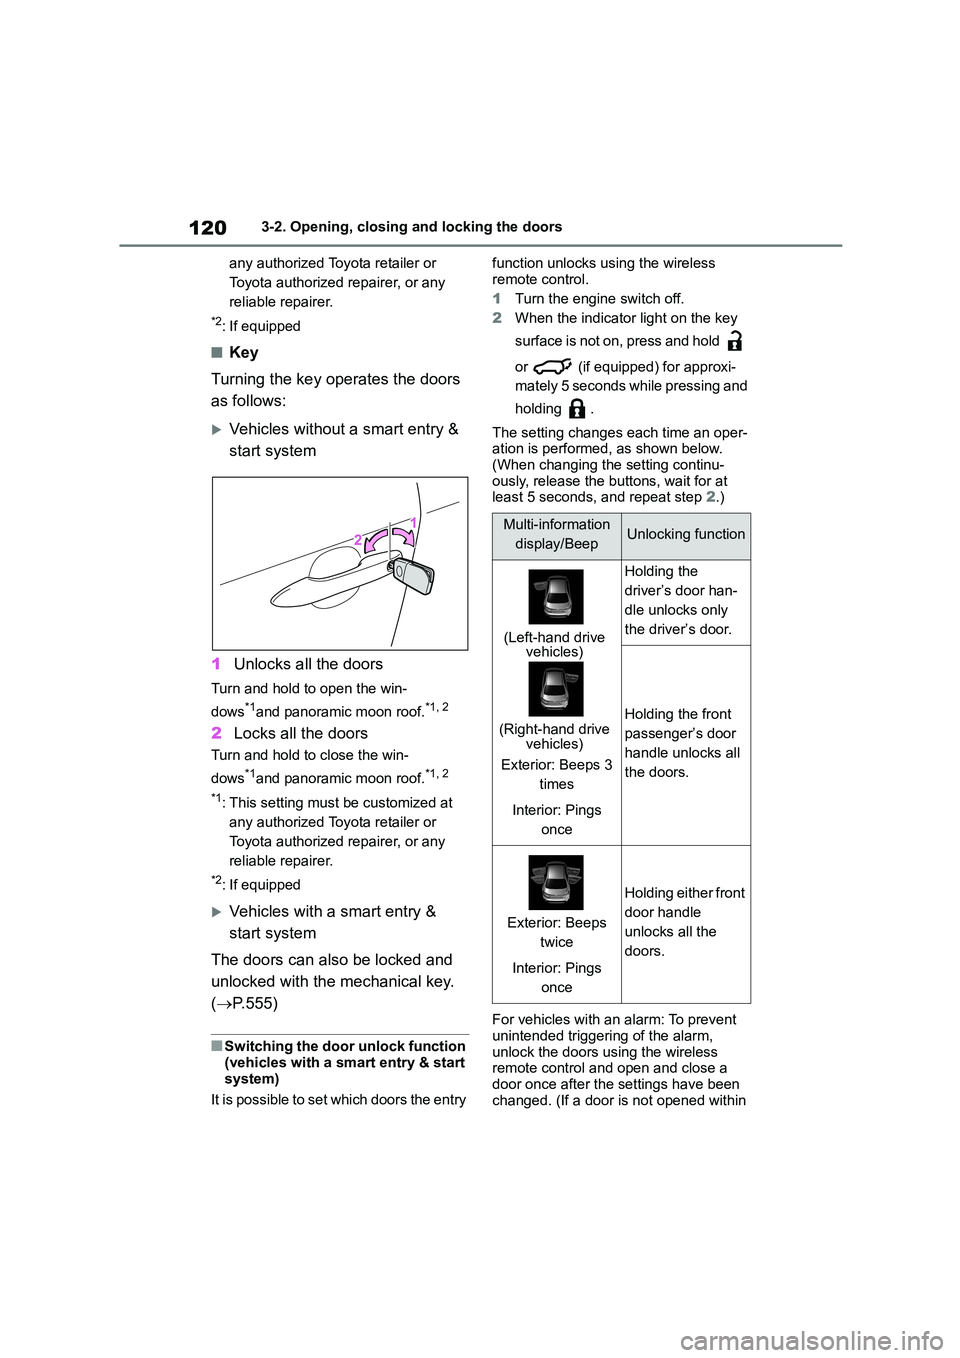
The setting changes each time an oper-
ation is performed, as shown below. (When changing the setting continu-
ously, release the buttons, wait for at
least 5 seconds, and repeat step 2.)
For vehicles with an alarm: To prevent
unintended triggering of the alarm, unlock the doors using the wireless
remote control and open and close a
door once after the settings have been changed. (If a door is not opened within
Multi-information
display/BeepUnlocking function
(Left-hand drive vehicles)
(Right-hand drive vehicles)
Exterior: Beeps 3
times
Interior: Pings
once
Holding the
driver’s door han-
dle unlocks only
the driver’s door.
Holding the front
passenger’s door
handle unlocks all
the doors.
Exterior: Beeps
twice
Interior: Pings
once
Holding either front
door handle
unlocks all the
doors.
Page 127 of 758
125
3
3-2. Opening, closing and locking the doors
Before driving
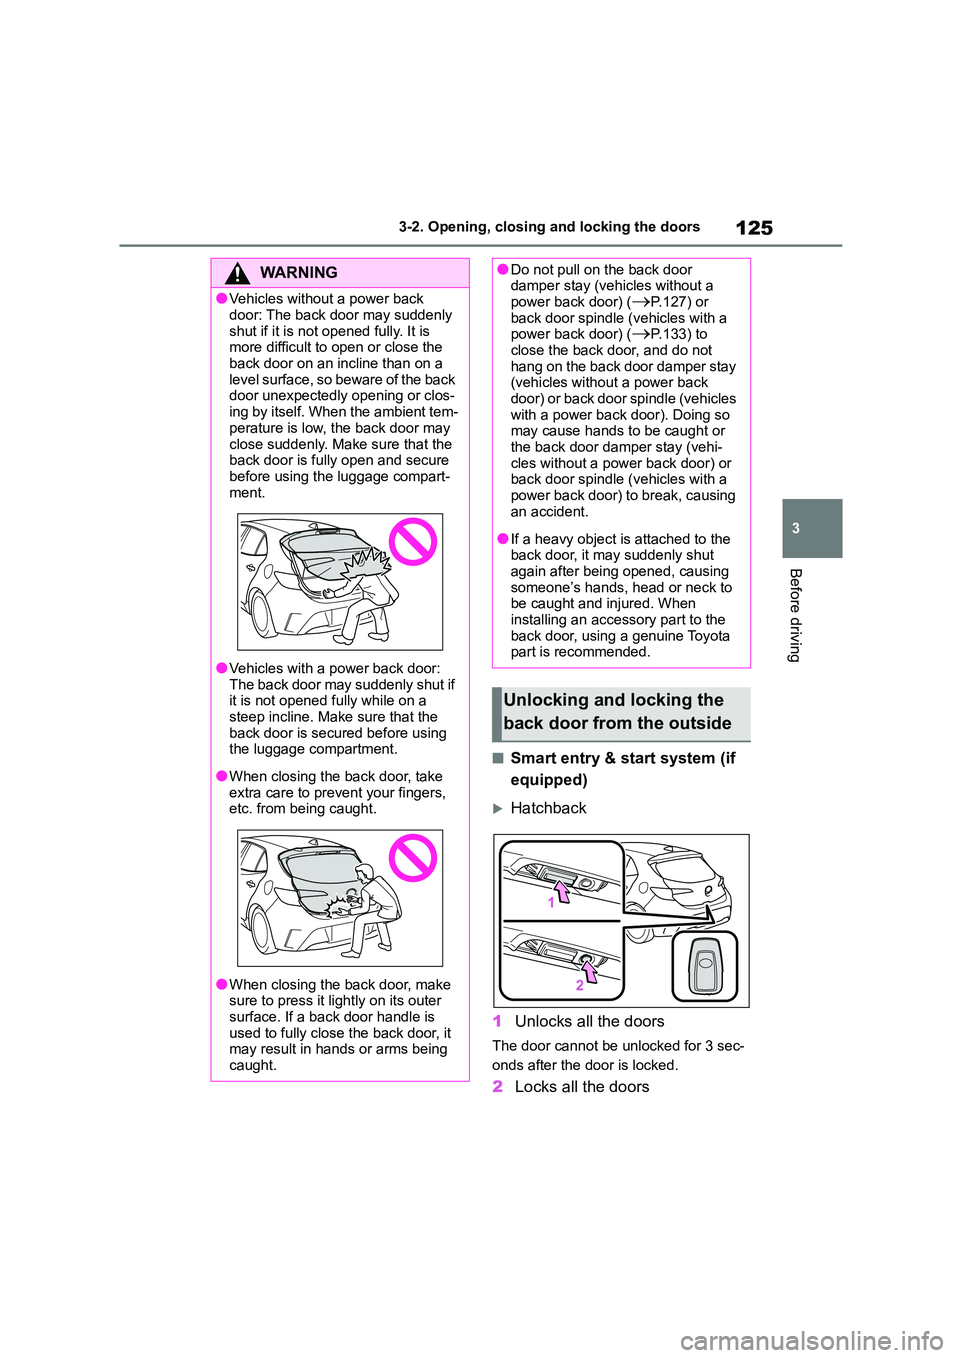
■Smart entry & start system (if
equipped)
Hatchback
1 Unlocks all the doors
The door cannot be unlocked for 3 sec-
onds after the door is locked.
2 Locks all the doors
WA R N I N G
●Vehicles without a power back
door: The back door may suddenly
shut if it is not opened fully. It is more difficult to open or close the
back door on an incline than on a
level surface, so beware of the back door unexpectedly opening or clos-
ing by itself. When the ambient tem-
perature is low, the back door may
close suddenly. Make sure that the back door is fully open and secure
before using the luggage compart-
ment.
●Vehicles with a power back door:
The back door may suddenly shut if it is not opened fully while on a
steep incline. Make sure that the
back door is secured before using the luggage compartment.
●When closing the back door, take extra care to prevent your fingers,
etc. from being caught.
●When closing the back door, make
sure to press it lightly on its outer
surface. If a back door handle is used to fully close the back door, it
may result in hands or arms being
caught.
●Do not pull on the back door damper stay (vehicles without a
power back door) (P.127) or
back door spindle (vehicles with a power back door) (P.133) to
close the back door, and do not
hang on the back door damper stay (vehicles without a power back
door) or back door spindle (vehicles
with a power back door). Doing so may cause hands to be caught or
the back door damper stay (vehi-
cles without a power back door) or back door spindle (vehicles with a
power back door) to break, causing
an accident.
●If a heavy object is attached to the
back door, it may suddenly shut again after being opened, causing
someone’s hands, head or neck to
be caught and injured. When installing an accessory part to the
back door, using a genuine Toyota
part is recommended.
Unlocking and locking the
back door from the outside
Page 129 of 758
127
3
3-2. Opening, closing and locking the doors
Before driving
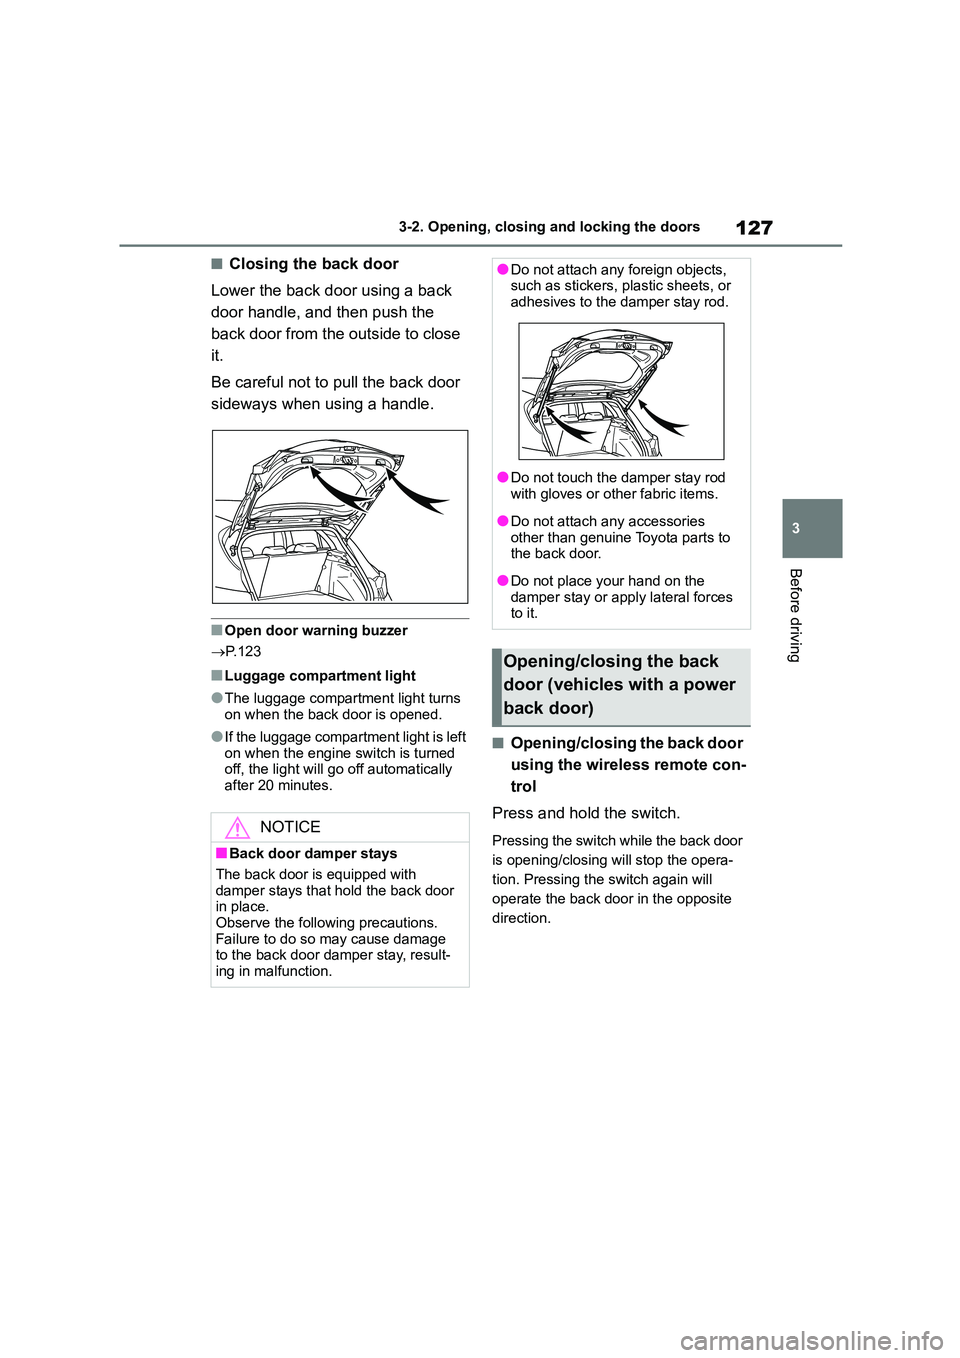
■Closing the back door
Lower the back door using a back
door handle, and then push the
back door from the outside to close
it.
Be careful not to pull the back door
sideways when using a handle.
■Open door warning buzzer
P.123
■Luggage compartment light
●The luggage compartment light turns
on when the back door is opened.
●If the luggage compartment light is left
on when the engine switch is turned
off, the light will go off automatically after 20 minutes.
■Opening/closing the back door
using the wireless remote con-
trol
Press and hold the switch.
Pressing the switch while the back door
is opening/closing will stop the opera-
tion. Pressing the switch again will
operate the back door in the opposite
direction.
NOTICE
■Back door damper stays
The back door is equipped with
damper stays that hold the back door in place.
Observe the following precautions.
Failure to do so may cause damage to the back door damper stay, result-
ing in malfunction.
●Do not attach any foreign objects, such as stickers, plastic sheets, or
adhesives to the damper stay rod.
●Do not touch the damper stay rod
with gloves or other fabric items.
●Do not attach any accessories
other than genuine Toyota parts to
the back door.
●Do not place your hand on the
damper stay or apply lateral forces to it.
Opening/closing the back
door (vehicles with a power
back door)
Page 131 of 758
129
3
3-2. Opening, closing and locking the doors
Before driving
have been locked. If the switch is
pressed while the power back door is
closing, the operation will stop.
■Closing the back door using
the back door handle
Lower the back door using the back
door handle, then a buzzer sounds
and the back door automatically
closes.
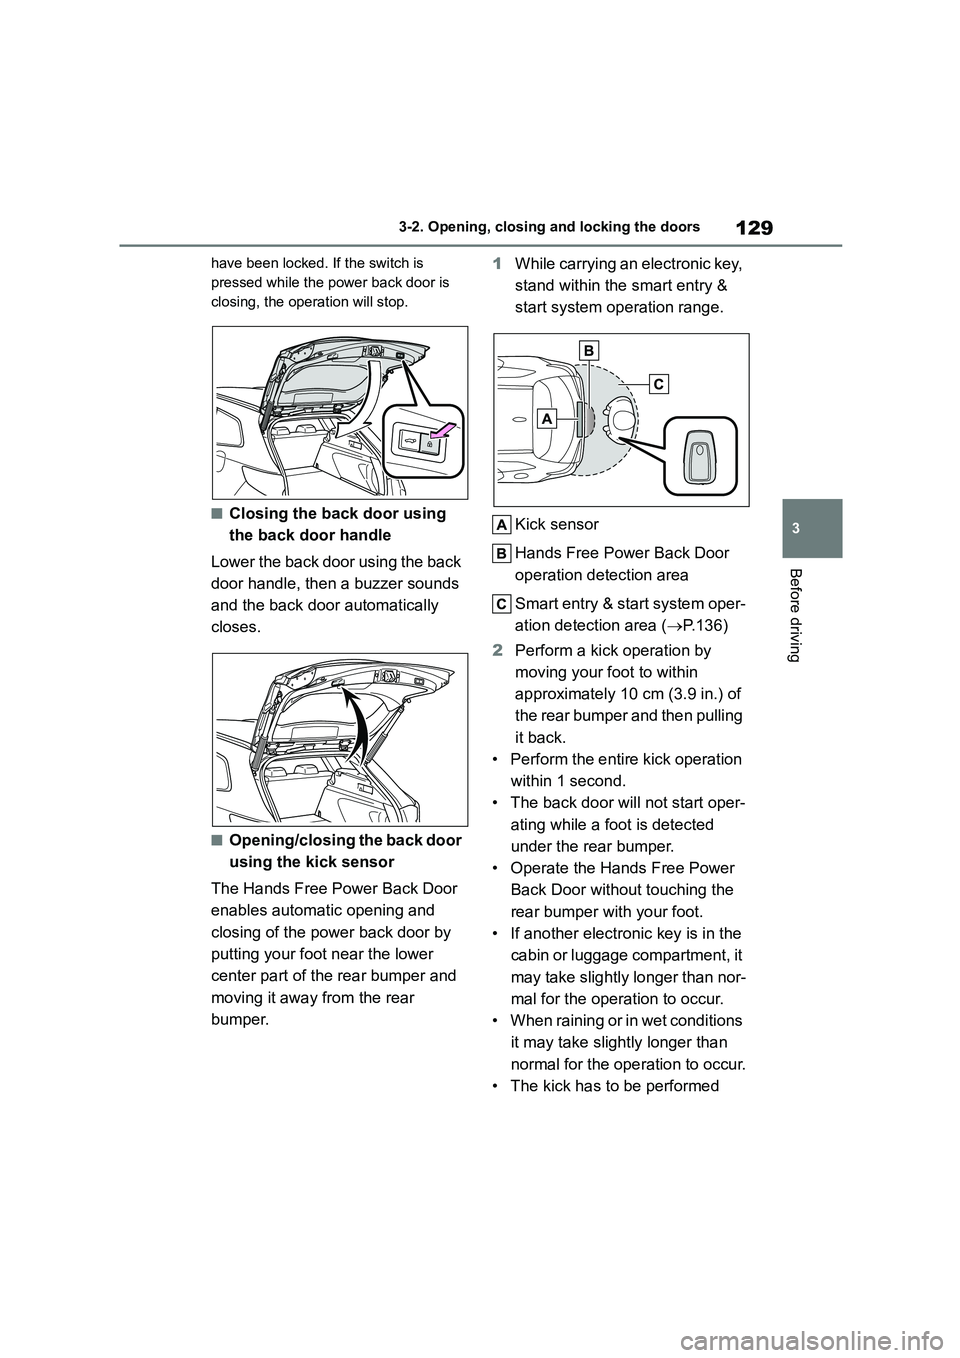
■Opening/closing the back door
using the kick sensor
The Hands Free Power Back Door
enables automatic opening and
closing of the power back door by
putting your foot near the lower
center part of the rear bumper and
moving it away from the rear
bumper.
1 While carrying an electronic key,
stand within the smart entry &
start system operation range.
Kick sensor
Hands Free Power Back Door
operation detection area
Smart entry & start system oper-
ation detection area ( P.136)
2 Perform a kick operation by
moving your foot to within
approximately 10 cm (3.9 in.) of
the rear bu mper and then pulling
it back.
• Perform the entire kick operation
within 1 second.
• The back door will not start oper-
ating while a foot is detected
under the rear bumper.
• Operate the Hands Free Power
Back Door without touching the
rear bumper with your foot.
• If another electronic key is in the
cabin or luggage compartment, it
may take slightly longer than nor-
mal for the operation to occur.
• When raining or in wet conditions
it may take slightly longer than
normal for the operation to occur.
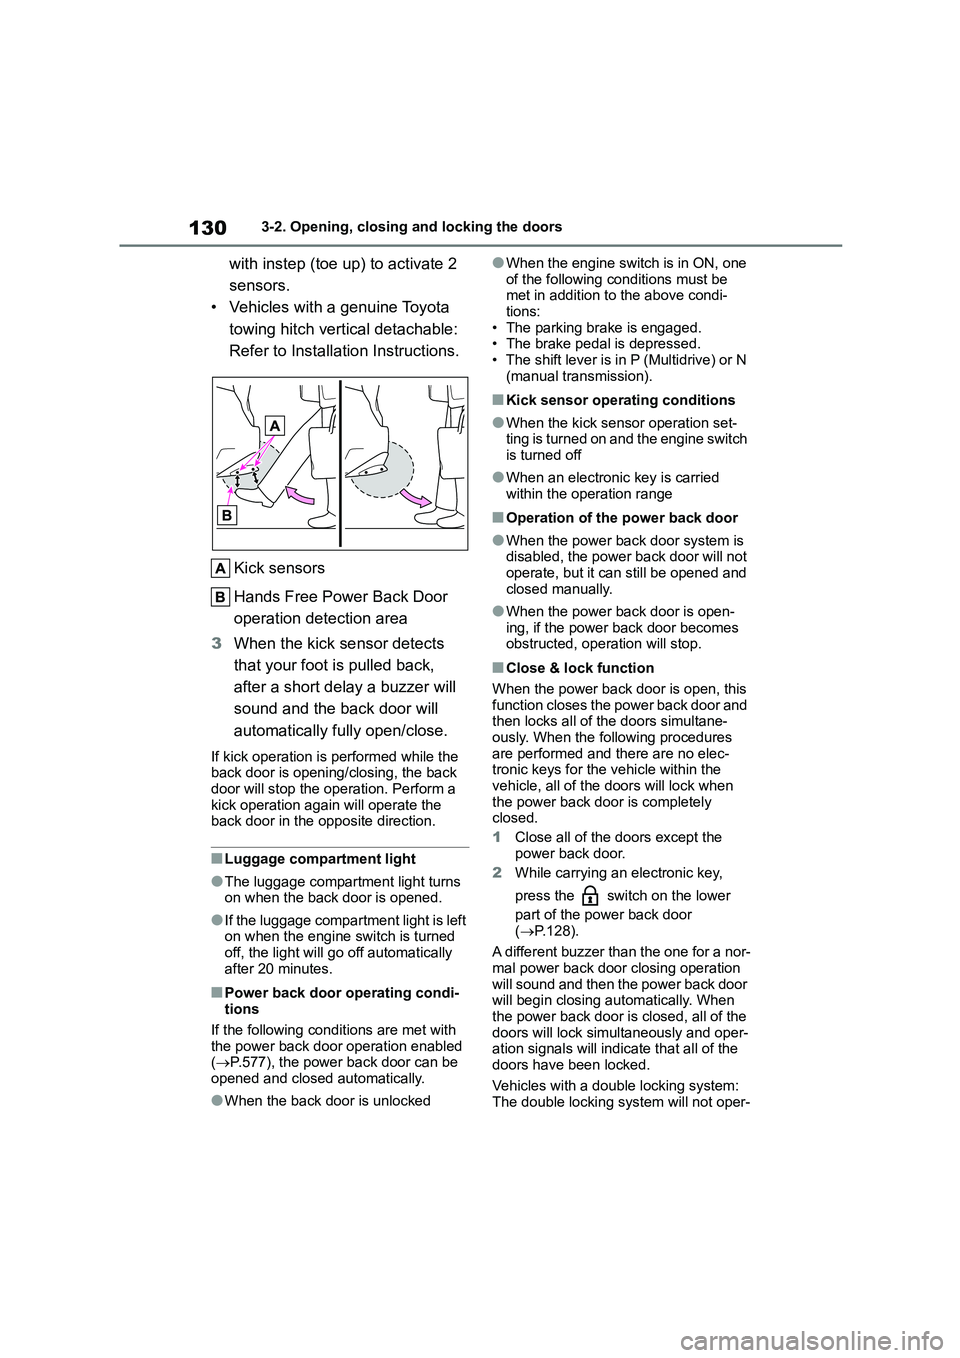
• The kick has to be performed
Page 132 of 758
1303-2. Opening, closing and locking the doors
with instep (toe up) to activate 2
sensors.
• Vehicles with a genuine Toyota
towing hitch vertical detachable:
Refer to Installation Instructions.
Kick sensors
Hands Free Power Back Door
operation detection area
3 When the kick sensor detects
that your foot is pulled back,
after a short delay a buzzer will
sound and the back door will
automatically fully open/close.
If kick operation is performed while the
back door is opening/closing, the back door will stop the operation. Perform a
kick operation again will operate the
back door in the opposite direction.
■Luggage compartment light
●The luggage compartment light turns
on when the back door is opened.
●If the luggage compartment light is left
on when the engine switch is turned off, the light will go off automatically
after 20 minutes.
■Power back door operating condi-
tions
If the following conditions are met with
the power back door operation enabled
( P.577), the power back door can be opened and closed automatically.
●When the back door is unlocked
●When the engine switch is in ON, one
of the following conditions must be met in addition to the above condi-
tions:
• The parking brake is engaged. • The brake pedal is depressed.
• The shift lever is in P (Multidrive) or N
(manual transmission).
■Kick sensor operating conditions
●When the kick sensor operation set-
ting is turned on and the engine switch is turned off
●When an electronic key is carried within the operation range
■Operation of the power back door
●When the power back door system is disabled, the power back door will not
operate, but it can still be opened and
closed manually.
●When the power back door is open-
ing, if the power back door becomes obstructed, operation will stop.
■Close & lock function
When the power back door is open, this
function closes the power back door and then locks all of the doors simultane-
ously. When the following procedures
are performed and there are no elec- tronic keys for the vehicle within the
vehicle, all of the doors will lock when
the power back door is completely closed.
1 Close all of the doors except the
power back door.
2 While carrying an electronic key,
press the switch on the lower
part of the power back door
( P.128).
A different buzzer than the one for a nor-
mal power back door closing operation will sound and then the power back door
will begin closing automatically. When
the power back door is closed, all of the doors will lock simultaneously and oper-
ation signals will indicate that all of the
doors have been locked.
Vehicles with a double locking system:
The double locking syst em will not oper-
Page 133 of 758
131
3
3-2. Opening, closing and locking the doors
Before driving
ate at this time.
■Situations in which the close & lock
function may not operate properly
In the following situations, the close &
lock function may not operate properly:
●If the switch on the lower part of
the power back door ( P.128) is
pressed by a hand which is holding an electronic key
●If the switch on the lower part of
the power back door ( P.128) is
pressed when the electronic key is in
a bag, etc. that is placed on the ground
●If the switch on the lower part of
the power back door ( P.128) is
pressed when the electronic key is not
near the vehicle.
■Preventing unintentional operation of the kick sensor
When an electronic key is in the opera-
tion detection area, the kick sensor may operate unintentionally, so be careful in
the following situations:
●When a large amount of water is
applied to the lower center part of the
rear bumper, such as when the vehi- cle is being washed or in heavy rain
●When dirt is wiped off the lower center part of the rear bumper
●When a small animal or small object,
such as a ball, moves under the lower center part of the rear bumper
●When an object is moved from under the lower center part of the rear
bumper
●If someone is swinging their legs while
sitting on the rear bumper
●If the legs or another part of some-
one’s body contacts the lower center
part of the rear bumper while passing by the vehicle
●When the vehicle is parked near an electrical noise source which affects
the sensitivity of the kick sensor, such
as a pay parking spot, gas station,
electrically heated road, or fluorescent light
●When the vehicle is near a TV tower, electric power plant, radio station,
large display, airport or other facility
that generates strong radio waves or electrical noise
●When the vehicle is parked in a place where objects such as plants are near
the lower center part of the rear
bumper
●If luggage, etc. is set near the lower
center part of the rear bumper
●If accessories or a vehicle cover is
installed/removed near the rear bumper
●When the vehicle is being towed
To prevent unintentional operation, turn
the kick sensor operation setting off.
■Situations in which the kick sensor
may not operate properly
In the following situations, the kick sen-
sor may not operate properly:
●When a foot remains under the lower
center part of the rear bumper
●If the lower center part of the rear
bumper is strongly hit with a foot or is
touched for a while If the lower center part of the rear
bumper has been touched for a while,
wait for a short time before attempting to operate the kick sensor again.
●When standing exce ssively close to the lower center part of the rear
bumper
●When an external radio wave source
interferes with the communication
between the electronic key and the
vehicle ( P.138)
●When the vehicle is parked near an
electrical noise source which affects the sensitivity of the kick sensor, such
as a pay parking spot, gas station,
electrically heated road, or fluorescent light
●When the vehicle is near a TV tower,
Page 141 of 758
139
3
3-2. Opening, closing and locking the doors
Before driving
• The electronic key is on the instru-
ment panel, luggage cover or floor, or in the door pockets or glove box when
the engine is started or engine switch
modes are changed.
●Do not leave the electronic key on top
of the instrument panel or near the door pockets when exiting the vehicle.
Depending on the radio wave recep-
tion conditions, it may be detected by the antenna outside the cabin and the
door will become lockable from the
outside, possibly trapping the elec- tronic key inside the vehicle.
●As long as the electronic key is within the effective range, the doors may be
locked or unlocked by anyone. How-
ever, only the doors detecting the electronic key can be used to unlock
the vehicle.
●Even if the electronic key is not inside
the vehicle, it may be possible to start
the engine if the electronic key is near the window.
●The doors may unlock or lock if a large amount of water splashes on the
door handle, such as in the rain or in a
car wash when the electronic key is within the effective range. (The doors
will automatically be locked after
approximately 30 seconds if the doors are not opened and closed.)
●If the wireless remote control is used to lock the doors when the electronic
key is near the vehicle, there is a pos-
sibility that the door may not be unlocked by the entry function. (Use
the wireless remote control to unlock
the doors.)
●Touching the door lock or unlock sen-
sor while wearing gloves may prevent
lock or unlock operation.
●Some models: When the lock opera-
tion is performed using the lock sen- sor, recognition signals will be shown
up to two consecutive times. After
this, no recognition signals will be given.
●If the door handle becomes wet while
the electronic key is within the effec-
tive range, the door may lock and unlock repeatedly. In that case, follow
the following correction procedures to
wash the vehicle: • Place the electronic key in a location 2
m (6 ft.) or more away from the vehi-
cle. (Take care to ensure that the key is not stolen.)
• Set the electronic key to battery-sav-
ing mode to disable the smart entry & start system. ( P.138)
●If the electronic key is inside the vehi- cle and a door handle becomes wet
during a car wash, a message may be
shown on the multi-information dis- play and a buzzer will sound outside
the vehicle. To turn off the alarm, lock
all the doors.
●The lock sensor may not work prop-
erly if it comes into contact with ice, snow, mud, etc. Clean the lock sensor
and attempt to operate it again.
●A sudden handle operation or a han-
dle operation immediately after enter-
ing the effective range may prevent the doors from being unlocked. Touch
the door unlock sensor and check that
the doors are unlocked before pulling the door handle again.
●If there is another electronic key in the detection area, it may take slightly
longer to unlock the doors after the
door handle is gripped.
■When the vehicle is not driven for extended periods
●To prevent theft of the vehicle, do not leave the electronic key within 2 m (6
ft.) of the vehicle.
●The smart entry & start system can be
deactivated in advance. ( P.577)
●Setting the electronic key to bat- tery-saving mode helps to reduce key
battery depletion. ( P.138)
■To operate the system properly
Make sure to carry the electronic key when operating the system. Do not get
the electronic key too close to the vehi-
cle when operating the system from the