check engine light TOYOTA COROLLA HATCHBACK 2022 Owners Manual (in English)
[x] Cancel search | Manufacturer: TOYOTA, Model Year: 2022, Model line: COROLLA HATCHBACK, Model: TOYOTA COROLLA HATCHBACK 2022Pages: 758, PDF Size: 155.26 MB
Page 6 of 758
4TABLE OF CONTENTS
5-6. Using Bluetooth® devices
Bluetooth® audio/phone...... 391
Using the steering wheel
switches ............................ 396
Register a Bluetooth® device
.......................................... 396
5-7. “SETUP” menu
Using the “SETUP” menu
(“Bluetooth” menu)............ 398
Using the “SETUP” menu (“TEL”
menu) ............................... 400
5-8. Bluetooth® Audio
Operating a Bluetooth® enabled
portable player .................. 404
5-9. Bluetooth® Phone
Making a phone call ............ 406
When receiving a phone call
.......................................... 407
Speaking on the phone ....... 407
5-10. Bluetooth®
Bluetooth®.......................... 409
6-1. Using the air conditioning
system and defogger
Manual air conditioning system
.......................................... 422
Automatic air conditioning sys-
tem.................................... 427
Heated steering wheel/seat
heaters.............................. 434
6-2. Using the interior lights
Interior lights list .................. 436
6-3. Using the storage features
List of storage features ....... 439
Luggage compartment features
.......................................... 442
6-4. Other interior features
Other interior features ......... 451
7-1. Maintenance and care
Cleaning and protecting the
vehicle exterior ................. 460
Cleaning and protecting the
vehicle interior .................. 463
7-2. Maintenance
Maintenance requirements
.......................................... 466
7-3. Do-it-yourself maintenance
Do-it-yourself service precau-
tions .................................. 468
Hood ................................... 470
Positioning a floor jack ........ 471
Engine compartment........... 472
Tires .................................... 479
Tire inflation pressure ......... 485
Wheels ................................ 487
Air conditioning filter ........... 489
Wireless remote control/elec-
tronic key battery .............. 490
Checking and replacing fuses
.......................................... 494
Light bulbs .......................... 497
8-1. Essential information
Emergency flashers ............ 502
If your vehicle has to be stopped
in an emergency ............... 502
6Interior features
7Maintenance and care
8When trouble arises
Page 14 of 758
12Pictorial index
Fuel filler door ................................................................................ P.211
Refueling method .............................................................................P.212
Fuel type/fuel tank capacity .............................................................P.568
Tires ................................................................................................P.479
Tire size/inflation pressure ...............................................................P.573
Winter tires/tire chains .....................................................................P.363
Checking/rotation/tire pressure warning system*2...........................P.479
Coping with flat tires.................................................................P.522, 539
Hood ................................................................................................P.470
Opening ...........................................................................................P.470
Engine oil .........................................................................................P.569
Coping with overheating ..................................................................P.560
Headlights/front position lights/daytime running lights/turn signal
lightsP.189, 195
Front fog lights*2............................................................................P.205
Stop lights/tail lights/turn signal lights................................P.189, 195
License plate lights........................................................................P.195
Tail light ..........................................................................................P.195
Rear fog light*3...............................................................................P.205
Back-up light*4
Shifting the shift position to R ..................................................P.182, 186
Tail light ..........................................................................................P.195
Rear fog light*4...............................................................................P.205
Back-up light*3
Shifting the shift position to R ..................................................P.182, 186
*1: Vehicles with a smart entry & start system
*2: If equipped
*3: Right-hand drive vehicles
*4: Left-hand drive vehicles
Light bulbs of the exterior lights for driving
(Replacing method: P.497, Watts: P.575)
Page 16 of 758
14Pictorial index
Fuel filler door ................................................................................ P.211
Refueling method .............................................................................P.212
Fuel type/fuel tank capacity .............................................................P.568
Tires ................................................................................................P.479
Tire size/inflation pressure ...............................................................P.573
Winter tires/tire chains .....................................................................P.363
Checking/rotation/tire pressure warning system*2...........................P.479
Coping with flat tires.................................................................P.522, 539
Hood ................................................................................................P.470
Opening ...........................................................................................P.470
Engine oil .........................................................................................P.569
Coping with overheating ..................................................................P.560
Headlights/front position lights/daytime running lights/turn signal
lightsP.189, 195
Front fog lights*2............................................................................P.205
Stop lights/tail lights/turn signal lights................................P.189, 195
License plate lights........................................................................P.195
Tail light ..........................................................................................P.195
Rear fog light*3...............................................................................P.205
Back-up light*4
Shifting the shift position to R ..................................................P.182, 186
Tail light ..........................................................................................P.195
Rear fog light*4...............................................................................P.205
Back-up light*3
Shifting the shift position to R ..................................................P.182, 186
*1: Vehicles with a smart entry & start system
*2: If equipped
*3: Right-hand drive vehicles
*4: Left-hand drive vehicles
Light bulbs of the exterior lights for driving
(Replacing method: P.497, Watts: P.575)
Page 47 of 758
45
1
1-1. For safe use
For safety and security
Exhaust gas precautions
Harmful substance to the
human body is included in
exhaust gases if inhaled.
WA R N I N G
Exhaust gases include harmful car-
bon monoxide (CO), which is color-
less and odorless. Observe the following precautions.
Failure to do so may cause exhaust
gases enter the vehicle and may lead to an accident caused by
light-headedness, or may lead to
death or a serious health hazard.
■Important points while driving
●Keep the back door closed.
●If you smell exhaust gases in the
vehicle even when the back door is closed, open the windows and have
the vehicle inspected at any author-
ized Toyota retailer or Toyota authorized repairer, or any reliable
repairer as soon as possible.
■When parking
●If the vehicle is in a poorly venti-
lated area or a closed area, such as a garage, stop the engine.
●Do not leave the vehicle with the engine on for a long time.
If such a situation cannot be
avoided, park the vehicle in an open space and ensure that
exhaust fumes do not enter the
vehicle interior.
●Do not leave the engine running in
an area with snow build-up, or where it is snowing. If snowbanks
build up around the vehicle while
the engine is running, exhaust gases may collect and enter the
vehicle.
■Exhaust pipe
The exhaust system needs to be
checked periodically. If there is a hole
or crack caused by corrosion, dam- age to a joint or abnormal exhaust
noise, be sure to have the vehicle
inspected and repaired by any author- ized Toyota retailer or Toyota author-
ized repairer, or any reliable repairer.
Page 83 of 758
81
1
1-4. Theft deterrent system
For safety and security
*: If equipped
■Items to check before locking
the vehicle
To prevent unexpected triggering of
the alarm and vehicle theft, make
sure of the following:
Nobody is in the vehicle.
The windows and panoramic
moon roof (if equipped) are
closed before the alarm is set.
No valuables or other personal
items are left in the vehicle.
■Setting
Close the door and hood, and lock
all the doors using the entry func-
tion (if equipped) or wireless
remote control. The system will set
automatically after 30 seconds.
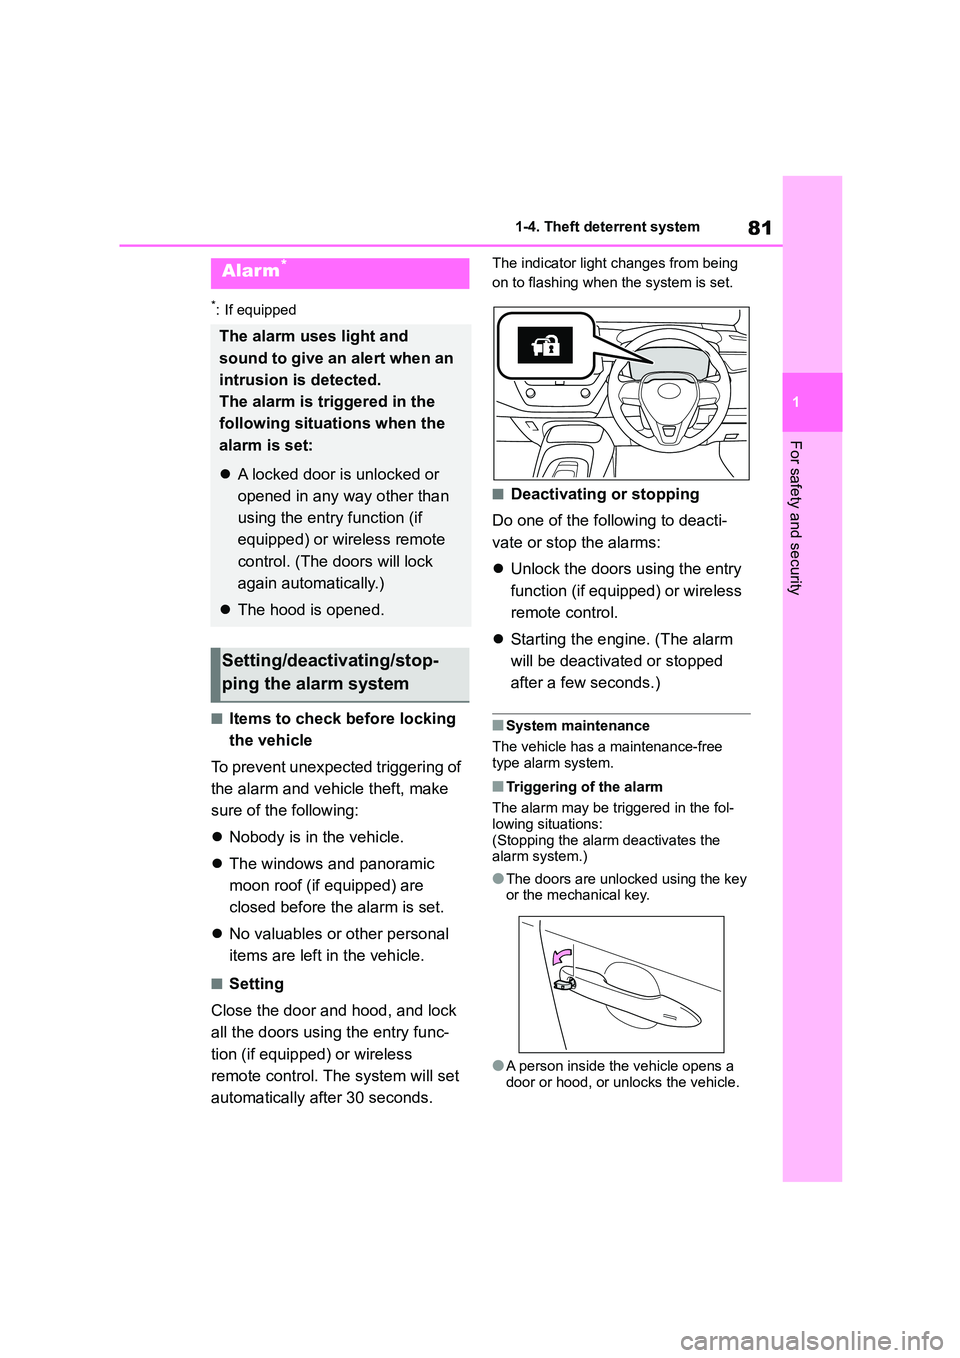
The indicator light changes from being
on to flashing when the system is set.
■Deactivating or stopping
Do one of the following to deacti-
vate or stop the alarms:
Unlock the doors using the entry
function (if equipped) or wireless
remote control.
Starting the engine. (The alarm
will be deactiva ted or stopped
after a few seconds.)
■System maintenance
The vehicle has a maintenance-free
type alarm system.
■Triggering of the alarm
The alarm may be triggered in the fol- lowing situations:
(Stopping the alarm deactivates the
alarm system.)
●The doors are unlocked using the key
or the mechanical key.
●A person inside the vehicle opens a
door or hood, or unlocks the vehicle.
Alarm*
The alarm uses light and
sound to give an alert when an
intrusion is detected.
The alarm is triggered in the
following situations when the
alarm is set:
A locked door is unlocked or
opened in any way other than
using the entry function (if
equipped) or wireless remote
control. (The doors will lock
again automatically.)
The hood is opened.
Setting/deactivating/stop-
ping the alarm system
Page 88 of 758
862-1. Instrument cluster
*1: These lights come on when the
engine switch is turned to ON to indi-
cate that a system check is being
performed. They will turn off after the
engine is started, or after a few sec-
onds. There may be a malfunction in
a system if the lights do not come
on, or turn off. Have the vehicle
inspected by any authorized Toyota
retailer or Toyota authorized repairer,
or any reliable repairer.
*2: This light illuminates on the
multi-information display.
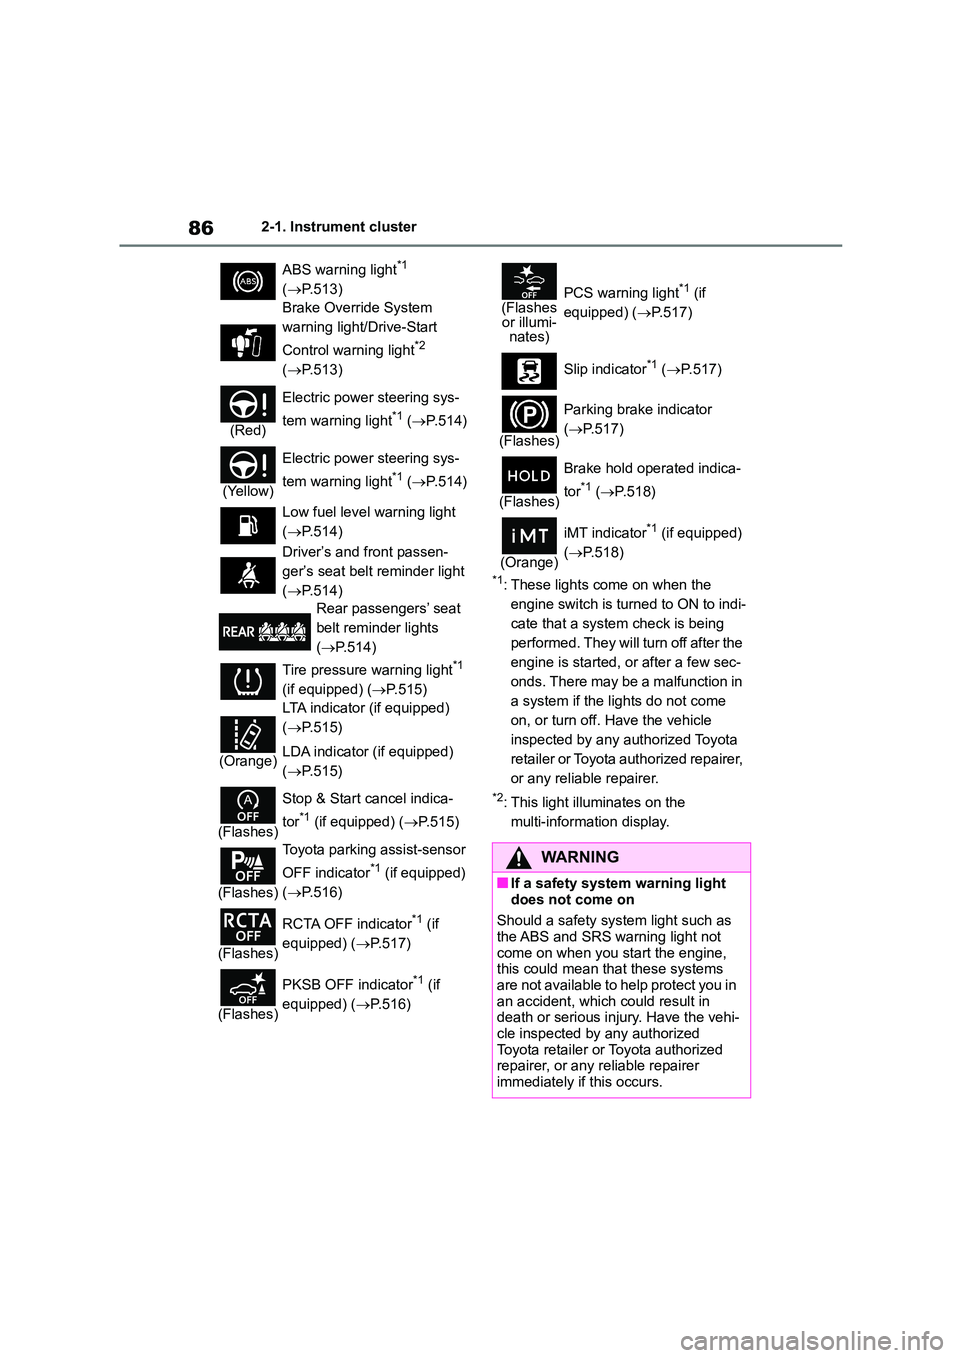
ABS warning light*1
( P.513)
Brake Override System
warning light/Drive-Start
Control warning light*2
( P.513)
(Red)
Electric power steering sys-
tem warning light*1 ( P.514)
(Yellow)
Electric power steering sys-
tem warning light*1 ( P.514)
Low fuel level warning light
( P.514)
Driver’s and front passen-
ger’s seat belt reminder light
( P.514)
Rear passengers’ seat
belt reminder lights
( P.514)
Tire pressure warning light*1
(if equipped) ( P.515)
(Orange)
LTA indicator (if equipped)
( P.515)
LDA indicator (if equipped)
( P.515)
(Flashes)
Stop & Start cancel indica-
tor*1 (if equipped) ( P.515)
(Flashes)
Toyota parking assist-sensor
OFF indicator*1 (if equipped)
( P.516)
(Flashes)
RCTA OFF indicator*1 (if
equipped) ( P.517)
(Flashes)
PKSB OFF indicator*1 (if
equipped) ( P.516)
(Flashes or illumi-nates)
PCS warning light*1 (if
equipped) ( P.517)
Slip indicator*1 ( P.517)
(Flashes)
Parking brake indicator
( P.517)
(Flashes)
Brake hold operated indica-
tor*1 ( P.518)
(Orange)
iMT indicator*1 (if equipped)
( P.518)
WA R N I N G
■If a safety system warning light
does not come on
Should a safety syst em light such as the ABS and SRS warning light not
come on when you start the engine,
this could mean that these systems are not available to help protect you in
an accident, which could result in
death or serious injury. Have the vehi-
cle inspected by any authorized Toyota retailer or Toyota authorized
repairer, or any reliable repairer
immediately if this occurs.
Page 90 of 758
882-1. Instrument cluster
*1: These lights come on when the
engine switch is turned to ON to indi-
cate that a system check is being
performed. They will turn off after the
engine is started, or after a few sec-
onds. There may be a malfunction in
a system if the lights do not come
on, or turn off. Have the vehicle
inspected by any authorized Toyota
retailer or Toyota authorized repairer,
or any reliable repairer.
*2: This light comes on when the system
is turned off.
*3: Depending on the operating condi-
tion, the color and illuminating/flash-
ing state of the light change.
*4: Vehicles without RCTA function:
In order to confirm operation, the BSM
outside rear view mirror indicators illu-
minate in the following situations:
• When the engine switch is in ON,
the BSM function is enabled on
of the multi-information dis-
play.
• When the BSM function is ena-
bled on of the multi-informa-
tion display, the engine switch is
in ON.
If the system is functioning correctly,
the BSM outside rear view mirror indi-
cators will turn off after a few seconds.
If the BSM outside rear view mirror indi-
cators do not illuminate or do not turn
off, there may be a malfunction in the
system.
If this occurs, have the vehicle
inspected by any authorized Toyota
retailer or Toyota authorized repairer, or
any reliable repairer.
*5: Vehicles with RCTA function:
These lights come on when the engine
switch is turned to ON to indicate that a
system check is being performed. They
will turn off after the engine is started,
or after a few seconds. There may be a
malfunction in a system if the lights do
not come on, or turn off. Have the vehi-
cle inspected by any authorized Toyota
retailer or Toyota authorized repairer, or
any reliable repairer.
*6: This light illuminates on the outside
rear view mirrors.
*7: This light illuminates on the
multi-information display.
*8: When the outside temperature is
approximately 3°C (37°F) or lower,
this indicator will flash for approxi-
mately 10 seconds, then stay on.
*9: This light illuminates on the center
panel.
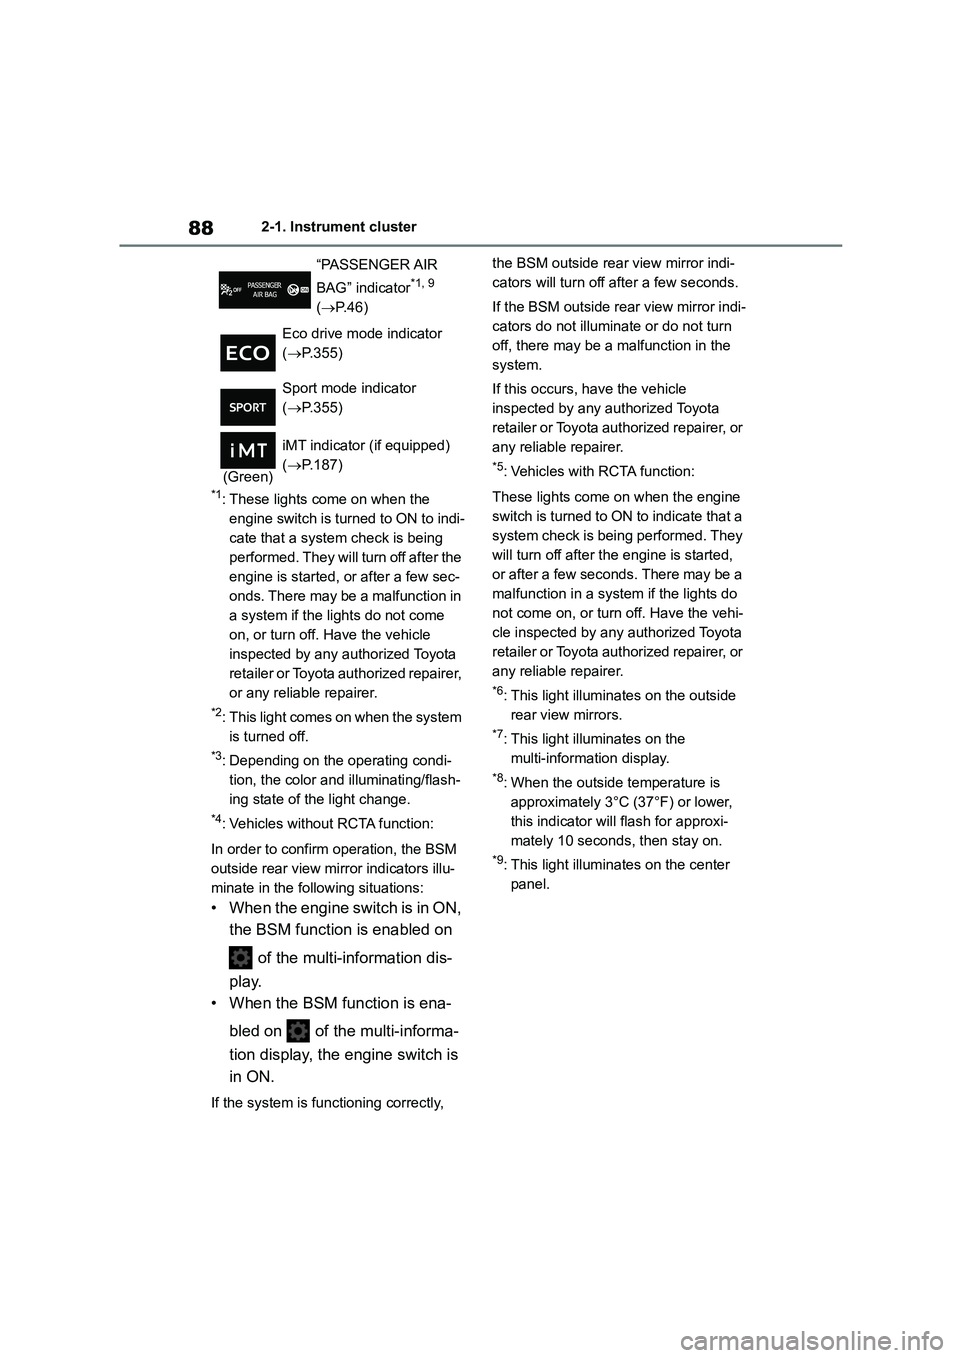
“PASSENGER AIR
BAG” indicator*1, 9
( P. 4 6 )
Eco drive mode indicator
( P.355)
Sport mode indicator
( P.355)
(Green)
iMT indicator (if equipped)
( P.187)
Page 92 of 758
902-1. Instrument cluster
■Outside temperature display
●In the following situations, the correct
outside temperature may not be dis- played, or the display may take longer
than normal to change:
• When stopped, or driving at low speeds (less than 25 km/h [16 mph])
• When the outside temperature has
changed suddenly (at the entrance/exit of a garage, tunnel, etc.)
●When “--” or “E” is displayed, the sys-tem may be malfunctioning. Take your
vehicle to any authorized Toyota
retailer or Toyota authorized repairer, or any reliable repairer.
■Liquid crystal display
P.100
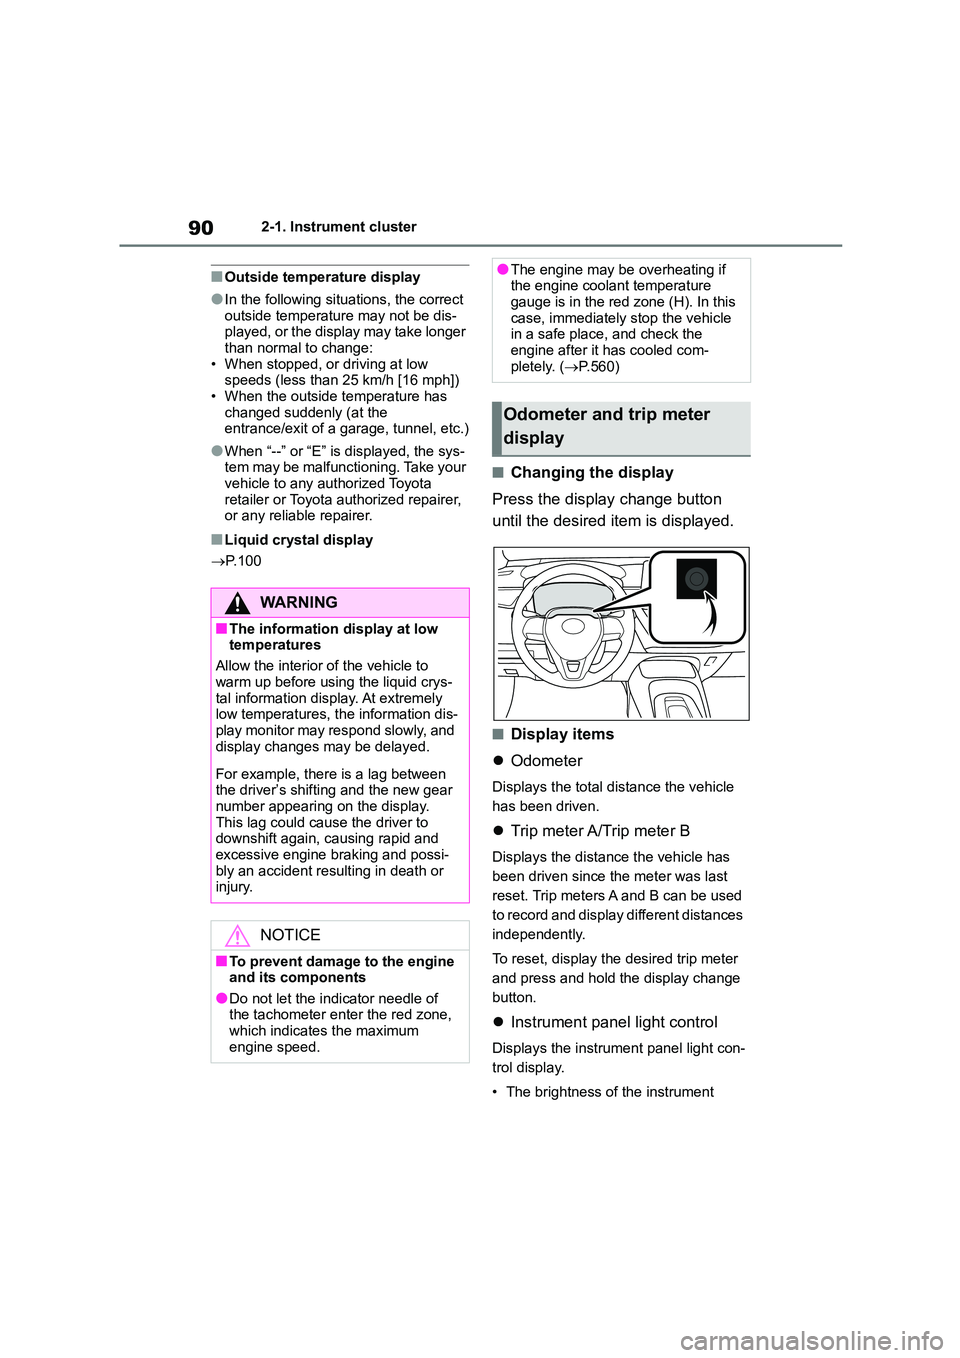
■Changing the display
Press the display change button
until the desired item is displayed.
■Display items
Odometer
Displays the total distance the vehicle
has been driven.
Trip meter A/Trip meter B
Displays the distance the vehicle has
been driven since the meter was last
reset. Trip meters A and B can be used
to record and display different distances
independently.
To reset, display the desired trip meter
and press and hold the display change
button.
Instrument panel light control
Displays the instrument panel light con-
trol display.
• The brightness of the instrument
WA R N I N G
■The information display at low
temperatures
Allow the interior of the vehicle to
warm up before using the liquid crys-
tal information display. At extremely low temperatures, the information dis-
play monitor may respond slowly, and
display changes may be delayed.
For example, there is a lag between
the driver’s shifting and the new gear number appearing on the display.
This lag could cause the driver to
downshift again, causing rapid and excessive engine braking and possi-
bly an accident resulting in death or
injury.
NOTICE
■To prevent damage to the engine
and its components
●Do not let the indicator needle of the tachometer enter the red zone,
which indicates the maximum
engine speed.
●The engine may be overheating if the engine coolant temperature
gauge is in the red zone (H). In this
case, immediately stop the vehicle in a safe place, and check the
engine after it has cooled com-
pletely. ( P.560)
Odometer and trip meter
display
Page 98 of 758
962-1. Instrument cluster
entrance/exit of a garage, tunnel, etc.)
●When “--” or “E” is displayed, the sys-
tem may be malfunctioning. Take your
vehicle to any authorized Toyota retailer or Toyota authorized repairer,
or any reliable repairer.
■Liquid crystal display
P.100
■Customization
The gauges and meters can be custom-
ized in of the multi-information dis-
play. ( P.104)
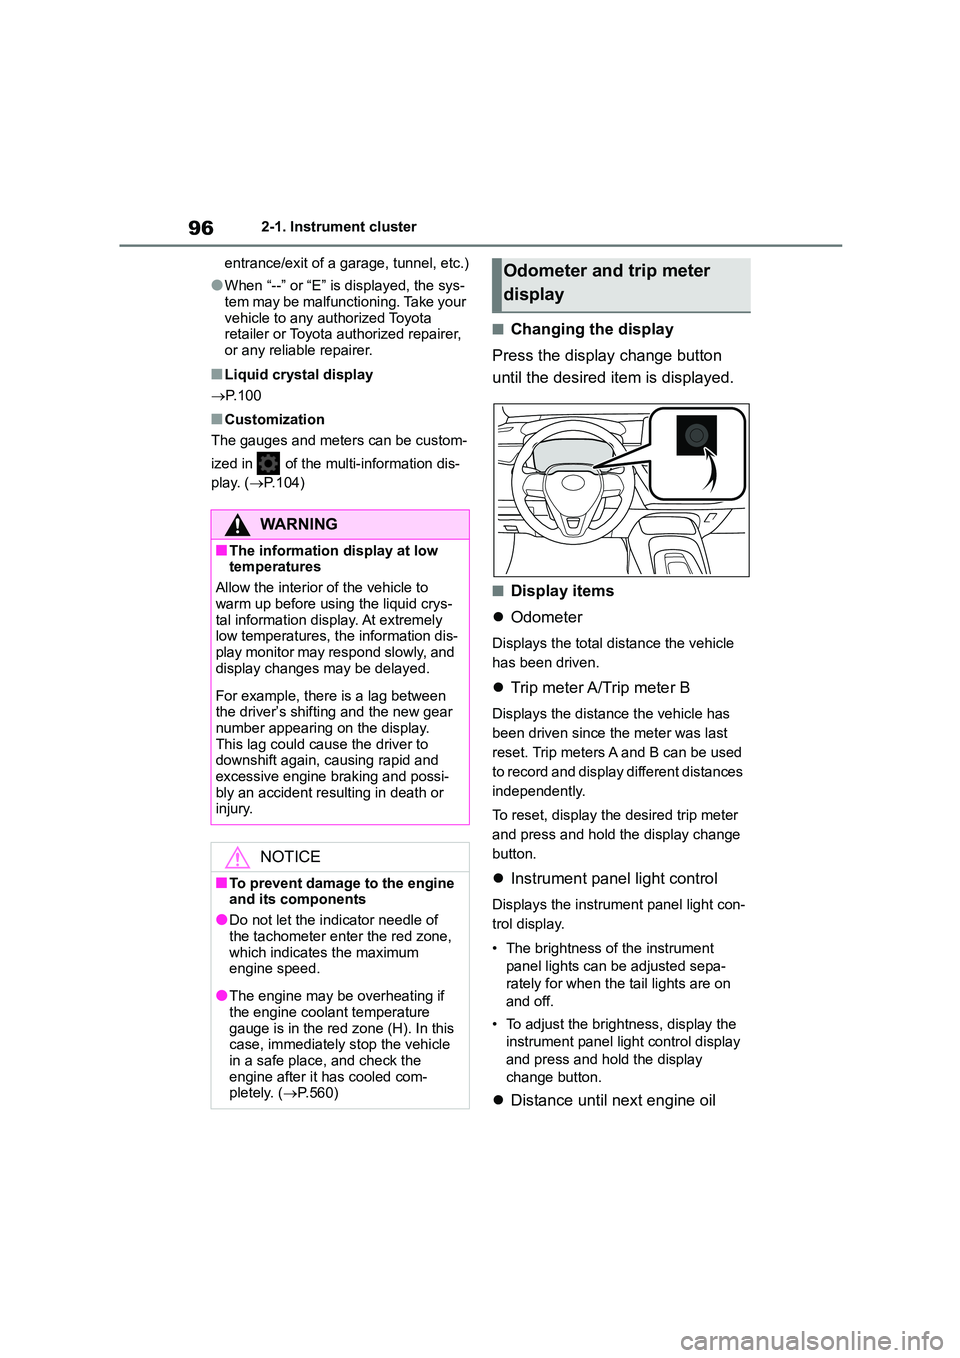
■Changing the display
Press the display change button
until the desired item is displayed.
■Display items
Odometer
Displays the total distance the vehicle
has been driven.
Trip meter A/Trip meter B
Displays the distance the vehicle has
been driven since the meter was last
reset. Trip meters A and B can be used
to record and display different distances
independently.
To reset, display the desired trip meter
and press and hold the display change
button.
Instrument panel light control
Displays the instrument panel light con-
trol display.
• The brightness of the instrument
panel lights can be adjusted sepa-
rately for when the tail lights are on
and off.
• To adjust the brightness, display the
instrument panel light control display
and press and hold the display
change button.
Distance until next engine oil
WA R N I N G
■The information display at low temperatures
Allow the interior of the vehicle to
warm up before using the liquid crys- tal information display. At extremely
low temperatures, the information dis-
play monitor may respond slowly, and display changes may be delayed.
For example, there is a lag between the driver’s shifting and the new gear
number appearing on the display.
This lag could cause the driver to downshift again, causing rapid and
excessive engine braking and possi-
bly an accident resulting in death or injury.
NOTICE
■To prevent damage to the engine
and its components
●Do not let the indicator needle of
the tachometer enter the red zone,
which indicates the maximum engine speed.
●The engine may be overheating if the engine coolant temperature
gauge is in the red zone (H). In this
case, immediately stop the vehicle in a safe place, and check the
engine after it has cooled com-
pletely. ( P.560)
Odometer and trip meter
display
Page 141 of 758
139
3
3-2. Opening, closing and locking the doors
Before driving
• The electronic key is on the instru-
ment panel, luggage cover or floor, or in the door pockets or glove box when
the engine is started or engine switch
modes are changed.
●Do not leave the electronic key on top
of the instrument panel or near the door pockets when exiting the vehicle.
Depending on the radio wave recep-
tion conditions, it may be detected by the antenna outside the cabin and the
door will become lockable from the
outside, possibly trapping the elec- tronic key inside the vehicle.
●As long as the electronic key is within the effective range, the doors may be
locked or unlocked by anyone. How-
ever, only the doors detecting the electronic key can be used to unlock
the vehicle.
●Even if the electronic key is not inside
the vehicle, it may be possible to start
the engine if the electronic key is near the window.
●The doors may unlock or lock if a large amount of water splashes on the
door handle, such as in the rain or in a
car wash when the electronic key is within the effective range. (The doors
will automatically be locked after
approximately 30 seconds if the doors are not opened and closed.)
●If the wireless remote control is used to lock the doors when the electronic
key is near the vehicle, there is a pos-
sibility that the door may not be unlocked by the entry function. (Use
the wireless remote control to unlock
the doors.)
●Touching the door lock or unlock sen-
sor while wearing gloves may prevent
lock or unlock operation.
●Some models: When the lock opera-
tion is performed using the lock sen- sor, recognition signals will be shown
up to two consecutive times. After
this, no recognition signals will be given.
●If the door handle becomes wet while
the electronic key is within the effec-
tive range, the door may lock and unlock repeatedly. In that case, follow
the following correction procedures to
wash the vehicle: • Place the electronic key in a location 2
m (6 ft.) or more away from the vehi-
cle. (Take care to ensure that the key is not stolen.)
• Set the electronic key to battery-sav-
ing mode to disable the smart entry & start system. ( P.138)
●If the electronic key is inside the vehi- cle and a door handle becomes wet
during a car wash, a message may be
shown on the multi-information dis- play and a buzzer will sound outside
the vehicle. To turn off the alarm, lock
all the doors.
●The lock sensor may not work prop-
erly if it comes into contact with ice, snow, mud, etc. Clean the lock sensor
and attempt to operate it again.
●A sudden handle operation or a han-
dle operation immediately after enter-
ing the effective range may prevent the doors from being unlocked. Touch
the door unlock sensor and check that
the doors are unlocked before pulling the door handle again.
●If there is another electronic key in the detection area, it may take slightly
longer to unlock the doors after the
door handle is gripped.
■When the vehicle is not driven for extended periods
●To prevent theft of the vehicle, do not leave the electronic key within 2 m (6
ft.) of the vehicle.
●The smart entry & start system can be
deactivated in advance. ( P.577)
●Setting the electronic key to bat- tery-saving mode helps to reduce key
battery depletion. ( P.138)
■To operate the system properly
Make sure to carry the electronic key when operating the system. Do not get
the electronic key too close to the vehi-
cle when operating the system from the