check engine TOYOTA COROLLA HATCHBACK 2023 Service Manual
[x] Cancel search | Manufacturer: TOYOTA, Model Year: 2023, Model line: COROLLA HATCHBACK, Model: TOYOTA COROLLA HATCHBACK 2023Pages: 436, PDF Size: 8.72 MB
Page 303 of 436
3036-3. Do-it-yourself maintenance
6
Maintenance and care
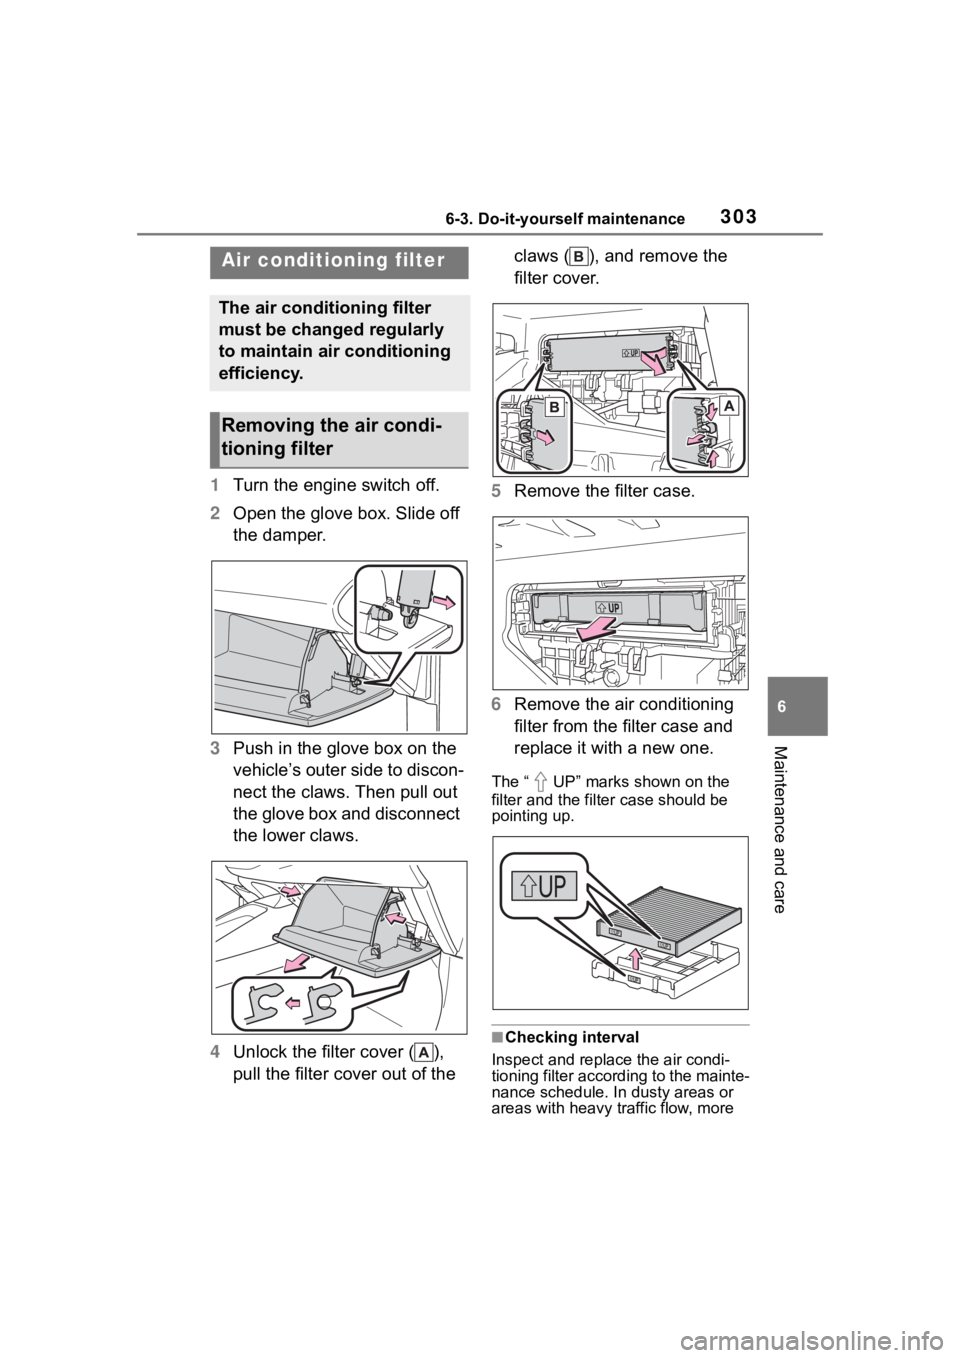
1Turn the engine switch off.
2 Open the glove box. Slide off
the damper.
3 Push in the glove box on the
vehicle’s outer side to discon-
nect the claws. Then pull out
the glove box and disconnect
the lower claws.
4 Unlock the filter cover ( ),
pull the filter cover out of the claws ( ), and remove the
filter cover.
5 Remove the filter case.
6 Remove the air conditioning
filter from the filter case and
replace it with a new one.
The “ UP” marks shown on the
filter and the filter case should be
pointing up.
■Checking interval
Inspect and replace the air condi-
tioning filter according to the mainte-
nance schedule. In dusty areas or
areas with heavy traffic flow, more
Air condition ing filter
The air conditioning filter
must be changed regularly
to maintain air conditioning
efficiency.
Removing the air condi-
tioning filter
Page 306 of 436

3066-3. Do-it-yourself maintenance
1Turn the engine switch off.
2 Open the fuse box cover.
Engine compartment: type A
fuse box
Push the tabs in and lift the lid off.
Engine compartment: type B
fuse box
Push the tabs in and lift the lid off.
WARNING
●If you accidentally swallow a
battery or put a b attery into a
part of your body, get emer-
gency medical attention imme-
diately.
■To prevent battery explosion
or leakage of flammable liq-
uid or gas
●Replace the battery with a new
battery of the same type. If a
wrong type of battery is used, it
may explode.
●Do not expose batteries to
extremely low pressure due to
high altitude or extremely high
temperatures.
●Do not burn, bre ak or cut a bat-
tery.
NOTICE
■When replacing the battery
Use a flathead screwdriver of
appropriate size. Applying exces-
sive force may deform or damage
the cover.
■For normal operation after
replacing the battery
Observe the following precautions
to prevent accidents:
●Always work with dry hands.
Moisture may cau se the battery
to rust.
●Do not touch or move any other
component inside the remote
control.
●Do not bend either of the battery
terminals.
Checking a nd replac-
ing fuses
If any of the electrical com-
ponents do not operate, a
fuse may have blown. If this
happens, check and replace
the fuses as necessary.
Checking and replacing
fuses
Page 327 of 436
3277-2. Steps to take in an emergency
7
When trouble arises
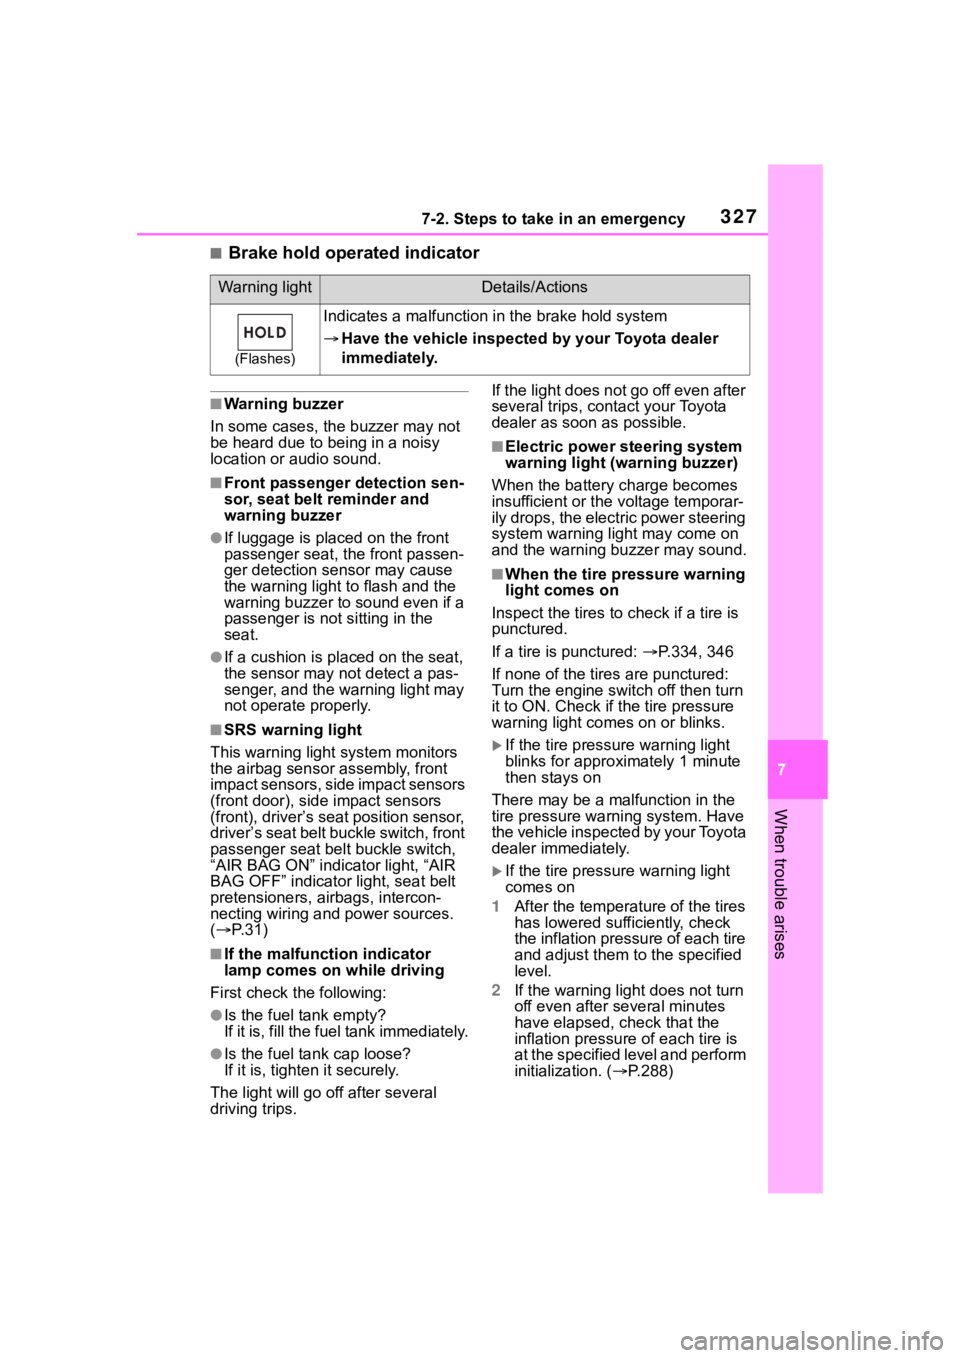
■Brake hold operated indicator
■Warning buzzer
In some cases, the buzzer may not
be heard due to being in a noisy
location or audio sound.
■Front passenger detection sen-
sor, seat belt reminder and
warning buzzer
●If luggage is placed on the front
passenger seat, the front passen-
ger detection sensor may cause
the warning light to flash and the
warning buzzer to sound even if a
passenger is not sitting in the
seat.
●If a cushion is placed on the seat,
the sensor may n ot detect a pas-
senger, and the warning light may
not operate properly.
■SRS warning light
This warning light system monitors
the airbag sensor assembly, front
impact sensors, side impact sensors
(front door), side impact sensors
(front), driver’s se at position sensor,
driver’s seat belt buckle switch, front
passenger seat belt buckle switch,
“AIR BAG ON” indicator light, “AIR
BAG OFF” indicator light, seat belt
pretensioners, airbags, intercon-
necting wiring and power sources.
( P.31)
■If the malfunction indicator
lamp comes on while driving
First check the following:
●Is the fuel t ank empty?
If it is, fill the f uel tank immediately.
●Is the fuel tank cap loose?
If it is, tighten it securely.
The light will go o ff after several
driving trips. If the light does not go off even after
several trips, con
tact your Toyota
dealer as soon as possible.
■Electric power steering system
warning light (warning buzzer)
When the battery charge becomes
insufficient or the voltage temporar-
ily drops, the electric power steering
system warning light may come on
and the warning buzzer may sound.
■When the tire pressure warning
light comes on
Inspect the tires to check if a tire is
punctured.
If a tire is punctured: P.334, 346
If none of the tires are punctured:
Turn the engine switch off then turn
it to ON. Check if the tire pressure
warning light com es on or blinks.
If the tire pressure warning light
blinks for approximately 1 minute
then stays on
There may be a malfunction in the
tire pressure warning system. Have
the vehicle inspected by your Toyota
dealer immediately.
If the tire pressur e warning light
comes on
1 After the temperature of the tires
has lowered sufficiently, check
the inflation pressure of each tire
and adjust them to the specified
level.
2 If the warning light does not turn
off even after several minutes
have elapsed, check that the
inflation pressure of each tire is
at the specified level and perform
initialization. ( P.288)
Warning lightDetails/Actions
(Flashes)
Indicates a malfunction in the brake hold system
Have the vehicle inspected by your Toyota dealer
immediately.
Page 330 of 436
3307-2. Steps to take in an emergency
■Warning messages
The warning messages explained
below may differ from the actual
messages according to operation
conditions and vehicle specifica-
tions.
■Warning buzzer
A buzzer may sound when a mes-
sage is displayed.
The buzzer may not be audible if the
vehicle is in a noisy location or if the
audio system volume is high.
■If “Engine Oil Level Low Add or
Replace” is displayed
The engine oil level is low. Check
the level of the engine oil, and add if
NOTICE
■To ensure the tire pressure
warning system operates
properly
Do not install tires with different
specifications or makers, as the
tire pressure warning system may
not operate properly.
If a war ning message
is displayed
The multi-information dis-
play shows warnings for
system malfunctions and
incorrectly performed oper-
ations, and messages that
indicate a need for mainte-
nance. When a message is
displayed, perform the
appropriate corrective
action for the message.
If a warning message is dis-
played again after the
appropriate actions have
been performed, contact
your Toyota dealer.
Additionally, if a warning
light comes on or flashes at
the same time that a warn-
ing message is displayed,
take the appropriate correc-
tive action for the warning
light. ( P.320)
Page 331 of 436
3317-2. Steps to take in an emergency
7
When trouble arises
necessary.
This message may appear if the
vehicle is stopped on a slope. Move
the vehicle to a level surface and
check to see if the message disap-
pears.
■If “Engine Stopped Steering
Power Low” is displayed
This message is displayed if the
engine is stopped while driving.
When steering wheel operations are
heavier than usual, grip the steering
wheel firmly and operate it using
more force th an usual.
■If “Auto Power OFF to Conserve
Battery” is displayed
Power was cut off due to the auto-
matic power off function. Next time
when starting the engine, increase
the engine speed slightly and main-
tain that level for approximately 5
minutes to recha rge the battery.
■If “Headlight System Malfunc-
tion Visit Your Dealer” is dis-
played
The following systems may be mal-
functioning. Have the vehicle
inspected by your Toyota dealer
immediately.
●The LED headlight system
●The automatic headlight leveling
system (if equipped)
●AHB (Automatic High Beam)
■If “System Malfunction Visit
Your Dealer” is displayed
Indicates one of the following sys-
tems is disabled.
●PCS (Pre-Collision system)
●LDA (Lane Departure Alert)
●LTA (Lane Tracing Assist)
●AHB (Automatic High Beam)
●Dynamic radar cruise control
●RSA (Road Sign Assist)
(if equipped)
●PDA (Proactive Driving Assist)
●BSM (Blind Spot Monitor)
(if equipped)
●SEA (Safe Exit Assist)
(if equipped)
Have the vehicle inspected by your
Toyota dealer immediately.
■If “System Stopped See
Owner’s Manual” is displayed
Indicates one of the following sys-
tems is disabled.
●PCS (Pre-Collision system)
●LDA (Lane Departure Alert)
●LTA (Lane Tracing Assist)
●AHB (Automatic High Beam)
●Dynamic radar cruise control
●RSA (Road Sign Assist)
(if equipped)
●PDA (Proactive Driving Assist)
●BSM (Blind Spot Monitor)
(if equipped)
●RCTA (Rear Cross Traffic
Alert) (if equipped)
●SEA (Safe Exit Assist)
(if equipped)
Follow the following correction
methods.
• Check the voltage of the battery
• Check the sensors that the Toyota Safety Sense 3.0 uses for foreign
matter covering them. Remove
them if any. ( P.162)
• Check the sensors that the BSM (Blind Spot Monitor), RCTA (Rear
Cross Traffic Alert) and SEA (Safe
Exit Assist) uses for foreign matter
covering them. Remove them if
any. ( P.210, 220)
Indicates the sensors may not be
operating properly. ( P.165, 212,
217, 223)
When problems are solved and the
sensors are operational, this indica-
Page 333 of 436

3337-2. Steps to take in an emergency
7
When trouble arises
●LDA (Lane Departure Alert)
●LTA (Lane Tracing Assist)
●AHB (Automatic High Beam)
●Dynamic radar cruise control
Follow the followi ng correction
methods.
The temperature of the radar sensor
is outside of the operating range.
Wait for the temperature to become
appropriate.
■If “System Stopped Front Radar
In Self Calibration See Owner’s
Manual” is displayed
Indicates one of the following sys-
tems is disabled.
●PCS (Pre-Collision system)
●LDA (Lane Departure Alert)
●LTA (Lane Tracing Assist)
●AHB (Automatic High Beam)
●Dynamic radar cruise control
Follow the followi ng correction
methods.
• Check if there is any foreign mat- ter attached to the radar sensor or
radar sensor cover and clean
them if necessary ( P.163)
• The radar sensor may be mis- aligned and will be adjusted auto-
matically while driving. Continue
driving for a while.
■If “Cruise Control Unavailable
See Owner’s Manual” is dis-
played
Indicates one of the following sys-
tems is disabled.
●Dynamic radar cruise control
●Cruise control
A message is displayed when the
driving assist s witch is pushed
repeatedly.
Press the driving assist switch
quickly and firmly.
■If “Maintenance Required
Soon” is displayed
Indicates that all maintenance
according to the driven distance on
the maintenance schedule
* should
be performed soon.
Comes on approximately 4500
miles (7200 km) after the message
has been reset. If necessary, per-
form maintenance. Please reset the
message after the maintenance is
performed. ( P.266)
*: Refer to the separate “Scheduled
Maintenance” or “Owner’s Man-
ual Supplement” for the mainte-
nance interval applicable to your
vehicle.
■If “Maintenance Required Visit
Your Dealer” is displayed
Indicates that all maintenance is
required to correspond to the driven
distance on the maintenance sched-
ule
*.
Comes on approximately 5000
miles (8000 km) after the message
has been reset. (The indicator will
not work properly unless the mes-
sage has been rese t.) Perform the
necessary maintenance. Please
reset the message after the mainte-
nance is performed. ( P.266)
*: Refer to the separate “Scheduled
Maintenance” or “Owner’s Man-
ual Supplement” for the mainte-
nance interval applicable to your
vehicle.
■If “Engine Maintenance
Required Visit Your Dealer” is
shown
The engine or an engine component
is malfunctioning. Have the vehicle
inspected by your Toyota dealer
immediately.
■If a message that indicates the
need for visiting your Toyota
dealer is displayed
The system or part shown on the
Page 335 of 436
3357-2. Steps to take in an emergency
7
When trouble arises
Stop the engine.
Turn on the emergency flash-
ers.
Check the degree of the tire
damage.
A tire should only be repaired
with the emergency tire punc-
ture repair kit if the damage is
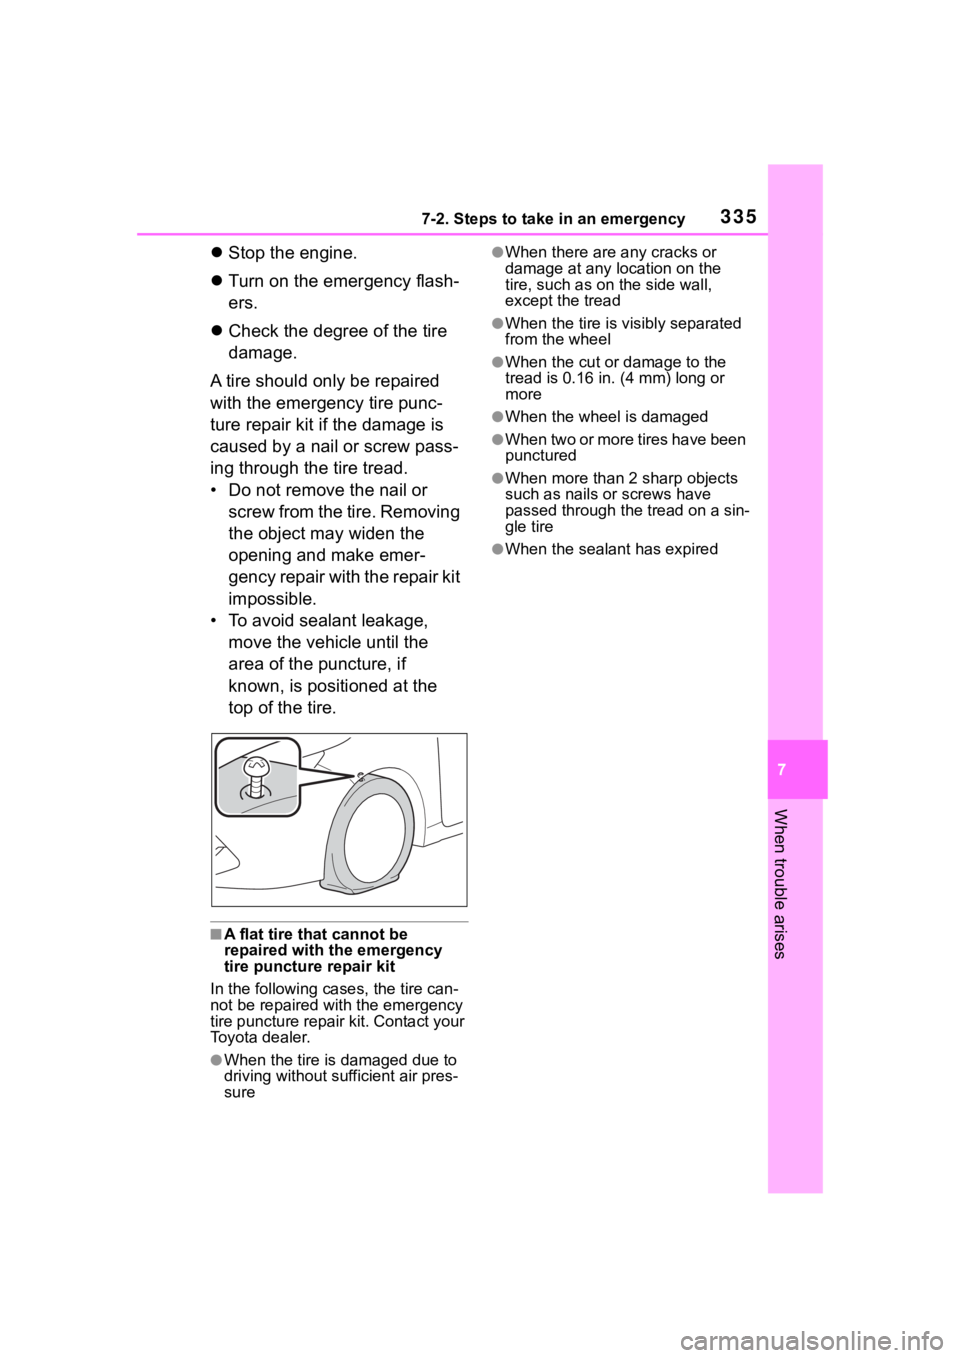
caused by a nail or screw pass-
ing through the tire tread.
• Do not remove the nail or screw from the tire. Removing
the object may widen the
opening and make emer-
gency repair with the repair kit
impossible.
• To avoid sealant leakage, move the vehicle until the
area of the puncture, if
known, is positioned at the
top of the tire.
■A flat tire that cannot be
repaired with t he emergency
tire puncture repair kit
In the following ca ses, the tire can-
not be repaired with the emergency
tire puncture repair kit. Contact your
Toyota dealer.
●When the tire is damaged due to
driving without sufficient air pres-
sure
●When there are a ny cracks or
damage at any location on the
tire, such as on the side wall,
except the tread
●When the tire is visibly separated
from the wheel
●When the cut or damage to the
tread is 0.16 in. (4 mm) long or
more
●When the wheel is damaged
●W h e n t w o o r m o r e t i r e s h a v e b e e n
punctured
●When more than 2 sharp objects
such as nails or screws have
passed through the tread on a sin-
gle tire
●When the sealant has expired
Page 341 of 436
3417-2. Steps to take in an emergency
7
When trouble arises
lar as shown. (P.370)
12 Start the engine. ( P.133)
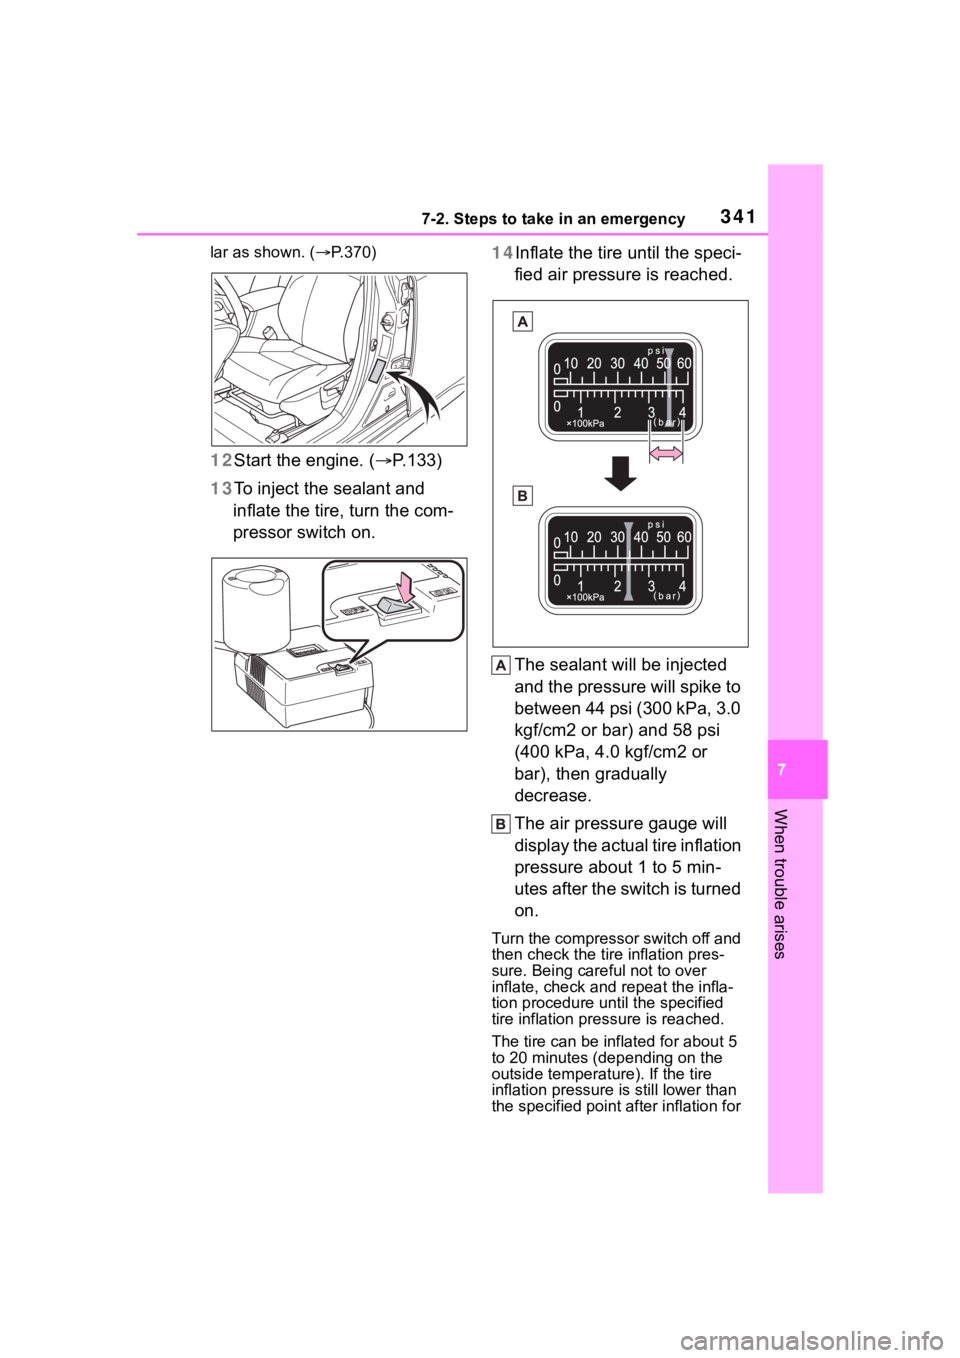
13 To inject the sealant and
inflate the tire, turn the com-
pressor switch on. 14Inflate the tire until the speci-
fied air pressure is reached.
The sealant will be injected
and the pressure will spike to
between 44 psi (300 kPa, 3.0
kgf/cm2 or bar) and 58 psi
(400 kPa, 4.0 kgf/cm2 or
bar), then gradually
decrease.
The air pressure gauge will
display the actual tire inflation
pressure about 1 to 5 min-
utes after the switch is turned
on.
Turn the compressor switch off and
then check the tire inflation pres-
sure. Being care ful not to over
inflate, check and repeat the infla-
tion procedure until the specified
tire inflation pressure is reached.
The tire can be inflated for about 5
to 20 minutes (depending on the
outside temperature). If the tire
inflation pressure is still lower than
the specified point after inflation for
Page 355 of 436
3557-2. Steps to take in an emergency
7
When trouble arises
The battery terminal connec-
tions may be loose or cor-
roded. ( P.279)
The engine starting system may
be malfunctioning due to an
electrical problem such as elec-
tronic key battery depletion or a
blown fuse. However, an interim
measure is available to start the
engine. ( P.355)
One of the following may be the
cause of the problem:
The battery may be dis-
charged. ( P.358)
One or both of the battery ter-
minals may be disconnected.
( P.279)
Contact your Toyot a dealer if the
problem cannot be repaired, or if
repair procedures are unknown.
When the engine does not start,
the following steps can be used
as an interim measure to start
the engine if the engine switch is
functioning normally. Do not use this starting proce-
dure except in case of emer-
gency.
1
Pull the parking brake switch
to check that the parking
brake is set. ( P.142)
Parking brake indicator will come
on.
2 Check that the shift lever is
set in P.
3 Turn the engine switch to
ACC
*.
4 Press and hold the engine
switch for about 15 seconds
while depressing the brake
pedal.
Even if the engi ne can be started
using the above steps, the system
may be malfunctioning. Have the
vehicle inspected by your Toyota
dealer.
*: ACC mode can be enabled/dis- abled on the customize menu.
( P.386)
The starter motor does
not turn over
The starter motor does
not turn over, the interior
lights and headlights do
not turn on, or the horn
does not sound.
Emergency start function
Page 356 of 436

3567-2. Steps to take in an emergency
■When the electronic key does
not work properly
●Make sure that the smart key sys-
tem has not been deactivated in
the customization setting. If it is
off, turn the function on. (Custom-
izable features P.386)
●Check if battery-saving mode is
set. If it is set, cancel the function.
( P.104)
●The electronic key function may
be suspended. ( P. 9 2 )
Use the mechanical key
If you lose your keys
New genuine mechanical
keys can be made by your
Toyota dealer using another
mechanical key and the key
number stamped on your
key number plate.
Keep the plate in a safe
place such as your wallet,
not in the vehicle.
NOTICE
■When an electronic key is lost
If the electronic key remains lost,
the risk of vehicle theft increases
significantly. Visit your Toyota
dealer immediately with all
remaining electronic keys that
were provided wit h your vehicle.
If the electronic key
does not operate prop-
erly
If communication between
the electronic key and vehi-
cle is interrupted ( P.104)
or the electronic key cannot
be used because the battery
is depleted, the smart key
system and wireless remote
control cannot be used. In
such cases, the doors can
be opened and the engine
can be started by following
the procedure below.
NOTICE
■In case of a smart key system
malfunction or other
key-related problems
Take your vehicle with all the elec-
tronic keys provided with your
vehicle to your Toyota dealer.
Locking and unlocking
the doors