child restraint TOYOTA COROLLA HYBRID 2021 (in English) Owner's Guide
[x] Cancel search | Manufacturer: TOYOTA, Model Year: 2021, Model line: COROLLA HYBRID, Model: TOYOTA COROLLA HYBRID 2021Pages: 584, PDF Size: 19.59 MB
Page 66 of 584
661-2. Child safety
COROLLA HV_U
■ISOFIX lower anchorages
(ISOFIX child restraint sys-
tem)
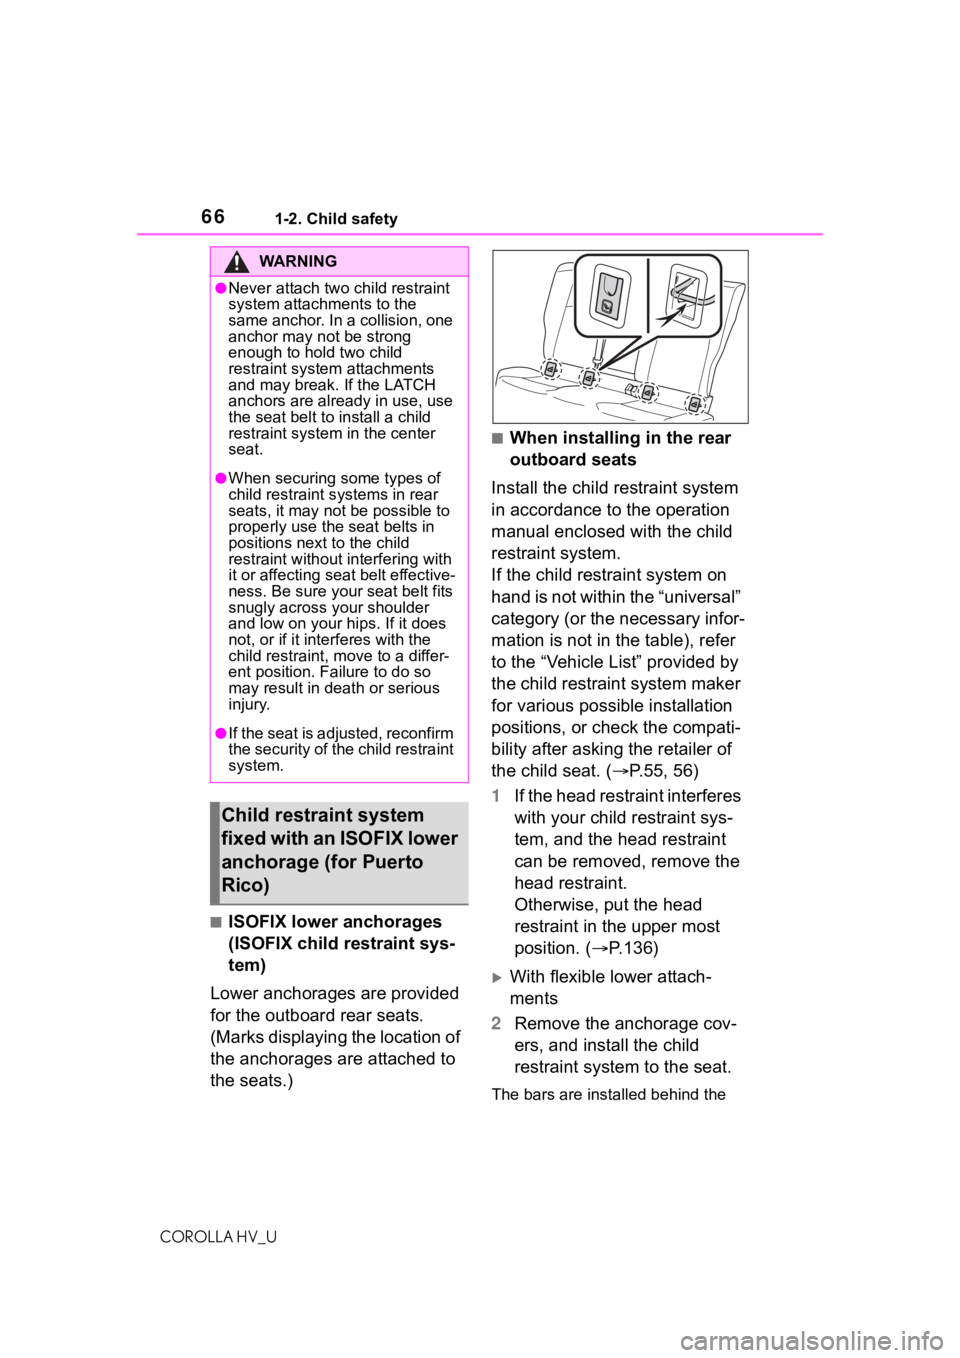
Lower anchorages are provided
for the outboard rear seats.
(Marks displaying the location of
the anchorages are attached to
the seats.)
■When installing in the rear
outboard seats
Install the child restraint system
in accordance to the operation
manual enclosed with the child
restraint system.
If the child restraint system on
hand is not within the “universal”
category (or the necessary infor-
mation is not in the table), refer
to the “Vehicle List” provided by
the child restraint system maker
for various possible installation
positions, or check the compati-
bility after asking the retailer of
the child seat. ( P.55, 56)
1 If the head restraint interferes
with your child restraint sys-
tem, and the head restraint
can be removed, remove the
head restraint.
Otherwise, put the head
restraint in the upper most
position. ( P.136)
With flexible lower attach-
ments
2 Remove the anchorage cov-
ers, and install the child
restraint system to the seat.
The bars are installed behind the
WA R N I N G
●Never attach two child restraint
system attachm ents to the
same anchor. In a collision, one
anchor may not be strong
enough to hold two child
restraint system attachments
and may break. If the LATCH
anchors are already in use, use
the seat belt to install a child
restraint system in the center
seat.
●When securing some types of
child restraint s ystems in rear
seats, it may not be possible to
properly use the seat belts in
positions next to the child
restraint without interfering with
it or affecting seat belt effective-
ness. Be sure your seat belt fits
snugly across your shoulder
and low on your hips. If it does
not, or if it interferes with the
child restraint, move to a differ-
ent position. Failure to do so
may result in death or serious
injury.
●If the seat is adjusted, reconfirm
the security of the child restraint
system.
Child restraint system
fixed with an ISOFIX lower
anchorage (for Puerto
Rico)
Page 67 of 584
671-2. Child safety
COROLLA HV_U
1
For safety and security
anchorage covers.
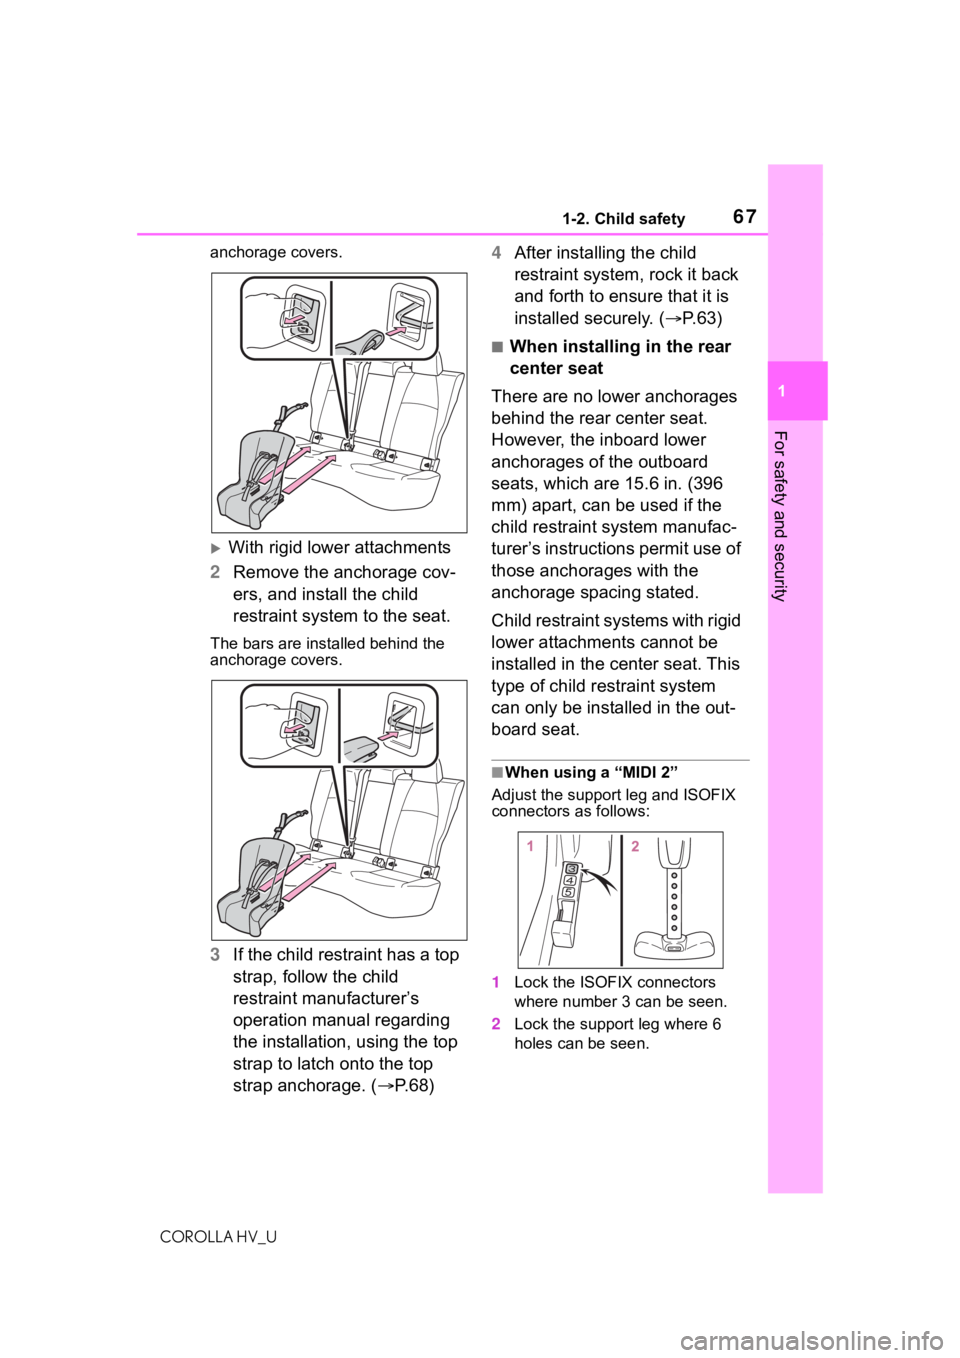
With rigid lower attachments
2 Remove the anchorage cov-
ers, and install the child
restraint system to the seat.
The bars are ins talled behind the
anchorage covers.
3 If the child restraint has a top
strap, follow the child
restraint manufacturer’s
operation manual regarding
the installation, using the top
strap to latch onto the top
strap anchorage. ( P. 6 8 )4
After installing the child
restraint system, rock it back
and forth to ensure that it is
installed securely. ( P.63)
■When installing in the rear
center seat
There are no lower anchorages
behind the rear center seat.
However, the inboard lower
anchorages of the outboard
seats, which are 15.6 in. (396
mm) apart, can be used if the
child restraint system manufac-
turer’s instructions permit use of
those anchorages with the
anchorage spacing stated.
Child restraint systems with rigid
lower attachments cannot be
installed in the center seat. This
type of child restraint system
can only be installed in the out-
board seat.
■When using a “MIDI 2”
Adjust the support leg and ISOFIX
connectors as follows:
1 Lock the ISOFIX connectors
where number 3 can be seen.
2 Lock the support leg where 6
holes can be seen.
Page 68 of 584
681-2. Child safety
COROLLA HV_U
■Anchor brackets (for top
tether strap)
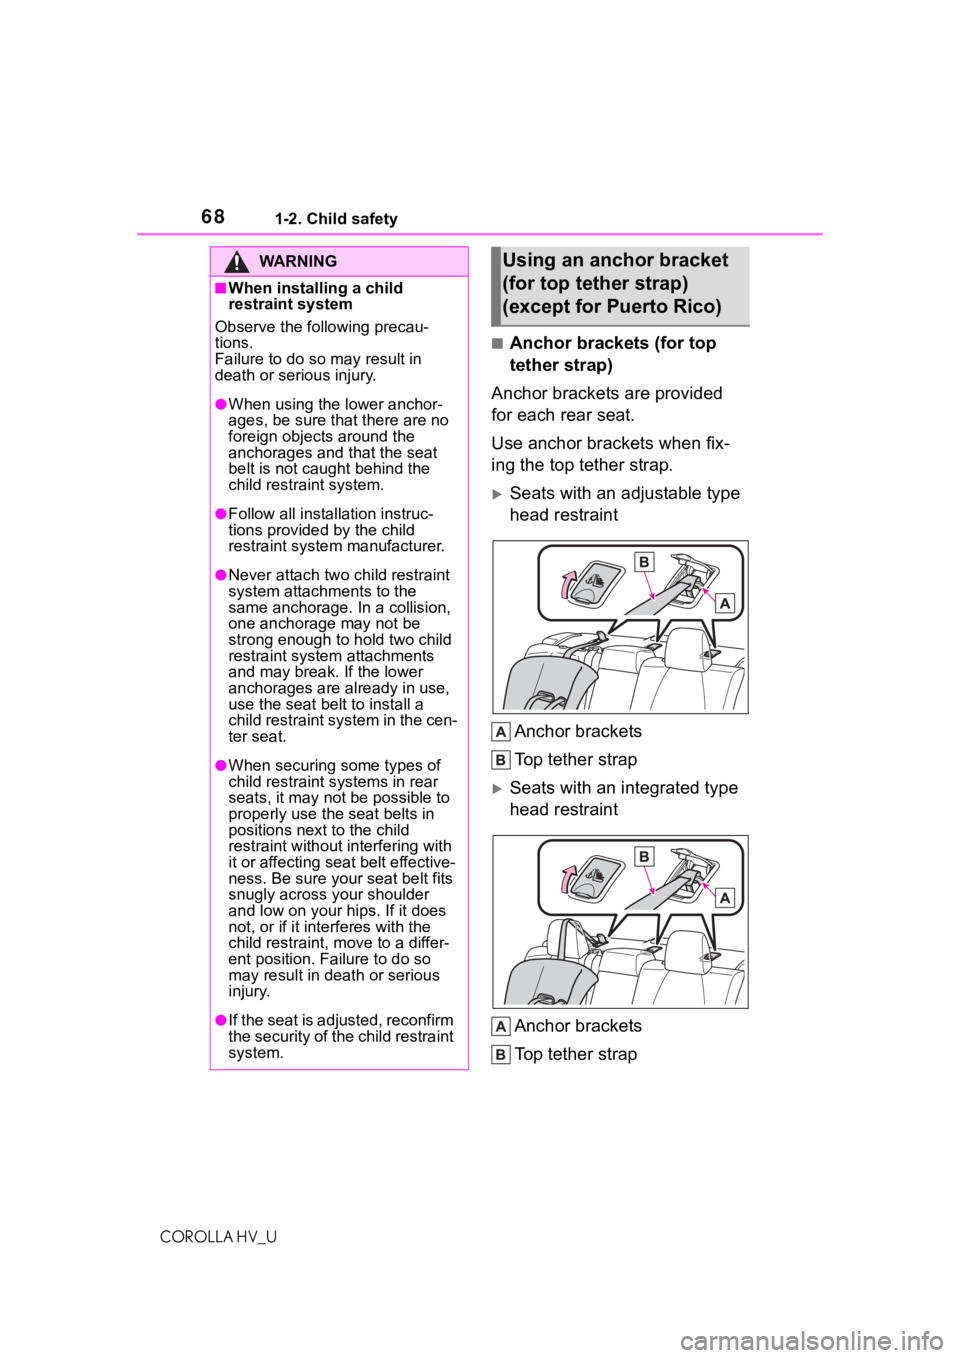
Anchor brackets are provided
for each rear seat.
Use anchor brackets when fix-
ing the top tether strap.
Seats with an adjustable type
head restraint
Anchor brackets
Top tether strap
Seats with an integrated type
head restraintAnchor brackets
Top tether strap
WA R N I N G
■When installing a child
restraint system
Observe the following precau-
tions.
Failure to do so m ay result in
death or serious injury.
●When using the lower anchor-
ages, be sure tha t there are no
foreign objects around the
anchorages and that the seat
belt is not caught behind the
child restraint system.
●Follow all installation instruc-
tions provided by the child
restraint system manufacturer.
●Never attach two child restraint
system attachm ents to the
same anchorage. In a collision,
one anchorage may not be
strong enough to hold two child
restraint system attachments
and may break. If the lower
anchorages are already in use,
use the seat belt to install a
child restraint system in the cen-
ter seat.
●When securing some types of
child restraint s ystems in rear
seats, it may not be possible to
properly use the seat belts in
positions next to the child
restraint without interfering with
it or affecting seat belt effective-
ness. Be sure your seat belt fits
snugly across your shoulder
and low on your hips. If it does
not, or if it interferes with the
child restraint, move to a differ-
ent position. Failure to do so
may result in death or serious
injury.
●If the seat is adjusted, reconfirm
the security of the child restraint
system.
Using an anchor bracket
(for top tether strap)
(except for Puerto Rico)
Page 69 of 584
691-2. Child safety
COROLLA HV_U
1
For safety and security
■Fixing the top tether strap
to the anchor bracket
Install the child restraint system
in accordance to the operation
manual enclosed with the child
restraint system.
Rear outboard seats
1 Adjust the head restraint to
the upmost position.
If the head restraint interferes with
your child restraint system, and the
head restraint can be removed,
remove the head restraint.
Otherwise, put the head restraint in
the upper most position. ( P.136)
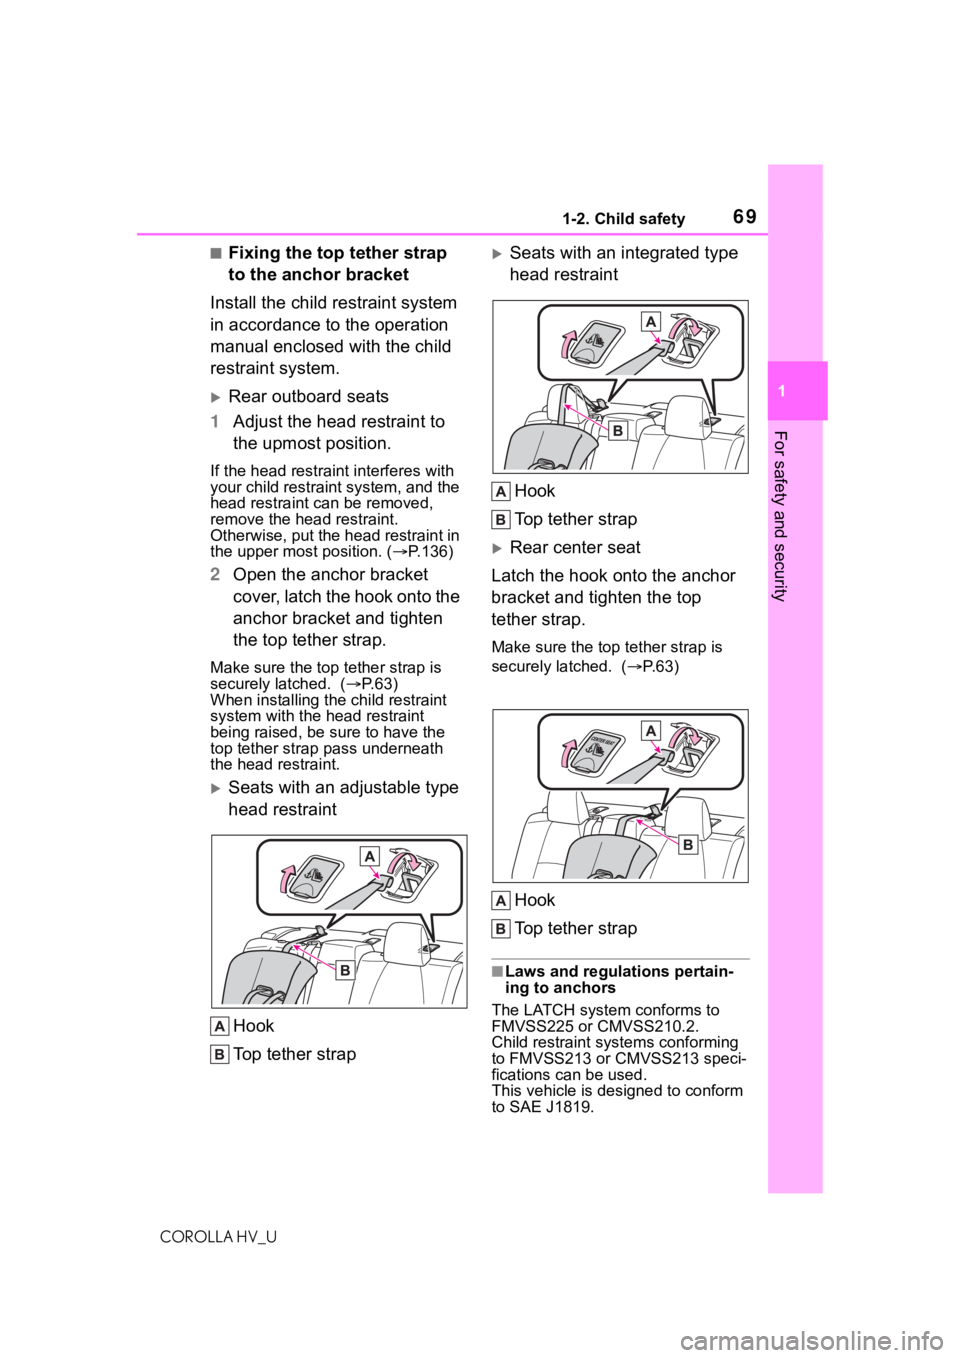
2 Open the anchor bracket
cover, latch the hook onto the
anchor bracket and tighten
the top tether strap.
Make sure the top tether strap is
securely latched. ( P. 6 3 )
When installing the child restraint
system with the head restraint
being raised, be sure to have the
top tether strap pass underneath
the head restraint.
Seats with an adjustable type
head restraint
Hook
Top tether strap
Seats with an integrated type
head restraintHook
Top tether strap
Rear center seat
Latch the hook onto the anchor
bracket and tighten the top
tether strap.
Make sure the top tether strap is
securely latched. ( P.63)
Hook
Top tether strap
■Laws and regulations pertain-
ing to anchors
The LATCH system conforms to
FMVSS225 or CMVSS210.2.
Child restraint systems conforming
to FMVSS213 or CMVSS213 speci-
fications can be used.
This vehicle is designed to conform
to SAE J1819.
Page 70 of 584
701-2. Child safety
COROLLA HV_U
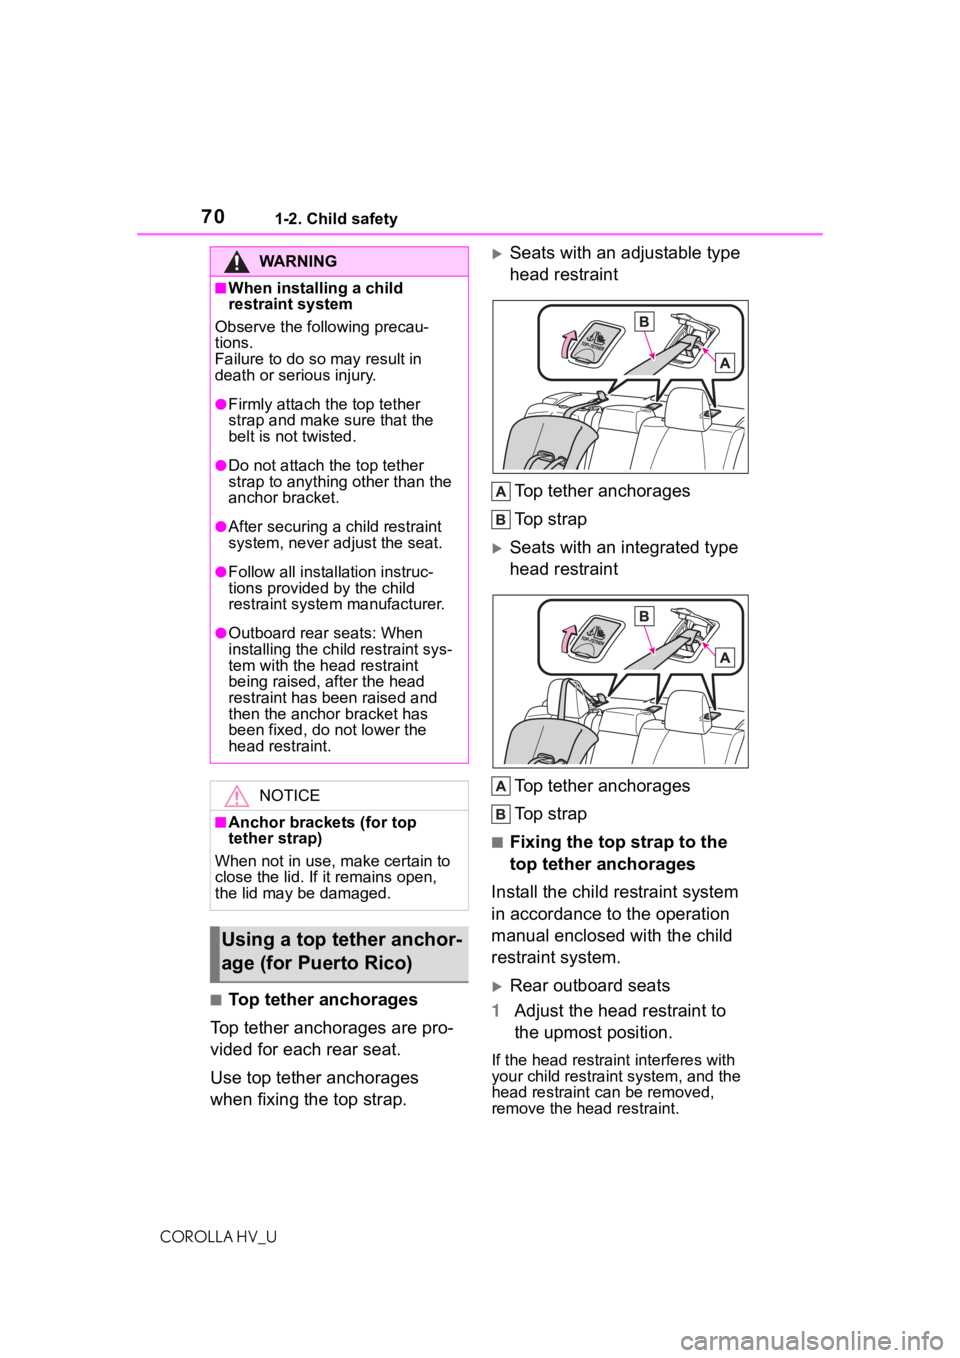
■Top tether anchorages
Top tether anchorages are pro-
vided for each rear seat.
Use top tether anchorages
when fixing the top strap.
Seats with an adjustable type
head restraint
Top tether anchorages
To p s t r a p
Seats with an integrated type
head restraint
Top tether anchorages
To p s t r a p
■Fixing the top strap to the
top tether anchorages
Install the child restraint system
in accordance to the operation
manual enclosed with the child
restraint system.
Rear outboard seats
1 Adjust the head restraint to
the upmost position.
If the head restraint interferes with
your child restraint system, and the
head restraint can be removed,
remove the head restraint.
WA R N I N G
■When installing a child
restraint system
Observe the following precau-
tions.
Failure to do so m ay result in
death or serious injury.
●Firmly attach t he top tether
strap and make sure that the
belt is not twisted.
●Do not attach the top tether
strap to anything other than the
anchor bracket.
●After securing a child restraint
system, never adjust the seat.
●Follow all installation instruc-
tions provided by the child
restraint system manufacturer.
●Outboard rear seats: When
installing the ch ild restraint sys-
tem with the head restraint
being raised, after the head
restraint has been raised and
then the anchor bracket has
been fixed, do not lower the
head restraint.
NOTICE
■Anchor brackets (for top
tether strap)
When not in use, make certain to
close the lid. If it remains open,
the lid may be damaged.
Using a top tether anchor-
age (for Puerto Rico)
Page 71 of 584
711-2. Child safety
COROLLA HV_U
1
For safety and security
Otherwise, put the head restraint in
the upper most position. ( P.136)
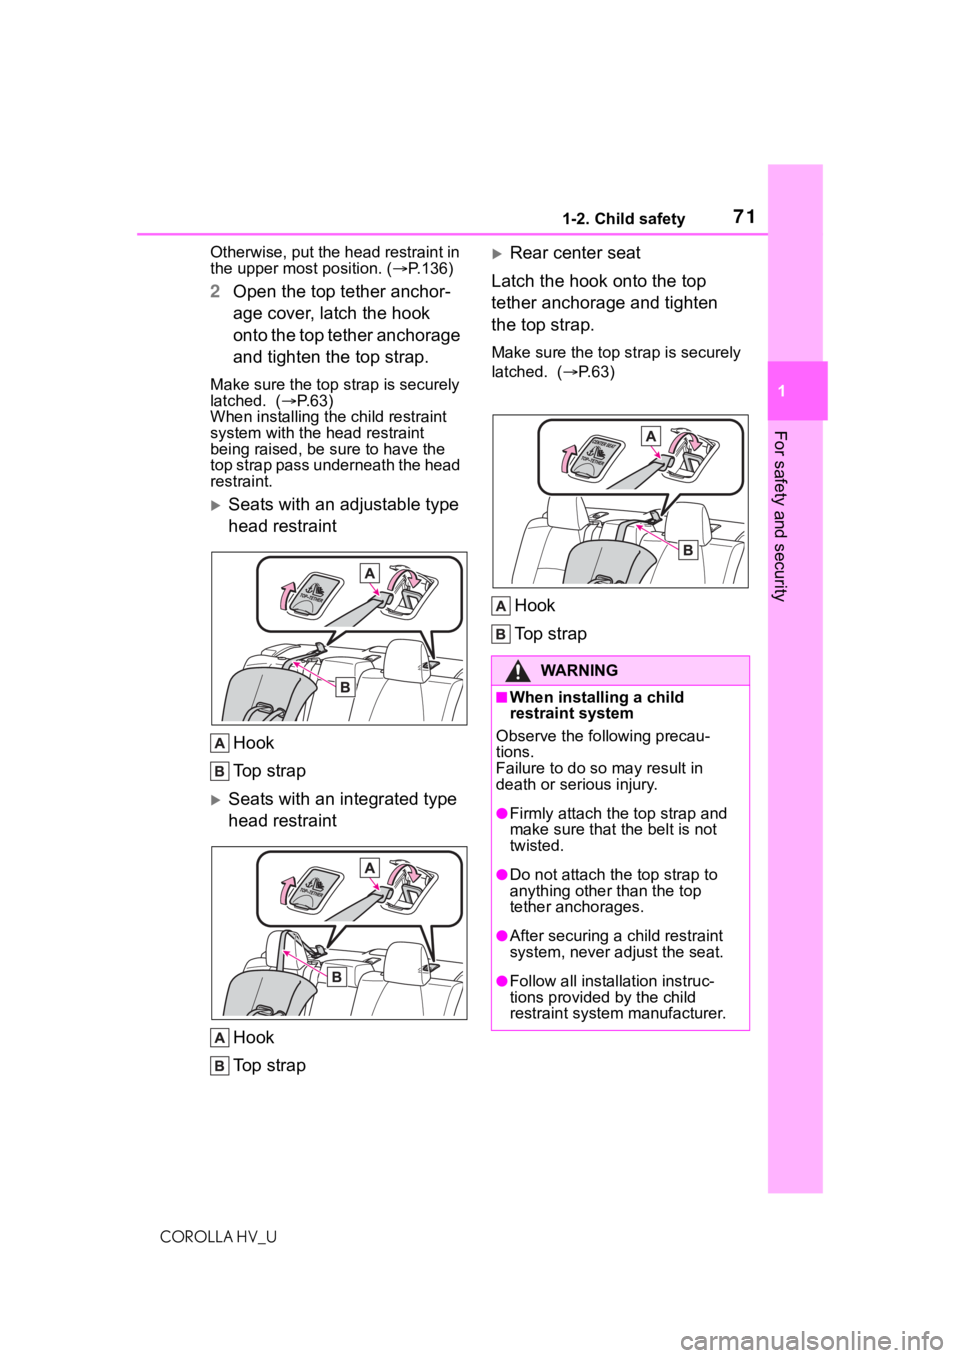
2 Open the top tether anchor-
age cover, latch the hook
onto the top tether anchorage
and tighten the top strap.
Make sure the top strap is securely
latched. ( P.63)
When installing the child restraint
system with the head restraint
being raised, be sure to have the
top strap pass underneath the head
restraint.
Seats with an adjustable type
head restraint
Hook
Top strap
Seats with an integrated type
head restraintHook
Top strap
Rear center seat
Latch the hook onto the top
tether anchorage and tighten
the top strap.
Make sure the top strap is securely
latched. ( P. 6 3 )
Hook
To p s t r a p
WA R N I N G
■When installing a child
restraint system
Observe the following precau-
tions.
Failure to do so may result in
death or serious injury.
●Firmly attach the top strap and
make sure that the belt is not
twisted.
●Do not attach the top strap to
anything other than the top
tether anchorages.
●After securing a child restraint
system, never adjust the seat.
●Follow all installation instruc-
tions provided by the child
restraint system manufacturer.
Page 72 of 584
721-2. Child safety
COROLLA HV_U
WA R N I N G
●Outboard rear seats: When
installing the child restraint sys-
tem with the head restraint
being raised, after the head
restraint has been raised and
then the top tether anchorage
has been fixed, do not lower the
head restraint.
NOTICE
■Top tether anchorages
When not in use, make certain to
close the lid. If it remains open,
the lid may be damaged.
Page 568 of 584
568Alphabetical Index
COROLLA HV_U
B
Back-up lights Replacing light bulbs ............ 466
Wattage ................................ 530
Battery (12-volt battery) Battery checking................... 439
If the 12-volt battery is dis-charged .............................. 513
Preparing and c hecking before
winter.................................. 247
Warning light ........................ 479
Battery (traction battery) ......... 83
Blind Spot Monitor (BSM) ...... 221
Bluetooth
® audio .................... 315
Registering/Conn ecting a Blue-
tooth
® device...................... 317
Bluetooth® button (Setup
screen) .................................. 258
Bluetooth
® details settings ... 272
Bluetooth® setup screen ...... 273
Connecting a Bluetooth® device
........................................... 273
Deleting a Bluetooth
® device275
Detailed settings screen ....... 277
Displaying the Bluetooth
® setup
screen ................................ 272
Editing the Bluetooth
® device
information ......................... 276
Registering a Bluetooth
® device
........................................... 275
Bluetooth
® device information
............................................... 276
Bluetooth
® hands-free system
............................................... 343
Bluetooth
® phone message func-
tion......................................... 354 Calling the message sender. 357
Checking received messages ........................................... 355
Displaying the message screen ........................................... 354 Receiving a mess
age ...........354
Replying to a message (dicta- tion reply)............................356
Replying to a message (quick reply) ..................................356
Bottle holders .........................398
Brake Brake hold ............................170
Fluid..............................438, 528
Parking brake .......................167
Regenerative braking .............81
Warning light.........................478
Brake assist ............................240
Break-in tips ............................147
Brightness control Instrument panel light control101
BSM (Blind Spot Monitor) ......221
C
Care Exterior .................................420
Interior ..................................422
Seat belts .............................422
Wheels and wheel ornaments...........................................420
Cargo capacity ........................155
Chains......................................248
Child restraint system Fixed with a LATCH system ...64
Fixed with a seat belt..............59
Front passenger occupant clas-sification system ...................41
Points to remember ................48
Riding with children ................47
Types of child restraint system installation method ...............50
Using an anchor bracket ........68
Child safety 12-volt battery precautions .439, 516
Airbag precautions .................36
Child restraint system .............50
Page 576 of 584
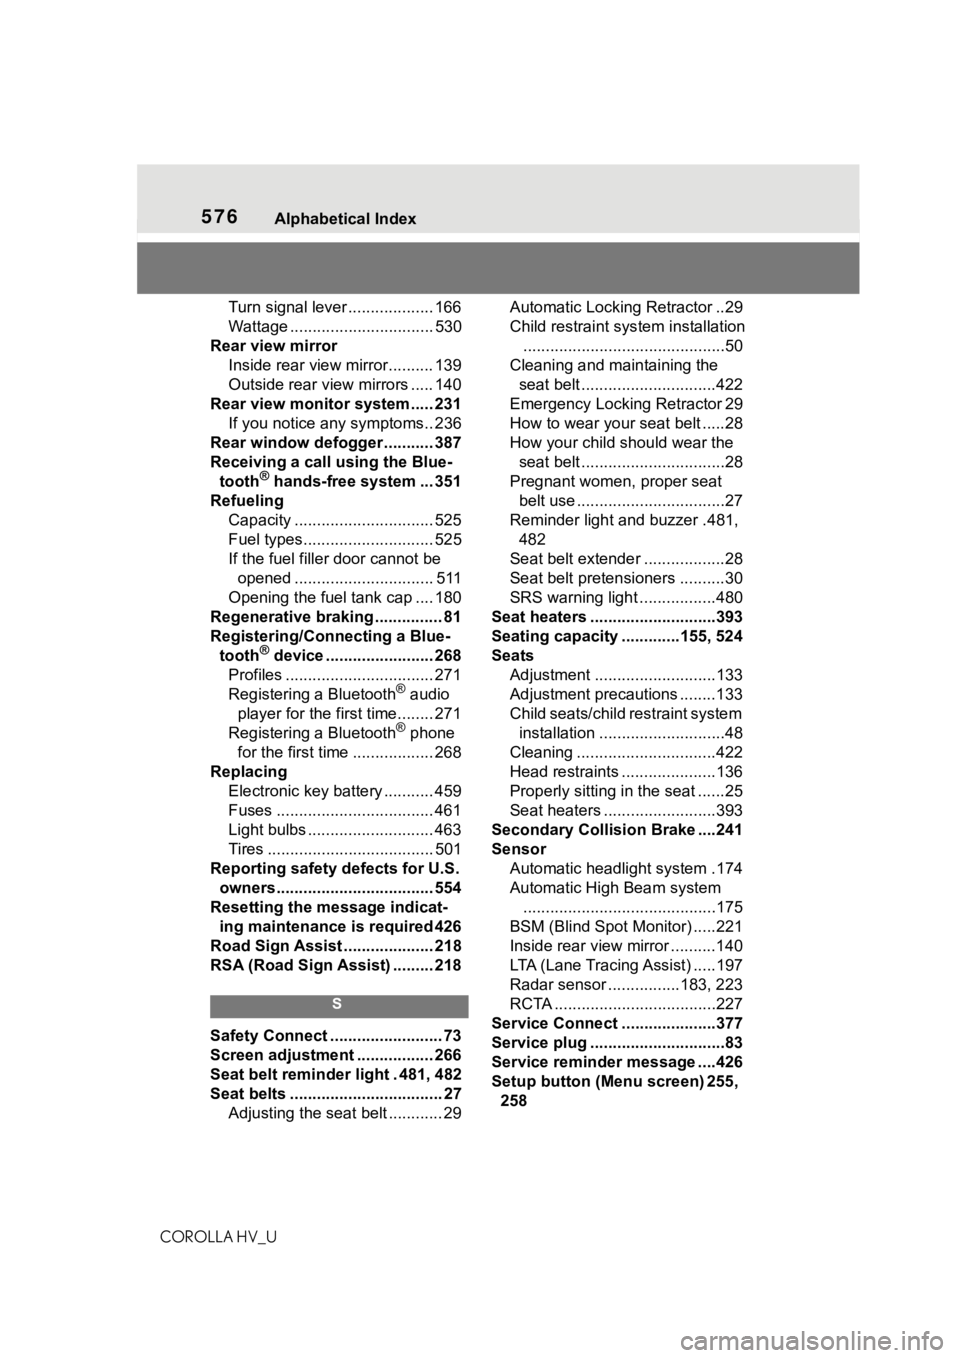
576Alphabetical Index
COROLLA HV_U
Turn signal lever ................... 166
Wattage ................................ 530
Rear view mirror Inside rear view mirror.......... 139
Outside rear view mirrors ..... 140
Rear view monitor system ..... 231 If you notice any symptoms.. 236
Rear window defogger ........... 387
Receiving a call using the Blue- tooth
® hands-free system ... 351
Refueling Capacity ............................... 525
Fuel types............................. 525
If the fuel filler door cannot be opened ............................... 511
Opening the fuel tank cap .... 180
Regenerative braking ............... 81
Registering/Connecting a Blue- tooth
® device ........................ 268
Profiles ................................. 271
Registering a Bluetooth
® audio
player for the first time........ 271
Registering a Bluetooth
® phone
for the first time .................. 268
Replacing Electronic key battery ........... 459
Fuses ................................... 461
Light bulbs ............................ 463
Tires ..................................... 501
Reporting safety defects for U.S. owners................................... 554
Resetting the message indicat- ing maintenance is required 426
Road Sign Assist .................... 218
RSA (Road Sign Assist) ......... 218
S
Safety Connect ......................... 73
Screen adjustment ................. 266
Seat belt reminder light . 481, 482
Seat belts .................................. 27 Adjusting the seat belt ............ 29 Automatic Locking Retractor ..29
Child restraint sys
tem installation
.............................................50
Cleaning and maintaining the seat belt ..............................422
Emergency Locking Retractor 29
How to wear your seat belt .....28
How your child should wear the seat belt ................................28
Pregnant women, proper seat belt use .................................27
Reminder light and buzzer .481, 482
Seat belt extender ..................28
Seat belt pretensioners ..........30
SRS warning light .................480
Seat heaters ............................393
Seating capacity .............155, 524
Seats Adjustment ...........................133
Adjustment precautions ........133
Child seats/child restraint system installation ............................48
Cleaning ...............................422
Head restraints .....................136
Properly sitting in the seat ......25
Seat heaters ....... ..................393
Secondary Collision Brake ....241
Sensor Automatic headlight system .174
Automatic High Beam system...........................................175
BSM (Blind Spot M onitor) .....221
Inside rear view mirror ..........140
LTA (Lane Tracing Assist) .....197
Radar sensor ................183, 223
RCTA ....................................227
Service Connect ... ..................377
Service plug ..............................83
Service reminder message ....426
Setup button (Menu screen) 255, 258