light TOYOTA COROLLA HYBRID 2021 (in English) Owner's Guide
[x] Cancel search | Manufacturer: TOYOTA, Model Year: 2021, Model line: COROLLA HYBRID, Model: TOYOTA COROLLA HYBRID 2021Pages: 584, PDF Size: 19.59 MB
Page 90 of 584
901-5. Theft deterrent system
COROLLA HV_U
■Items to check before lock-
ing the vehicle
To prevent unexpected trigger-
ing of the alarm and vehicle
theft, make sure of the following:
Nobody is in the vehicle.
The windows are closed
before the alarm is set.
No valuables or other per-
sonal items are left in the
vehicle.
■Setting
Close the doors, trunk and
hood, and lock all the doors.
The system will set automati-
cally after 30 seconds.
The indicator light changes from
NOTICE
■To ensure the system oper-
ates correctly
Do not modify or remove the sys-
tem. If modified or removed, the
proper operation of the system
cannot be guaranteed.
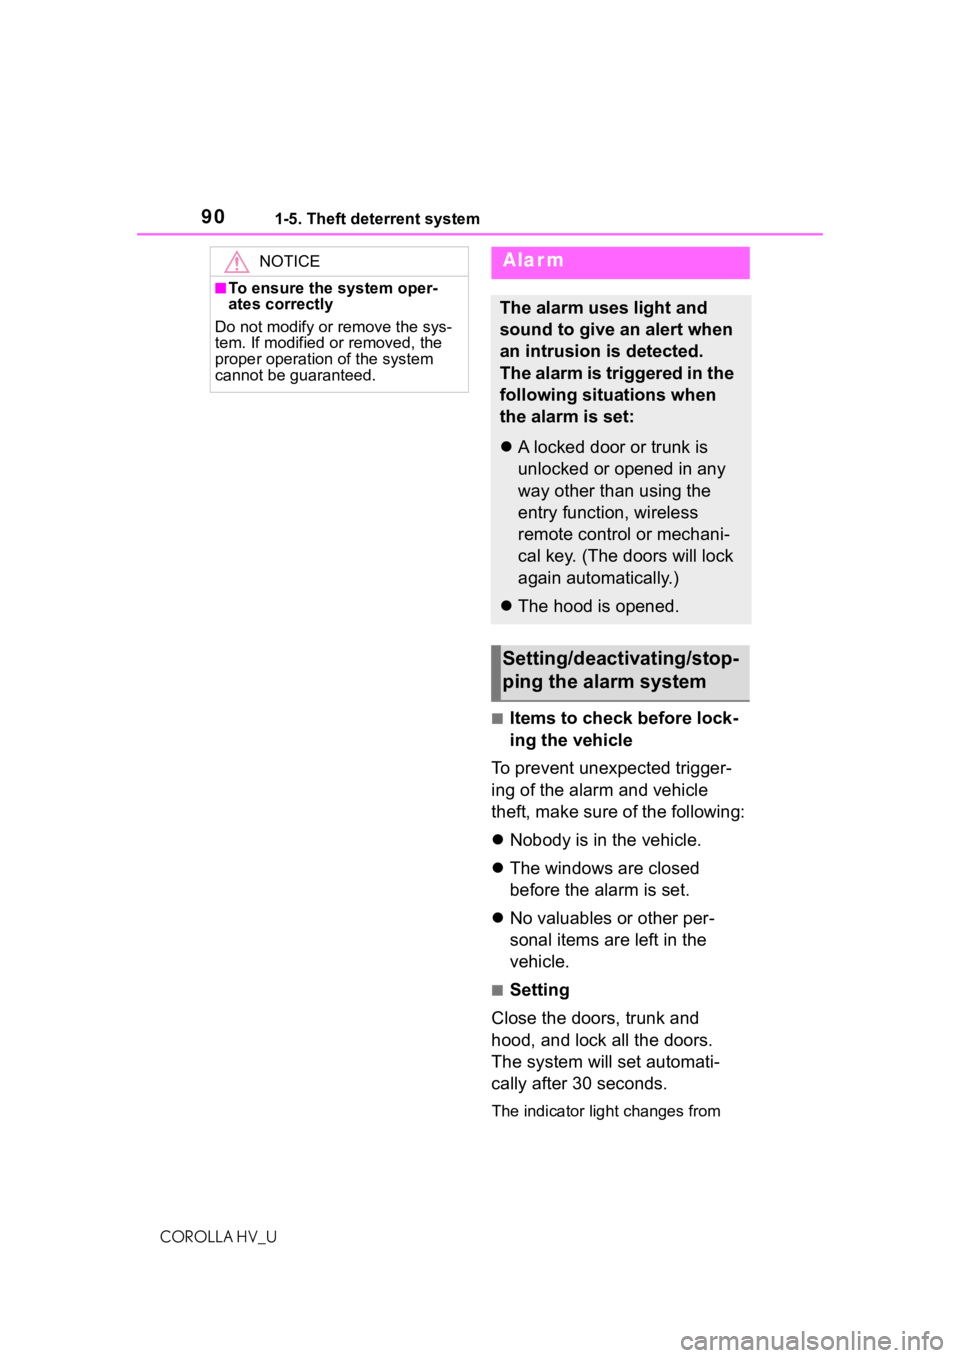
Alar m
The alarm uses light and
sound to give an alert when
an intrusion is detected.
The alarm is triggered in the
following situations when
the alarm is set:
A locked door or trunk is
unlocked or opened in any
way other than using the
entry function, wireless
remote control or mechani-
cal key. (The doors will lock
again automatically.)
The hood is opened.
Setting/deactivating/stop-
ping the alarm system
Page 93 of 584
93
COROLLA HV_U
2
2
Vehicle status information and indicators
Vehicle status informationand indicators
.2-1. Instrument cluster
Warning lights and indica-tors ............................... 94
Gauges and meters ....... 98
Multi-information display .................................. 103
Energy monitor/consump- tion screen................. 109
Page 94 of 584
942-1. Instrument cluster
COROLLA HV_U
2-1.Instrument cluster
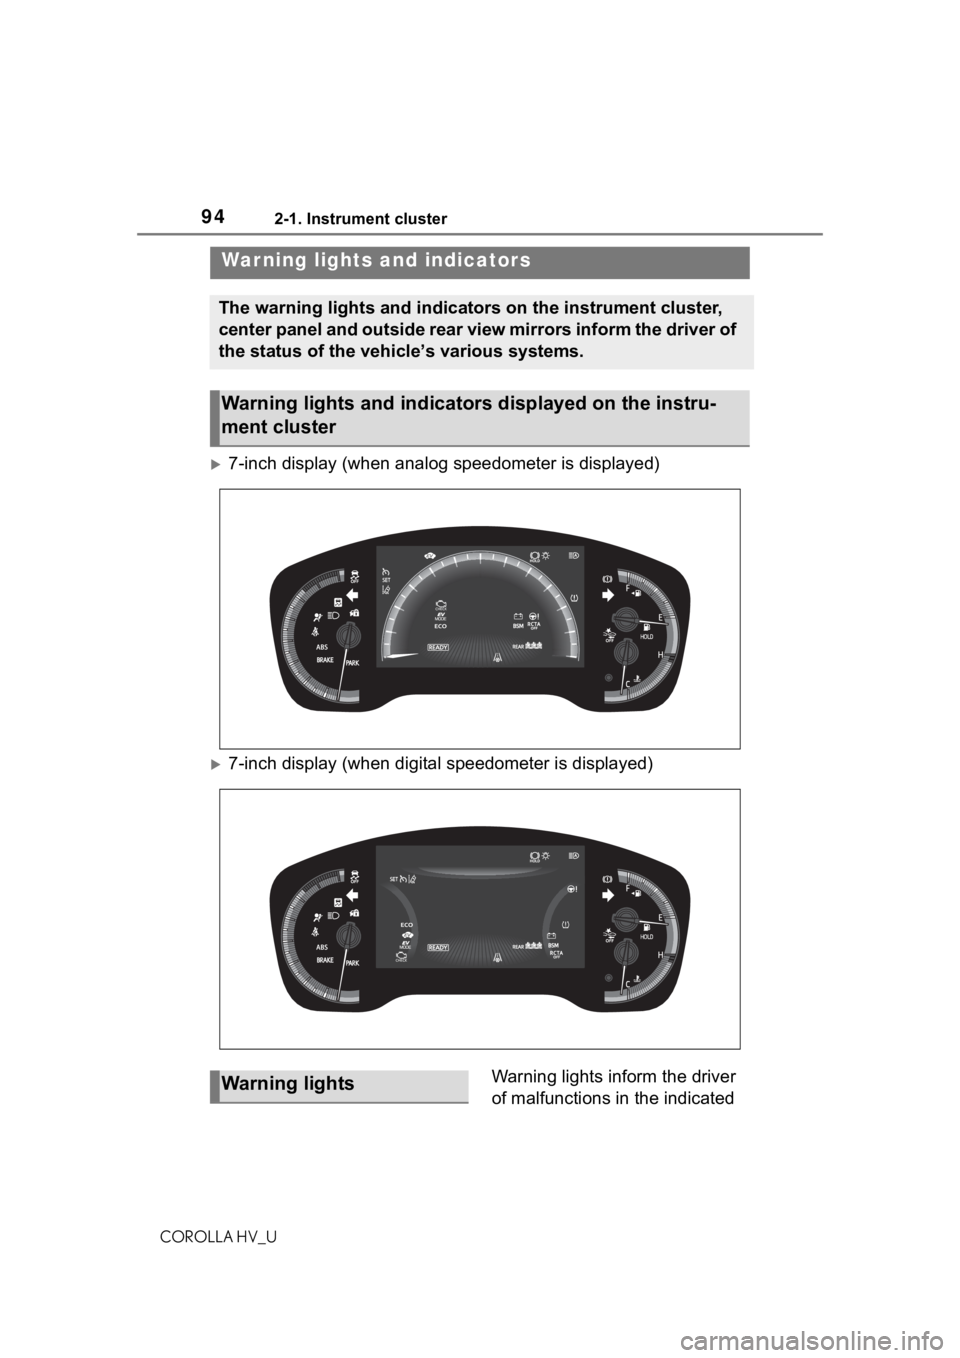
7-inch display (when analog speedometer is displayed)
7-inch display (when digital speedometer is displayed)Warning lights inform the driver
of malfunctions in the indicated
War ning lights and indicators
The warning lights and indicators on the instrument cluster,
center panel and outside rear view mirrors inform the driver of
the status of the vehicle’s various systems.
Warning lights and indicators displayed on the instru-
ment cluster
Warning lights
Page 95 of 584
952-1. Instrument cluster
COROLLA HV_U
2
Vehicle status information and indicators
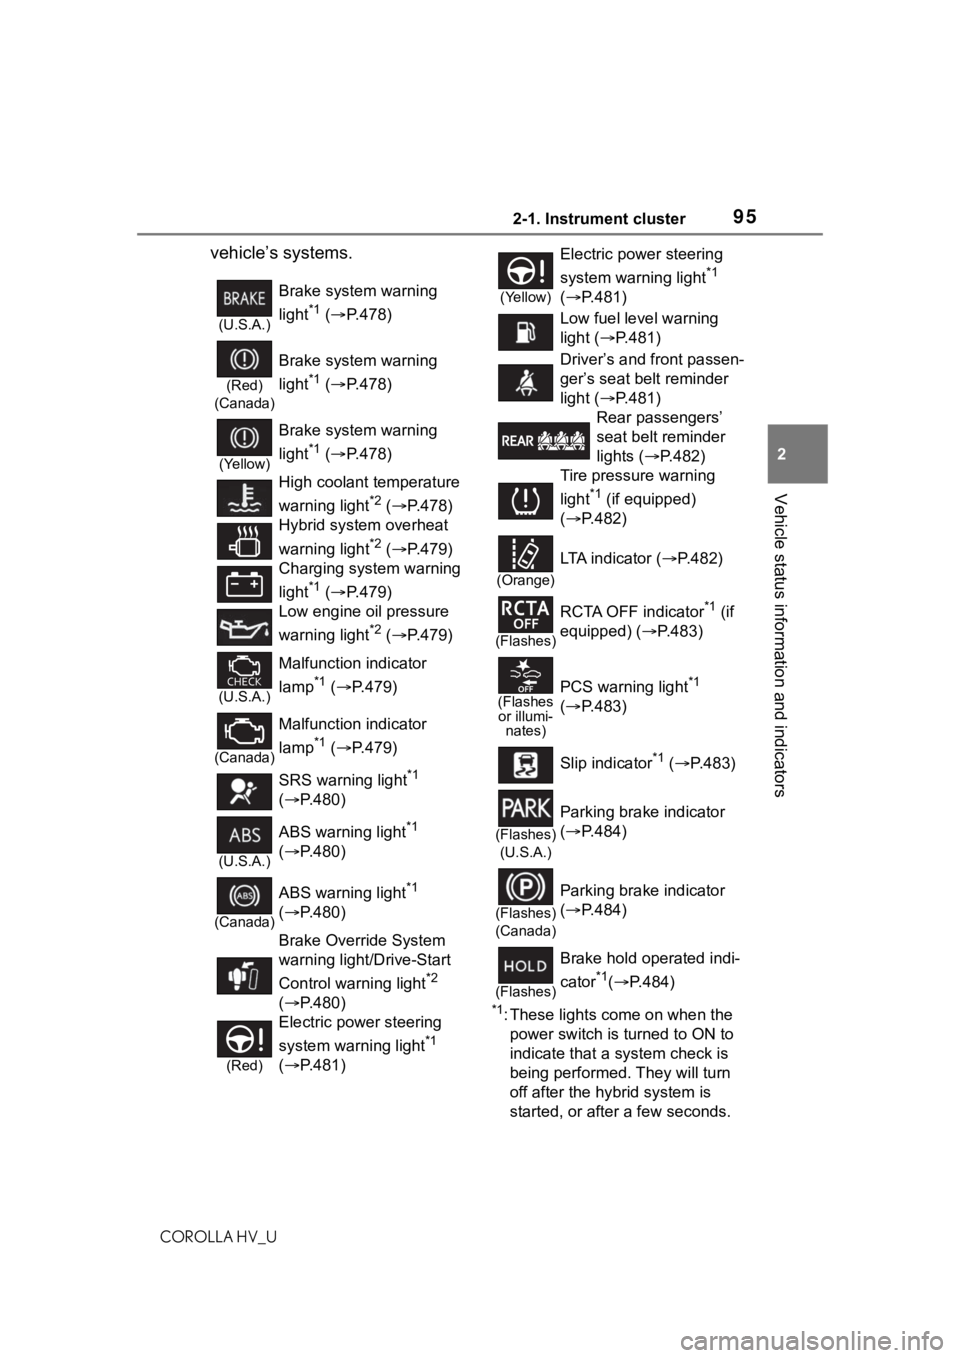
vehicle’s systems.
*1: These lights come on when the power switch is turned to ON to
indicate that a system check is
being performed. They will turn
off after the hybrid system is
started, or after a few seconds.
(U.S.A.)
Brake system warning
light
*1 ( P.478)
(Red)
(Canada)
Brake system warning
light
*1 ( P.478)
(Yellow)
Brake system warning
light
*1 ( P.478)
High coolant temperature
warning light
*2 ( P.478)
Hybrid system overheat
warning light
*2 ( P.479)
Charging system warning
light
*1 ( P.479)
Low engine oil pressure
warning light
*2 ( P.479)
(U.S.A.)
Malfunction indicator
lamp
*1 ( P.479)
(Canada)
Malfunction indicator
lamp
*1 ( P.479)
SRS warning light
*1
( P.480)
(U.S.A.)
ABS warning light*1
( P.480)
(Canada)
ABS warning light*1
( P.480)
Brake Override System
warning light/Drive-Start
Control warning light
*2
( P.480)
(Red)
Electric power steering
system warning light
*1
( P.481)
(Yellow)
Electric power steering
system warning light
*1
( P.481)
Low fuel level warning
light ( P.481)
Driver’s and front passen-
ger’s seat belt reminder
light ( P.481)
Rear passengers’
seat belt reminder
lights ( P.482)
Tire pressure warning
light
*1 (if equipped)
( P.482)
(Orange)
LTA indicator ( P.482)
(Flashes)
RCTA OFF indicator*1 (if
equipped) ( P.483)
(Flashes
or illumi- nates)PCS warning light*1
( P.483)
Slip indicator
*1 ( P.483)
(Flashes)
(U.S.A.)
Parking brake indicator
( P.484)
(Flashes)
(Canada)
Parking brake indicator
( P.484)
(Flashes)
Brake hold operated indi-
cator
*1( P.484)
Page 96 of 584
962-1. Instrument cluster
COROLLA HV_UThere may be a malfunction in a
system if the lights do not come
on, or turn off. Have the vehicle
inspected by your Toyota dealer.
*2: This light illuminates on the
multi-information display.
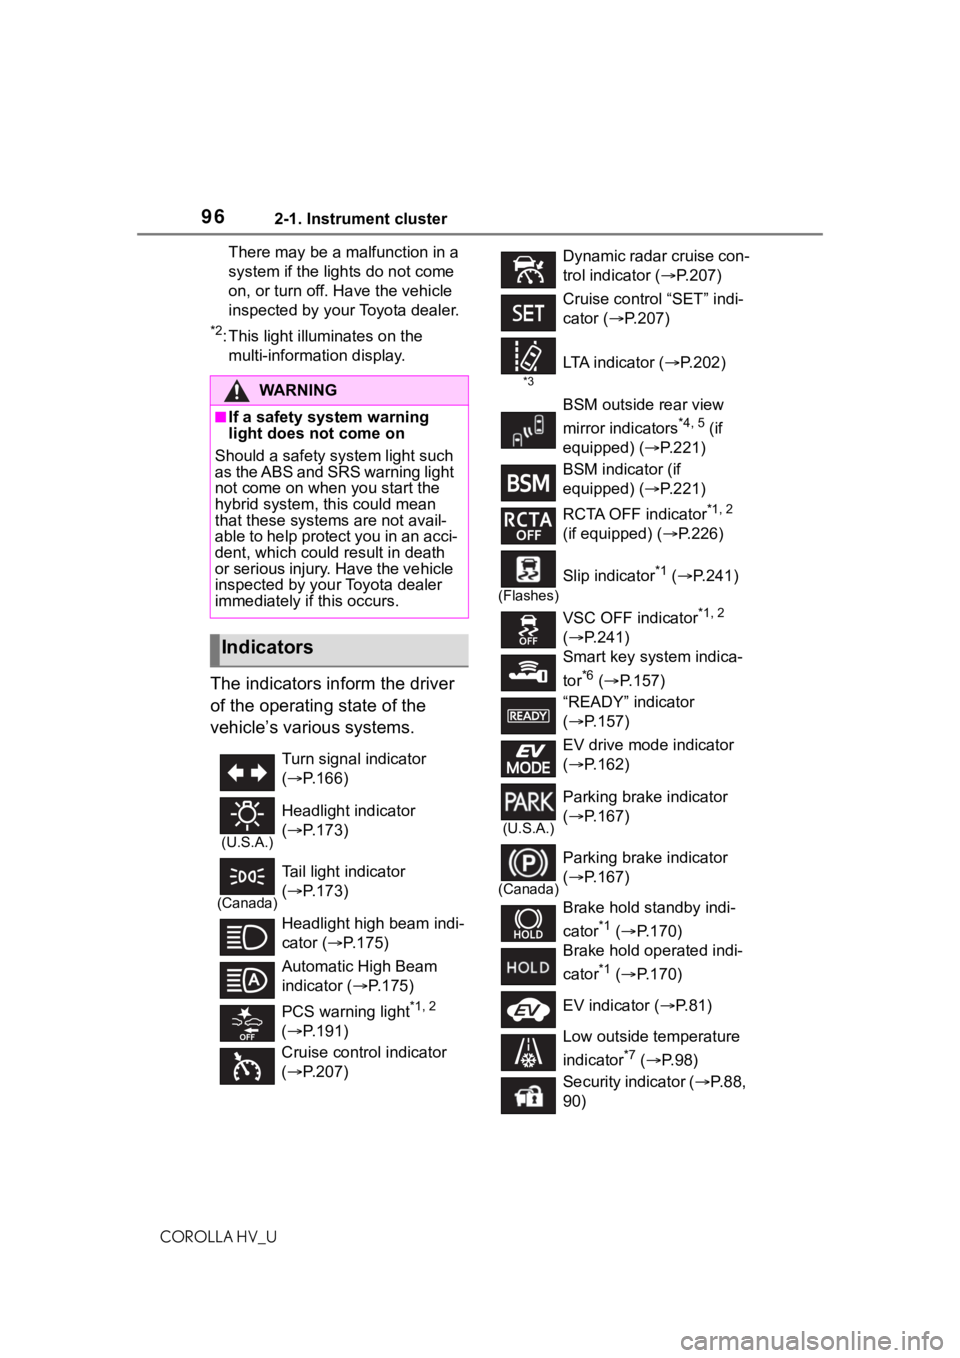
The indicators inform the driver
of the operating state of the
vehicle’s various systems.
WA R N I N G
■If a safety system warning
light does not come on
Should a safety system light such
as the ABS and SRS warning light
not come on when you start the
hybrid system, th is could mean
that these systems are not avail-
able to help protect you in an acci-
dent, which could result in death
or serious injury. Have the vehicle
inspected by your Toyota dealer
immediately if this occurs.
Indicators
Turn signal indicator
( P.166)
(U.S.A.)
Headlight indicator
( P.173)
(Canada)
Tail light indicator
( P.173)
Headlight high beam indi-
cator ( P.175)
Automatic High Beam
indicator ( P.175)
PCS warning light
*1, 2
( P.191)
Cruise control indicator
( P.207)
Dynamic radar cruise con-
trol indicator ( P.207)
Cruise control “SET” indi-
cator ( P.207)
*3
LTA i n d i c a t o r ( P.202)
BSM outside rear view
mirror indicators
*4, 5 (if
equipped) (P.221)
BSM indicator (if
equipped) (P.221)
RCTA OFF indicator
*1, 2
(if equipped) ( P.226)
(Flashes)
Slip indicator*1 ( P.241)
VSC OFF indicator
*1, 2
( P.241)
Smart key system indica-
tor
*6 ( P.157)
“READY” indicator
( P.157)
EV drive mode indicator
( P.162)
(U.S.A.)
Parking brake indicator
( P.167)
(Canada)
Parking brake indicator
( P.167)
Brake hold standby indi-
cator
*1 ( P.170)
Brake hold operated indi-
cator
*1 ( P.170)
EV indicator ( P.81)
Low outside temperature
indicator
*7 ( P. 9 8 )
Security indicator ( P. 8 8 ,
90)
Page 97 of 584
972-1. Instrument cluster
COROLLA HV_U
2
Vehicle status information and indicators
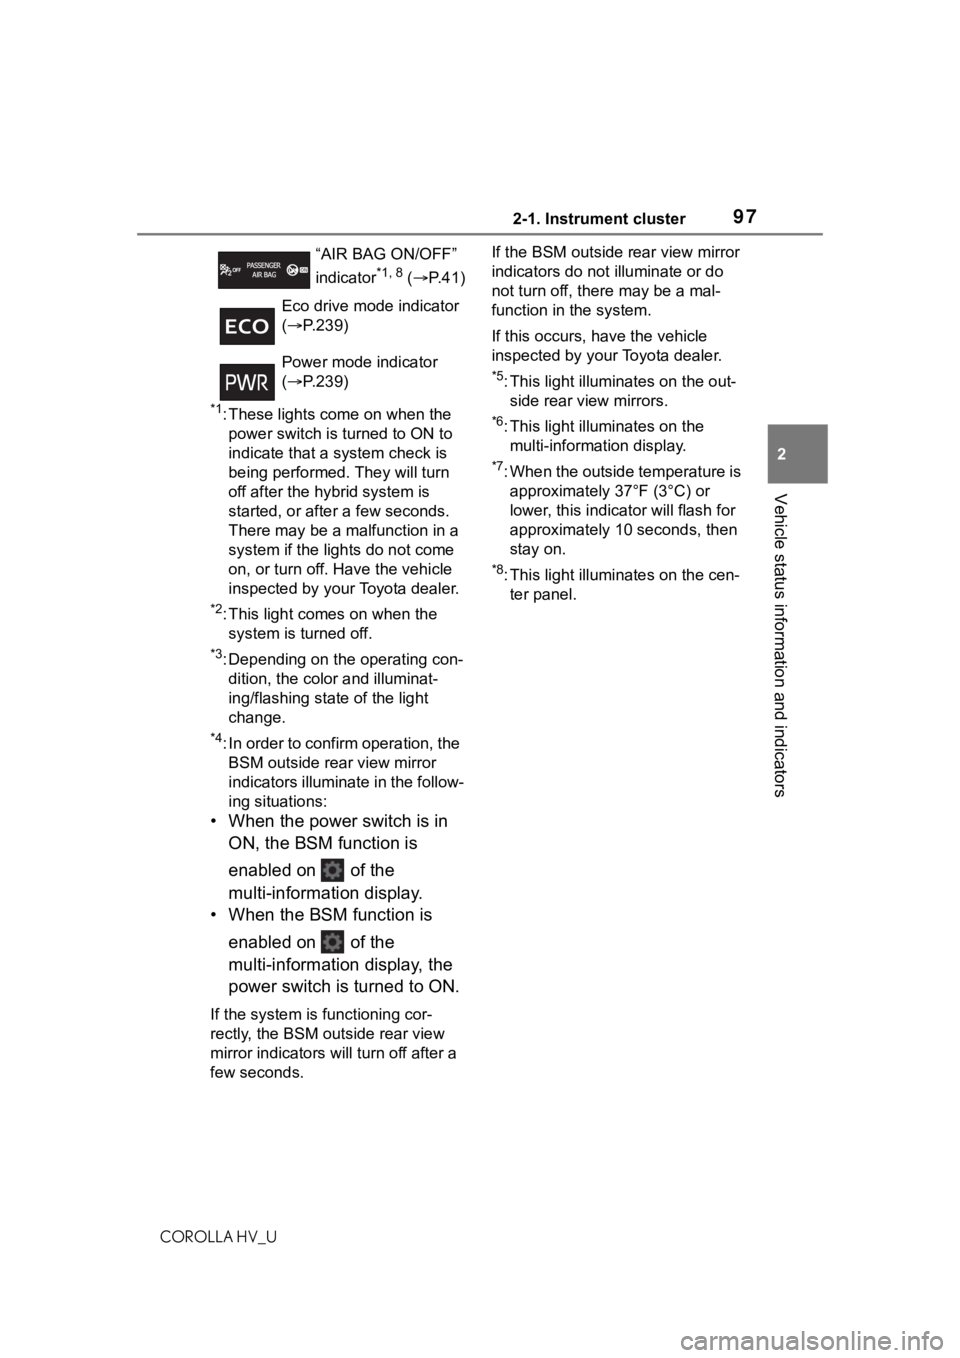
*1: These lights come on when the power switch is turned to ON to
indicate that a system check is
being performed. They will turn
off after the hybrid system is
started, or after a few seconds.
There may be a malfunction in a
system if the lights do not come
on, or turn off. Have the vehicle
inspected by your Toyota dealer.
*2: This light comes on when the system is turned off.
*3: Depending on the operating con-dition, the color and illuminat-
ing/flashing state of the light
change.
*4: In order to confirm operation, the BSM outside rear view mirror
indicators illumina te in the follow-
ing situations:
• When the power switch is in
ON, the BSM function is
enabled on of the
multi-information display.
• When the BSM function is
enabled on of the
multi-information display, the
power switch is turned to ON.
If the system is functioning cor-
rectly, the BSM outside rear view
mirror indicators will turn off after a
few seconds. If the BSM outside rear view mirror
indicators do not illuminate or do
not turn off, there may be a mal-
function in the system.
If this occurs, have the vehicle
inspected by your Toyota dealer.
*5: This light illuminates on the out-
side rear view mirrors.
*6: This light illuminates on the multi-information display.
*7: When the outside temperature is approximately 37°F (3°C) or
lower, this indicator will flash for
approximately 10 seconds, then
stay on.
*8: This light illuminates on the cen-ter panel.
“AIR BAG ON/OFF”
indicator
*1, 8 (
P. 4 1 )
Eco drive mode indicator
( P.239)
Power mode indicator
( P.239)
Page 101 of 584
1012-1. Instrument cluster
COROLLA HV_U
2
Vehicle status information and indicators
different distances independently.
To reset, display the desired trip
meter and press and hold the dis-
play change button.
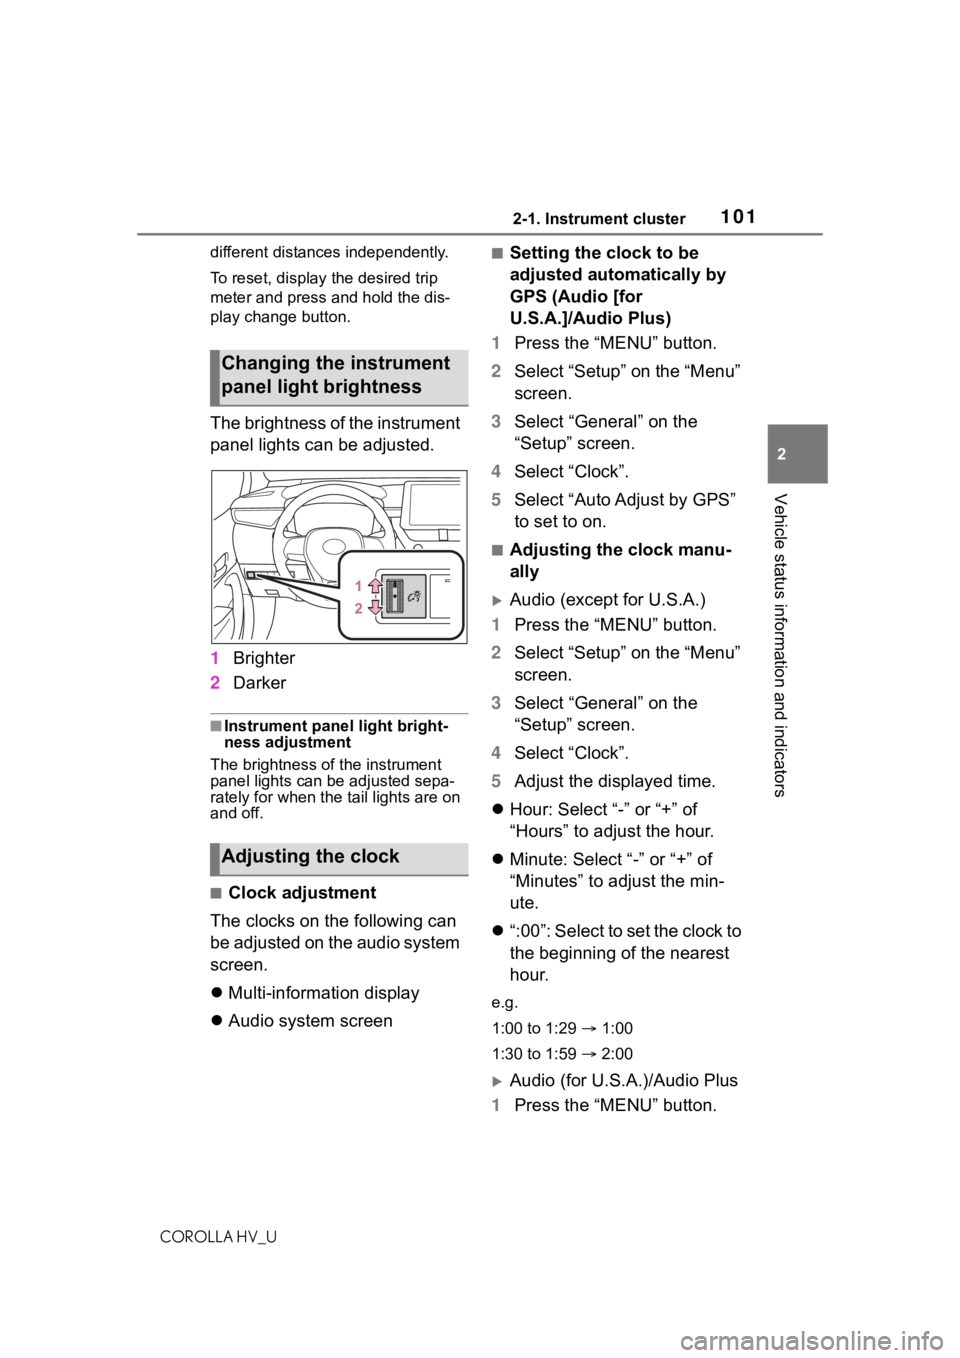
The brightness of the instrument
panel lights can be adjusted.
1 Brighter
2 Darker
■Instrument panel light bright-
ness adjustment
The brightness of the instrument
panel lights can be adjusted sepa-
rately for when the tail lights are on
and off.
■Clock adjustment
The clocks on the following can
be adjusted on the audio system
screen.
Multi-information display
Audio system screen
■Setting the clock to be
adjusted automatically by
GPS (Audio [for
U.S.A.]/Audio Plus)
1 Press the “MENU” button.
2 Select “Setup” on the “Menu”
screen.
3 Select “General” on the
“Setup” screen.
4 Select “Clock”.
5 Select “Auto Adjust by GPS”
to set to on.
■Adjusting the clock manu-
ally
Audio (except for U.S.A.)
1 Press the “MENU” button.
2 Select “Setup” on the “Menu”
screen.
3 Select “General” on the
“Setup” screen.
4 Select “Clock”.
5 Adjust the displayed time.
Hour: Select “-” or “+” of
“Hours” to adjust the hour.
Minute: Select “-” or “+” of
“Minutes” to adjust the min-
ute.
“:00”: Select to set the clock to
the beginning of the nearest
hour.
e.g.
1:00 to 1:29 1:00
1:30 to 1:59 2:00
Audio (for U.S.A.)/Audio Plus
1 Press the “MENU” button.
Changing the instrument
panel light brightness
Adjusting the clock
Page 102 of 584
1022-1. Instrument cluster
COROLLA HV_U
2Select “Setup” on the “Menu”
screen.
3 Select “General” on the
“Setup” screen.
4 Select “Clock”.
5 Select “Auto Adjust by GPS”
to set to off.
6 Adjust the displayed time.
Hour: Select “-” or “+” of
“Hours” to adjust the hour.
Minute: Select “-” or “+” of
“Minutes” to adjust the min-
ute.
“:00”: Select to set the clock to
the beginning of the nearest
hour.
e.g.
1:00 to 1:29 1:00
1:30 to 1:59 2:00
■Setting the time zone
(Audio [for U.S.A.]/Audio
Plus)
1 Press the “MENU” button.
2 Select “Setup” on the “Menu”
screen.
3 Select “General” on the
“Setup” screen.
4 Select “Clock”.
5 Select “Time Zone”.
Select the desired time zone.
■Setting daylight saving time
(Audio [for U.S.A.]/Audio
Plus)
1 Press the “MENU” button. 2
Select “Setup” on the “Menu”
screen.
3 Select “General” on the
“Setup” screen.
4 Select “Clock”.
5 Select “Daylight Saving
Time” then on/off.
■Changing the clock
between 12-hour/24-hour
format
1 Press the “MENU” button.
2 Select “Setup” on the “Menu”
screen.
3 Select “General” on the
“Setup” screen.
4 Select “Clock”.
5 Select “24-Hour Time For-
mat” and then on/off.
When set to off, the clock is dis-
played in 12 hour time format.
■Clock settings screen (Audio
[for U.S.A.]/Audio Plus)
If “Clock : 00” is displayed when
is selected on the multi-information
display, the system may be malfunc-
tioning. Have the vehicle inspected
by your Toyota dealer.
Page 103 of 584
1032-1. Instrument cluster
COROLLA HV_U
2
Vehicle status information and indicators
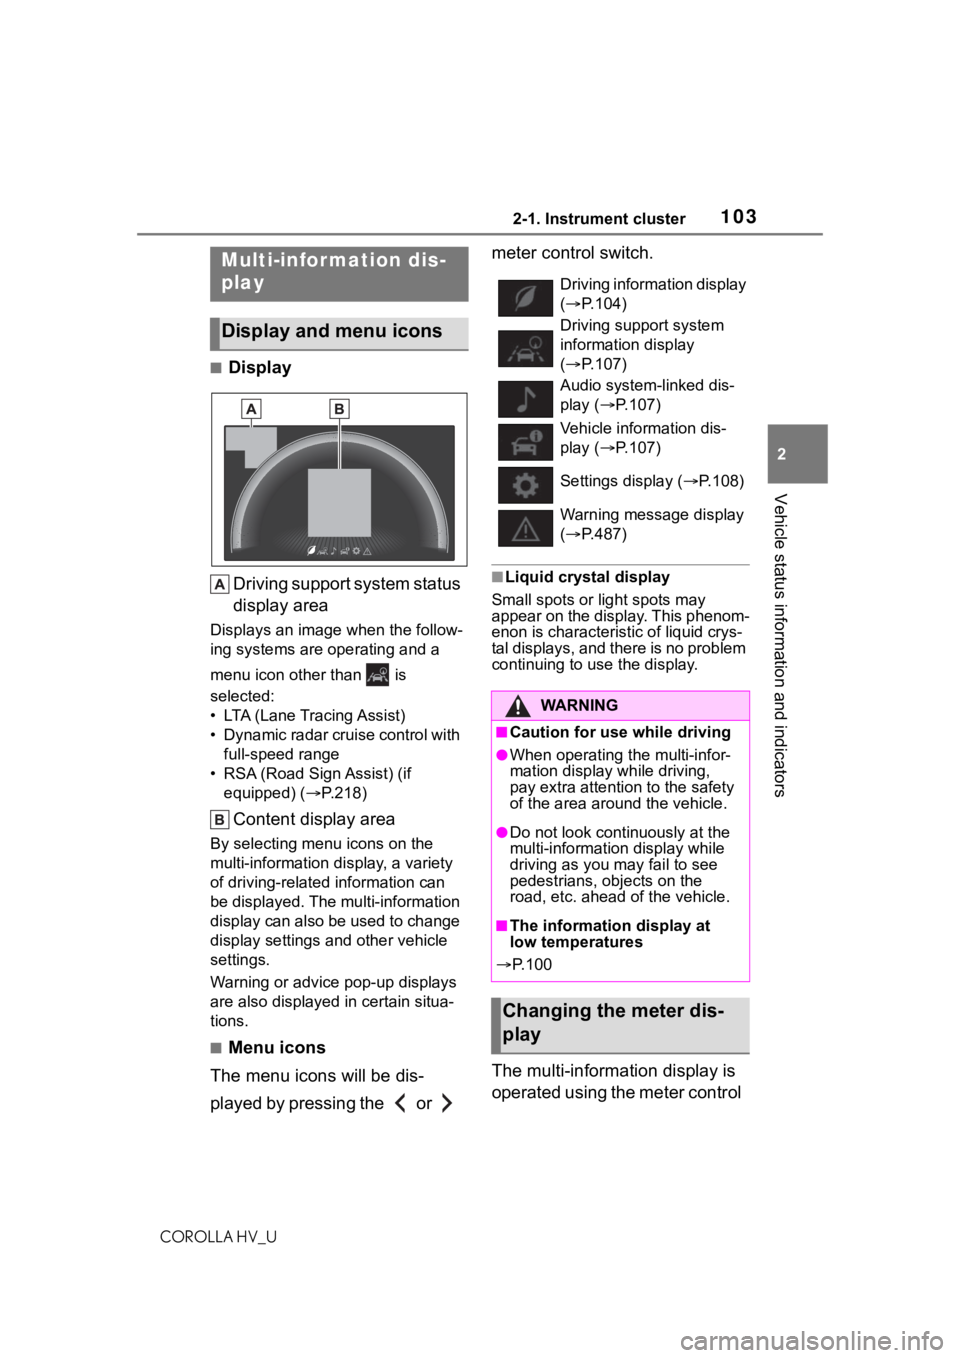
■Display Driving support system status
display area
Displays an image when the follow-
ing systems are operating and a
menu icon other than is
selected:
• LTA (Lane Tracing Assist)
• Dynamic radar cruise control with full-speed range
• RSA (Road Sign Assist) (if equipped) ( P.218)
Content display area
By selecting menu icons on the
multi-information di splay, a variety
of driving-related information can
be displayed. The multi-information
display can also be used to change
display settings and other vehicle
settings.
Warning or advice pop-up displays
are also displayed in certain situa-
tions.
■Menu icons
The menu icons will be dis-
played by pressing the or meter control switch.
■Liquid crystal display
Small spots or light spots may
appear on the display. This phenom-
enon is characteristic of liquid crys-
tal displays, and there is no problem
continuing to use the display.
The multi-information display is
operated using the meter control
Multi-infor mation dis-
play
Display and menu icons
Driving information display
( P.104)
Driving support system
information display
( P.107)
Audio system-linked dis-
play ( P.107)
Vehicle information dis-
play ( P.107)
Settings display ( P.108)
Warning message display
( P.487)
WA R N I N G
■Caution for use while driving
●When operating the multi-infor-
mation display while driving,
pay extra attention to the safety
of the area around the vehicle.
●Do not look continuously at the
multi-informatio n display while
driving as you may fail to see
pedestrians, objects on the
road, etc. ahead of the vehicle.
■The information display at
low temperatures
P. 1 0 0
Changing the meter dis-
play
Page 112 of 584
1122-1. Instrument cluster
COROLLA HV_UThese images are examples only,
and may vary slightly from actual condi-
tions.
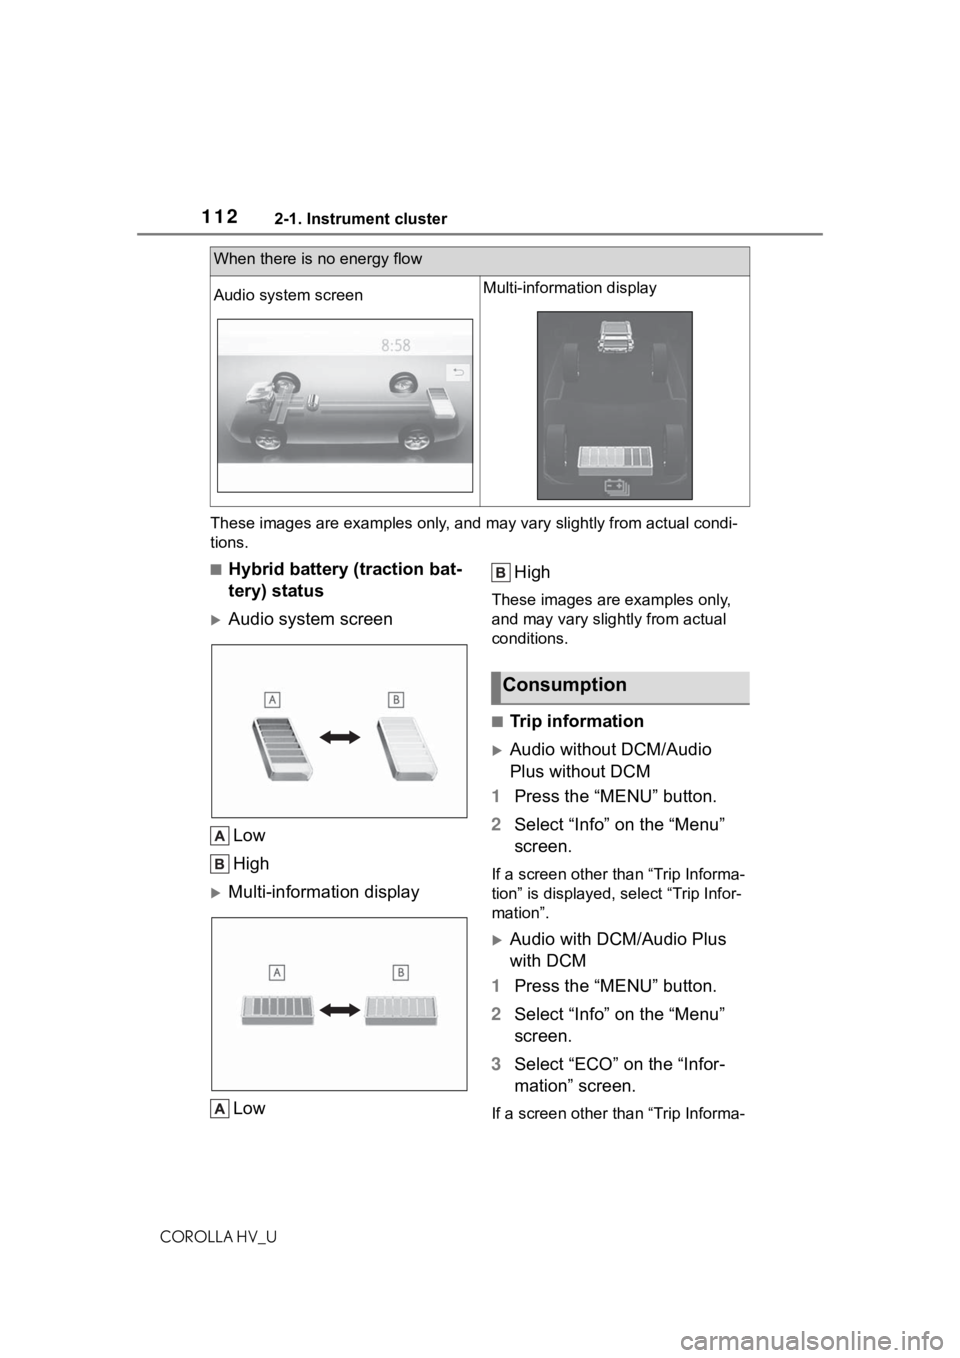
■Hybrid battery (traction bat-
tery) status
Audio system screen
Low
High
Multi-information displayLow High
These images are examples only,
and may vary slight
ly from actual
conditions.
■Trip information
Audio without DCM/Audio
Plus without DCM
1 Press the “MENU” button.
2 Select “Info” on the “Menu”
screen.
If a screen other than “Trip Informa-
tion” is displayed, select “Trip Infor-
mation”.
Audio with DCM/Audio Plus
with DCM
1 Press the “MENU” button.
2 Select “Info” on the “Menu”
screen.
3 Select “ECO” on the “Infor-
mation” screen.
If a screen other than “Trip Informa-
When there is no energy flow
Audio system screenMulti-information display
Consumption