height TOYOTA COROLLA HYBRID 2021 Owners Manual (in English)
[x] Cancel search | Manufacturer: TOYOTA, Model Year: 2021, Model line: COROLLA HYBRID, Model: TOYOTA COROLLA HYBRID 2021Pages: 584, PDF Size: 19.59 MB
Page 29 of 584
291-1. For safe use
COROLLA HV_U
1
For safety and security
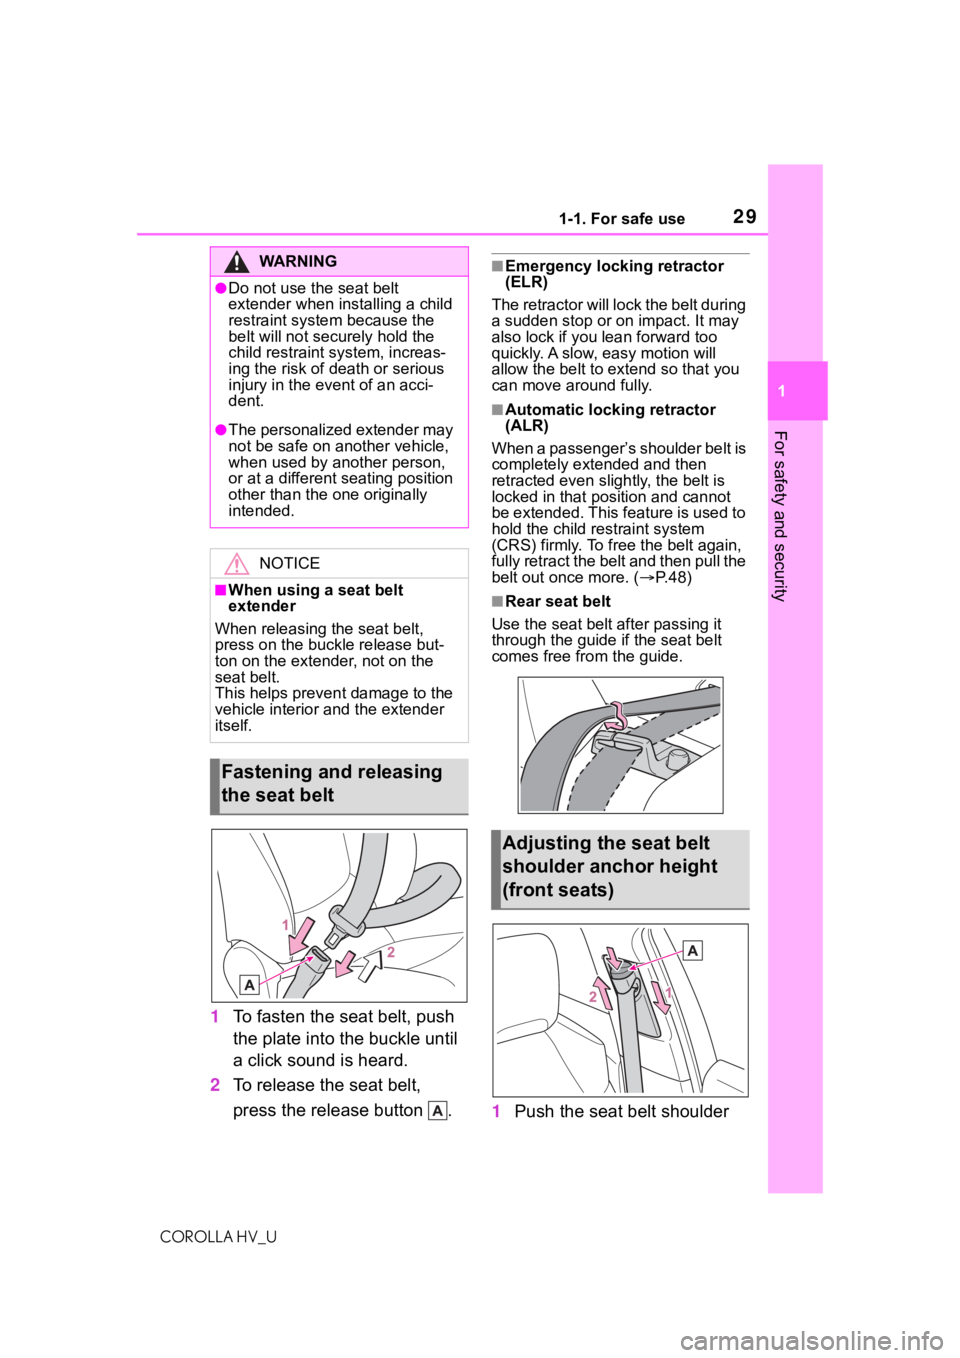
1 To fasten the seat belt, push
the plate into the buckle until
a click sound is heard.
2 To release the seat belt,
press the release button .
■Emergency locking retractor
(ELR)
The retractor will lock the belt during
a sudden stop or on impact. It may
also lock if you lean forward too
quickly. A slow, easy motion will
allow the belt to extend so that you
can move around fully.
■Automatic locking retractor
(ALR)
When a passenger’s shoulder belt is
completely extended and then
retracted even slightly, the belt is
locked in that position and cannot
be extended. This feature is used to
hold the child restraint system
(CRS) firmly. To free the belt again,
fully retract the belt and then pull the
belt out once more. ( P. 4 8 )
■Rear seat belt
Use the seat belt after passing it
through the guide if the seat belt
comes free fro m the guide.
1Push the seat belt shoulder
WA R N I N G
●Do not use the seat belt
extender when installing a child
restraint system because the
belt will not securely hold the
child restraint system, increas-
ing the risk of death or serious
injury in the event of an acci-
dent.
●The personalized extender may
not be safe on another vehicle,
when used by another person,
or at a different seating position
other than the one originally
intended.
NOTICE
■When using a seat belt
extender
When releasing the seat belt,
press on the buckle release but-
ton on the extender, not on the
seat belt.
This helps prevent damage to the
vehicle interior and the extender
itself.
Fastening and releasing
the seat belt
Adjusting the seat belt
shoulder anchor height
(front seats)
Page 30 of 584
301-1. For safe use
COROLLA HV_U
anchor down while pressing
the release button .
2 Push the seat belt shoulder
anchor up while pressing the
release button .
Move the height adjuster up and
down as needed until you hear a
click.
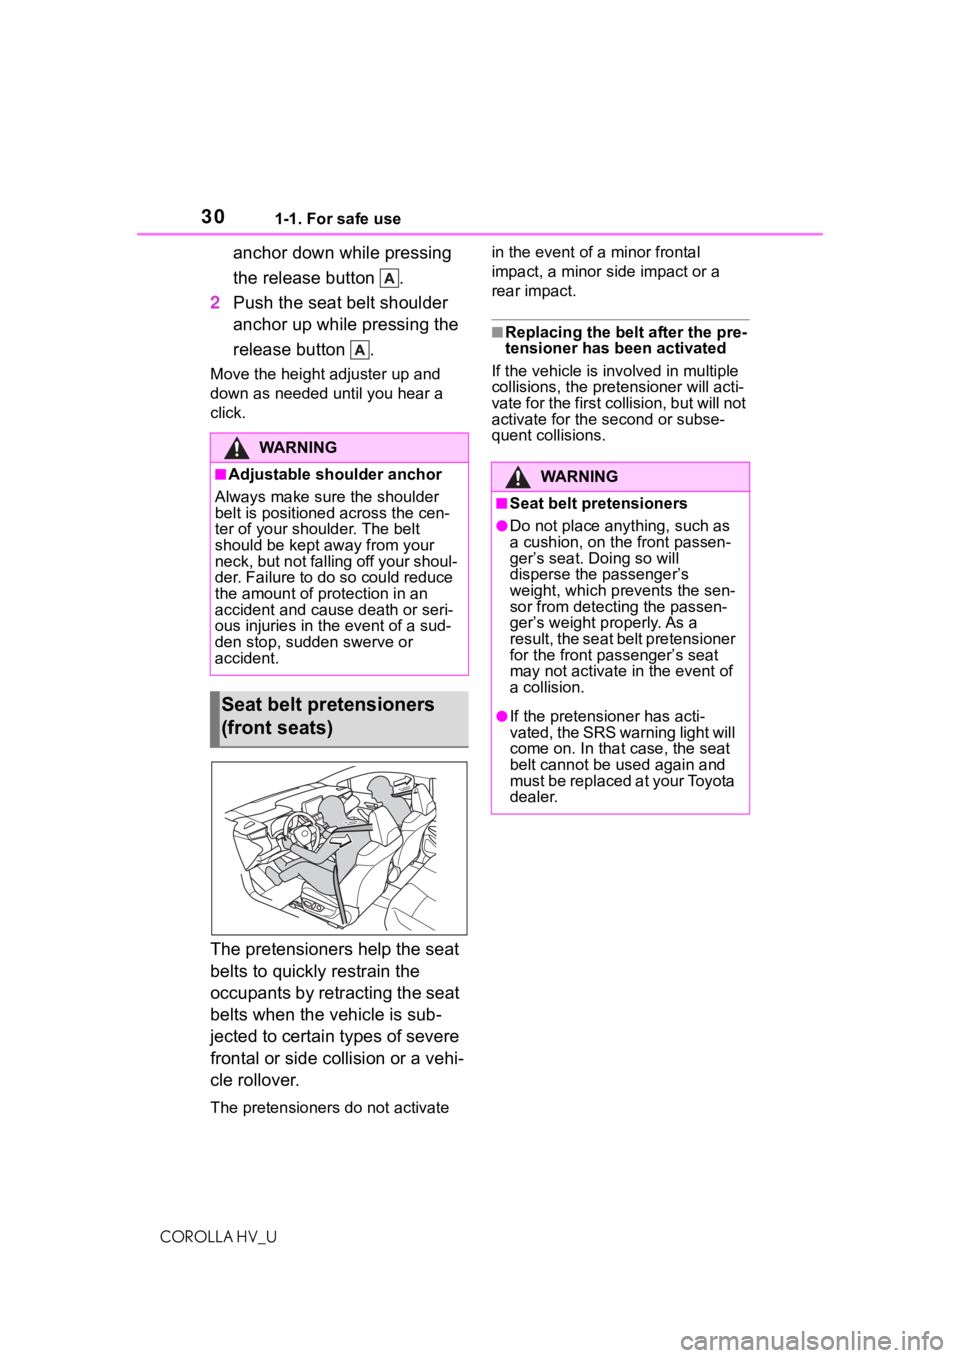
The pretensioners help the seat
belts to quickly restrain the
occupants by retracting the seat
belts when the vehicle is sub-
jected to certain types of severe
frontal or side collision or a vehi-
cle rollover.
The pretensioners do not activate in the event of a minor frontal
impact, a minor s
ide impact or a
rear impact.
■Replacing the belt after the pre-
tensioner has been activated
If the vehicle is involved in multiple
collisions, the pretensioner will acti-
vate for the first collision, but will not
activate for the second or subse-
quent collisions.
WA R N I N G
■Adjustable shoulder anchor
Always make sure the shoulder
belt is positioned across the cen-
ter of your shoulder. The belt
should be kept away from your
neck, but not falling off your shoul-
der. Failure to do so could reduce
the amount of protection in an
accident and cause death or seri-
ous injuries in the event of a sud-
den stop, sudden swerve or
accident.
Seat belt pretensioners
(front seats)
WA R N I N G
■Seat belt pretensioners
●Do not place anything, such as
a cushion, on the front passen-
ger’s seat. Doing so will
disperse the passenger’s
weight, which prevents the sen-
sor from detecting the passen-
ger’s weight properly. As a
result, the seat belt pretensioner
for the front passenger’s seat
may not activate in the event of
a collision.
●If the pretensioner has acti-
vated, the SRS warning light will
come on. In that case, the seat
belt cannot be used again and
must be replaced at your Toyota
dealer.
Page 52 of 584
521-2. Child safety
COROLLA HV_U
■When installing a child
restraint system to a front
passenger seat
For the safety of a child, install a
child restraint system to a rear
seat. When installing a child
restraint system to a front pas-
senger seat is unavoidable,
adjust the seat as follows and install the child restraint system:
Move the front seat fully rear-
ward.
If the passenger seat height
can be adjusted, Adjust the
seat height to the upper most
position.
Adjust the seatback angle to
the most upright position.
If there is a gap between the child
seat and the seatb ack, adjust the
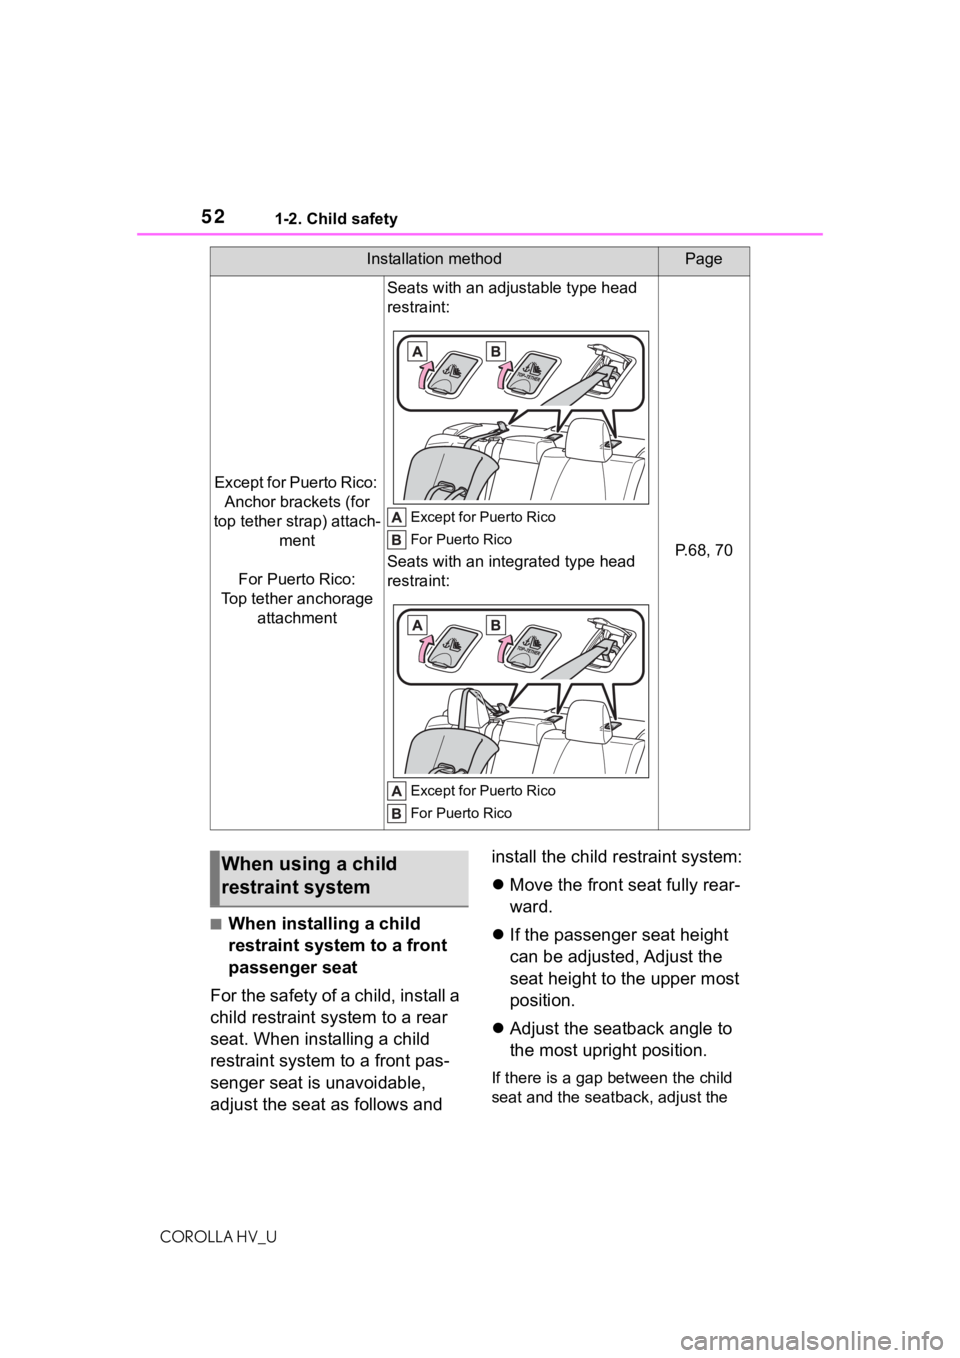
Except for Puerto Rico:
Anchor brackets (for
top tether strap) attach- ment
For Puerto Rico:
Top tether anchorage attachment
Seats with an adjustable type head
restraint:
Except for Puerto Rico
For Puerto Rico
Seats with an integrated type head
restraint:
Except for Puerto Rico
For Puerto Rico
P.68, 70
Installation methodPage
When using a child
restraint system
Page 55 of 584
![TOYOTA COROLLA HYBRID 2021 Owners Manual (in English) 551-2. Child safety
COROLLA HV_U
1
For safety and security
restraint system together with
the following [Before confirming
the compatibility of each seating
position with child restraint sys-
tems]](/img/14/42505/w960_42505-54.png "TOYOTA COROLLA HYBRID 2021 Owners Manual (in English) 551-2. Child safety
COROLLA HV_U
1
For safety and security
restraint system together with
the following [Before confirming
the compatibility of each seating
position with child restraint sys-
tems]")
551-2. Child safety
COROLLA HV_U
1
For safety and security
restraint system together with
the following [Before confirming
the compatibility of each seating
position with child restraint sys-
tems].
■Before confirming the com-
patibility of each seating
position with child restraint
systems
1 Checking the child restraint
system standards.
Use a child restraint system
that conforms to UN(ECE)
R44
*1 or UN(ECE) R129*1, 2.
The following approval mark
is displayed on child restraint
systems which are con-
formed.
Check for an approval mark
attached to the child restraint
system.
Example of the displayed regulation
number
UN(ECE) R44 approval
mark
*3
The weight range of the child who is applicable for an
UN(ECE) R44 approval mark
is indicated.
UN(ECE) R129 approval
mark
*3
The height range of the child
who is applicabl
e as well as
available weights for an
UN(ECE) R129 approval
mark is indicated.
2 Checking the category of the
child restraint system.
Check the approval mark of
the child restraint system for
which of the following catego-
ries the child restraint system
is suitable.
Also, if there are any uncer-
tainties, check the user’s
guide included with the child
restraint system or contact
the retailer of the child
restraint system.
• “universal”
• “semi-universal”
• “restricted”
• “vehicle specific”
*1: UN(ECE) R44 and UN(ECE) R129 are U.N. regulations for
child restraint systems.
*2: The child restrai nt systems men-
Page 56 of 584
561-2. Child safety
COROLLA HV_Utioned in the table may not be
available outside of the EU area.
*3: The displayed mark may differ
depending on the product.
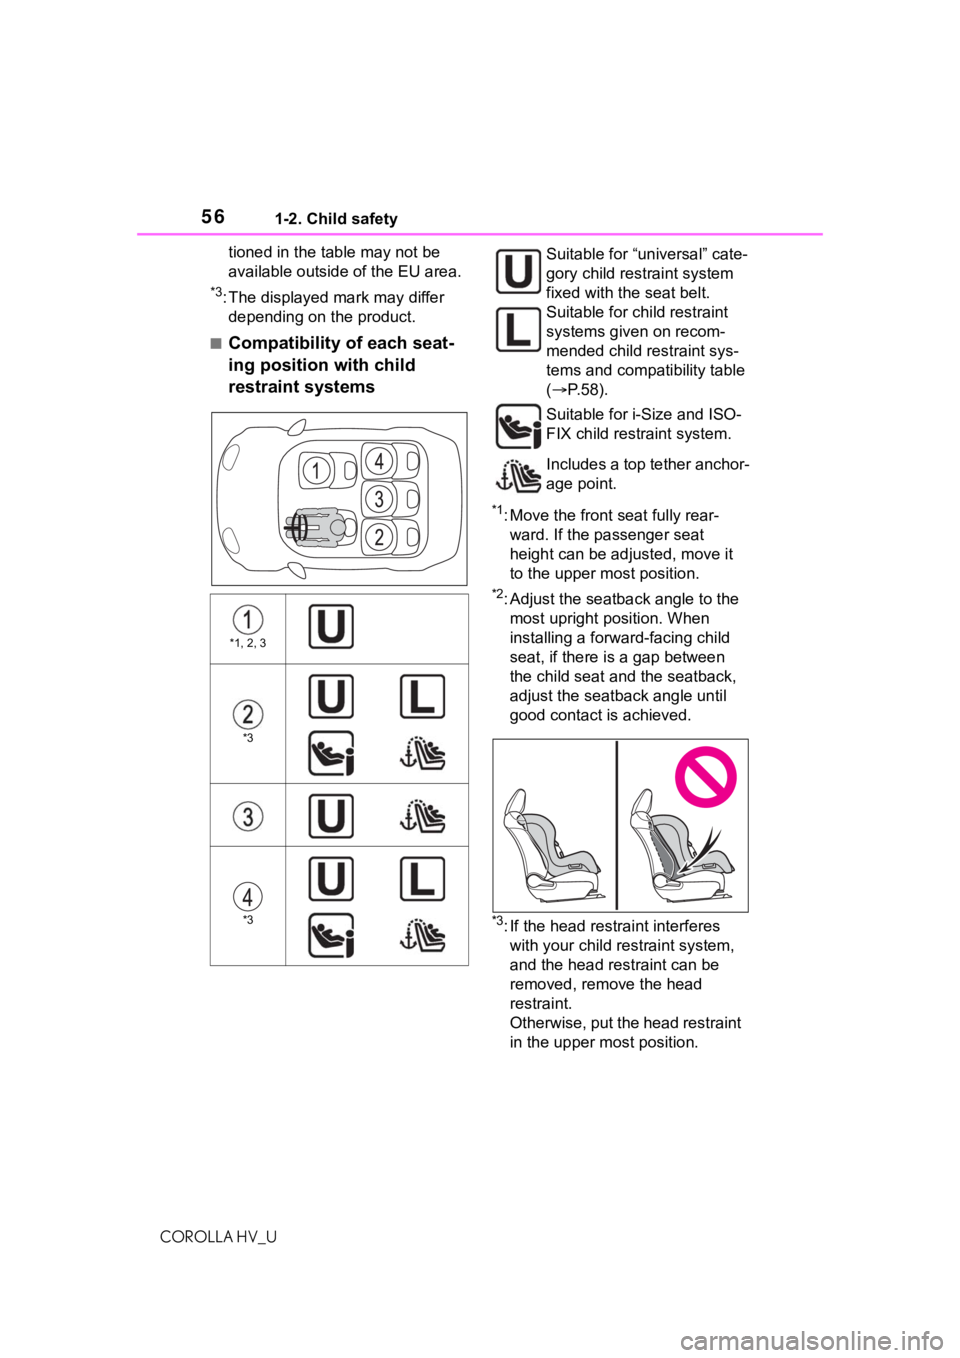
■Compatibility of each seat-
ing position with child
restraint systems
*1: Move the front seat fully rear-ward. If the passenger seat
height can be adjusted, move it
to the upper most position.
*2: Adjust the seatback angle to the most upright position. When
installing a forw ard-facing child
seat, if there is a gap between
the child seat and the seatback,
adjust the seatback angle until
good contact is achieved.
*3: If the head restraint interferes with your child restraint system,
and the head restraint can be
removed, remove the head
restraint.
Otherwise, put the head restraint
in the upper most position.
*1, 2, 3
*3
*3
Suitable for “universal” cate-
gory child restraint system
fixed with the seat belt.
Suitable for child restraint
systems given on recom-
mended child restraint sys-
tems and compatibility table
( P. 5 8 ) .
Suitable for i-Size and ISO-
FIX child restraint system.
Includes a top tether anchor-
age point.
Page 58 of 584
581-2. Child safety
COROLLA HV_U
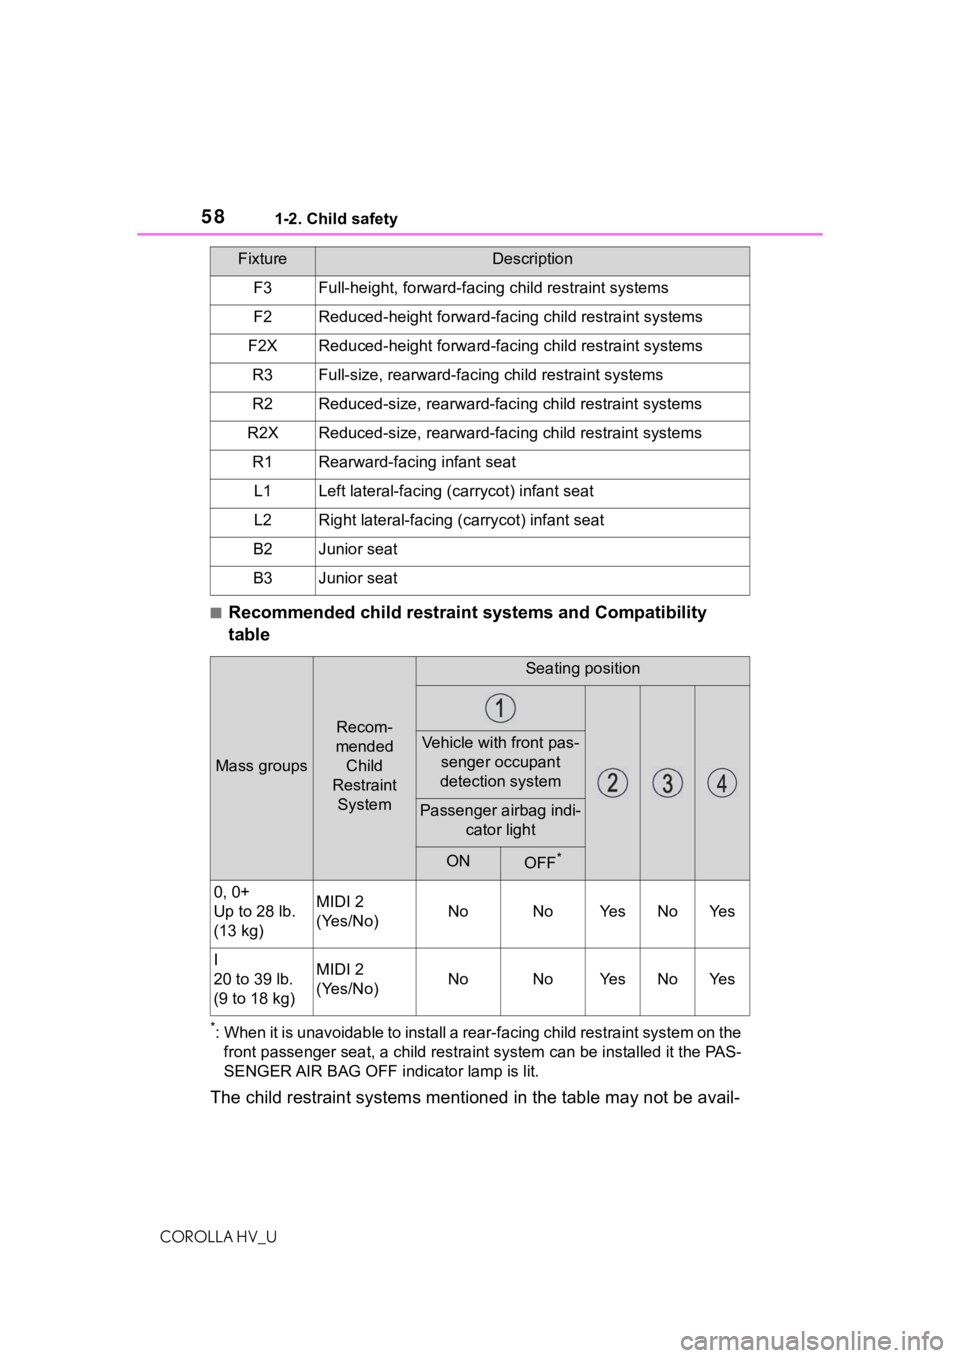
■Recommended child restraint systems and Compatibility
table
*: When it is unavoidable to install a rear-facing child restraint system on the front passenger seat, a child res traint system can be installed it the PAS-
SENGER AIR BAG OFF indi cator lamp is lit.
The child restraint systems mentioned in the table may not be avail-
FixtureDescription
F3Full-height, forward-facing child restraint systems
F2Reduced-height forward-faci ng child restraint systems
F2XReduced-height forward-facing child restraint systems
R3Full-size, rearward-facing child restraint systems
R2Reduced-size, rearward-facing child restraint systems
R2XReduced-size, rearward-facing child restraint systems
R1Rearward-facing infant seat
L1Left lateral-facing (carrycot) infant seat
L2Right lateral-facing ( carrycot) infant seat
B2Junior seat
B3Junior seat
Mass groups
Recom-
mended Child
Restraint System
Seating position
Vehicle with front pas- senger occupant
detection system
Passenger airbag indi- cator light
ONOFF*
0, 0+
Up to 28 lb.
(13 kg)MIDI 2
(Yes/No)NoNoYe sNoYe s
I
20 to 39 lb.
(9 to 18 kg)MIDI 2
(Yes/No)NoNoYe sNoYe s
Page 133 of 584
1333-3. Adjusting the seats
COROLLA HV_U
3
Before driving
3-3.Adjusting the seats
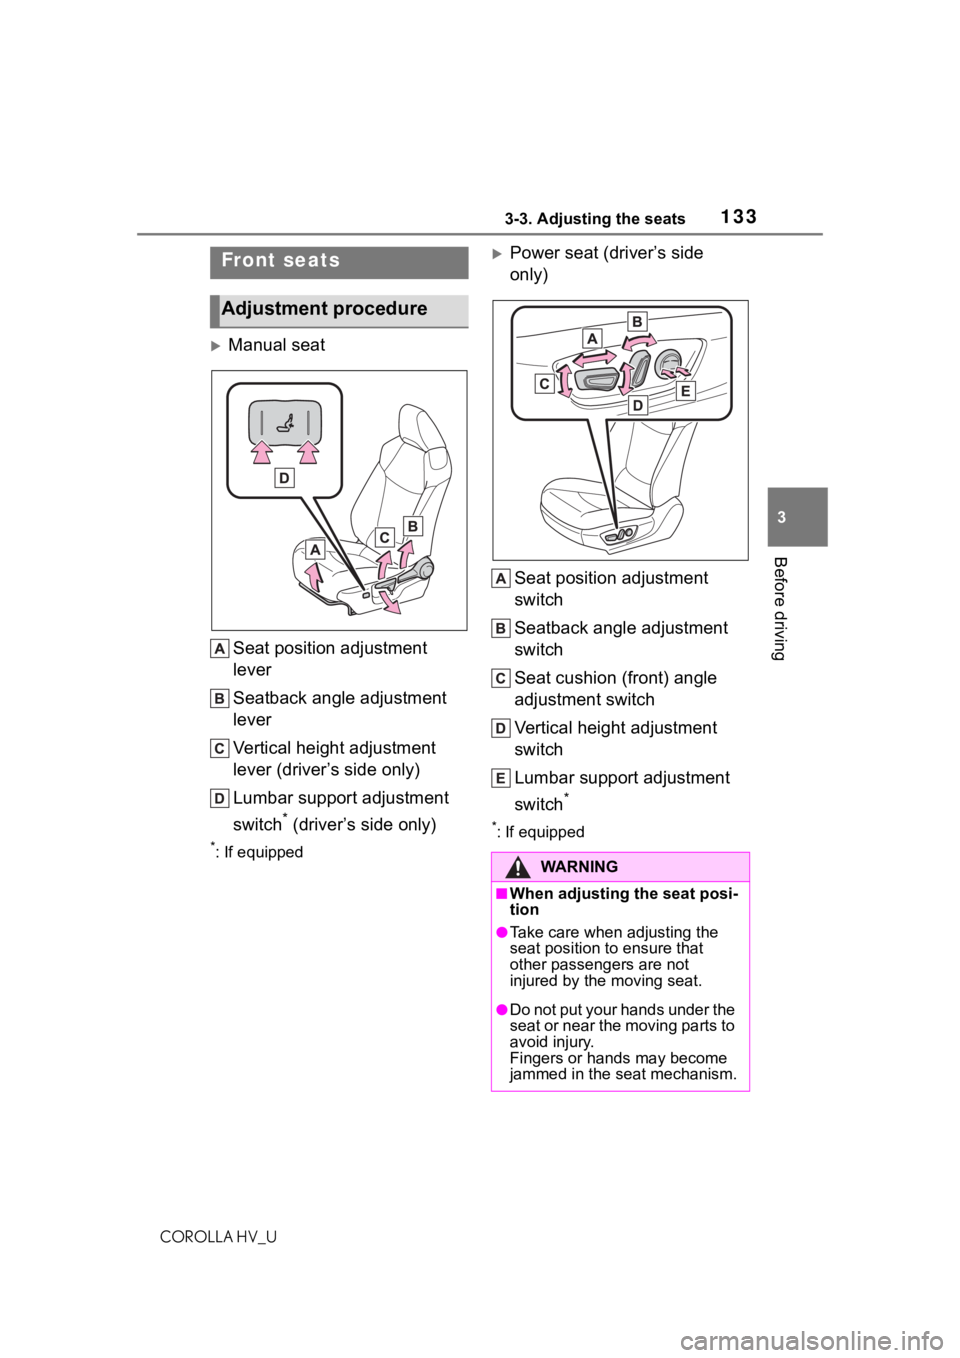
Manual seat Seat position adjustment
lever
Seatback angle adjustment
lever
Vertical height adjustment
lever (driver’s side only)
Lumbar support adjustment
switch
* (driver’s side only)
*: If equipped
Power seat (driver’s side
only)Seat position adjustment
switch
Seatback angle adjustment
switch
Seat cushion (front) angle
adjustment switch
Vertical height adjustment
switch
Lumbar support adjustment
switch
*
*: If equipped
Front seats
Adjustment procedure
WA R N I N G
■When adjusting the seat posi-
tion
●Take care when adjusting the
seat position to ensure that
other passengers are not
injured by the moving seat.
●Do not put your hands under the
seat or near the moving parts to
avoid injury.
Fingers or hands may become
jammed in the seat mechanism.
Page 136 of 584
1363-3. Adjusting the seats
COROLLA HV_U
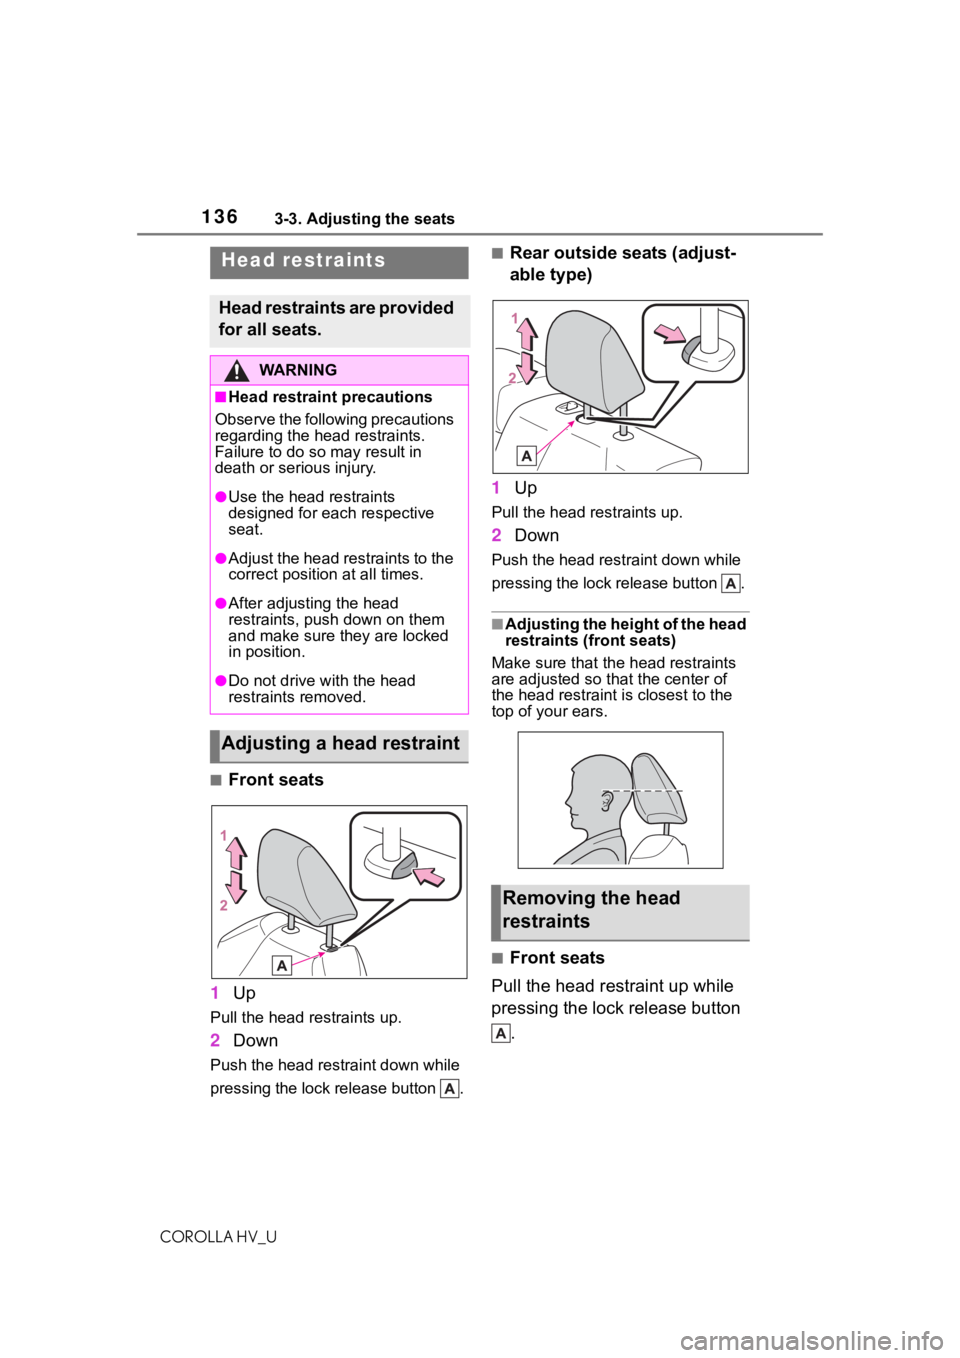
■Front seats
1 Up
Pull the head restraints up.
2Down
Push the head restraint down while
pressing the lock release button .
■Rear outside seats (adjust-
able type)
1 Up
Pull the head restraints up.
2Down
Push the head restraint down while
pressing the lock release button .
■Adjusting the height of the head
restraints (front seats)
Make sure that the head restraints
are adjusted so that the center of
the head restraint i s closest to the
top of your ears.
■Front seats
Pull the head restraint up while
pressing the lock release button .
Head restraints
Head restraints are provided
for all seats.
WA R N I N G
■Head restraint precautions
Observe the following precautions
regarding the head restraints.
Failure to do so m ay result in
death or serious injury.
●Use the head restraints
designed for each respective
seat.
●Adjust the head restraints to the
correct position at all times.
●After adjusting the head
restraints, push down on them
and make sure they are locked
in position.
●Do not drive with the head
restraints removed.
Adjusting a head restraint
Removing the head
restraints
Page 139 of 584
1393-4. Adjusting the steering wheel and mirrors
COROLLA HV_U
3
Before driving
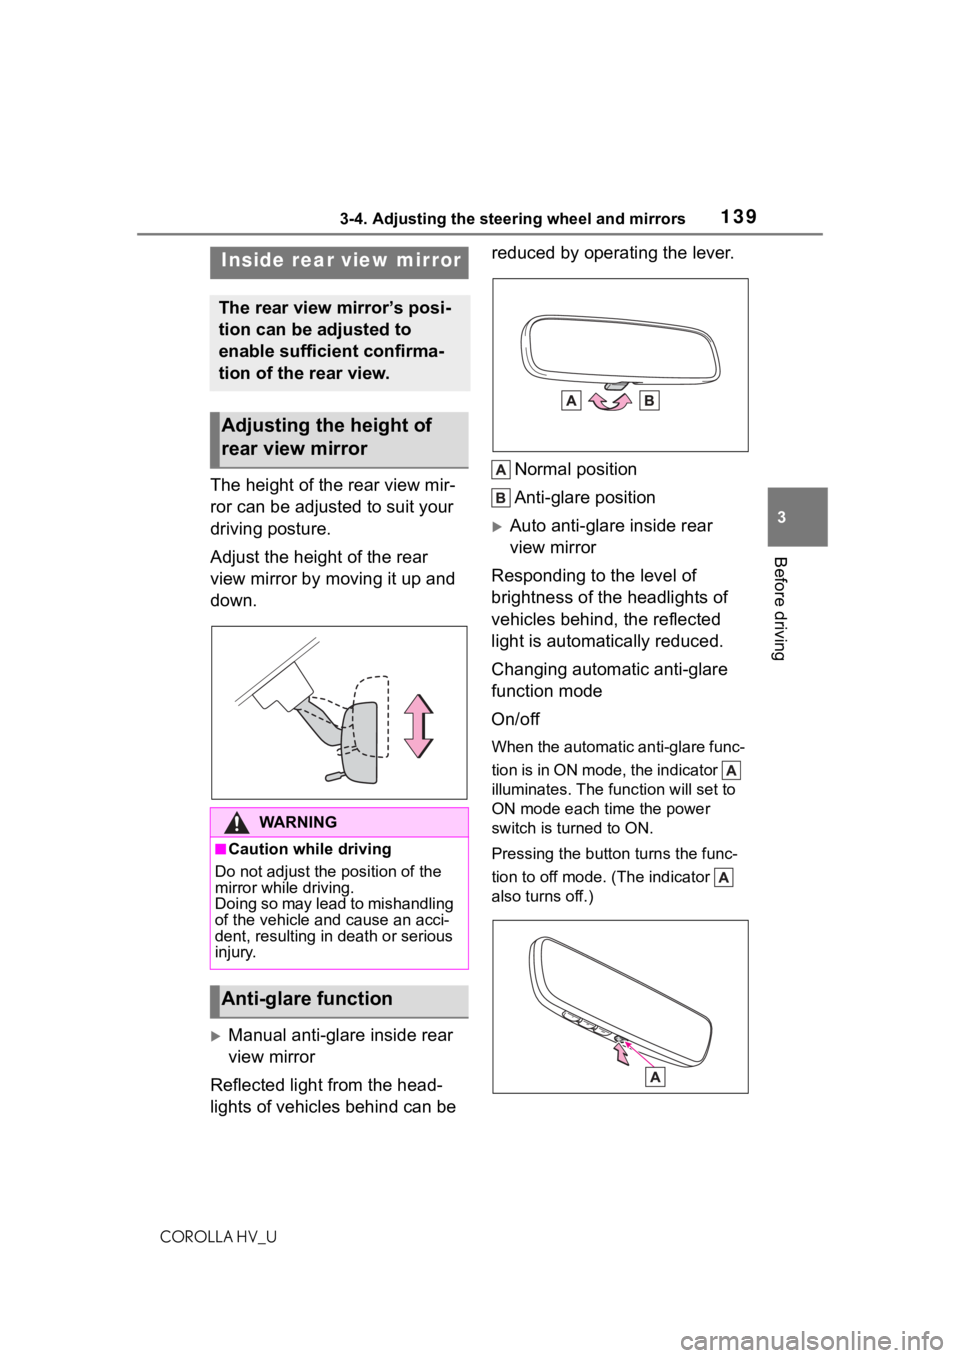
The height of the rear view mir-
ror can be adjusted to suit your
driving posture.
Adjust the height of the rear
view mirror by moving it up and
down.
Manual anti-glare inside rear
view mirror
Reflected light from the head-
lights of vehicles behind can be reduced by operating the lever.
Normal position
Anti-glare position
Auto anti-glare inside rear
view mirror
Responding to the level of
brightness of the headlights of
vehicles behind, the reflected
light is automatically reduced.
Changing automatic anti-glare
function mode
On/off
When the automatic anti-glare func-
tion is in ON mode, the indicator
illuminates. The func tion will set to
ON mode each time the power
switch is turned to ON.
Pressing the button turns the func-
tion to off mode. (The indicator
also turns off.)
Inside rear view mirror
The rear view mirror’s posi-
tion can be adjusted to
enable sufficient confirma-
tion of the rear view.
Adjusting the height of
rear view mirror
WA R N I N G
■Caution while driving
Do not adjust the position of the
mirror while driving.
Doing so may lead to mishandling
of the vehicle and cause an acci-
dent, resulting in death or serious
injury.
Anti-glare function
Page 195 of 584
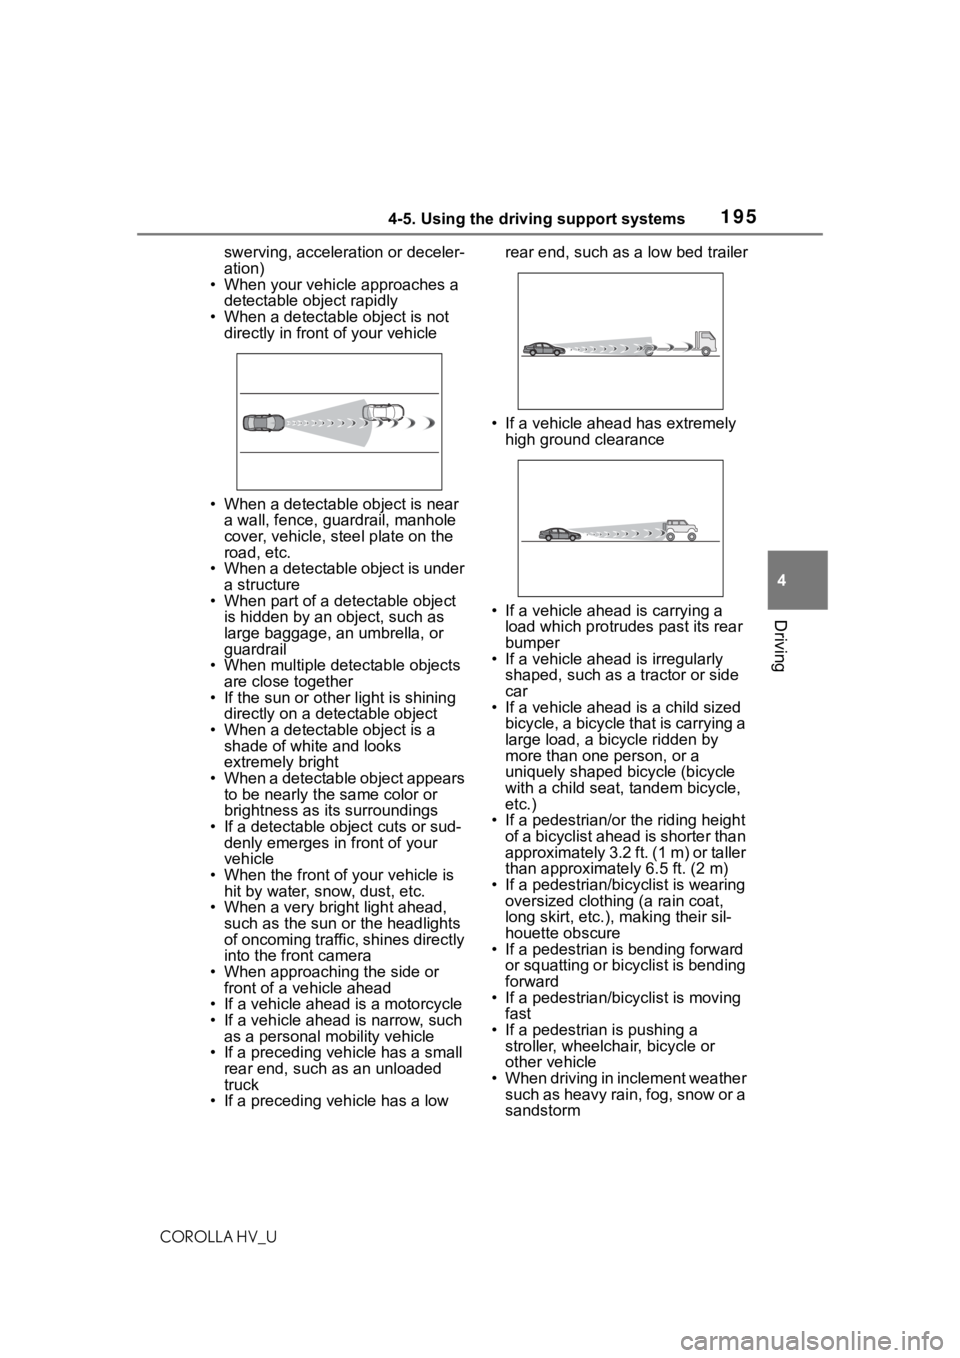
1954-5. Using the driving support systems
COROLLA HV_U
4
Driving
swerving, accelera tion or deceler-
ation)
• When your vehicle approaches a
detectable object rapidly
• When a detectable object is not directly in front of your vehicle
• When a detectable object is near a wall, fence, guardrail, manhole
cover, vehicle, steel plate on the
road, etc.
• When a detectable object is under
a structure
• When part of a detectable object is hidden by an object, such as
large baggage, an umbrella, or
guardrail
• When multiple detectable objects
are close together
• If the sun or other light is shining directly on a detectable object
• When a detectable object is a shade of white and looks
extremely bright
• When a detectable object appears to be nearly the same color or
brightness as its surroundings
• If a detectable object cuts or sud- denly emerges in front of your
vehicle
• When the front of your vehicle is hit by water, snow, dust, etc.
• When a very bright light ahead,
such as the sun or the headlights
of oncoming traffic, shines directly
into the front camera
• When approaching the side or front of a vehicle ahead
• If a vehicle ahead is a motorcycle
• If a vehicle ahead is narrow, such as a personal mobility vehicle
• If a preceding vehicle has a small rear end, such as an unloaded
truck
• If a preceding vehicle has a low rear end, such as a low bed trailer
• If a vehicle ahead has extremely high ground clearance
• If a vehicle ahead is carrying a load which protrudes past its rear
bumper
• If a vehicle ahead is irregularly
shaped, such as a tractor or side
car
• If a vehicle ahead is a child sized
bicycle, a bicycle that is carrying a
large load, a bicycle ridden by
more than one person, or a
uniquely shaped bicycle (bicycle
with a child seat, tandem bicycle,
etc.)
• If a pedestrian/or the riding height of a bicyclist ahead is shorter than
approximately 3.2 ft. (1 m) or taller
than approximate ly 6.5 ft. (2 m)
• If a pedestrian/bic yclist is wearing
oversized clothing (a rain coat,
long skirt, etc.), making their sil-
houette obscure
• If a pedestrian is bending forward
or squatting or bicyclist is bending
forward
• If a pedestrian/bicyclist is moving
fast
• If a pedestrian is pushing a stroller, wheelchair, bicycle or
other vehicle
• When driving in inclement weather such as heavy rain, fog, snow or a
sandstorm