TOYOTA DYNA 100/150 2012 (in English) Workshop Manual
Manufacturer: TOYOTA, Model Year: 2012, Model line: DYNA 100/150, Model: TOYOTA DYNA 100/150 2012Pages: 240, PDF Size: 15.05 MB
Page 51 of 240

SEATS, SEAT BELTS, STEERING WHEEL AND MIRRORS45
A child restraint system for a small
child or baby must itself be properly
restrained on the seat with either the
lap belt or the lap portion of the lap/
shoulder belt. You must carefully con-
sult the manufacturer ’s instructions
which accompany the child restraint
system.
To provide proper restraint, use a child
restraint system following the manufactur-
er ’s instructions about the appropriate age
and size of the child for the child restraint
system.
Toyota recommends that you use a child
restraint system which conforms to the
regulation “ECE No.44”.
Install the child restraint system correctly
following the instructions provided by its
manufacturer. General directions are also
provided under the following illustrations.
The child restraint system should be
installed on the rear seat. According to
accident statistics, the child is safer when
properly restrained in the rear seat than
in the front seat.CAUTION
When the child restraint system is
not in use:
DKeep the child restraint system
properly secured on the seat even
if it is not in use. Do not store the
restraint unsecured in the passen-
ger compartment.
DIf it is necessary to detach the
child restraint system, remove it
from the vehicle or store it securely
in the luggage compartment. This
will prevent it from injuring passen-
gers in the event of a sudden stop,
sudden swerve or accident.
DAfter installing the child restraint
system, make sure it is secured in
place following the manufacturer ’s
instructions. If it is not restrained
securely, it may cause death or se-
rious injury to the child in the
event of a sudden stop, sudden
swerve or accident.
When installing a child restraint system
witha3−point seat belt, you will need a
locking clip.
If your child restraint systemdoes not
provide a locking clip, you can purchase
the following item from any authorized
Toyota dealer or repairer, or another duly
qualified and equipped professional.
Locking clip for child restraint system
(Part No. 73119−22010)
Dyna100/150_EE
—Child restraint system
Page 52 of 240
46SEATS, SEAT BELTS, STEERING WHEEL AND MIRRORS
Child restraint systems are classified into
the following 5 groups according to the
regulation ECE No.44.
Group 0: Up to 10 kg (22 lb.)
(0—9 months)
Group 0
+: Upto13kg(28lb.)
(0—2 years)
Group I: 9—18 kg (20 to 39 lb.)
(9 months—4 years)
Group II: 15—25 kg (34 to 55 lb.)
(4 years—7 years)
Group III: 22—36 kg (49 to 79 lb.)
(6 years—12 years)
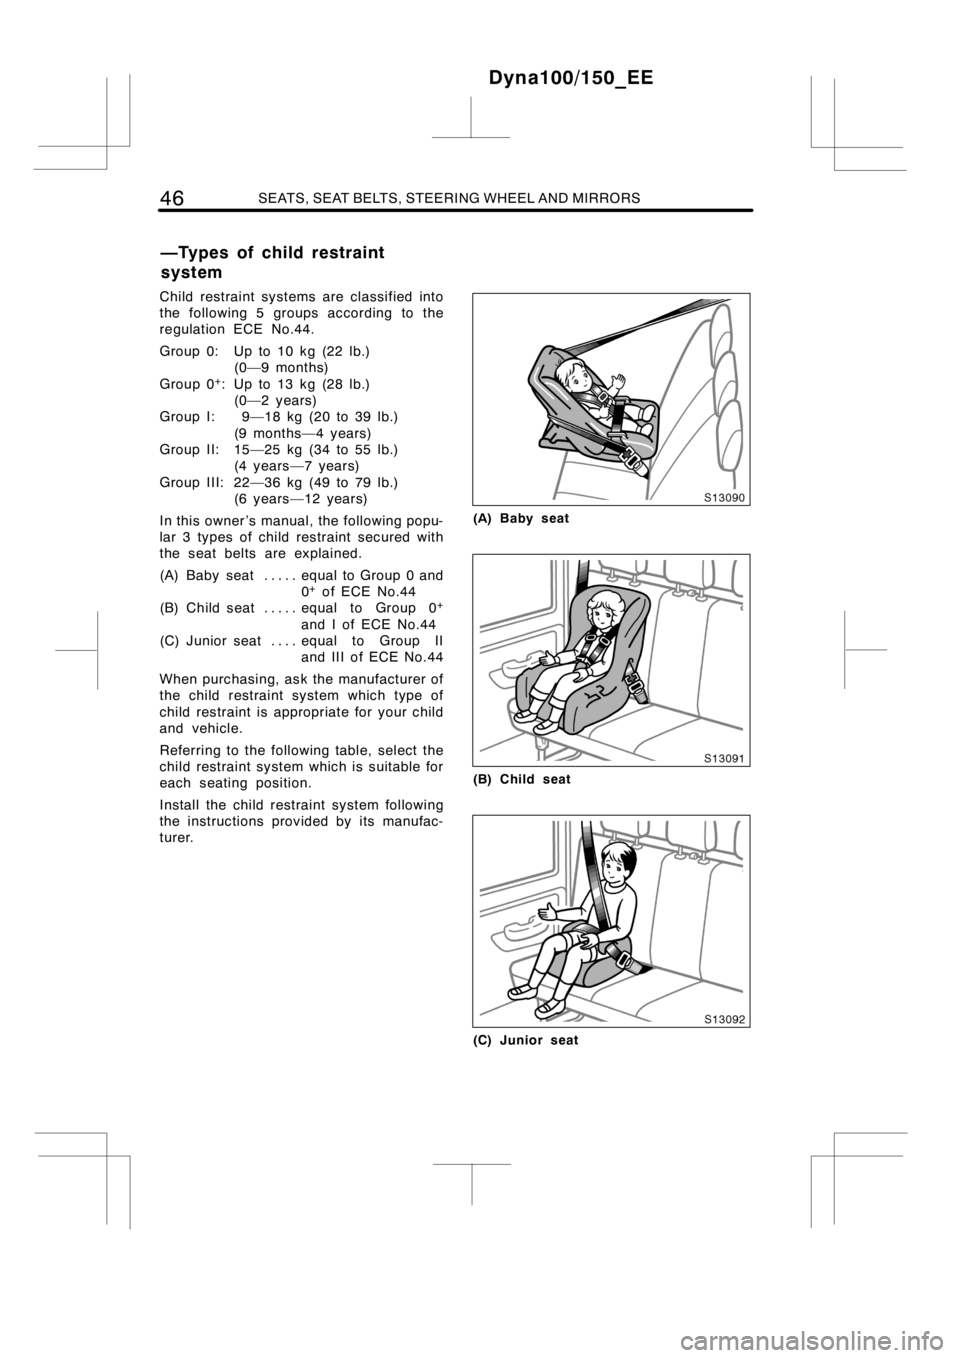
In this owner ’s manual, the following popu-
lar 3 types of child restraint secured with
the seat belts are explained.
(A) Baby seat equal to Group 0 and.....
0
+of ECE No.44
(B) Child seat equal to Group 0+.....
andIofECENo.44
(C) Junior seat equal to Group II....
and III of ECE No.44
When purchasing, ask the manufacturer of
the child restraint system which type of
child restraint is appropriate for your child
and vehicle.
Referring to the following table, select the
child restraint system which is suitable for
each seating position.
Install the child restraint system following
the instructions provided by its manufac-
turer.
(A) Baby seat
(B) Child seat
(C) Junior seat
Dyna100/150_EE
—Types of child restraint
system
Page 53 of 240

SEATS, SEAT BELTS, STEERING WHEEL AND MIRRORS47
Provided information in the table shows your child restraint system suitability for various
seating positions. This table is applicable to only EU countries.
Front seat Rear seat
Passenger
seatCenter Outside
0
Up to 10 kg (22 lb.)
(0—9 months)
0
+
Up to 13 kg (28 lb.)
(0—2 years)
I
9to18kg
(20to39lb.)
(9 months—4 years)
II, III
15 to 36 kg
(34to79lb.)
(4—12 years)
Seating position
Mass groups
L1
L1
L3X
X
X
XU
U
U
U L2Center
X
X
UF
UF
Key of letters inserted in the above table:
U: Suitable for “universal” category child restraintsystemapproved for the use in this
mass group
UF: Suitable for forward−facing “universal” category child restraintsystemapproved for
the use in this mass group
L1: Suitable for “TOYOTA BABYSAFE (0 to 13 kg)” approved for the use in this mass
group
L2: Suitable for “TOYOTA DUO (without ISOFIX, 9 to 18 kg)” approved for the use in
this mass group
L3: Suitable for “TOYOTA KID (15 to 36 kg)” approved for the use in this mass group
X: Not suitable seat position for children in this mass group
Other child restraint system which is different from the system mentioned in the table
can be used, but the suitability of the systems must be carefully checked with the child
restraint system manufacturer concerned and the seller of those seats.
Dyna100/150_EE
—Child restraint system suitability for various seating positions
Page 54 of 240
48SEATS, SEAT BELTS, STEERING WHEEL AND MIRRORS
CAUTION
The use of any child restraint system
which is not suitable for this vehicle
would not properly secure the infant
or child. Therefore, they could be
killed or seriously injured.
For further information, see “—Installation
with 2−point type seat belt” on page 48
and “—Installation with 3−point type seat
belt” on page 51 in this Section.
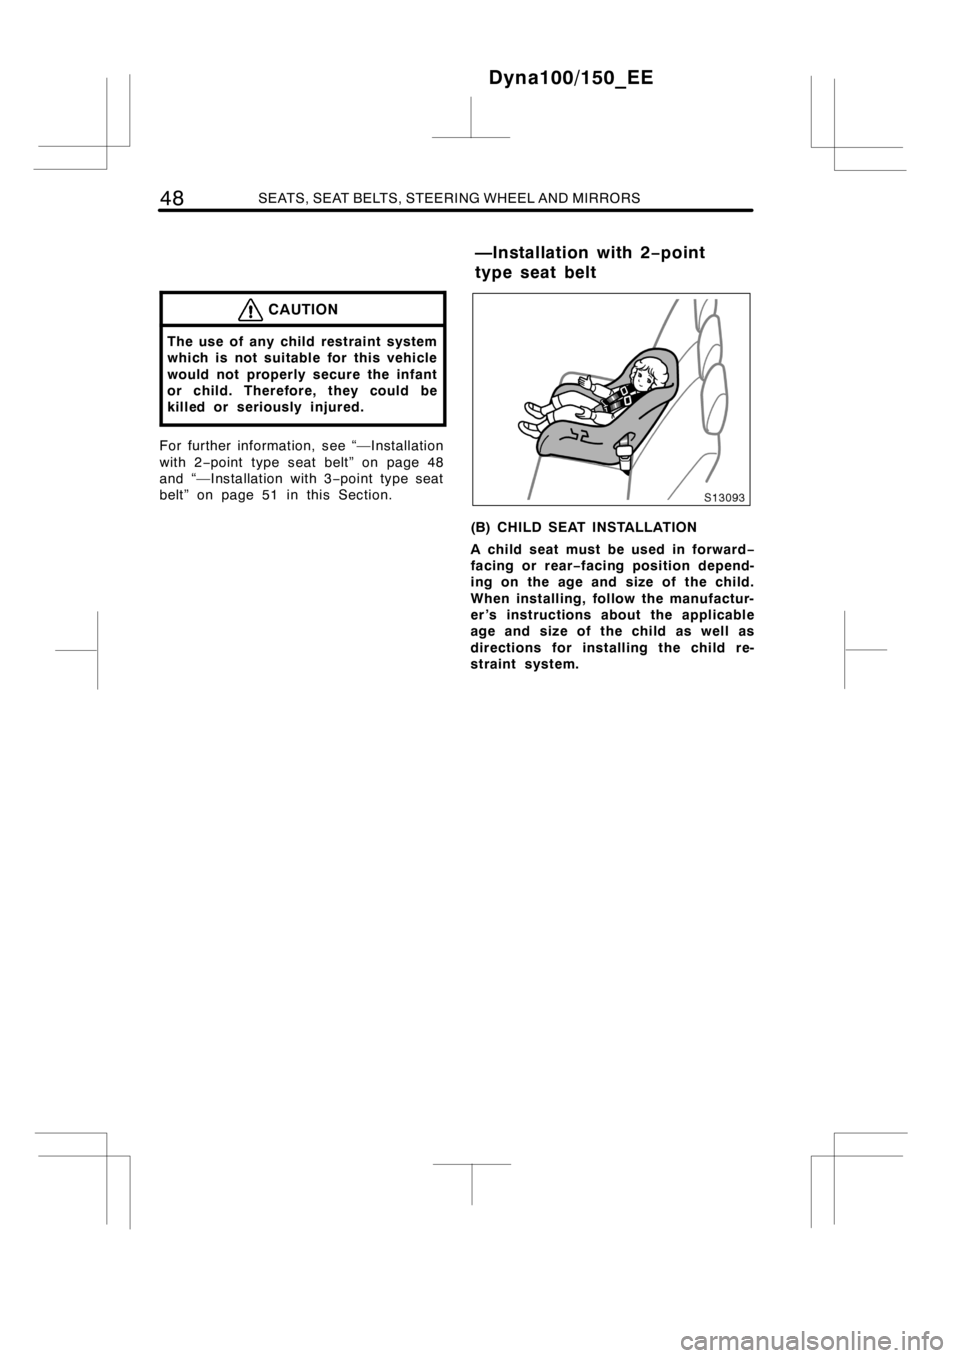
(B) CHILD SEAT INSTALLATION
A child seat must be used in forward−
facing or rear−facing position depend-
ing on the age and size of the child.
When installing, follow the manufactur-
er ’s instructions about the applicable
age and size of the child as well as
directions for installing the child re-
straint system.
Dyna100/150_EE
—Installation with 2−point
type seat belt
Page 55 of 240
SEATS, SEAT BELTS, STEERING WHEEL AND MIRRORS49
CAUTION
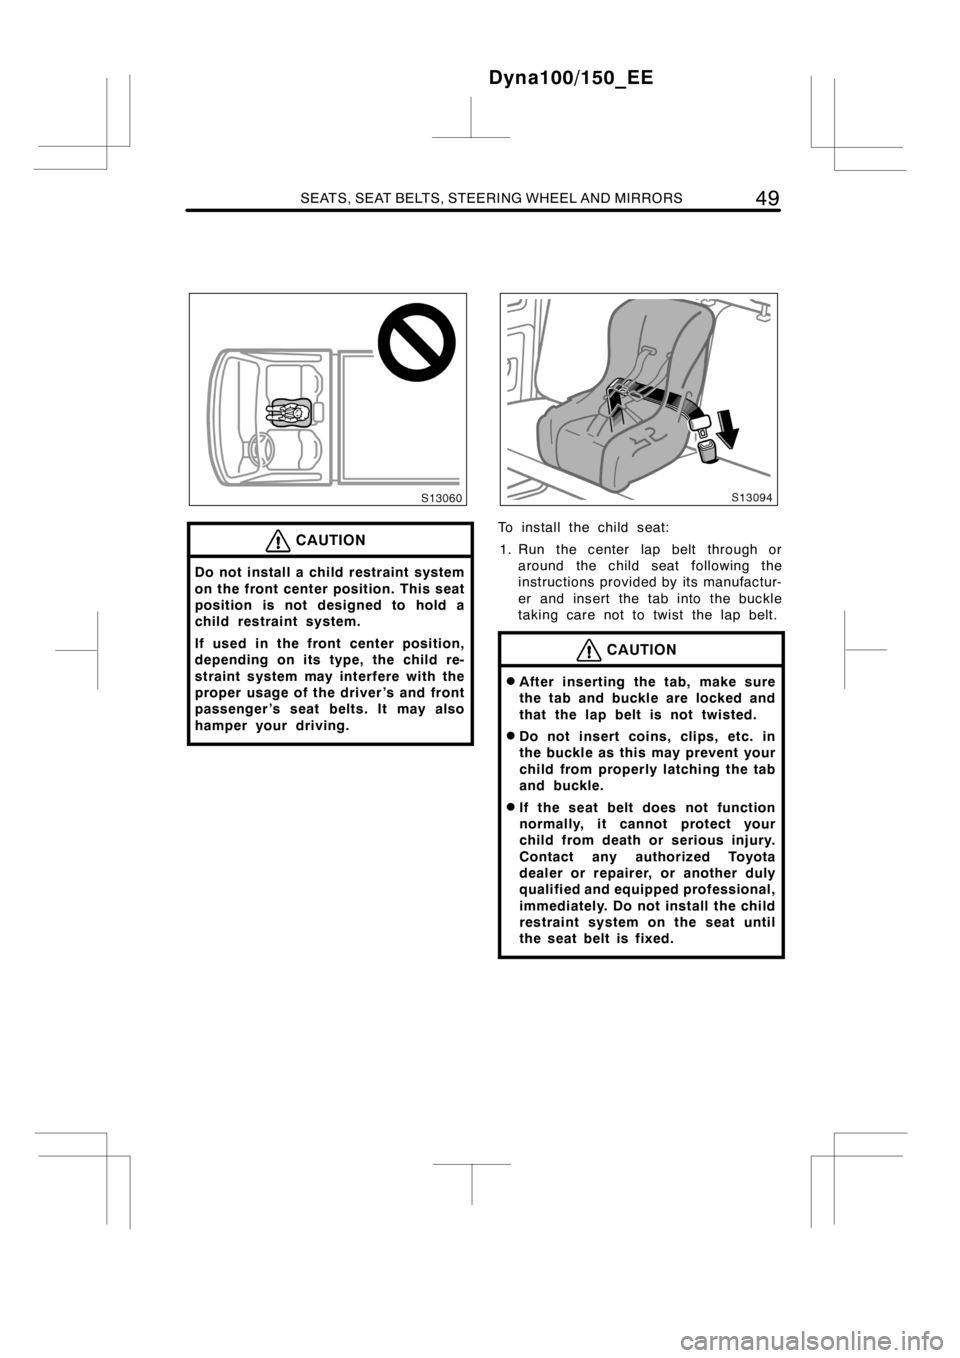
Do not install a child restraint system
on the front center position. This seat
position is not designed to hold a
child restraint system.
If used in the front center position,
depending on its type, the child re-
straint system may interfere with the
proper usage of the driver ’s and front
passenger ’s seat belts. It may also
hamper your driving.
To install the child seat:
1. Run the center lap belt through or
around the child seat following the
instructions provided by its manufactur-
er and insert the tab into the buckle
taking care not to twist the lap belt.
CAUTION
DAfter inserting the tab, make sure
the tab and buckle are locked and
that the lap belt is not twisted.
DDo not insert coins, clips, etc. in
the buckle as this may prevent your
child from properly latching the tab
and buckle.
DIf the seat belt does not function
normally, it cannot protect your
child from death or serious injury.
Contact any authorized Toyota
dealer or repairer, or another duly
qualified and equipped professional,
immediately. Do not install the child
restraint system on the seat until
the seat belt is fixed.
Dyna100/150_EE
Page 56 of 240
50SEATS, SEAT BELTS, STEERING WHEEL AND MIRRORS
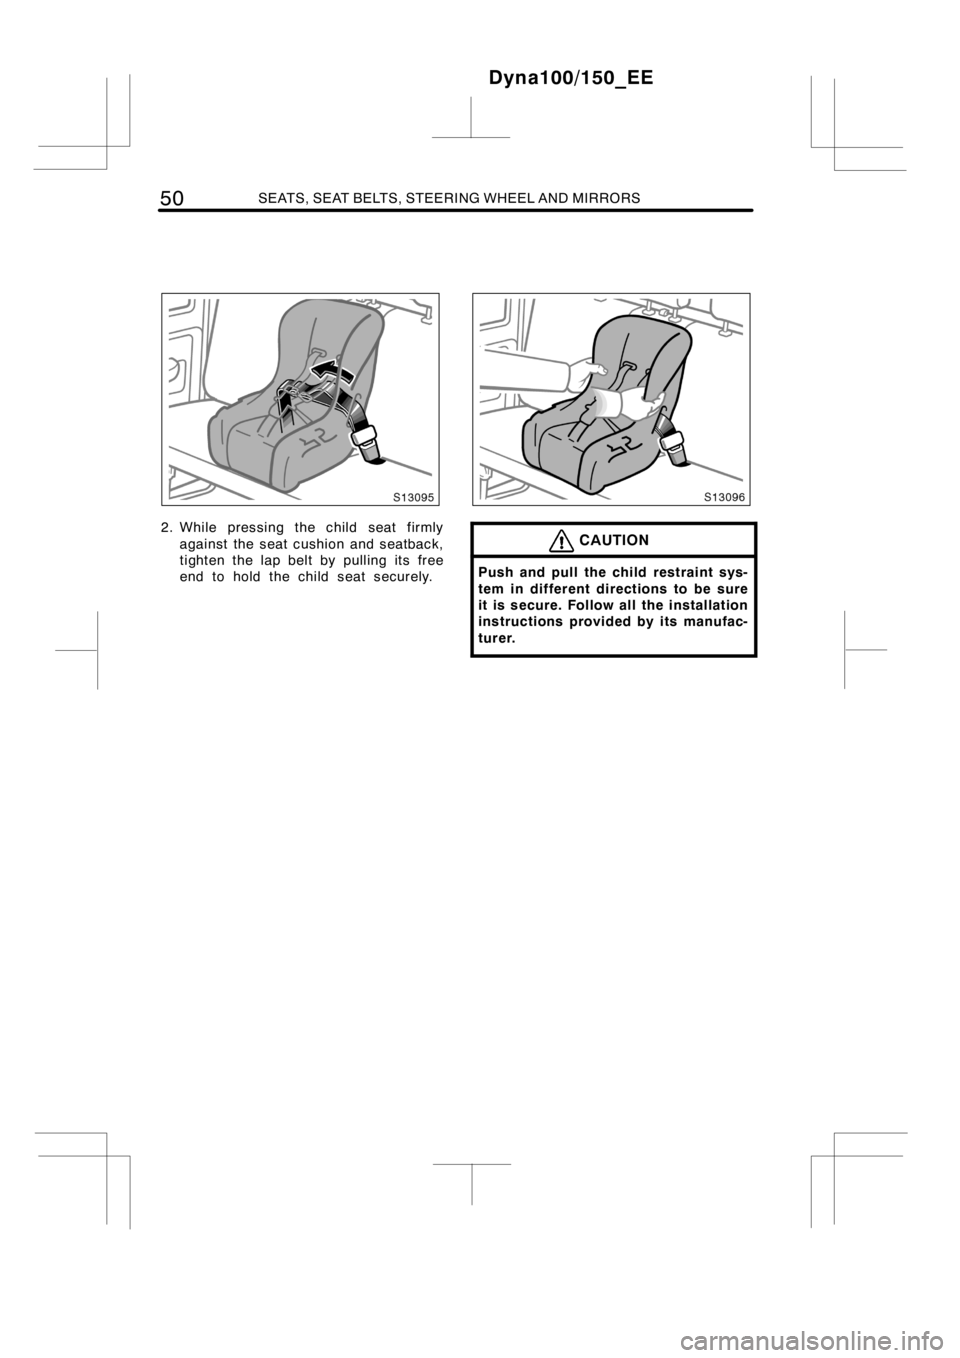
2. While pressing the child seat firmly
against the seat cushion and seatback,
tighten the lap belt by pulling its free
end to hold the child seat securely.CAUTION
Push and pull the child restraint sys-
tem in different directions to be sure
it is secure. Follow all the installation
instructions provided by its manufac-
turer.
Dyna100/150_EE
Page 57 of 240
SEATS, SEAT BELTS, STEERING WHEEL AND MIRRORS51
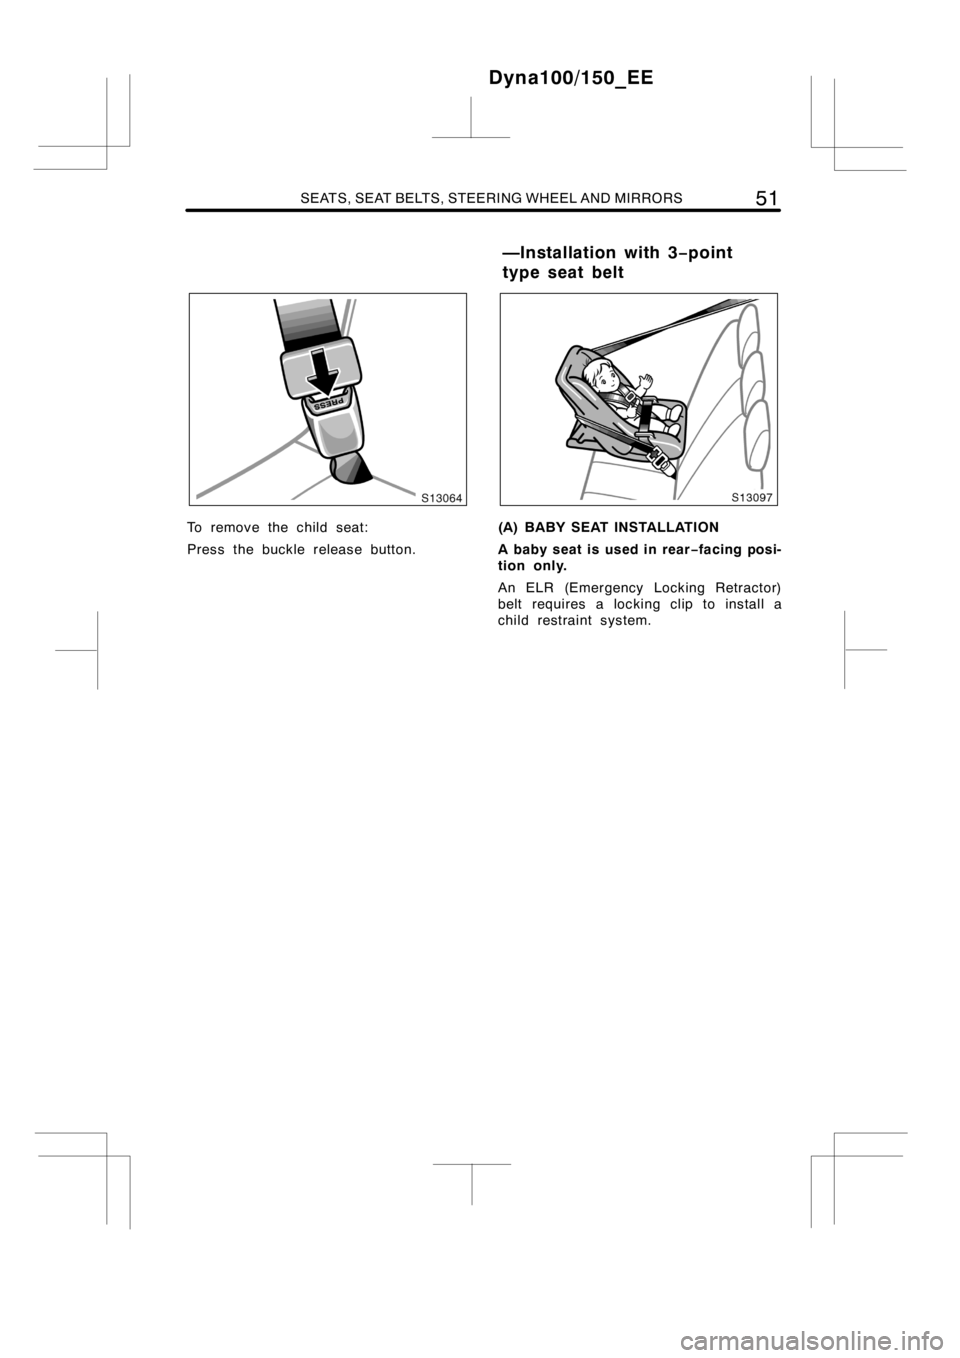
To remove the child seat:
Press the buckle release button.(A) BABY SEAT INSTALLATION
A baby seat is used in rear−facing posi-
tion only.
An ELR (Emergency Locking Retractor)
belt requires a locking clip to install a
child restraint system.
Dyna100/150_EE
—Installation with 3−point
type seat belt
Page 58 of 240
52SEATS, SEAT BELTS, STEERING WHEEL AND MIRRORS
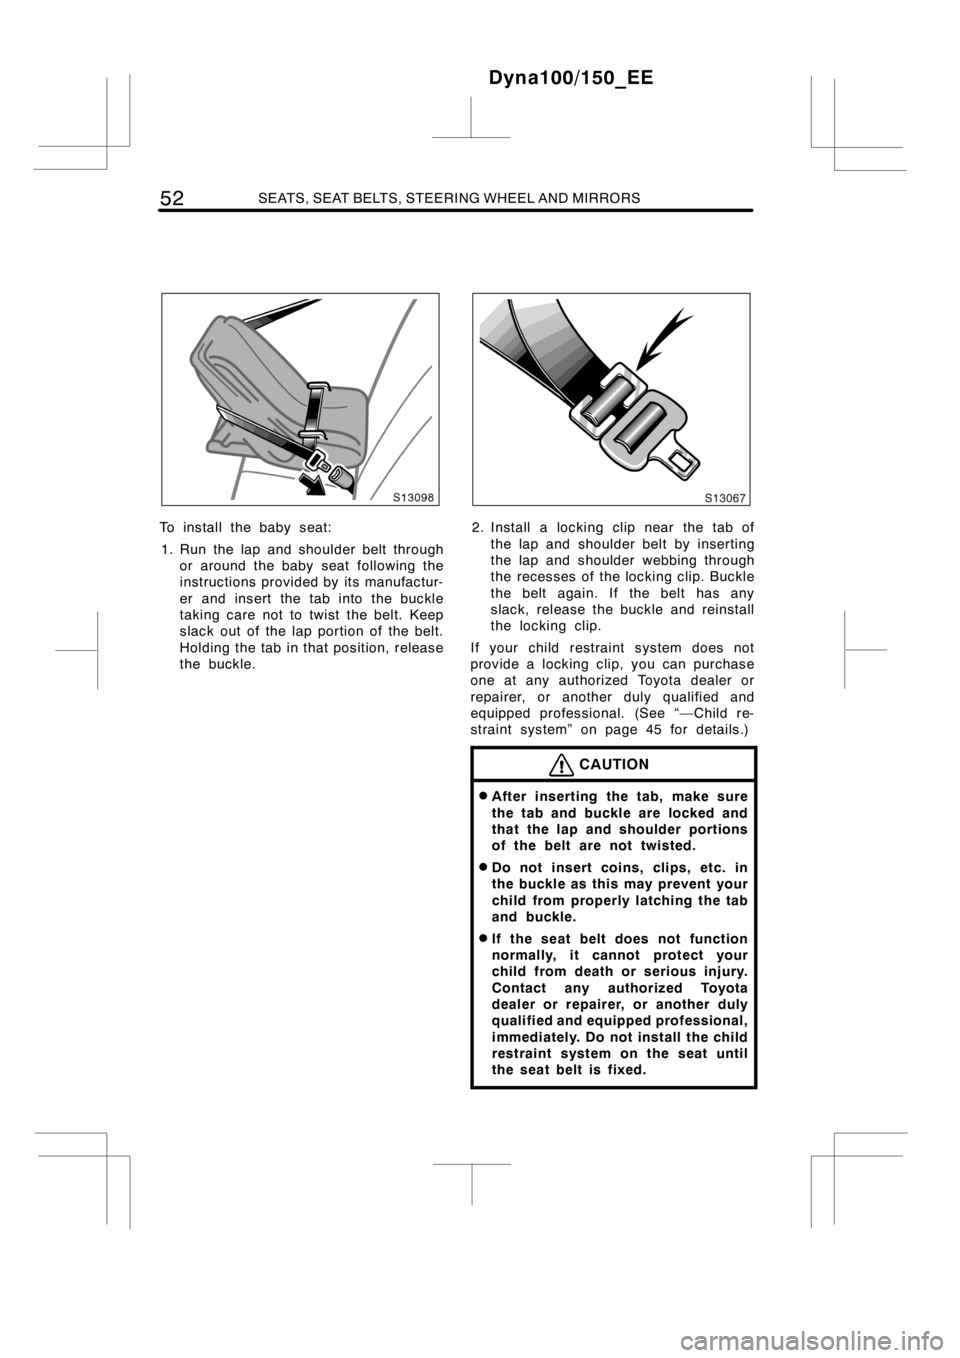
To install the baby seat:
1. Run the lap and shoulder belt through
or around the baby seat following the
instructions provided by its manufactur-
er and insert the tab into the buckle
taking care not to twist the belt. Keep
slack out of the lap portion of the belt.
Holding the tab in that position, release
the buckle.2. Install a locking clip near the tab of
the lap and shoulder belt by inserting
the lap and shoulder webbing through
the recesses of the locking clip. Buckle
the belt again. If the belt has any
slack, release the buckle and reinstall
the locking clip.
If your child restraint systemdoes not
provide a locking clip, you can purchase
one at any authorized Toyota dealer or
repairer, or another duly qualified and
equipped professional. (See “—Child re-
straint system” onpage 45 for details.)
CAUTION
DAfter inserting the tab, make sure
the tab and buckle are locked and
that the lap and shoulder portions
of the belt are not twisted.
DDo not insert coins, clips, etc. in
the buckle as this may prevent your
child from properly latching the tab
and buckle.
DIf the seat belt does not function
normally, it cannot protect your
child from death or serious injury.
Contact any authorized Toyota
dealer or repairer, or another duly
qualified and equipped professional,
immediately. Do not install the child
restraint system on the seat until
the seat belt is fixed.
Dyna100/150_EE
Page 59 of 240
SEATS, SEAT BELTS, STEERING WHEEL AND MIRRORS53
CAUTION
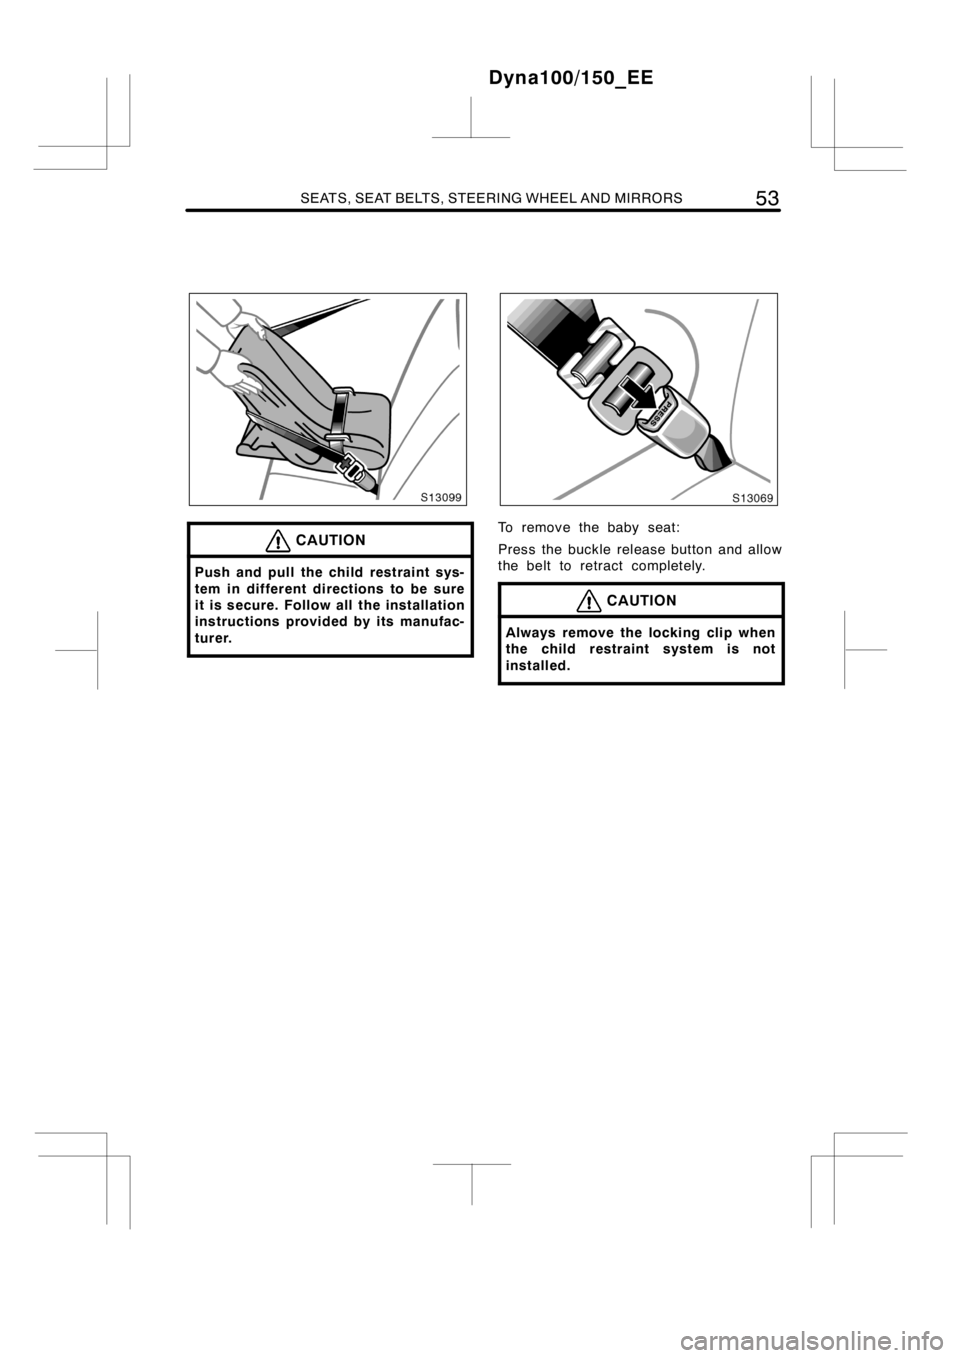
Push and pull the child restraint sys-
tem in different directions to be sure
it is secure. Follow all the installation
instructions provided by its manufac-
turer.
To remove the baby seat:
Press the buckle release button and allow
the belt to retract completely.
CAUTION
Always remove the locking clip when
the child restraint system is not
installed.
Dyna100/150_EE
Page 60 of 240
54SEATS, SEAT BELTS, STEERING WHEEL AND MIRRORS
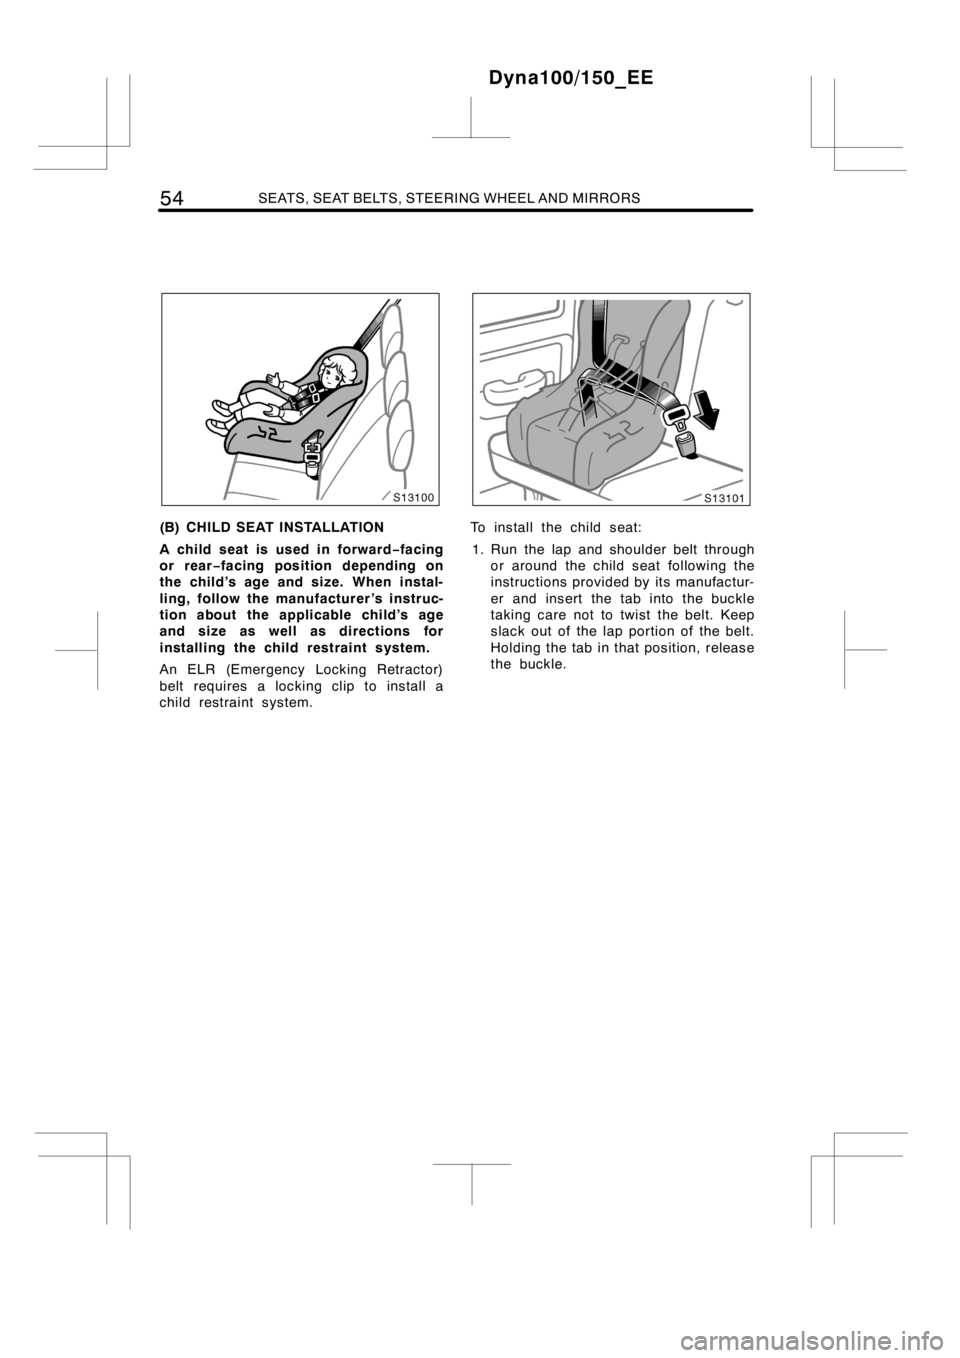
(B) CHILD SEAT INSTALLATION
A child seat is used in forward−facing
or rear−facing position depending on
the child’s age and size. When instal-
ling, follow the manufacturer ’s instruc-
tion about the applicable child’s age
and size as well as directions for
installing the child restraintsystem.
An ELR (Emergency Locking Retractor)
belt requires a locking clip to install a
child restraint system.To install the child seat:
1. Run the lap and shoulder belt through
or around the child seat following the
instructions provided by its manufactur-
er and insert the tab into the buckle
taking care not to twist the belt. Keep
slack out of the lap portion of the belt.
Holding the tab in that position, release
the buckle.
Dyna100/150_EE