TOYOTA GT86 2018 (in English) Owner's Manual
Manufacturer: TOYOTA, Model Year: 2018, Model line: GT86, Model: TOYOTA GT86 2018Pages: 28, PDF Size: 1.62 MB
Page 21 of 28
19
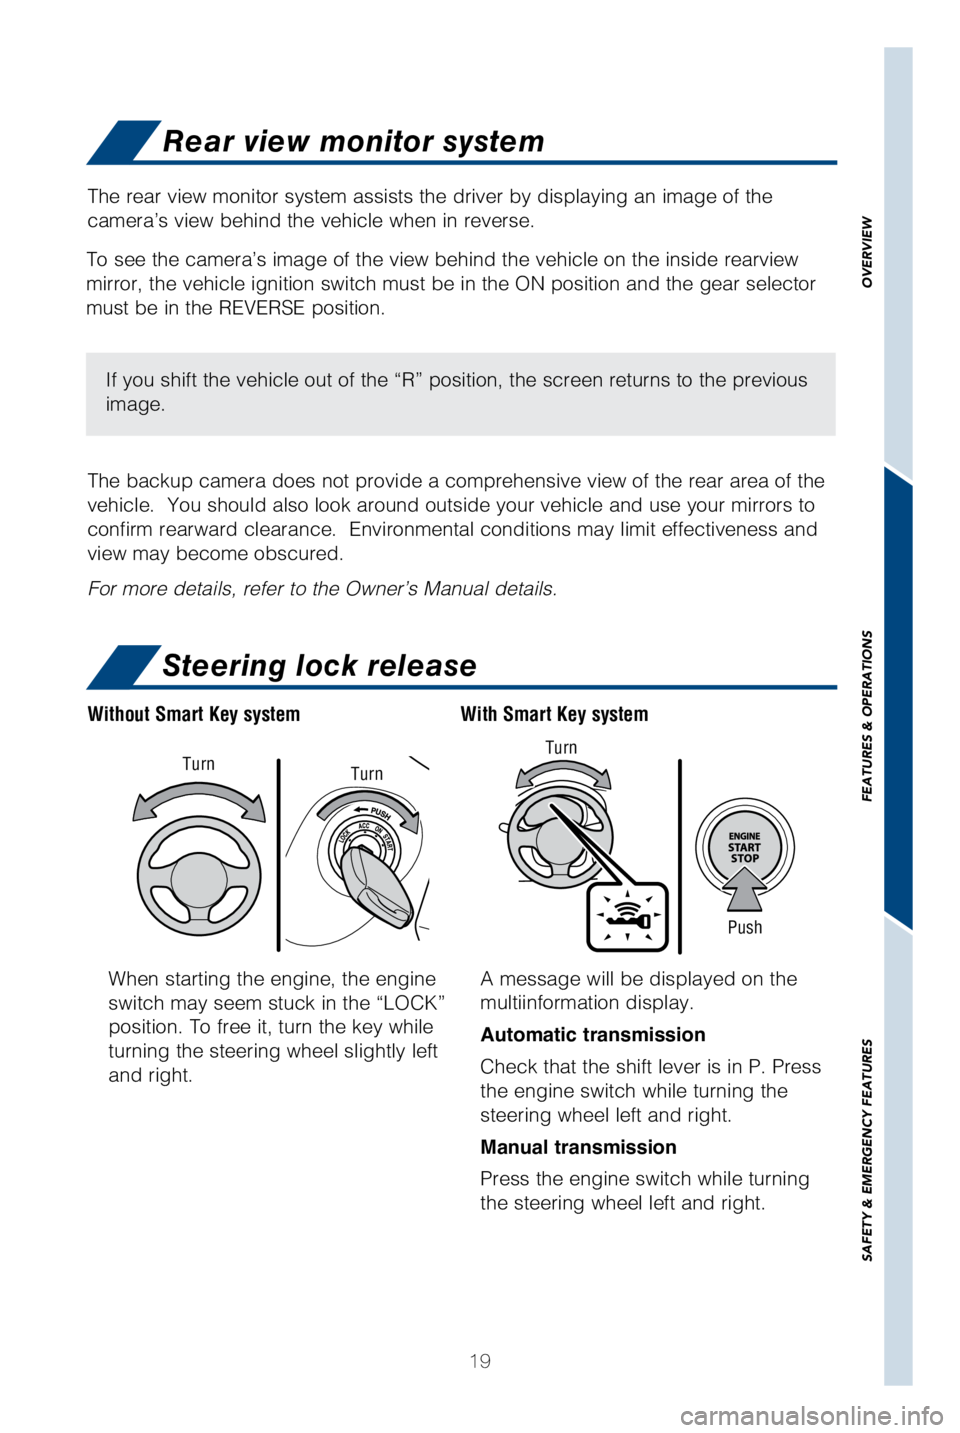
When starting the engine, the engine
switch may seem stuck in the “LOCK”
position. To free it, turn the key while
turning the steering wheel slightly left
and right.A message will be displayed on the
multiinformation display.
Automatic transmission
Check that the shift lever is in P. Press
the engine switch while turning the
steering wheel left and right.
Manual transmission
Press the engine switch while turning
the steering wheel left and right.
With Smart Key system
Without Smart Key system
Push
Turn
Turn
Turn
Rear view monitor system
Steering lock release
The rear view monitor system assists the driver by displaying an image o\
f the
camera’s view behind the vehicle when in reverse.
The backup camera does not provide a comprehensive view of the rear area\
of the
vehicle. You should also look around outside your vehicle and use your \
mirrors to
confirm rearward clearance. Environmental conditions may limit effectiv\
eness and
view may become obscured.
For more details, refer to the Owner’s Manual details.
To see the camera’s image of the view behind the vehicle on the insid\
e rearview
mirror, the vehicle ignition switch must be in the ON position and the g\
ear selector
must be in the REVERSE position.
If you shift the vehicle out of the “R” position, the screen retur\
ns to the previous
image.
OVERVIEW
FEATURES & OPERATIONS
SAFETY & EMERGENCY FEATURES
Page 22 of 28
20
Seat belts
Tire Pressure Monitoring (warning) System (TPMS)
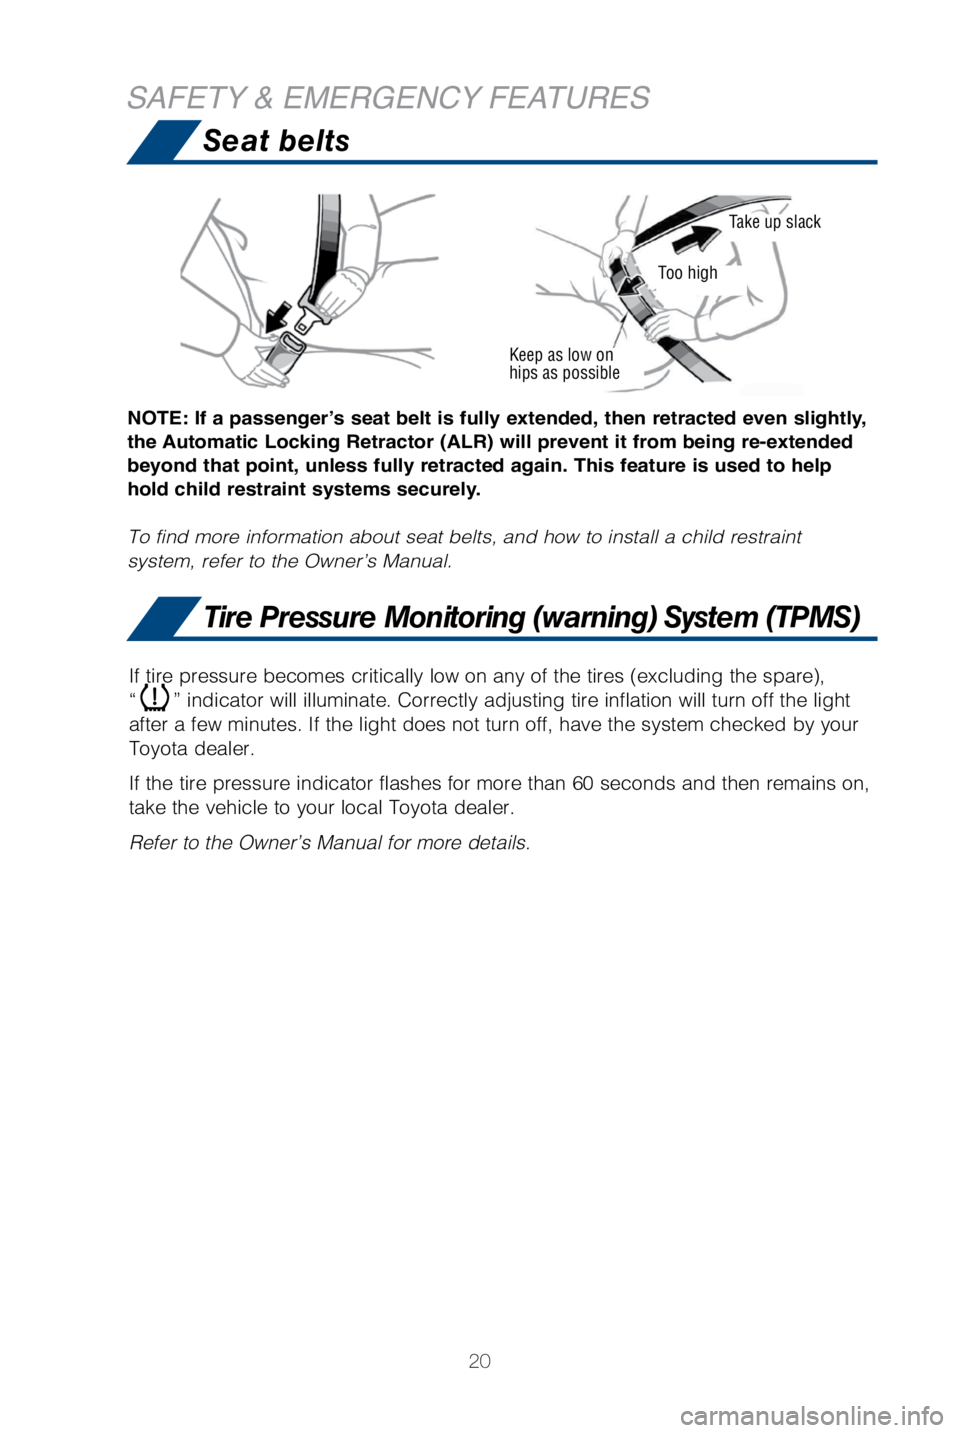
NOTE: If a passenger’s seat belt is fully extended, then retracted even slightly,
the Automatic Locking Retractor (ALR) will prevent it from being re-extended
beyond that point, unless fully retracted again. This feature is used to help
hold child restraint systems securely.
To find more information about seat belts, and how to install a child re\
straint
system, refer to the Owner’s Manual.
Keep as low on
hips as possible
Take up slack
Too high
SAFETY & EMERGENCY FEATURES
If tire pressure becomes critically low on any of the tires (excluding \
the spare),
“
” indicator will illuminate. Correctly adjusting tire inflation will \
turn off the light
after a few minutes. If the light does not turn off, have the system che\
cked by your
Toyota dealer.
If the tire pressure indicator flashes for more than 60 seconds and then\
remains on,
take the vehicle to your local Toyota dealer.
Refer to the Owner’s Manual for more details.
Page 23 of 28
21
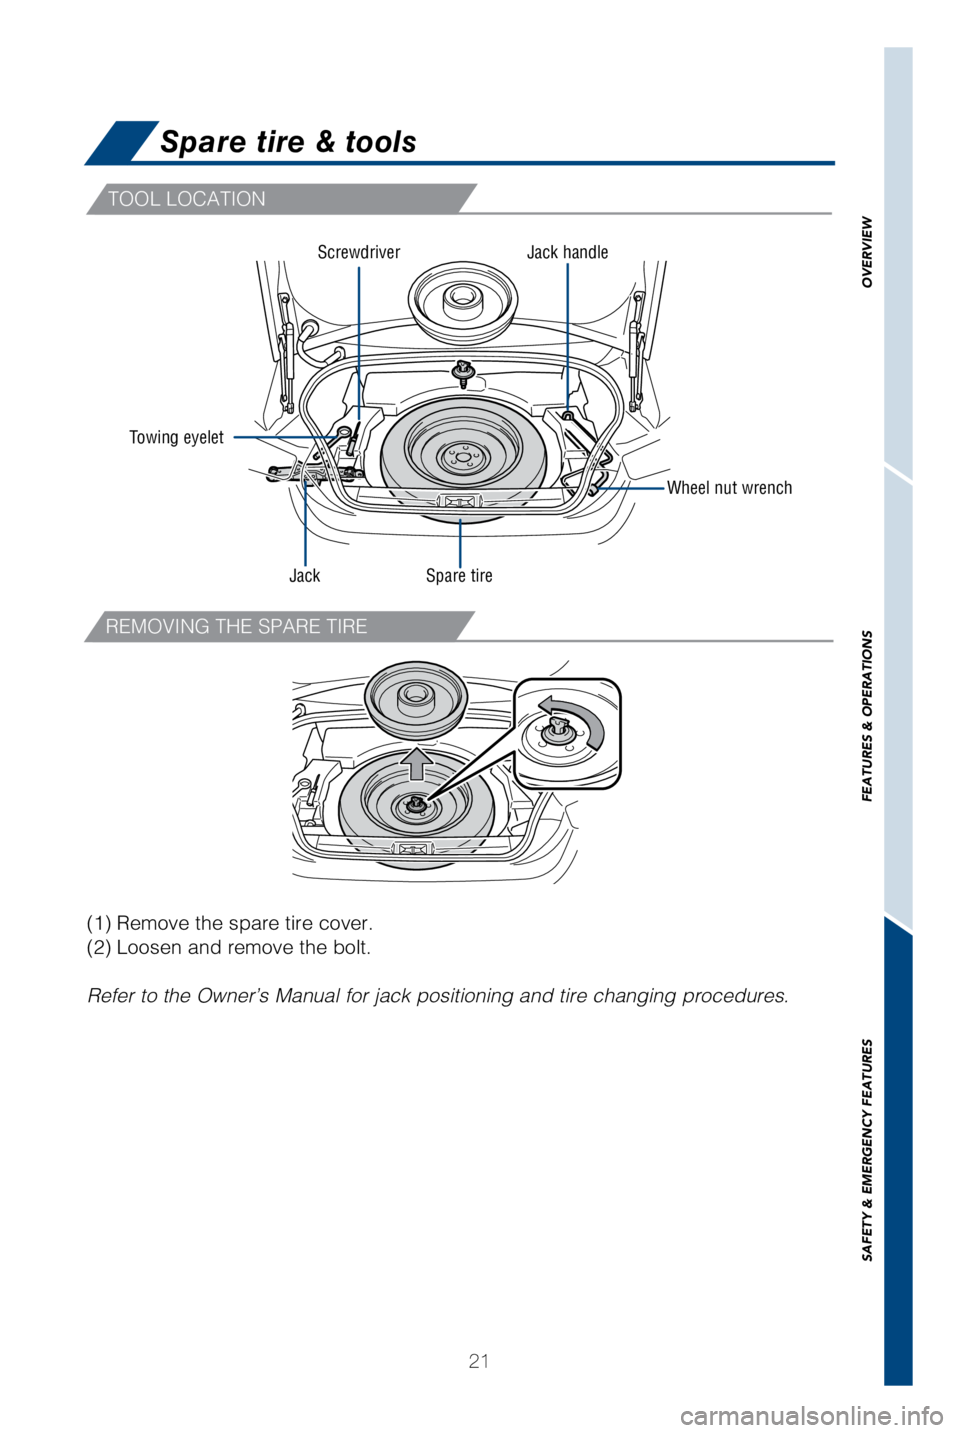
TOOL LOCATION
REMOVING THE SPARE TIRE
Spare tire & tools
Towing eyelet
Wheel nut wrench
Jack handle
Spare tire
Jack Screwdriver
(1) Remove the spare tire cover.
(2) Loosen and remove the bolt.
Refer to the Owner’s Manual for jack positioning and tire changing pr\
ocedures.
OVERVIEW
FEATURES & OPERATIONS
SAFETY & EMERGENCY FEATURES
Page 24 of 28
22
Star Safety System™
Your vehicle comes standard with the Star Safety SystemTM, which combines Anti-
lock Braking System (ABS), Brake Assist (BA), Electronic Brake-force\
Distribution
(EBD), Smart Stop Technology (SST), Traction Control (TRAC) and Ve\
hicle Stability
Control (VSC).
Refer to the Owner’s Manual for more details and important informatio\
n on
limitations to these systems.
SAFETY & EMERGENCY FEATURES
Smart Stop Technology automatically reduces engine power when the accele\
rator
and brake pedals are pressed simultaneously under certain conditions.
SST engages when the accelerator is depressed first and the brakes are a\
pplied
firmly for longer than one-half second at speeds greater than five miles\
per hour.
SST doesn’t engage if the brake pedal is depressed before the acceler\
ator pedal,
allowing vehicles to start on a steep hill and safely accelerate without\
rolling
backward.
SMART STOP TECHNOLOGY (SST)
VSC helps prevent loss of traction during cornering by reducing engine p\
ower and
applying brake force to selected wheels.
Toyota’s VSC monitors steering angle and the direction your vehicle i\
s traveling.
When it senses that the front or rear wheels begin to lose traction, VSC\
reduces
engine power and applies braking to selected wheels. This helps restore \
traction
and vehicle control.
VEHICLE STABILITY CONTROL (VSC)
Toyota’s ABS sensors detect which wheels are locking up and limits wh\
eel lockup
by “pulsing” each wheel’s brakes independently. Pulsing release\
s brake pressure
repeatedly for fractions of a second. This helps the tires attain the tr\
action that
current road conditions will allow, helping you to stay in directional c\
ontrol.
ANTI-LOCK BRAKE SYSTEM (ABS)
Brake Assist is designed to detect sudden or “panic” braking, and \
then add braking
pressure to help decrease the vehicle’s stopping distance. When there\
’s only a split
second to react, Brake Assist can add additional brake pressure more qui\
ckly than
just the driver alone can.
BRAKE ASSIST (BA)
Toyota’s ABS technology has Electronic Brake-force Distribution (EBD\
) to help
maintain control and balance when braking. Abrupt stops can cause a vehi\
cle to tilt
forward, reducing the braking power of the rear wheels. EBD responds to \
sudden
stops by redistributing brake force to enhance the braking effectiveness\
of all four
wheels.
ELECTRONIC BRAKE FORCE DISTRIBUTION (EBD)
Page 25 of 28
23
VSC helps prevent loss of traction during cornering by reducing engine p\
ower, and
Traction Control helps maintain traction on loose gravel and wet, icy, o\
r uneven
surfaces by applying brake force to the spinning wheel(s).
Toyota’s TRAC sensors are activated when one of the drive wheels star\
ts to slip.
TRAC limits engine output and applies the brakes to the spinning wheel. \
This
transfers power to the wheels that still have traction to help keep you \
on track.
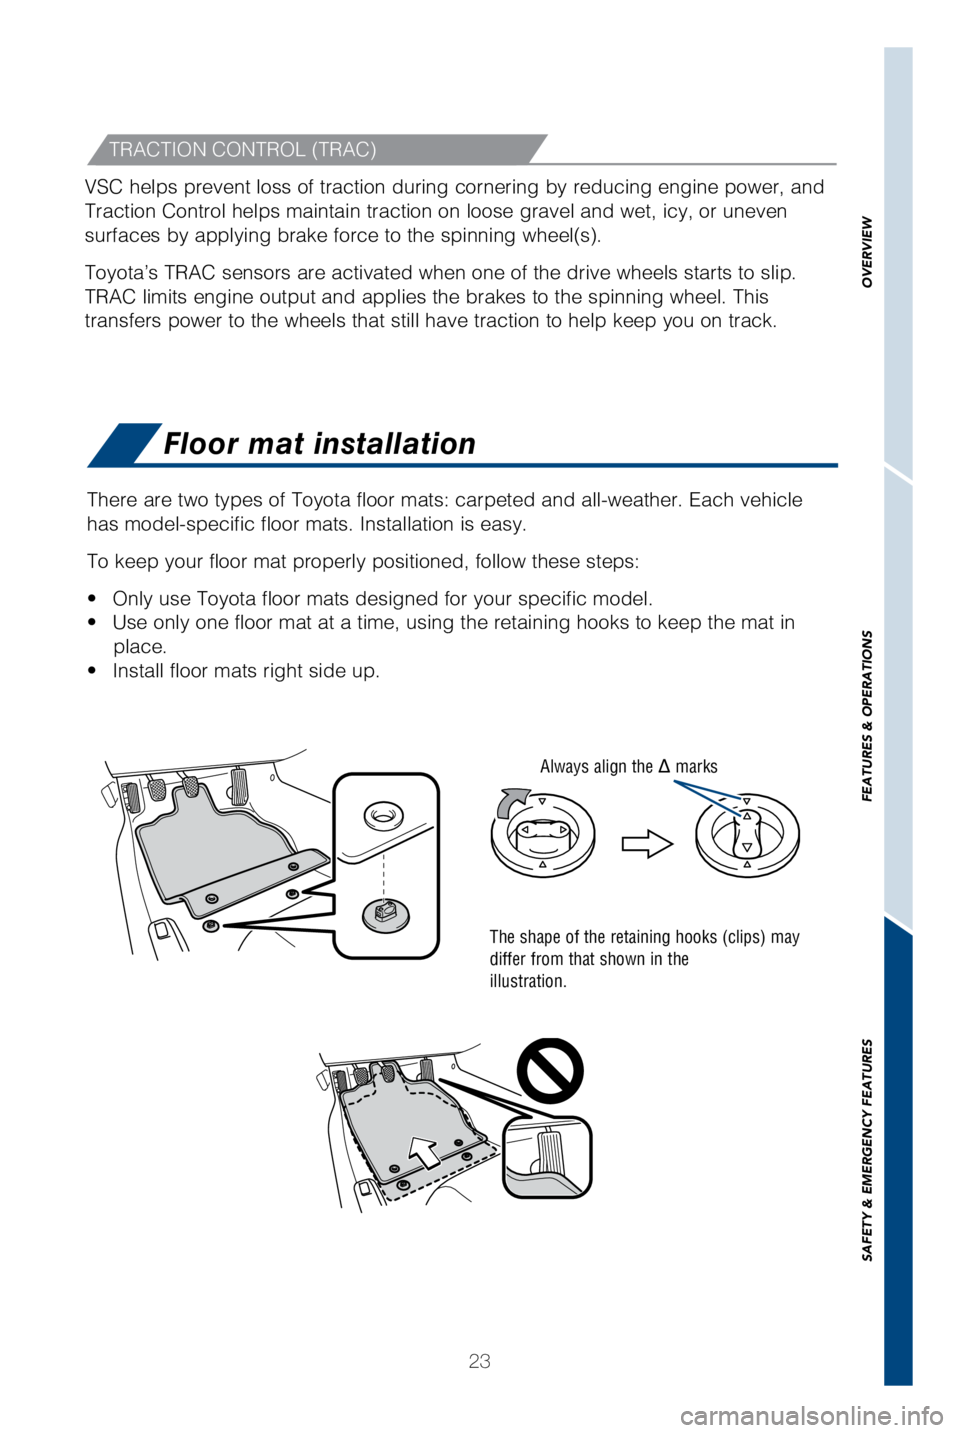
Floor mat installation
There are two types of Toyota floor mats: carpeted and all-weather. Each\
vehicle
has model-specific floor mats. Installation is easy.
To keep your floor mat properly positioned, follow these steps:
•
Only use Toyota floor mats designed for your specific model.
•
Use only one floor mat at a time, using the retaining hooks to keep the \
mat in place.
•
Install floor mats right side up.
The shape of the retaining hooks (clips) may
differ from that shown in the
illustration.
Always align the marks
TRACTION CONTROL (TRAC)
OVERVIEW
FEATURES & OPERATIONS
SAFETY & EMERGENCY FEATURES
Page 26 of 28
24
PAIRING BLUETOOTH® PHONE FOR THE FIRST TIME
Touch Screen Display Audio and Display Audio with Navigation1
To use the hands-free system3, it is necessary to pair a Bluetooth®2
phone with the system. Once the phone has been paired, it is possible to
use the hands-free system
3. (NOTE: The Bluetooth®2 pairing process for
Non-Navigation and Navigation1 units differ, as noted below)
You can pair up to 4 devices.
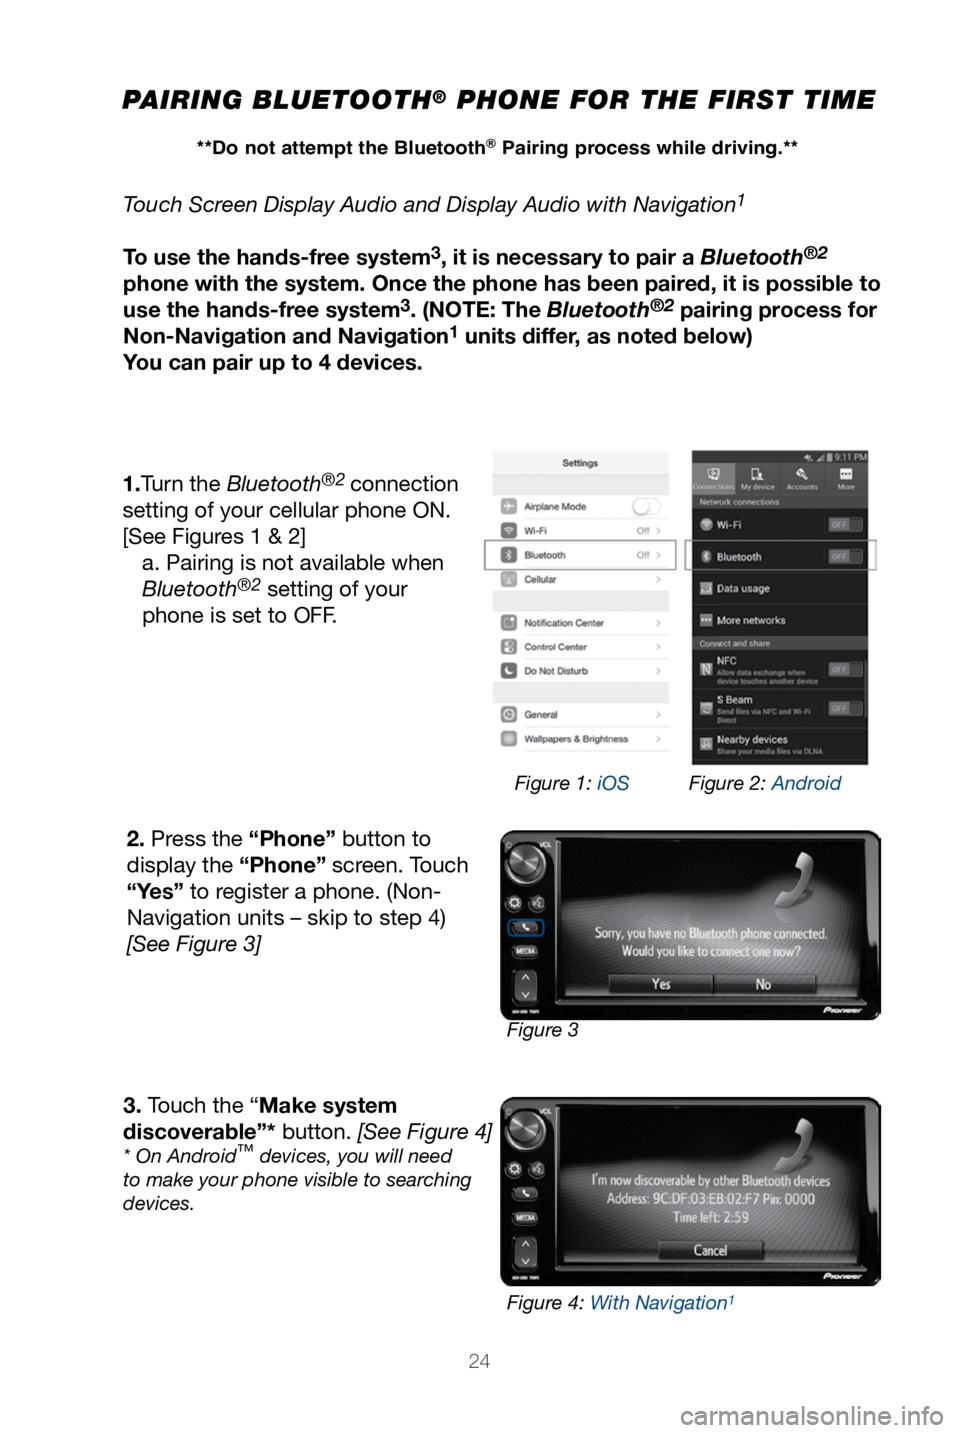
1.Turn the Bluetooth
®2 connection
setting of your cellular phone ON.
[See Figures 1 & 2] a. Pairing is not available when
Bluetooth
®2 setting of your
phone is set to OFF.
2. Press the “Phone” button to
display the “Phone” screen. Touch
“Yes” to register a phone. (Non-
Navigation units – skip to step 4)
[See Figure 3]
3. Touch the “Make system
discoverable”* button. [See Figure 4]
* On Android™ devices, you will need
to make your phone visible to searching
devices.
Figure 3 Figure 1: iOS
Figure 2: Android
Figure 4: With Navigation
1
**Do not attempt the Bluetooth® Pairing process while driving.**
Page 27 of 28
25
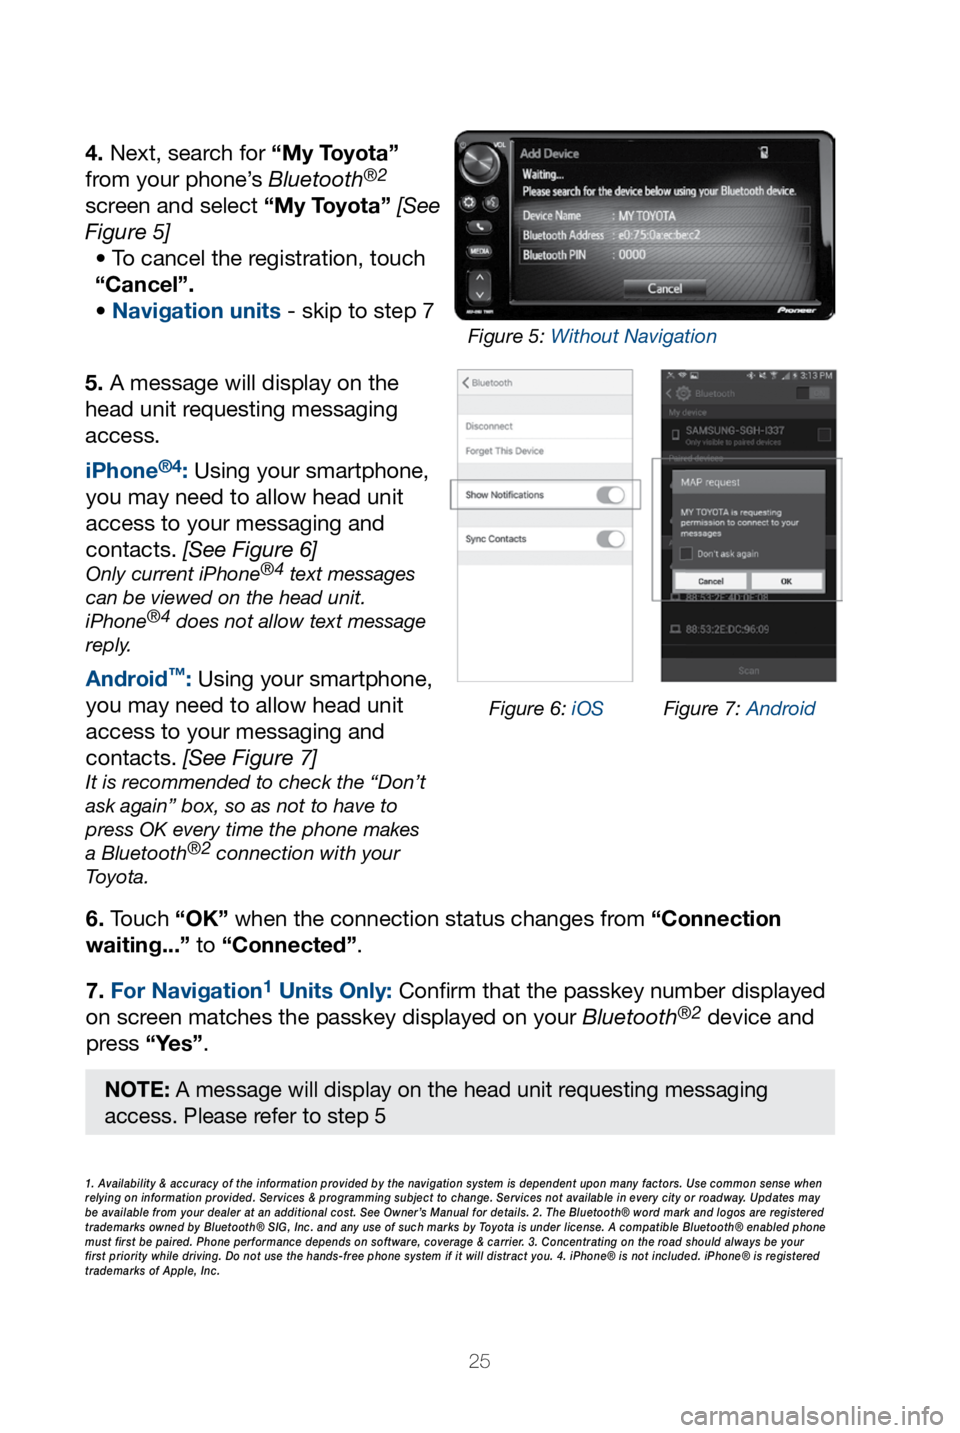
5. A message will display on the
head unit requesting messaging
access.6. Touch “OK” when the connection status changes from “Connection
waiting...” to “Connected”.
7. For Navigation
1 Units Only: Confi rm that the passkey number displayed
on screen matches the passkey displayed on your Bluetooth®2 device and
press “Yes”. iPhone
®4: Using your smartphone,
you may need to allow head unit
access to your messaging and
contacts. [See Figure 6]
Only current iPhone®4 text messages
can be viewed on the head unit.
iPhone
®4 does not allow text message
reply.
Android™: Using your smartphone,
you may need to allow head unit
access to your messaging and
contacts. [See Figure 7]
It is recommended to check the “Don’t
ask again” box, so as not to have to
press OK every time the phone makes
a Bluetooth
®2 connection with your
Toyota.
4. Next, search for “My Toyota”
from your phone’s Bluetooth®2
screen and select “My Toyota” [See
Figure 5]
• To cancel the registration, touch
“Cancel”.
• Navigation units - skip to step 7
1. Availability & accuracy of the information provided by the navigation sys\
tem is dependent upon many factors. Use common sense when
relying on information provided. Services & programming subject to change. Services not available in every city or roadway. Updates may
be available from your dealer at an additional cost. See Owner’s Manual for details. 2. The Bluetooth® word mark and logos are regis\
tered
trademarks owned by Bluetooth® SIG, Inc. and any use of such marks by\
Toyota is under license. A compatible Bluetooth® enabled phone
must first be paired. Phone performance depends on software, coverage & \
carrier. 3. Concentrating on the road should always be your
first priority while driving. Do not use the hands-free phone system if \
it will distract you. 4. iPhone® is not included. iPhone® is registered
trademarks of Apple, Inc.
Figure 6: iOS Figure 7: Android
Figure 5: Without Navigation
NOTE: A message will display on the head unit requesting messaging
access. Please refer to step 5
Page 28 of 28

86
2 0 18www.toyota.com/owners
CUSTOMER EXPERIENCE CENTER
1- 8 0 0 - 3 31- 4 3 31
Printed in U.S.A. 11/ 17
17 - M K G - 1 0 19 4
QUICK REFERENCE GUIDE