TOYOTA HIGHLANDER 2009 XU40 / 2.G Owners Manual
HIGHLANDER 2009 XU40 / 2.G
TOYOTA
TOYOTA
https://www.carmanualsonline.info/img/14/6399/w960_6399-0.png
TOYOTA HIGHLANDER 2009 XU40 / 2.G Owners Manual
Trending: key, wiper blades, light, oil, door lock, catalytic converter, manual transmission
Page 271 of 608
271
3-1. Using the air conditioning system and defogger
3
Interior features
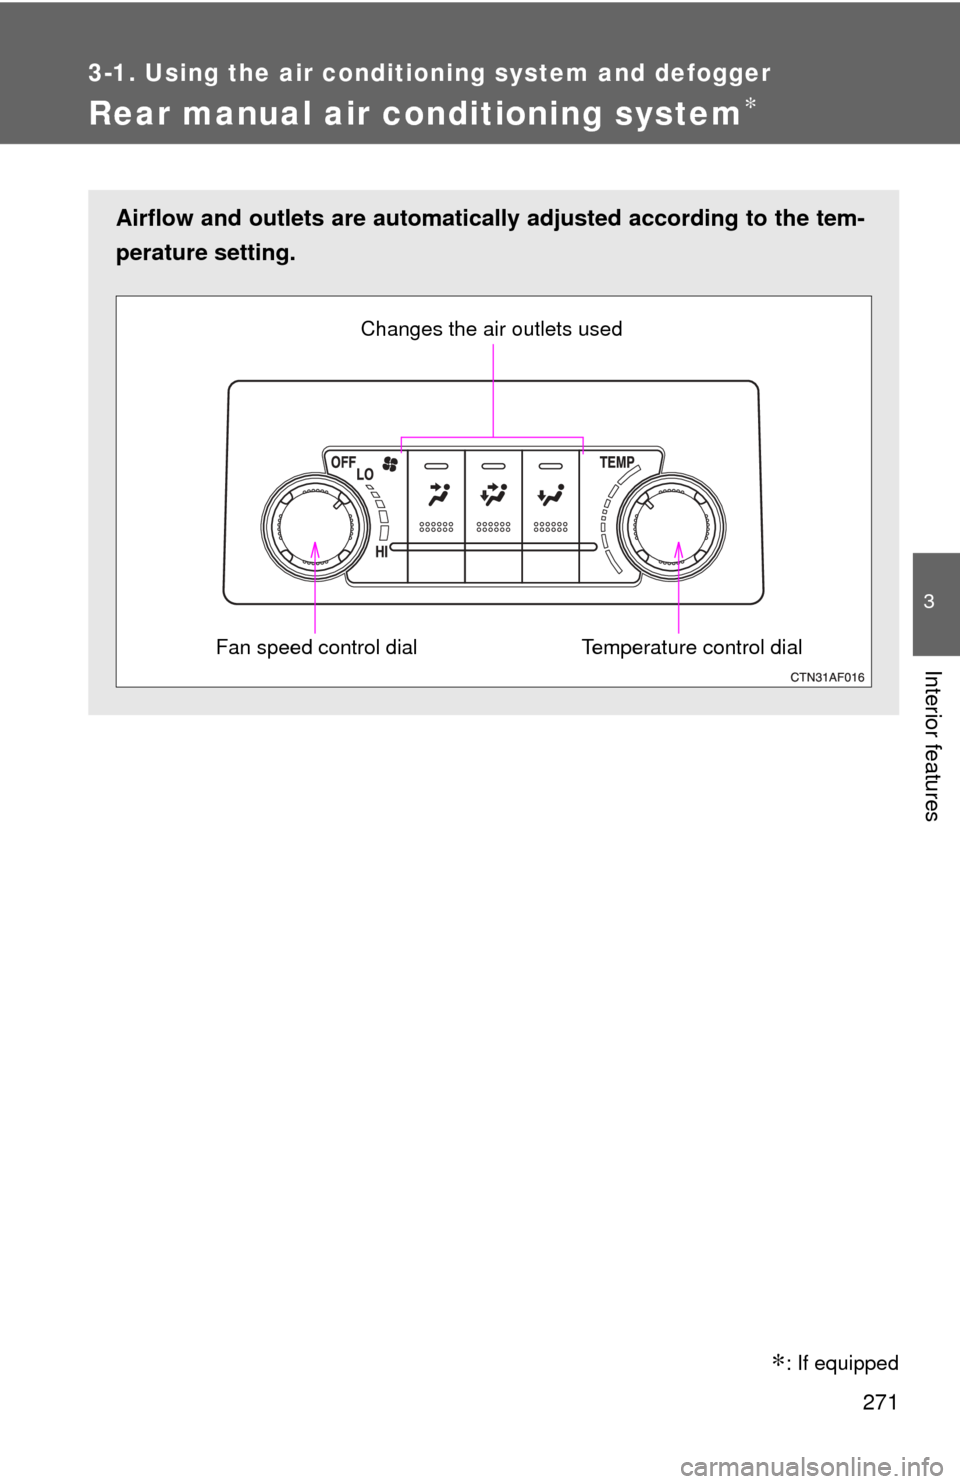
Rear manual air conditioning system∗
Airflow and outlets are automatically adjusted according to the tem-
perature setting.
Temperature control dial
Changes the air outlets used
Fan speed control dial
�: If equipped
Page 272 of 608
272 3-1. Using the air conditioning system and defogger
Adjusting the settings
■ Adjusting the temperature setting
Turn the temperature control dial clockwise (warm) or counter-
clockwise (cool).
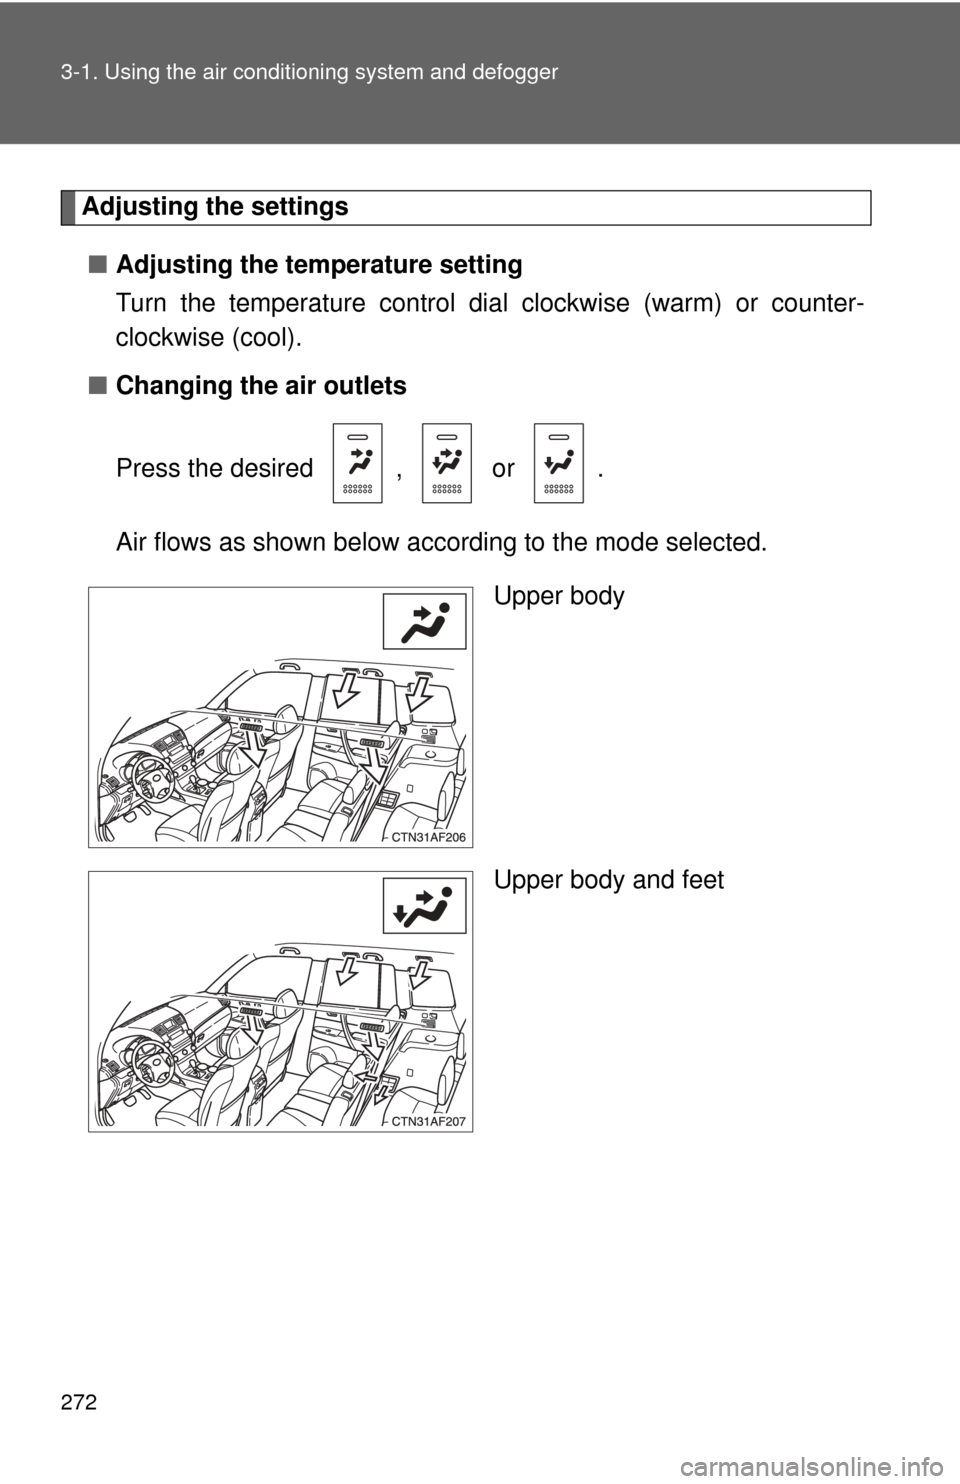
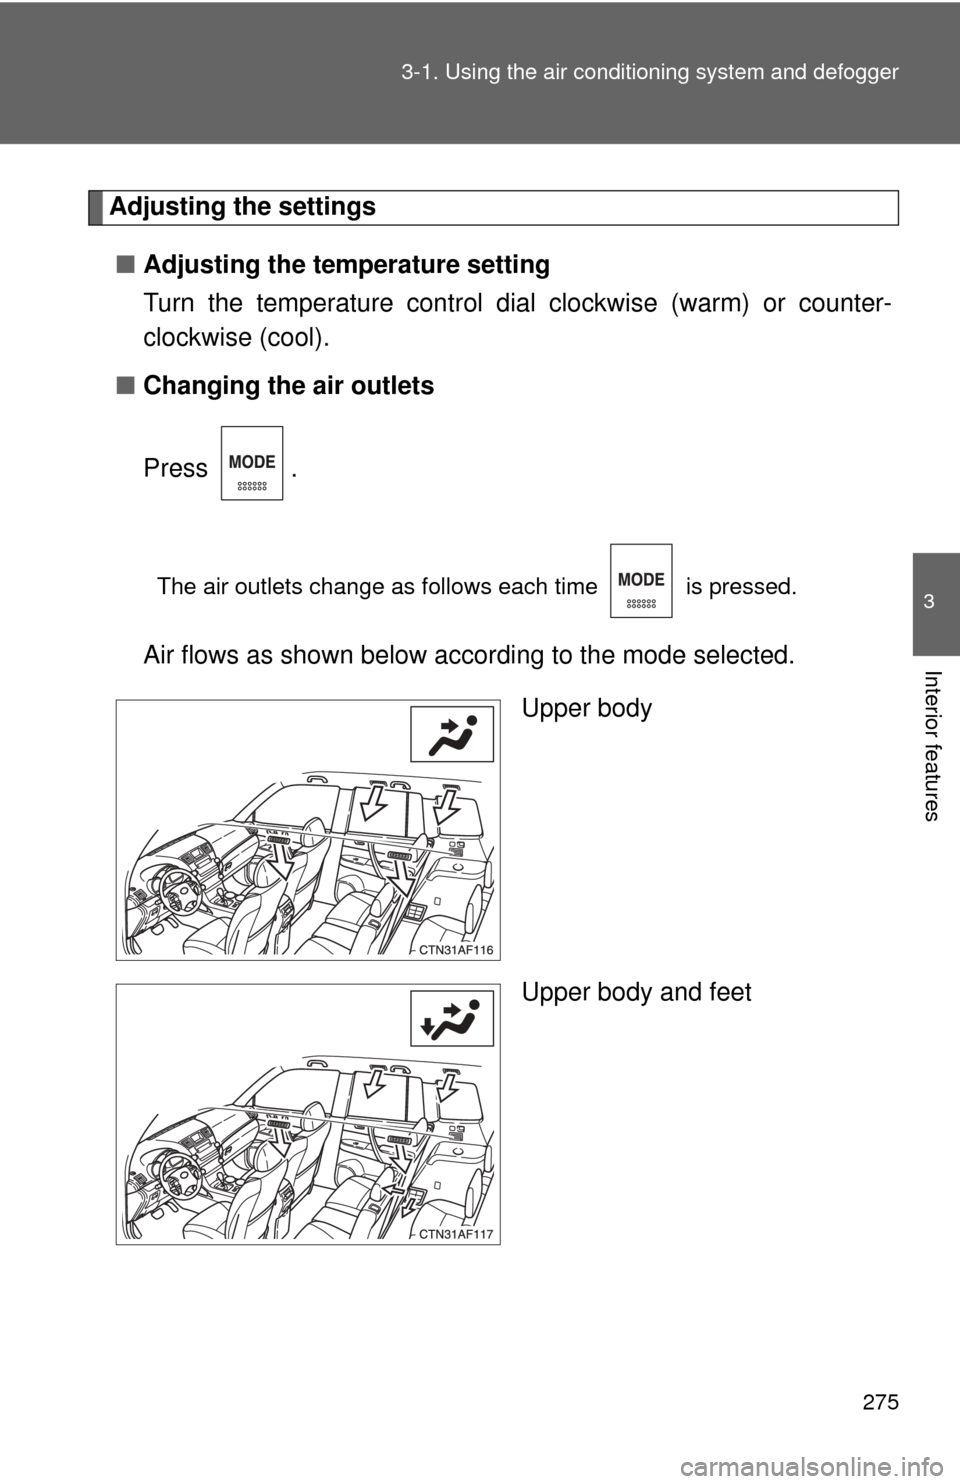
■ Changing the air outlets
Press the desired , or .
Air flows as shown below according to the mode selected.
Upper body
Upper body and feet
Page 273 of 608
273
3-1. Using the air conditioning system
and defogger
3
Interior features
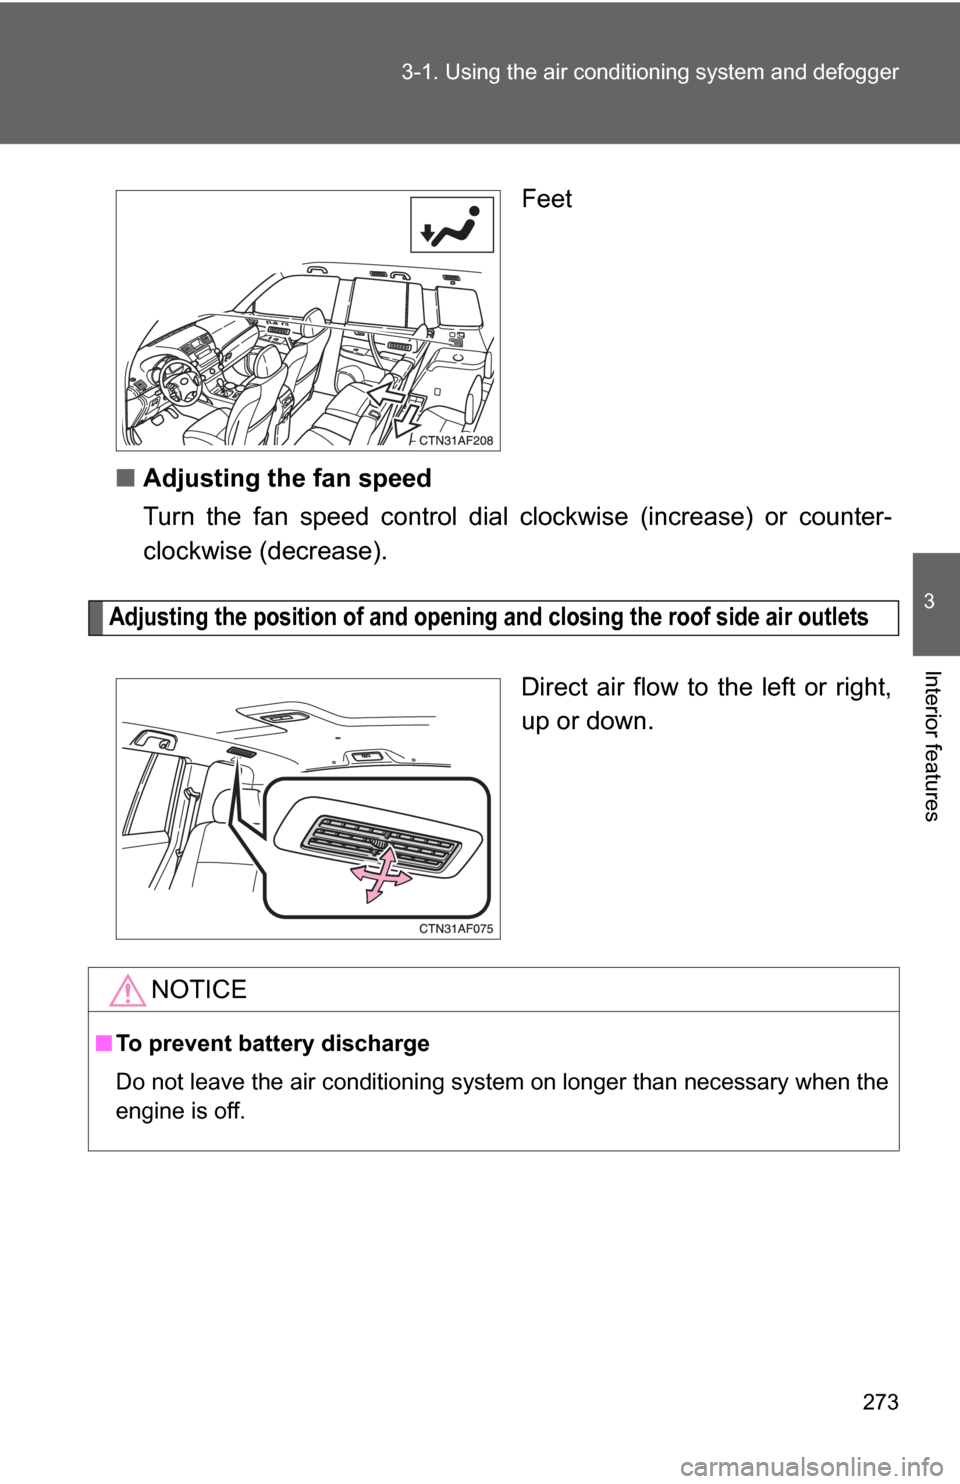
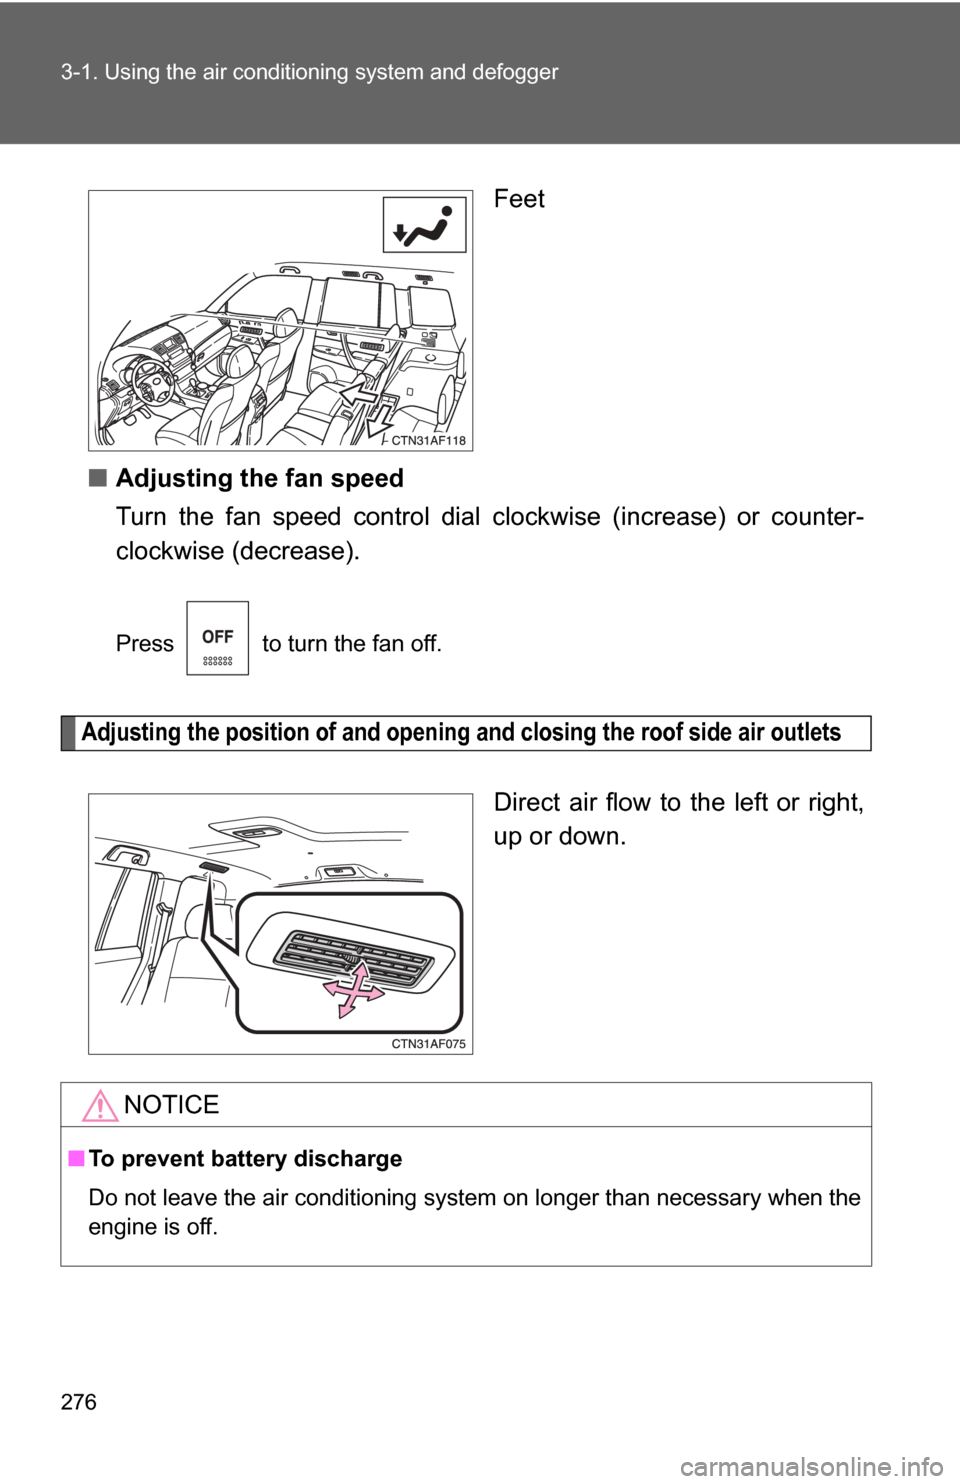
Feet
■ Adjusting the fan speed
Turn the fan speed control dial clockwise (increase) or counter-
clockwise (decrease).
Adjusting the position of and opening and closing the roof side air outlets
Direct air flow to the left or right,
up or down.
NOTICE
■To prevent battery discharge
Do not leave the air conditioning system on longer than necessary when the
engine is off.
Page 274 of 608
274
3-1. Using the air conditioning system and defogger
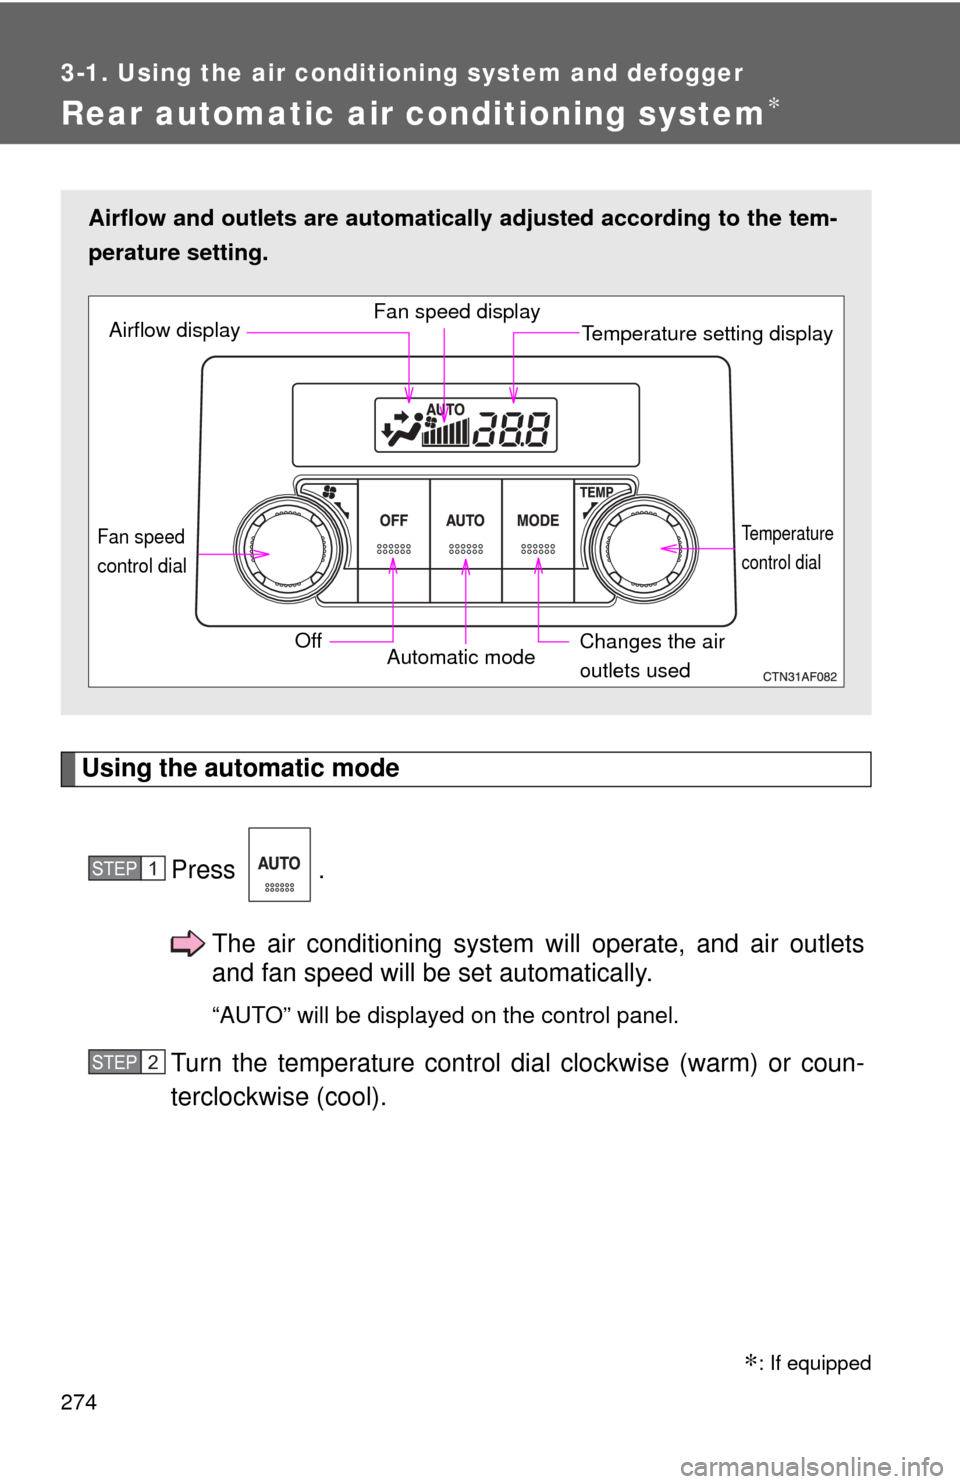
Rear automatic air conditioning system∗
Using the automatic modePress .The air conditioning system will operate, and air outlets
and fan speed will be set automatically.
“AUTO” will be displayed on the control panel.
Turn the temperature control dial clockwise (warm) or coun-
terclockwise (cool).
Airflow and outlets are automatica lly adjusted according to the tem-
perature setting.
Airflow display Fan speed display
Temperature setting display
Fan speed
control dial
OffAutomatic mode Changes the air
outlets used
Temperature
control dial
STEP1
STEP2
∗: If equipped
Page 275 of 608
275
3-1. Using the air conditioning system
and defogger
3
Interior features
Adjusting the settings
■ Adjusting the temperature setting
Turn the temperature control dial clockwise (warm) or counter-
clockwise (cool).
■ Changing the air outlets
Press .
The air outlets change as follows each time is pressed.
Air flows as shown below according to the mode selected.
Upper body
Upper body and feet
Page 276 of 608
276 3-1. Using the air conditioning system and defogger
Feet
■ Adjusting the fan speed
Turn the fan speed control dial clockwise (increase) or counter-
clockwise (decrease).
Press to turn the fan off.
Adjusting the position of and opening and closing the roof side air outlets
Direct air flow to the left or right,
up or down.
NOTICE
■ To prevent battery discharge
Do not leave the air conditioning system on longer than necessary when the
engine is off.
Page 277 of 608
277
3-1. Using the air conditioning system and defogger
3
Interior features
Rear window and outside rear view mirror defoggers
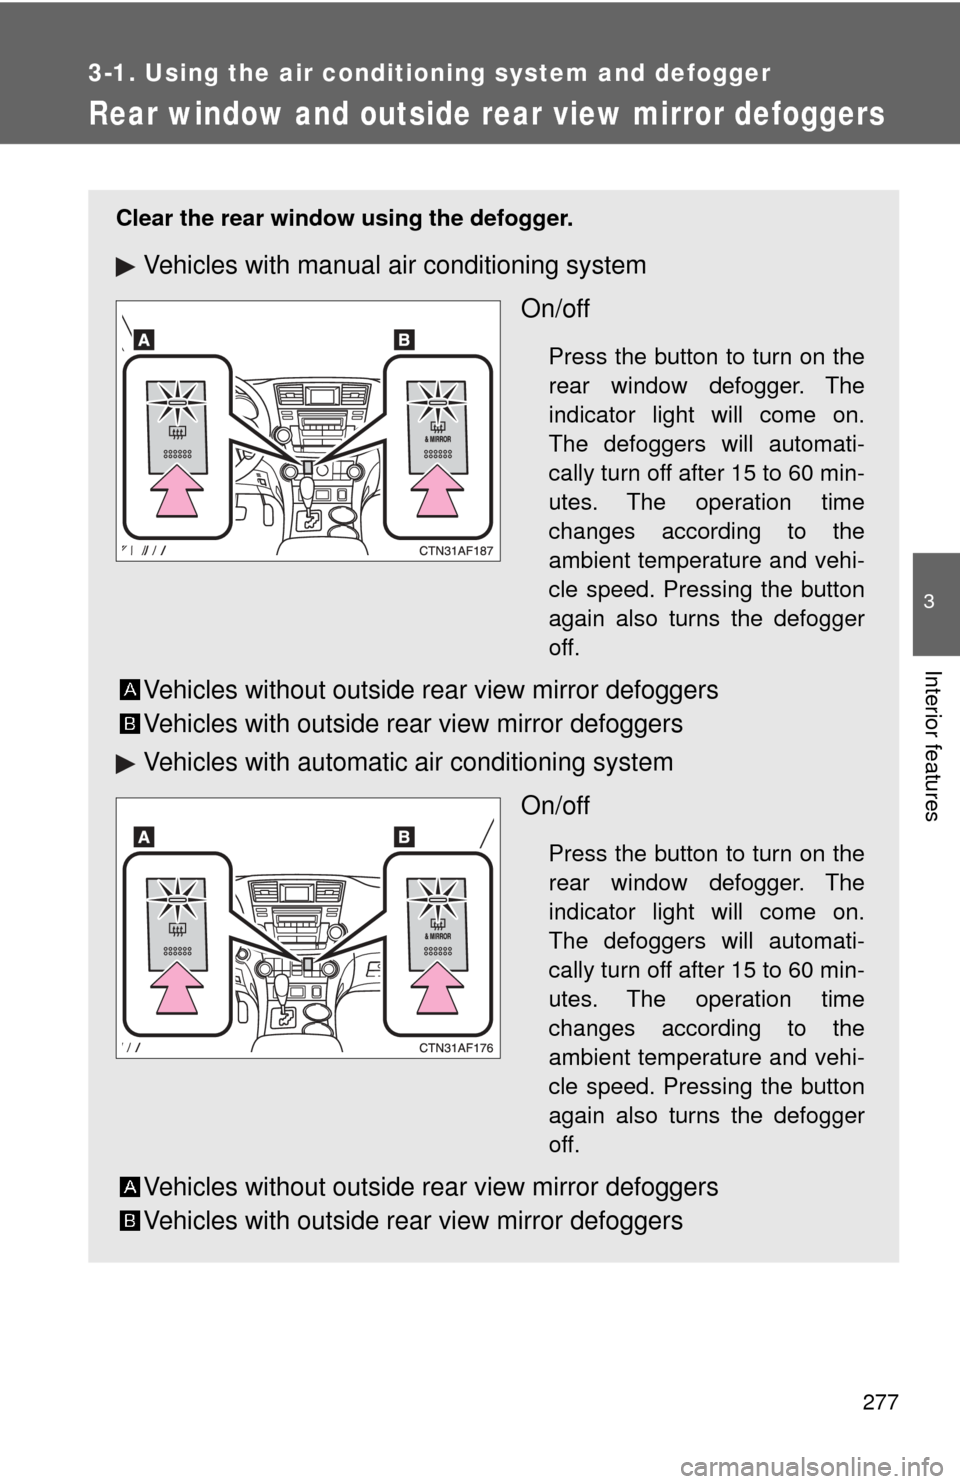
Clear the rear window using the defogger.
Vehicles with manual air conditioning system
On/off
Press the button to turn on the
rear window defogger. The
indicator light will come on.
The defoggers will automati-
cally turn off after 15 to 60 min-
utes. The operation time
changes according to the
ambient temperature and vehi-
cle speed. Pressing the button
again also turns the defogger
off.
Vehicles without outside rear view mirror defoggers
Vehicles with outside rear view mirror defoggers
Vehicles with automatic air conditioning systemOn/off
Press the button to turn on the
rear window defogger. The
indicator light will come on.
The defoggers will automati-
cally turn off after 15 to 60 min-
utes. The operation time
changes according to the
ambient temperature and vehi-
cle speed. Pressing the button
again also turns the defogger
off.
Vehicles without outside rear view mirror defoggers
Vehicles with outside rear view mirror defoggers
Page 278 of 608
278 3-1. Using the air conditioning system and defogger
■The defogger can be operated when
Vehicles without smart key system
The engine switch is in the “ON” position.
Vehicles with smart key system
The “ENGINE START STOP” switch is in IGNITION ON mode.
■ Outside rear view mirror defoggers (vehicles with outside rear view
mirror defoggers)
Turning the rear window defogger on will turn the outside rear view mirror
defoggers on.
CAUTION
■Outside rear view mirror defoggers (vehicles with outside rear view
mirror defoggers)
The surfaces of the outside rear view mirrors become hot. Do not touch
them to prevent from burning yourself.
Page 279 of 608
279
3-1. Using the air conditioning system and defogger
3
Interior features
Windshield wiper de-icer∗
■The de-icer can be operated when
Vehicles without smart key system
The engine switch is in the “ON” position.
Vehicles with smart key system
The “ENGINE START STOP” switch is in IGNITION ON mode.
CAUTION
■ When the windshield wiper de-icer is on
Do not touch the glass at the lower part of the windshield or to the side of the
front pillars as the surfaces can become very hot and burn you.
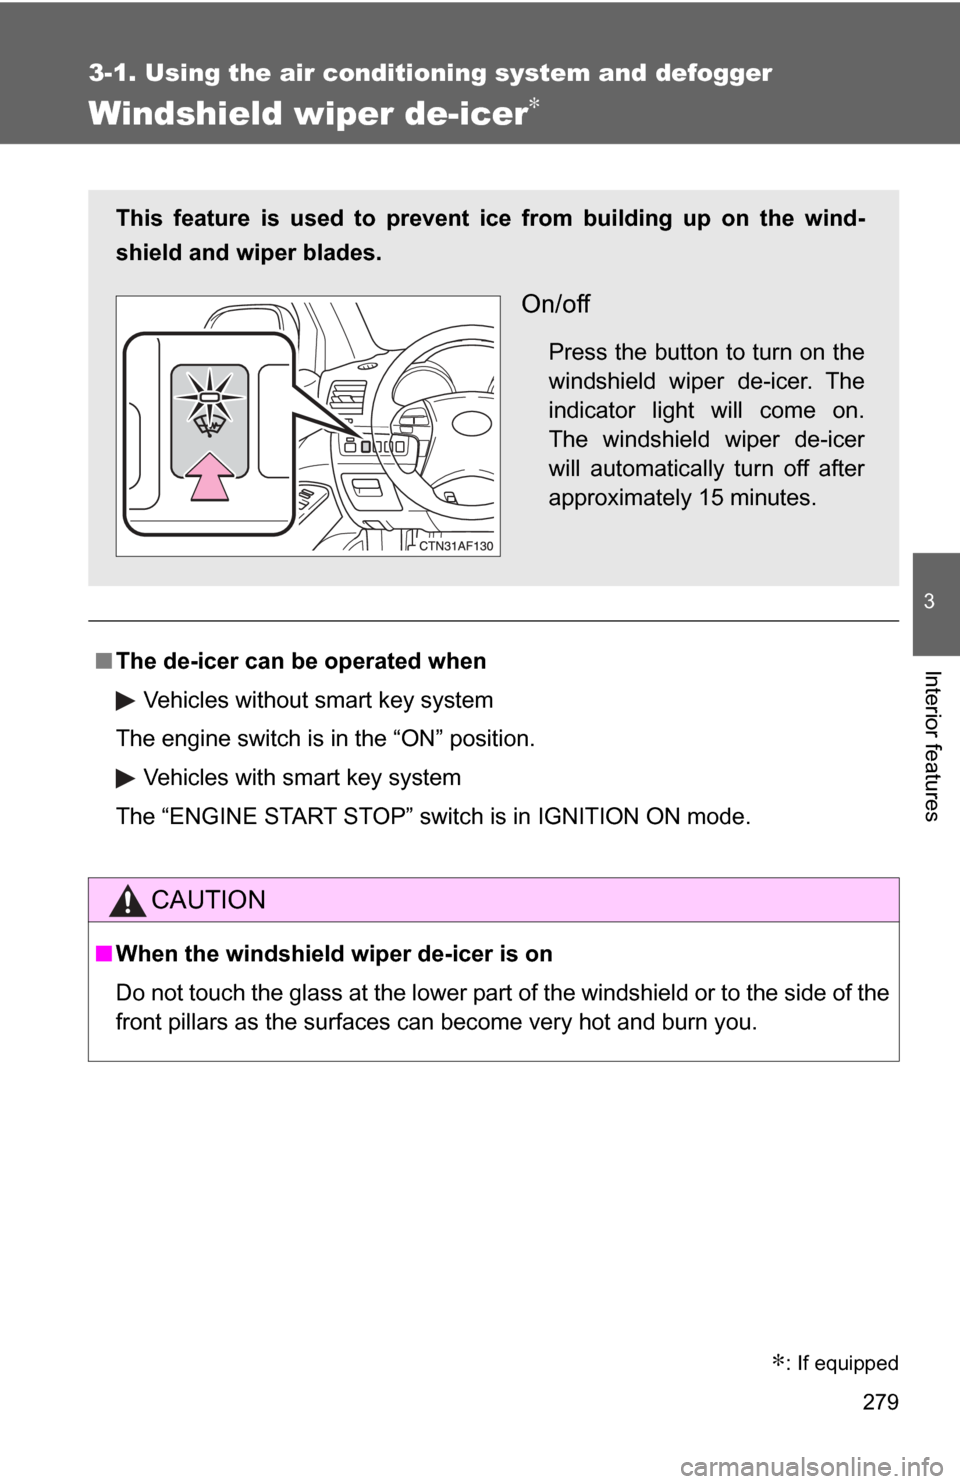
This feature is used to prevent ice from building up on the wind-
shield and wiper blades.
On/off
Press the button to turn on the
windshield wiper de-icer. The
indicator light will come on.
The windshield wiper de-icer
will automatically turn off after
approximately 15 minutes.
∗: If equipped
Page 280 of 608
280
3-1. Using the air conditioning system and defogger
Using the steering wheel climate remote control switches∗
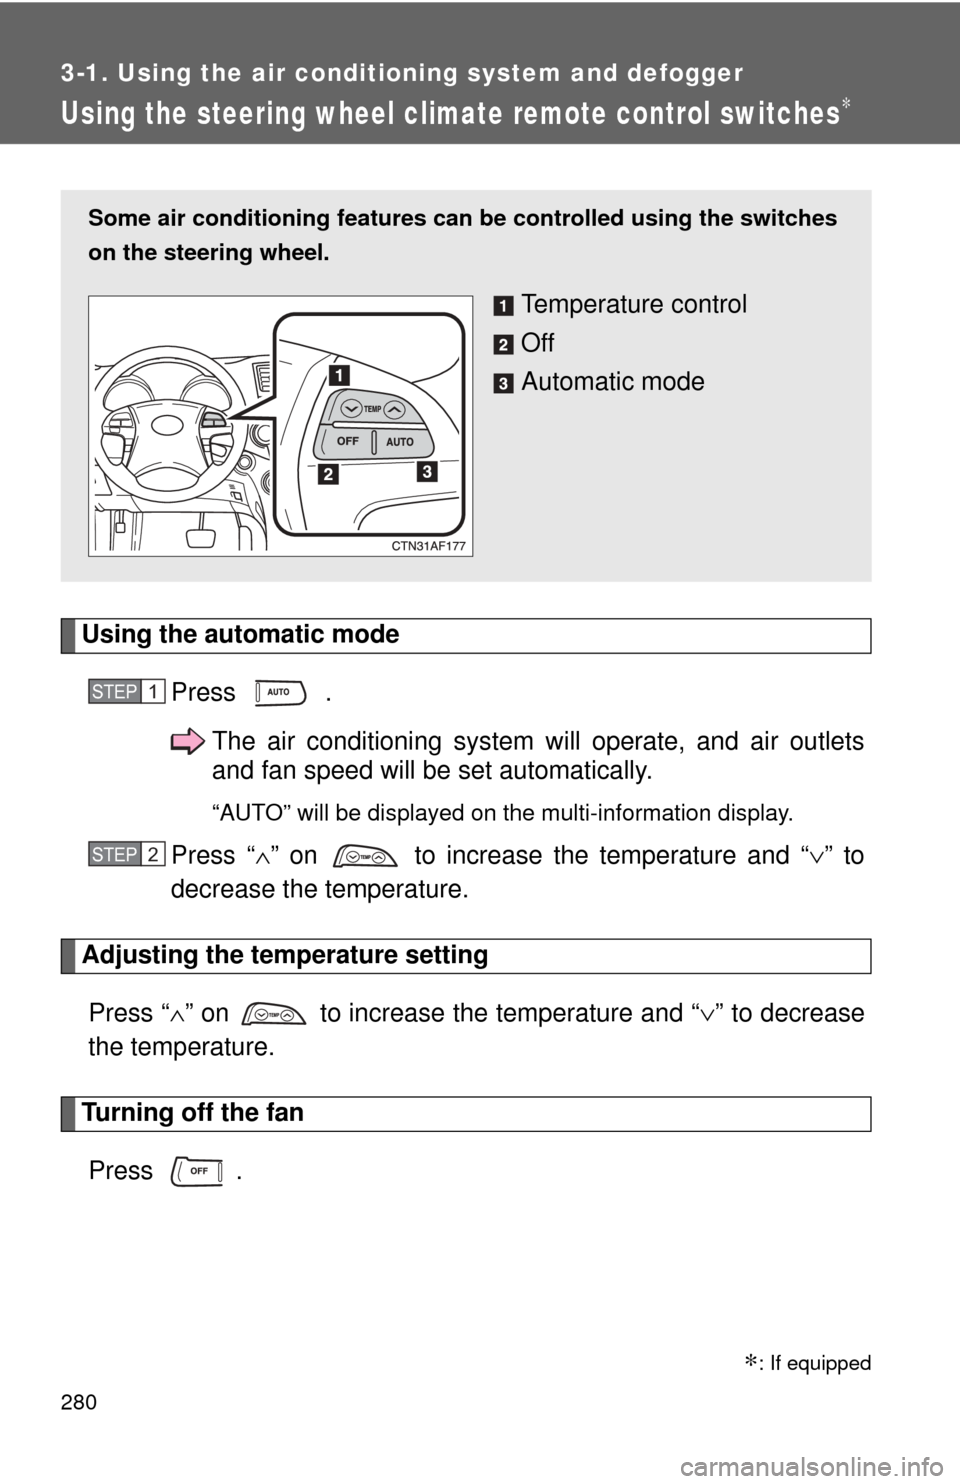
Using the automatic modePress .The air conditioning system will operate, and air outlets
and fan speed will be set automatically.
“AUTO” will be displayed on the multi-information display.
Press “∧” on to increase the temperature and “ ∨” to
decrease the temperature.
Adjusting the temperature setting
Press “ ∧” on to increase the temperature and “ ∨” to decrease
the temperature.
Turning off the fan
Press .
Some air conditioning features can be controlled using the switches
on the steering wheel.
Temperature control
Off
Automatic mode
STEP1
STEP2
∗: If equipped
Trending: run flat, brakes, coolant capacity, check transmission fluid, ABS, bluetooth, water pump
