buttons TOYOTA HIGHLANDER 2014 XU50 / 3.G Navigation Manual
[x] Cancel search | Manufacturer: TOYOTA, Model Year: 2014, Model line: HIGHLANDER, Model: TOYOTA HIGHLANDER 2014 XU50 / 3.GPages: 356, PDF Size: 28.61 MB
Page 83 of 356
83
2. RADIO OPERATION
3
AUDIO/VISUAL SYSTEM
No.Function
Select to scroll the page of preset buttons.
Select to display the option screen.
Select to display the audio source selection screen.
Select to display the sound setting screen.
Select to display a list of receivable stations/channels.
Select to scan for receivable stations/channels.
Select to store information of the audio currently being broadcast on the radio.
Select to tune to preset stations/channels.
Select to display the additional text information.
Analog FM only: Select to display RBDS text messages.
Select to turn HD Radio mode on/off.
When the “HD Radio™” indicator is off, the station list shows only analog broadcasts.
Cache radio only: Select to play/pause.
Select to display the cache radio operation buttons. (P.85)
Press to turn mute on/off.
Cache radio only: Select to play/pause.
Turn to step up/down frequencies.
Turn to move up/down the list. Also, the knob can be used to enter selections on the
list screens by pressing it.
Press to seek for a station/channel.
Press and hold for continuous seek.
Turn to adjust volume.
Press to turn the audio system on/off.
Press and hold to restart the audio system.
INFORMATION
●The radio automatically changes to stereo reception when a stereo broadcast is received.
●The radio automatically blends to an HD Radio signal in AM or FM where available.
Page 85 of 356
85
2. RADIO OPERATION
3
AUDIO/VISUAL SYSTEM
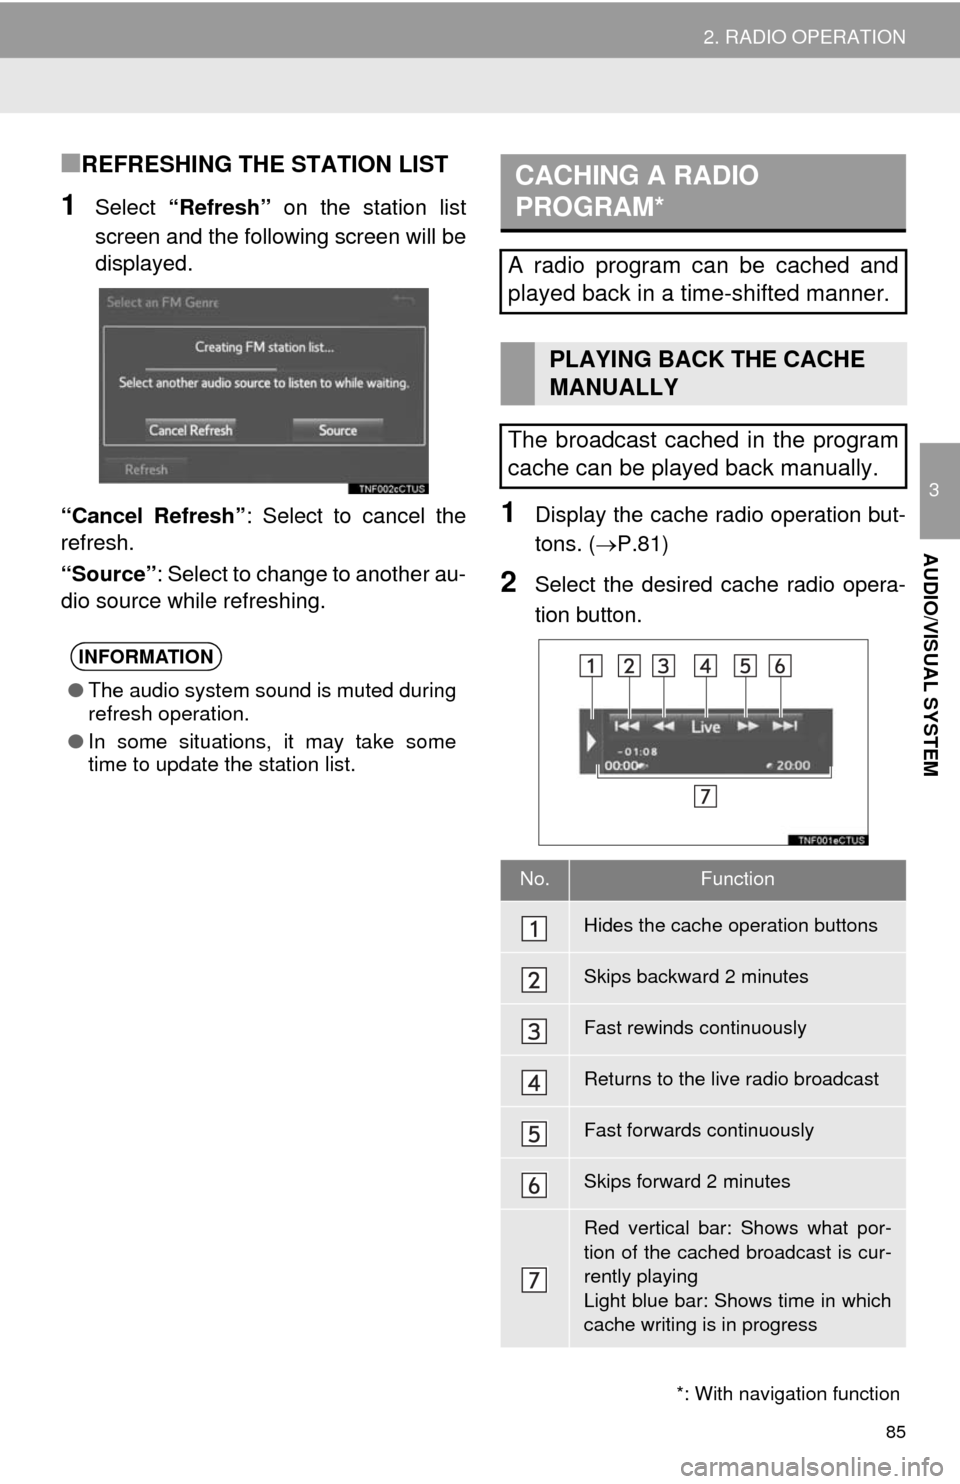
■REFRESHING THE STATION LIST
1Select “Refresh” on the station list
screen and the following screen will be
displayed.
“Cancel Refresh”: Select to cancel the
refresh.
“Source”: Select to change to another au-
dio source while refreshing.
1Display the cache radio operation but-
tons. (P.81)
2Select the desired cache radio opera-
tion button.
INFORMATION
●The audio system sound is muted during
refresh operation.
●In some situations, it may take some
time to update the station list.
*: With navigation function
CACHING A RADIO
PROGRAM*
A radio program can be cached and
played back in a time-shifted manner.
PLAYING BACK THE CACHE
MANUALLY
The broadcast cached in the program
cache can be played back manually.
No.Function
Hides the cache operation buttons
Skips backward 2 minutes
Fast rewinds continuously
Returns to the live radio broadcast
Fast forwards continuously
Skips forward 2 minutes
Red vertical bar: Shows what por-
tion of the cached broadcast is cur-
rently playing
Light blue bar: Shows time in which
cache writing is in progress
Page 92 of 356
92
2. RADIO OPERATION
No.Function
Select to scroll the page of preset buttons.
Select to display the option screen.
Select to scan for receivable channels.
Select “Additional Information” to display the information.
Select to display the audio source selection screen.
Select to display the sound setting screen.
Select to display a list of receivable channels.
Select to tune to preset channels.
Turn to step up/down channels.
Turn to move up/down the list. Also, the knob can be used to enter selections on the
list screens by pressing it.
Press to seek for a channel.
Press and hold for continuous seek.
Turn to adjust volume.
Press to turn the audio system on/off.
Press and hold to restart the audio system.
CERTIFICATION
CAUTION:
FCC WARNING: Changes or modifications in construction not expressly approved by the
party responsible for compliance could void the user's authority to operate the equip-
ment.
Radio frequency exposure.
This device is approved for Mobile Application only and, to comply with applicable FCC
radio frequency exposure regulations, must be used with a distance of at least 7.9 in.
(20cm) between the antenna and the body of any person at all time during use.
NOTICE:
THIS DEVICE COMPLIES WITH PART15 OF THE FCC RULES.
OPERATION IS SUBJECT TO THE FOLLOWING TWO CONDITIONS,
1) THIS DEVICE MAY NOT CAUSE HARMFUL INTERFERENCE AND
2) THIS DEVICE MUST ACCEPT ANY INTERFERENCE RECEIVED, INCLUDING
INTERFERENCE THAT MAY CAUSE UNDESIRED OPERATION.
Page 139 of 356
139
7. REAR SEAT ENTERTAINMENT SYSTEM OPERATION
3
AUDIO/VISUAL SYSTEM
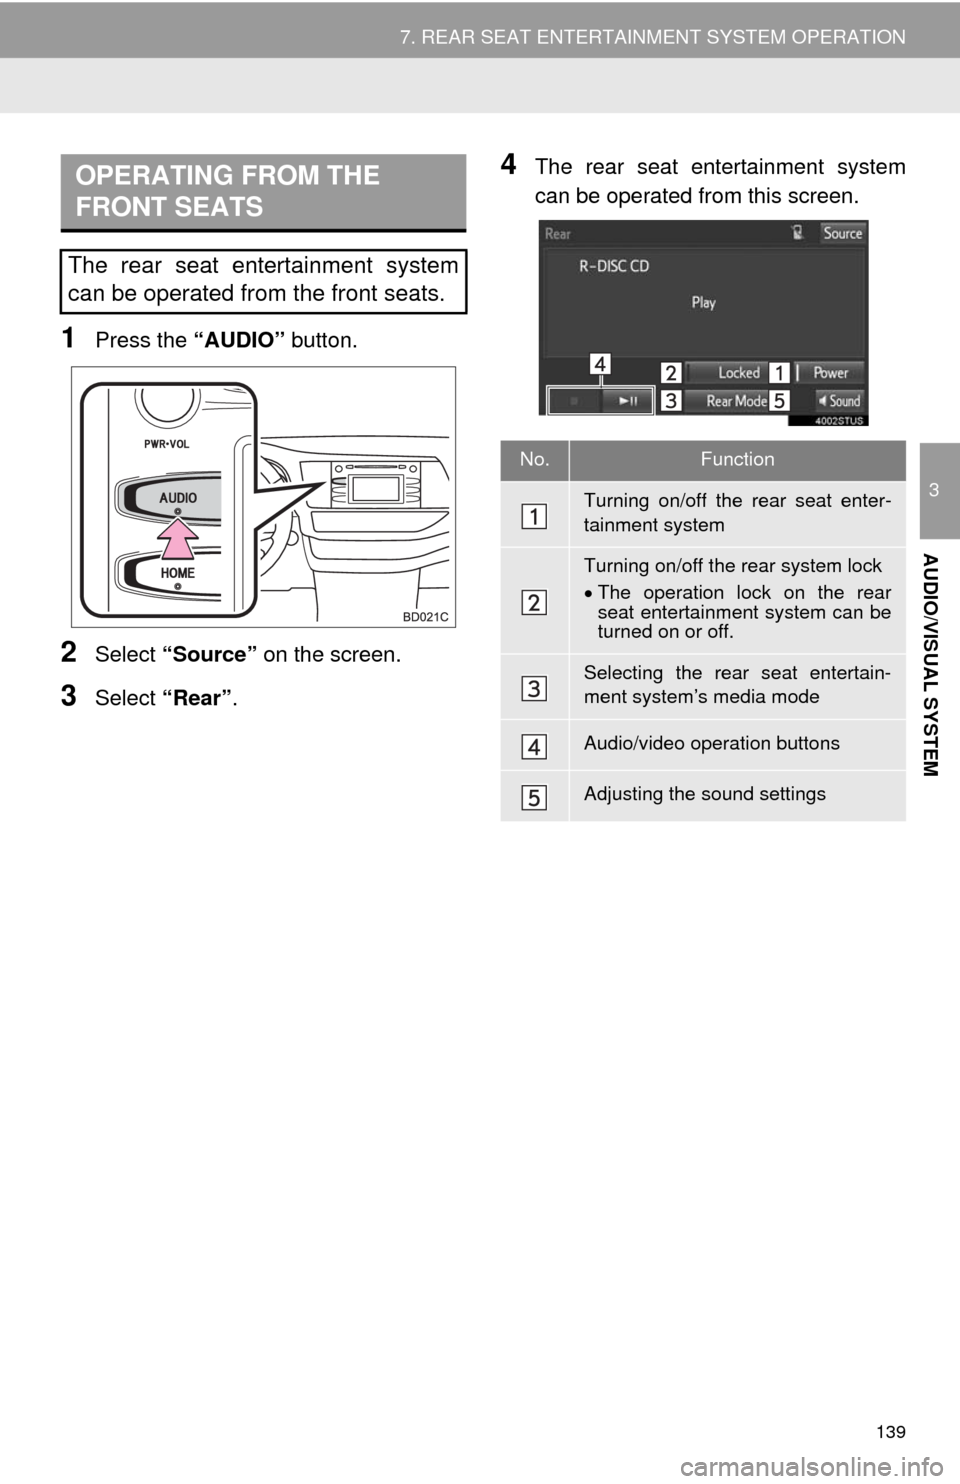
1Press the “AUDIO” button.
2Select “Source” on the screen.
3Select “Rear”.
4The rear seat entertainment system
can be operated from this screen.OPERATING FROM THE
FRONT SEATS
The rear seat entertainment system
can be operated from the front seats.
No.Function
Turning on/off the rear seat enter-
tainment system
Turning on/off the rear system lock
The operation lock on the rear
seat entertainment system can be
turned on or off.
Selecting the rear seat entertain-
ment system’s media mode
Audio/video operation buttons
Adjusting the sound settings
Page 146 of 356
146
7. REAR SEAT ENTERTAINMENT SYSTEM OPERATION
1Insert a disc or press the “DISC” but-
ton.
The player will start to play the disc auto-
matically.
1Press the button to play/
pause.
Press and hold the button while
pausing, the video is played slowly.
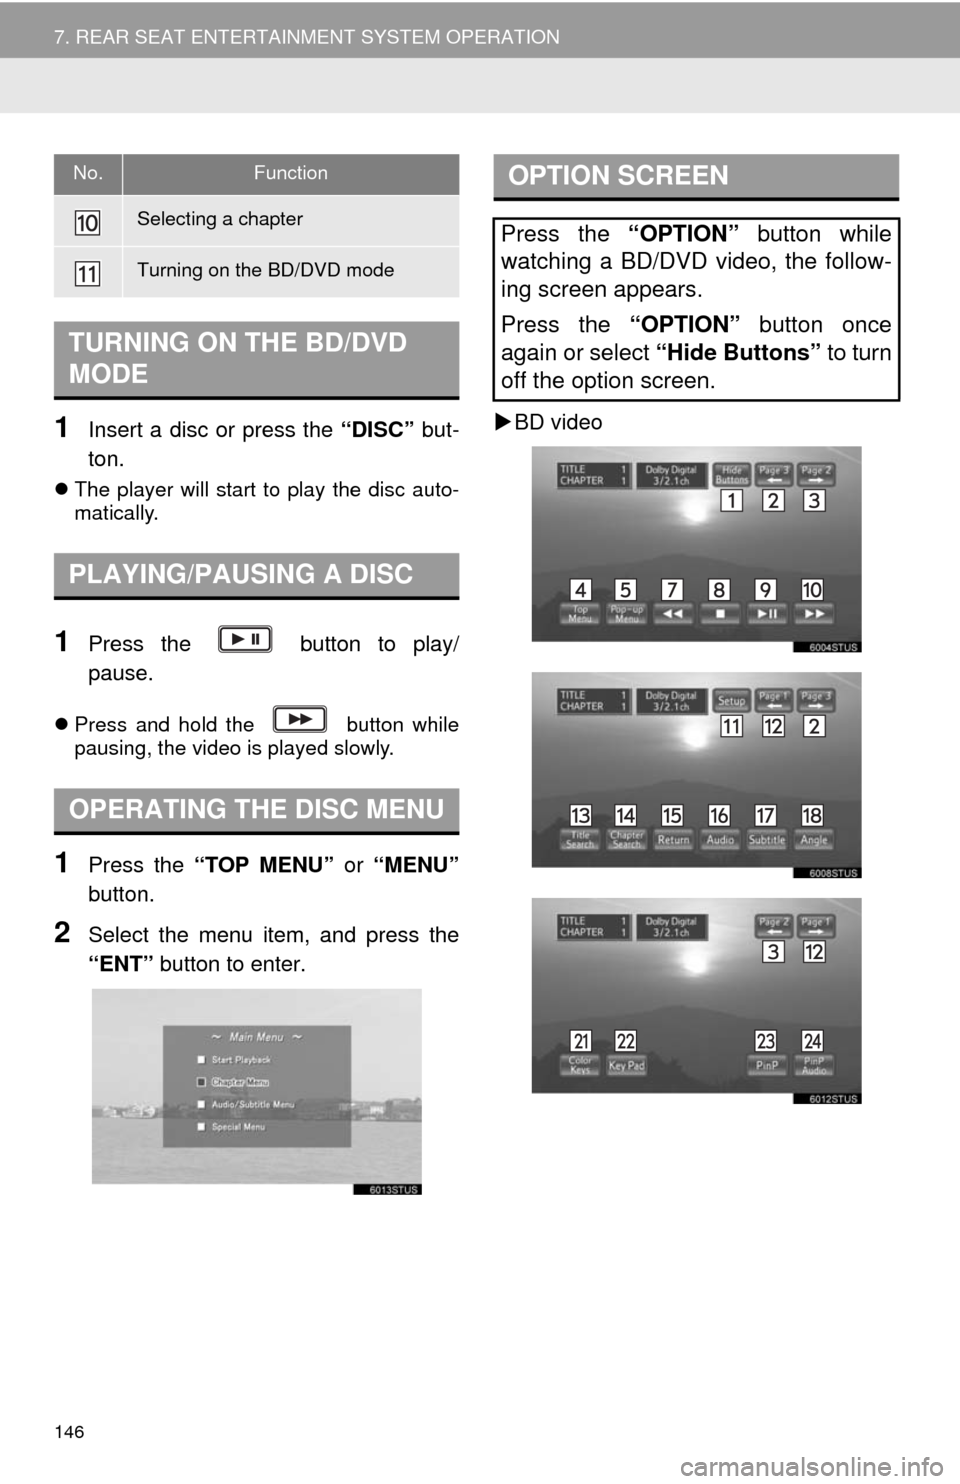
1Press the “TOP MENU” or “MENU”
button.
2Select the menu item, and press the
“ENT” button to enter.BD video
Selecting a chapter
Turning on the BD/DVD mode
TURNING ON THE BD/DVD
MODE
PLAYING/PAUSING A DISC
OPERATING THE DISC MENU
No.FunctionOPTION SCREEN
Press the “OPTION” button while
watching a BD/DVD video, the follow-
ing screen appears.
Press the “OPTION” button once
again or select “Hide Buttons” to turn
off the option screen.
Page 148 of 356
148
7. REAR SEAT ENTERTAINMENT SYSTEM OPERATION
BD video
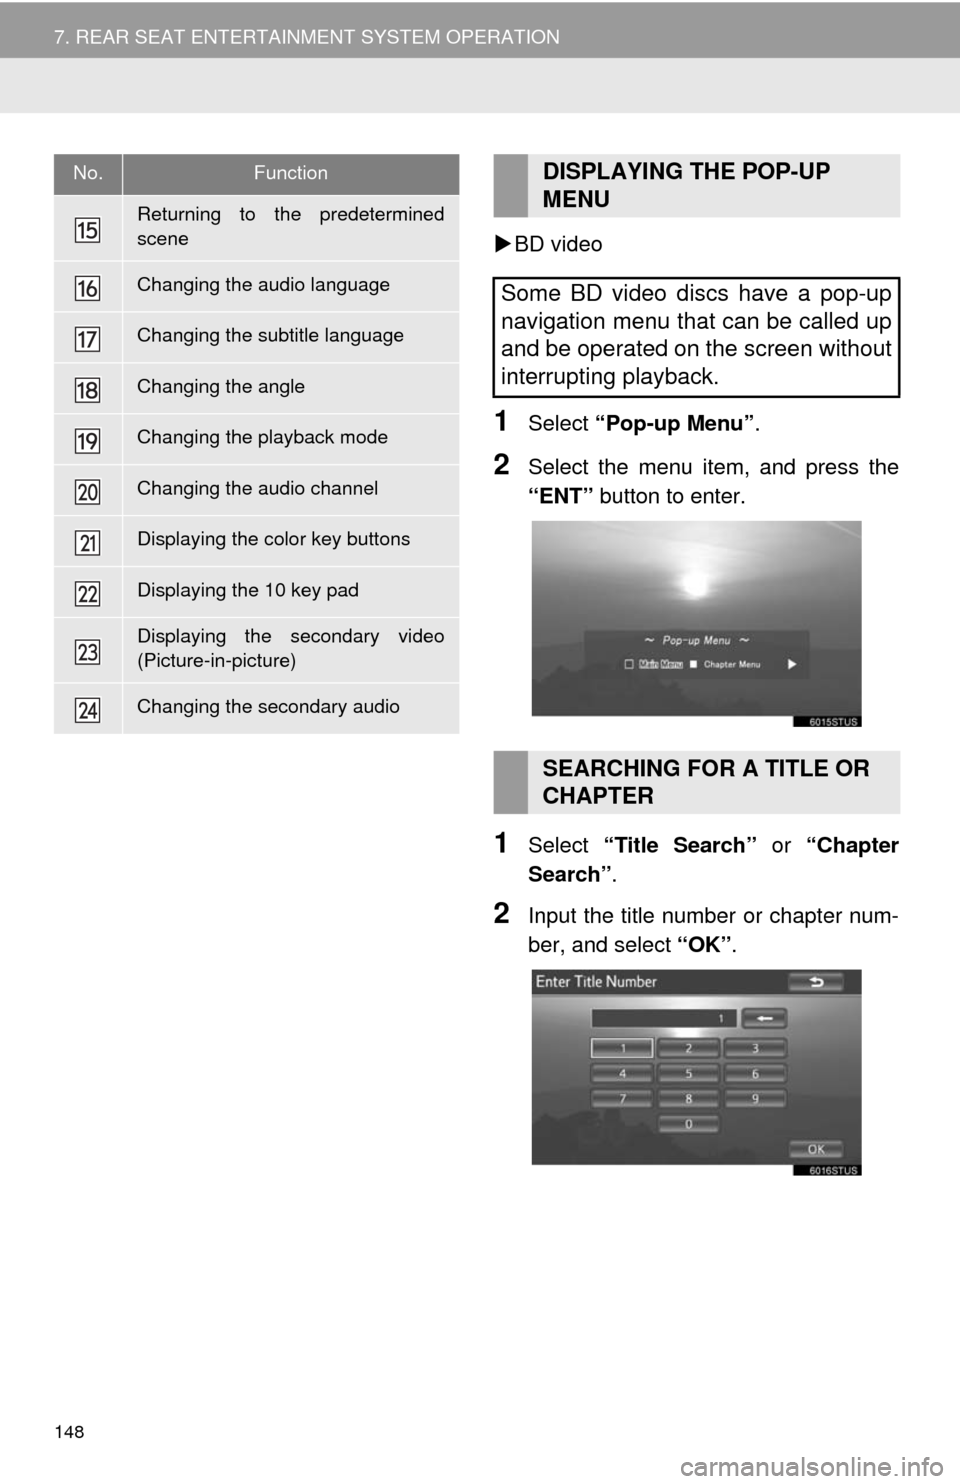
1Select “Pop-up Menu”.
2Select the menu item, and press the
“ENT” button to enter.
1Select “Title Search” or “Chapter
Search”.
2Input the title number or chapter num-
ber, and select “OK”.
Returning to the predetermined
scene
Changing the audio language
Changing the subtitle language
Changing the angle
Changing the playback mode
Changing the audio channel
Displaying the color key buttons
Displaying the 10 key pad
Displaying the secondary video
(Picture-in-picture)
Changing the secondary audio
No.FunctionDISPLAYING THE POP-UP
MENU
Some BD video discs have a pop-up
navigation menu that can be called up
and be operated on the screen without
interrupting playback.
SEARCHING FOR A TITLE OR
CHAPTER
Page 151 of 356
151
7. REAR SEAT ENTERTAINMENT SYSTEM OPERATION
3
AUDIO/VISUAL SYSTEM
BD video
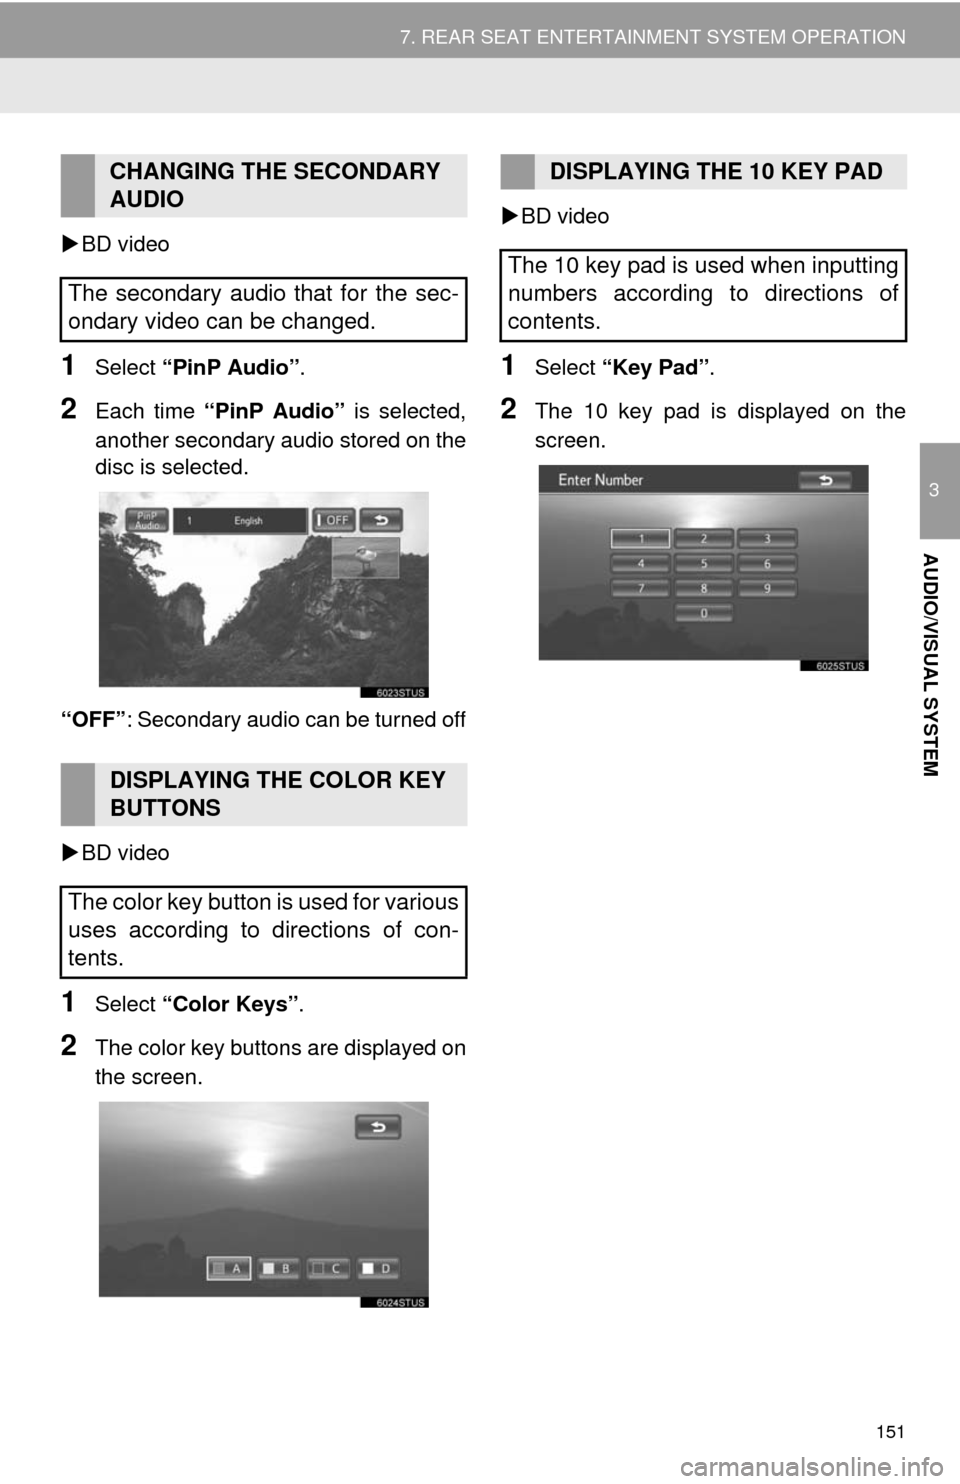
1Select “PinP Audio”.
2Each time “PinP Audio” is selected,
another secondary audio stored on the
disc is selected.
“OFF”: Secondary audio can be turned off
BD video
1Select “Color Keys”.
2The color key buttons are displayed on
the screen.BD video
1Select “Key Pad”.
2The 10 key pad is displayed on the
screen.
CHANGING THE SECONDARY
AUDIO
The secondary audio that for the sec-
ondary video can be changed.
DISPLAYING THE COLOR KEY
BUTTONS
The color key button is used for various
uses according to directions of con-
tents.
DISPLAYING THE 10 KEY PAD
The 10 key pad is used when inputting
numbers according to directions of
contents.
Page 260 of 356
260
1. BASIC OPERATION
1. QUICK REFERENCE
MAP SCREEN
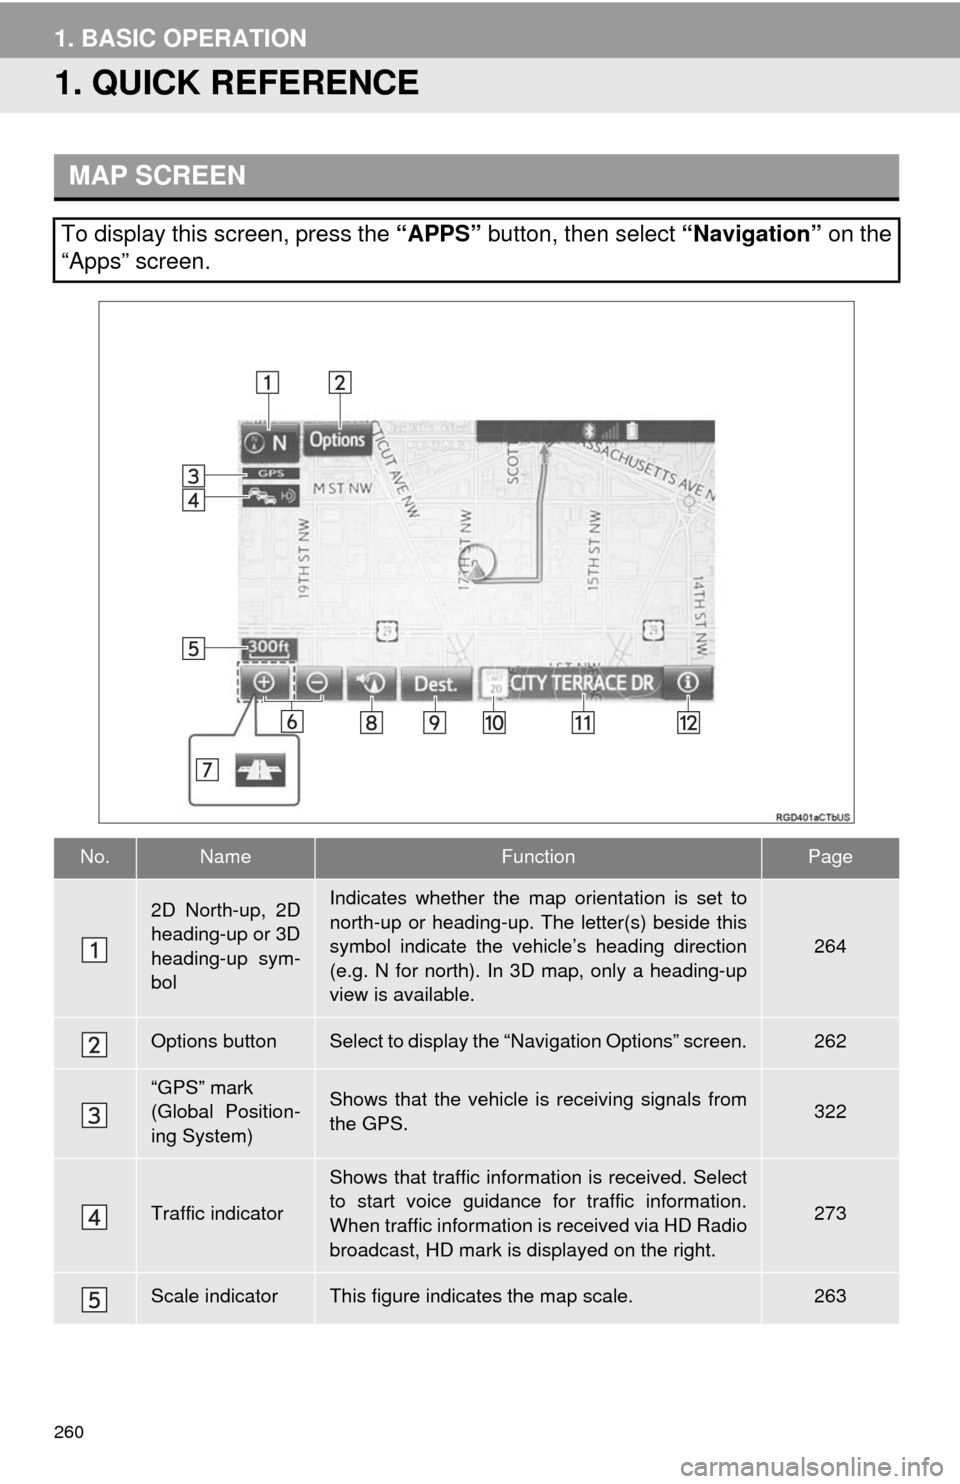
To display this screen, press the “APPS” button, then select “Navigation” on the
“Apps” screen.
No.NameFunctionPage
2D North-up, 2D
heading-up or 3D
heading-up sym-
bolIndicates whether the map orientation is set to
north-up or heading-up. The letter(s) beside this
symbol indicate the vehicle’s heading direction
(e.g. N for north). In 3D map, only a heading-up
view is available.
264
Options buttonSelect to display the “Navigation Options” screen.262
“GPS” mark
(Global Position-
ing System)Shows that the vehicle is receiving signals from
the GPS.322
Traffic indicator
Shows that traffic information is received. Select
to start voice guidance for traffic information.
When traffic information is received via HD Radio
broadcast, HD mark is displayed on the right.
273
Scale indicatorThis figure indicates the map scale.263
Page 261 of 356
261
1. BASIC OPERATION
8
NAVIGATION SYSTEM
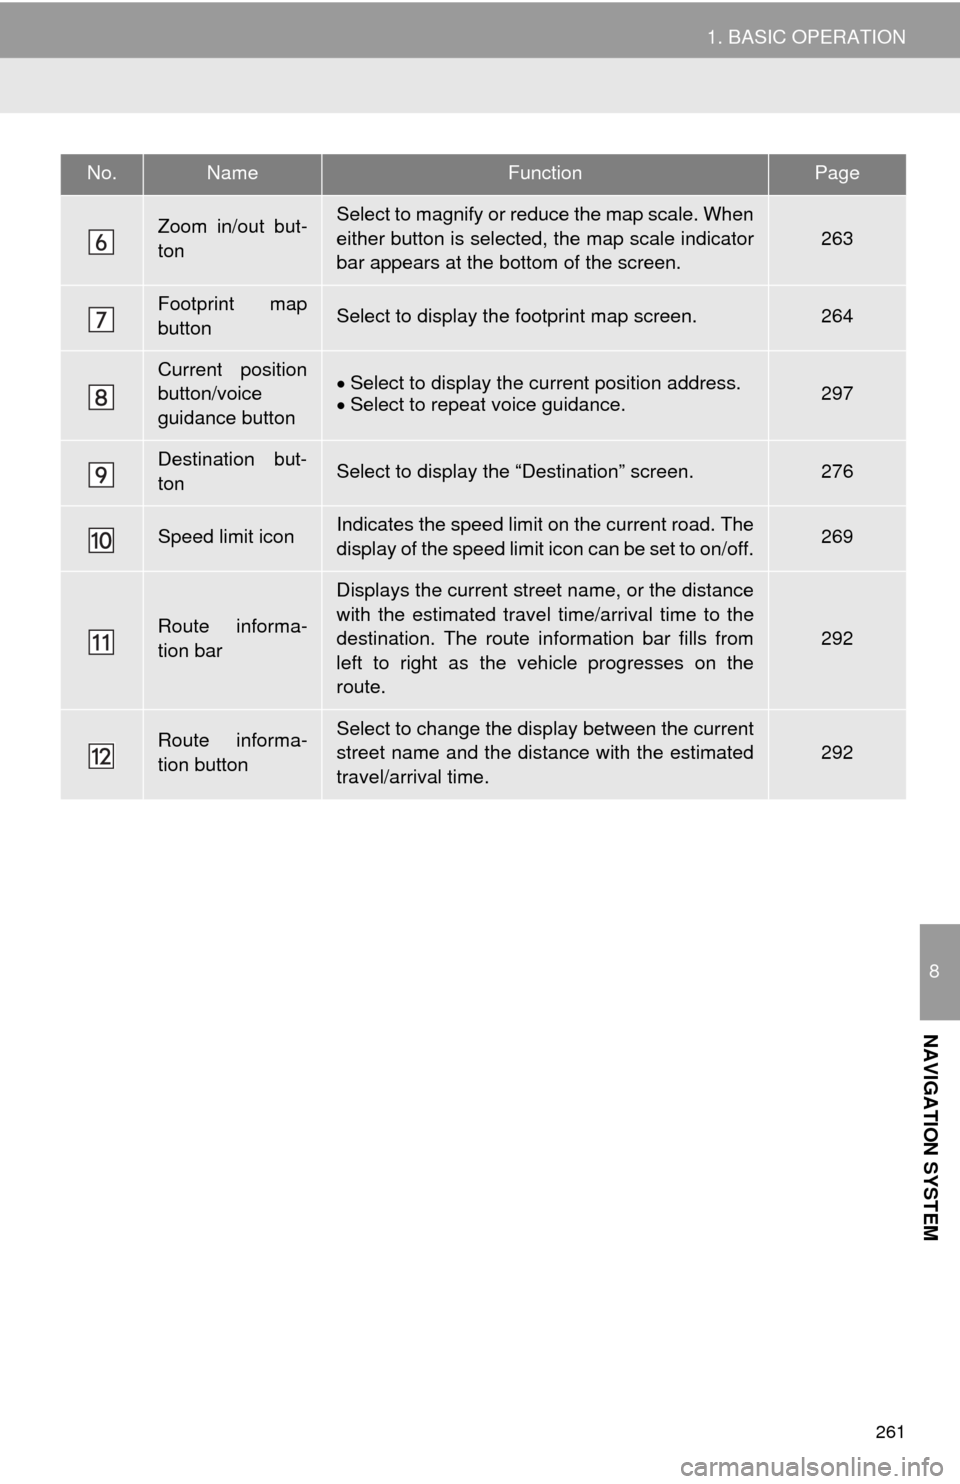
Zoom in/out but-
tonSelect to magnify or reduce the map scale. When
either button is selected, the map scale indicator
bar appears at the bottom of the screen.
263
Footprint map
buttonSelect to display the footprint map screen.264
Current position
button/voice
guidance buttonSelect to display the current position address.
Select to repeat voice guidance.297
Destination but-
tonSelect to display the “Destination” screen.276
Speed limit iconIndicates the speed limit on the current road. The
display of the speed limit icon can be set to on/off.269
Route informa-
tion bar
Displays the current street name, or the distance
with the estimated travel time/arrival time to the
destination. The route information bar fills from
left to right as the vehicle progresses on the
route.
292
Route informa-
tion buttonSelect to change the display between the current
street name and the distance with the estimated
travel/arrival time.292
No.NameFunctionPage
Page 265 of 356
265
1. BASIC OPERATION
8
NAVIGATION SYSTEM
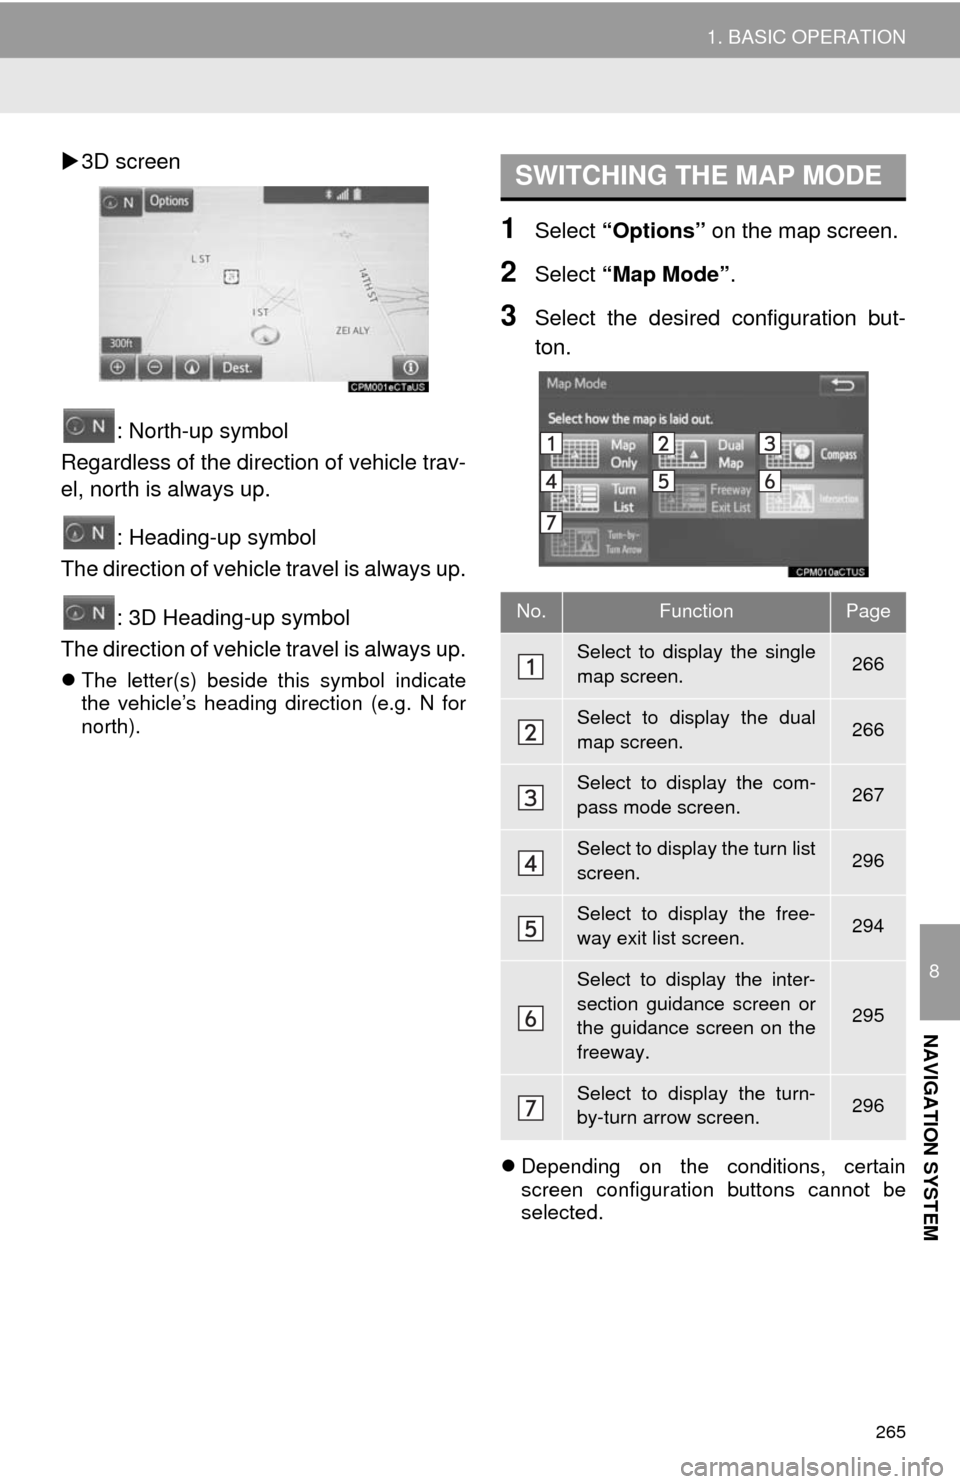
3D screen
: North-up symbol
Regardless of the direction of vehicle trav-
el, north is always up.
: Heading-up symbol
The direction of vehicle travel is always up.
: 3D Heading-up symbol
The direction of vehicle travel is always up.
The letter(s) beside this symbol indicate
the vehicle’s heading direction (e.g. N for
north).
1Select “Options” on the map screen.
2Select “Map Mode”.
3Select the desired configuration but-
ton.
Depending on the conditions, certain
screen configuration buttons cannot be
selected.
SWITCHING THE MAP MODE
No.FunctionPage
Select to display the single
map screen. 266
Select to display the dual
map screen.266
Select to display the com-
pass mode screen.267
Select to display the turn list
screen.296
Select to display the free-
way exit list screen.294
Select to display the inter-
section guidance screen or
the guidance screen on the
freeway.
295
Select to display the turn-
by-turn arrow screen.296