display TOYOTA HIGHLANDER 2022 Owners Manual
[x] Cancel search | Manufacturer: TOYOTA, Model Year: 2022, Model line: HIGHLANDER, Model: TOYOTA HIGHLANDER 2022Pages: 568, PDF Size: 13.73 MB
Page 356 of 568
3565-2. Using the air conditioning system and defogger
control indicator is displayed for several seconds.
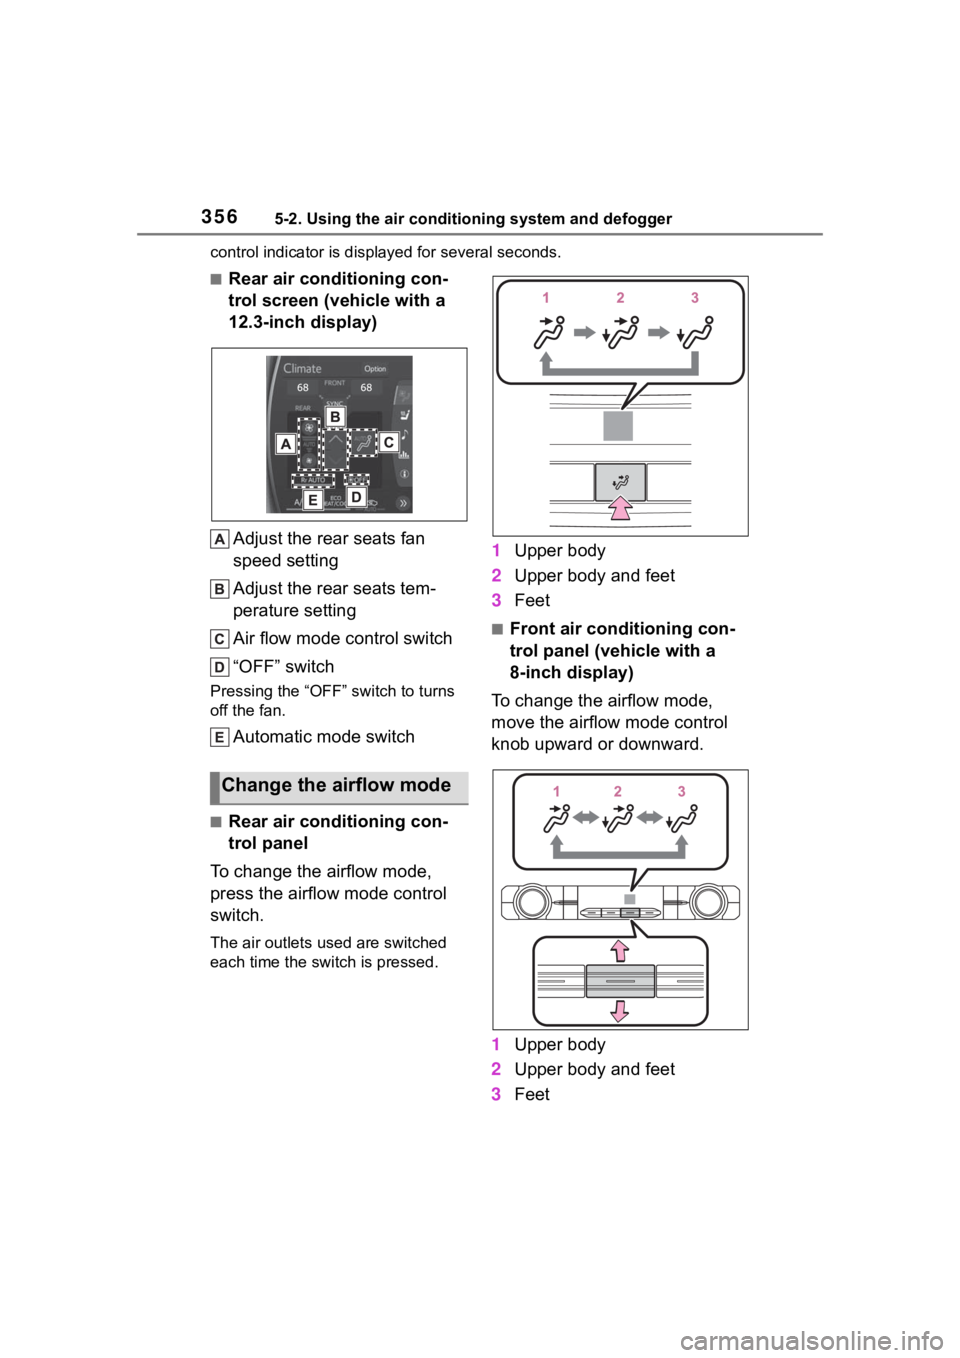
■Rear air conditioning con-
trol screen (vehicle with a
12.3-inch display)
Adjust the rear seats fan
speed setting
Adjust the rear seats tem-
perature setting
Air flow mode control switch
“OFF” switch
Pressing the “OFF” switch to turns
off the fan.
Automatic mode switch
■Rear air conditioning con-
trol panel
To change the airflow mode,
press the airflow mode control
switch.
The air outlets used are switched
each time the switch is pressed.
1 Upper body
2 Upper body and feet
3 Feet
■Front air conditioning con-
trol panel (vehicle with a
8-inch display)
To change the airflow mode,
move the airflow mode control
knob upward or downward.
1 Upper body
2 Upper body and feet
3 Feet
Change the airflow mode
Page 357 of 568
3575-2. Using the air conditioning system and defogger
5
Interior features
■Rear air conditioning con-
trol screen (vehicle with a
12.3-inch display)
To change the airflow mode,
select the airflow mode control
switch.
The air outlets used are switched
each time the switch is selected.
: Air flows to the upper body
: Air flows to the upper body and
feet
: Air flows to the feet
1Press the automatic mode
switch.
2 Adjust the temperature set-
ting.
3 To stop the operation, press
the “OFF” switch.
If the fan speed setting or air
flow modes are operated, the
automatic mode indicator goes
off. However, automatic mode
for functions other than that
operated is maintained.
■Using automatic mode
Fan speed is adjusted automati-
cally according to the temperature
setting and the ambient conditions.
Therefore, the fan may stop for a
while until warm or cool air is ready
to flow immediately after the auto-
matic mode switch is pressed.
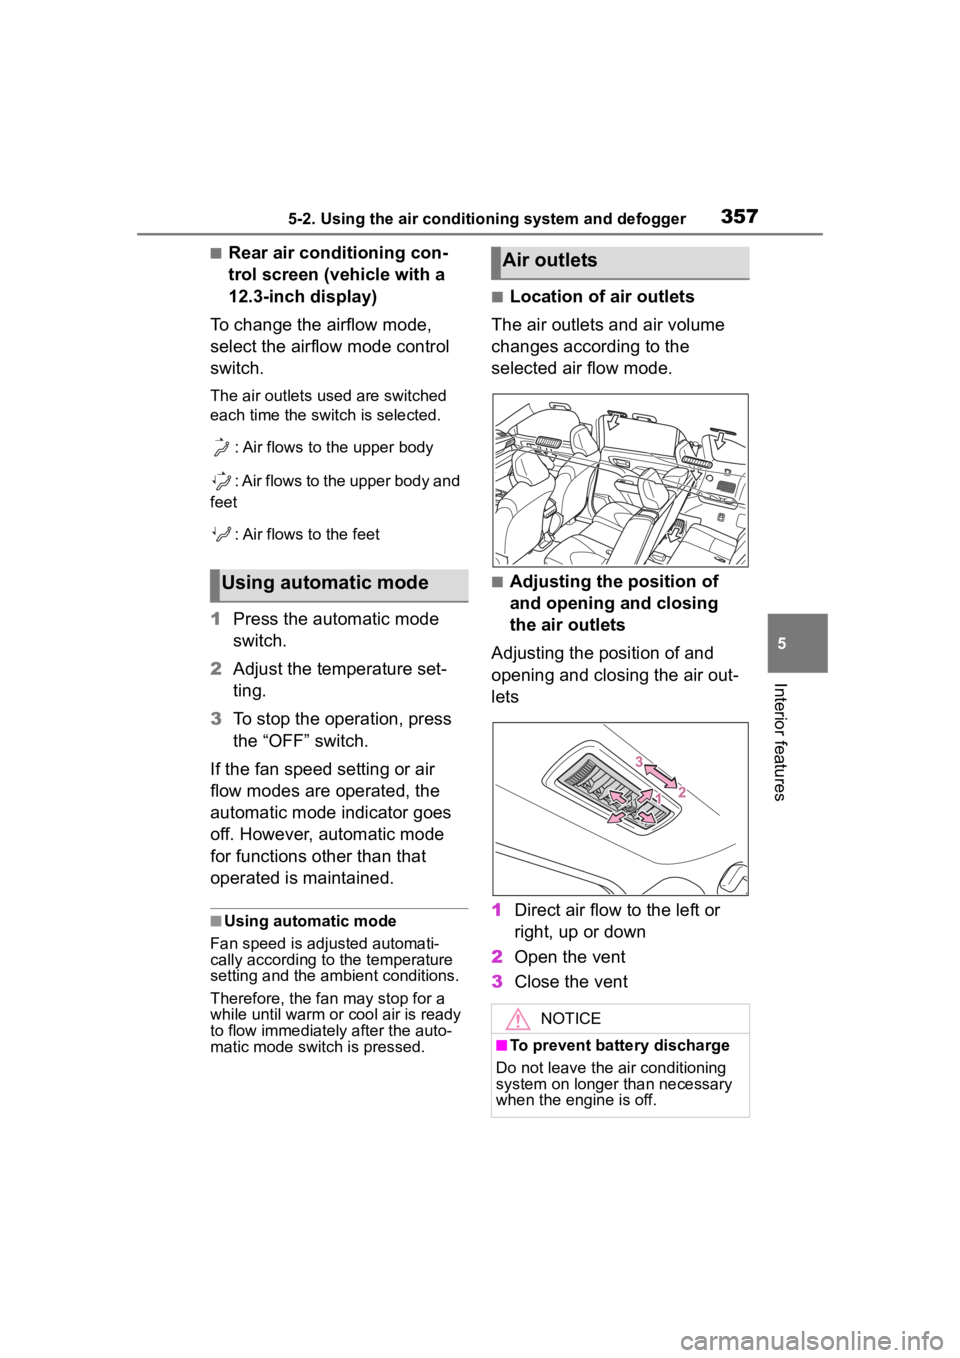
■Location of air outlets
The air outlets and air volume
changes according to the
selected air flow mode.
■Adjusting the position of
and opening and closing
the air outlets
Adjusting the position of and
opening and closing the air out-
lets
1 Direct air flow to the left or
right, up or down
2 Open the vent
3 Close the ventUsing automatic mode
Air outlets
NOTICE
■To prevent battery discharge
Do not leave the air conditioning
system on longer than necessary
when the engine is off.
Page 359 of 568
3595-2. Using the air conditioning system and defogger
5
Interior features
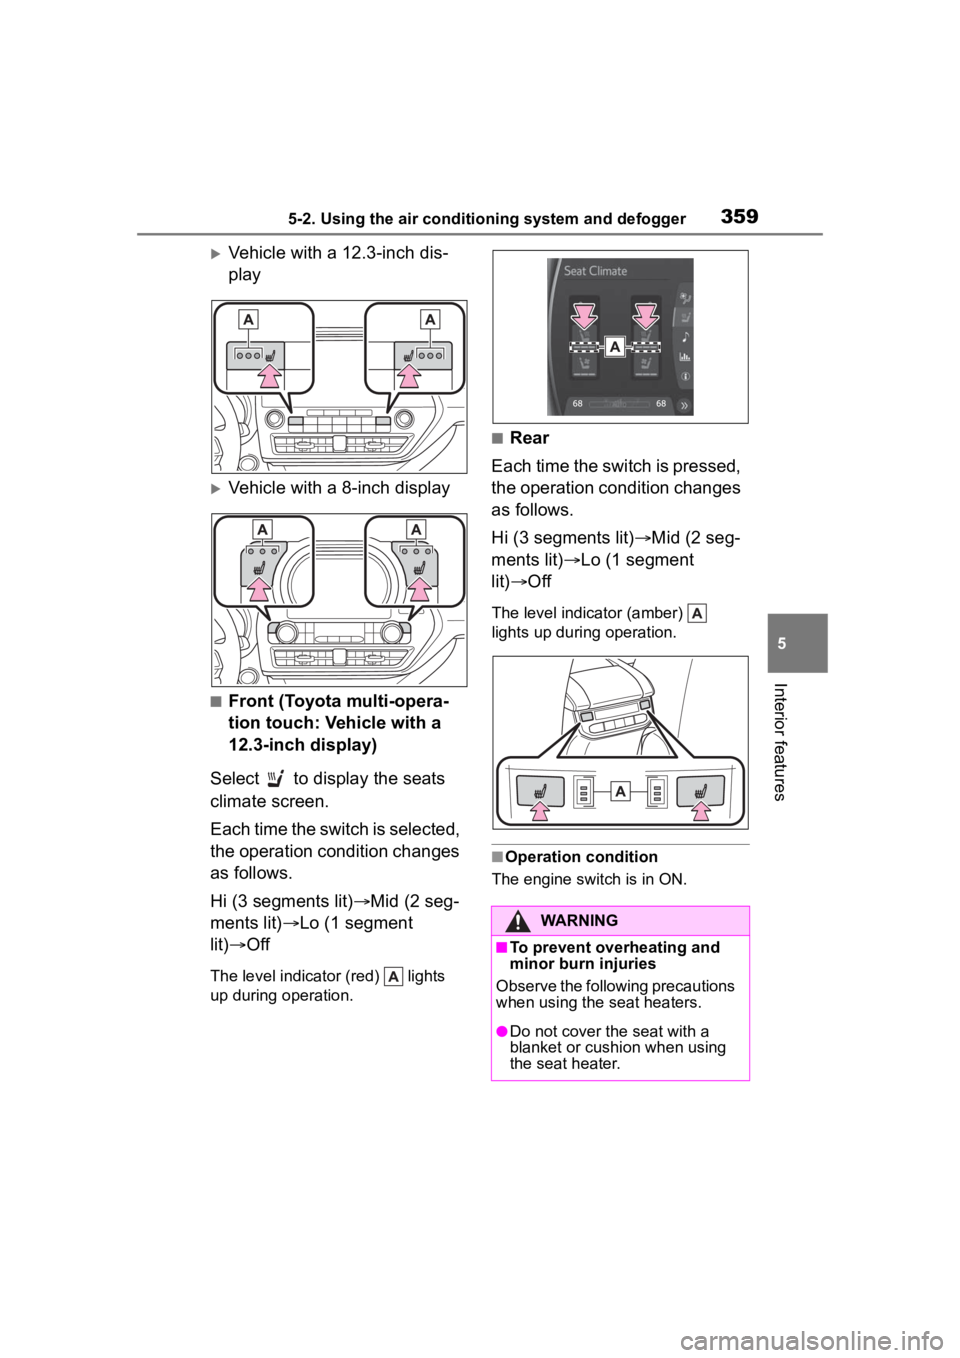
Vehicle with a 12.3-inch dis-
play
Vehicle with a 8-inch display
■Front (Toyota multi-opera-
tion touch: Vehicle with a
12.3-inch display)
Select to display the seats
climate screen.
Each time the switch is selected,
the operation condition changes
as follows.
Hi (3 segments lit) Mid (2 seg-
ments lit) Lo (1 segment
lit) Off
The level indicator (red) lights
up during operation.
■Rear
Each time the switch is pressed,
the operation condition changes
as follows.
Hi (3 segments lit) Mid (2 seg-
ments lit) Lo (1 segment
lit) Off
The level indicator (amber)
lights up during operation.
■Operation condition
The engine switch is in ON.
WARNING
■To prevent overheating and
minor burn injuries
Observe the following precautions
when using the seat heaters.
●Do not cover the seat with a
blanket or cushion when using
the seat heater.
Page 360 of 568
3605-2. Using the air conditioning system and defogger
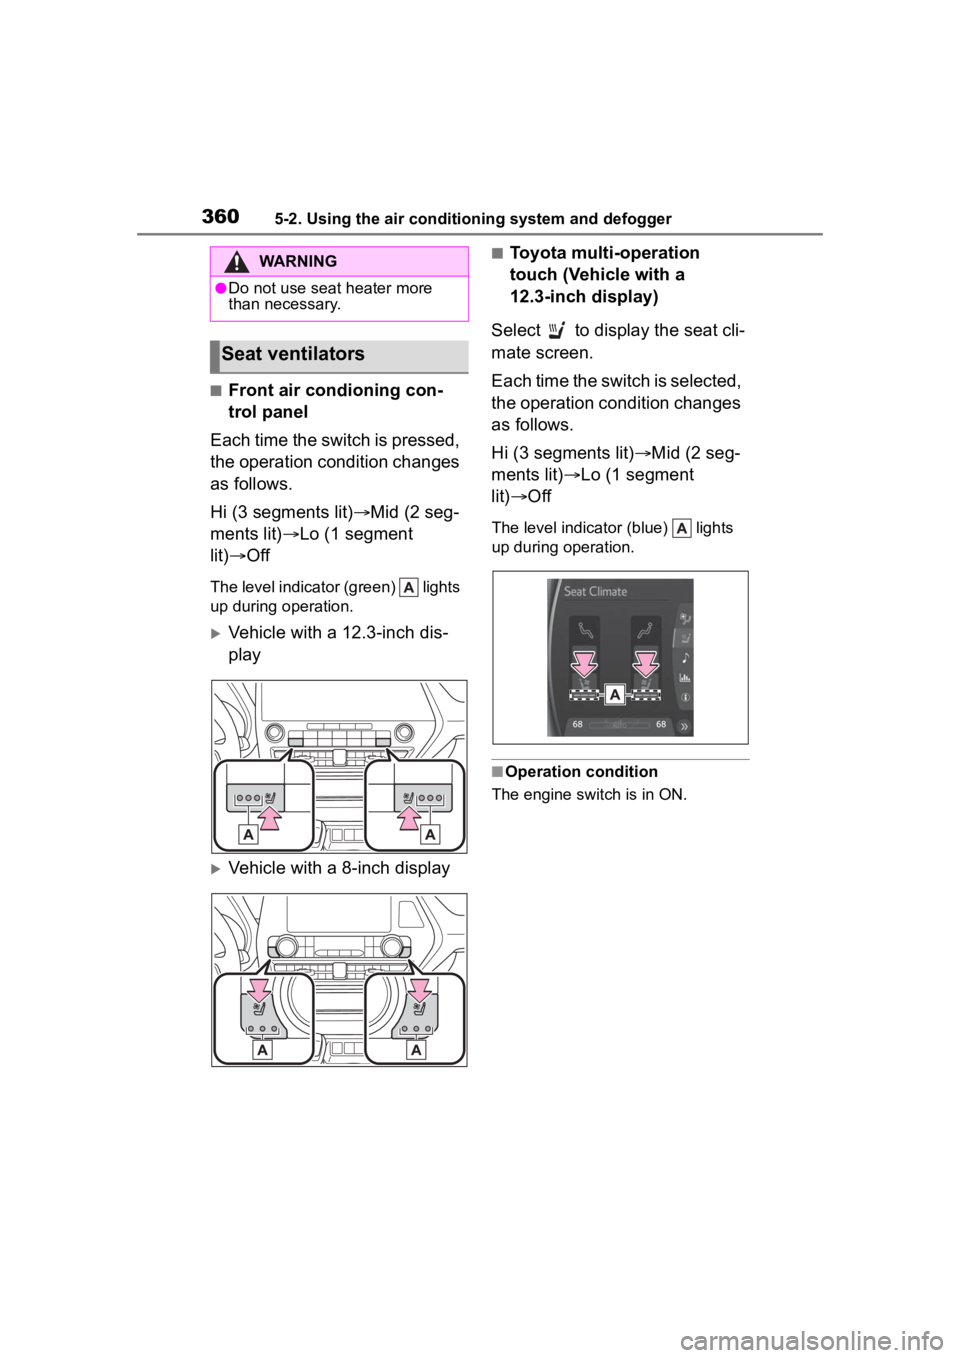
■Front air condioning con-
trol panel
Each time the switch is pressed,
the operation condition changes
as follows.
Hi (3 segments lit) Mid (2 seg-
ments lit) Lo (1 segment
lit) Off
The level indicator (green) lights
up during operation.
Vehicle with a 12.3-inch dis-
play
Vehicle with a 8-inch display
■Toyota multi-operation
touch (Vehicle with a
12.3-inch display)
Select to display the seat cli-
mate screen.
Each time the switch is selected,
the operation condition changes
as follows.
Hi (3 segments lit) Mid (2 seg-
ments lit) Lo (1 segment
lit) Off
The level indicator (blue) lights
up during operation.
■Operation condition
The engine switch is in ON.
WARNING
●Do not use seat heater more
than necessary.
Seat ventilators
Page 401 of 568
4016-2. Maintenance
6
Maintenance and care
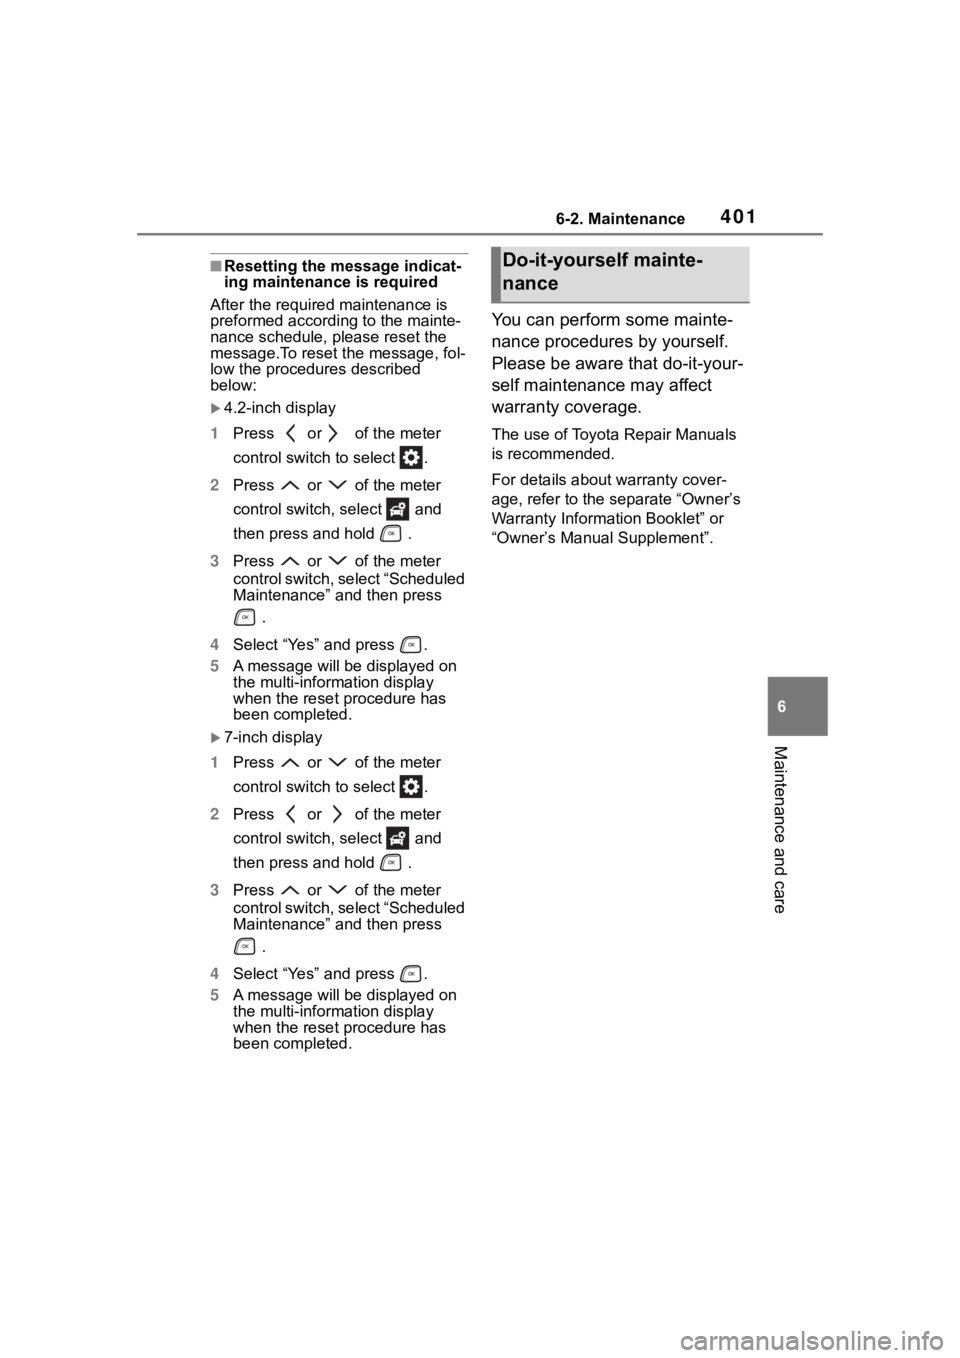
■Resetting the message indicat-
ing maintenance is required
After the required maintenance is
preformed according to the mainte-
nance schedule, please reset the
message.To reset t he message, fol-
low the procedures described
below:
4.2-inch display
1 Press or of the meter
control switch to select .
2 Press or of the meter
control switch, select and
then press and hold .
3 Press or of the meter
control switch, se lect “Scheduled
Maintenance” and then press
.
4 Select “Yes” and press .
5 A message will be displayed on
the multi-information display
when the reset procedure has
been completed.
7-inch display
1 Press or of the meter
control switch to select .
2 Press or of the meter
control switch, select and
then press and hold .
3 Press or of the meter
control switch, se lect “Scheduled
Maintenance” and then press
.
4 Select “Yes” and press .
5 A message will be displayed on
the multi-information display
when the reset procedure has
been completed.
You can perform some mainte-
nance procedures by yourself.
Please be aware that do-it-your-
self maintenance may affect
warranty coverage.
The use of Toyota Repair Manuals
is recommended.
For details about warranty cover-
age, refer to the separate “Owner’s
Warranty Informat ion Booklet” or
“Owner’s Manual Supplement”.
Do-it-yourself mainte-
nance
Page 412 of 568
4126-3. Do-it-yourself maintenance
●When the engine is new, for
example directly after purchasing
the vehicle or after replacing the
engine
●If low quality oil or oil of an inap-
propriate viscosity is used
●When driving at high engine
speeds or with a heavy load,
when towing, or when driving
while accelerating o r decelerating
frequently
●When leaving the engine idling for
a long time, or wh en driving fre-
quently through heavy traffic
■If the oil is spilled on the engine
cover
To prevent the engine cover from
being damaged, remove any engine
oil from the engine cover as soon as
possible using a neutral detergent.
Do not use an organic solvent such
as brake cleaner.
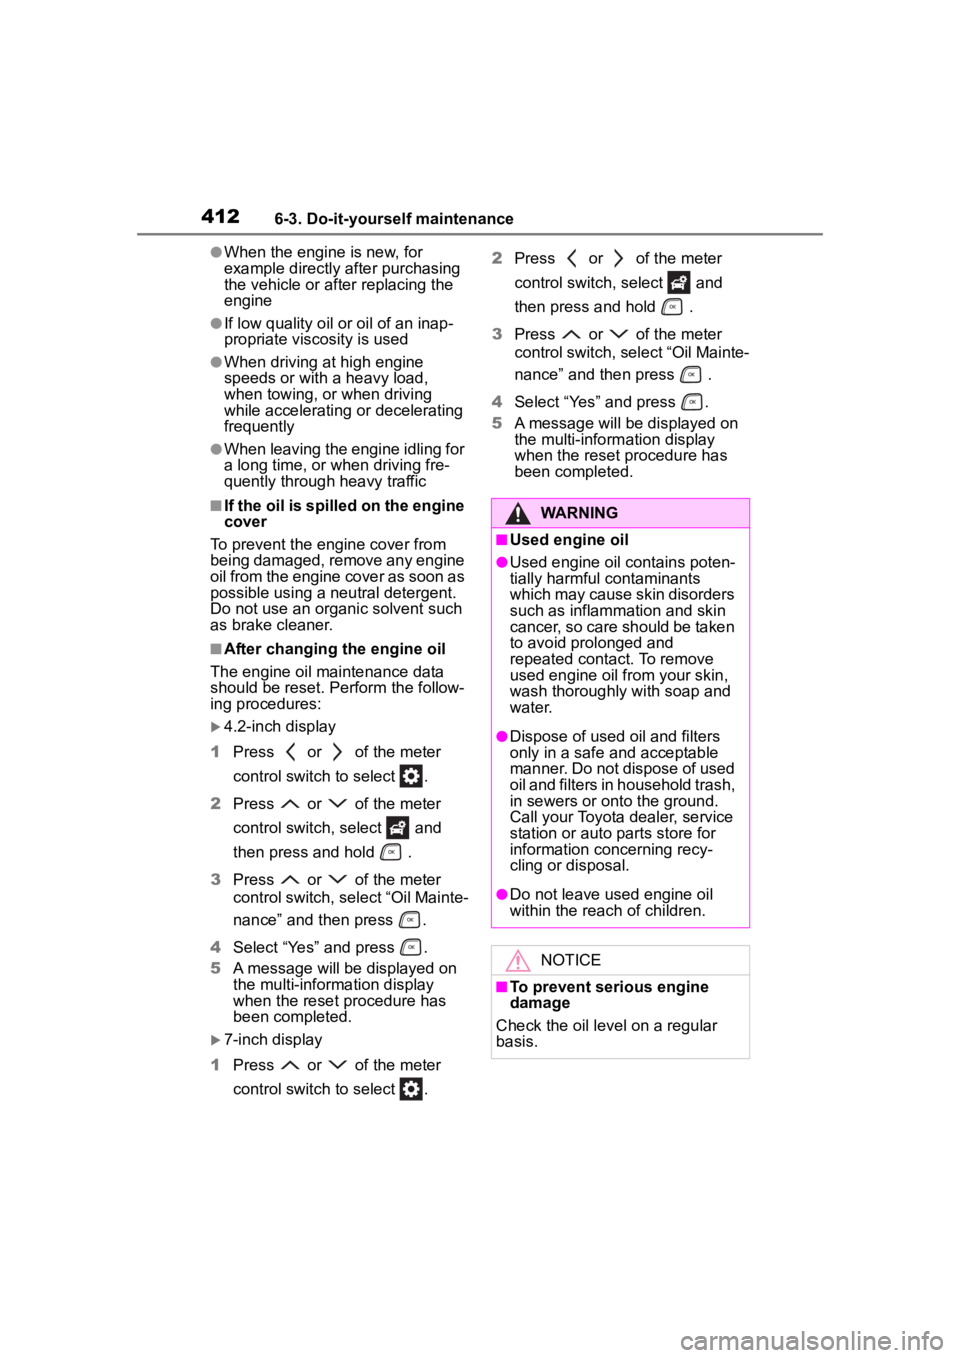
■After changing the engine oil
The engine oil maintenance data
should be reset. Perform the follow-
ing procedures:
4.2-inch display
1 Press or of the meter
control switch to select .
2 Press or of the meter
control switch, select and
then press and hold .
3 Press or of the meter
control switch, se lect “Oil Mainte-
nance” and then press .
4 Select “Yes” and press .
5 A message will be displayed on
the multi-information display
when the reset procedure has
been completed.
7-inch display
1 Press or of the meter
control switch to select . 2
Press or of the meter
control switch, select and
then press and hold .
3 Press or of the meter
control switch, select “Oil Mainte-
nance” and then press .
4 Select “Yes” and press .
5 A message will be displayed on
the multi-inform ation display
when the reset procedure has
been completed.
WARNING
■Used engine oil
●Used engine oil contains poten-
tially harmful contaminants
which may cause skin disorders
such as inflammation and skin
cancer, so care should be taken
to avoid prolonged and
repeated contact. To remove
used engine oil from your skin,
wash thoroughly with soap and
water.
●Dispose of used oil and filters
only in a safe and acceptable
manner. Do not dispose of used
oil and filters in h ousehold trash,
in sewers or onto the ground.
Call your Toyota dealer, service
station or auto parts store for
information concerning recy-
cling or disposal.
●Do not leave used engine oil
within the reach of children.
NOTICE
■To prevent serious engine
damage
Check the oil le vel on a regular
basis.
Page 416 of 568
4166-3. Do-it-yourself maintenance
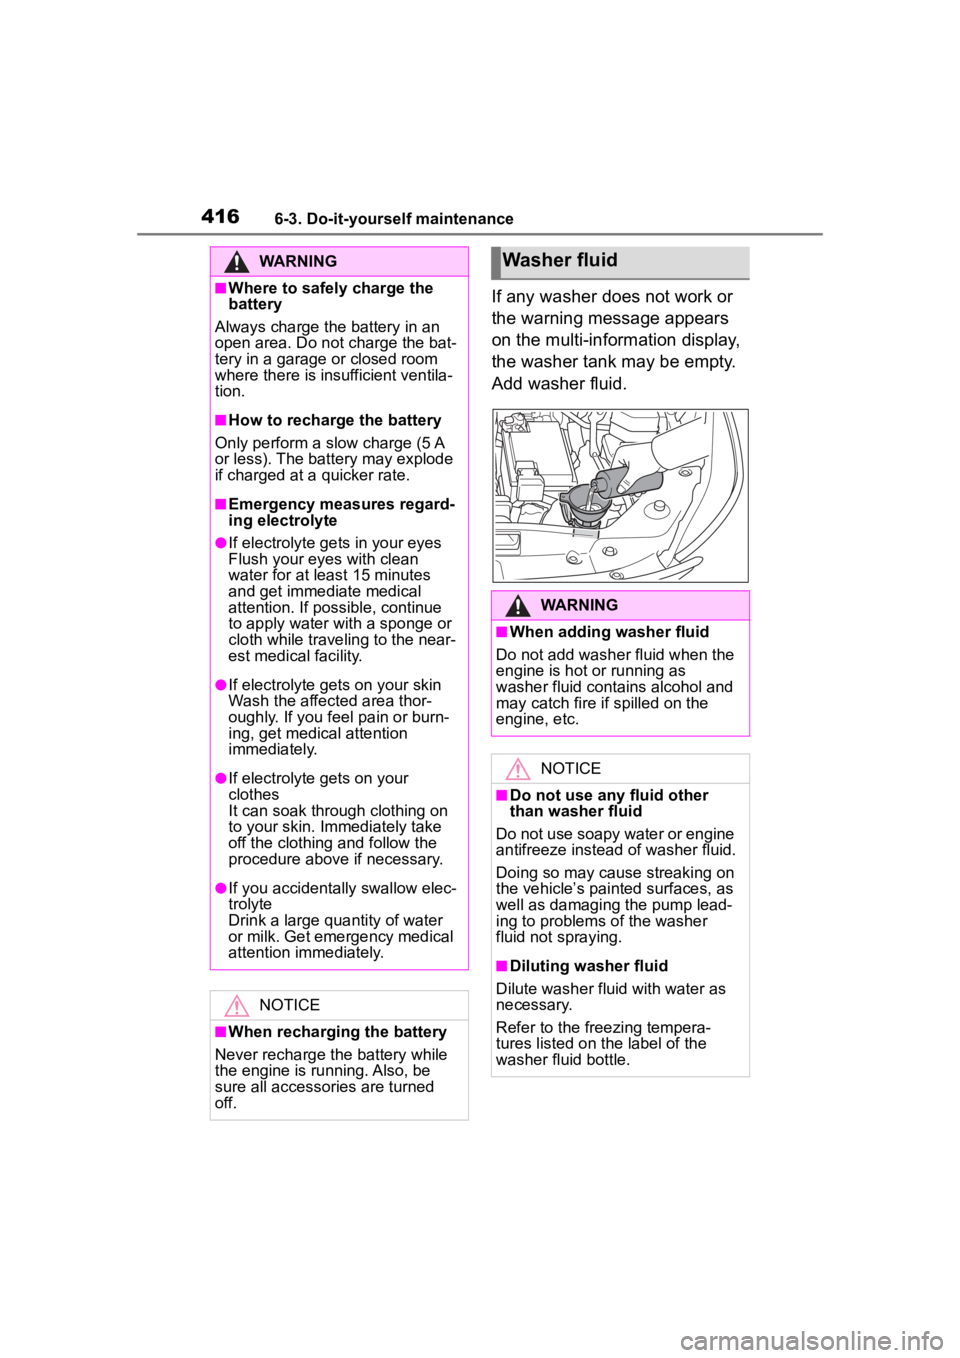
If any washer does not work or
the warning message appears
on the multi-information display,
the washer tank may be empty.
Add washer fluid.
WARNING
■Where to safely charge the
battery
Always charge the battery in an
open area. Do not charge the bat-
tery in a garage or closed room
where there is insufficient ventila-
tion.
■How to recharge the battery
Only perform a slow charge (5 A
or less). The battery may explode
if charged at a quicker rate.
■Emergency measures regard-
ing electrolyte
●If electrolyte gets in your eyes
Flush your eyes with clean
water for at least 15 minutes
and get immediate medical
attention. If possible, continue
to apply water with a sponge or
cloth while traveling to the near-
est medical facility.
●If electrolyte gets on your skin
Wash the affected area thor-
oughly. If you fee l pain or burn-
ing, get medical attention
immediately.
●If electrolyte gets on your
clothes
It can soak through clothing on
to your skin. Immediately take
off the clothing and follow the
procedure above if necessary.
●If you accidentally swallow elec-
trolyte
Drink a large quantity of water
or milk. Get emergency medical
attention immediately.
NOTICE
■When recharging the battery
Never recharge the battery while
the engine is running. Also, be
sure all accessories are turned
off.
Washer fluid
WARNING
■When adding washer fluid
Do not add washer fluid when the
engine is hot or running as
washer fluid contains alcohol and
may catch fire if spilled on the
engine, etc.
NOTICE
■Do not use any fluid other
than washer fluid
Do not use soapy water or engine
antifreeze instead of washer fluid.
Doing so may cause streaking on
the vehicle’s painted surfaces, as
well as damaging the pump lead-
ing to problems of the washer
fluid not spraying.
■Diluting washer fluid
Dilute washer fluid with water as
necessary.
Refer to the freezing tempera-
tures listed on the label of the
washer fluid bottle.
Page 420 of 568
4206-3. Do-it-yourself maintenance
sure warning system after tire rota-
tion.
Your vehicle is equipped with a
tire pressure warning system
that uses tire pressure warning
valves and transmitters to detect
low tire inflation pressure before
serious problems arise.
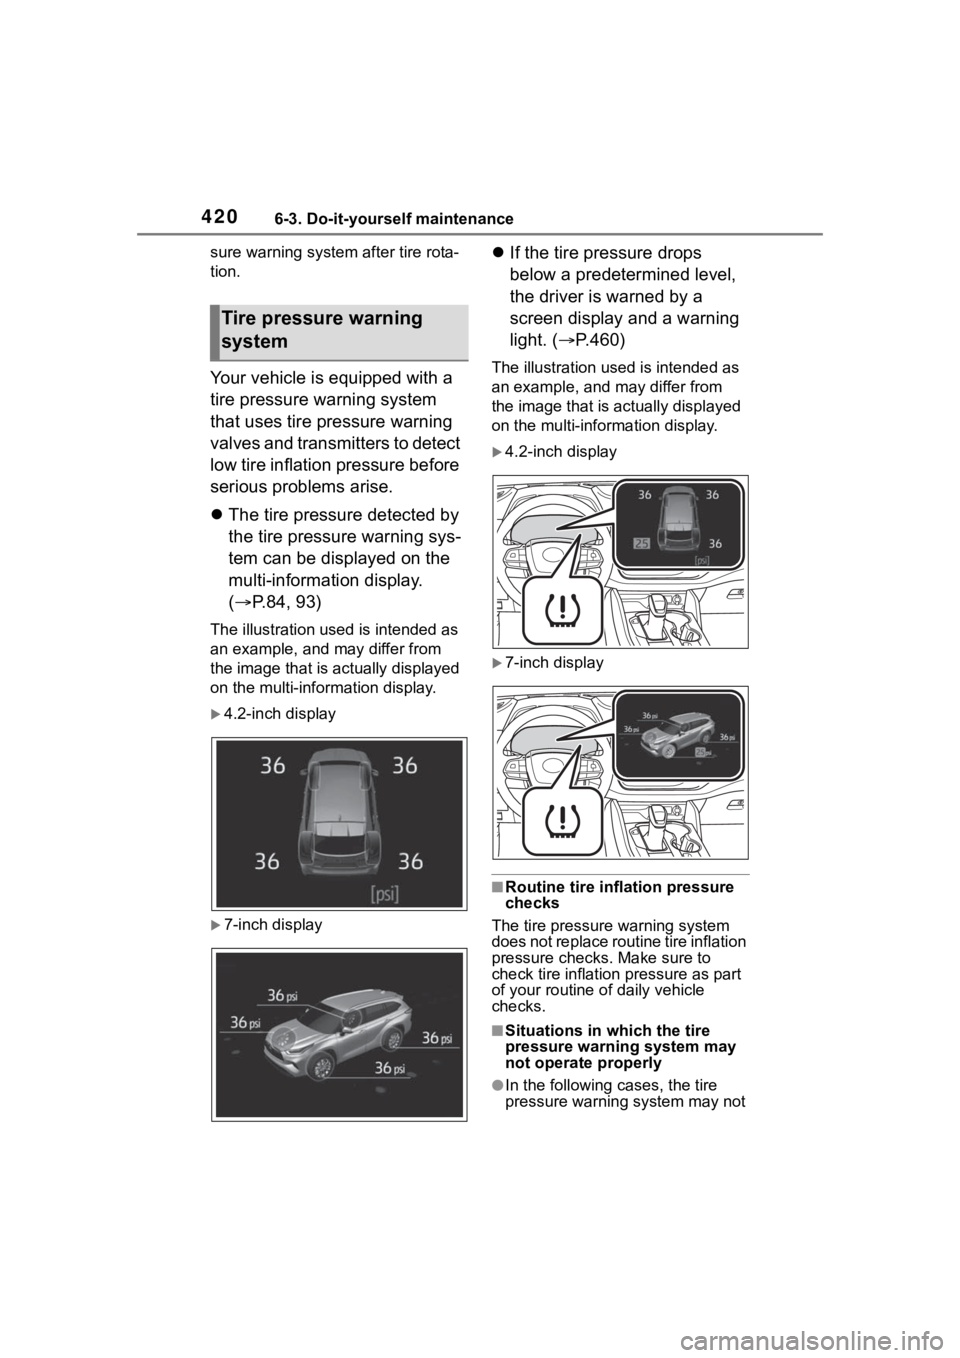
The tire pressure detected by
the tire pressure warning sys-
tem can be displayed on the
multi-information display.
( P.84, 93)
The illustration used is intended as
an example, and may differ from
the image that is actually displayed
on the multi-information display.
4.2-inch display
7-inch display
If the tire pressure drops
below a predetermined level,
the driver is warned by a
screen display and a warning
light. ( P.460)
The illustration used is intended as
an example, and may differ from
the image that is actually displayed
on the multi-information display.
4.2-inch display
7-inch display
■Routine tire inflation pressure
checks
The tire pressure warning system
does not replace routine tire inflation
pressure checks . Make sure to
check tire inflation pressure as part
of your routine o f daily vehicle
checks.
■Situations in which the tire
pressure warning system may
not operate properly
●In the following cases, the tire
pressure warning system may not
Tire pressure warning
system
Page 421 of 568

4216-3. Do-it-yourself maintenance
6
Maintenance and care
operate properly.
• If non-genuine Toyota wheels are used.
• A tire has been replaced with a tire that is not an OE (Original
Equipment) tire.
• A tire has been replaced with a tire that is not of the specified size.
• Tire chains, etc. are equipped.
• An auxiliary-supported run-flat tire
is equipped.
• If a window tint that affects the
radio wave signals is installed.
• If there is a lot of snow or ice on the vehicle, particularly around the
wheels or wheel housings.
• If the tire inflation pressure is extremely higher than the speci-
fied level.
• If the spare tire is in a location subject to poor radio wave signal
reception.
*
• If wheel without the tire pressure
warning valve and transmitter is
used.
• If the ID code on the tire pressure warning valves and transmitters is
not registered in the tire pressure
warning computer.
*: Vehicles with full-size spare tire
only
●Performance may be affected in
the following situations.
• Near a TV tower, electric power plant, gas station, radio station,
large display, airpo rt or other facil-
ity that generates strong radio
waves or electrical noise
• When carrying a portable radio, cellular phone, cordless phone or
other wireless communication
device
●If tire position information is not
correctly displayed due to the
radio wave conditions, the display
may be corrected by driving and
changing the radio wave condi-
tions.
●When the vehicle is parked, the
time taken for the warning to start
or go off could be extended.
●When tire inflation pressure
declines rapidly for example when
a tire has burst, the warning may
not function.
■Warning performance of the tire
pressure warning system
The warning of the tire pressure
warning system w ill change in
accordance with the conditions
under which it was initialized. For
this reason, the system may give a
warning even if th e tire pressure
does not reach a low enough level,
or if the pressure is higher than the
pressure that was adjusted to when
the system was initialized.
Page 424 of 568

4246-3. Do-it-yourself maintenance
■How to initialize the tire
pressure warning system
4.2-inch display
1 Park the vehicle in a safe
place and turn the engine
switch off.
Initialization cannot be performed
while the vehicle is moving.
2Adjust the tire inflation pres-
sure to the specified cold tire
inflation pressure level.
( P.505)
Make sure to adjust the tire pres-
sure to the specifie d cold tire infla-
tion pressure level. The tire
pressure warning system will oper-
ate based on this pressure level.
3 Turn the engine switch to
ON.
4 Press or of the meter
control switch to select .
5 Press or of the meter
control switch, select and
then press and hold .
6 Press or of the meter
control switch, select “TPWS”
and then press .
7 Press or of the meter
control switch, select “Set
Pressure” and then press
and hold .
7-inch display
1 Park the vehicle in a safe
place and turn the engine
switch off.
Initialization cannot be performed while the vehicle is moving.
2
Adjust the tire inflation pres-
sure to the specified cold tire
inflation pressure level.
( P.505)
Make sure to adjust the tire pres-
sure to the specifie d cold tire infla-
tion pressure level. The tire
pressure warning system will oper-
ate based on this pressure level.
3Turn the engine switch to
ON.
4 Press or of the meter
control switch to select .
5 Press or of the meter
control switch, select and
then press and hold .
6 Press or of the meter
control switch, select “TPWS”
and then press .
7 Press or of the meter
control switch, select “Set
Pressure” and then press
and hold .
“Setting Tire Pressure Warning
System” will be displayed on the
multi-information display and the
tire pressure warning light will
blink 3 times.
When the message disappears,
initialization is complete.
A message is displayed on the
multi-information display. Also,
“--” is displayed for inflation
pressure of each tire on the
multi-information display while