display TOYOTA HIGHLANDER 2022 Owners Manual
[x] Cancel search | Manufacturer: TOYOTA, Model Year: 2022, Model line: HIGHLANDER, Model: TOYOTA HIGHLANDER 2022Pages: 568, PDF Size: 13.73 MB
Page 425 of 568

4256-3. Do-it-yourself maintenance
6
Maintenance and care
the tire pressure warning sys-
tem determines the position.
Drive the vehicle at approxi-
mately 25 mph (40 km/h) or
more for approximately 10 to 30
minutes until the inflation pres-
sure of each tire is displayed on
the multi-information display.
When initialization is complete,
the inflation pressure of each
tire will be displayed on the
multi-information display.
Even if the vehicle is not driven
at approximately 25 mph (40
km/h) or more, initialization can
be completed by driving for a
long time. However, if initializa-
tion does not complete after
driving for 1 hour or more, park
the vehicle in a safe place for
approximately 20 minutes and
then drive the vehicle again.
■Initializing the tire pressure
warning system
Initialize the syst em with the tire
inflation pressure adjusted to the
specified level.
■Initialization procedure
●Make sure to carry out initializa-
tion after adjusting the tire inflation
pressure.
Also, make sure the tires are cold
before carrying out initialization or
tire inflation pressure adjustment.
●If you have accidentally turned the
engine switch off during initializa-
tion, it is not necessary to restart
the initialization ag ain as initializa-
tion will restart aut omatically when
the engine switch has been turned
to ON for the next time.
●If you accidentally restart the ini- tialization when initialization is not
necessary, adjust the tire inflation
pressure to the s
pecified level
when the tires are cold, and con-
duct initialization again.
●While the position of each tire is
being determined and the inflation
pressures are not being displayed
on the multi-information display, if
the inflation pressure of a tire
drops, the tire pressure warning
light will come on.
■When initializat ion of the tire
pressure warning system has
failed
Initialization may take longer to
complete if the vehi cle is driven on
an unpaved road. When performing
initialization, drive on a paved road if
possible. Depending on the driving
environment and condition of the
tires, initialization will be completed
in approximately 10 to 30 minutes. If
initialization is not complete after
driving approximately 10 to 30 min-
utes, continue driving for a while.
If the inflation pressure of each tire
is not displayed after driving for
approximately 1 ho ur, perform the
following procedure.
●Park the vehicle in a safe place for
approximately 20 minutes. Then
drive straight (with occasional left
and right turns) at approximately
25 mph (40 km/h) or more for
approximately 10 to 30 minutes.
However, in the following situations,
the tire inflation pr essure will not be
recorded and the system will not
operate properly. Perform initializa-
tion again.
●If the vehicle is reversed during
initialization, the data up to that
point is reset, so p erform the ini-
tialization procedure again from
the beginning.
●When operating the tire pressure
warning reset switch, the tire pres-
sure warning light does not blink 3
times.
Page 426 of 568
4266-3. Do-it-yourself maintenance
●After performing initialization, the
tire pressure warning light blinks
for 1 minute then stays on while
driving.
If the inflation pressure of each tire
is still not displayed, have the vehi-
cle inspected by your Toyota dealer.
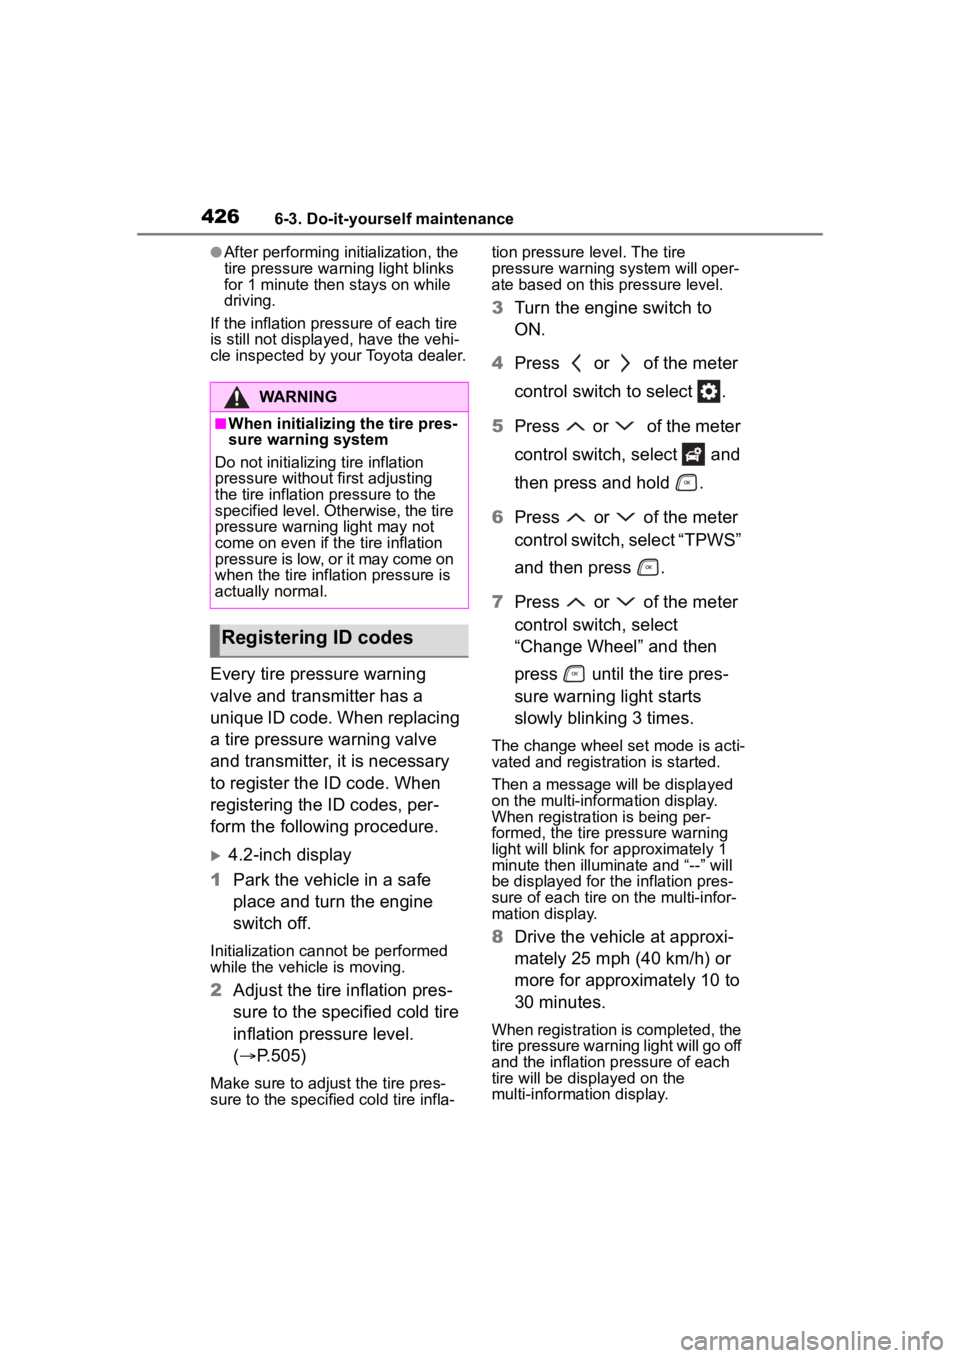
Every tire pressure warning
valve and transmitter has a
unique ID code. When replacing
a tire pressure warning valve
and transmitter, it is necessary
to register the ID code. When
registering the ID codes, per-
form the following procedure.
4.2-inch display
1 Park the vehicle in a safe
place and turn the engine
switch off.
Initialization cannot be performed
while the vehicle is moving.
2Adjust the tire inflation pres-
sure to the specified cold tire
inflation pressure level.
( P.505)
Make sure to adjust the tire pres-
sure to the specifie d cold tire infla- tion pressure level. The tire
pressure warning system will oper-
ate based on this
pressure level.
3Turn the engine switch to
ON.
4 Press or of the meter
control switch to select .
5 Press or of the meter
control switch, select and
then press and hold .
6 Press or of the meter
control switch, select “TPWS”
and then press .
7 Press or of the meter
control switch, select
“Change Wheel” and then
press until the tire pres-
sure warning light starts
slowly blinking 3 times.
The change wheel set mode is acti-
vated and registra tion is started.
Then a message will be displayed
on the multi-information display.
When registration is being per-
formed, the tire pressure warning
light will blink for approximately 1
minute then illuminate and “--” will
be displayed for the inflation pres-
sure of each tire on the multi-infor-
mation display.
8 Drive the vehicle at approxi-
mately 25 mph (40 km/h) or
more for approximately 10 to
30 minutes.
When registration is completed, the
tire pressure warni ng light will go off
and the inflation pressure of each
tire will be disp layed on the
multi-information display.
WARNING
■When initializing the tire pres-
sure warning system
Do not initializing tire inflation
pressure without first adjusting
the tire inflation pressure to the
specified level. Otherwise, the tire
pressure warning light may not
come on even if the tire inflation
pressure is low, or it may come on
when the tire inflation pressure is
actually normal.
Registering ID codes
Page 427 of 568

4276-3. Do-it-yourself maintenance
6
Maintenance and care
Even if the vehicle is not driven at
approximately 25 mph (40 km/h) or
more, registration can be com-
pleted by driving for a long time.
However, if registration does not
complete after driving for 1 hour or
more, perform the procedure again
from the beginning.
9 Initialize the tire pressure
warning system. ( P.424)
7-inch display
1 Park the vehicle in a safe
place and turn the engine
switch off.
Initialization cannot be performed
while the vehicle is moving.
2Adjust the tire inflation pres-
sure to the specified cold tire
inflation pressure level.
( P.505)
Make sure to adjust the tire pres-
sure to the specifie d cold tire infla-
tion pressure level. The tire
pressure warning system will oper-
ate based on this pressure level.
3 Turn the engine switch to
ON.
4 Press or of the meter
control switch to select .
5 Press or of the meter
control switch, select and
then press and hold .
6 Press or of the meter
control switch, select “TPWS”
and then press .
7 Press or of the meter
control switch, select
“Change Wheel” and then press until the tire pres-
sure warning light starts
slowly blinking 3 times.
The change wheel set mode is acti-
vated and registra
tion is started.
Then a message will be displayed
on the multi-information display.
When registration is being per-
formed, the tire pressure warning
light will blink for approximately 1
minute then illumi nate and “--” will
be displayed for the inflation pres-
sure of each tire o n the multi-infor-
mation display.
8 Drive the vehicle at approxi-
mately 25 mph (40 km/h) or
more for approximately 10 to
30 minutes.
When registration is completed, the
tire pressure warni ng light will go off
and the inflation pressure of each
tire will be disp layed on the
multi-information display.
Even if the vehicle is not driven at
approximately 25 mph (40 km/h) or
more, registration can be com-
pleted by driving for a long time.
However, if registration does not
complete after driving for 1 hour or
more, perform the p rocedure again
from the beginning.
9 Initialize the tire pressure
warning system. ( P.424)
■When registering ID codes
●ID code registrati on is performed
while driving at a vehicle speed of
approximately 25 mph (40 km/h)
or more.
●Before performing ID code regis-
tration, make sure that no wheels
with tire pressure warning valve
and transmitters installed are near
the vehicle.
●Make sure to initi alize the tire
pressure warning system after
Page 429 of 568
4296-3. Do-it-yourself maintenance
6
Maintenance and care
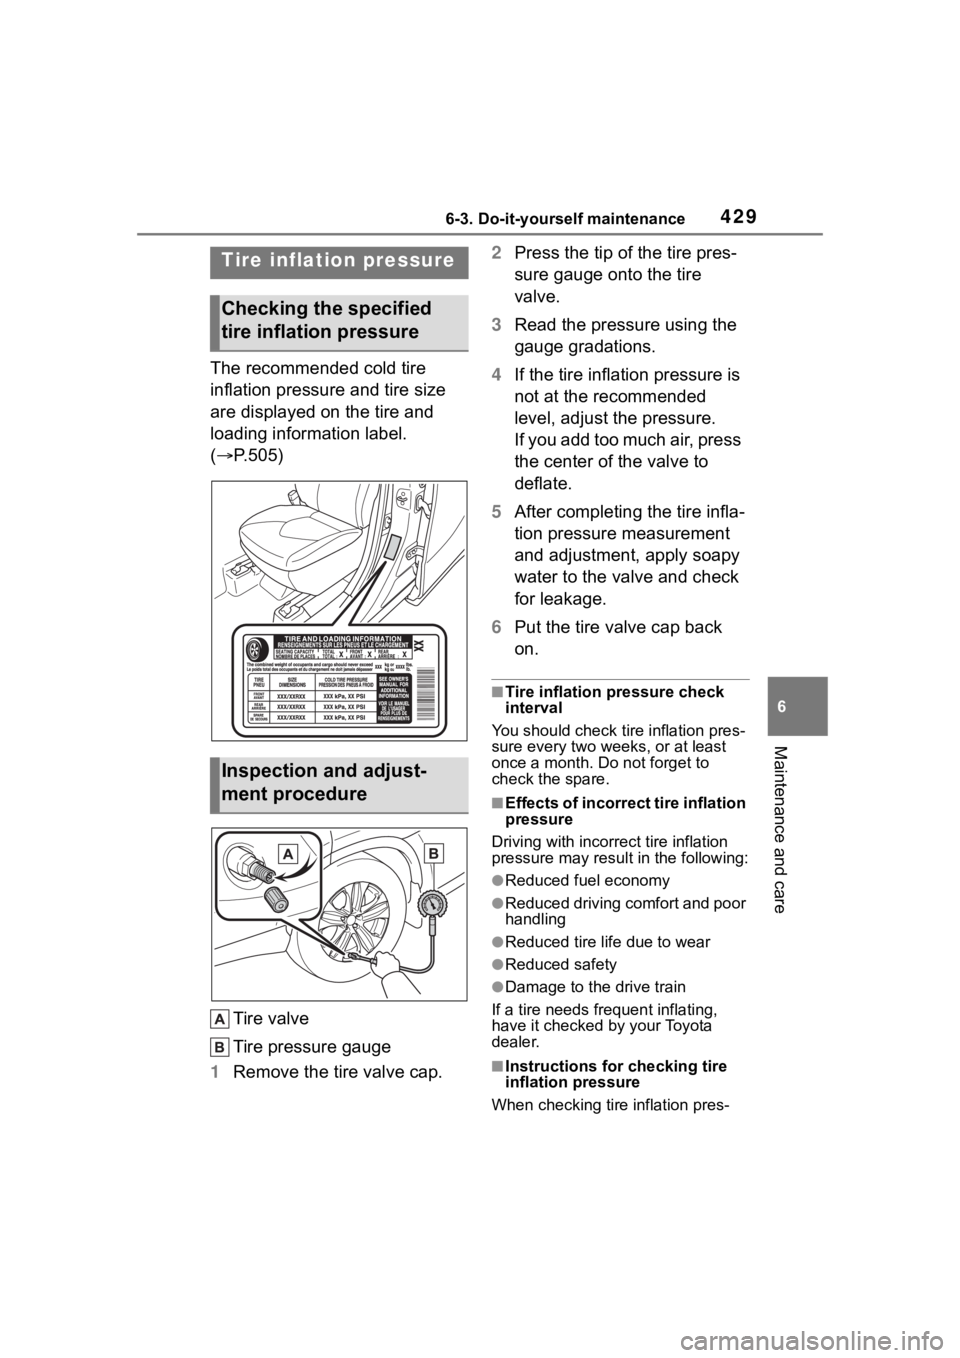
The recommended cold tire
inflation pressure and tire size
are displayed on the tire and
loading information label.
(P.505)
Tire valve
Tire pressure gauge
1 Remove the tire valve cap. 2
Press the tip of the tire pres-
sure gauge onto the tire
valve.
3 Read the pressure using the
gauge gradations.
4 If the tire inflation pressure is
not at the recommended
level, adjust the pressure.
If you add too much air, press
the center of the valve to
deflate.
5 After completing the tire infla-
tion pressure measurement
and adjustment, apply soapy
water to the valve and check
for leakage.
6 Put the tire valve cap back
on.
■Tire inflation pressure check
interval
You should check ti re inflation pres-
sure every two week s, or at least
once a month. Do not forget to
check the spare.
■Effects of incorrect tire inflation
pressure
Driving with incorrec t tire inflation
pressure may resul t in the following:
●Reduced fuel economy
●Reduced driving comfort and poor
handling
●Reduced tire life due to wear
●Reduced safety
●Damage to the drive train
If a tire needs frequent inflating,
have it checked by your Toyota
dealer.
■Instructions for checking tire
inflation pressure
When checking tire inflation pres-
Tire inflation pressure
Checking the specified
tire inflation pressure
Inspection and adjust-
ment procedure
Page 456 of 568
4567-2. Steps to take in an emergency
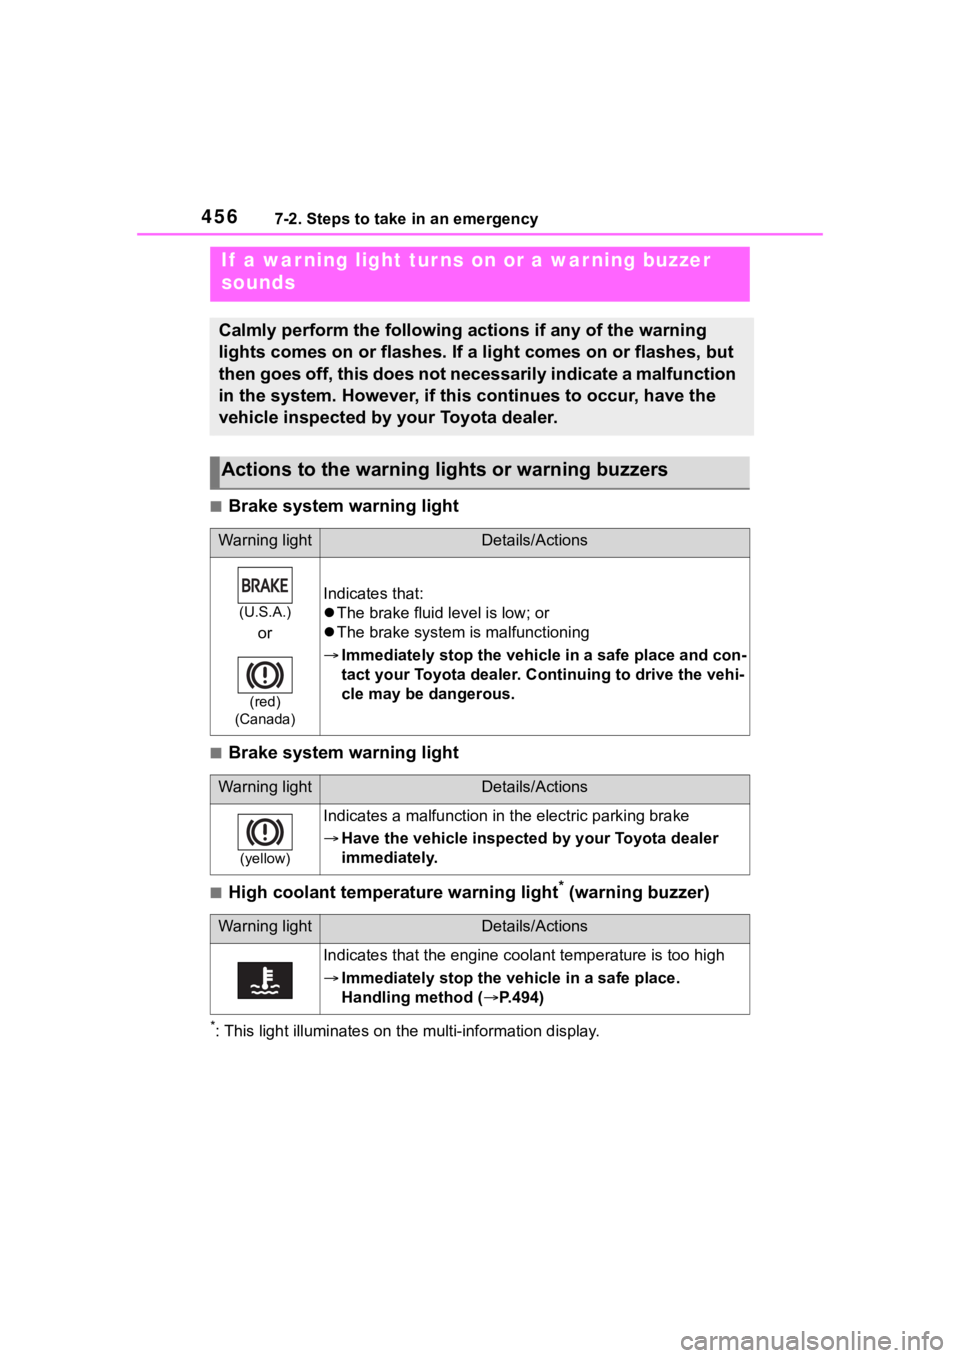
■Brake system warning light
■Brake system warning light
■High coolant temperature warning light* (warning buzzer)
*: This light illuminat es on the multi-information display.
If a war ning light tur ns on or a war ning buzzer
sounds
Calmly perform the following actions if any of the warning
lights comes on or flashes. If a light comes on or flashes, but
then goes off, this does not necessarily indicate a malfunction
in the system. However, if this continues to occur, have the
vehicle inspected by your Toyota dealer.
Actions to the warning lights or warning buzzers
Warning lightDetails/Actions
(U.S.A.)
or
(red)
(Canada)
Indicates that:
The brake fluid level is low; or
The brake system is malfunctioning
Immediately stop the vehicle in a safe place and con-
tact your Toyota dealer. Continuing to drive the vehi-
cle may be dangerous.
Warning lightDetails/Actions
(yellow)
Indicates a malfunction in the electric parking brake
Have the vehicle inspected by your Toyota dealer
immediately.
Warning lightDetails/Actions
Indicates that the engine coolant temperature is too high
Immediately stop the vehicle in a safe place.
Handling method ( P.494)
Page 457 of 568
4577-2. Steps to take in an emergency
7
When trouble arises
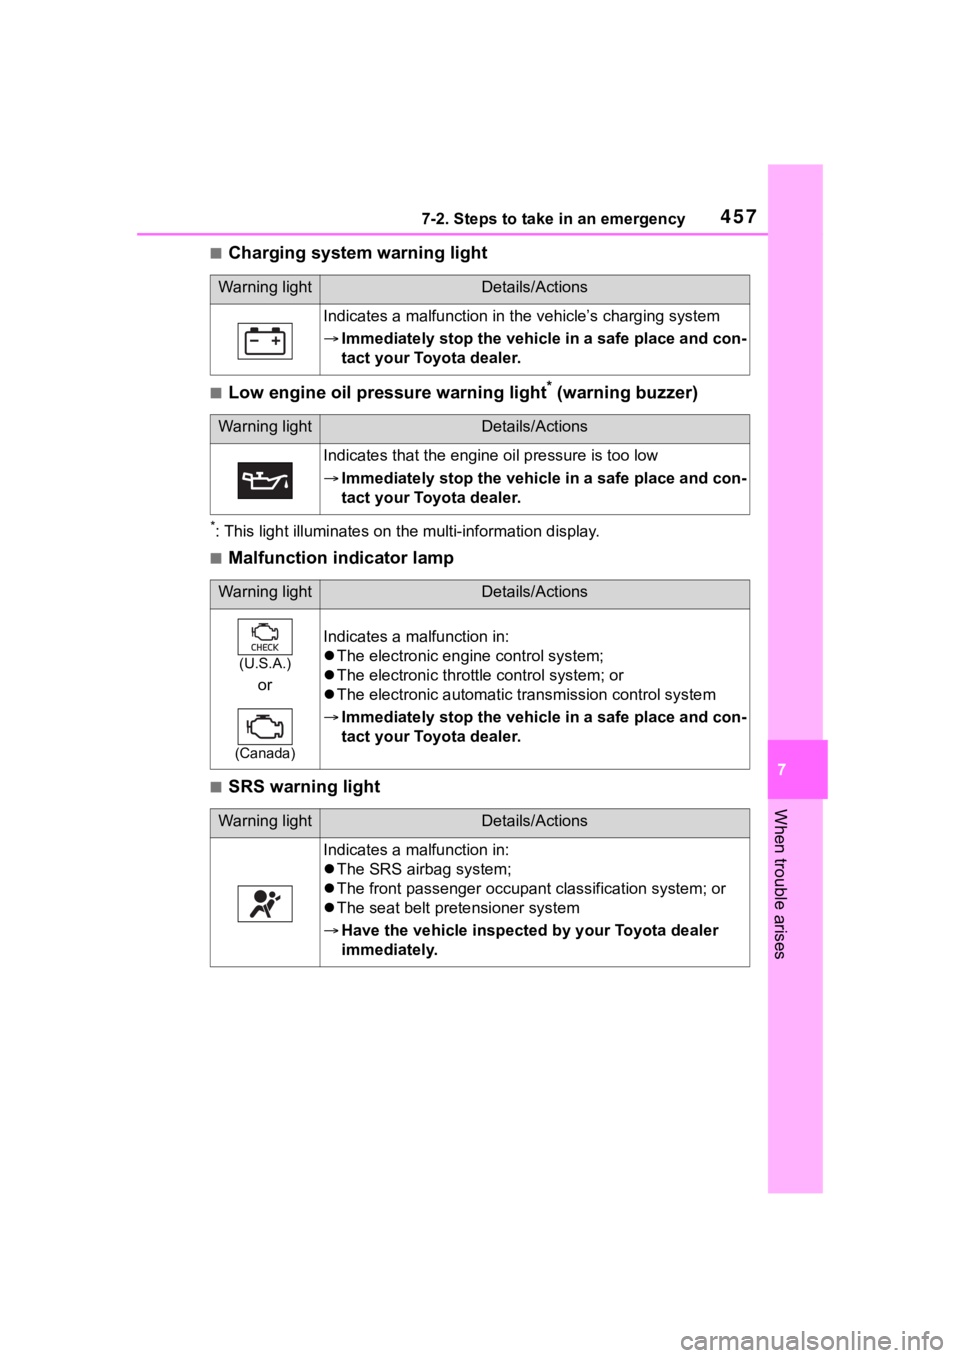
■Charging system warning light
■Low engine oil pressure warning light* (warning buzzer)
*: This light illuminat es on the multi-information display.
■Malfunction indicator lamp
■SRS warning light
Warning lightDetails/Actions
Indicates a malfunction in the vehicle’s charging system
Immediately stop the vehicle in a safe place and con-
tact your Toyota dealer.
Warning lightDetails/Actions
Indicates that the engine oil pressure is too low
Immediately stop the vehicle in a safe place and con-
tact your Toyota dealer.
Warning lightDetails/Actions
(U.S.A.)
or
(Canada)
Indicates a malfunction in:
The electronic engine control system;
The electronic throttle control system; or
The electronic automatic transmission control system
Immediately stop the vehicle in a safe place and con-
tact your Toyota dealer.
Warning lightDetails/Actions
Indicates a malfunction in:
The SRS airb ag system;
The front passenger occupan t classification system; or
The seat belt pretensioner system
Have the vehicle inspected by your Toyota dealer
immediately.
Page 458 of 568
4587-2. Steps to take in an emergency
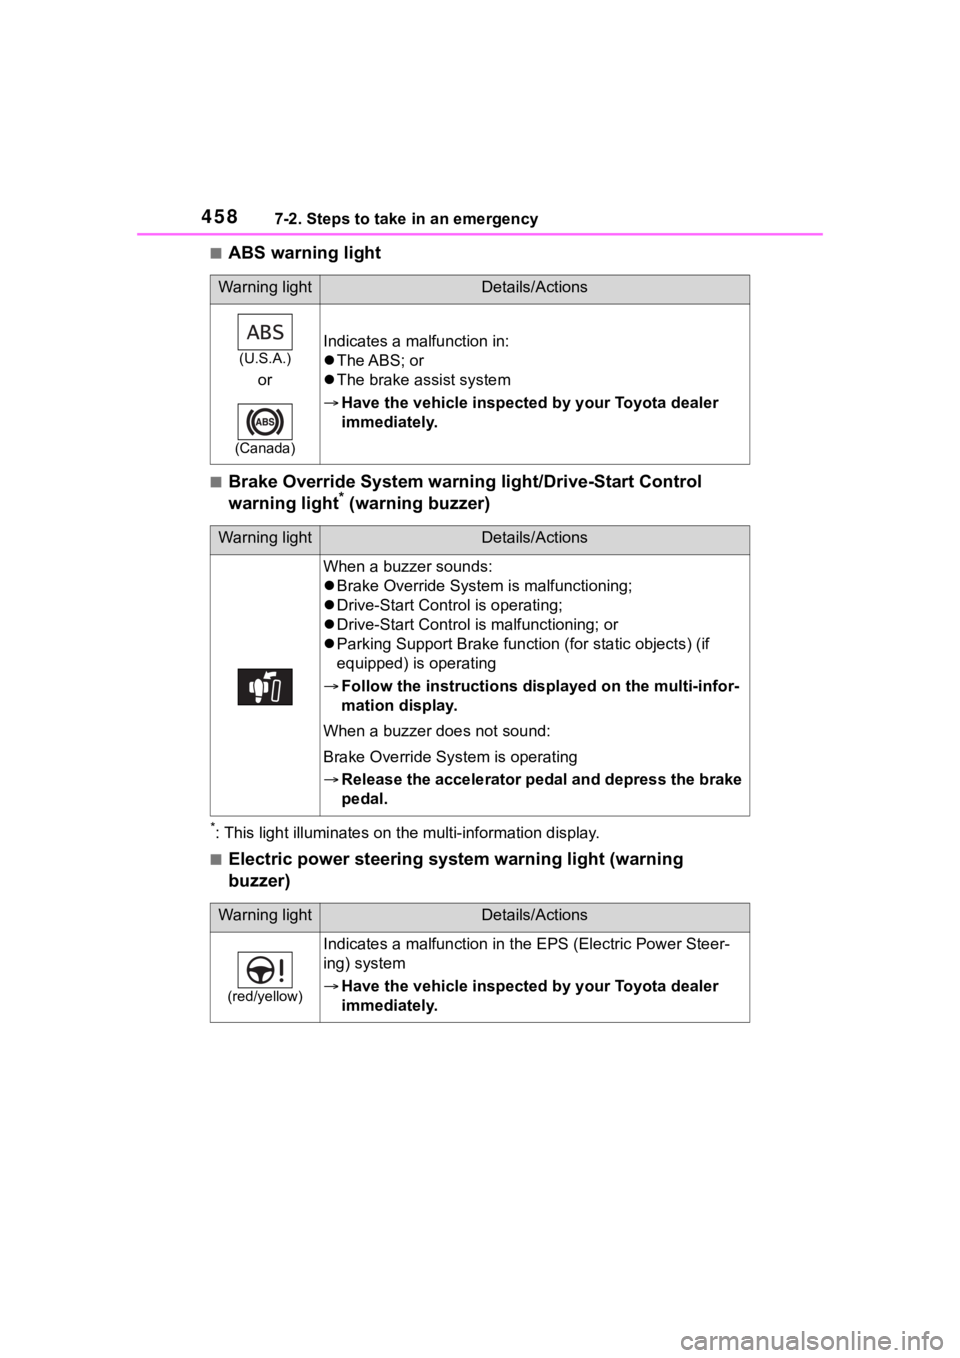
■ABS warning light
■Brake Override System warning light/Drive-Start Control
warning light* (warning buzzer)
*: This light illuminat es on the multi-information display.
■Electric power steering system warning light (warning
buzzer)
Warning lightDetails/Actions
(U.S.A.)
or
(Canada)
Indicates a malfunction in:
The ABS; or
The brake assist system
Have the vehicle inspected by your Toyota dealer
immediately.
Warning lightDetails/Actions
When a buzzer sounds:
Brake Override System is malfunctioning;
Drive-Start Contro l is operating;
Drive-Start Control is malfunctioning; or
Parking Support Brake functio n (for static objects) (if
equipped) is operating
Follow the instructions di splayed on the multi-infor-
mation display.
When a buzzer does not sound:
Brake Override System is operating
Release the accelerator pedal and depress the brake
pedal.
Warning lightDetails/Actions
(red/yellow)
Indicates a malfunction in th e EPS (Electric Power Steer-
ing) system
Have the vehicle inspected by your Toyota dealer
immediately.
Page 459 of 568
4597-2. Steps to take in an emergency
7
When trouble arises
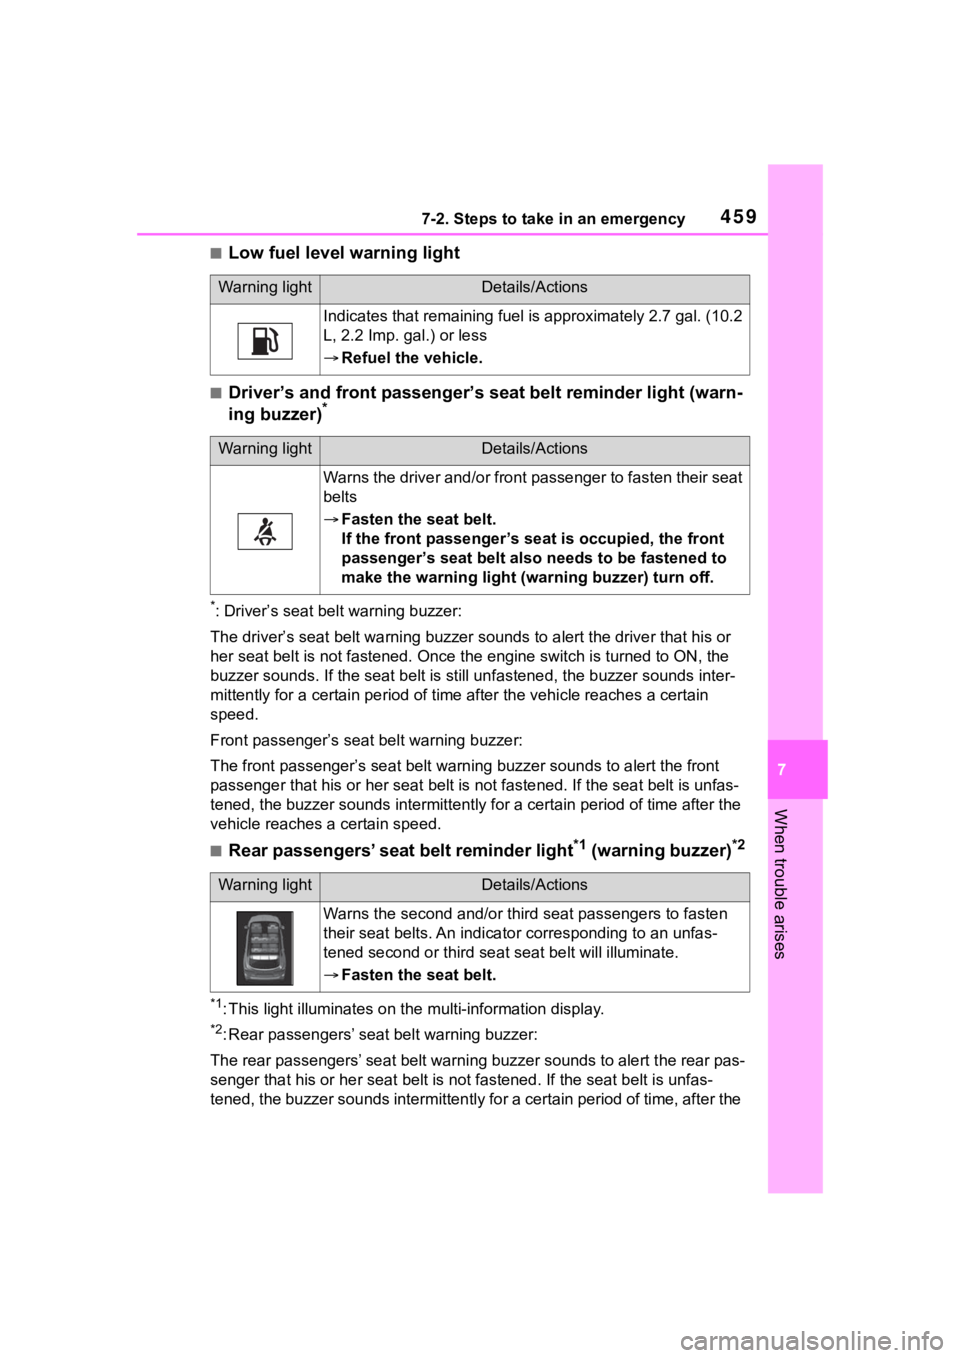
■Low fuel level warning light
■Driver’s and front passenger’s seat belt reminder light (warn-
ing buzzer)*
*: Driver’s seat belt warning buzzer:
The driver’s seat belt warning buzzer sounds to alert the driver that his or
her seat belt is not fastened. O nce the engine switch is turned to ON, the
buzzer sounds. If the seat belt is still un fastened, the buzzer sounds inter-
mittently for a certain period of time after the vehicle reache s a certain
speed.
Front passenger’s seat belt warning buzzer:
The front passenger’s seat belt w arning buzzer sounds to alert the front
passenger that his or her seat belt is not fastened. If the seat belt is unfas-
tened, the buzzer sounds intermittently for a certain period of time after the
vehicle reaches a certain speed.
■Rear passengers’ seat belt reminder light*1 (warning buzzer)*2
*1: This light illuminates on the multi-information display.
*2: Rear passengers’ seat belt warning buzzer:
The rear passengers’ seat belt warning buzzer sounds to alert t he rear pas-
senger that his or he r seat belt is not fastened. If the seat b elt is unfas-
tened, the buzzer sounds intermittently for a certain period of time, after the
Warning lightDetails/Actions
Indicates that remaining fuel is approximately 2.7 gal. (10.2
L, 2.2 Imp. gal.) or less
Refuel the vehicle.
Warning lightDetails/Actions
Warns the driver and/or front passenger to fasten their seat
belts
Fasten the seat belt.
If the front passenger’s se at is occupied, the front
passenger’s seat belt also needs to be fastened to
make the warning light (w arning buzzer) turn off.
Warning lightDetails/Actions
Warns the second and/or thir d seat passengers to fasten
their seat belts. An indicato r corresponding to an unfas-
tened second or third seat seat b elt will illuminate.
Fasten the seat belt.
Page 460 of 568
4607-2. Steps to take in an emergency
seat belt is fastened and unfast ened and the vehicle reaches a certain
speed.
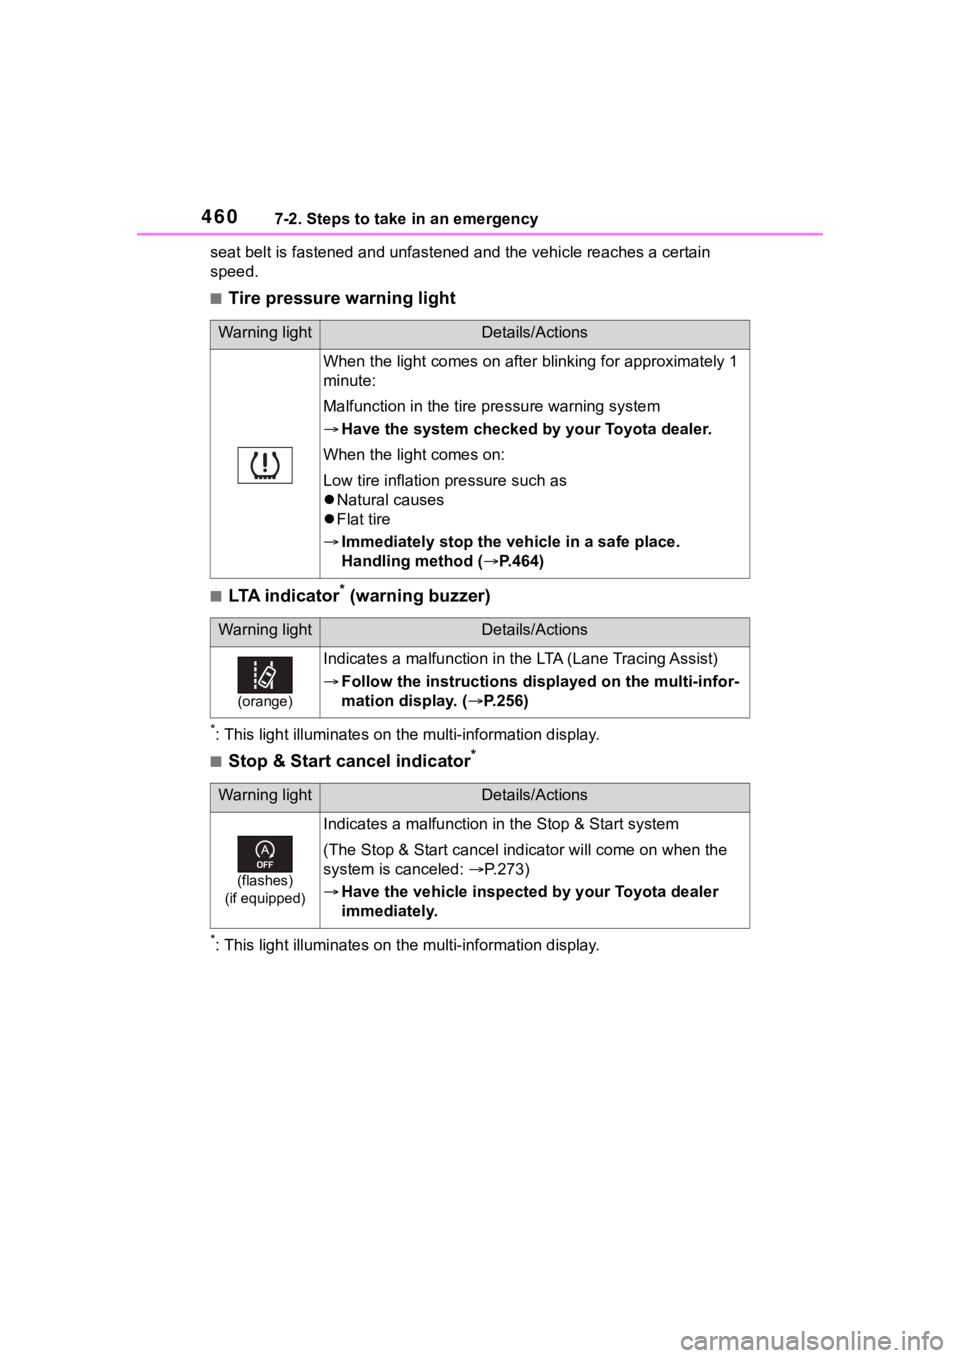
■Tire pressure warning light
■LTA indicator* (warning buzzer)
*: This light illuminat es on the multi-information display.
■Stop & Start cancel indicator*
*: This light illuminates on the multi-information display.
Warning lightDetails/Actions
When the light comes on after blinking for approximately 1
minute:
Malfunction in the tire pressure warning system
Have the system checked by your Toyota dealer.
When the light comes on:
Low tire inflation pressure such as
Natural causes
Flat tire
Immediately stop the vehicle in a safe place.
Handling method ( P.464)
Warning lightDetails/Actions
(orange)
Indicates a malfunction in the LTA (Lane Tracing Assist)
Follow the instructions di splayed on the multi-infor-
mation display. ( P.256)
Warning lightDetails/Actions
(flashes)
(if equipped)
Indicates a malfunction in the Stop & Start system
(The Stop & Start cancel ind icator will come on when the
system is canceled: P.273)
Have the vehicle inspected by your Toyota dealer
immediately.
Page 461 of 568
4617-2. Steps to take in an emergency
7
When trouble arises
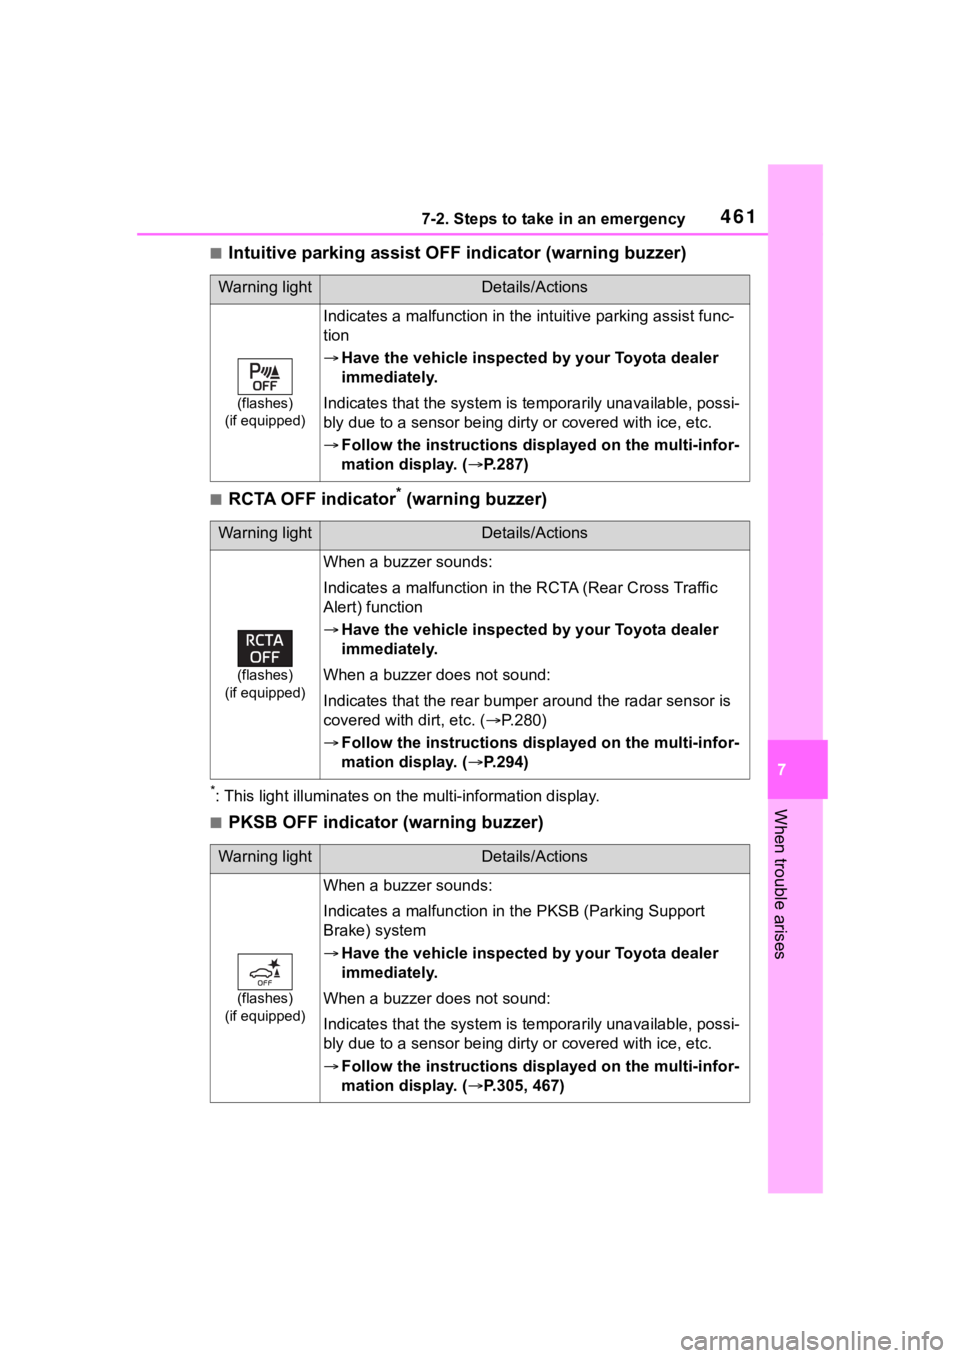
■Intuitive parking assist OFF indicator (warning buzzer)
■RCTA OFF indicator* (warning buzzer)
*: This light illuminat es on the multi-information display.
■PKSB OFF indicator (warning buzzer)
Warning lightDetails/Actions
(flashes)
(if equipped)
Indicates a malfunction in the intuitive parking assist func-
tion
Have the vehicle inspected by your Toyota dealer
immediately.
Indicates that the system is te mporarily unavailable, possi-
bly due to a sensor being dirty or covered with ice, etc.
Follow the instructions di splayed on the multi-infor-
mation display. ( P.287)
Warning lightDetails/Actions
(flashes)
(if equipped)
When a buzzer sounds:
Indicates a malfunction in the RCTA (Rear Cross Traffic
Alert) function
Have the vehicle inspected by your Toyota dealer
immediately.
When a buzzer does not sound:
Indicates that the re ar bumper around the radar sensor is
covered with dirt, etc. ( P.280)
Follow the instructions di splayed on the multi-infor-
mation display. ( P.294)
Warning lightDetails/Actions
(flashes)
(if equipped)
When a buzzer sounds:
Indicates a malfunction in the PKSB (Parking Support
Brake) system
Have the vehicle inspected by your Toyota dealer
immediately.
When a buzzer does not sound:
Indicates that the system is te mporarily unavailable, possi-
bly due to a sensor being dirty or covered with ice, etc.
Follow the instructions di splayed on the multi-infor-
mation display. ( P.305, 467)