check engine light TOYOTA HIGHLANDER 2022 Owners Manual
[x] Cancel search | Manufacturer: TOYOTA, Model Year: 2022, Model line: HIGHLANDER, Model: TOYOTA HIGHLANDER 2022Pages: 568, PDF Size: 13.73 MB
Page 4 of 568

4TABLE OF CONTENTS
Emission inspection and mainte-nance (I/M) programs....... 404
6-3. Do-it-yourself maintenance Do-it-yourself service precau-tions ................................. 406
Hood .................................. 408
Positioning a floor jack ....... 409
Engine compartment .......... 410
Tires ................................... 417
Tire inflation pressure......... 429
Wheels ............................... 431
Air conditioning filter ........... 432
Electronic key battery ......... 434
Checking and replacing fuses ......................................... 436
Headlight aim ..................... 438
Light bulbs .......................... 439
7-1. Essential information Emergency flashers ........... 448
If your vehicle has to be stopped in an emergency .............. 448
If the vehicle is submerged or water on the road is rising......................................... 449
7-2. Steps to take in an emergency If your vehicle needs to be towed......................................... 451
If you think something is wrong ......................................... 454
Fuel pump shut off system ......................................... 455
If a warning light turns on or a warning buzzer sounds .... 456
If a warning message is dis- played .............................. 467
If you have a flat tire ........... 471
If the engine will not start ... 485
If you lose your keys .......... 486If the fuel filler door cannot be
opened ............................. 487
If the electronic key does not operate properly............... 488
If the vehicle battery is dis- charged ............................ 490
If your vehicle overheats .... 494
If the vehicle becomes stuck ......................................... 496
8-1. Specifications Maintenance data (fuel, oil level, etc.) .................................. 500
Fuel information ................. 509
Tire information .................. 511
8-2. Customization Customizable features ....... 521
8-3. Initialization Items to initialize ................ 533
9-1. For owners Reporting safety defects for U.S. owners ............................. 536
Reporting safety defects for Canadian owners ............. 536
Seat belt instructions for Cana- dian owners (in French) ... 537
SRS airbag instructions for Canadian owners (in French)........ ................................. 538
Headlight aim instructions for Canadian owners (in French)........
................................. 545
7When trouble arises
8Vehicle specifications
9For owners
Page 14 of 568
14Pictorial index
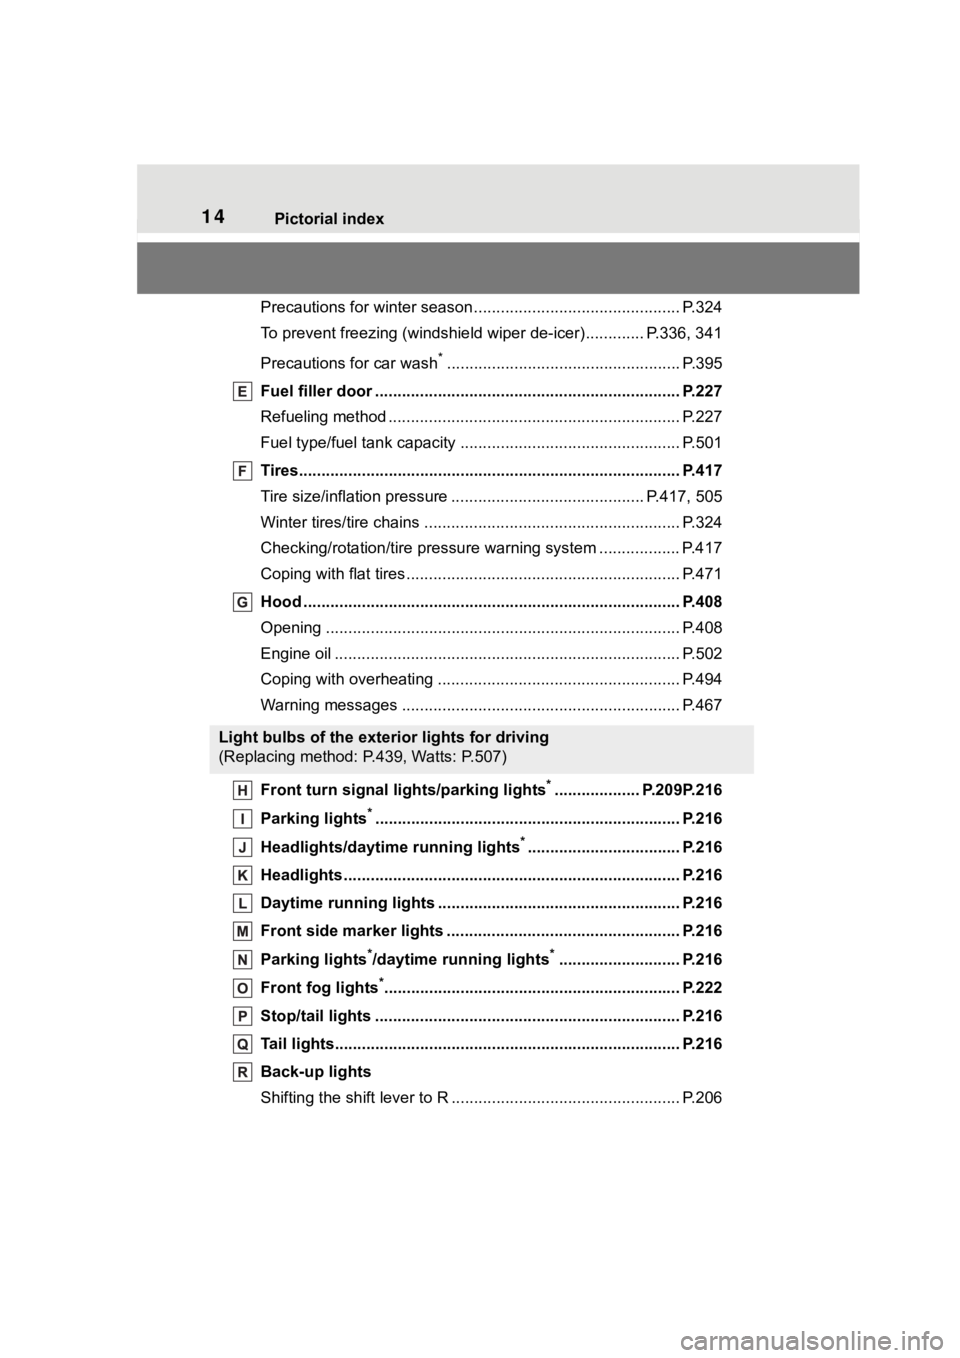
Precautions for winter season.............................................. P.324
To prevent freezing (windshiel d wiper de-icer) ............. P.336, 341
Precautions for car wash
*.................................................... P.395
Fuel filler door ............................................... ..................... P.227
Refueling method ............................................... .................. P.227
Fuel type/fuel tan k capacity ................................... .............. P.501
Tires.......................................................... ........................... P.417
Tire size/inflation pressure ................................... ........ P.417, 505
Winter tires/tire chains ....................................... .................. P.324
Checking/rotation/tire pressur e warning system ..................P.417
Coping with flat tires......................................... .................... P.471
Hood ........................................................... ......................... P.408
Opening ............................................................................... P.408
Engine oil ..................................................... ........................ P.502
Coping with overheating ...................................................... P.494
Warning messages ............................................... ............... P.467
Front turn signal lights/parking lights
*................... P.209P.216
Parking lights
*............................................................... ..... P.216
Headlights/daytime running lights
*.................................. P.216
Headlights..................................................... ...................... P.216
Daytime running lights .. .................................................... P.216
Front side marker lights ....................................... ............. P.216
Parking lights
*/daytime running lights*........................... P.216
Front fog lights
*............................................................... ... P.222
Stop/tail lights ............................................... ..................... P.216
Tail lights.................................................... ......................... P.216
Back-up lights
Shifting the shift lever to R ................................................... P.206
Light bulbs of the exterior lights for driving
(Replacing method: P.439, Watts: P.507)
Page 25 of 568
251-1. For safe use
1
For safety and security
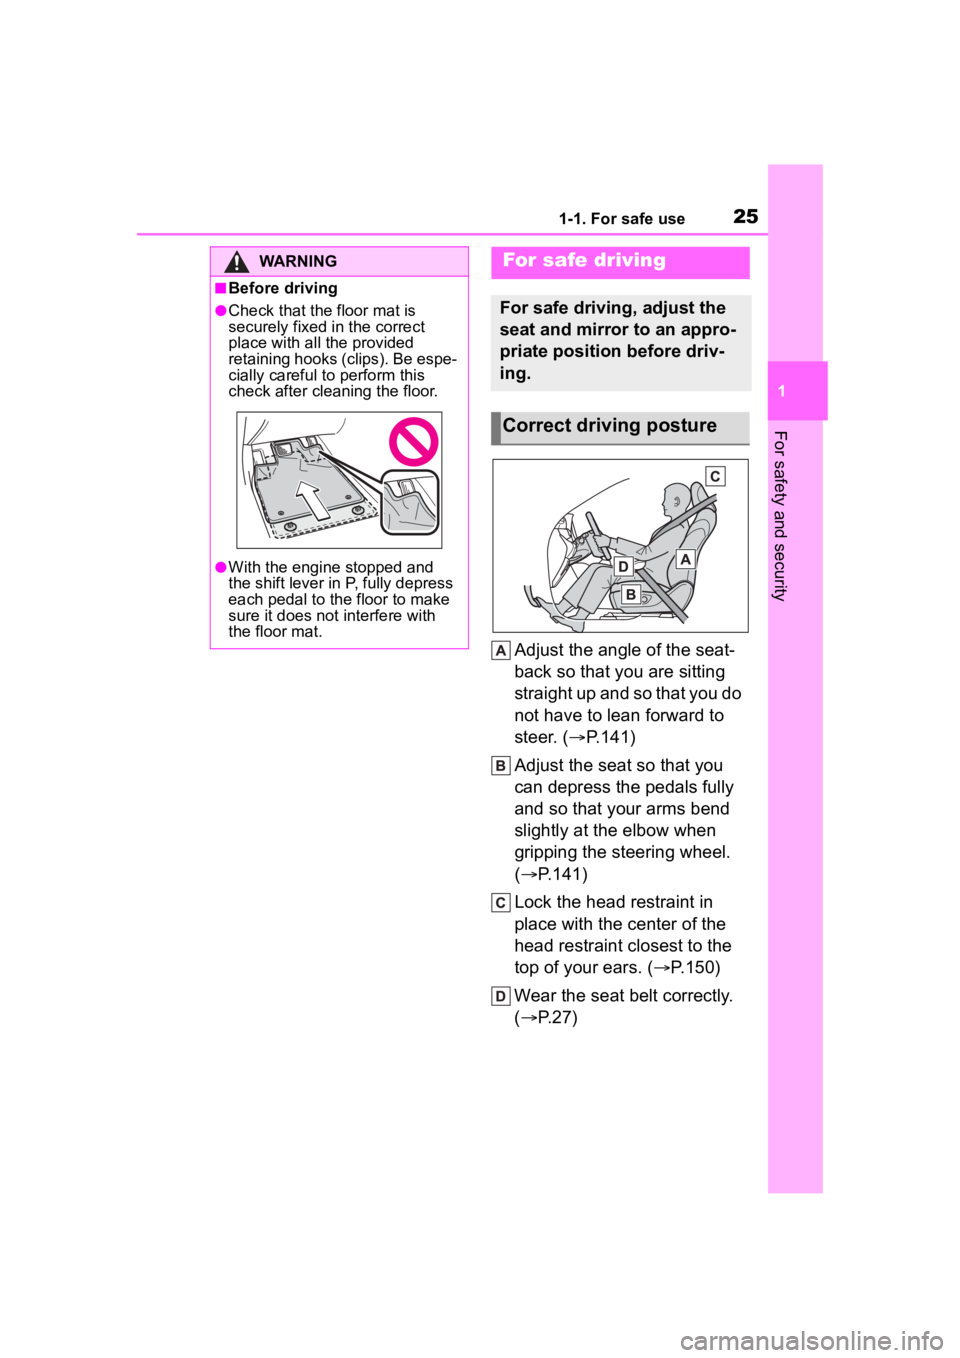
Adjust the angle of the seat-
back so that you are sitting
straight up and so that you do
not have to lean forward to
steer. (P.141)
Adjust the seat so that you
can depress the pedals fully
and so that your arms bend
slightly at the elbow when
gripping the steering wheel.
( P.141)
Lock the head restraint in
place with the center of the
head restraint closest to the
top of your ears. ( P.150)
Wear the seat belt correctly.
( P.27)
WARNING
■Before driving
●Check that the floor mat is
securely fixed in the correct
place with all the provided
retaining hooks (clips). Be espe-
cially careful to perform this
check after cleaning the floor.
●With the engine stopped and
the shift lever in P, fully depress
each pedal to the floor to make
sure it does not interfere with
the floor mat.
For safe driving
For safe driving, adjust the
seat and mirror to an appro-
priate position before driv-
ing.
Correct driving posture
Page 48 of 568
481-1. For safe use
Exhaust gas precau-
tions
Harmful substance to the
human body is included in
exhaust gases if inhaled.
WARNING
Exhaust gases include harmful
carbon monoxide (CO), which is
colorless and odorless. Observe
the following precautions.
Failure to do so may cause
exhaust gases enter the vehicle
and may lead to an accident
caused by light-headedness, or
may lead to death or a serious
health hazard.
■Important points while driving
●Keep the back door closed.
●If you smell exhaust gases in
the vehicle even when the back
door is closed, open the win-
dows and have the vehicle
inspected at your Toyota dealer
as soon as possible.
■When parking
●If the vehicle is in a poorly venti-
lated area or a closed area,
such as a garage, stop the
engine.
●Do not leave the vehicle with
the engine running for a long
time.
If such a situation cannot be
avoided, park the vehicle in an
open space and ensure that
exhaust fumes do not enter the
vehicle interior.
●Do not leave the engine running
in an area with snow build-up,
or where it is snowing. If snow-
banks build up around the vehi-
cle while the engine is running,
exhaust gases may collect and
enter the vehicle.
■Exhaust pipe
The exhaust system needs to be
checked periodically. If there is a
hole or crack caused by corro-
sion, damage to a joint or abnor-
mal exhaust noise, be sure to
have the vehicle inspected and
repaired by your Toyota dealer.
Page 73 of 568
731-4. Theft deterrent system
1
For safety and security
*: If equipped
■Items to check before lock-
ing the vehicle
To prevent unexpected trigger-
ing of the alarm and vehicle
theft, make sure of the following:
Nobody is in the vehicle.
The windows, moon roof (if
equipped) and panoramic
moon roof (if equipped) are
closed before the alarm is set.
No valuables or other per-
sonal items are left in the
vehicle.
■Setting
Close the doors and hood, and
lock all the doors. The system will be set automatically after 30
seconds.
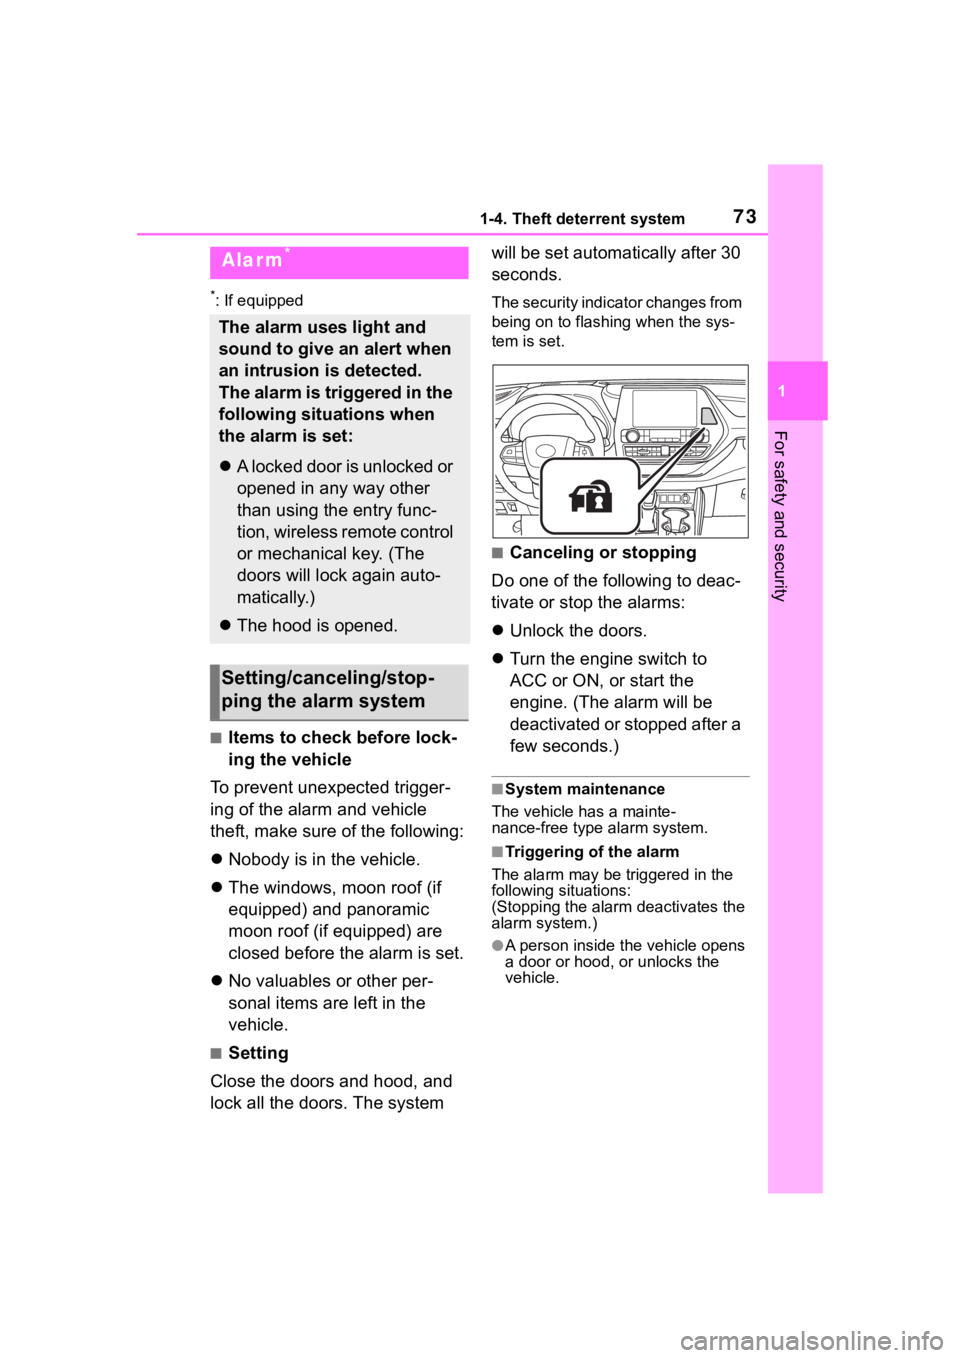
The security indicator changes from
being on to flashing when the sys-
tem is set.
■Canceling or stopping
Do one of the following to deac-
tivate or stop the alarms:
Unlock the doors.
Turn the engine switch to
ACC or ON, or start the
engine. (The alarm will be
deactivated or stopped after a
few seconds.)
■System maintenance
The vehicle has a mainte-
nance-free type alarm system.
■Triggering of the alarm
The alarm may be triggered in the
following situations:
(Stopping the alarm deactivates the
alarm system.)
●A person inside the vehicle opens
a door or hood, or unlocks the
vehicle.
Alarm*
The alarm uses light and
sound to give an alert when
an intrusion is detected.
The alarm is triggered in the
following situations when
the alarm is set:
A locked door is unlocked or
opened in any way other
than using the entry func-
tion, wireless remote control
or mechanical key. (The
doors will lock again auto-
matically.)
The hood is opened.
Setting/canceling/stop-
ping the alarm system
Page 78 of 568
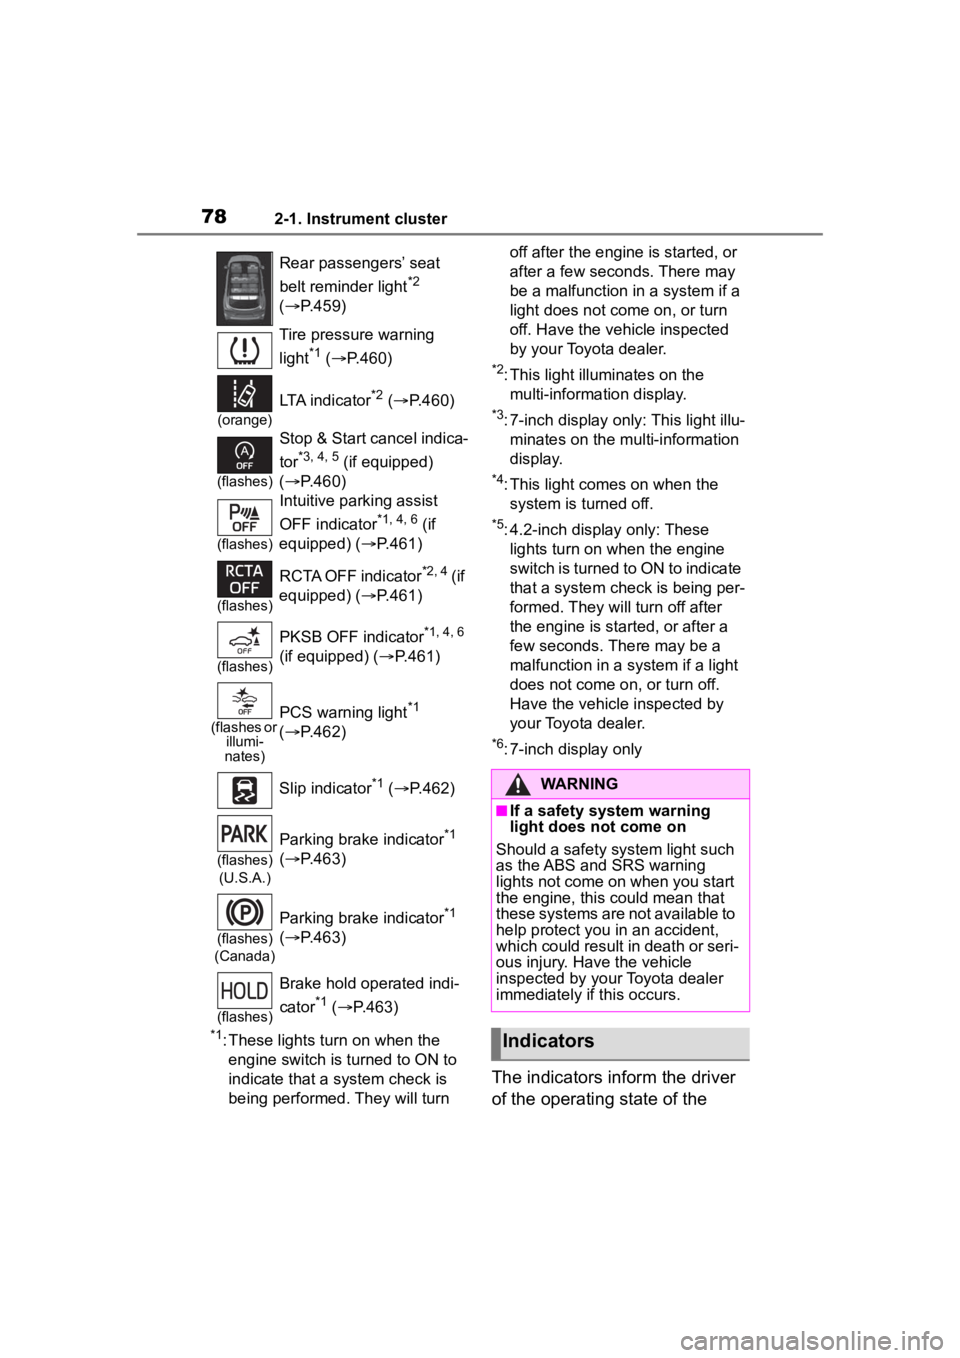
782-1. Instrument cluster
*1: These lights turn on when the engine switch is turned to ON to
indicate that a system check is
being performed. They will turn off after the engine is started, or
after a few seconds. There may
be a malfunction in a system if a
light does not come on, or turn
off. Have the vehicle inspected
by your Toyota dealer.
*2: This light illuminates on the
multi-information display.
*3: 7-inch display only : This light illu-
minates on the mu lti-information
display.
*4: This light comes on when the system is turned off.
*5: 4.2-inch display only: These lights turn on when the engine
switch is turned to ON to indicate
that a system check is being per-
formed. They will turn off after
the engine is started, or after a
few seconds. There may be a
malfunction in a system if a light
does not come on, or turn off.
Have the vehicle inspected by
your Toyota dealer.
*6: 7-inch display only
The indicators inform the driver
of the operating state of the
Rear passengers’ seat
belt reminder light
*2
( P.459)
Tire pressure warning
light
*1 ( P.460)
(orange)
LTA indicator*2 ( P.460)
(flashes)
Stop & Start cancel indica-
tor
*3, 4, 5 (if equipped)
( P.460)
(flashes)
Intuitive parking assist
OFF indicator
*1, 4, 6 (if
equipped) ( P.461)
(flashes)
RCTA OFF indicator*2, 4 ( if
equipped) ( P.461)
(flashes)
PKSB OFF indicator*1, 4, 6
(if equipped) ( P.461)
(flashes or
illumi-
nates)PCS warning light*1
( P.462)
Slip indicator
*1 ( P.462)
(flashes)
(U.S.A.)
Parking brake indicator*1
( P.463)
(flashes)
(Canada)
Parking brake indicator*1
( P.463)
(flashes)
Brake hold operated indi-
cator
*1 ( P.463)
WARNING
■If a safety system warning
light does not come on
Should a safety system light such
as the ABS and SRS warning
lights not come on when you start
the engine, this could mean that
these systems are not available to
help protect you in an accident,
which could result in death or seri-
ous injury. Have the vehicle
inspected by you r Toyota dealer
immediately if this occurs.
Indicators
Page 80 of 568

802-1. Instrument cluster
Drive mode indicators
*1: 7-inch display only: This light illu-
minates on the multi-information
display.
*2: This light illuminates on the multi-information display.
*3: This light comes on when the system is turned off.
*4: These lights turn on when the engine switch is turned to ON to
indicate that a system check is
being performed. They will turn
off after the engine is started, or
after a few seconds. There may
be a malfunction in a system if a
light does not co me on, or turn
off. Have the vehicle inspected
by your Toyota dealer.
*5: In order to confirm operation, the BSM outside rear view mirror
indicators illumina te in the follow-
ing situations:
When the BSM function is
enabled on of the
multi-information display, the
engine switch is turned to ON.
When the engine switch is in
ON, the BSM function is
enabled on of the
multi-information display. If the system is functioning cor-
rectly, the BSM outside rear
view mirror indicators will turn
off after a few seconds. If the
BSM outside rear view mirror
indicators do not illuminate or do
not turn off, there may be a mal-
function in the system. If this
occurs, have the vehicle
inspected by your Toyota dealer.
*6: This light illuminates on the out-
side rear view mirrors.
*7: When the outside temperature is approximately 37°F (3°C) or
lower, this indicator will flash for
approximately 10 seconds, then
stay on.
*8: This light illuminates on the cen-ter panel.
*9: 4.2-inch display only: These lights turn on when the engine
switch is turned to ON to indicate
that a system che ck is being per-
formed. They will turn off after
the engine is started, or after a
few seconds. There may be a
malfunction in a system if a light
does not come on, or turn off.
Have the vehicle inspected by
your Toyota dealer.
*10:7-inch display only
Eco drive mode indicator
*2
( P.311)
Sport mode indicator
*2
( P.311)
Mud & sand mode indica-
tor
*2 (if equipped)
( P.313)
Rock & dirt mode indica-
tor
*2 (if equipped)
( P.313)
Page 83 of 568
832-1. Instrument cluster
2
Vehicle status information and indicators
■Display items
Odometer
Displays the total distance the vehi-
cle has been driven.
Trip meter A/trip meter B
Displays the distan ce the vehicle
has been driven si nce the meter
was last reset. Trip meters A and B
can be used to record and display
different distances independently.
Distance until next engine oil
change
Displays the distan ce the vehicle
can be driven until an oil change is
necessary.
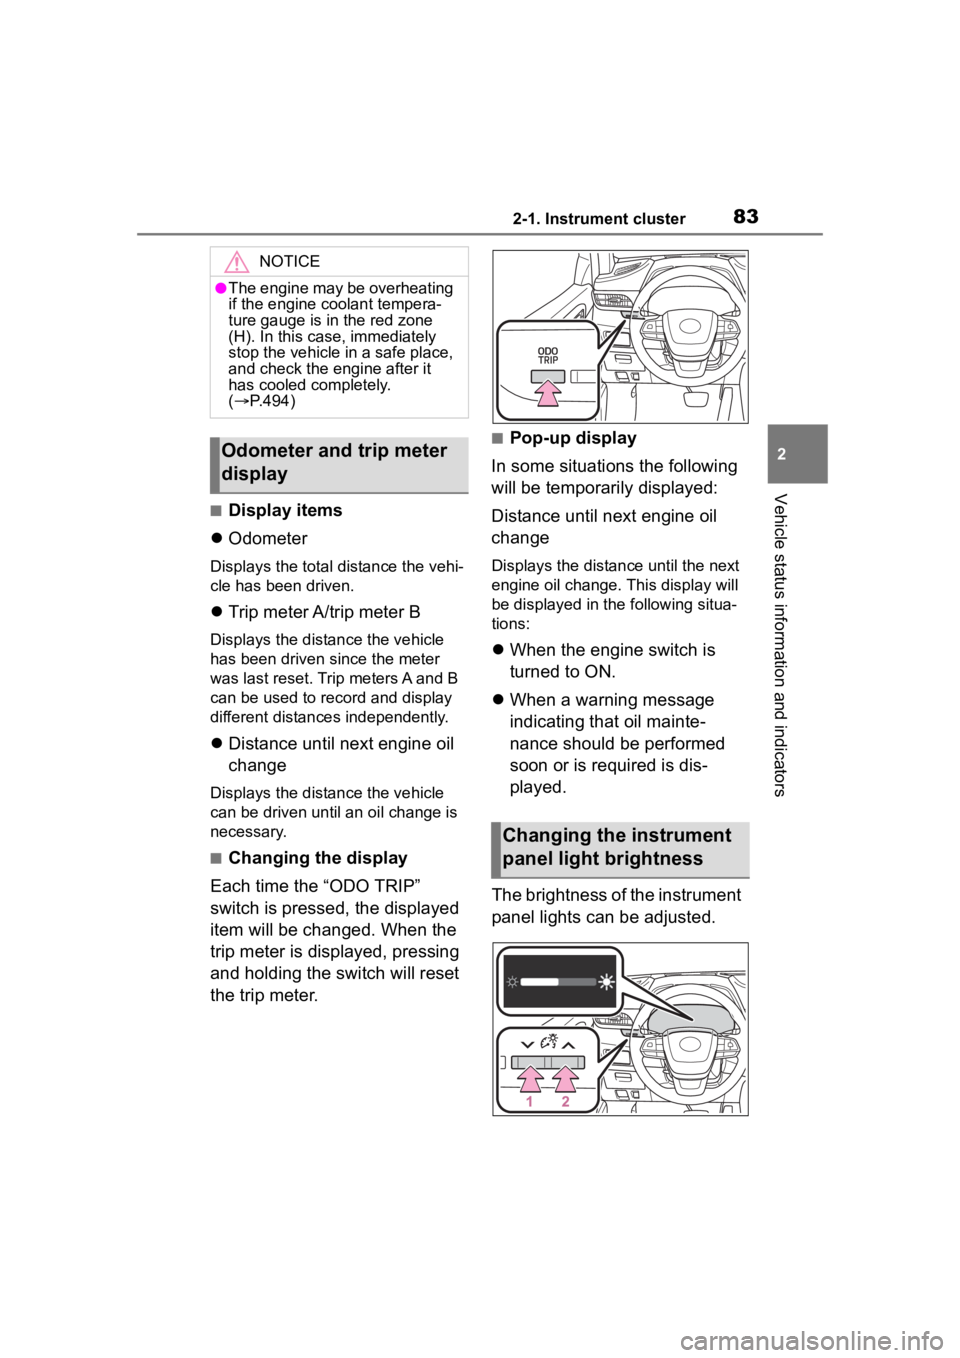
■Changing the display
Each time the “ODO TRIP”
switch is pressed, the displayed
item will be changed. When the
trip meter is displayed, pressing
and holding the switch will reset
the trip meter.
■Pop-up display
In some situations the following
will be temporarily displayed:
Distance until next engine oil
change
Displays the distance until the next
engine oil change. This display will
be displayed in the following situa-
tions:
When the engine switch is
turned to ON.
When a warning message
indicating that oil mainte-
nance should be performed
soon or is required is dis-
played.
The brightness of the instrument
panel lights can be adjusted.
NOTICE
●The engine may be overheating
if the engine coolant tempera-
ture gauge is in the red zone
(H). In this case, immediately
stop the vehicle in a safe place,
and check the engine after it
has cooled completely.
( P.494)
Odometer and trip meter
display
Changing the instrument
panel light brightness
Page 117 of 568
1173-2. Opening, closing and locking the doors
3
Before driving
3-2.Opening, closing and locking the doors
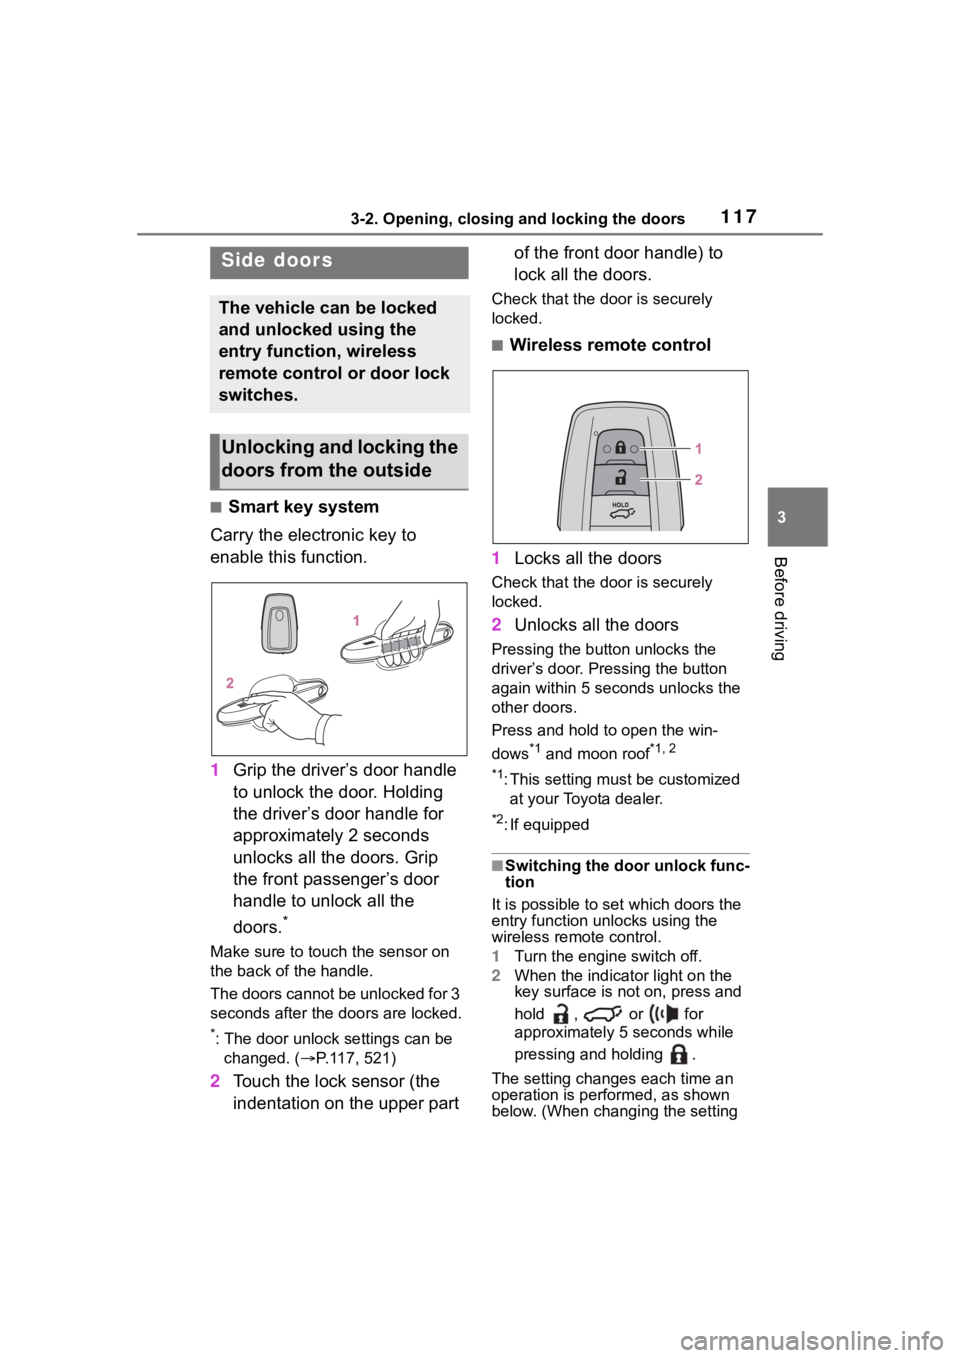
■Smart key system
Carry the electronic key to
enable this function.
1 Grip the driver’s door handle
to unlock the door. Holding
the driver’s door handle for
approximately 2 seconds
unlocks all the doors. Grip
the front passenger’s door
handle to unlock all the
doors.
*
Make sure to touch the sensor on
the back of the handle.
The doors cannot be unlocked for 3
seconds after the doors are locked.
*: The door unlock settings can be
changed. ( P.117, 521)
2 Touch the lock sensor (the
indentation on the upper part of the front door handle) to
lock all the doors.
Check that the d
oor is securely
locked.
■Wireless remote control
1 Locks all the doors
Check that the d oor is securely
locked.
2 Unlocks all the doors
Pressing the button unlocks the
driver’s door. Pressing the button
again within 5 seconds unlocks the
other doors.
Press and hold to open the win-
dows
*1 and moon roof*1, 2
*1
: This setting must be customized at your Toyota dealer.
*2: If equipped
■Switching the door unlock func-
tion
It is possible to set which doors the
entry function unlocks using the
wireless remote control.
1 Turn the engine switch off.
2 When the indicator light on the
key surface is not on, press and
hold , or for
approximately 5 seconds while
pressing and holding .
The setting changes each time an
operation is per formed, as shown
below. (When changing the setting
Side doors
The vehicle can be locked
and unlocked using the
entry function, wireless
remote control or door lock
switches.
Unlocking and locking the
doors from the outside
Page 136 of 568

1363-2. Opening, closing and locking the doors
side the cabin and the door will
become lockable from the outside,
possibly trapping the electronic
key inside the vehicle.
●As long as the electronic key is
within the effective range, the
doors may be locked or unlocked
by anyone. However, only the
doors detecting the electronic key
can be used to unlock the vehicle.
●Even if the electronic key is not
inside the vehicle, it may be possi-
ble to start the engine if the elec-
tronic key is near the window.
●The doors may unlock or lock if a
large amount of water splashes on
the door handle, such as in the
rain or in a car wash when the
electronic key is w ithin the effec-
tive range. (The doors will auto-
matically be locked after
approximately 60 seconds if the
doors are not opened and closed.)
●If the wireless remote control is
used to lock the doors when the
electronic key is near the vehicle,
there is a possib ility that the door
may not be unlocke d by the entry
function. (Use the wireless remote
control to unloc k the doors.)
●Touching the door lock or unlock
sensor while wearing gloves may
prevent lock or unlock operation.
●When the lock op eration is per-
formed using the lock sensor, rec-
ognition signals will be shown up
to two consecutive times. After
this, no recogniti on signals will be
given.
●If the door handle becomes wet
while the electronic key is within
the effective ran ge, the door may
lock and unlock repeatedly. In that
case, follow the fo llowing correc-
tion procedures to wash the vehi-
cle:
• Place the electronic key in a loca- tion 6 ft. (2 m) or more away from
the vehicle. (Take care to ensure
that the key is not stolen.)
• Set the electronic key to bat- tery-saving mode to disable the
smart key system. (
P.135)
●If the electronic key is inside the
vehicle and a door handle
becomes wet during a car wash, a
message may be shown on the
multi-information display and a
buzzer will sound outside the vehi-
cle. To turn off the alarm, lock all
the doors.
●The lock sensor may not work
properly if it comes into contact
with ice, snow, m ud, etc. Clean
the lock sensor and attempt to
operate it again, or use the lock
sensor on the lower part of the
door handle.
●A sudden handle operation or a
handle operation immediately
after entering the effective range
may prevent the doors from being
unlocked. Touch the door unlock
sensor and check that the doors
are unlocked befo re pulling the
door handle again.
●If there is another electronic key in
the detection area, it may take
slightly longer to unlock the doors
after the door handle is gripped.
■When the vehicle is not driven
for extended periods
●To prevent theft of the vehicle, do
not leave the electronic key within
6 ft. (2 m) of the vehicle.
●The smart key system can be
deactivated in advance. ( P.521)
●Setting the electronic key to bat-
tery-saving mode helps to reduce
key battery depletion. ( P.135)
■To operate the system properly
Make sure to carry the electronic
key when operating the system. Do
not get the electronic key too close
to the vehicle when operating the
system from the out side of the vehi-
cle.
Depending on the position and hold-
ing condition of the electronic key,
the key may not be detected cor-