TOYOTA LAND CRUISER 2007 J200 Navigation Manual
LAND CRUISER 2007 J200
TOYOTA
TOYOTA
https://www.carmanualsonline.info/img/14/6477/w960_6477-0.png
TOYOTA LAND CRUISER 2007 J200 Navigation Manual
Page 104 of 203
xciv
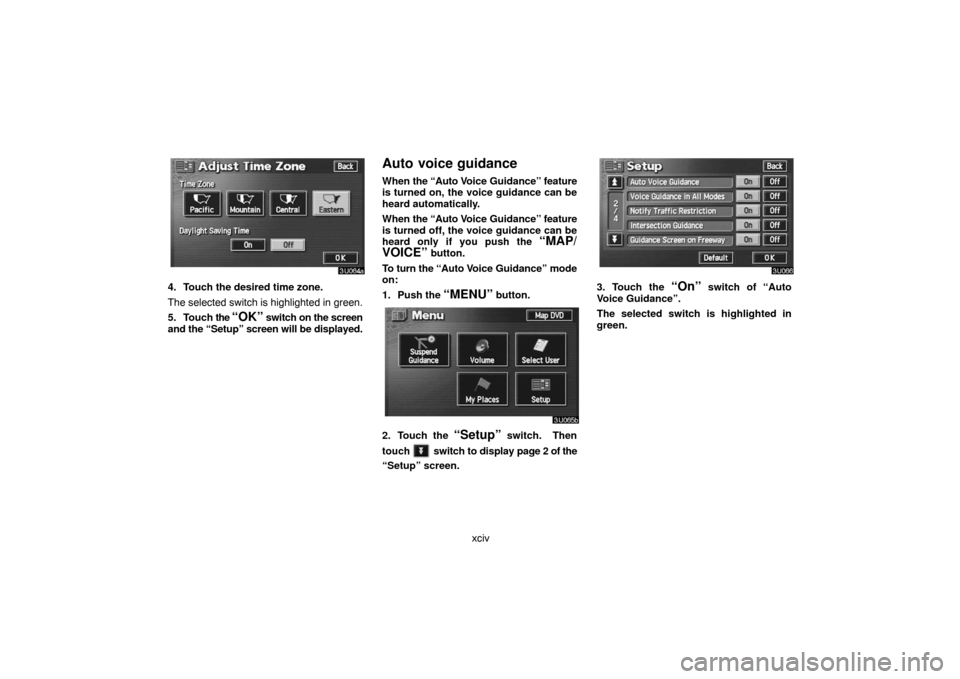
4. Touch the desired time zone.
The selected switch is highlighted in green.
5. Touch the
“OK” switch on the screen
and the “Setup” screen will be displayed.
Auto voice guidance
When the “Auto Voice Guidance” feature
is turned on, the voice guidance can be
heard automatically.
When the “Auto Voice Guidance” feature
is turned off, the voice guidance can be
heard only if you push the
“MAP/
VOICE”
button.
To turn the “Auto Voice Guidance” mode
on:
1. Push the
“MENU” button.
2. Touch the “Setup” switch. Then
touch
switch to display page 2 of the
“Setup” screen.
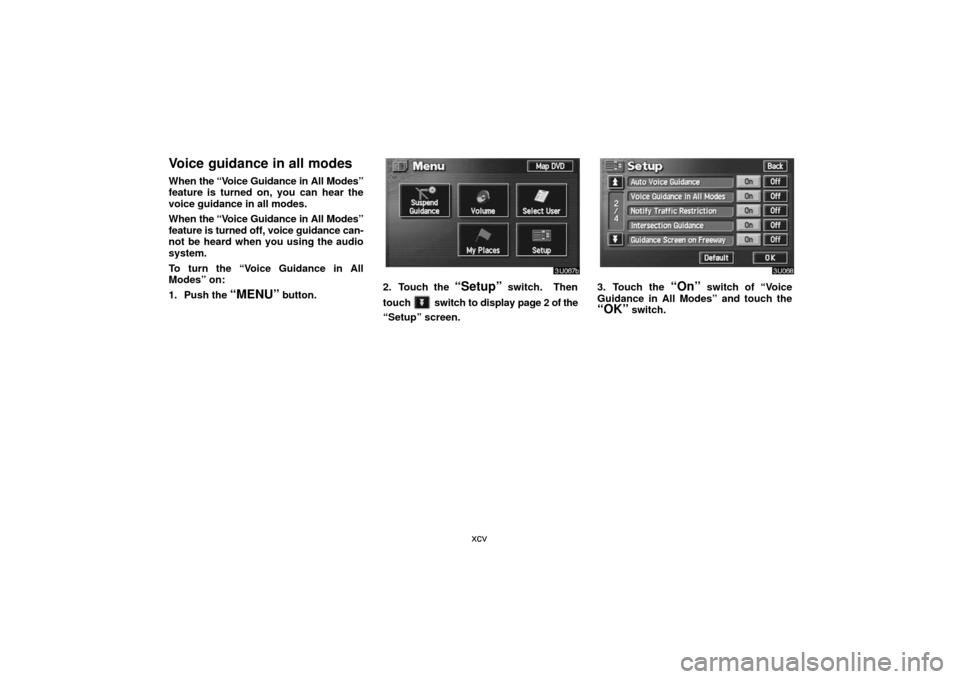
3. Touch the “On” switch of “Auto
Voice Guidance”.
The selected switch is highlighted in
green.
Page 105 of 203
xcv
Voice guidance in all modes
When the “Voice Guidance in All Modes”
feature is turned on, you can hear the
voice guidance in all modes.
When the “Voice Guidance in All Modes”
feature is turned off, voice guidance can-
not be heard when you using the audio
system.
To turn the “Voice Guidance in All
Modes” on:
1. Push the
“MENU” button.2. Touch the “Setup” switch. Then
touch
switch to display page 2 of the
“Setup” screen.
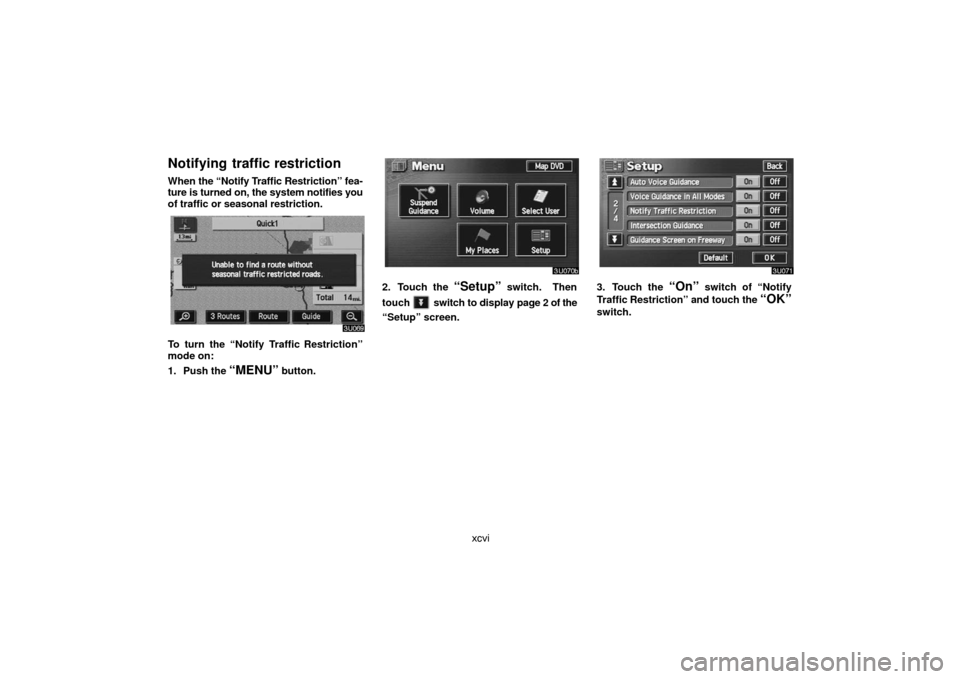
3. Touch the “On” switch of “Voice
Guidance in All Modes” and touch the
“OK” switch.
Page 106 of 203
xcvi
Notifying traffic restriction
When the “Notify Traffic Restriction” fea-
ture is turned on, the system notifies you
of traffic or seasonal restriction.
To turn the “Notify Traffic Restriction”
mode on:
1. Push the
“MENU” button.
2. Touch the “Setup” switch. Then
touch
switch to display page 2 of the
“Setup” screen.
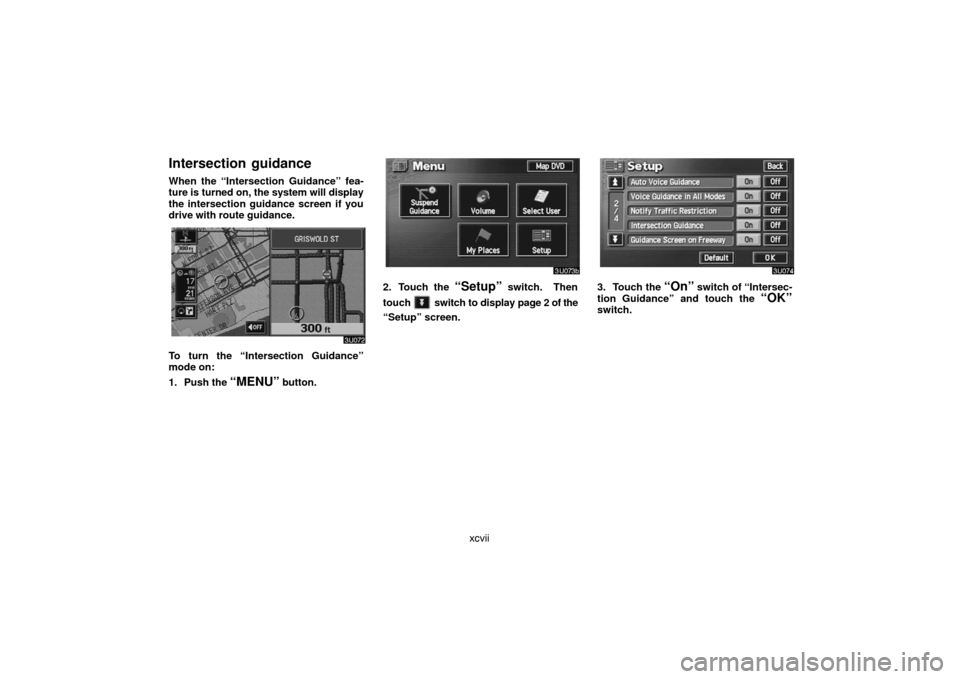
3. Touch the “On” switch of “Notify
Traffic Restriction” and touch the
“OK”
switch.
Page 107 of 203
xcvii
Intersection guidance
When the “Intersection Guidance” fea-
ture is turned on, the system will display
the intersection guidance screen if you
drive with route guidance.
To turn the “Intersection Guidance”
mode on:
1. Push the
“MENU” button.
2. Touch the “Setup” switch. Then
touch
switch to display page 2 of the
“Setup” screen.
3. Touch the “On” switch of “Intersec-
tion Guidance” and touch the
“OK”switch.
Page 108 of 203
xcviii
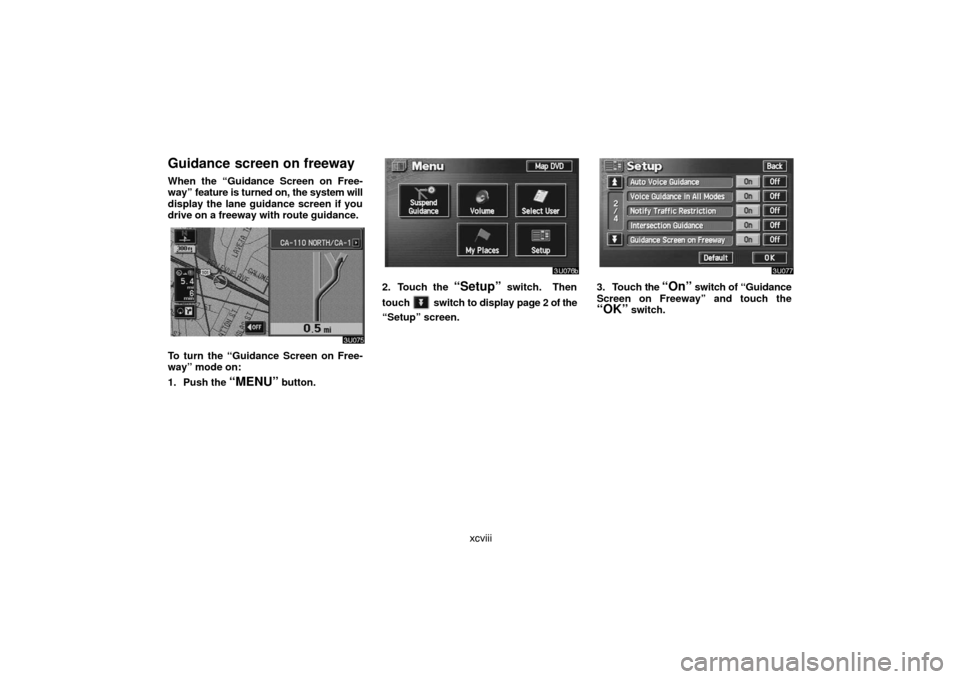
Guidance screen on freeway
When the “Guidance Screen on Free-
way” feature is turned on, the system will
display the lane guidance screen if you
drive on a freeway with route guidance.
To turn the “Guidance Screen on Free-
way” mode on:
1. Push the
“MENU” button.
2. Touch the “Setup” switch. Then
touch
switch to display page 2 of the
“Setup” screen.
3. Touch the “On” switch of “Guidance
Screen on Freeway” and touch the
“OK” switch.
Page 109 of 203
xcix
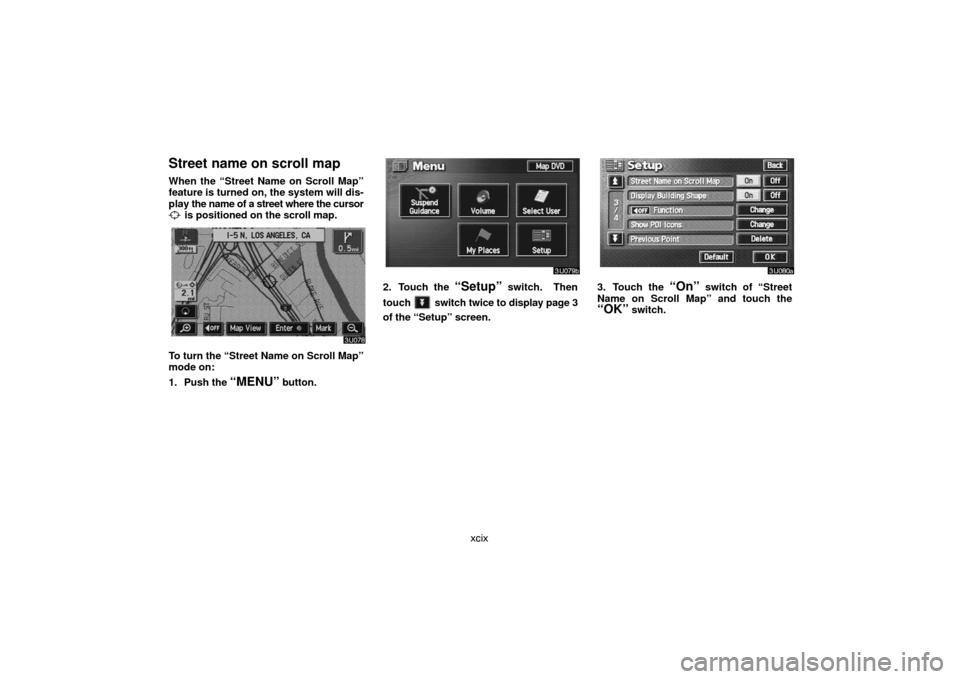
Street name on scroll map
When the “Street Name on Scroll Map”
feature is turned on, the system will dis-
play the name of a street where the cursor
is positioned on the scroll map.
To turn the “Street Name on Scroll Map”
mode on:
1. Push the
“MENU” button.
2. Touch the “Setup” switch. Then
touch
switch twice to display page 3
of the “Setup” screen.
3. Touch the “On” switch of “Street
Name on Scroll Map” and touch the
“OK” switch.
Page 110 of 203
c
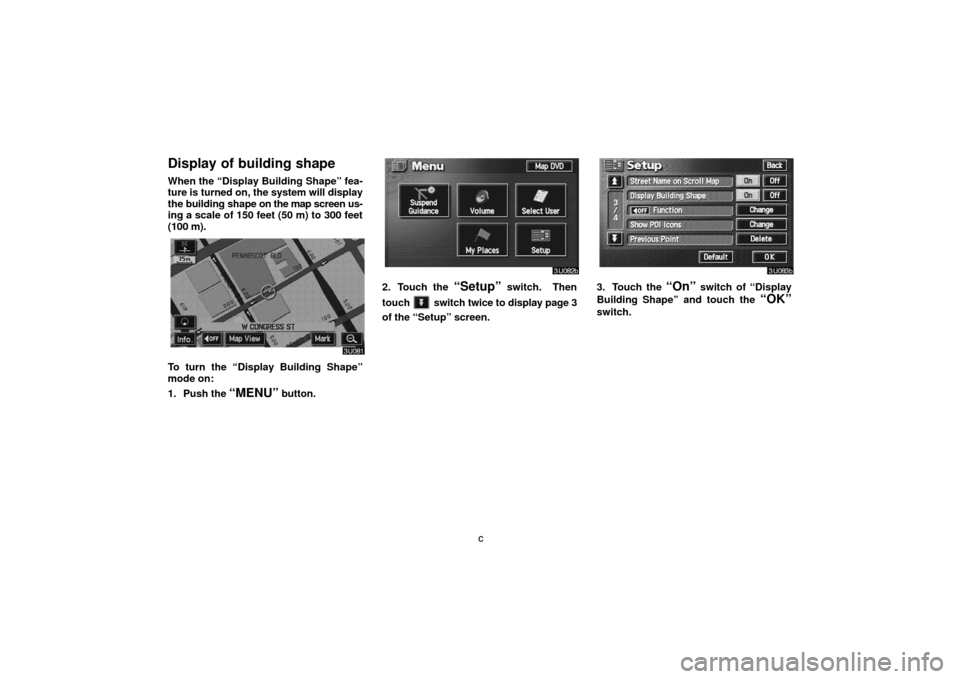
Display of building shape
When the “Display Building Shape” fea-
ture is turned on, the system will display
the building shape on the map screen us-
ing a scale of 150 feet (50 m) to 300 feet
(100 m).
To turn the “Display Building Shape”
mode on:
1. Push the
“MENU” button.
2. Touch the “Setup” switch. Then
touch
switch twice to display page 3
of the “Setup” screen.
3. Touch the “On” switch of “Display
Building Shape” and touch the
“OK”
switch.
Page 111 of 203
ci
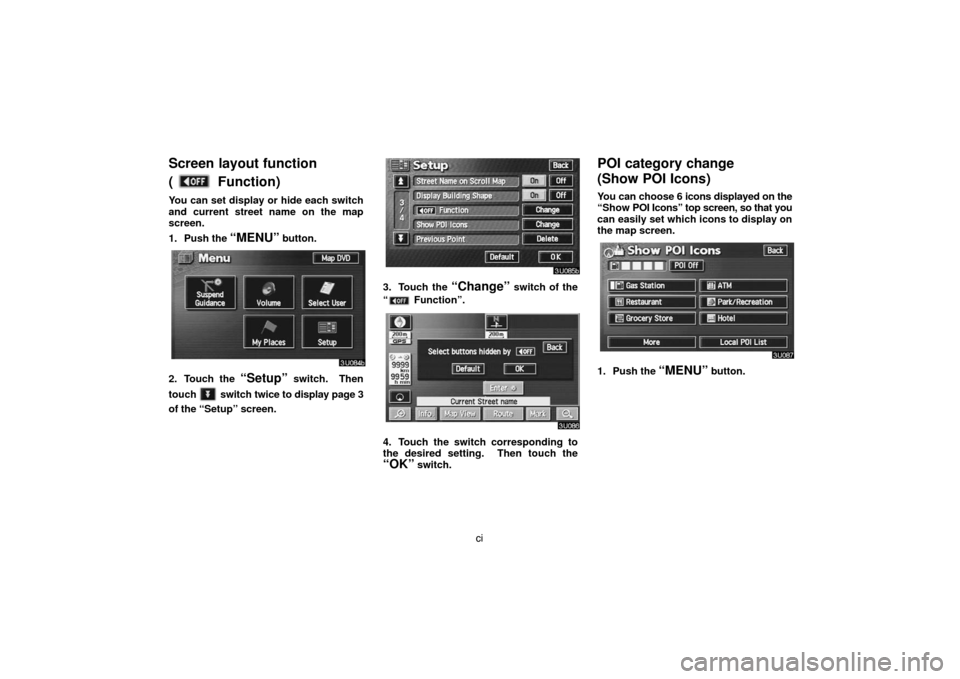
Screen layout function
(
Function)
You can set display or hide each switch
and current street name on the map
screen.
1. Push the
“MENU” button.
2. Touch the “Setup” switch. Then
touch
switch twice to display page 3
of the “Setup” screen.
3. Touch the “Change” switch of the
“
Function”.
4. Touch the switch corresponding to
the desired setting. Then touch the
“OK” switch.
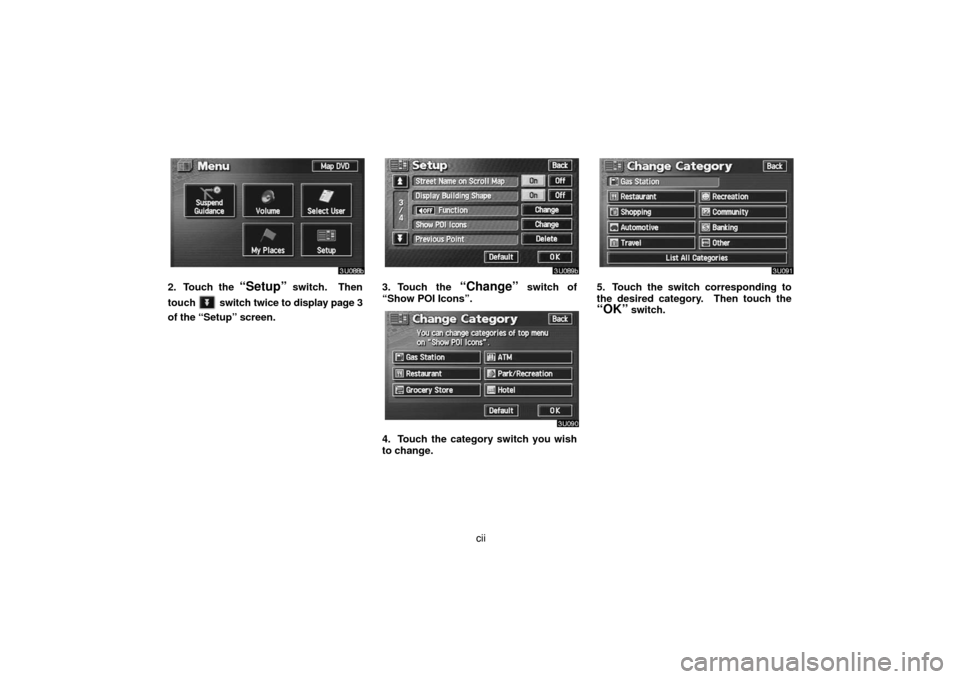
POI category change
(Show POI Icons)
You can choose 6 icons displayed on the
“Show POI Icons” top screen, so that you
can easily set which icons to display on
the map screen.
1. Push the “MENU” button.
Page 112 of 203
cii
2. Touch the “Setup” switch. Then
touch
switch twice to display page 3
of the “Setup” screen.
3. Touch the “Change” switch of
“Show POI Icons”.
4. Touch the category switch you wish
to change.
5. Touch the switch corresponding to
the desired category. Then touch the
“OK” switch.
Page 113 of 203
ciii
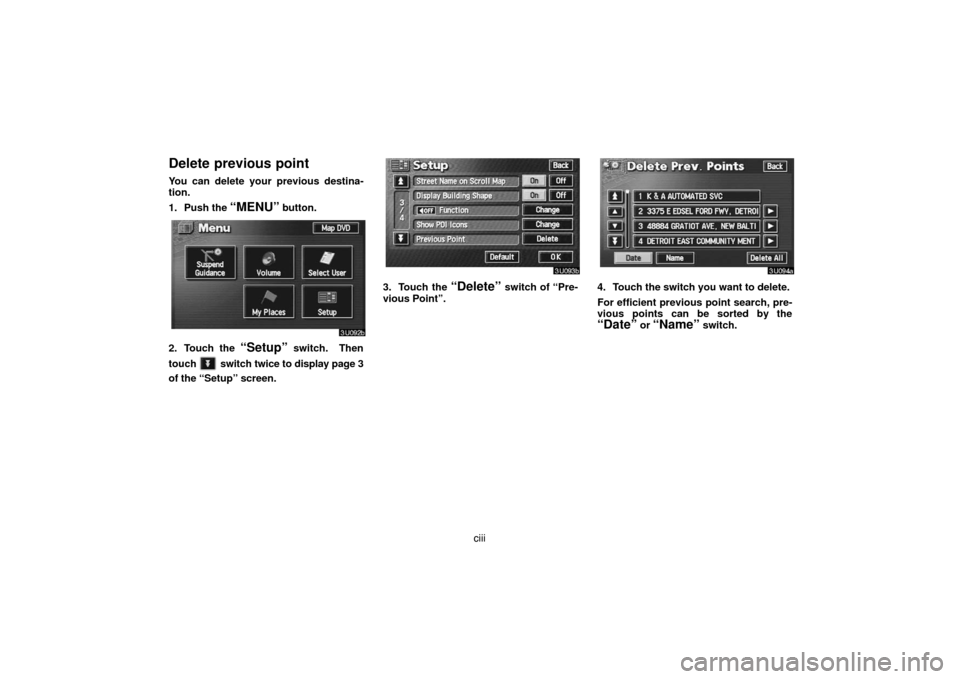
Delete previous point
You can delete your previous destina-
tion.
1. Push the
“MENU” button.
2. Touch the “Setup” switch. Then
touch
switch twice to display page 3
of the “Setup” screen.
3. Touch the “Delete” switch of “Pre-
vious Point”.4. Touch the switch you want to delete.
For efficient previous point search, pre-
vious points can be sorted by the
“Date” or “Name” switch.
