display TOYOTA LAND CRUISER 2015 J200 Navigation Manual
[x] Cancel search | Manufacturer: TOYOTA, Model Year: 2015, Model line: LAND CRUISER, Model: TOYOTA LAND CRUISER 2015 J200Pages: 427, PDF Size: 7.69 MB
Page 373 of 427
373
2. TOYOTA PARKING ASSIST MONITOR
10
L/C200_Navi_OM60M04U_(U)
14.05.28 15:38
PERIPHERAL MONITORING SYSTEM
3. PERPENDICULAR PARKING (PARKING ASSIST GUIDE LINE DISPLAY MODE)
w
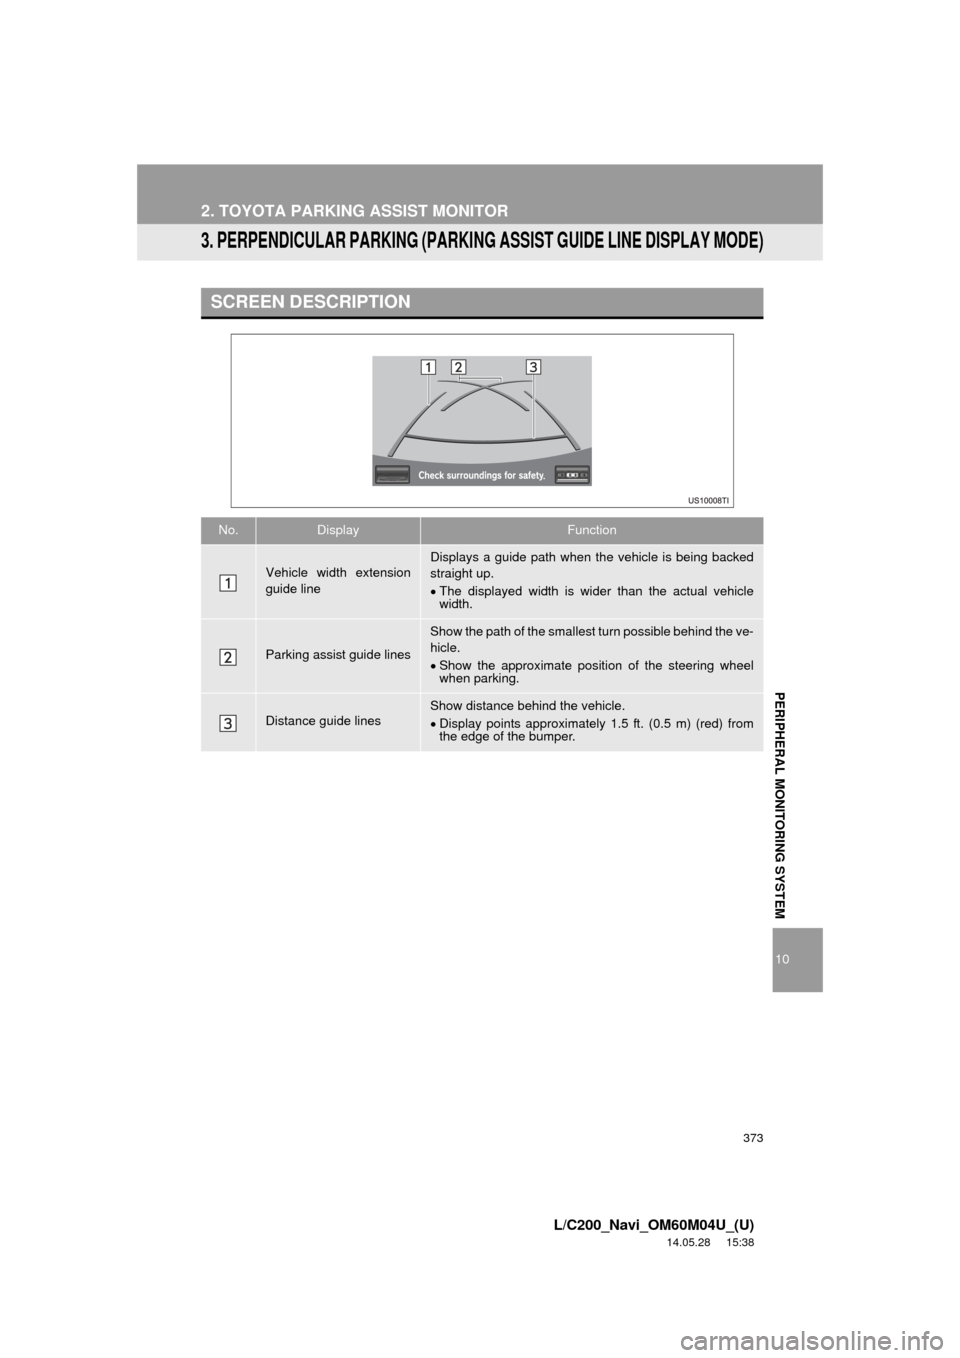
SCREEN DESCRIPTION
No.DisplayFunction
Vehicle width extension
guide lineDisplays a guide path when the vehicle is being backed
straight up.
The displayed width is wider than the actual vehicle
width.
Parking assist guide lines
Show the path of the smallest turn possible behind the ve-
hicle.
Show the approximate position of the steering wheel
when parking.
Distance guide linesShow distance behind the vehicle.
Display points approximately 1.5 ft. (0.5 m) (red) from
the edge of the bumper.
Page 375 of 427
375
2. TOYOTA PARKING ASSIST MONITOR
10
L/C200_Navi_OM60M04U_(U)
14.05.28 15:38
PERIPHERAL MONITORING SYSTEM
4. PARALLEL PARKING
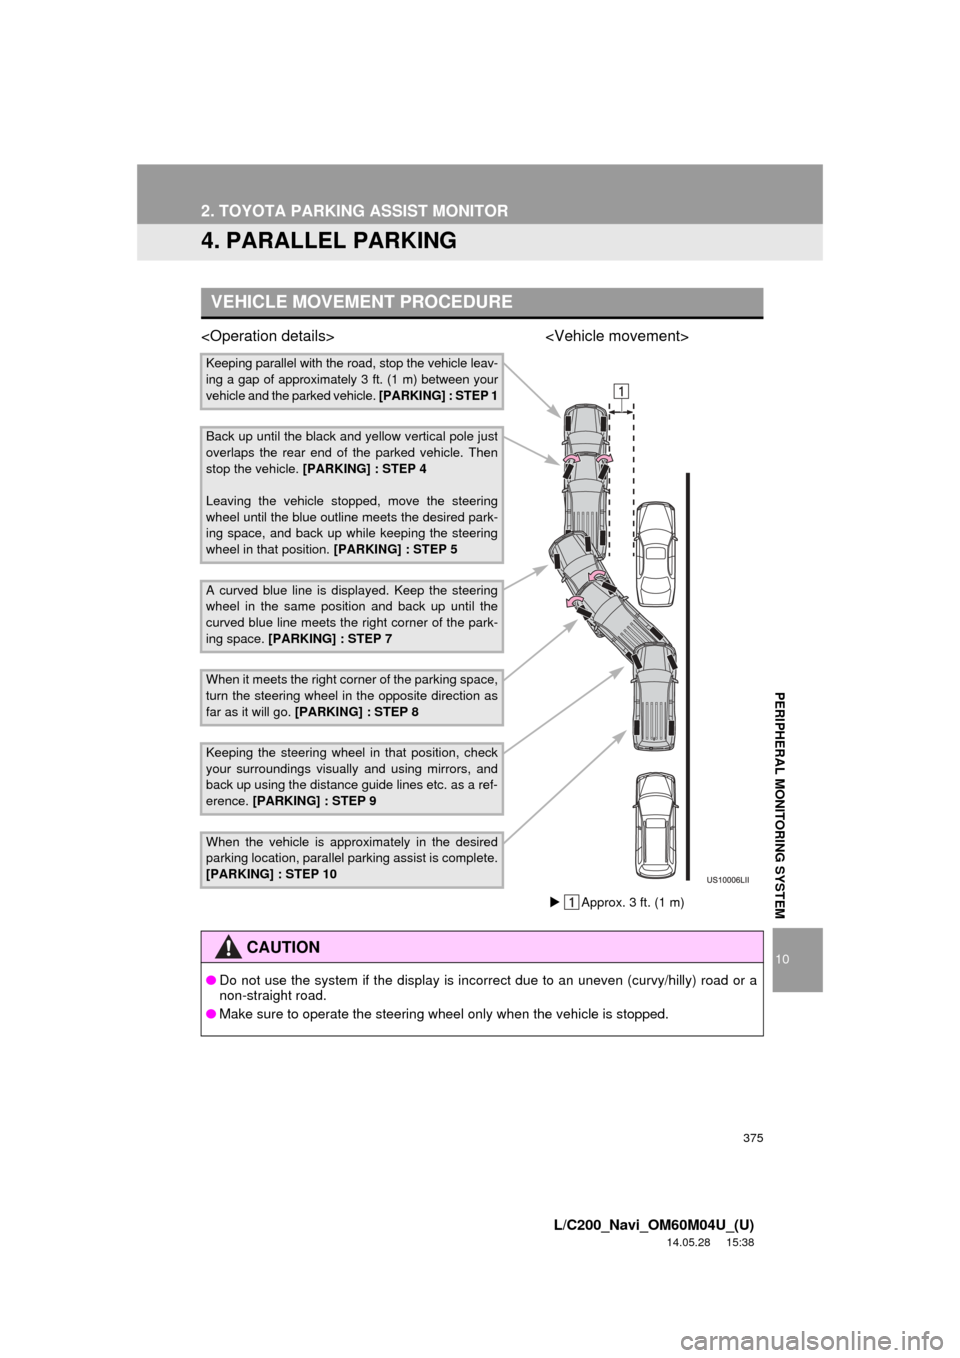
VEHICLE MOVEMENT PROCEDURE
Keeping parallel with the road, stop the vehicle leav-
ing a gap of approximately 3 ft. (1 m) between your
vehicle and the parked vehicle. [PARKING] : STEP 1
Back up until the black and yellow vertical pole just
overlaps the rear end of the parked vehicle. Then
stop the vehicle. [PARKING] : STEP 4
Leaving the vehicle stopped, move the steering
wheel until the blue outline meets the desired park-
ing space, and back up while keeping the steering
wheel in that position. [PARKING] : STEP 5
A curved blue line is displayed. Keep the steering
wheel in the same position and back up until the
curved blue line meets the right corner of the park-
ing space. [PARKING] : STEP 7
When it meets the right corner of the parking space,
turn the steering wheel in the opposite direction as
far as it will go. [PARKING] : STEP 8
Keeping the steering wheel in that position, check
your surroundings visually and using mirrors, and
back up using the distance guide lines etc. as a ref-
erence. [PARKING] : STEP 9
When the vehicle is approximately in the desired
parking location, parallel parki ng assist is complete.
[PARKING] : STEP 10
CAUTION
● Do not use the system if the display is incorrect due to an uneven (curvy/hilly) road or a
non-straight road.
● Make sure to operate the steering wheel only when the vehicle is stopped.
Approx. 3 ft. (1 m)
Page 376 of 427
376
2. TOYOTA PARKING ASSIST MONITOR
L/C200_Navi_OM60M04U_(U)
14.05.28 15:38
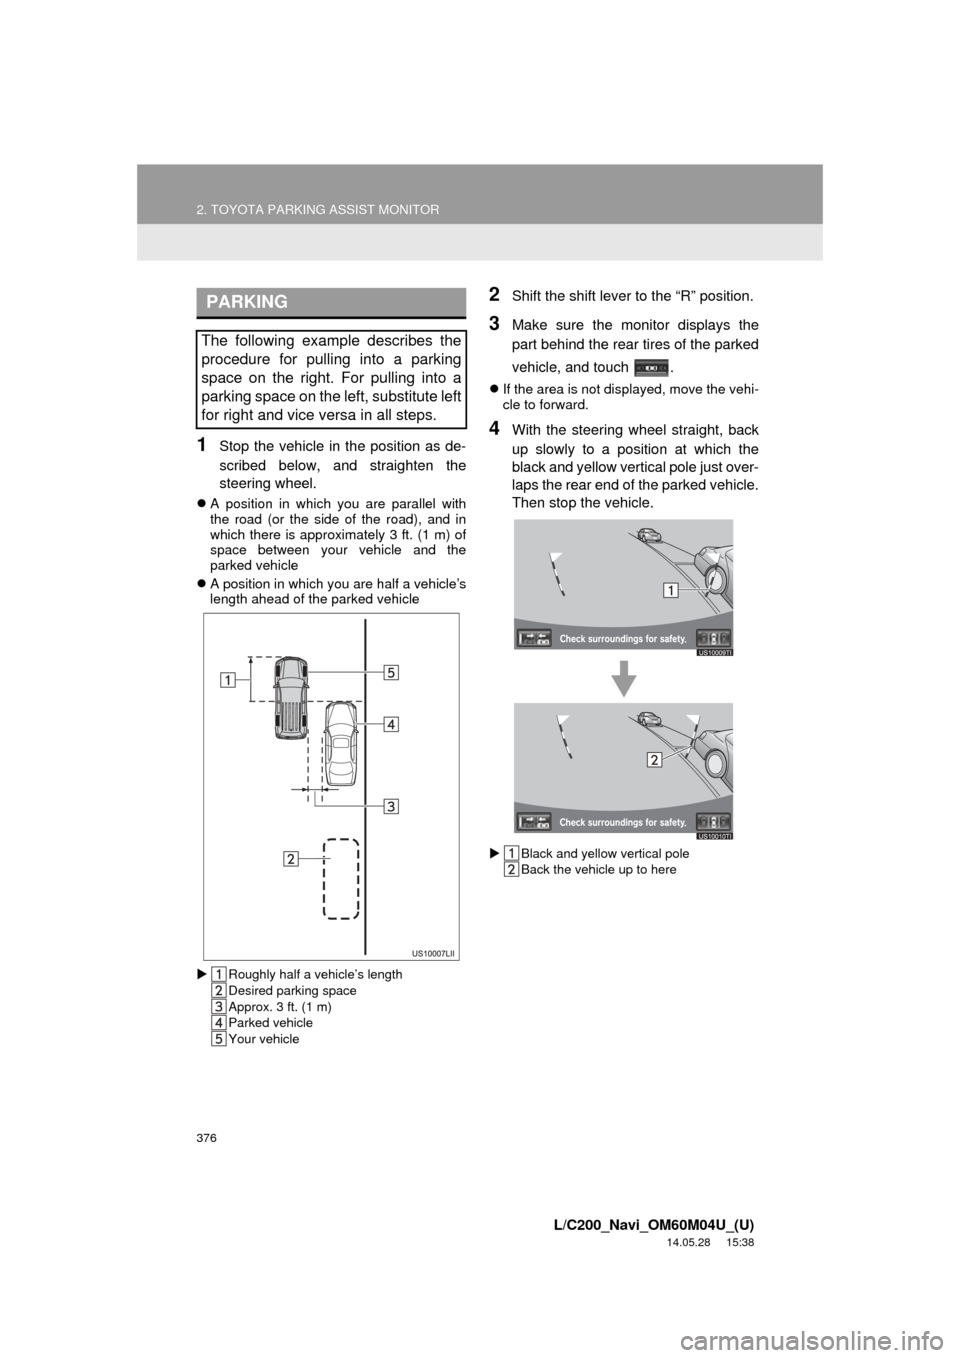
1Stop the vehicle in the position as de-
scribed below, and straighten the
steering wheel.
A position in which you are parallel with
the road (or the side of the road), and in
which there is approximately 3 ft. (1 m) of
space between your vehicle and the
parked vehicle
A position in which you are half a vehicle’s
length ahead of the parked vehicle
Roughly half a v ehicle’s length
Desired parking space
Approx. 3 ft. (1 m)
Parked vehicle
Your vehicle
2Shift the shift lever to the “R” position.
3Make sure the monitor displays the
part behind the rear tires of the parked
vehicle, and touch .
If the area is not displayed, move the vehi-
cle to forward.
4With the steering wheel straight, back
up slowly to a position at which the
black and yellow vertical pole just over-
laps the rear end of the parked vehicle.
Then stop the vehicle.
Black and yellow vertical pole
Back the vehicle up to here
PARKING
The following example describes the
procedure for pulling into a parking
space on the right. For pulling into a
parking space on the left, substitute left
for right and vice versa in all steps.
Page 377 of 427
377
2. TOYOTA PARKING ASSIST MONITOR
10
PERIPHERAL MONITORING SYSTEM
L/C200_Navi_OM60M04U_(U)
14.05.28 15:38
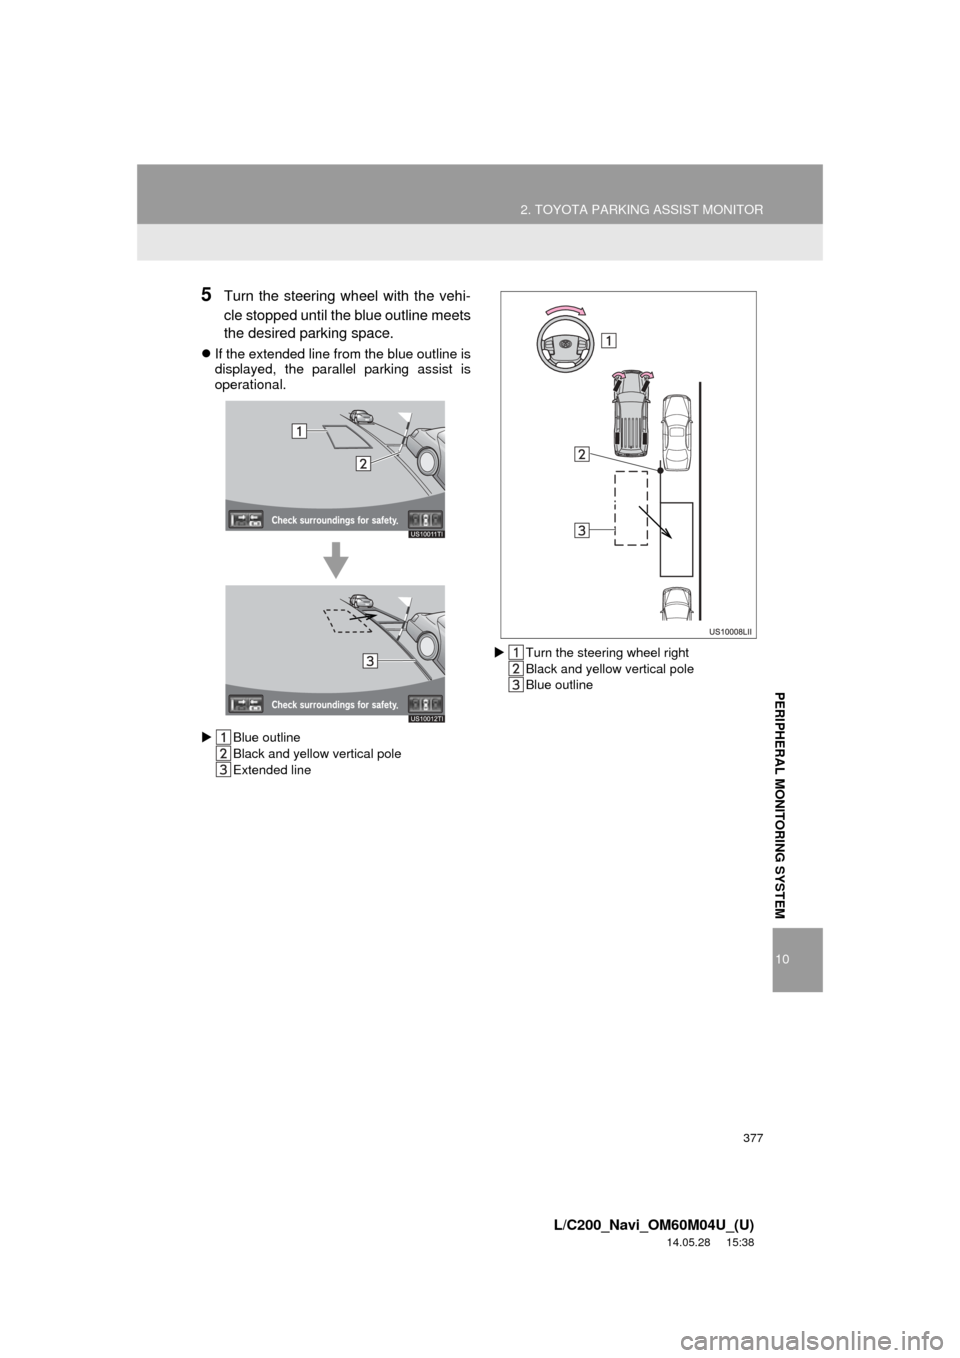
5Turn the steering wheel with the vehi-
cle stopped until the blue outline meets
the desired parking space.
If the extended line from the blue outline is
displayed, the parallel parking assist is
operational.
Blue outline
Black and yellow vertical pole
Extended line
Turn the steering wheel right
Black and yellow vertical pole
Blue outline
Page 380 of 427
380
2. TOYOTA PARKING ASSIST MONITOR
L/C200_Navi_OM60M04U_(U)
14.05.28 15:38
9When the screen changes, keep the
steering wheel in its current position
and back up.
10When the vehicle is parallel with the
road or the shoulder, straighten the
steering wheel.
Check your surroundings visually and
with the mirrors, then back up using the
distance guide lines as a reference,
and stop.
When the vehicle is approximately in the
desired parking location, the parallel park-
ing assist is complete.
1Touch .
If the intuitive parking assist detects an
object while you attempt to park in a park-
ing space on the left, the black and yellow
vertical pole could be obscured by the
intuitive parking assist display. In this
event, turn the intuitive parking assist
switch off (For details, refer to “Owner’s
Manual”.), and operate the vehicle while
checking the safety of the surrounding
area direct visually and with mirror. After
the operation, turn the switch on.
The steering wheel has been turned too
far, and the system cannot function.
Return the steering wheel to its original
position.
If the message is displayed before the out-
line is positioned over the desired parking
space, it is likely that the vehicle is too far
away from the shoulder. Check that there
is a gap of approximately 3 ft. (1 m)
between your vehicle and the parked vehi-
cle.
CAUTION
●When backing up, be careful not to hit
any obstacles with your vehicle. Back
the vehicle up slowly.
INFORMATION
●There is a possibility that parallel parking
guidance may not be given when back-
ing up at a very slow speed.
● If the back door is opened, the parallel
parking assist will be discontinued half-
way.
CANCELING PARALLEL
PARKING ASSIST
VEHICLES EQUIPPED WITH
INTUITIVE PARKING ASSIST
IF THE MESSAGE “Steering
wheel turned too far, please
return.” IS DISPLAYED
Page 381 of 427
381
2. TOYOTA PARKING ASSIST MONITOR
10
PERIPHERAL MONITORING SYSTEM
L/C200_Navi_OM60M04U_(U)
14.05.28 15:38
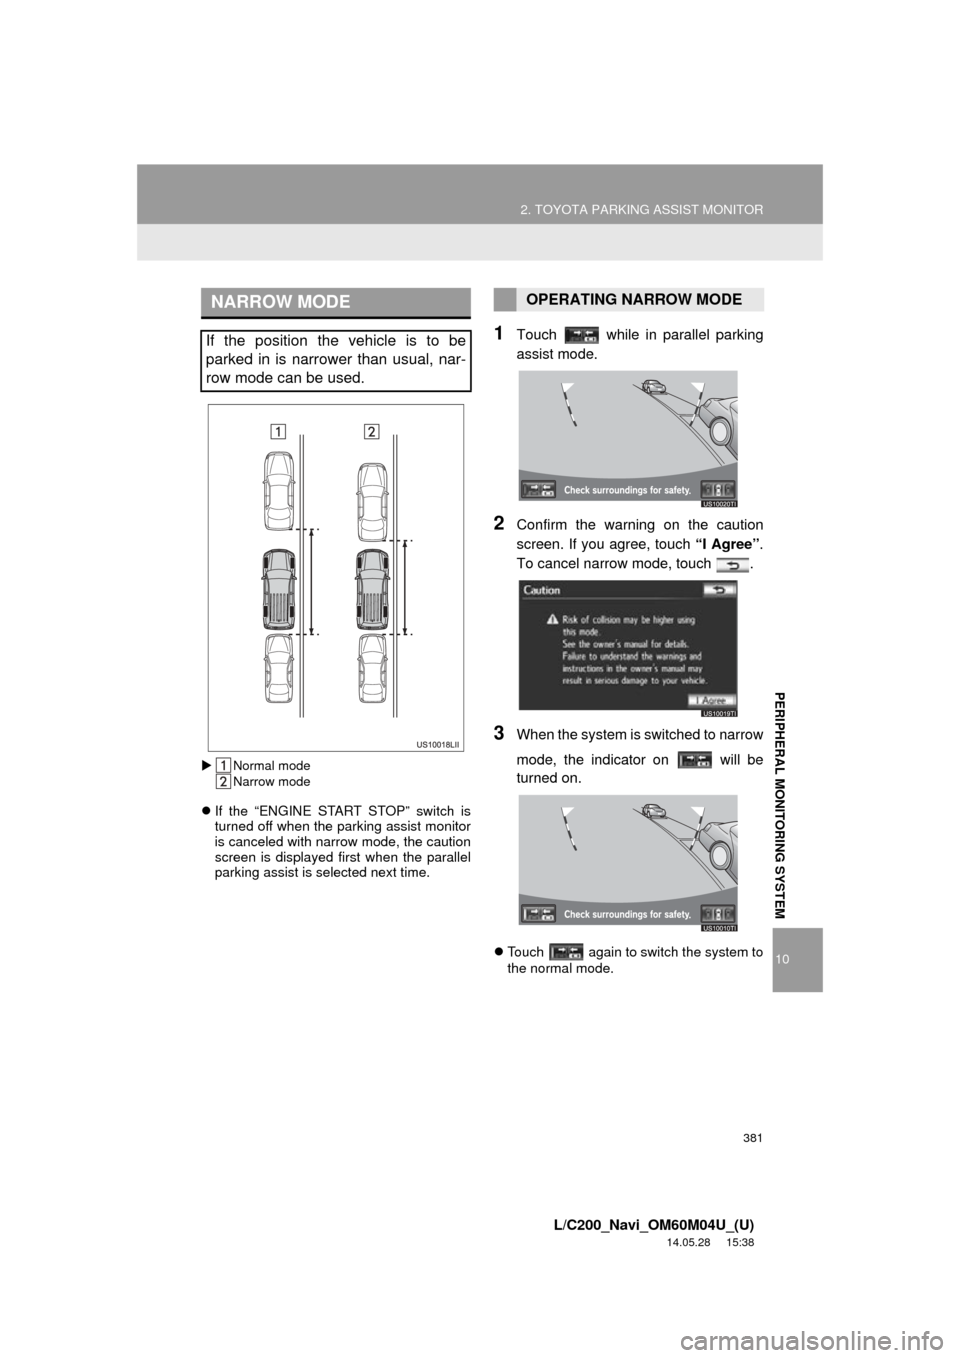
Normal mode
Narrow mode
If the “ENGINE START STOP” switch is
turned off when the parking assist monitor
is canceled with narrow mode, the caution
screen is displayed first when the parallel
parking assist is selected next time.
1Touch while in parallel parking
assist mode.
2Confirm the warning on the caution
screen. If you agree, touch “I Agree”.
To cancel narrow mode, touch .
3When the system is s witched to narrow
mode, the indicator on will be
turned on.
Touch again to switch the system to
the normal mode.
NARROW MODE
If the position the vehicle is to be
parked in is narrower than usual, nar-
row mode can be used.
OPERATING NARROW MODE
Page 382 of 427
382
2. TOYOTA PARKING ASSIST MONITOR
L/C200_Navi_OM60M04U_(U)
14.05.28 15:38
5. TOYOTA PARKING ASSI ST MONITOR PRECAUTIONS
The image adjustment procedure for the
parking assist monitor screen is the same
as the procedure for adjusting the naviga-
tion screen. (See page 31.)
AREA DISPLAYED ON
SCREEN
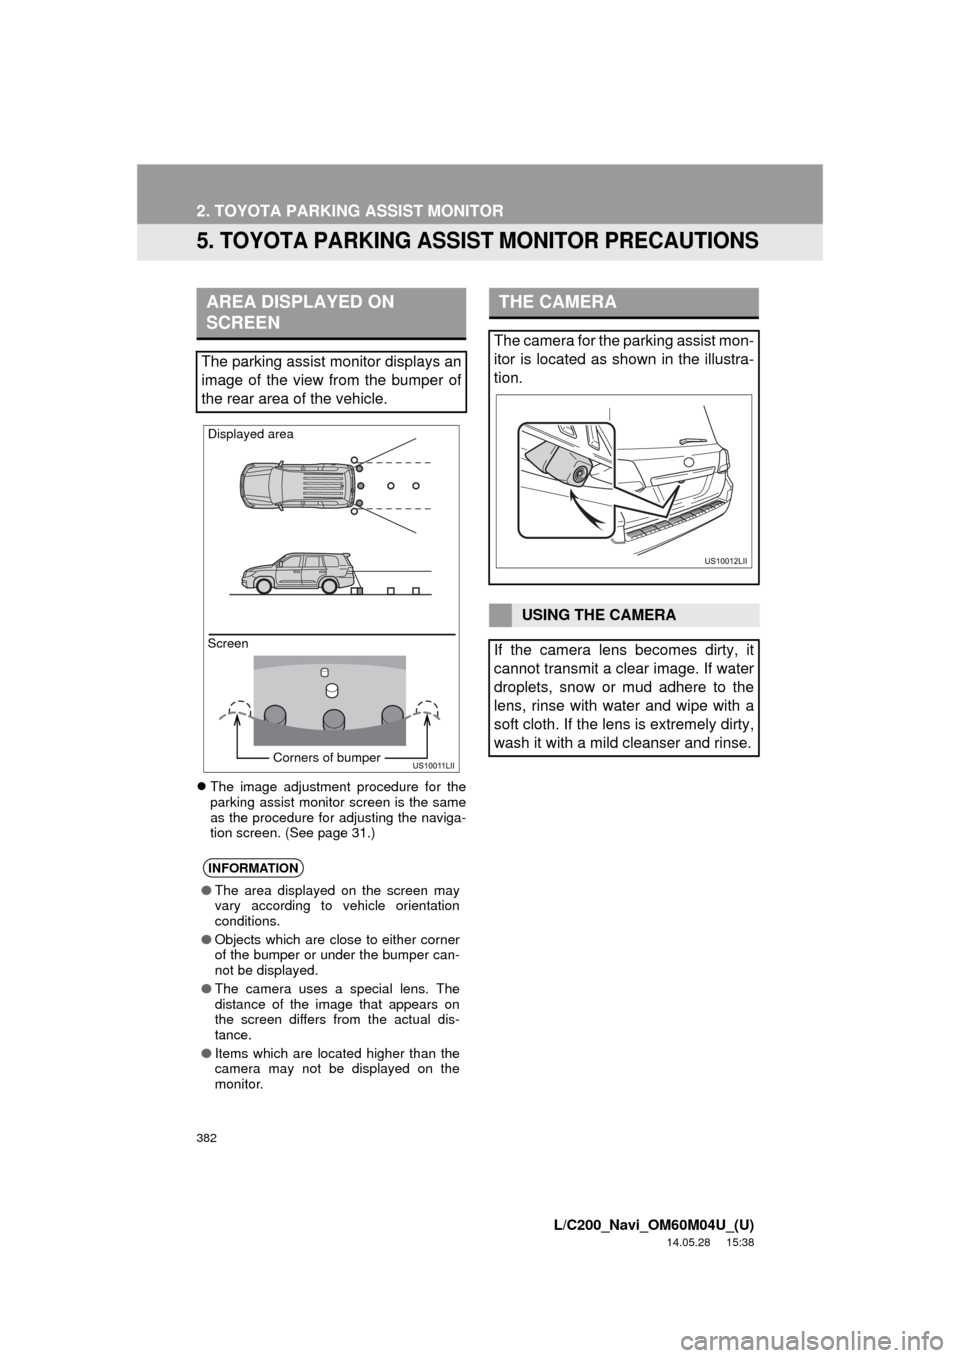
The parking assist monitor displays an
image of the view from the bumper of
the rear area of the vehicle.
INFORMATION
● The area displayed on the screen may
vary according to vehicle orientation
conditions.
● Objects which are close to either corner
of the bumper or under the bumper can-
not be displayed.
● The camera uses a special lens. The
distance of the image that appears on
the screen differs from the actual dis-
tance.
● Items which are located higher than the
camera may not be displayed on the
monitor.
Screen Displayed area
Corners of bumper
THE CAMERA
The camera for the parking assist mon-
itor is located as shown in the illustra-
tion.
USING THE CAMERA
If the camera lens becomes dirty, it
cannot transmit a clear image. If water
droplets, snow or mud adhere to the
lens, rinse with water and wipe with a
soft cloth. If the lens is extremely dirty,
wash it with a mild cleanser and rinse.
Page 388 of 427
388
2. TOYOTA PARKING ASSIST MONITOR
L/C200_Navi_OM60M04U_(U)
14.05.28 15:38
The guide lines are very far
out of alignmentThe camera position is out of
alignment.Have the vehicle inspected by
your Toyota dealer.
The vehicle is tilted (there is
a heavy load on the vehicle,
tire pressure is low due to a
tire puncture, etc.)
The vehicle is used on an
incline.If this happens due to these
causes, it does not indicate a
malfunction.
Back up while visually check-
ing the vehicle’s surround-
ings.
The estimated course lines
move even though the steer-
ing wheel is straightThere is a malfunction in the
signals being output by the
steering sensor.Have the vehicle inspected by
your Toyota dealer.
Guide lines are not displayedThe back door is open.Close the back door.
If this does not resolve the
symptom, have the vehicle in-
spected by your Toyota deal-
er.
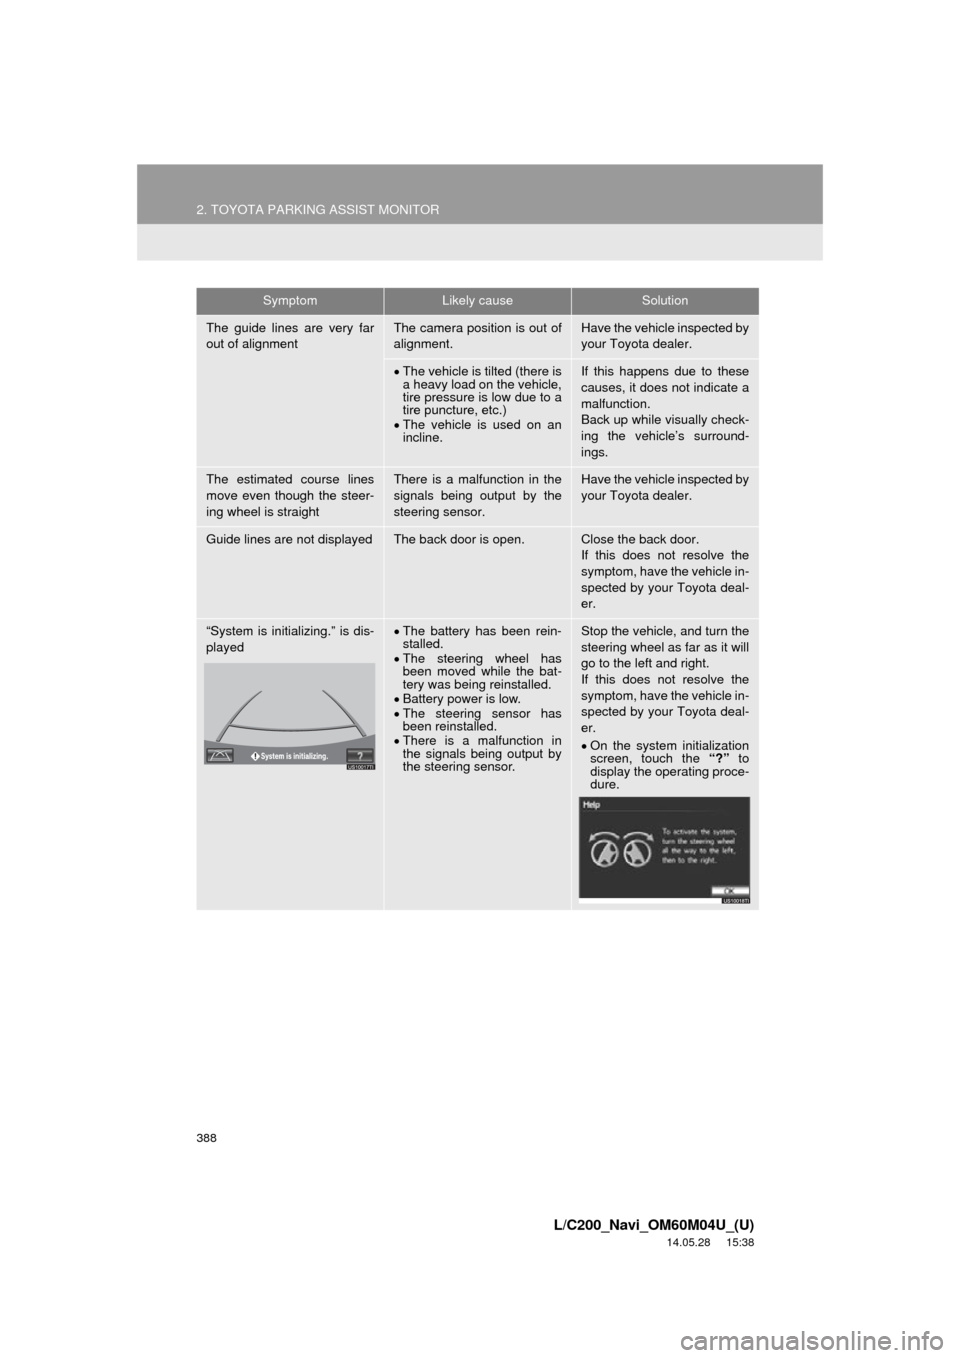
“System is initializing.” is dis-
playedThe battery has been rein-
stalled.
The steering wheel has
been moved while the bat-
tery was being reinstalled.
Battery power is low.
The steering sensor has
been reinstalled.
There is a malfunction in
the signals being output by
the steering sensor.Stop the vehicle, and turn the
steering wheel as far as it will
go to the left and right.
If this does not resolve the
symptom, have the vehicle in-
spected by your Toyota deal-
er.
On the system initialization
screen, touch the “?” to
display the operating proce-
dure.
SymptomLikely causeSolution
Page 391 of 427
391
L/C200_Navi_OM60M04U_(U)
14.05.01 20:55
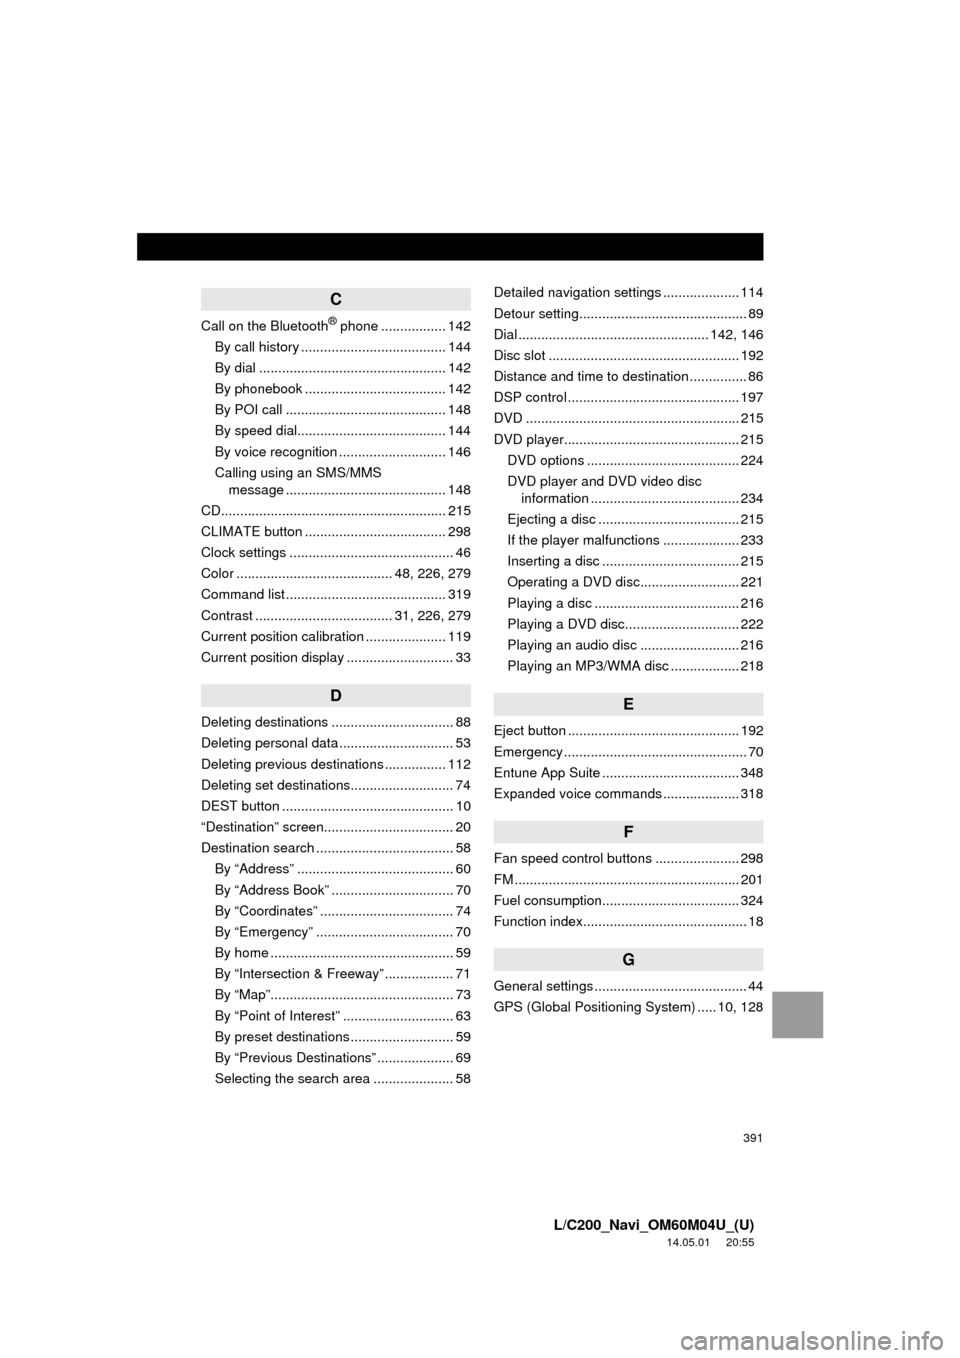
C
Call on the Bluetooth® phone ................. 142
By call history ...................................... 144
By dial ................................................. 142
By phonebook ..................................... 142
By POI call .......................................... 148
By speed dial....................................... 144
By voice recognition ............................ 146
Calling using an SMS/MMS message .......................................... 148
CD........................................................... 215
CLIMATE button ..................................... 298
Clock settings ........................................... 46
Color ......................................... 48, 226, 279
Command list .......................................... 319
Contrast .................................... 31, 226, 279
Current position calibration ..................... 119
Current position display ............................ 33
D
Deleting destinations ................................ 88
Deleting personal data .............................. 53
Deleting previous destinations ................ 112
Deleting set destinations........................... 74
DEST button ............................................. 10
“Destination” screen.................................. 20
Destination search .................................... 58 By “Address” ......................................... 60
By “Address Book” ................................ 70
By “Coordinates” ................................... 74
By “Emergency” .................................... 70
By home ................................................ 59
By “Intersection & Freeway” .................. 71
By “Map”................................................ 73
By “Point of Interest” ............................. 63
By preset destinations ........................... 59
By “Previous Destinations” .................... 69
Selecting the search area ..................... 58 Detailed navigation settings .................... 114
Detour setting............................................ 89
Dial .................................................. 142, 146
Disc slot .................................................. 192
Distance and time to destination ............... 86
DSP control ............................................. 197
DVD ........................................................ 215
DVD player.............................................. 215
DVD options ........................................ 224
DVD player and DVD video disc information ....................................... 234
Ejecting a disc ..................................... 215
If the player malfunctions .................... 233
Inserting a disc .................................... 215
Operating a DVD disc.......................... 221
Playing a disc ...................................... 216
Playing a DVD disc.............................. 222
Playing an audio disc .......................... 216
Playing an MP3/WMA disc .................. 218
E
Eject button ............................................. 192
Emergency ................................................ 70
Entune App Suite .................................... 348
Expanded voice commands .................... 318
F
Fan speed control buttons ...................... 298
FM ........................................................... 201
Fuel consumption.................................... 324
Function index........................................... 18
G
General settings ........................................ 44
GPS (Global Positioning System) ..... 10, 128
Page 392 of 427
392
ALPHABETICAL INDEX
L/C200_Navi_OM60M04U_(U)
14.05.01 20:55
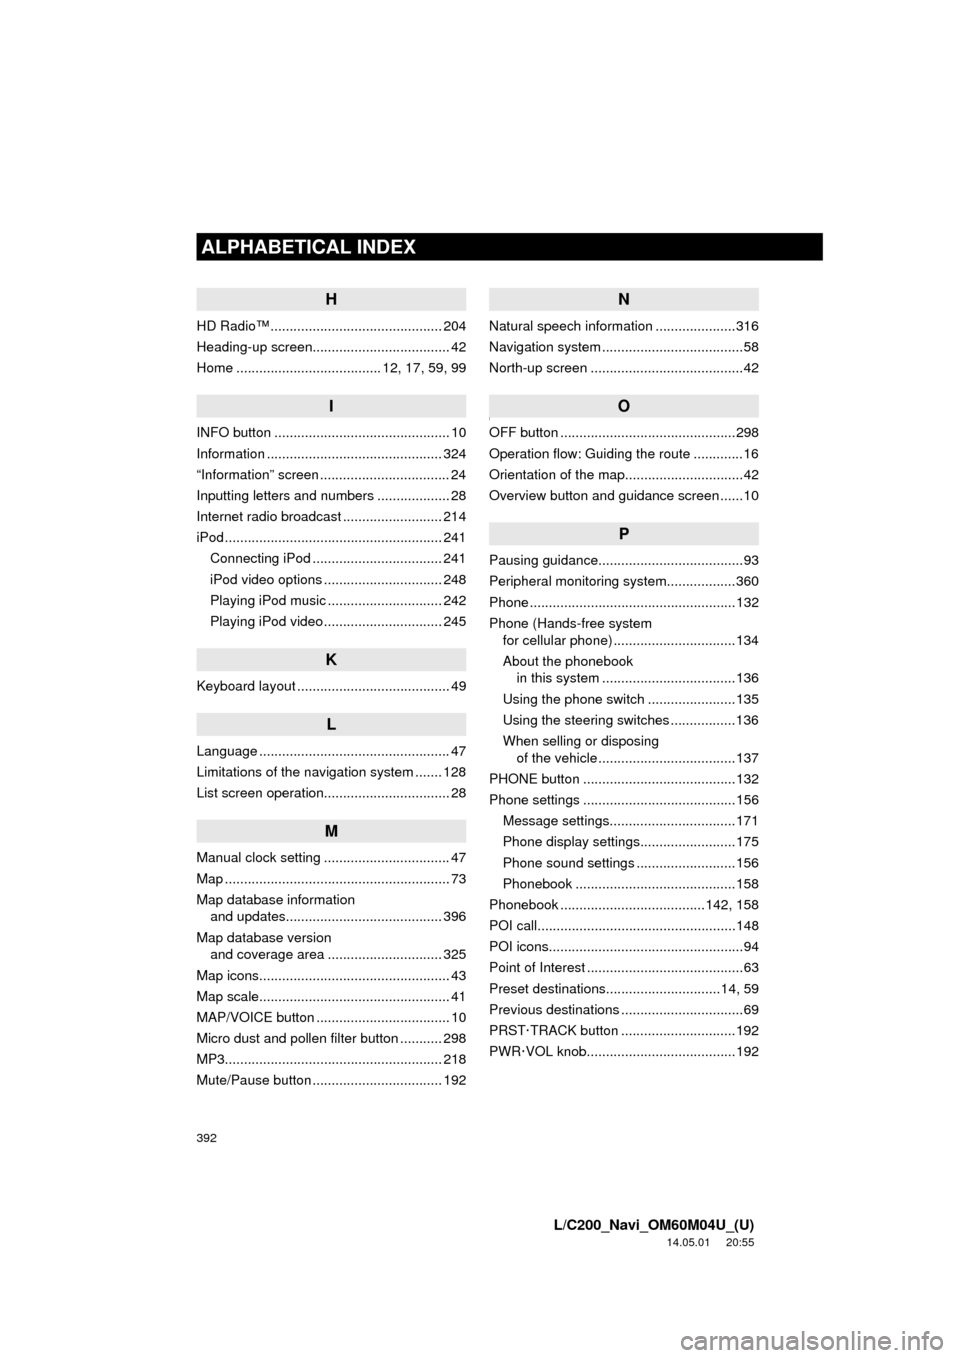
H
HD Radio™ ............................................. 204
Heading-up screen.................................... 42
Home ...................................... 12, 17, 59, 99
I
INFO button .............................................. 10
Information .............................................. 324
“Information” screen .................................. 24
Inputting letters and numbers ................... 28
Internet radio broadcast .......................... 214
iPod ......................................................... 241Connecting iPod .................................. 241
iPod video options ............................... 248
Playing iPod music .............................. 242
Playing iPod video ............................... 245
K
Keyboard layout ........................................ 49
L
Language .................................................. 47
Limitations of the navigation system ....... 128
List screen operation................................. 28
M
Manual clock setting ................................. 47
Map ........................................................... 73
Map database information and updates......................................... 396
Map database version and coverage area .............................. 325
Map icons.................................................. 43
Map scale.................................................. 41
MAP/VOICE button ................................... 10
Micro dust and pollen filter button ........... 298
MP3......................................................... 218
Mute/Pause button .................................. 192
N
Natural speech information .....................316
Navigation system ............ .........................58
North-up screen ........................................42
]O
OFF button ..............................................298
Operation flow: Guiding the route .............16
Orientation of the map...............................42
Overview button and guidance screen ......10
P
Pausing guidance......................................93
Peripheral monitoring syst em..................360
Phone ......................................................132
Phone (Hands-free system for cellular phone) ................................134
About the phonebook in this system ............ .......................136
Using the phone switch .......................135
Using the steering switches .................136
When selling or disposing of the vehicle ....................................137
PHONE button ........................................132
Phone settings ........................................156 Message settings.................................171
Phone display settings.........................175
Phone sound settings ..........................156
Phonebook ..........................................158
Phonebook ......................................142, 158
POI call....................................................148
POI icons...................................................94
Point of Interest .........................................63
Preset destinations..............................14, 59
Previous destinations ................................69
PRST·TRACK button ..............................192
PWR·VOL knob.......................................192