TOYOTA LAND CRUISER 2015 J200 Owners Manual
LAND CRUISER 2015 J200
TOYOTA
TOYOTA
https://www.carmanualsonline.info/img/14/6504/w960_6504-0.png
TOYOTA LAND CRUISER 2015 J200 Owners Manual
Trending: keyless entry, horn, snow chains, brake fluid, run flat, tire pressure reset, automatic transmission fluid
Page 581 of 728
581
4-3. Do-it-yourself maintenance
4
Maintenance and care
LC200_OM_OM60L83U_(U)
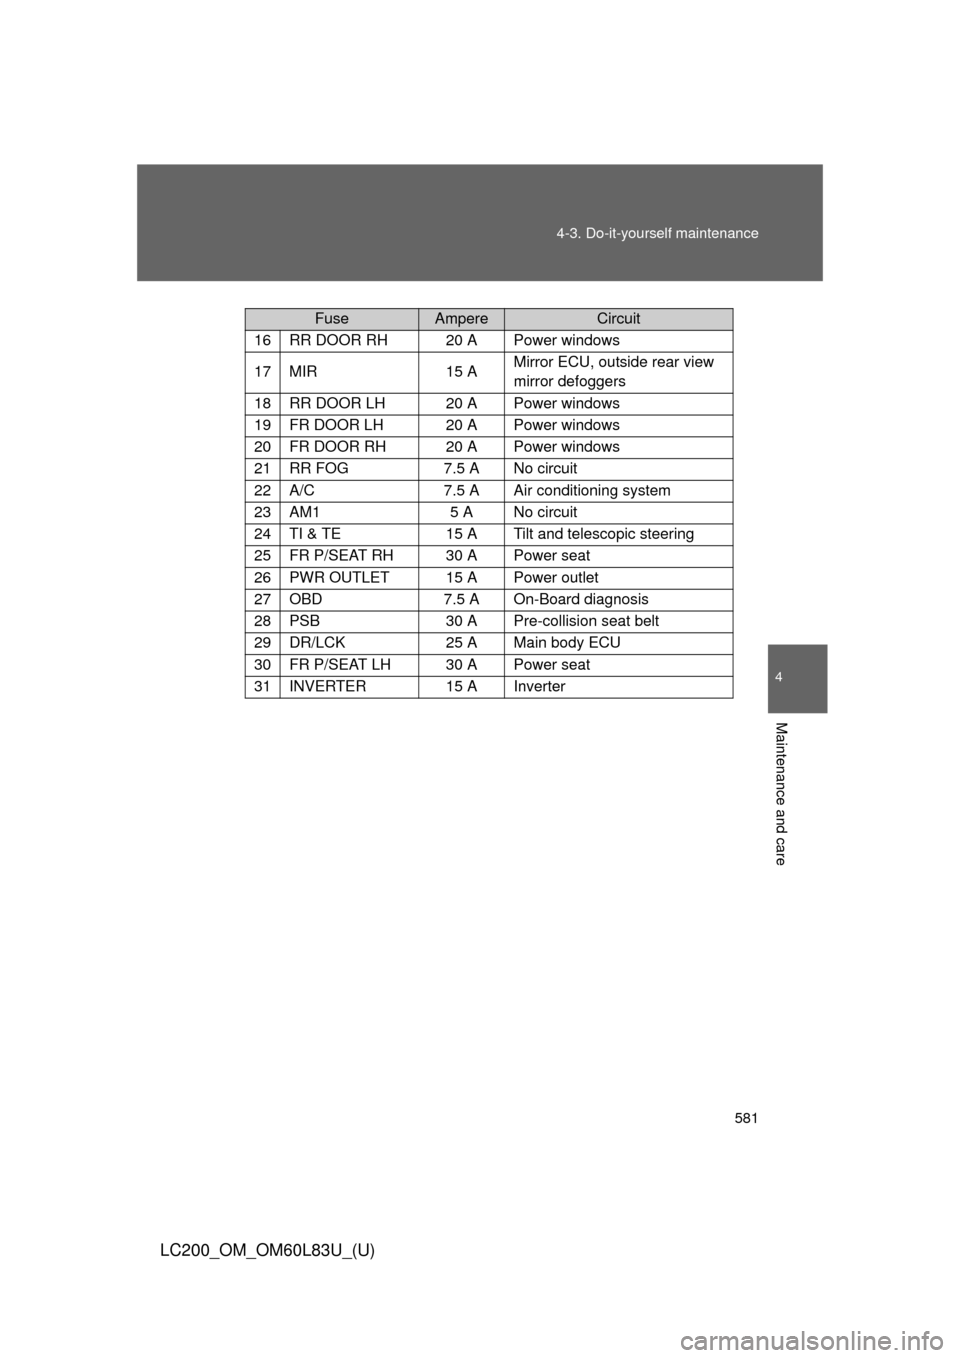
16RR DOOR RH20 A Power windows
17MIR15 A
Mirror ECU, outside rear view
mirror defoggers
18RR DOOR LH20 A Power windows
19FR DOOR LH20 A Power windows
20FR DOOR RH20 A Power windows
21RR FOG7.5 A No circuit
22A/C7.5 A Air conditioning system
23AM15 A No circuit
24TI & TE15 A Tilt and telescopic steering
25FR P/SEAT RH30 A Power seat
26PWR OUTLET15 A Power outlet
27OBD7.5 A On-Board diagnosis
28PSB30 A Pre-collision seat belt
29DR/LCK25 A Main body ECU
30FR P/SEAT LH30 A Power seat
31INVERTER15 A Inverter
FuseAmpereCircuit
Page 582 of 728
582 4-3. Do-it-yourself maintenance
LC200_OM_OM60L83U_(U)■
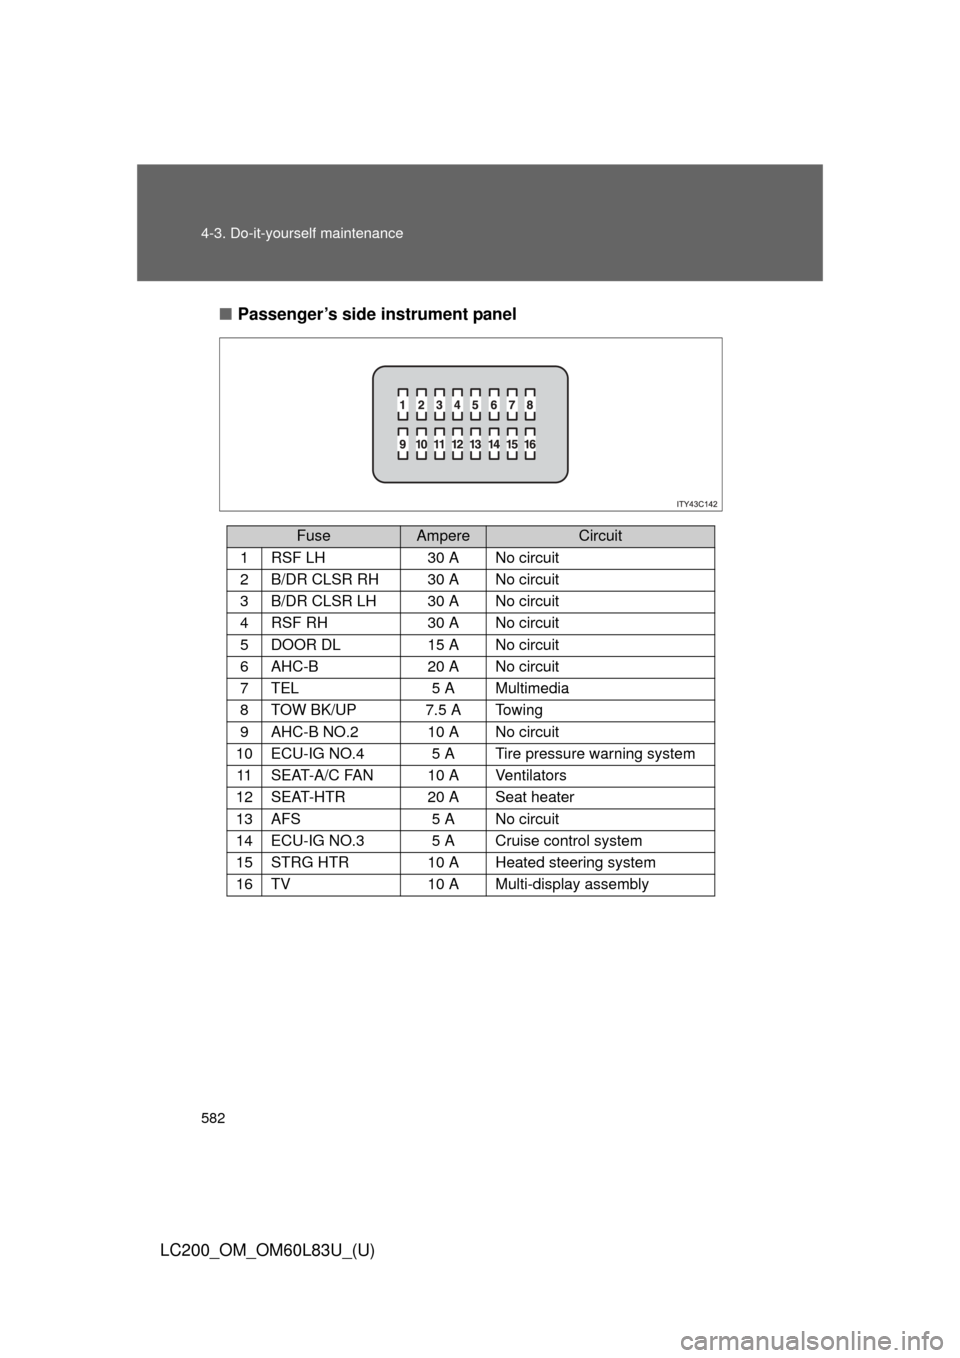
Passenger’s side instrument panel
FuseAmpereCircuit
1RSF LH30 A No circuit
2B/DR CLSR RH30 A No circuit
3B/DR CLSR LH30 A No circuit
4RSF RH30 A No circuit
5DOOR DL15 A No circuit
6AHC-B20 A No circuit
7TEL5 A Multimedia
8TOW BK/UP7.5 A Towing
9AHC-B NO.210 A No circuit
10ECU-IG NO.45 A Tire pressure warning system
11SEAT-A/C FAN10 A Ventilators
12SEAT-HTR20 A Seat heater
13AFS5 A No circuit
14ECU-IG NO.35 A Cruise control system
15STRG HTR10 A Heated steering system
16TV10 A Multi-display assembly
Page 583 of 728
583
4-3. Do-it-yourself maintenance
4
Maintenance and care
LC200_OM_OM60L83U_(U)
■
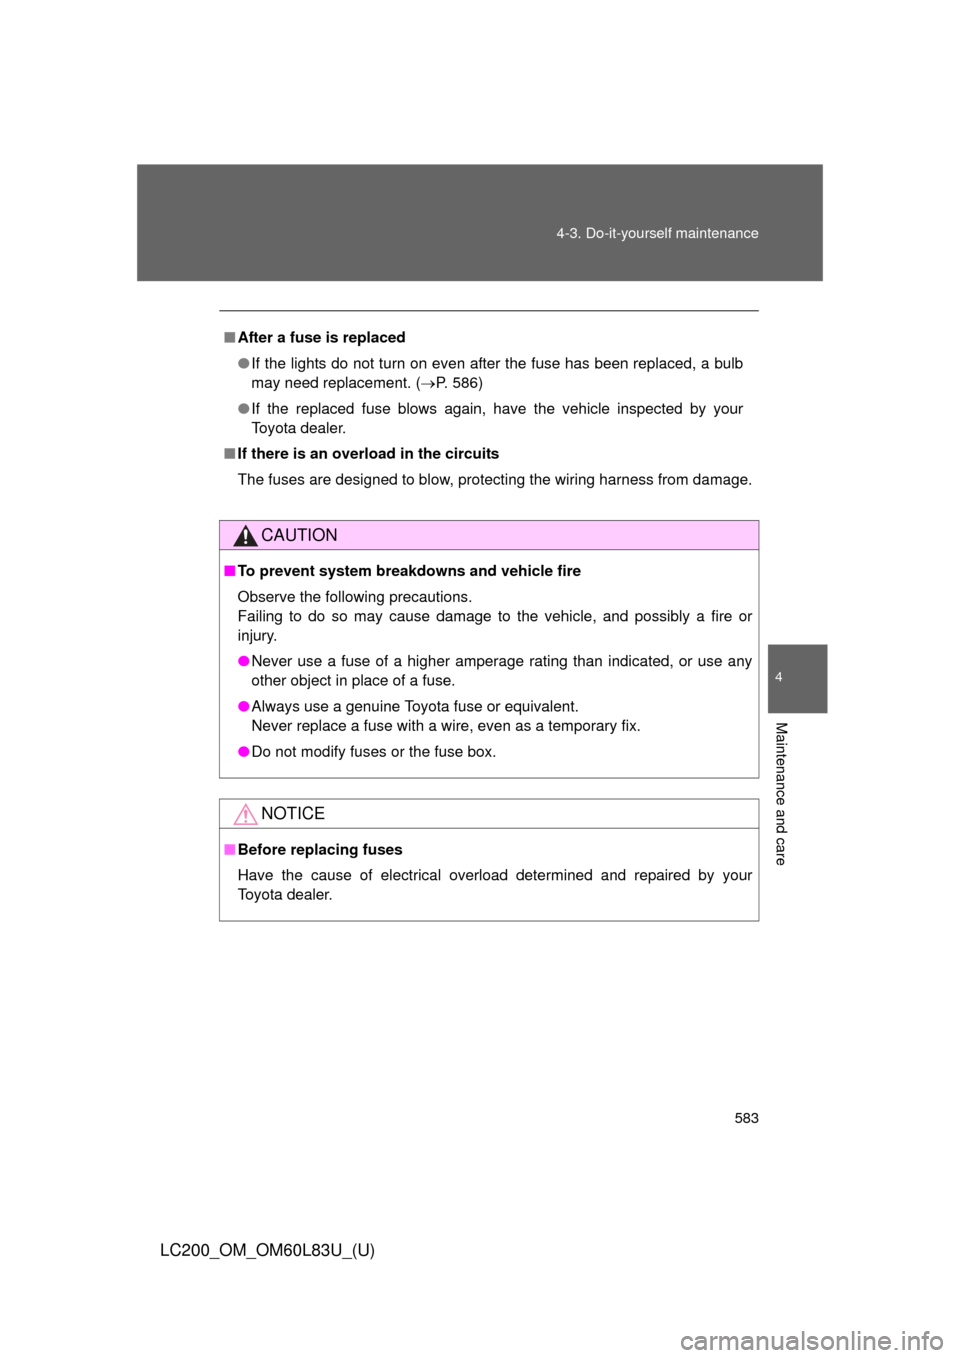
After a fuse is replaced
●If the lights do not turn on even after the fuse has been replaced, a bulb
may need replacement. ( P. 586)
● If the replaced fuse blows again, have the vehicle inspected by your
Toyota dealer.
■ If there is an overload in the circuits
The fuses are designed to blow, protecting the wiring harness from damage.
CAUTION
■To prevent system breakdowns and vehicle fire
Observe the following precautions.
Failing to do so may cause damage to the vehicle, and possibly a fire or
injury.
●Never use a fuse of a higher amperage rating than indicated, or use any
other object in place of a fuse.
● Always use a genuine Toyota fuse or equivalent.
Never replace a fuse with a wire, even as a temporary fix.
● Do not modify fuses or the fuse box.
NOTICE
■Before replacing fuses
Have the cause of electrical overload determined and repaired by your
Toyota dealer.
Page 584 of 728
584
4-3. Do-it-yourself maintenance
LC200_OM_OM60L83U_(U)
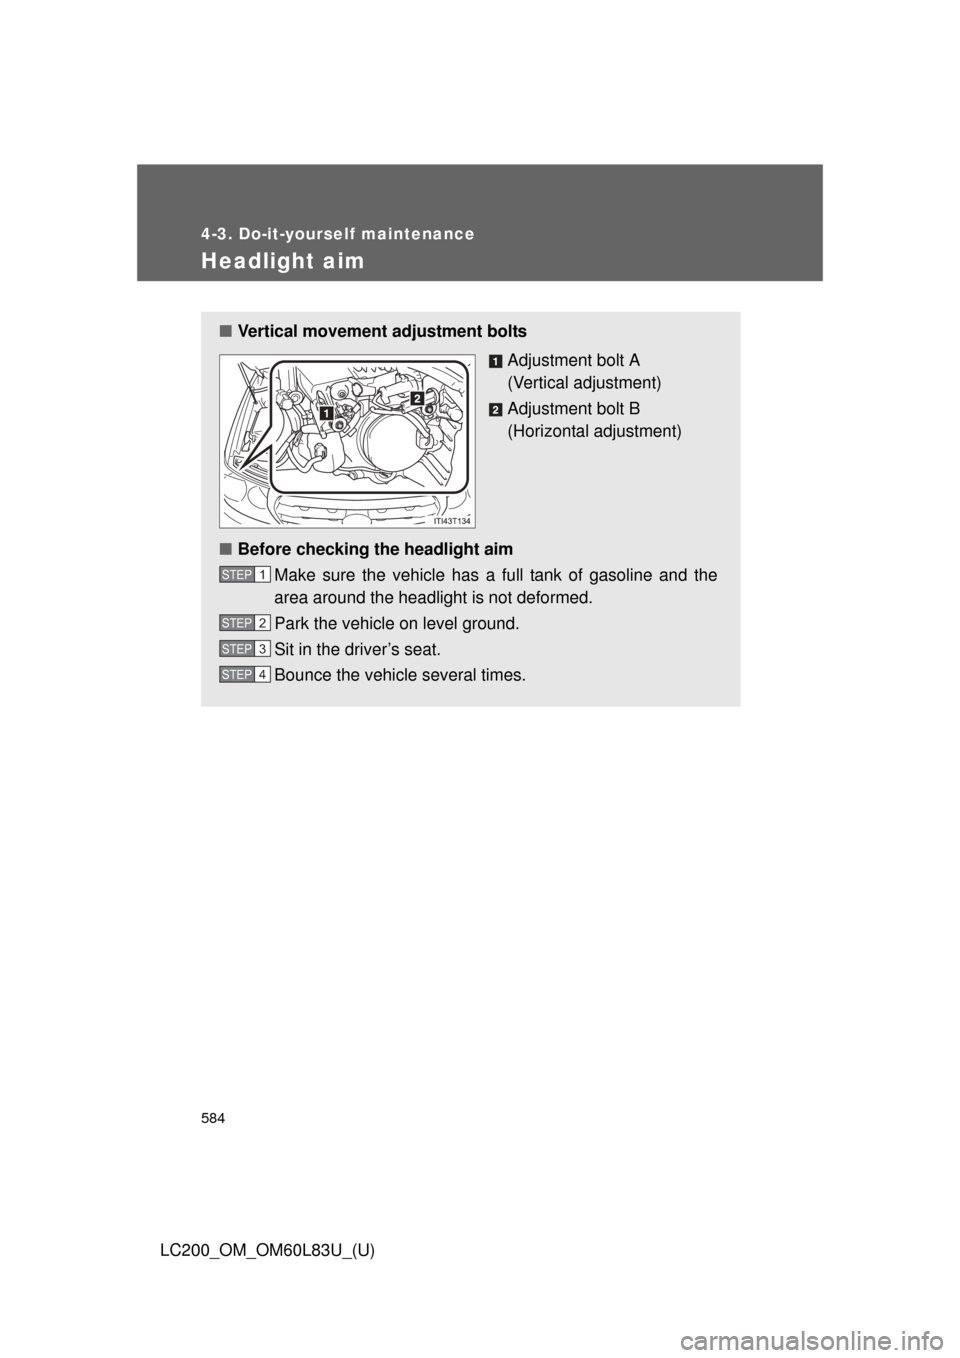
Headlight aim
■Vertical movement adjustment bolts
Adjustment bolt A
(Vertical adjustment)
Adjustment bolt B
(Horizontal adjustment)
■ Before checking the headlight aim
Make sure the vehicle has a full tank of gasoline and the
area around the headlight is not deformed.
Park the vehicle on level ground.
Sit in the driver’s seat.
Bounce the vehicle several times.
STEP1
STEP2
STEP3
STEP4
Page 585 of 728
585
4-3. Do-it-yourself maintenance
4
Maintenance and care
LC200_OM_OM60L83U_(U)
■
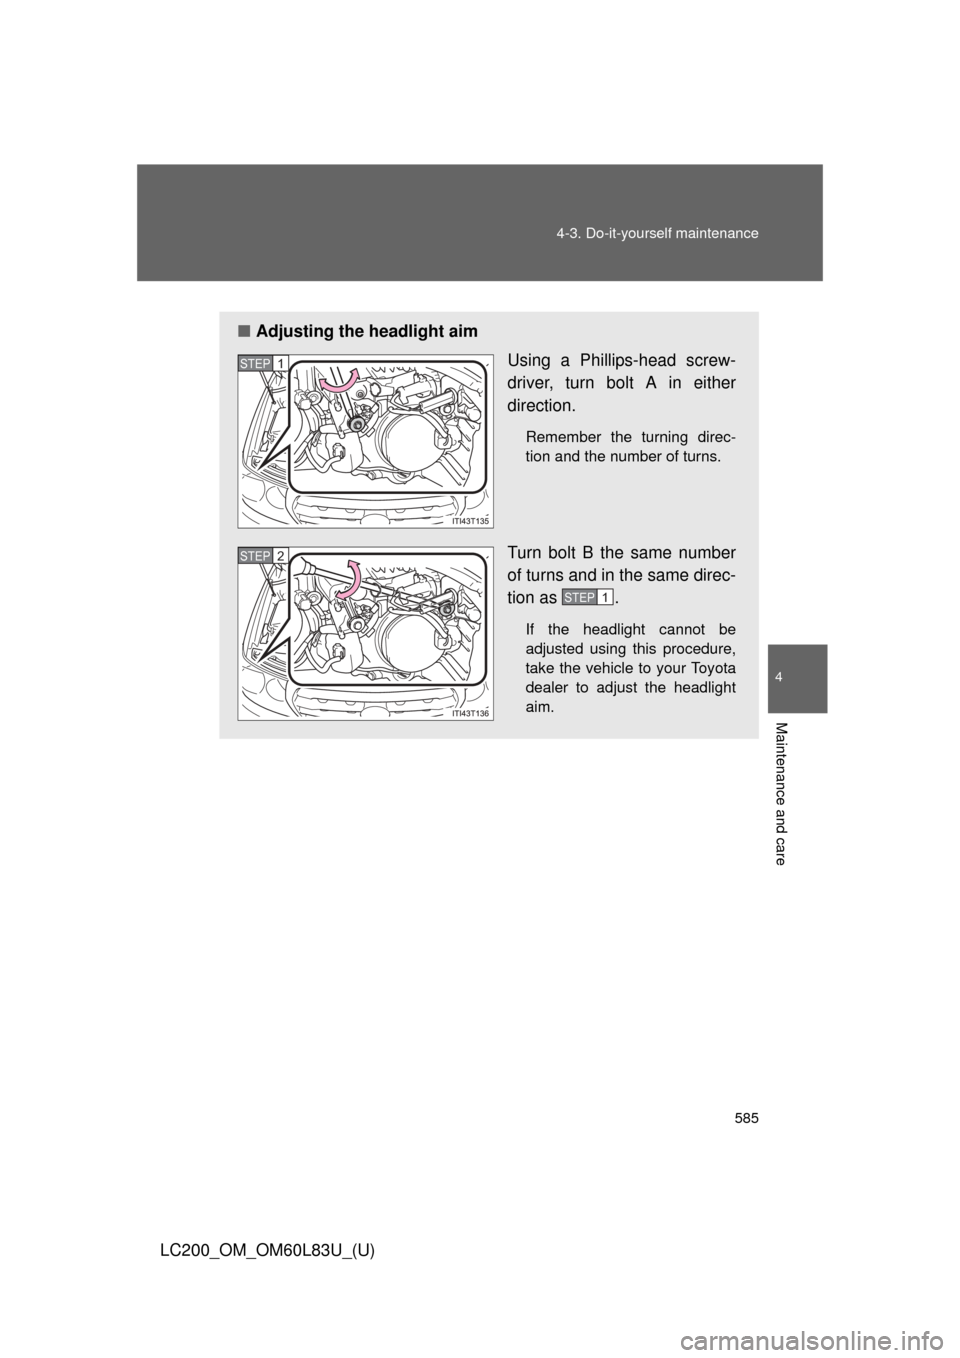
Adjusting the headlight aim
Using a Phillips-head screw-
driver, turn bolt A in either
direction.
Remember the turning direc-
tion and the number of turns.
Turn bolt B the same number
of turns and in the same direc-
tion as .
If the headlight cannot be
adjusted using this procedure,
take the vehicle to your Toyota
dealer to adjust the headlight
aim.
STEP1
STEP2
STEP1
Page 586 of 728
586
4-3. Do-it-yourself maintenance
LC200_OM_OM60L83U_(U)
Light bulbs
You may replace the following bulbs by yourself. The difficulty level
of replacement varies depending on the bulb. If necessary bulb
replacement seems difficult to perfor m, contact your Toyota dealer.
For more information about replacing other light bulbs, contact your
Toyota dealer.
■ Prepare a replacement light bulb
Check the wattage of the light bulb being replaced. ( P. 683)
■ Remove the engine compartment cover
P. 534
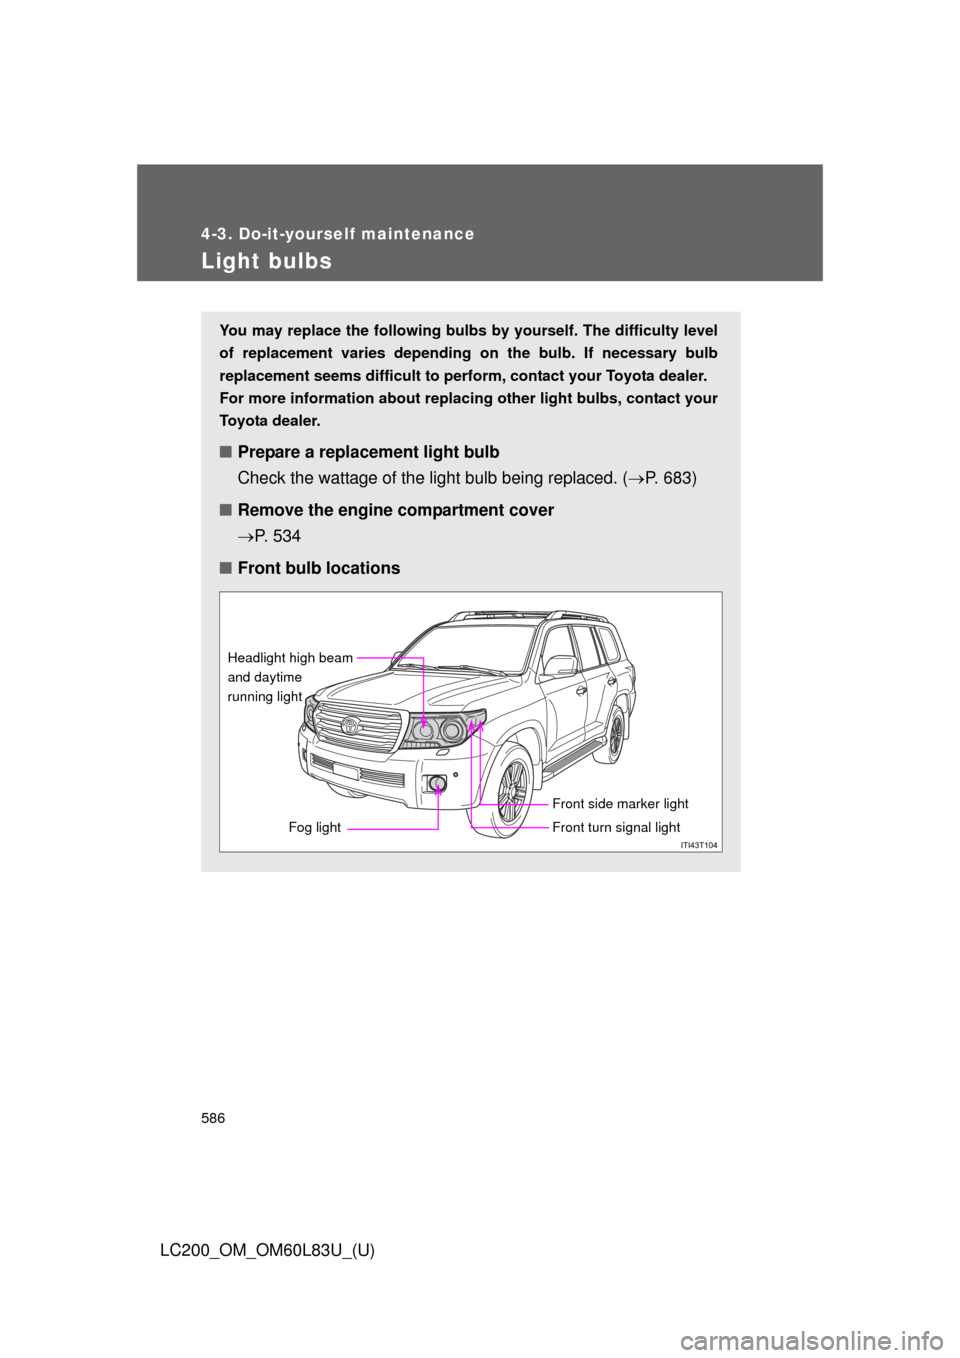
■ Front bulb locations
Front side marker light
Fog light
Headlight high beam
and daytime
running light
Front turn signal light
Page 587 of 728
587
4-3. Do-it-yourself maintenance
4
Maintenance and care
LC200_OM_OM60L83U_(U)
■
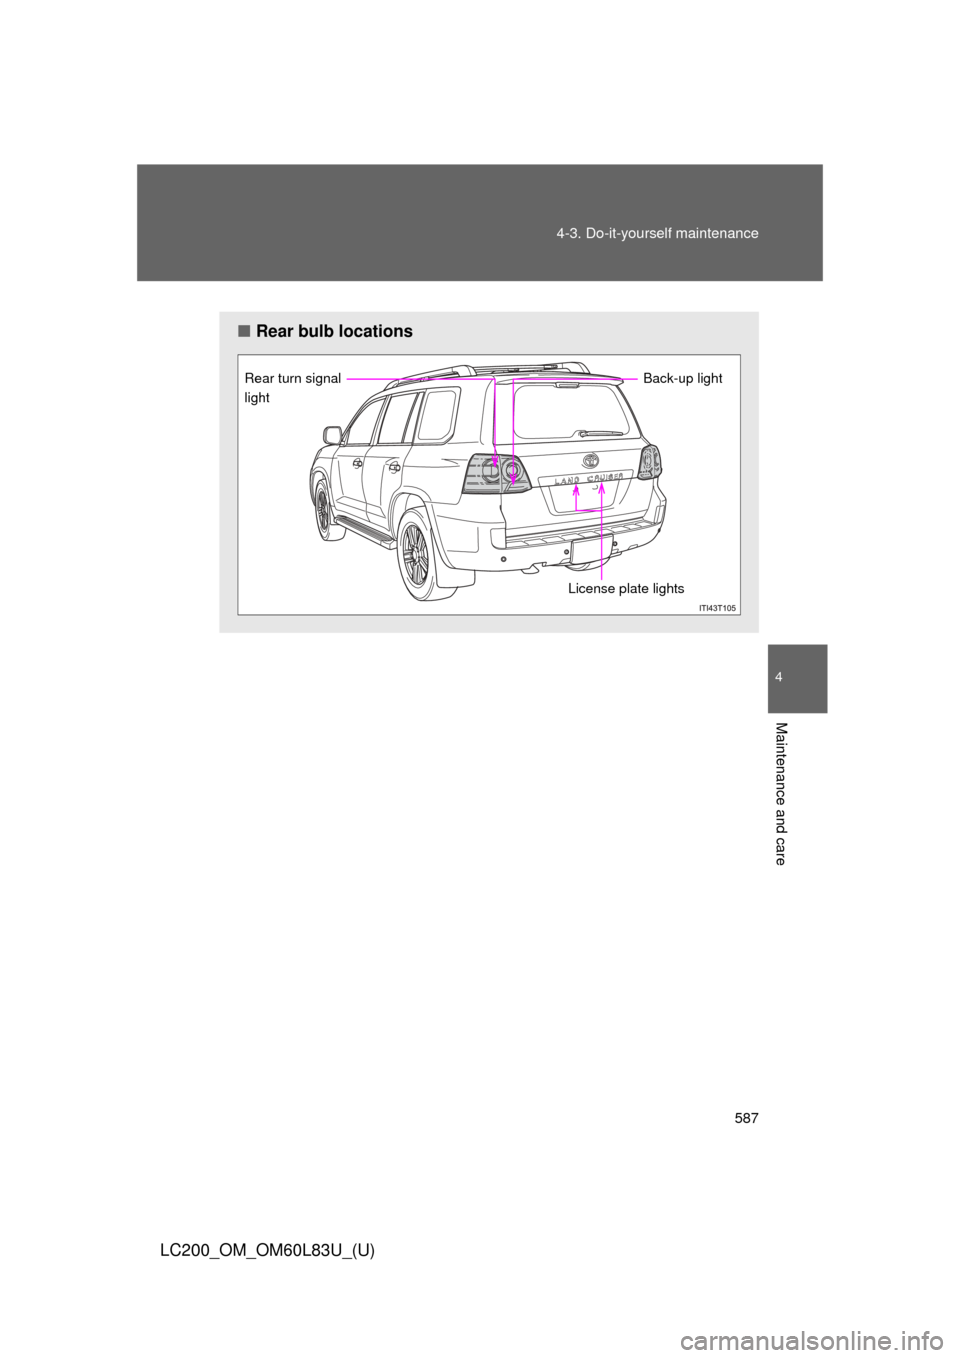
Rear bulb locations
License plate lights
Rear turn signal
light
Back-up light
Page 588 of 728
588 4-3. Do-it-yourself maintenance
LC200_OM_OM60L83U_(U)
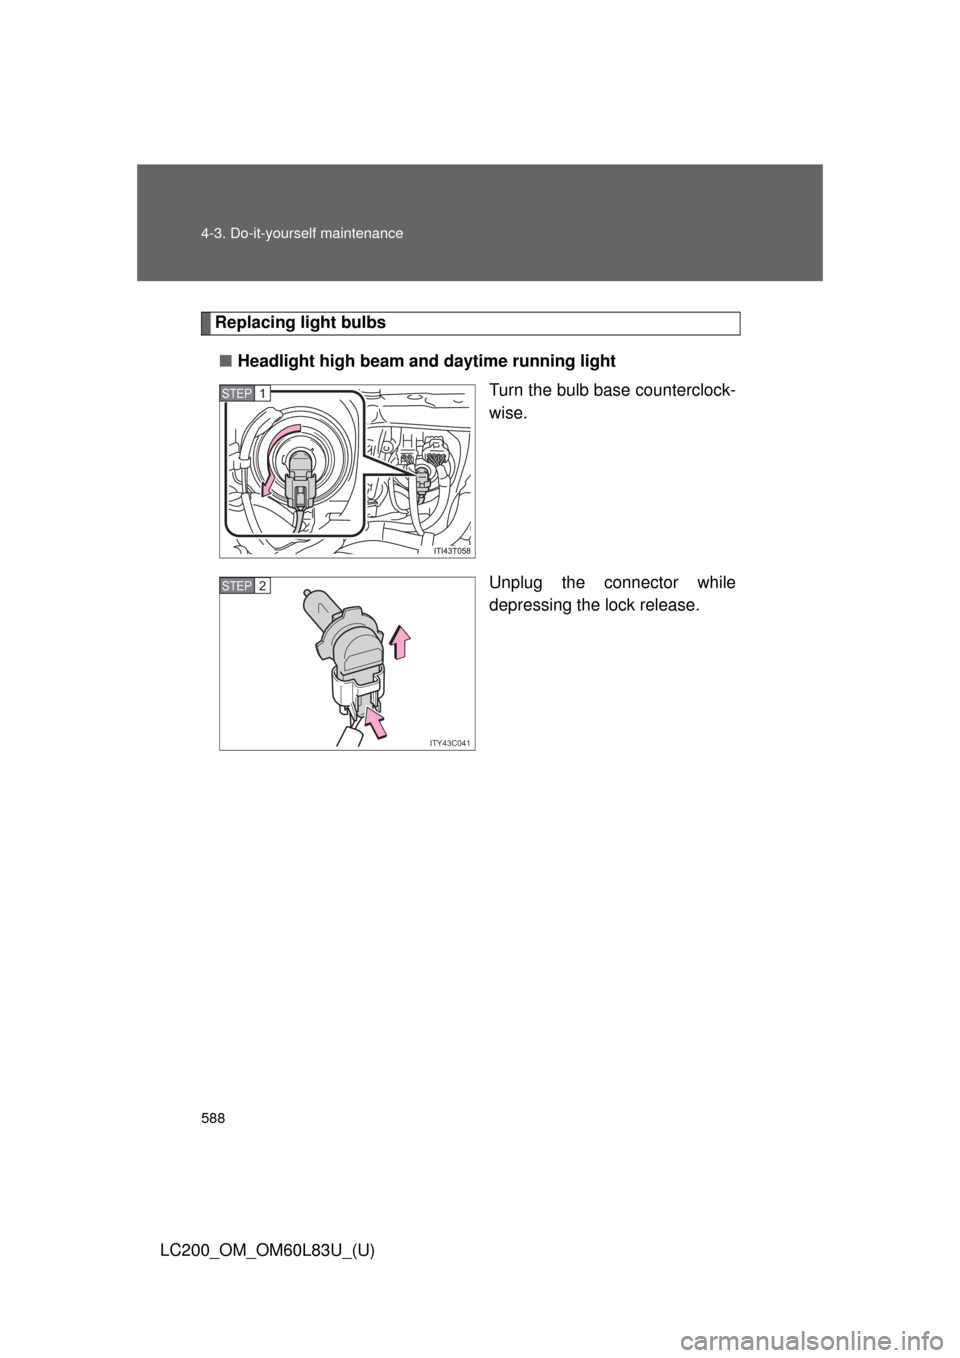
Replacing light bulbs■ Headlight high beam and daytime running light
Turn the bulb base counterclock-
wise.
Unplug the connector while
depressing the lock release.
STEP1
ITY43C041
STEP2
Page 589 of 728
589
4-3. Do-it-yourself maintenance
4
Maintenance and care
LC200_OM_OM60L83U_(U)
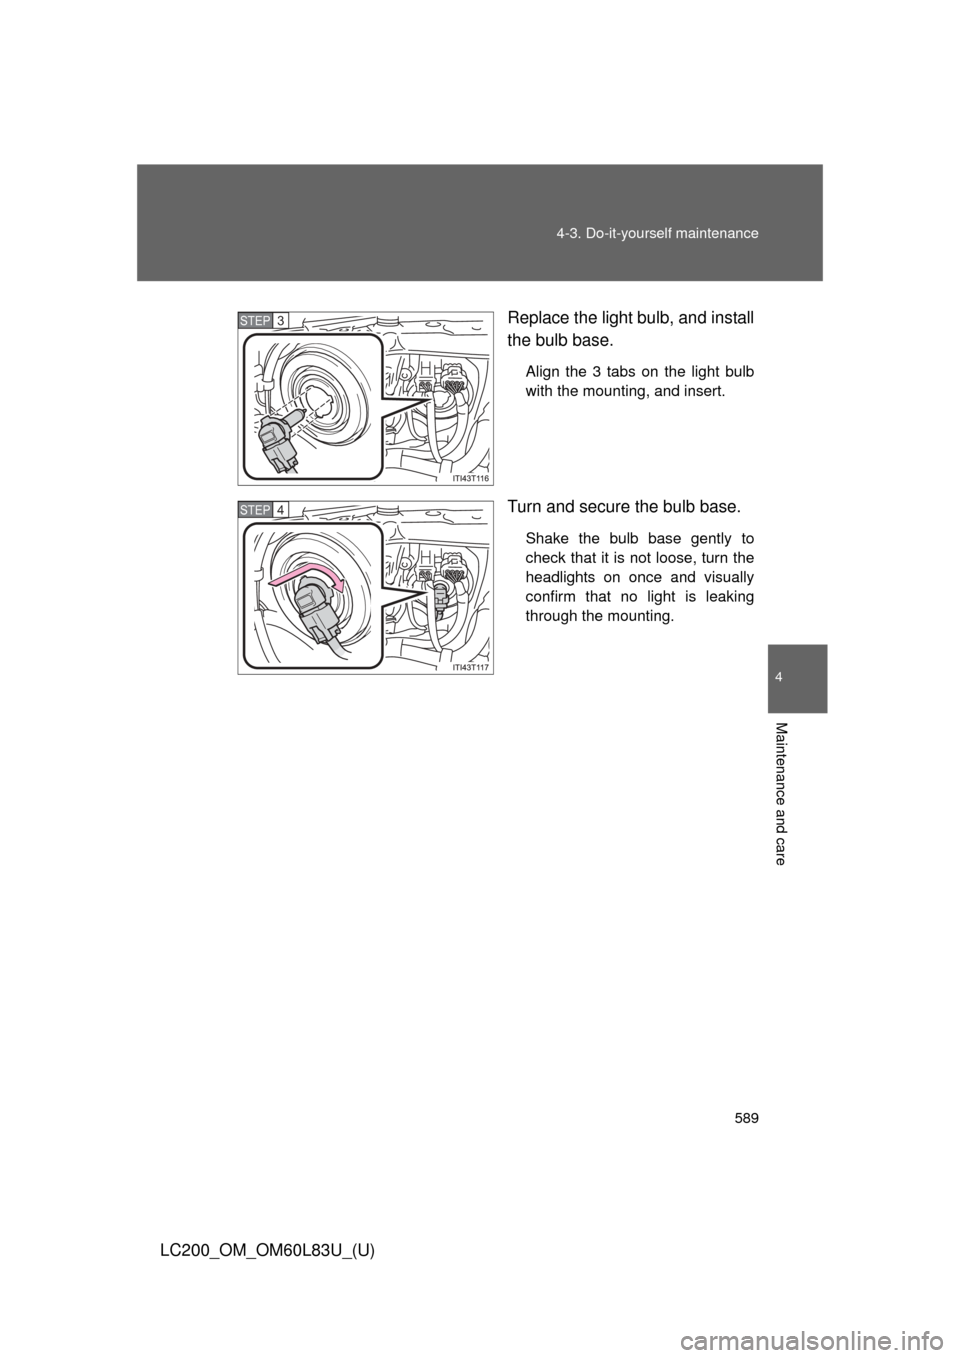
Replace the light bulb, and install
the bulb base.
Align the 3 tabs on the light bulb
with the mounting, and insert.
Turn and secure the bulb base.
Shake the bulb base gently to
check that it is not loose, turn the
headlights on once and visually
confirm that no light is leaking
through the mounting.
STEP3
STEP4
Page 590 of 728
590 4-3. Do-it-yourself maintenance
LC200_OM_OM60L83U_(U)■
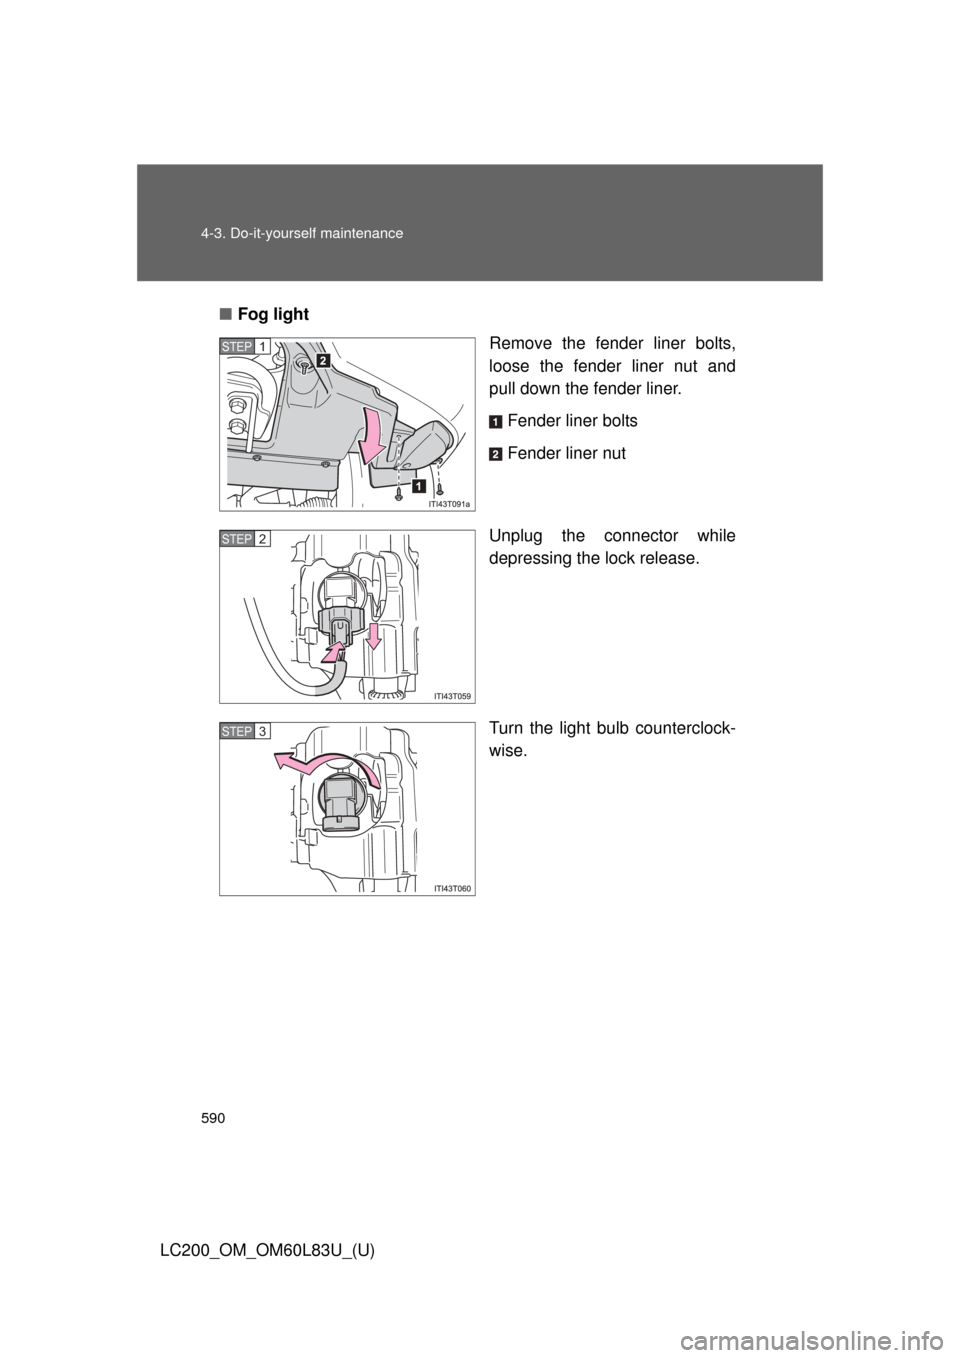
Fog light
Remove the fender liner bolts,
loose the fender liner nut and
pull down the fender liner.
Fender liner bolts
Fender liner nut
Unplug the connector while
depressing the lock release.
Turn the light bulb counterclock-
wise.
STEP1
STEP2
STEP3
Trending: fuel fill door release, odometer, lane assist, CD player, coolant capacity, air condition, turn signal bulb
