TOYOTA MIRAI 2016 1.G Owners Manual
Manufacturer: TOYOTA, Model Year: 2016, Model line: MIRAI, Model: TOYOTA MIRAI 2016 1.GPages: 464, PDF Size: 8.05 MB
Page 291 of 464
2916-4. Other interior features
6
Interior features
MIRAI_OM_USA_OM62004U
NOTICE
■Conditions in which the function may not operate correctly
In the following conditions, it may not operate correctly
●The portable device is fully charged
● There is foreign matter between the charge area and portable device
● The temperature of the portable device gets higher from charging
● The charging surface of the portable device is facing up
● The placement of the portable device is out of alignment with the charge
area
● Near a TV tower, electric power plant, gas station, radio station, large dis-
play, airport or other facility that generates strong radio waves or electrical
noise
● When the electronic key is in contact with, or is covered by the following
metallic objects
• Cards to which aluminum foil is attached
• Cigarette boxes that have aluminum foil inside
• Metallic wallets or bags
• Coins
• Hand warmers made of metal
• Media such as CDs and DVDs
● When other wireless keys (that emit radio waves) are being used nearby
In addition, excluding the above-mentioned, when the charger does not per-
form normally or the operation display lamp is flashing continuously, it is
considered that the wireless charger is malfunctioning. Contact your Toyota
dealer.
■ To prevent failure or damage to data
●Do not bring magnetic cards, such as credit cards, or magnetic recording
media, etc., close to the charger while charging, otherwise, data may dis-
appear under the influence of magnetism. Also, do not bring precision
instruments such as wrist watches, etc., close to the charger, as such
objects may break.
● Do not leave portable devices in the cabin. The temperature inside the
cabin may become high, when under the sun, and cause damage to the
device.
■ To prevent 12-volt battery discharge
When the fuel cell system is stopped, do not use the wireless charger for a
long time.
Page 292 of 464
2926-4. Other interior features
MIRAI_OM_USA_OM62004U
Garage door opener
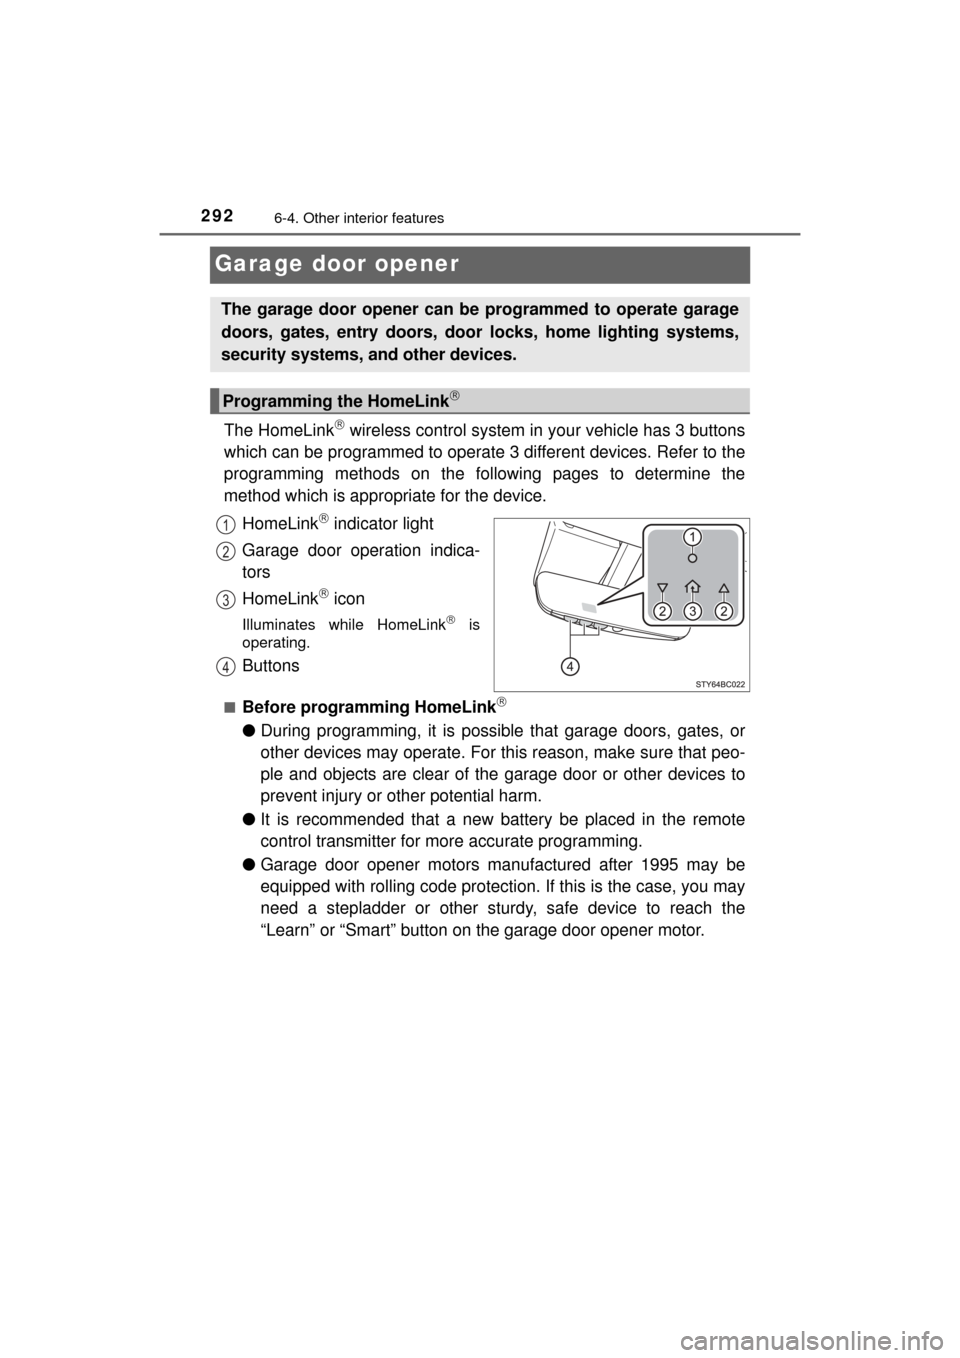
The HomeLink wireless control system in your vehicle has 3 buttons
which can be programmed to operate 3 different devices. Refer to the
programming methods on the following pages to determine the
method which is appr opriate for the device.
HomeLink
indicator light
Garage door operation indica-
tors
HomeLink
icon
Illuminates while HomeLink is
operating.
Buttons
■Before programming HomeLink
● During programming, it is possible that garage doors, gates, or
other devices may operate. For this reason, make sure that peo-
ple and objects are clear of the garage door or other devices to
prevent injury or other potential harm.
● It is recommended that a new battery be placed in the remote
control transmitter for more accurate programming.
● Garage door opener motors manufactured after 1995 may be
equipped with rolling code protection. If this is the case, you may
need a stepladder or other sturdy, safe device to reach the
“Learn” or “Smart” button on the garage door opener motor.
The garage door opener can be programmed to operate garage
doors, gates, entry doors, door locks, home lighting systems,
security systems, and other devices.
Programming the HomeLink
1
2
3
4
Page 293 of 464
2936-4. Other interior features
6
Interior features
MIRAI_OM_USA_OM62004U■
Programming HomeLink
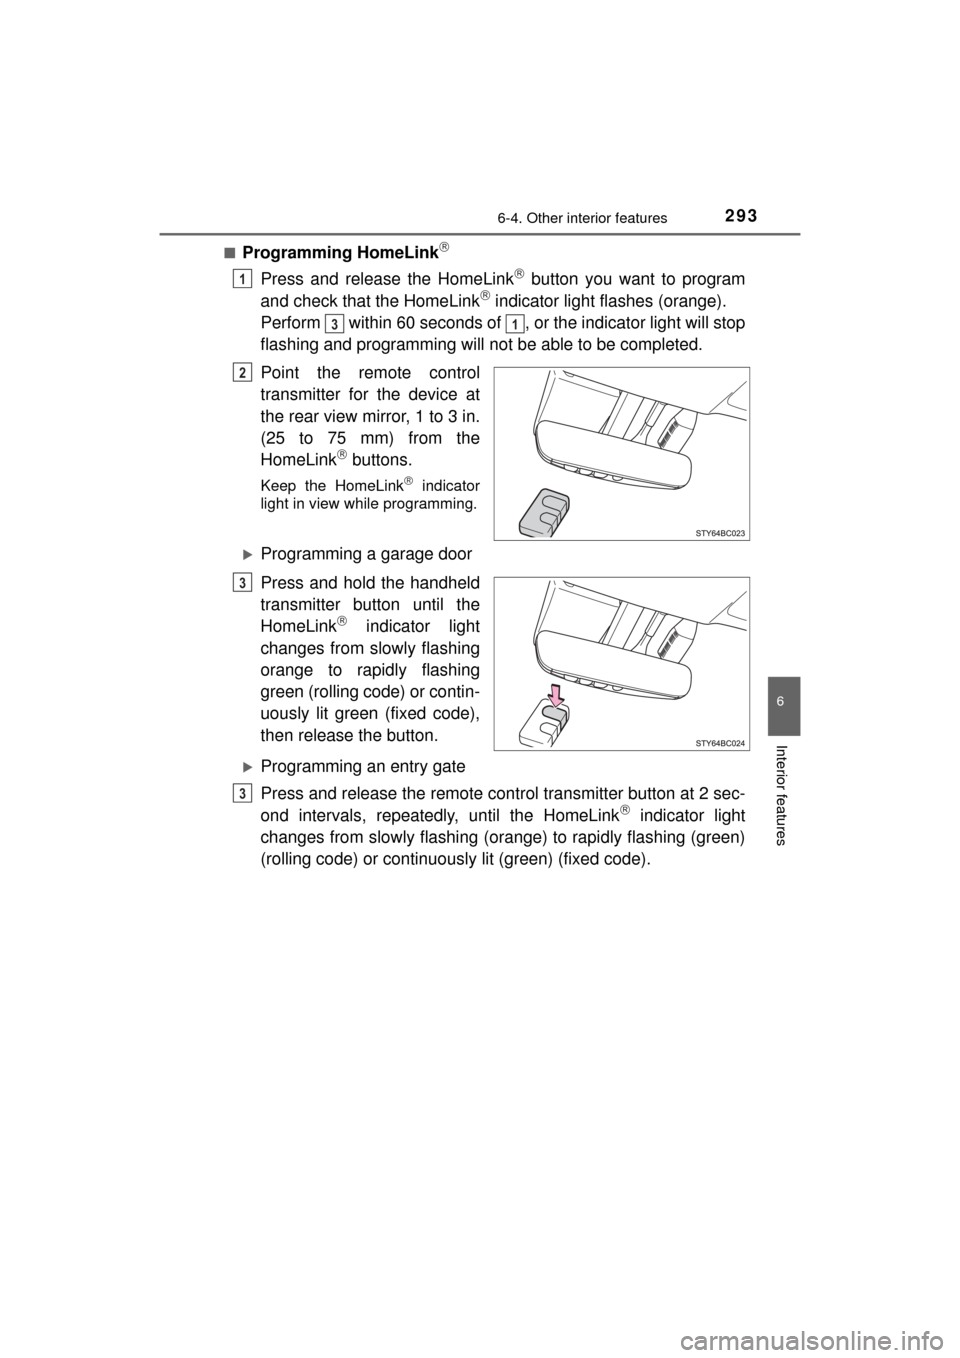
Press and release the HomeLink button you want to program
and check that the HomeLink indicator light flashes (orange).
Perform within 60 seconds of , or the indicator light will stop
flashing and programming will not be able to be completed.
Point the remote control
transmitter for the device at
the rear view mirror, 1 to 3 in.
(25 to 75 mm) from the
HomeLink
buttons.
Keep the HomeLink indicator
light in view while programming.
Programming a garage door
Press and hold the handheld
transmitter button until the
HomeLink
indicator light
changes from slowly flashing
orange to rapidly flashing
green (rolling code) or contin-
uously lit green (fixed code),
then release the button.
Programming an entry gate
Press and release the remote control transmitter button at 2 sec-
ond intervals, repeatedly, until the HomeLink
indicator light
changes from slowly flashing (or ange) to rapidly flashing (green)
(rolling code) or continuously lit (green) (fixed code).
1
31
2
3
3
Page 294 of 464
2946-4. Other interior features
MIRAI_OM_USA_OM62004U
Test the HomeLink operation by pressing the newly pro-
grammed button and observing the indicator light:
● Device with fixed code: If the in dicator light is solid/continuous,
programming has been completed and your garage door or
other device should operate when the HomeLink
button is
pressed and released.
● Device with rolling code: If the indicator light flashes rapidly,
your garage door opener motor (or other device) is equipped
with a rolling code. Complete the programming process by
firmly pressing and holding the programmed HomeLink
but-
ton for 2 seconds and then release the button.
● If the garage door or other device does not operate, proceed
to “Programming a rolling code system”.
Repeat the steps above to program another device for any of the
remaining HomeLink
buttons.
■Programming a rolling code system
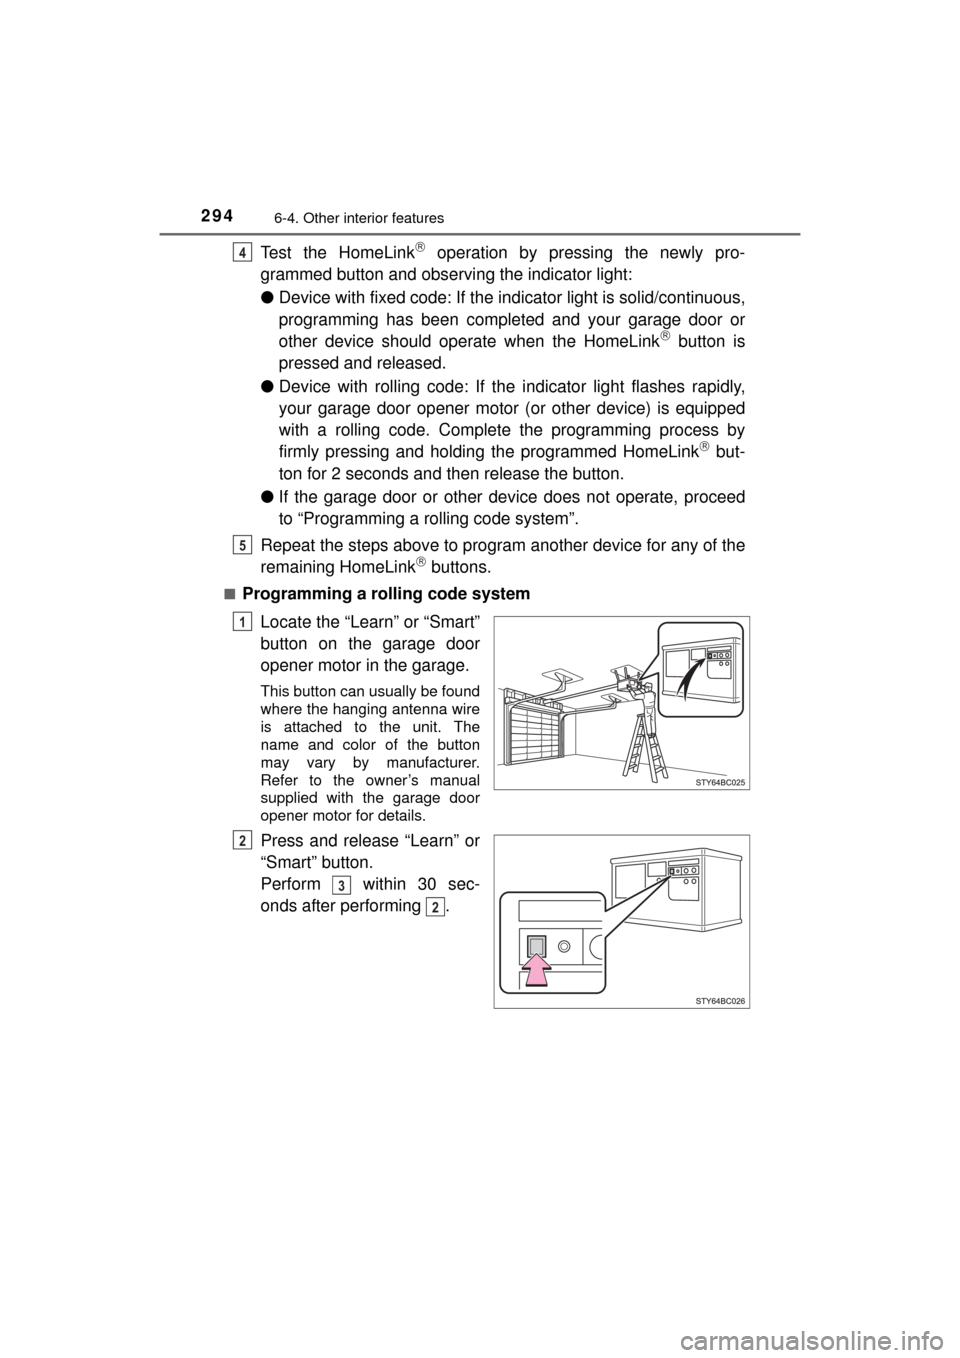
Locate the “Learn” or “Smart”
button on the garage door
opener motor in the garage.
This button can usually be found
where the hanging antenna wire
is attached to the unit. The
name and color of the button
may vary by manufacturer.
Refer to the owner’s manual
supplied with the garage door
opener motor for details.
Press and release “Learn” or
“Smart” button.
Perform within 30 sec-
onds after performing .
4
5
1
2
3
2
Page 295 of 464
2956-4. Other interior features
6
Interior features
MIRAI_OM_USA_OM62004U
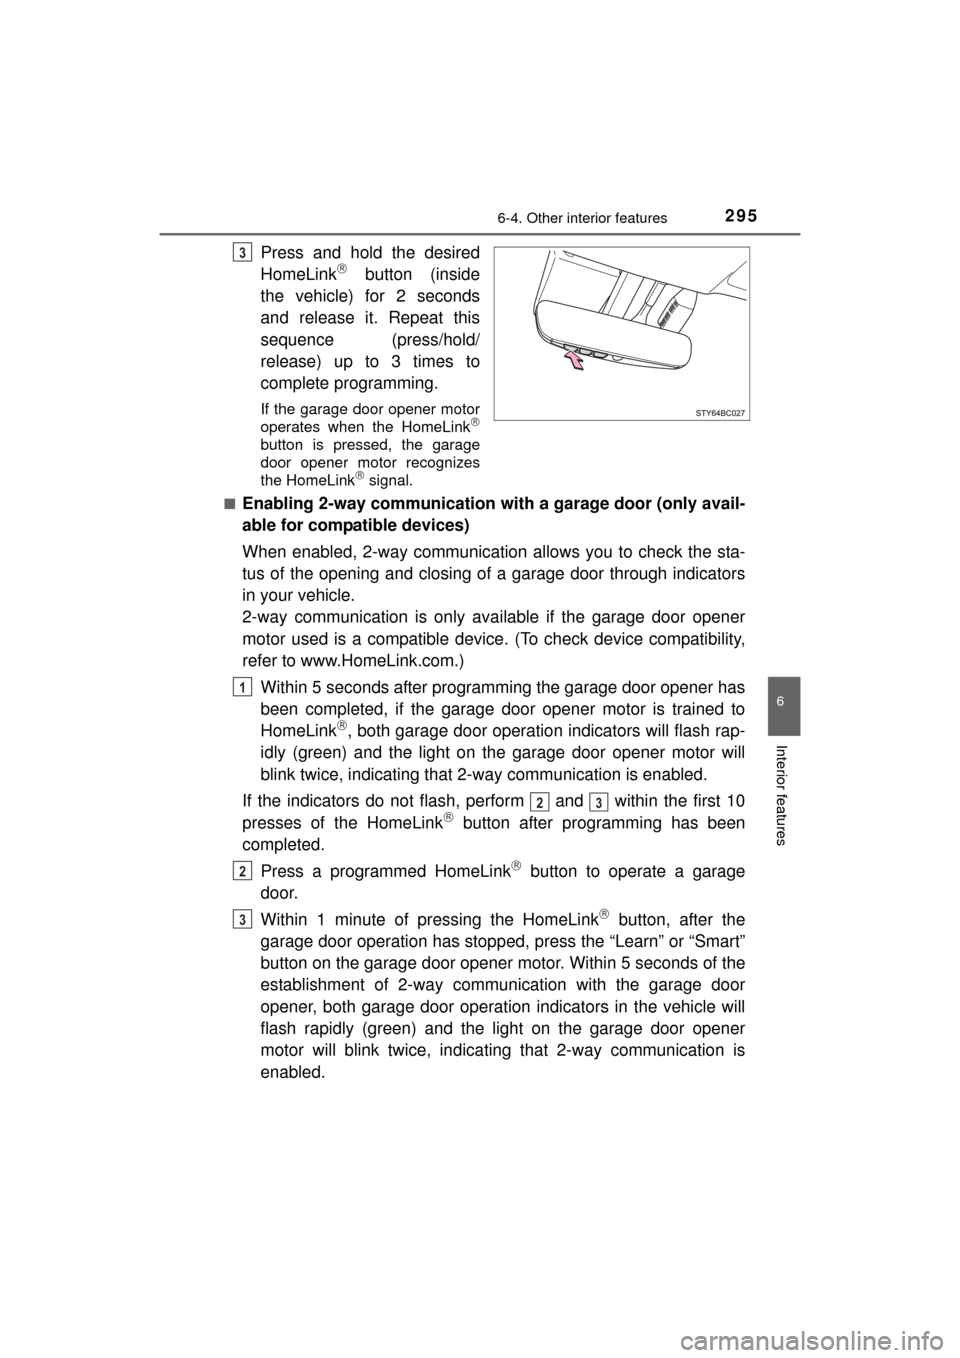
Press and hold the desired
HomeLink button (inside
the vehicle) for 2 seconds
and release it. Repeat this
sequence (press/hold/
release) up to 3 times to
complete programming.
If the garage door opener motor
operates when the HomeLink
button is pressed, the garage
door opener motor recognizes
the HomeLink
signal.
■
Enabling 2-way communication with a garage door (only avail-
able for compatible devices)
When enabled, 2-way communication allows you to check the sta-
tus of the opening and closing of a garage door through indicators
in your vehicle.
2-way communication is only available if the garage door opener
motor used is a compatible device. (To check device compatibility,
refer to www.HomeLink.com.)
Within 5 seconds after programming the garage door opener has
been completed, if the garage door opener motor is trained to
HomeLink
, both garage door operation indicators will flash rap-
idly (green) and the light on the garage door opener motor will
blink twice, indicating that 2-way communication is enabled.
If the indicators do not flash, perform and within the first 10
presses of the HomeLink
button after programming has been
completed.
Press a programmed HomeLink
button to operate a garage
door.
Within 1 minute of pr essing the HomeLink
button, after the
garage door operation has stopped, press the “Learn” or “Smart”
button on the garage door opener motor. Within 5 seconds of the
establishment of 2-way comm unication with the garage door
opener, both garage door operati on indicators in the vehicle will
flash rapidly (green) and the light on the garage door opener
motor will blink twice, indicating that 2-way communication is
enabled.
3
1
23
2
3
Page 296 of 464
2966-4. Other interior features
MIRAI_OM_USA_OM62004U■
Reprogramming a single HomeLink button
When the following procedure is pe rformed, buttons which already
have devices registered to them can be overwritten:
With one hand, press and hold the desired HomeLink
button.
When the HomeLink
indicator starts flashing (orange), continue
to hold the HomeLink button and perform “Programming
HomeLink” (it takes 20 seconds for the HomeLink indicator
to start flashing).
Press the appropriate HomeLink
button. The HomeLink indicator
light should turn on.
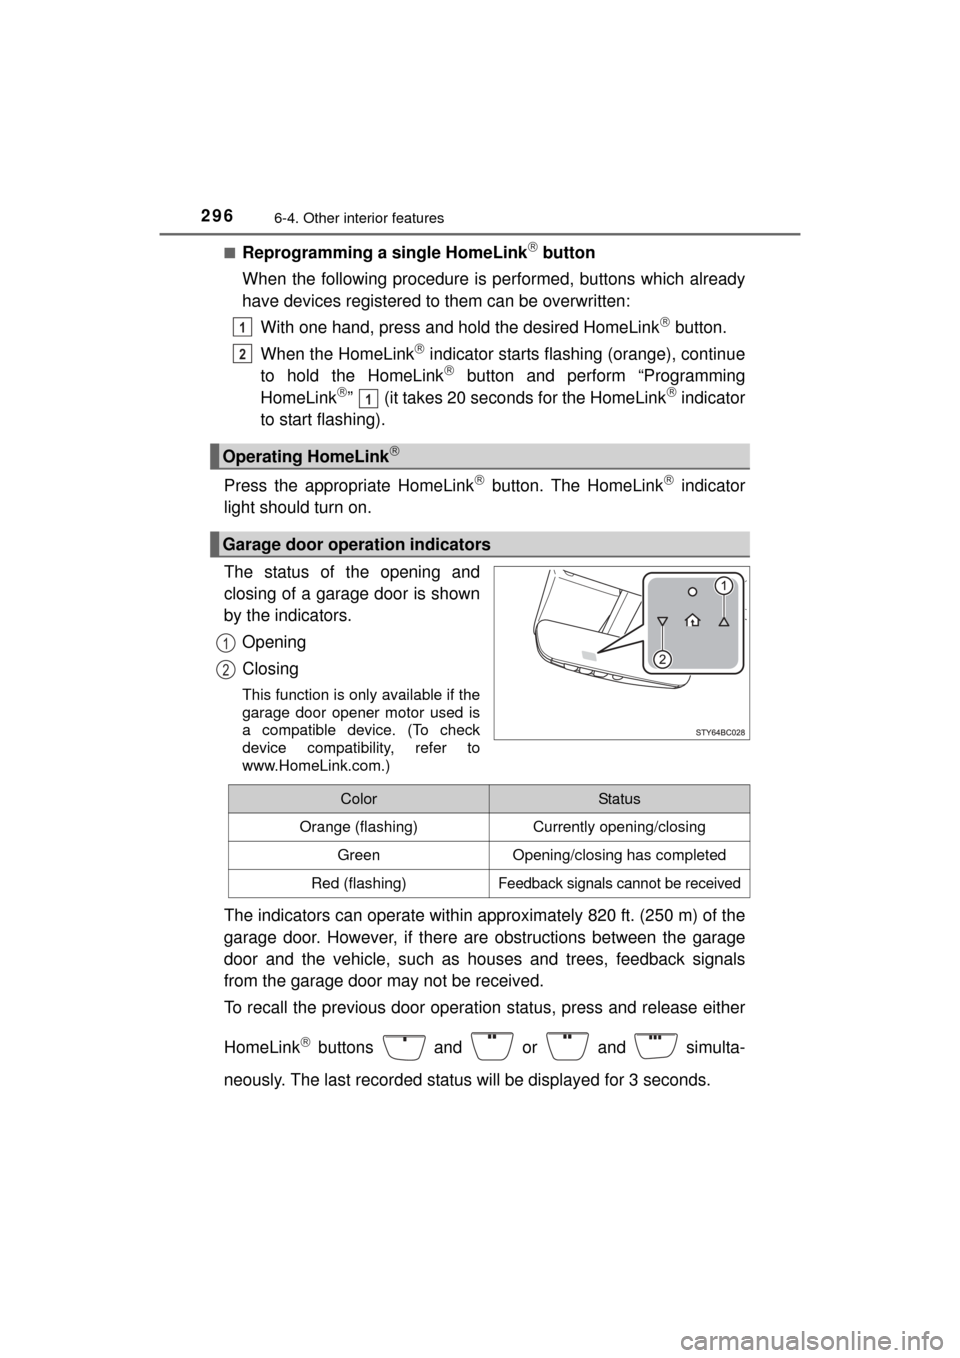
The status of the opening and
closing of a garage door is shown
by the indicators.
Opening
Closing
This function is only available if the
garage door opener motor used is
a compatible device. (To check
device compatibility, refer to
www.HomeLink.com.)
The indicators can operate within approximately 820 ft. (250 m) of the
garage door. However, if there are obstructions between the garage
door and the vehicle, such as houses and trees, feedback signals
from the garage door may not be received.
To recall the previous door operat ion status, press and release either
HomeLink
buttons and or and simulta-
neously. The last recorded status will be displayed for 3 seconds.
Operating HomeLink
Garage door operation indicators
1
2
1
1
2
ColorStatus
Orange (flashing)Currently opening/closing
GreenOpening/closing has completed
Red (flashing)Feedback signals cannot be received
Page 297 of 464
2976-4. Other interior features
6
Interior features
MIRAI_OM_USA_OM62004U
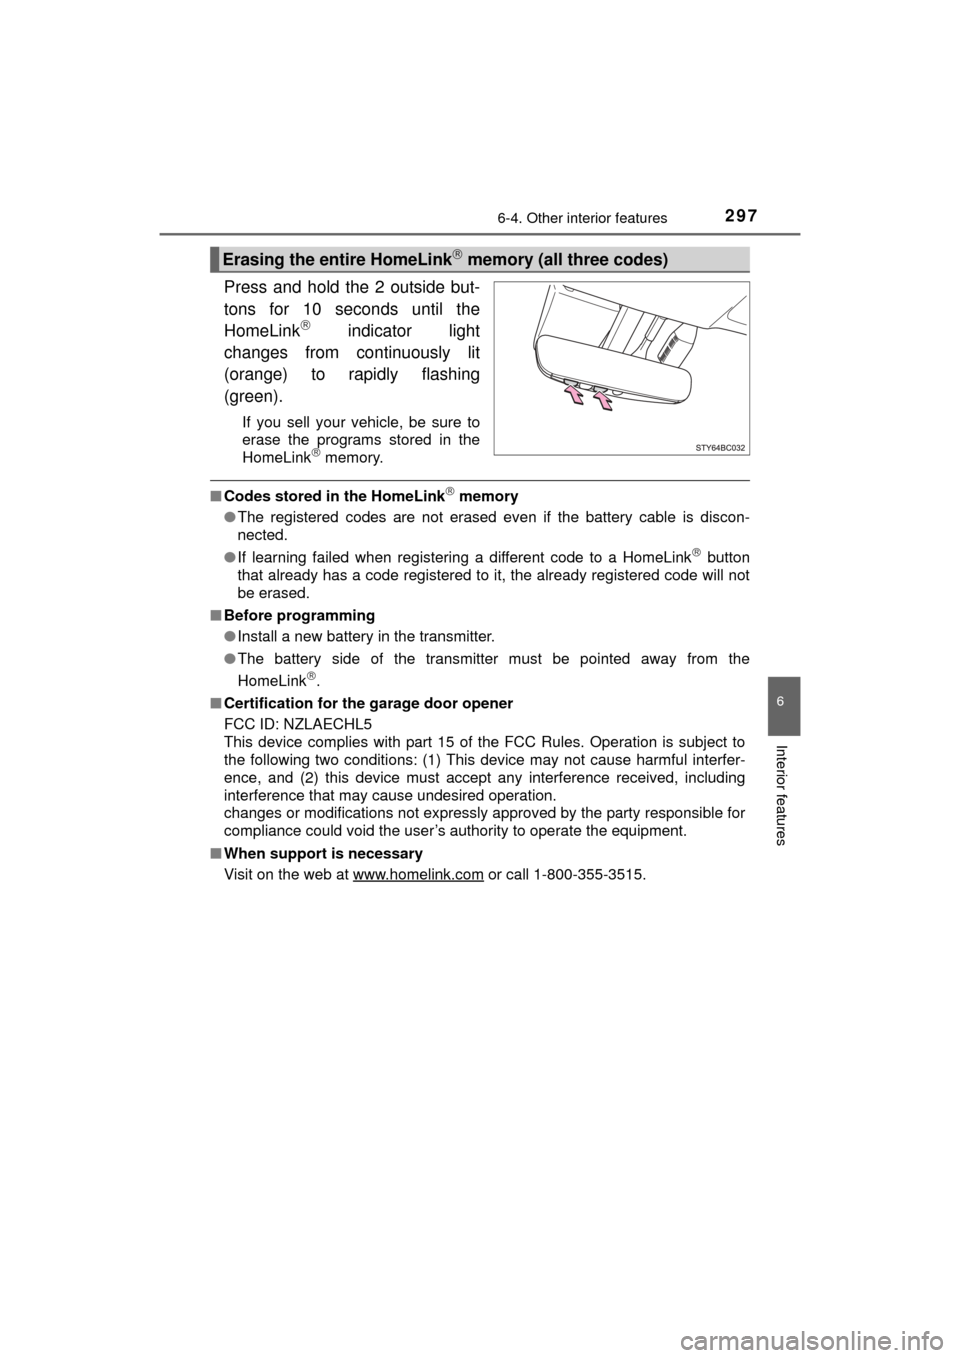
Press and hold the 2 outside but-
tons for 10 seconds until the
HomeLink
indicator light
changes from continuously lit
(orange) to rapidly flashing
(green).
If you sell your vehicle, be sure to
erase the programs stored in the
HomeLink
memory.
■ Codes stored in the HomeLink memory
● The registered codes are not erased even if the battery cable is discon-
nected.
● If learning failed when registering a different code to a HomeLink
button
that already has a code registered to it, the already registered code will not
be erased.
■ Before programming
●Install a new battery in the transmitter.
● The battery side of the transmitter must be pointed away from the
HomeLink
.
■ Certification for the garage door opener
FCC ID: NZLAECHL5
This device complies with part 15 of the FCC Rules. Operation is subject to
the following two conditions: (1) This device may not cause harmful interfer-
ence, and (2) this device must accept any interference received, including
interference that may cause undesired operation.
changes or modifications not expressly approved by the party responsible for
compliance could void the user’s authority to operate the equipment.
■ When support is necessary
Visit on the web at www.homelink.com
or call 1-800-355-3515.
Erasing the entire HomeLink memory (all three codes)
Page 298 of 464

2986-4. Other interior features
MIRAI_OM_USA_OM62004U
WARNING
■When programming a garage door or other remote control devices
The garage door or other devices may operate, so ensure people and
objects are out of danger to prevent potential harm.
■ Conforming to federal safety standards
Do not use the HomeLink
compatible transceiver with any garage door
opener or device that lacks safety stop and reverse features as required by
federal safety standards.
This includes any garage door that cannot detect an interfering object. A
door or device without these features increases the risk of death or ser\
ious
injury.
■ When operating or programming HomeLink
Never allow a child to operate or play with the HomeLink buttons.
Page 299 of 464
2996-4. Other interior features
6
Interior features
MIRAI_OM_USA_OM62004U
Safety Connect
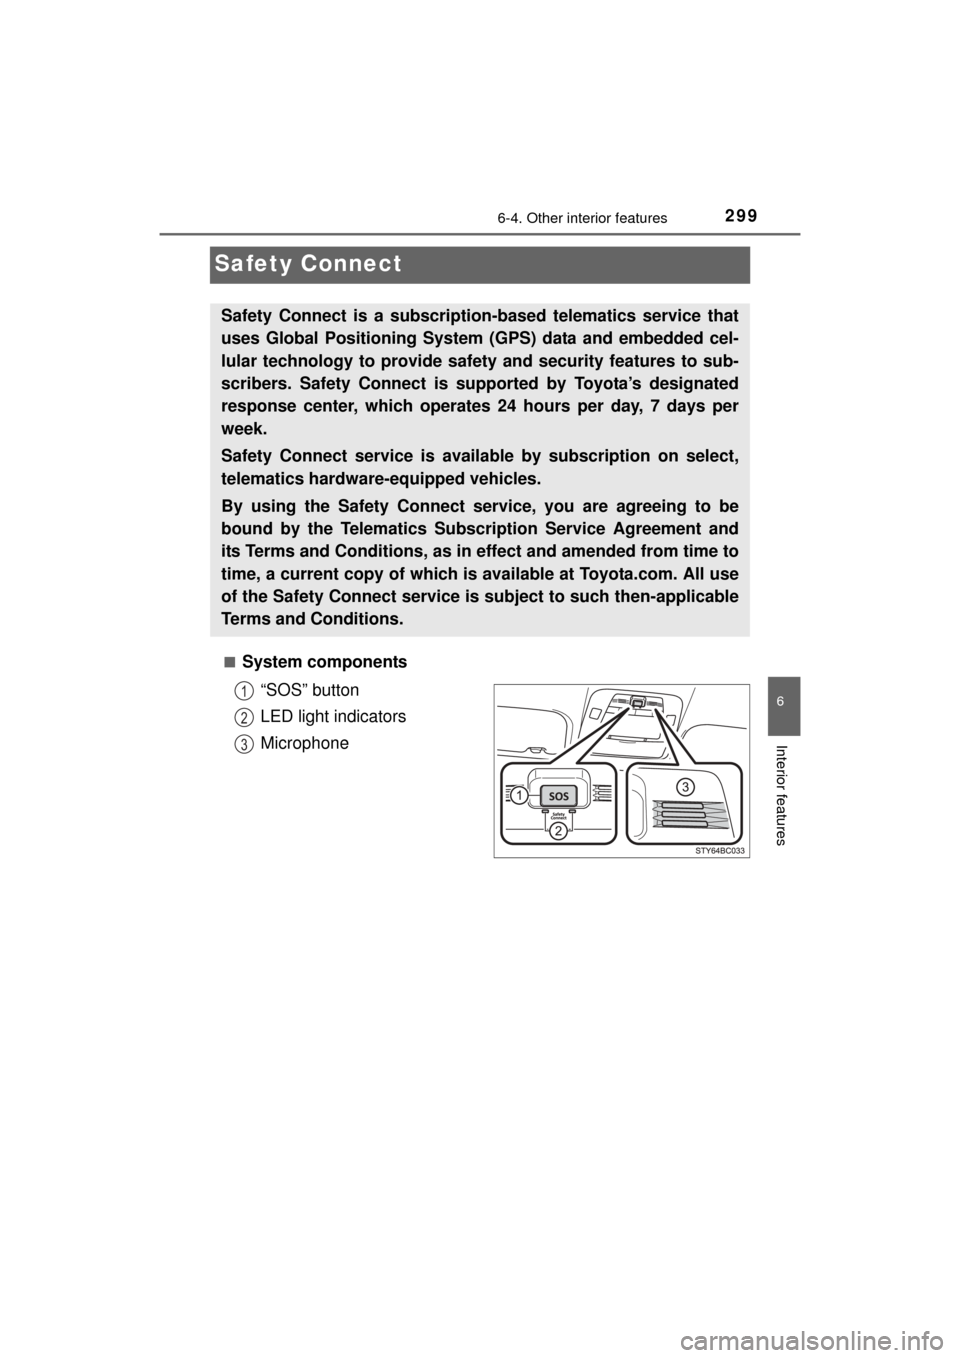
■System components“SOS” button
LED light indicators
Microphone
Safety Connect is a subscripti on-based telematics service that
uses Global Positioning System (GPS) data and embedded cel-
lular technology to provide safety and security features to sub-
scribers. Safety Connect is supported by Toyota’s designated
response center, which operates 24 hours per day, 7 days per
week.
Safety Connect service is avai lable by subscription on select,
telematics hardware-equipped vehicles.
By using the Safety Connect service, you are agreeing to be
bound by the Telematics Subscription Service Agreement and
its Terms and Conditions, as in ef fect and amended from time to
time, a current copy of which is available at Toyota.com. All use
of the Safety Connect service is subject to such then-applicable
Terms and Conditions.
1
2
3
Page 300 of 464

3006-4. Other interior features
MIRAI_OM_USA_OM62004U■
Services
Subscribers have the following Safe
ty Connect services available:
● Automatic Collision Notification
*
Helps drivers receive necessary response from emergency ser-
vice providers. ( P. 301)
*: U.S. Patent No. 7,508,298 B2
● Stolen Vehicle Location
Helps drivers in the event of vehicle theft. ( P. 302)
● Emergency Assistance Button (SOS)
Connects drivers to response-center support. ( P. 302)
● Enhanced Roadside Assistance
Provides drivers various on-road assistance. ( P. 302)
■Subscription
After you have signed the Telemati cs Subscription Service Agree-
ment and are enrolled, you c an begin receiving services.
A variety of subscription terms ar e available for purchase. Contact
your Toyota dealer, call 1-800-331-4331, or push the “SOS” button
in your vehicle for furt her subscription details.
■Safety Connect Services Information
●Phone calls using the vehicle’s Bluetooth® technology will not be possible
during Safety Connect.
● Safety Connect is available beginning Fall 2009 on select Toyota models.
Contact with the Safety Connect response center is dependent upon the
telematics device being in operative condition, cellular connection availabil-
ity, and GPS satellite signal reception, which can limit the ability to reach the
response center or receive emergency service support. Enrollment and
Telematics Subscription Service Agreement are required. A variety of sub-
scription terms are available; charges vary by subscription term selected.
● Automatic Collision Notification, Emergency Assistance, Stolen Vehicle
Location, and Enhanced Roadside Assistance will function in the United
States, including Hawaii and Alaska, and in Canada. No Safety Connect
services will function outside of the United States in countries other than
Canada.
● Safety Connect services are not subject to section 255 of the Telecommuni-
cations Act and the device is not TTY compatible.