buttons TOYOTA MIRAI 2019 Owners Manual (in English)
[x] Cancel search | Manufacturer: TOYOTA, Model Year: 2019, Model line: MIRAI, Model: TOYOTA MIRAI 2019Pages: 528, PDF Size: 11.84 MB
Page 22 of 528
22Pictorial index
MIRAI_OM_USA_OM62054U(18MY)_O
M62048U(19MY)
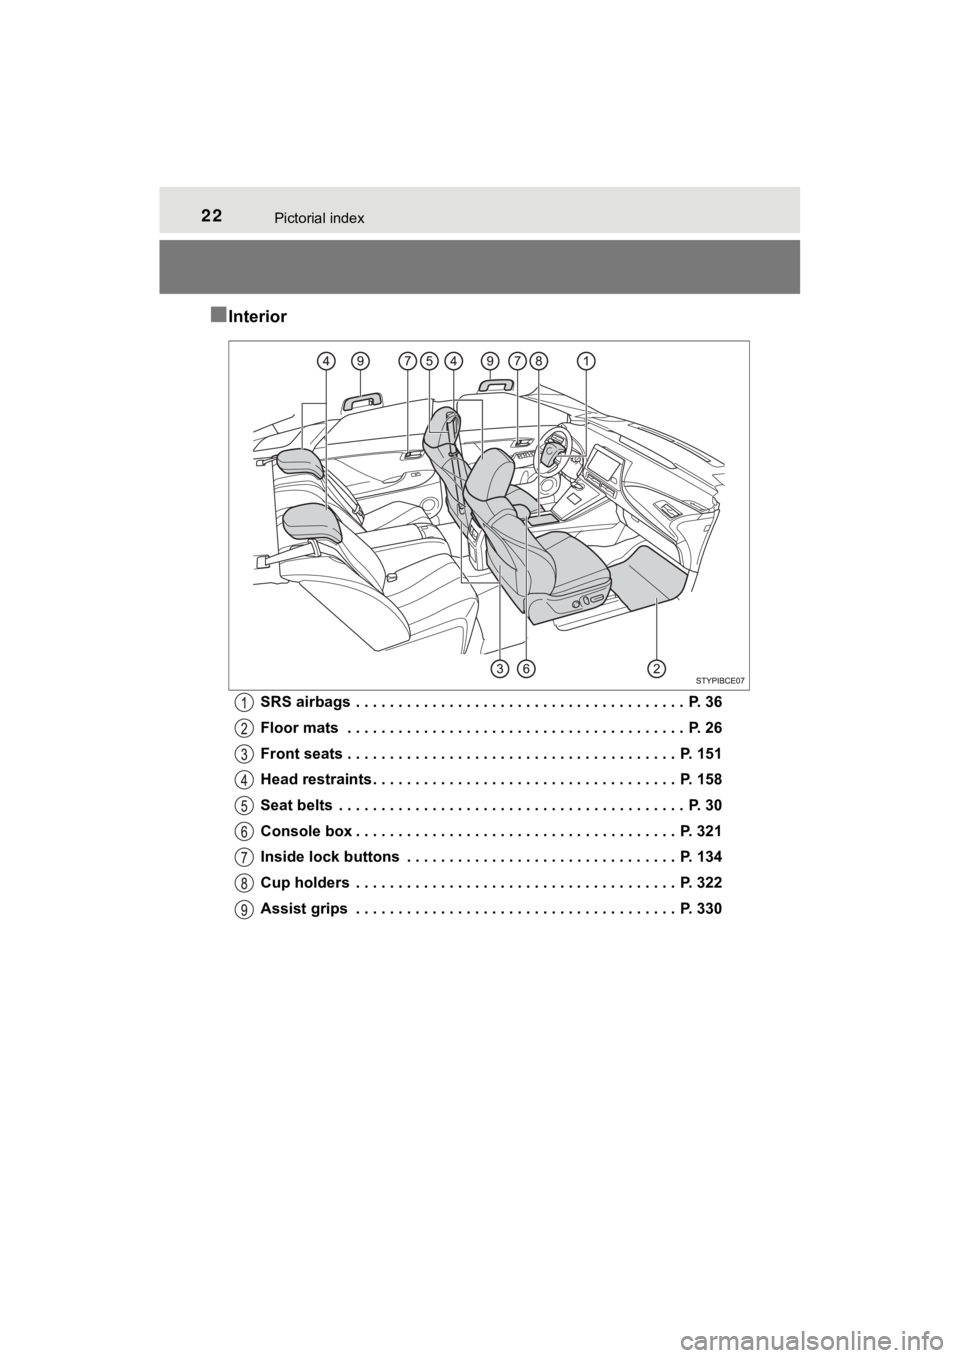
■Interior
SRS airbags . . . . . . . . . . . . . . . . . . . . . . . . . . . . . . . . . . . . . . . P. 36
Floor mats . . . . . . . . . . . . . . . . . . . . . . . . . . . . . . . . . . . . . . . . P. 26
Front seats . . . . . . . . . . . . . . . . . . . . . . . . . . . . . . . . . . . . . . . P. 151
Head restraints . . . . . . . . . . . . . . . . . . . . . . . . . . . . . . . . . . . . P. 158
Seat belts . . . . . . . . . . . . . . . . . . . . . . . . . . . . . . . . . . . . . . . . . P. 30
Console box . . . . . . . . . . . . . . . . . . . . . . . . . . . . . . . . . . . . . . P. 321
Inside lock buttons . . . . . . . . . . . . . . . . . . . . . . . . . . . . . . . . P. 134
Cup holders . . . . . . . . . . . . . . . . . . . . . . . . . . . . . . . . . . . . . . P. 322
Assist grips . . . . . . . . . . . . . . . . . . . . . . . . . . . . . . . . . . . . . . P. 330
Page 67 of 528
671-1. For safe use
1
For safety and security
MIRAI_OM_USA_OM62054U(18MY)_O
M62048U(19MY)■
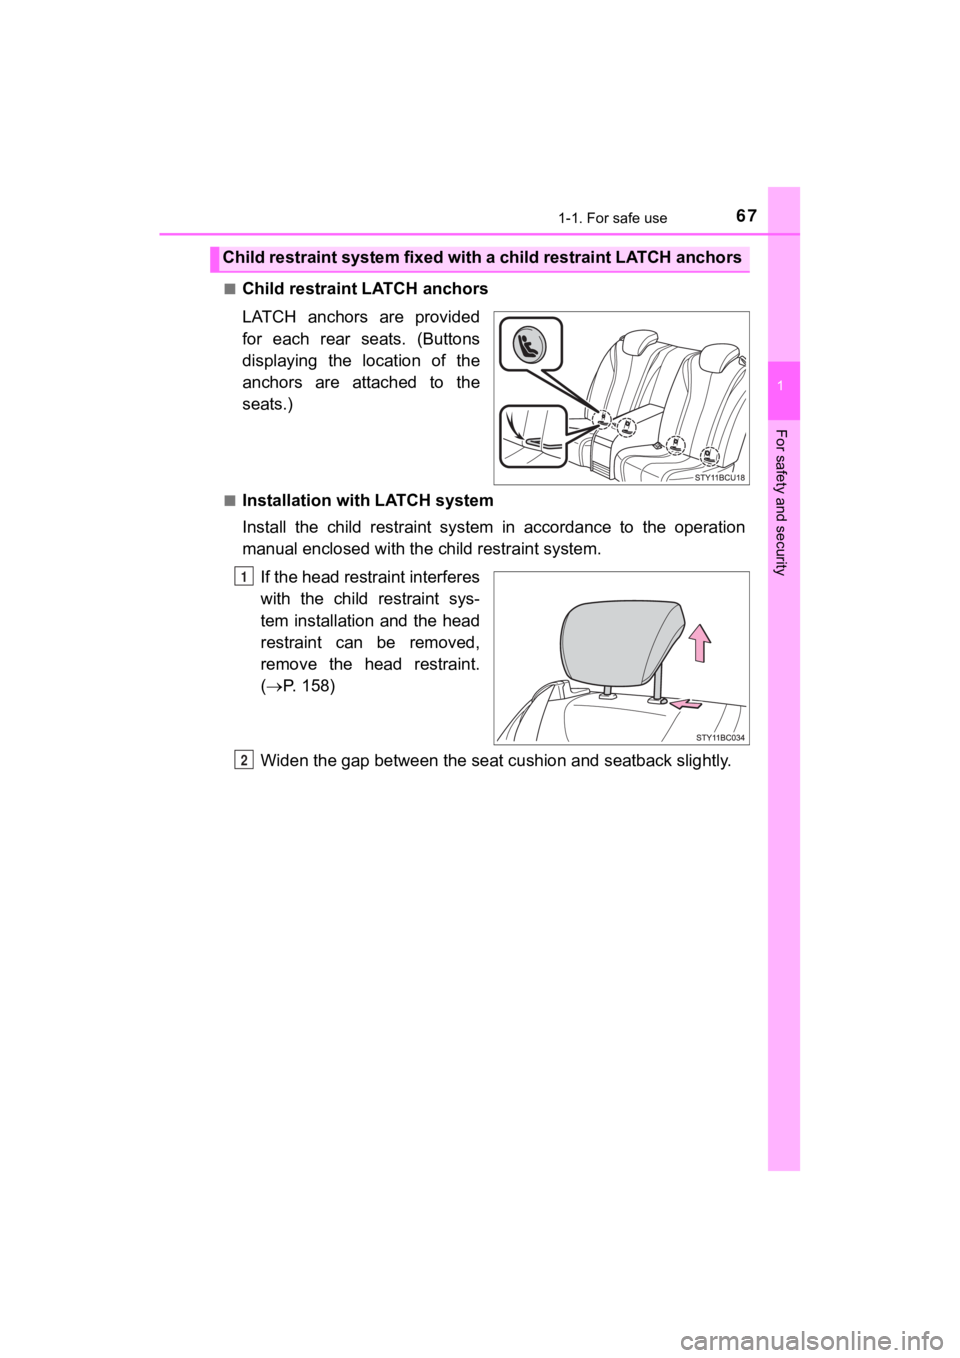
Child restraint LATCH anchors
LATCH anchors are provided
for each rear seats. (Buttons
displaying the location of the
anchors are attached to the
seats.)
■Installation with LATCH system
Install the child restraint system in accordance to the operati
on
manual enclosed with the child restraint system.
If the head restraint interferes
with the child restraint sys-
tem installation and the head
restraint can be removed,
remove the head restraint.
( P. 158)
Widen the gap between the seat cushion and seatback slightly.
Child restraint system fixed with a child restraint LATCH ancho rs
1
2
Page 134 of 528
1344-2. Opening, closing and locking the doors
MIRAI_OM_USA_OM62054U(18MY)_O
M62048U(19MY)
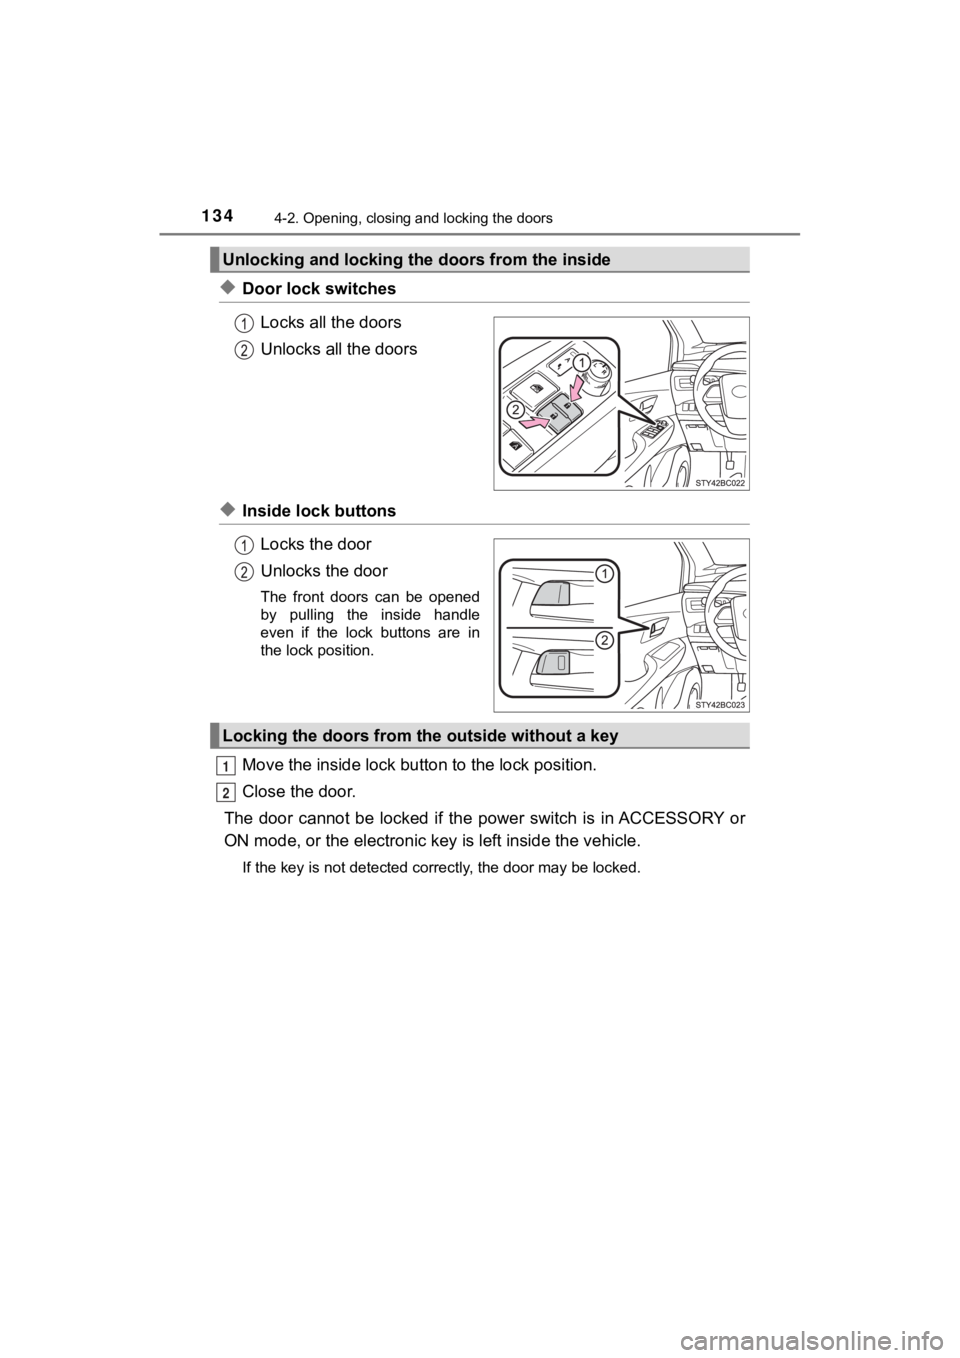
◆Door lock switchesLocks all the doors
Unlocks all the doors
◆Inside lock buttonsLocks the door
Unlocks the door
The front doors can be opened
by pulling the inside handle
even if the lock buttons are in
the lock position.
Move the inside lock bu tton to the lock position.
Close the door.
The door cannot be locked if the p ower switch is in ACCESSORY or
ON mode, or the electronic key is left inside the vehicle.
If the key is not detected correctly, the door may be locked.
Unlocking and locking the doors from the inside
Locking the doors from the outside without a key
1
2
Page 136 of 528
1364-2. Opening, closing and locking the doors
MIRAI_OM_USA_OM62054U(18MY)_O
M62048U(19MY)
■Switching the door unlock function
It is possible to set which doors the entry function unlocks using the wireless
remote control.
Turn the power switch off.
When the indicator light on the key surface is not on, press and hold ,
or for approximately 5 seconds while pressing and holding
.
The setting changes each time an operation is performed, as sho wn below.
(When changing the setting continuously, release the buttons, w ait for at least
5 seconds, and repeat step .)
To prevent unintended triggering of the alarm, unlock the doors using the
wireless remote control and open and close a door once after th e settings
have been changed. (If a door is not opened within 60 seconds a fter is
pressed, the doors will be locked again and the alarm will auto matically be
set.)
In case that the alarm is triggered, immediately stop the alarm . ( P. 81)
■ Impact detection door lock release system
In the event that the vehicle is subject to a strong impact, all the doors are
unlocked. Depending on the force of the impact or the type of a ccident, how-
ever, the system may not operate.
■ Using the mechanical key
The doors can also be locked and unlocked with the mechanical k ey.
( P. 449)
■ Open door warning buzzer
If the vehicle speed reaches 3 mph (5 km/h), the master warning light flashes
and a buzzer sounds to indicate that door(s) or the hood is not fully closed.
The open door(s) or hood is displayed on the multi-information display.
1
2
2
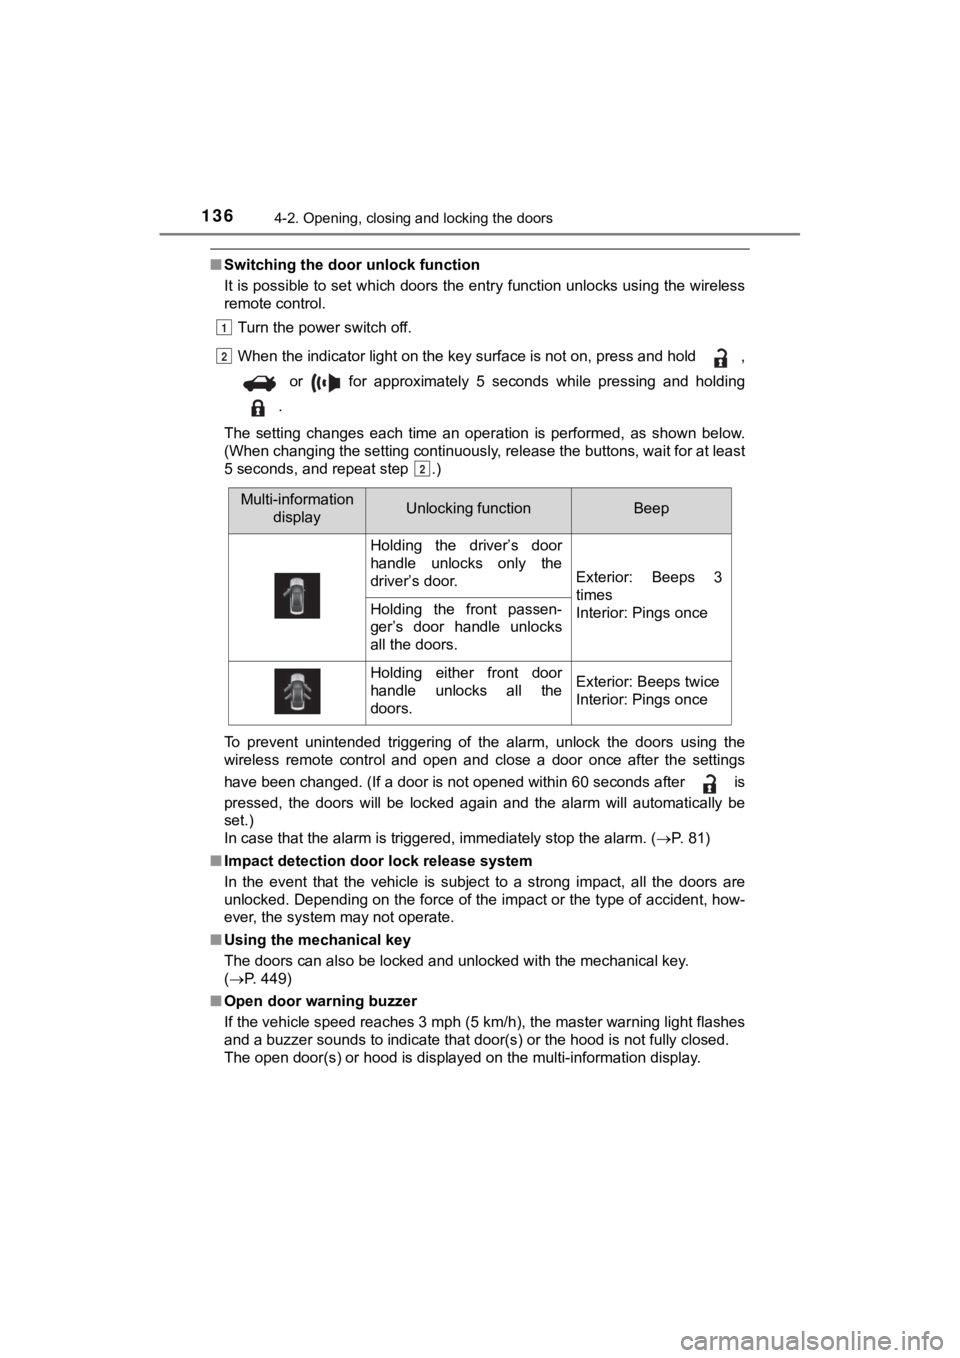
Multi-information
displayUnlocking functionBeep
Holding the driver’s door
handle unlocks only the
driver’s door.
Exterior: Beeps 3
times
Interior: Pings once
Holding the front passen-
ger’s door handle unlocks
all the doors.
Holding either front door
handle unlocks all the
doors.Exterior: Beeps twice
Interior: Pings once
Page 137 of 528
1374-2. Opening, closing and locking the doors
4
Operation of each component
MIRAI_OM_USA_OM62054U(18MY)_O
M62048U(19MY)■
Conditions affecting the operation of the smart key system or w ireless
remote control
P. 146
■ Customization
Settings (e.g. unlocking function using a key) can be changed.
(Customizable features: P. 485)
WARNING
■To prevent an accident
Observe the following precautions while driving the vehicle.
Failure to do so may result in a door opening and an occupant f alling out,
resulting in death or serious injury.
● Ensure that all doors are properly closed and locked.
● Do not pull the inside handle of the doors while driving.
Be especially careful for the front doors, as the doors may be opened
even if the inside lock buttons are in locked position.
● Set the rear door child-protector locks when children are seate d in the rear
seats.
■ When opening or closing a door
Check the surroundings of the vehicle such as whether the vehic le is on an
incline, whether there is enough space for a door to open and w hether a
strong wind is blowing.
When opening or closing the door, hold the door handle tightly to prepare
for any unpredictable movement.
■ When using the wireless remote control and operating the power win-
dows
Operate the power window after checking to make sure that there is no pos-
sibility of any passenger having any of their body parts caught in the win-
dow. Also, do not allow children to operate the wireless remote control. It is
possible for children and other passengers to get caught in the power win-
dow.
Page 145 of 528
1454-2. Opening, closing and locking the doors
4
Operation of each component
MIRAI_OM_USA_OM62054U(18MY)_O
M62048U(19MY)■
When “Smart Key System Malfuncti on See Owner’s Manual” will be dis-
played on the multi-information display
The system may be malfunctioning. Have the vehicle inspected by your
Toyota dealer immediately.
■ Battery-saving function
The battery-saving function will be activated in order to preve nt the electronic
key battery and the 12-volt battery from being discharged while the vehicle is
not in operation for a long time.
● In the following situations, the smart key system may take some time to
unlock the doors.
• The electronic key has been left in an area of approximately 6 ft. (2 m) of
the outside of the vehicle for 10 minutes or longer.
• The smart key system has not been used for 5 days or longer.
● If the smart key system has not been used for 14 days or longer , the doors
cannot be unlocked at any doors except the driver’s door. In th is case, take
hold of the driver’s door handle, or use the wireless remote co ntrol or the
mechanical key, to unlock the doors.
■ Electronic Key battery-Saving Function
When battery-saving mode is set, battery depletion is minimized by stopping
the electronic key from receiving radio waves.
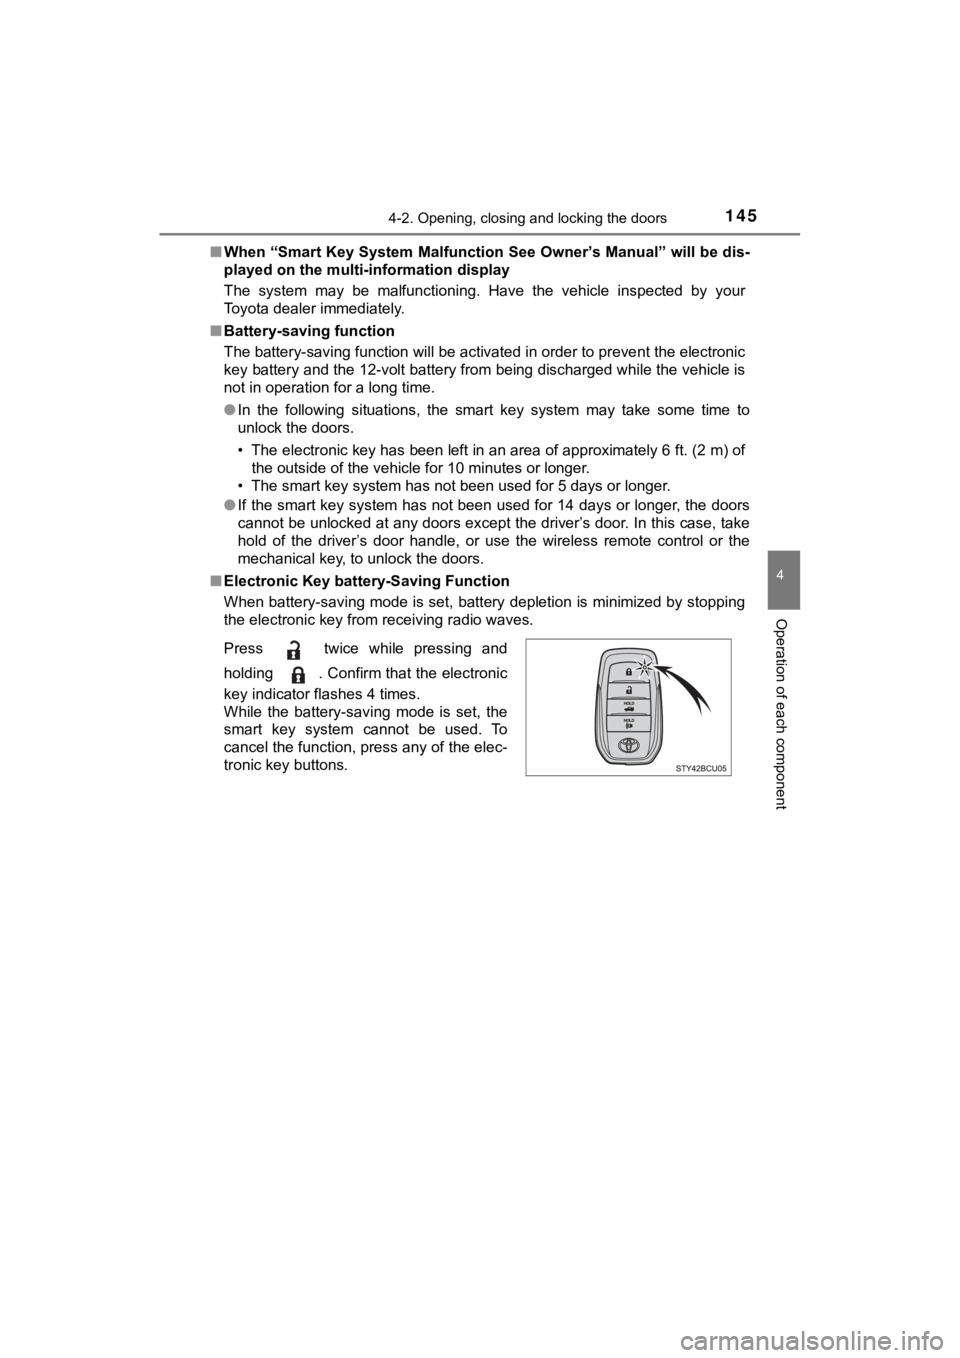
Press twice while pressing and
holding . Confirm that the electronic
key indicator flashes 4 times.
While the battery-saving mode is set, the
smart key system cannot be used. To
cancel the function, press any of the elec-
tronic key buttons.
Page 154 of 528
1544-3. Adjusting the seats
MIRAI_OM_USA_OM62054U(18MY)_O
M62048U(19MY)
Your preferred driving position (the position of the driver’s seat, steer-
ing wheel and outside rear view mirrors) can be recorded and re called
by pressing a button.
Two different driving positions can be recorded into memory.
■Recording procedure
Turn the power switch to ON mode.
Check that the shif t position is in P.
Adjust the driver’s seat, steering wheel and outside rear view
mirrors to the desired positions.
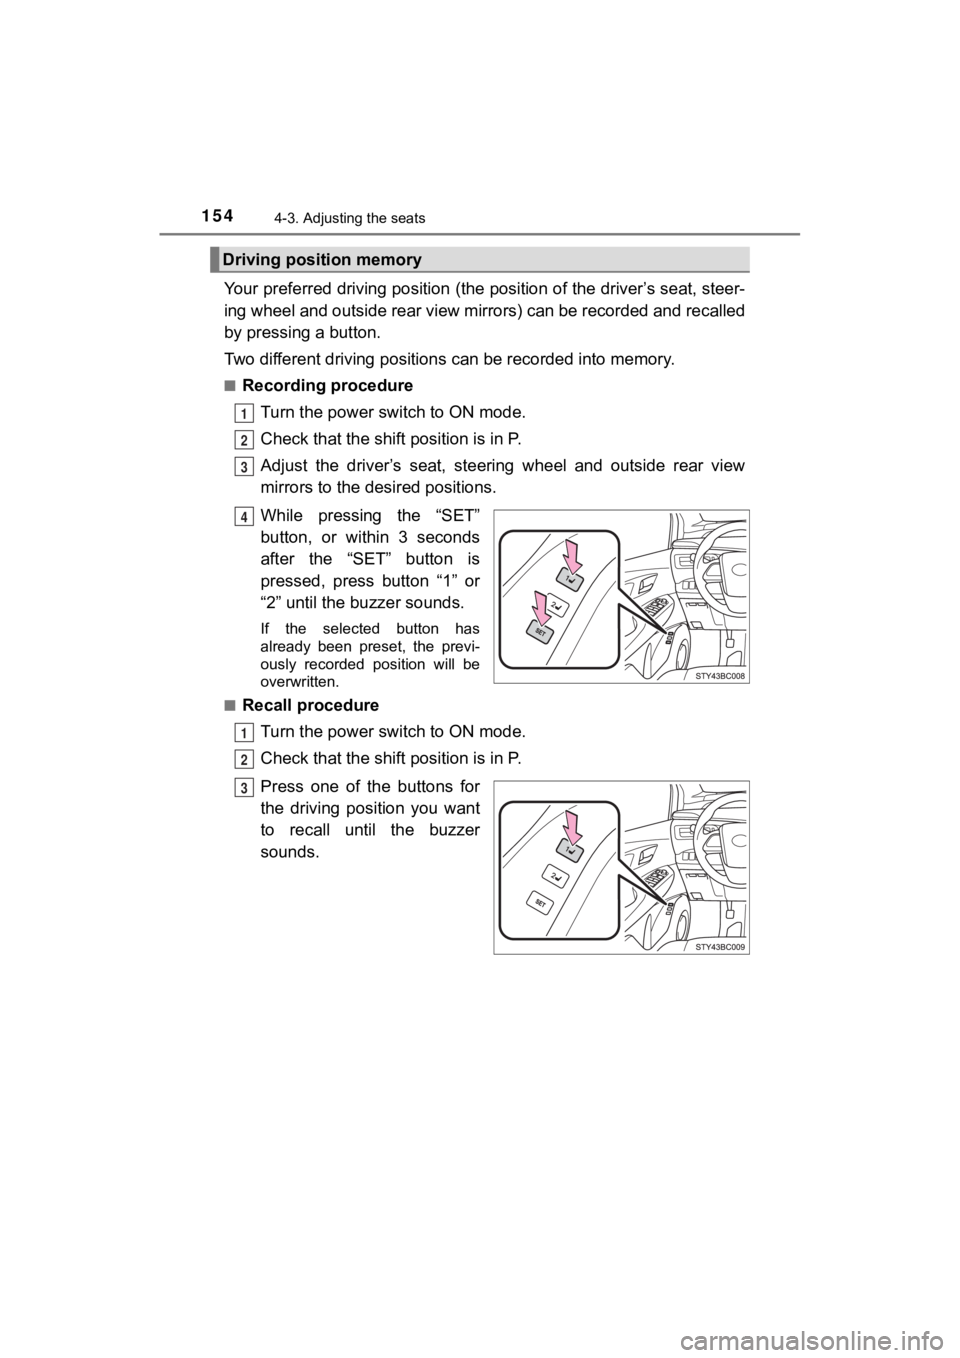
While pressing the “SET”
button, or within 3 seconds
after the “SET” button is
pressed, press button “1” or
“2” until the buzzer sounds.
If the selected button has
already been preset, the previ-
ously recorded position will be
overwritten.
■
Recall procedure
Turn the power switch to ON mode.
Check that the shif t position is in P.
Press one of the buttons for
the driving position you want
to recall until the buzzer
sounds.
Driving position memory
1
2
3
4
1
2
3
Page 343 of 528
3436-4. Other interior features
6
Interior features
MIRAI_OM_USA_OM62054U(18MY)_O
M62048U(19MY)
Garage door opener
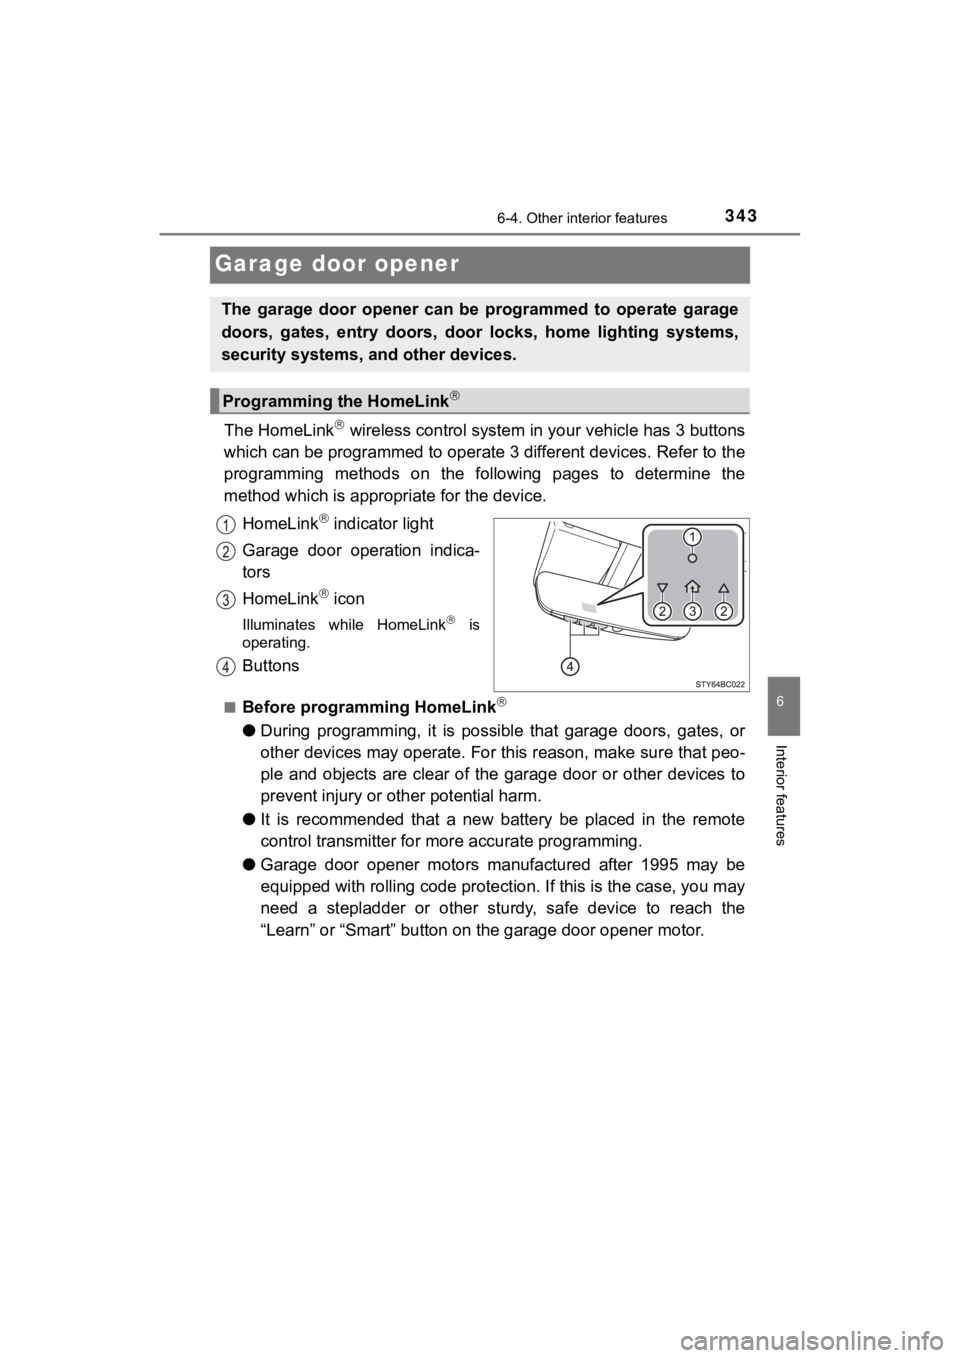
The HomeLink wireless control system in your vehicle has 3 buttons
which can be programmed to operate 3 different devices. Refer to the
programming methods on the following pages to determine the
method which is approp riate for the device.
HomeLink
indicator light
Garage door operation indica-
tors
HomeLink
icon
Illuminates while HomeLink is
operating.
Buttons
■Before programming HomeLink
● During programming, it is possible that garage doors, gates, or
other devices may operate. For this reason, make sure that peo-
ple and objects are clear of the garage door or other devices t o
prevent injury or other potential harm.
● It is recommended that a new battery be placed in the remote
control transmitter for mo re accurate programming.
● Garage door opener motors manufactured after 1995 may be
equipped with rolling code pro tection. If this is the case, you may
need a stepladder or other sturdy, safe device to reach the
“Learn” or “Smart” button on the garage door opener motor.
The garage door opener can be programmed to operate garage
doors, gates, entry doors, door locks, home lighting systems,
security systems, and other devices.
Programming the HomeLink
Page 344 of 528
3446-4. Other interior features
MIRAI_OM_USA_OM62054U(18MY)_O
M62048U(19MY)■
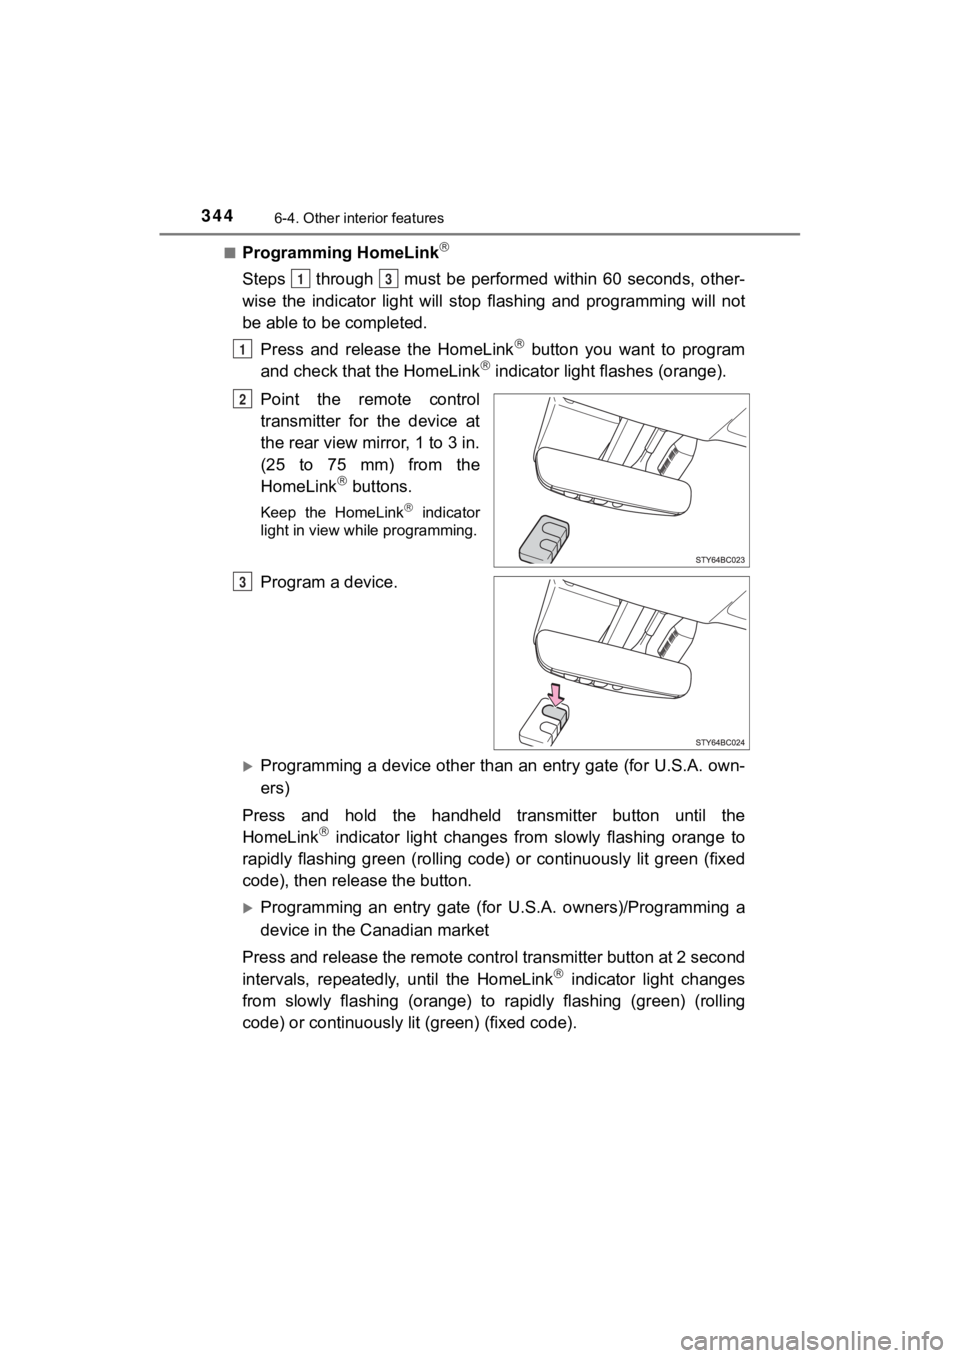
Programming HomeLink
Steps through must be performed within 60 seconds, other-
wise the indicator light will st
op flashing and programming wil l not
be able to be completed.
Press and release the HomeLink
button you want to program
and check that the HomeLink indicator light flashes (orange).
Point the remote control
transmitter for the device at
the rear view mirror, 1 to 3 in.
(25 to 75 mm) from the
HomeLink
buttons.
Keep the HomeLink indicator
light in view while programming.
Program a device.
Programming a device other than an entry gate (for U.S.A. own-
ers)
Press and hold the handheld transmitter button until the
HomeLink
indicator light changes from slowly flashing orange to
rapidly flashing green (rolling code) or continu ously lit green (fixed
code), then release the button.
Programming an entry gate (for U.S.A. owners)/Programming a
device in the Canadian market
Press and release the remote control transmitter button at 2 se cond
intervals, repeatedly, until the HomeLink
indicator light changes
from slowly flashing (orange) to rapidly flashing (green) (rolling
code) or continuously l it (green) (fixed code).
13
1
2
3
Page 345 of 528
3456-4. Other interior features
6
Interior features
MIRAI_OM_USA_OM62054U(18MY)_O
M62048U(19MY)
Test the HomeLink operation by pressing the newly pro-
grammed button and observi ng the indicator light:
● Indicator light illuminates: Progr amming of a fixed code device
has completed. The garage door or other device should oper-
ate when a HomeLink
button is pressed and released.
● Indicator light flashes rapidly: The garage door opener motor
or other device is equipped with a rolling code. To complete
programming, firmly press and hold the HomeLink
button for
2 seconds then release it.
● If the garage door or other device does not operate, proceed
to “Programming a rolling code system”.
Repeat the steps above to program another device for any of the
remaining HomeLink
buttons.
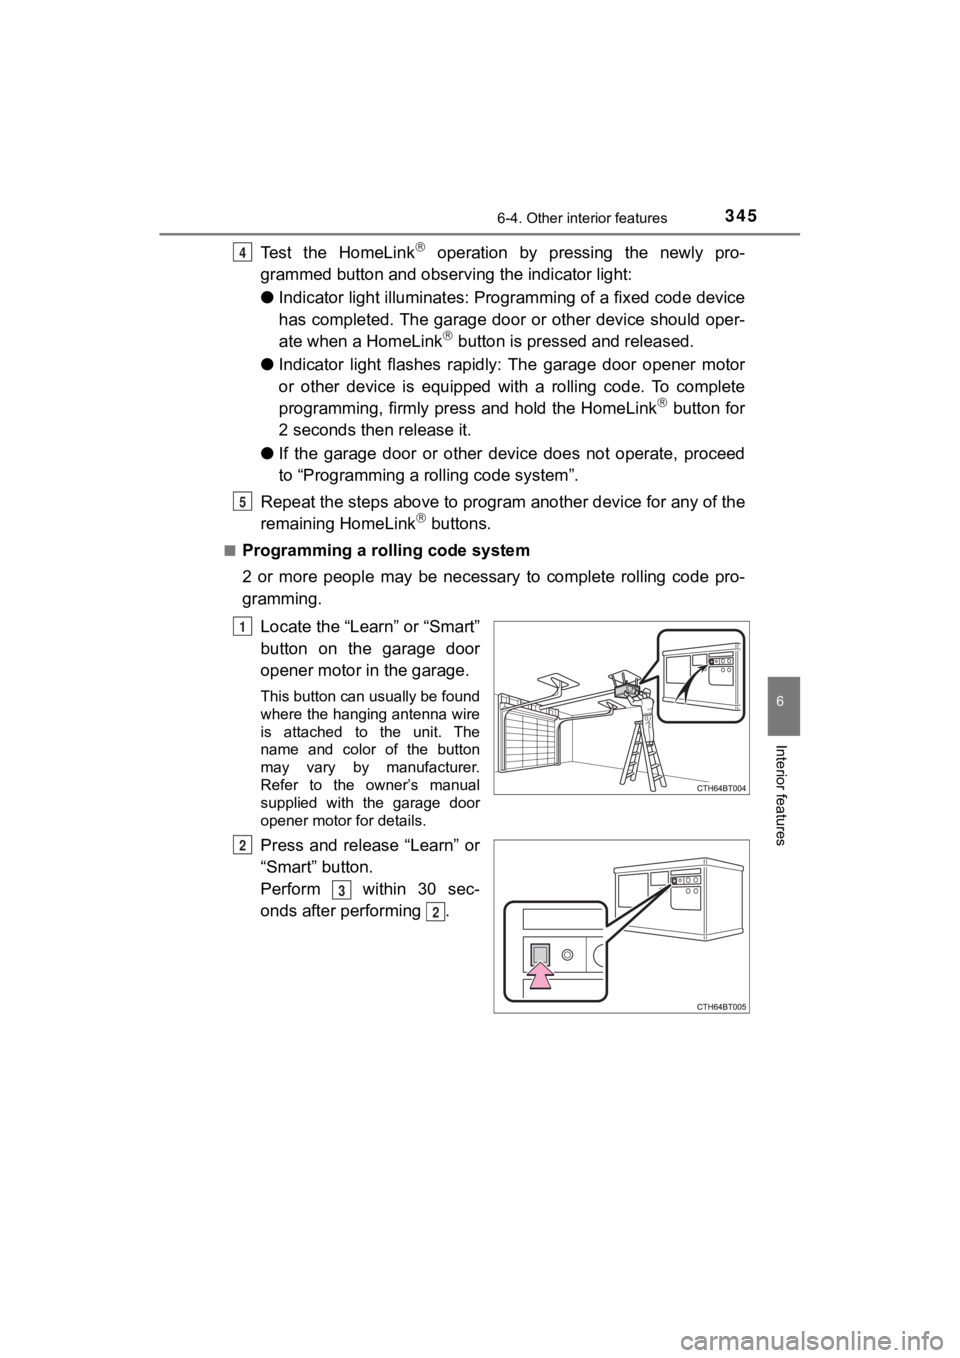
■Programming a rolling code system
2 or more people may be necessary to complete rolling code pro-
gramming.
Locate the “Learn” or “Smart”
button on the garage door
opener motor in the garage.
This button can usually be found
where the hanging antenna wire
is attached to the unit. The
name and color of the button
may vary by manufacturer.
Refer to the owner’s manual
supplied with the garage door
opener motor for details.
Press and release “Learn” or
“Smart” button.
Perform within 30 sec-
onds after performing .
4
5
1
2
3
2