sensor TOYOTA MIRAI 2022 Owners Manual
[x] Cancel search | Manufacturer: TOYOTA, Model Year: 2022, Model line: MIRAI, Model: TOYOTA MIRAI 2022Pages: 556, PDF Size: 17.34 MB
Page 35 of 556
351-1. For safe use
Owners Manual_USA_M62084_en
1
For safety and security
• Can help prevent the occupants from being thrown from the vehi cle in the
event of vehicle rollover
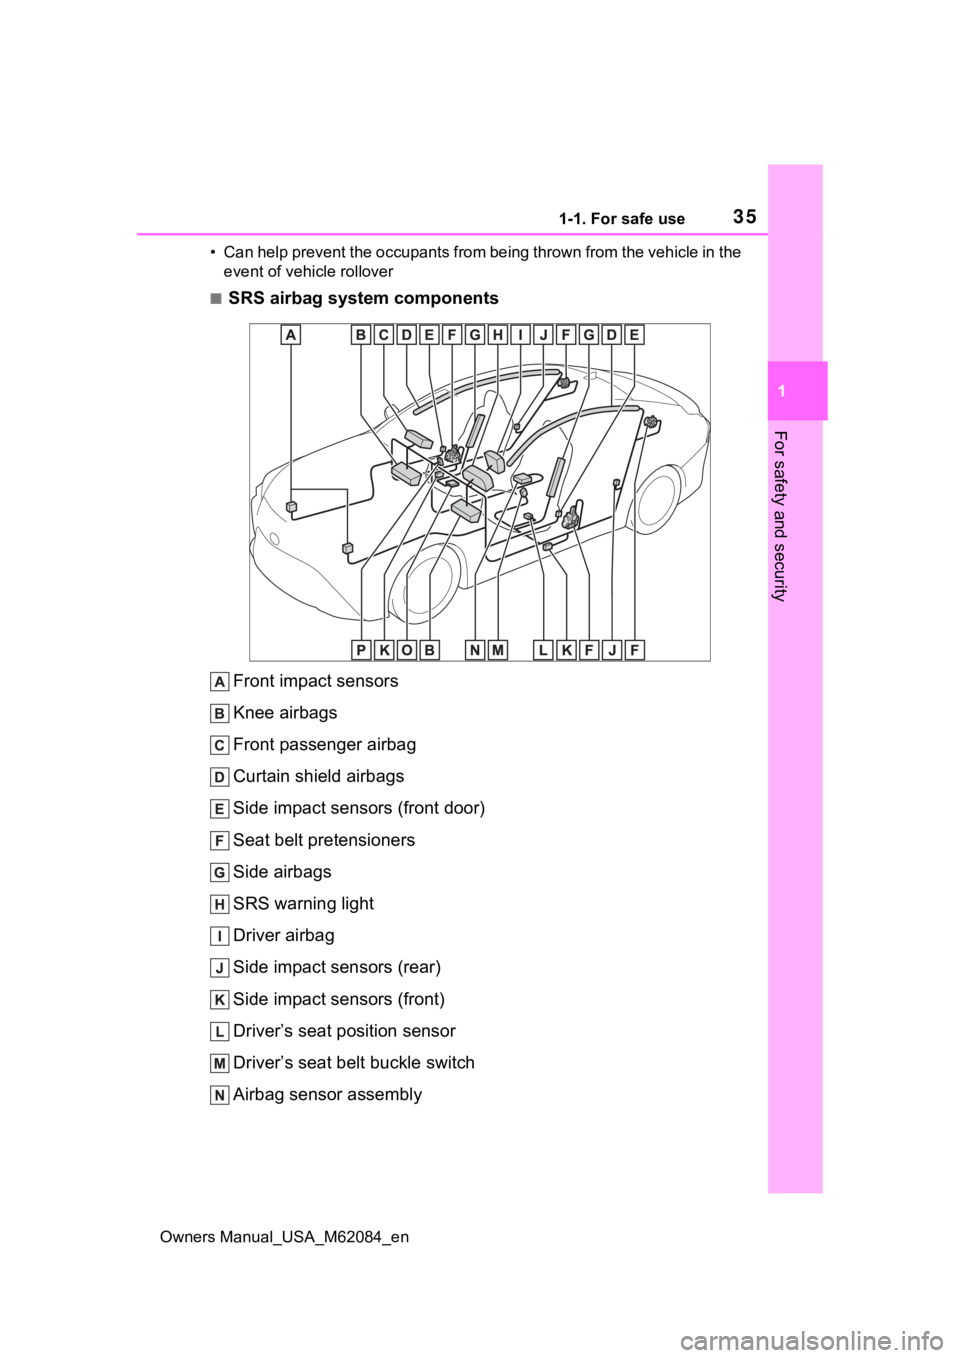
■SRS airbag system components
Front impact sensors
Knee airbags
Front passenger airbag
Curtain shield airbags
Side impact sensors (front door)
Seat belt pretensioners
Side airbags
SRS warning light
Driver airbag
Side impact sensors (rear)
Side impact sensors (front)
Driver’s seat position sensor
Driver’s seat bel t buckle switch
Airbag sensor assembly
Page 36 of 556

361-1. For safe use
Owners Manual_USA_M62084_en
Front passenger occupant classification system (ECU and sen-
sors)
“AIRBAG ON” and “AIRBAG OFF” indicator lights
Your vehicle is equipped with ADVANCED AIRBAGS designed
based on the US motor vehicle safety standards (FMVSS208). The
airbag sensor assembly (ECU) cont rols airbag deployment based on
information obtained from the sensors etc. shown in the system
components diagram above. This in formation includes crash sever-
ity and occupant information. As the airbags deploy, a chemical
reaction in the inflators quickly fills the airbags with non-toxic gas to
help restrain the motion of the occupants.
■If the SRS airbags deploy
(inflate)
●Slight abrasions, burns, bruising,
etc., may be sustained from SRS
airbags, due to the extremely high
speed deployment (inflation) by
hot gases.
●A loud noise and white powder will
be emitted.
●Parts of the airbag module (steer-
ing wheel hub, airbag cover and
inflator) as well as the front seats,
parts of the front and rear pillars,
and roof side rails, may be hot for
several minutes. T he airbag itself
may also be hot.
●The windshield may crack.
●The fuel cell system will be
stopped and hydr ogen supply will
be stopped fro m the hydrogen
tank valves. ( P. 8 7 )
●All of the doors will be unlocked.
( P.122)
●The brakes and st op lights will be
controlled automatically. ( P.316)
●The interior lights will turn on auto-
matically. ( P.348)
●The emergency flashers will turn
on automatically. ( P.432)
●For Safety Connect subscribers, if
any of the following situations
occur, the system is designed to send an emergency call to the
response center, notifying them of
the vehicle’s location (without
needing to push the “SOS” button)
and an agent will attempt to speak
with the occupants to ascertain
the level of emergency and assis-
tance required. If the occupants
are unable to communicate, the
agent automatically treats the call
as an emergency and helps to dis-
patch the necessary emergency
services. (
P. 6 5 )
• An SRS airbag is deployed.
• A seat belt pretensioner is acti- vated.
• The vehicle is involved in a severe rear-end collision.
■SRS airbag deployment condi-
tions (SRS front airbags)
●The SRS front airbags will deploy
in the event of an impact that
exceeds the set threshold level
(the level of forc e corresponding
to an approximately 12 - 18 mph
[20 - 30 km/h] frontal collision with
a fixed wall that does not move or
deform).
However, this threshold velocity will
be considerably higher in the follow-
ing situations:
• If the vehicle strikes an object, such as a parked vehicle or sign
pole, which can move or deform
on impact
Page 43 of 556
431-1. For safe use
Owners Manual_USA_M62084_en
1
For safety and security
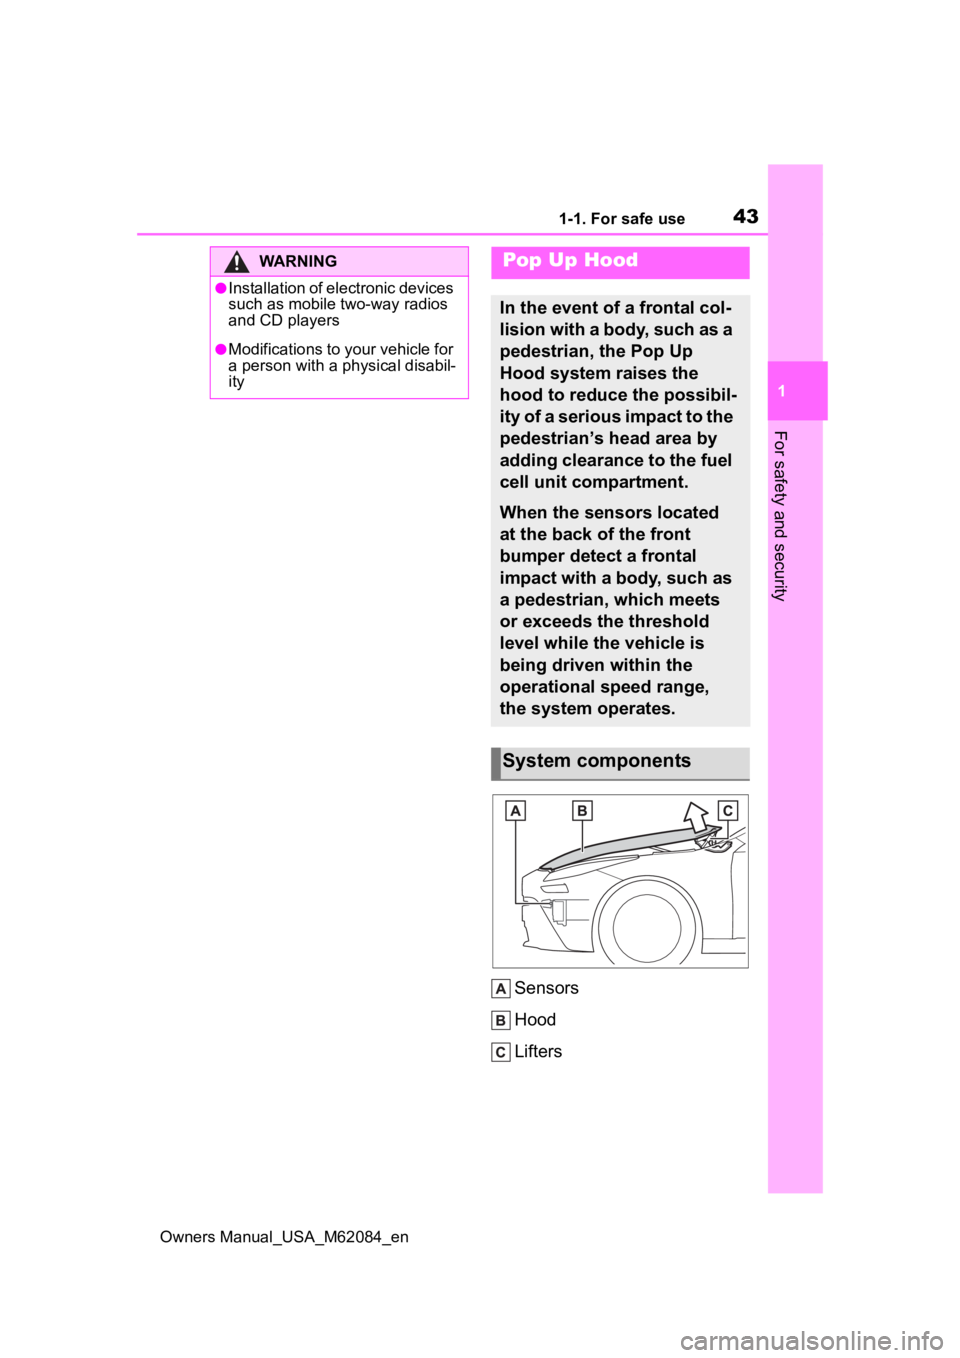
Sensors
Hood
Lifters
WARNING
●Installation of electronic devices
such as mobile two-way radios
and CD players
●Modifications to your vehicle for
a person with a physical disabil-
ity
Pop Up Hood
In the event of a frontal col-
lision with a body, such as a
pedestrian, the Pop Up
Hood system raises the
hood to reduce the possibil-
ity of a serious impact to the
pedestrian’s head area by
adding clearance to the fuel
cell unit compartment.
When the sensors located
at the back of the front
bumper detect a frontal
impact with a body, such as
a pedestrian, which meets
or exceeds the threshold
level while the vehicle is
being driven within the
operational speed range,
the system operates.
System components
Page 45 of 556
451-1. For safe use
Owners Manual_USA_M62084_en
1
For safety and security
WARNING
●If the Pop Up Hood has oper-
ated, have it replaced by your
Toyota dealer. If the Pop Up
Hood has operated, stop the
vehicle in a safe place and con-
tact your Toyota dealer.
●Do not touch the lifters immedi-
ately after the Pop Up Hood has
operated, as the lifters may be
hot and burn you.
NOTICE
■Pop Up Hood precautions
●Make sure to close the hood
before driving, as the system
may not operate properly if the
hood is not fully closed.
●Make sure that all 4 tires are of
the specified size and inflated to
the specified tire pressure. If
tires of a different size are used,
the system may not operate
properly.
●If something has hit the area
around the front bumper, the
sensors may be damaged even
if the Pop Up Hood has not
operated. Have the vehicle
inspected by your Toyota
dealer.
●Do not remove or repair the
parts or wiring of the Pop Up
Hood, as doing so may cause
accidental operation or prevent
the system from operating prop-
erly. If repair or replacement is
necessary, contact your Toyota
dealer.
●Do not remove such compo-
nents as the front bumper, hood
or suspension, or replace them
with non-genuine parts, as
doing so may prevent the sys-
tem from operating properly.
●Do not install anything to the
front bumper or hood, as doing
so may prevent the sensors
from detecting an impact cor-
rectly and prevent the system
from operating properly.
●Do not close the hood with force
or apply load to the lifters, as
doing so may damage the lifters
and prevent the system from
operating properly.
●Do not modify the suspension,
as changes made to the vehicle
height may prevent the system
from operating properly.
Page 84 of 556
842-1. Fuel cell vehicle
Owners Manual_USA_M62084_en
■Basic concepts of hydrogen
safety
●Prevent leakage
The pipe joints o f the hydrogen
pipelines are designed to prevent
leaks.
The joints are checked for gas leak-
age at every official vehicle inspec-
tion.
●Detect to stop leakage
• The vehicle is equipped with
hydrogen detectors. If the hydro-
gen detectors detect a leak, the
hydrogen tank valves automati-
cally close to prevent more hydro-
gen from escaping.
• The vehicle is equipped with a col- lision sensor. If the collision sen-
sor detects a collision, the
hydrogen tank valves automati-
cally close to prevent hydrogen
gas from leaking from any dam- aged components.
●Disperse the leaked hydrogen gas
The hydrogen tanks and pipelines
are located outside of the passenger
compartment, so any leaked gas will
disperse into the atmosphere by
design.
●Eliminate sources of fire
No source of fire is located near the
hydrogen pipelines by design.
Ease of accumu-
lation
Disperses
upward and is
diluted to safe
concentrations
in open air
Does not
adhere to cloth-
ing
Spreads on the
ground or floor
Does not
adhere to cloth-
ingSpreads on the
ground or floor
Adheres to
clothing
Detectability
Due to its color-
less and odor-
less state,
difficult to
detect by sight
or smell
Vehicle hydro-
gen detectors
will display a
warning on the
multi-informa-
tion display
Detectable by
odor and gas
leaking noiseDetectable by
color and odor
Hydrogen gasLPG (Liquid
Petroleum Gas)Gasoline
WARNING
■Hydrogen-related compo-
nents
●Never alter, customize, or disas-
semble any hydrogen-related
parts.
Page 121 of 556
1214-2. Opening, closing and locking the doors and trunk
Owners Manual_USA_M62084_en
4
Before driving
4-2.Opening, closing and locking the doors and trunk
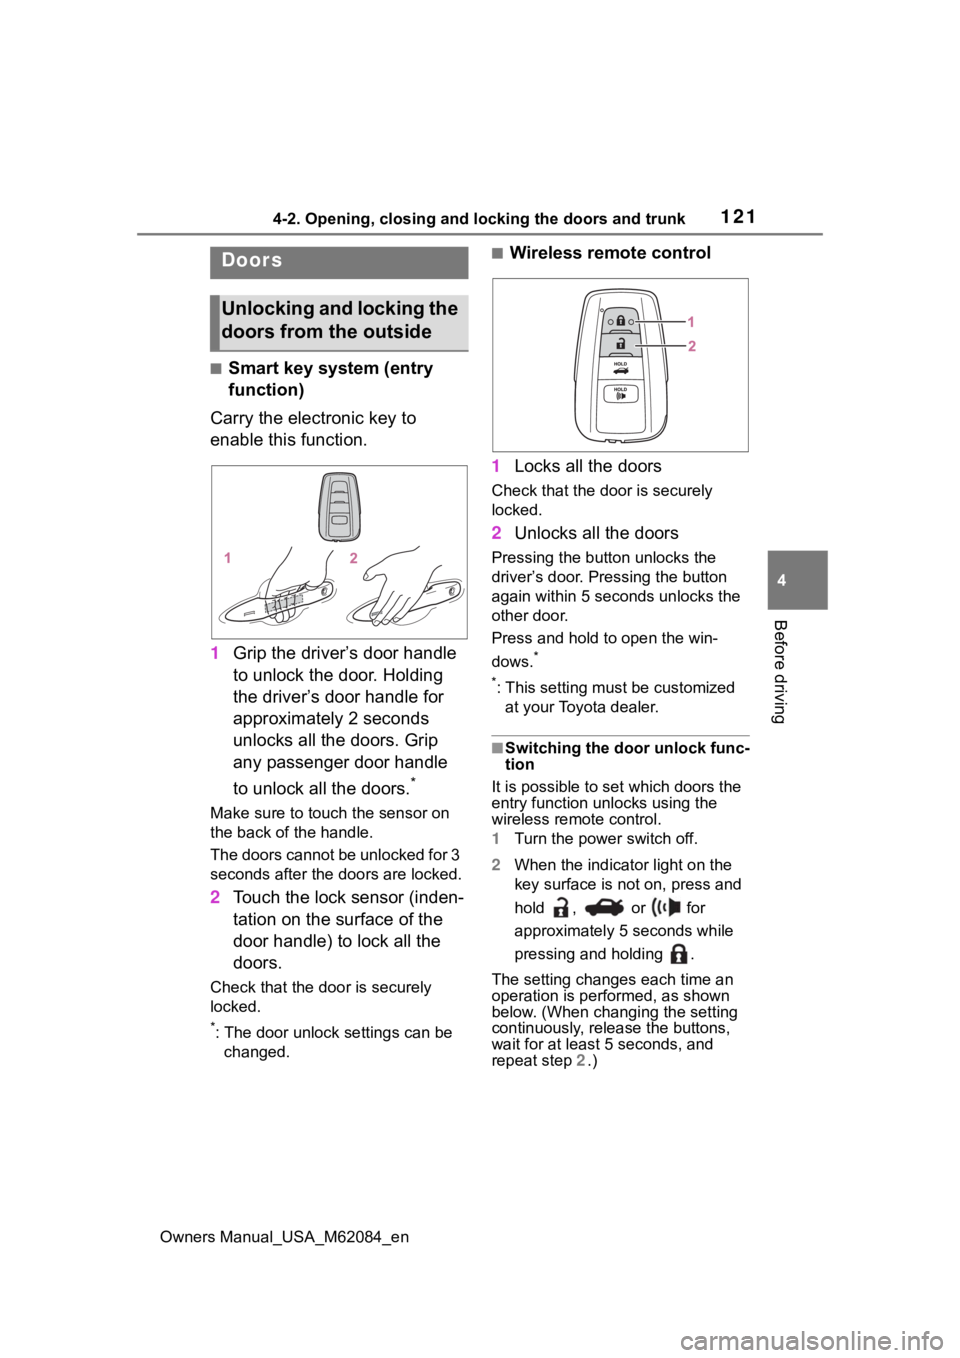
■Smart key system (entry
function)
Carry the electronic key to
enable this function.
1 Grip the driver’s door handle
to unlock the door. Holding
the driver’s door handle for
approximately 2 seconds
unlocks all the doors. Grip
any passenger door handle
to unlock all the doors.
*
Make sure to touch the sensor on
the back of the handle.
The doors cannot be unlocked for 3
seconds after the doors are locked.
2Touch the lock sensor (inden-
tation on the surface of the
door handle) to lock all the
doors.
Check that the door is securely
locked.
*: The door unlock settings can be
changed.
■Wireless remote control
1 Locks all the doors
Check that the d oor is securely
locked.
2 Unlocks all the doors
Pressing the button unlocks the
driver’s door. Pressing the button
again within 5 seconds unlocks the
other door.
Press and hold to open the win-
dows.
*
*
: This setting must be customized at your Toyota dealer.
■Switching the door unlock func-
tion
It is possible to set which doors the
entry function unlocks using the
wireless remote control.
1 Turn the power switch off.
2 When the indicator light on the
key surface is not on, press and
hold , or for
approximately 5 seconds while
pressing and holding .
The setting changes each time an
operation is per formed, as shown
below. (When changing the setting
continuously, release the buttons,
wait for at least 5 seconds, and
repeat step 2 .)
Doors
Unlocking and locking the
doors from the outside
Page 122 of 556
1224-2. Opening, closing and locking the doors and trunk
Owners Manual_USA_M62084_enTo prevent unintended triggering of
the alarm, unlock
the doors using
the wireless remote control and
open and close a door once after
the settings have been changed. (If
a door is not opened within 60 sec-
onds after is pressed, the doors
will be locked again and the alarm
will automatically be set.)
In a case that the alarm is triggered,
immediately stop the alarm. ( P. 7 0 )
■Impact detection door lock
release system
In the event that t he vehicle is sub-
ject to a strong impact, all the doors
are unlocked. Depending on the
force of the impact or the type of
accident, however, the system may
not operate.
■Operation signals
A buzzer sounds and the emer-
gency flashers flash to indicate that
the doors have been locked/unlocked. (Locked: once;
Unlocked: twice)
A buzzer sounds to indicate that the
windows are operating.
■Security feature
If a door is not opened within
approximately 60 s econds after the
vehicle is unlocked, the security fea-
ture automatically locks the vehicle
again.
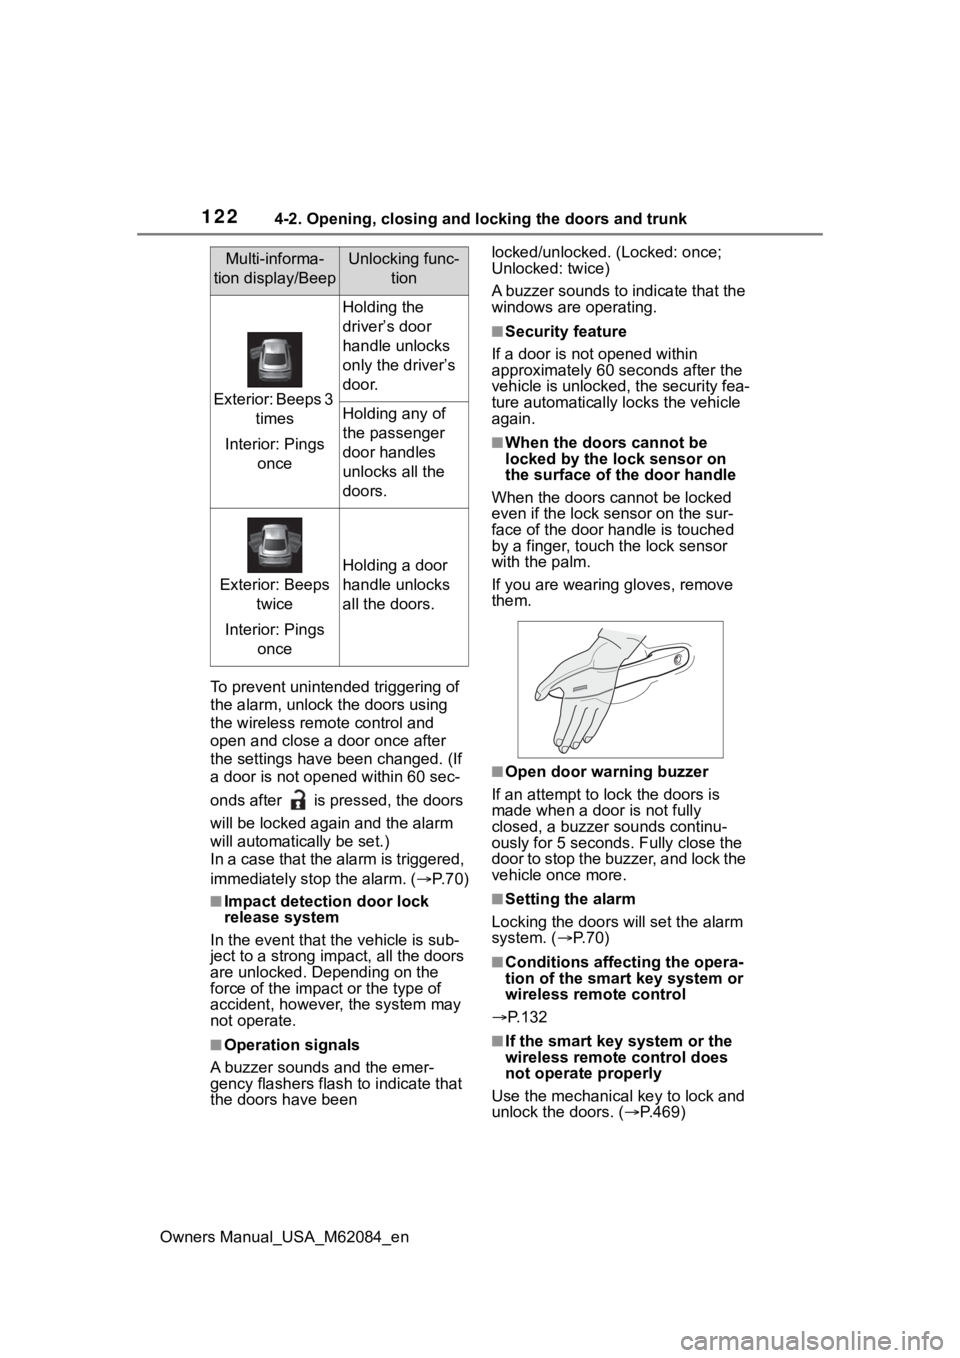
■When the doors cannot be
locked by the lock sensor on
the surface of the door handle
When the doors cannot be locked
even if the lock se nsor on the sur-
face of the door handle is touched
by a finger, touch the lock sensor
with the palm.
If you are wearing gloves, remove
them.
■Open door warning buzzer
If an attempt to lock the doors is
made when a door is not fully
closed, a buzzer sounds continu-
ously for 5 seconds. Fully close the
door to stop the buzzer, and lock the
vehicle once more.
■Setting the alarm
Locking the doors will set the alarm
system. ( P. 7 0 )
■Conditions affecting the opera-
tion of the smart key system or
wireless remote control
P.132
■If the smart key system or the
wireless remote control does
not operate properly
Use the mechanical key to lock and
unlock the doors. ( P.469)
Multi-informa-
tion display/BeepUnlocking func- tion
Exterior: Beeps 3 times
Interior: Pings once
Holding the
driver’s door
handle unlocks
only the driver’s
door.
Holding any of
the passenger
door handles
unlocks all the
doors.
Exterior: Beeps twice
Interior: Pings once
Holding a door
handle unlocks
all the doors.
Page 133 of 556

1334-2. Opening, closing and locking the doors and trunk
Owners Manual_USA_M62084_en
4
Before driving
doors detecting the electronic key
can be used to unl ock the vehicle.
●Even if the electronic key is not
inside the vehicle, it may be possi-
ble to start the fuel cell system if
the electronic key is near the win-
dow.
●The doors may unlock or lock if a
large amount of water splashes on
the door handle, such as in the
rain or in a car wash, when the
electronic key is within the effec-
tive range. (The doors will auto-
matically be locked after
approximately 60 seconds if the
doors are not opened and closed.)
●If the wireless remote control is
used to lock the doors when the
electronic key is near the vehicle,
there is a possib ility that the door
may not be unlocke d by the entry
function. (Use the wireless remote
control to unloc k the doors.)
●Touching the door lock sensor
while wearing gloves may delay or
prevent lock operation.
●When the lock op eration is per-
formed using the lock sensor, rec-
ognition signals will be shown up
to two consecutive times. After
this, no recogniti on signals will be
given.
●If the door handle becomes wet
while the electronic key is within
the effective ran ge, the door may
lock and unlock repeatedly. In this
case, follow the fo llowing correc-
tion procedures to wash the vehi-
cle:
• Place the electronic key in a loca- tion 6 ft. (2 m) or more away from
the vehicle. (Take care to ensure
that the key is not stolen.)
• Set the electronic key to battery- saving mode to disable the smart
key system. ( P.131)
●If the electronic key is inside the
vehicle and a door handle
becomes wet during a car wash, a
message may be shown on the
multi-informatio n display and a buzzer will sound outside the vehi-
cle. To turn off the alarm, lock all
the doors.
●The lock sensor may not work
properly if it comes into contact
with ice, snow, m
ud, etc. Clean
the lock sensor and attempt to
operate it again.
●A sudden approach to the effec-
tive range or door handle may pre-
vent the doors from being
unlocked. In this case, return the
door handle to the original position
and check that t he doors unlock
before pulling the door handle
again.
●If there is another electronic key in
the detection area, it may take
slightly longer to unlock the doors
after the door handle is gripped.
■When the vehicle is not driven
for extended periods
●To prevent theft of the vehicle, do
not leave the electronic key within
6 ft. (2 m) of the vehicle.
●The smart key system can be
deactivated in advance.
●Setting the electronic key to bat-
tery-saving mode helps to reduce
key battery depletion. ( P.131)
■To operate the system properly
●Make sure to carry the electronic
key when operating the system.
Do not get the electronic key too
close to the vehicle when operat-
ing the system from the outside of
the vehicle.
Depending on the position and hold-
ing condition of the electronic key,
the key may not be detected cor-
rectly and the system may not oper-
ate properly. (The alarm may go off
accidentally, or the door lock pre-
vention function m ay not operate.)
●Do not leave the electronic key
inside the trunk.
The key confinement prevention
function may not operate, depend-
Page 144 of 556
1444-4. Adjusting the steering wheel and mirrors
Owners Manual_USA_M62084_en
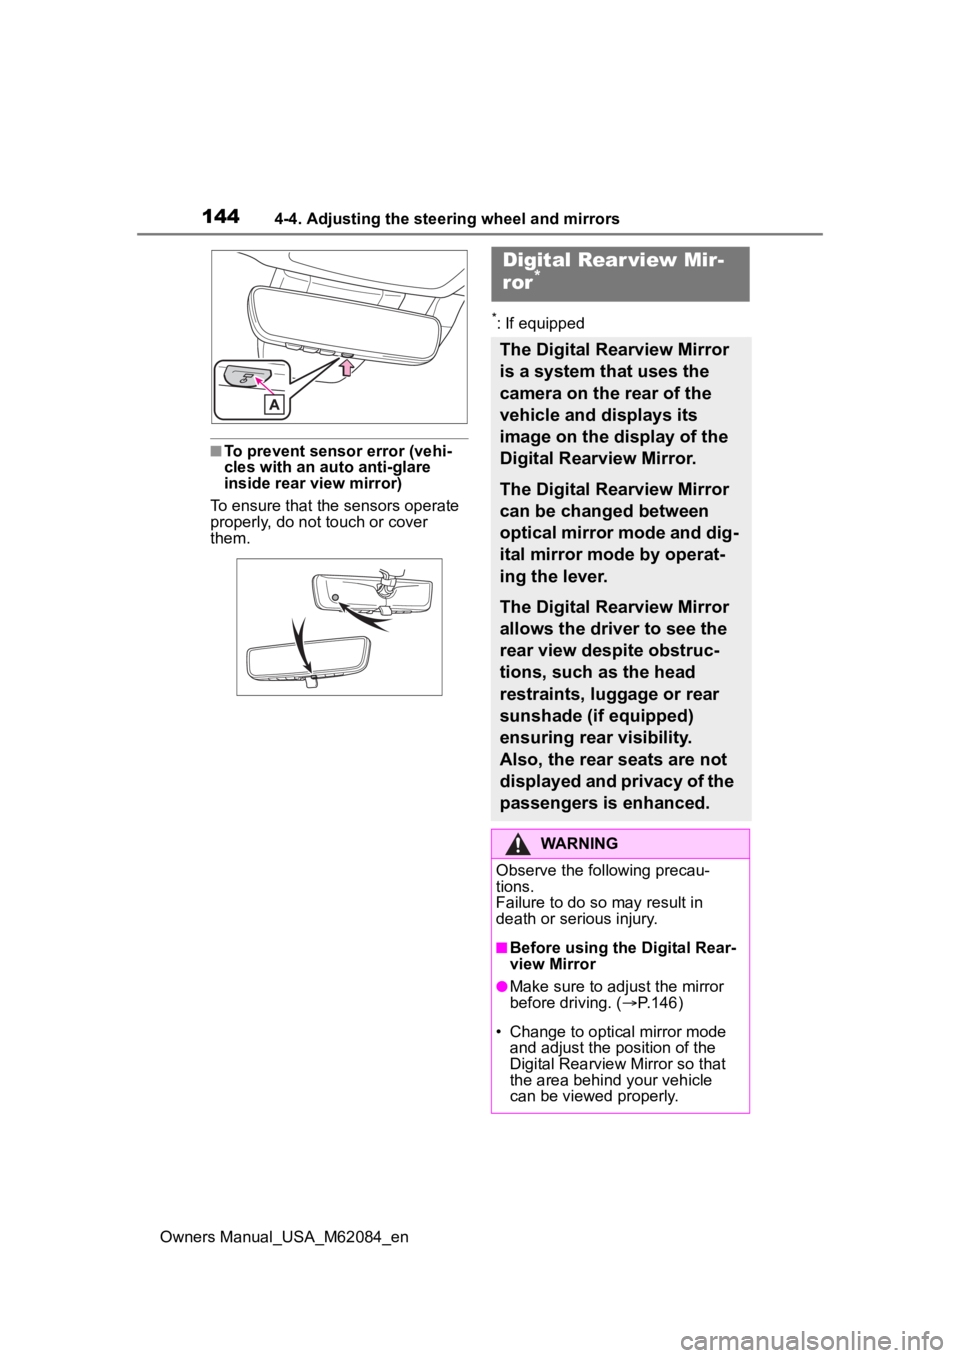
■To prevent sensor error (vehi-
cles with an auto anti-glare
inside rear view mirror)
To ensure that the sensors operate
properly, do not touch or cover
them.
*: If equipped
Digital Rear view Mir-
ror*
The Digital Rearview Mirror
is a system that uses the
camera on the rear of the
vehicle and displays its
image on the display of the
Digital Rearview Mirror.
The Digital Rearview Mirror
can be changed between
optical mirror mode and dig-
ital mirror mode by operat-
ing the lever.
The Digital Rearview Mirror
allows the driver to see the
rear view despite obstruc-
tions, such as the head
restraints, luggage or rear
sunshade (if equipped)
ensuring rear visibility.
Also, the rear seats are not
displayed and privacy of the
passengers is enhanced.
WARNING
Observe the following precau-
tions.
Failure to do so may result in
death or serious injury.
■Before using the Digital Rear-
view Mirror
●Make sure to adjust the mirror
before driving. ( P.146)
• Change to optical mirror mode and adjust the position of the
Digital Rearview Mirror so that
the area behind your vehicle
can be viewed properly.
Page 148 of 556
1484-4. Adjusting the steering wheel and mirrors
Owners Manual_USA_M62084_en
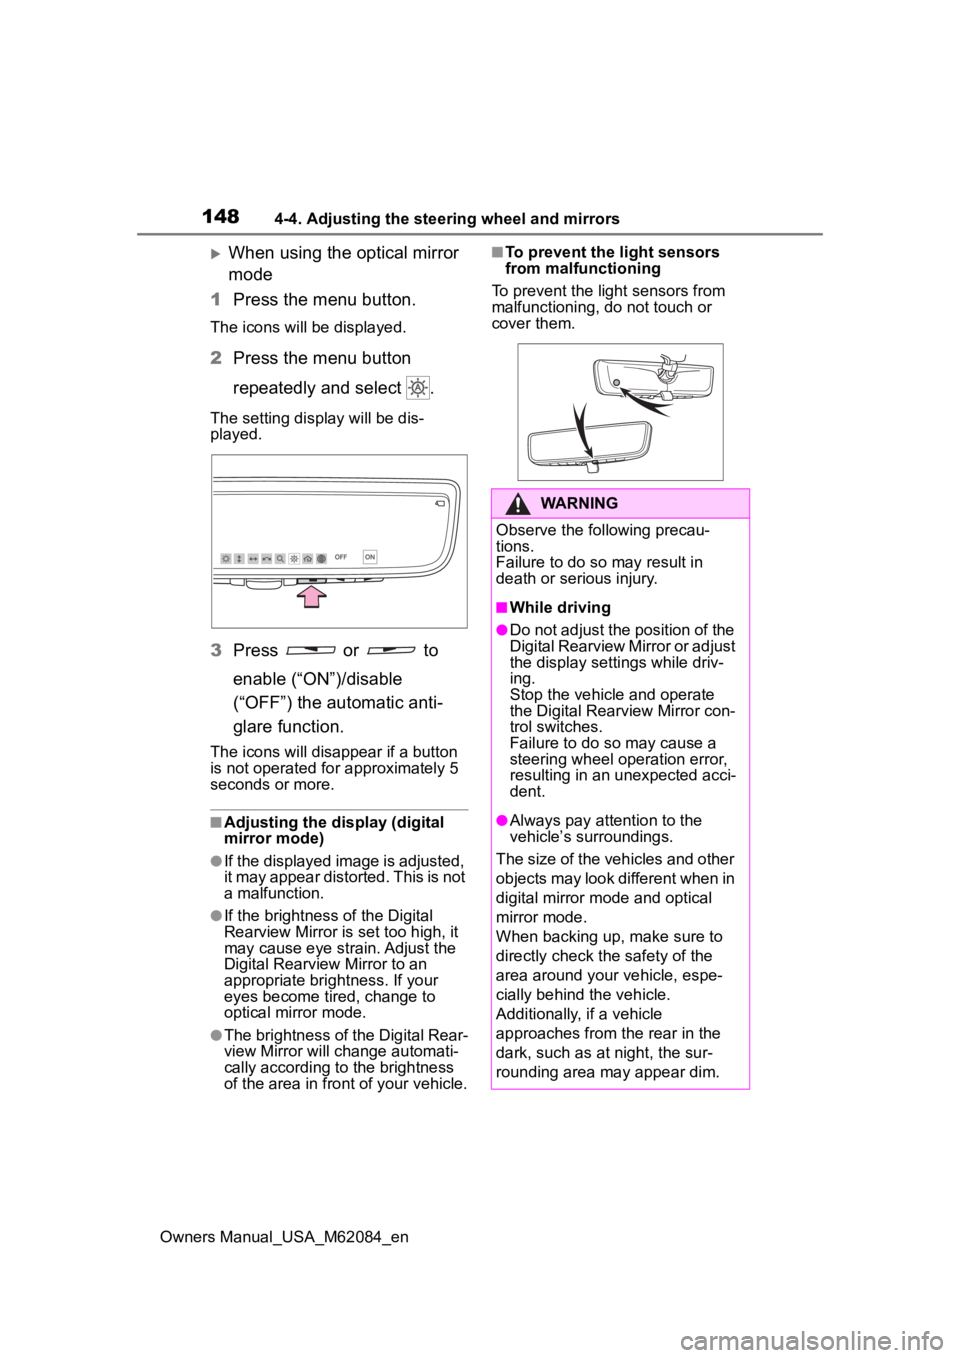
When using the optical mirror
mode
1 Press the menu button.
The icons will be displayed.
2Press the menu button
repeatedly and select .
The setting display will be dis-
played.
3Press or to
enable (“ON”)/disable
(“OFF”) the automatic anti-
glare function.
The icons will disappear if a button
is not operated fo r approximately 5
seconds or more.
■Adjusting the display (digital
mirror mode)
●If the displayed image is adjusted,
it may appear distorted. This is not
a malfunction.
●If the brightness of the Digital
Rearview Mirror is set too high, it
may cause eye strain. Adjust the
Digital Rearvie w Mirror to an
appropriate brightness. If your
eyes become tired, change to
optical mirror mode.
●The brightness of the Digital Rear-
view Mirror will ch ange automati-
cally according to the brightness
of the area in front of your vehicle.
■To prevent the light sensors
from malfunctioning
To prevent the light sensors from
malfunctioning, do not touch or
cover them.
WARNING
Observe the following precau-
tions.
Failure to do so may result in
death or serious injury.
■While driving
●Do not adjust the position of the
Digital Rearview Mirror or adjust
the display settings while driv-
ing.
Stop the vehicle and operate
the Digital Rearview Mirror con-
trol switches.
Failure to do so may cause a
steering wheel operation error,
resulting in an unexpected acci-
dent.
●Always pay attention to the
vehicle’s surroundings.
The size of the vehicles and other
objects may look different when in
digital mirror mode and optical
mirror mode.
When backing up, make sure to
directly check the safety of the
area around your vehicle, espe-
cially behind the vehicle.
Additionally, if a vehicle
approaches from the rear in the
dark, such as at night, the sur-
rounding area may appear dim.