steering wheel adjustment TOYOTA MIRAI 2023 Owners Manual
[x] Cancel search | Manufacturer: TOYOTA, Model Year: 2023, Model line: MIRAI, Model: TOYOTA MIRAI 2023Pages: 572, PDF Size: 17.71 MB
Page 141 of 572
1414-3. Adjusting the seats
Owners Manual_USA_M62064_en
4
Before driving
4-3.Adjusting the seats
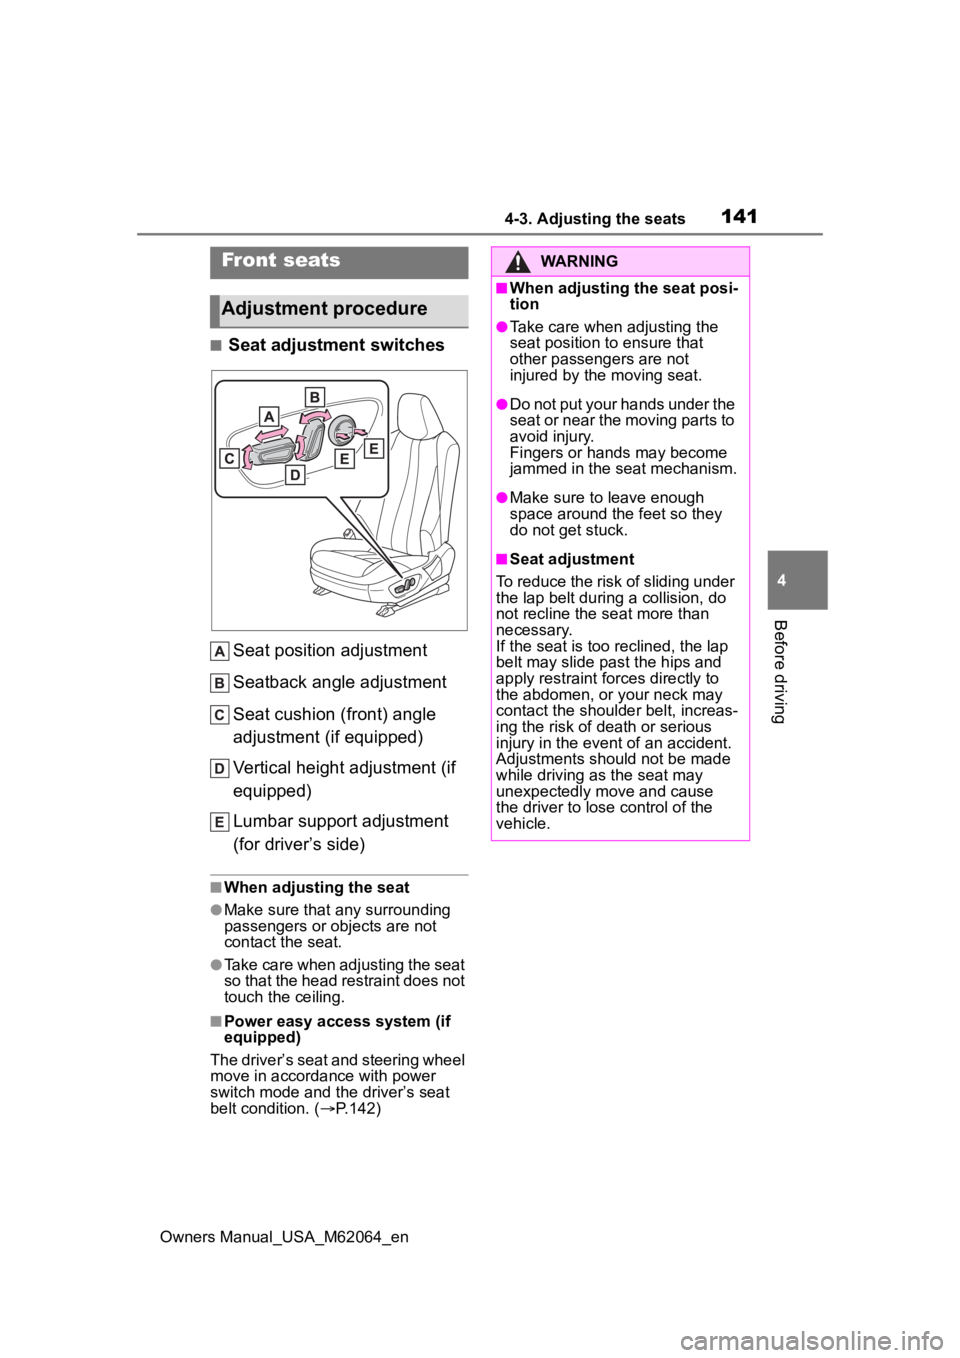
■Seat adjustment switches Seat position adjustment
Seatback angle adjustment
Seat cushion (front) angle
adjustment (if equipped)
Vertical height adjustment (if
equipped)
Lumbar support adjustment
(for driver’s side)
■When adjusting the seat
●Make sure that any surrounding
passengers or ob jects are not
contact the seat.
●Take care when adjusting the seat
so that the head restraint does not
touch the ceiling.
■Power easy access system (if
equipped)
The driver’s seat and steering wheel
move in accordance with power
switch mode and the driver’s seat
belt condition. ( P.142)
Front seats
Adjustment procedure
WARNING
■When adjusting the seat posi-
tion
●Take care when adjusting the
seat position to ensure that
other passengers are not
injured by the moving seat.
●Do not put your hands under the
seat or near the moving parts to
avoid injury.
Fingers or hands may become
jammed in the seat mechanism.
●Make sure to leave enough
space around the feet so they
do not get stuck.
■Seat adjustment
To reduce the risk of sliding under
the lap belt during a collision, do
not recline the se at more than
necessary.
If the seat is too reclined, the lap
belt may slide past the hips and
apply restraint for ces directly to
the abdomen, or your neck may
contact the shoulder belt, increas-
ing the risk of death or serious
injury in the event of an accident.
Adjustments should not be made
while driving as the seat may
unexpectedly move and cause
the driver to lose control of the
vehicle.
Page 143 of 572
1434-3. Adjusting the seats
Owners Manual_USA_M62064_en
4
Before driving
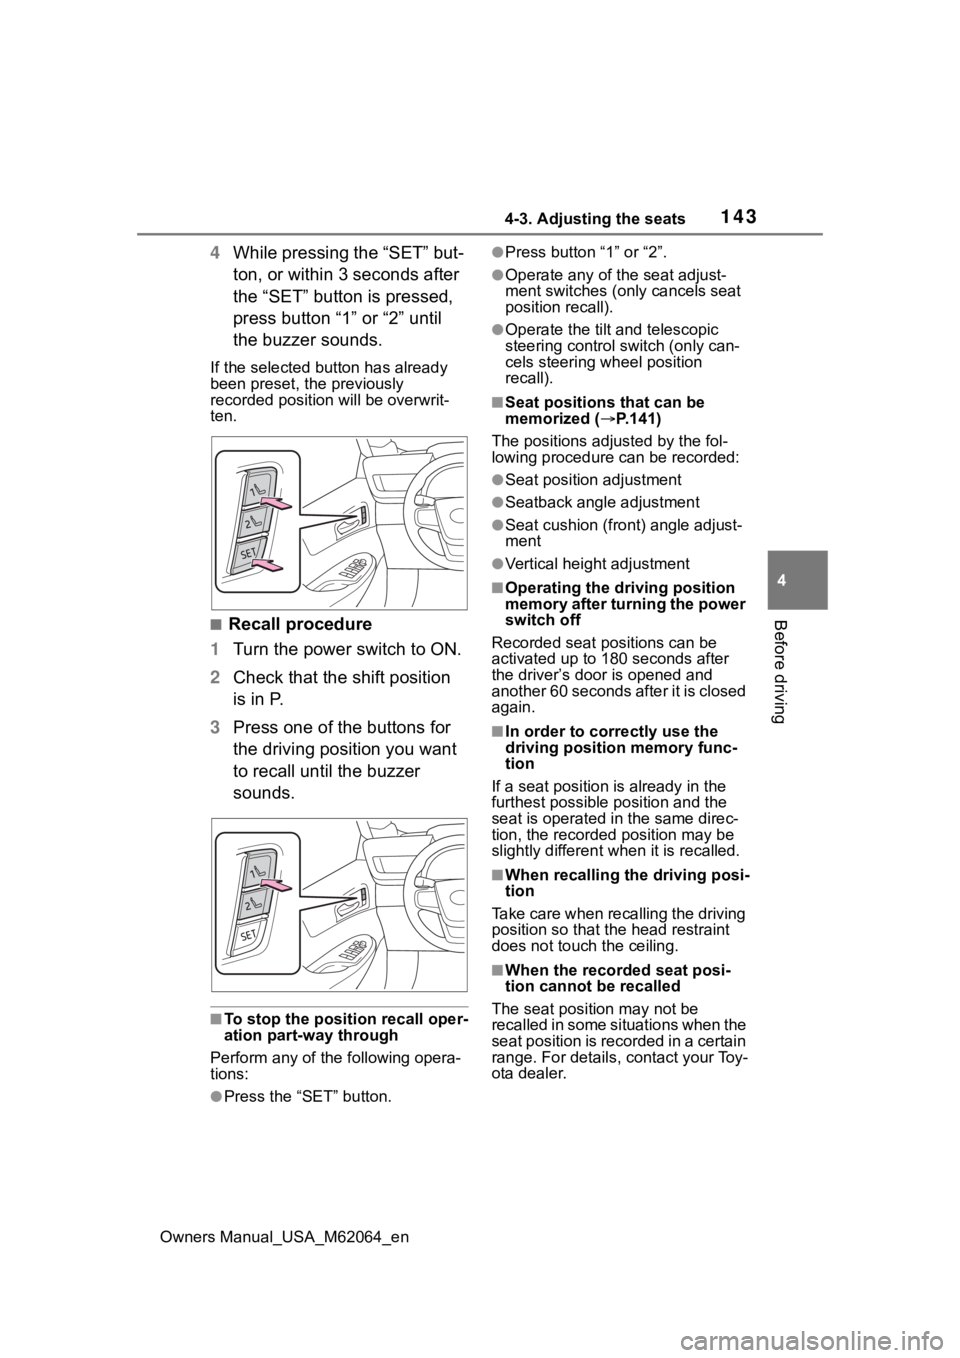
4 While pressing the “SET” but-
ton, or within 3 seconds after
the “SET” button is pressed,
press button “1” or “2” until
the buzzer sounds.
If the selected button has already
been preset, the previously
recorded position will be overwrit-
ten.
■Recall procedure
1 Turn the power switch to ON.
2 Check that the shift position
is in P.
3 Press one of the buttons for
the driving position you want
to recall until the buzzer
sounds.
■To stop the position recall oper-
ation part-way through
Perform any of the following opera-
tions:
●Press the “SET” button.
●Press button “1” or “2”.
●Operate any of t he seat adjust-
ment switches (only cancels seat
position recall).
●Operate the tilt and telescopic
steering control switch (only can-
cels steering wheel position
recall).
■Seat positions that can be
memorized ( P.141)
The positions adjusted by the fol-
lowing procedure can be recorded:
●Seat position adjustment
●Seatback angle adjustment
●Seat cushion (front) angle adjust-
ment
●Vertical height adjustment
■Operating the driving position
memory after turning the power
switch off
Recorded seat positions can be
activated up to 180 seconds after
the driver’s door is opened and
another 60 seconds after it is closed
again.
■In order to corre ctly use the
driving position memory func-
tion
If a seat position is already in the
furthest possible position and the
seat is operated in the same direc-
tion, the recorded position may be
slightly different w hen it is recalled.
■When recalling the driving posi-
tion
Take care when recalling the driving
position so that the head restraint
does not touch the ceiling.
■When the recorded seat posi-
tion cannot be recalled
The seat positi on may not be
recalled in some situations when the
seat position is recorded in a certain
range. For details, contact your Toy-
ota dealer.
Page 144 of 572
1444-3. Adjusting the seats
Owners Manual_USA_M62064_en
■Registering procedure
Record your driving position to
button “1” or “2” before perform-
ing the following:
Carry only the key you want to
register, and then close the
driver’s door.
If 2 or more keys are in the vehi-
cle, the driving position cannot
be recorded properly.
1 Turn the power switch to ON.
2 Check that the shift position
is in P.
3 Recall the driving position
that you want to record.
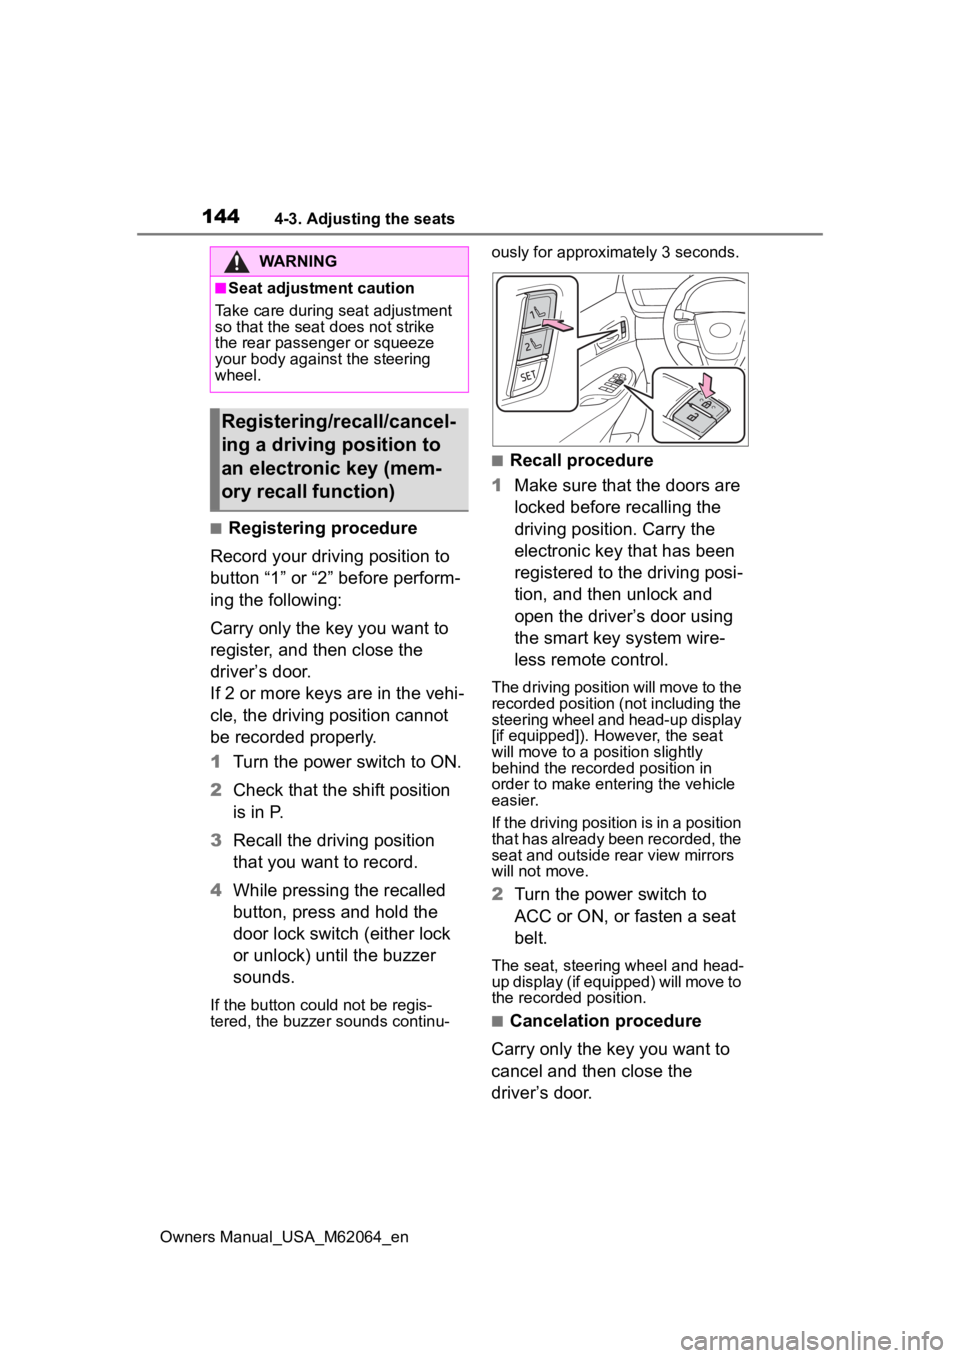
4 While pressing the recalled
button, press and hold the
door lock switch (either lock
or unlock) until the buzzer
sounds.
If the button could not be regis-
tered, the buzzer sounds continu- ously for approxim
ately 3 seconds.
■Recall procedure
1 Make sure that the doors are
locked before recalling the
driving position. Carry the
electronic key that has been
registered to the driving posi-
tion, and then unlock and
open the driver’s door using
the smart key system wire-
less remote control.
The driving position will move to the
recorded position (not including the
steering wheel and head-up display
[if equipped]). However, the seat
will move to a position slightly
behind the recorded position in
order to make entering the vehicle
easier.
If the driving position is in a position
that has already been recorded, the
seat and outside rear view mirrors
will not move.
2Turn the power switch to
ACC or ON, or fasten a seat
belt.
The seat, steering wheel and head-
up display (if equipped) will move to
the recorded position.
■Cancelation procedure
Carry only the key you want to
cancel and then close the
driver’s door.
WARNING
■Seat adjustment caution
Take care during seat adjustment
so that the seat d oes not strike
the rear passenger or squeeze
your body again st the steering
wheel.
Registering/recall/cancel-
ing a driving position to
an electronic key (mem-
ory recall function)
Page 147 of 572
1474-4. Adjusting the steering wheel and mirrors
Owners Manual_USA_M62064_en
4
Before driving
4-4.Adjusting the steering wheel and mirrors
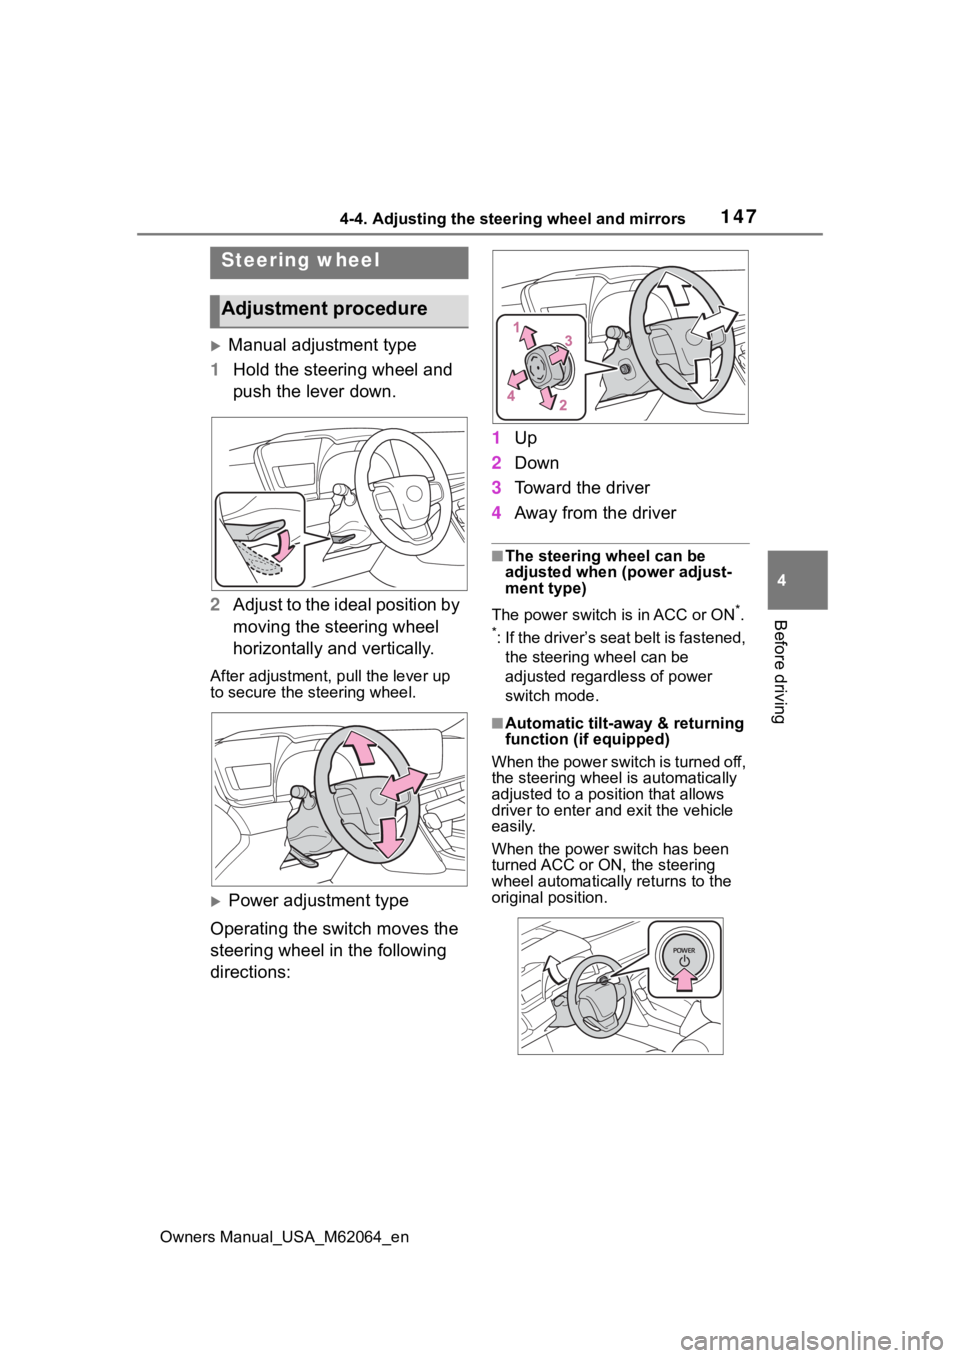
Manual adjustment type
1 Hold the steering wheel and
push the lever down.
2 Adjust to the ideal position by
moving the steering wheel
horizontally and vertically.
After adjustment, pull the lever up
to secure the steering wheel.
Power adjustment type
Operating the switch moves the
steering wheel in the following
directions: 1
Up
2 Down
3 Toward the driver
4 Away from the driver
■The steering wheel can be
adjusted when (power adjust-
ment type)
The power switch is in ACC or ON
*.
*: If the driver’s seat belt is fastened, the steering wheel can be
adjusted regardless of power
switch mode.
■Automatic tilt-away & returning
function (if equipped)
When the power switch is turned off,
the steering wheel is automatically
adjusted to a posit ion that allows
driver to enter and exit the vehicle
easily.
When the power switch has been
turned ACC or ON, the steering
wheel automatically returns to the
original position.
Steering wheel
Adjustment procedure
Page 148 of 572
1484-4. Adjusting the steering wheel and mirrors
Owners Manual_USA_M62064_en
■Automatic adjustment of the
steering position (if equipped)
A desired steering position can be
entered to memory and recalled
automatically by the driving position
memory system. ( P.142)
■Power easy access system (if
equipped)
The steering wheel and driver’s seat
move in accordance with power
switch mode and the driver’s seat
belt condition. ( P.142)
■After adjusting the steering
wheel (manual adjustment type)
Make sure that the steering wheel is
securely locked.
The horn may not sound if the steer-
ing wheel is not securely locked.
■Customization
Some functions can be customized.
( P.512)
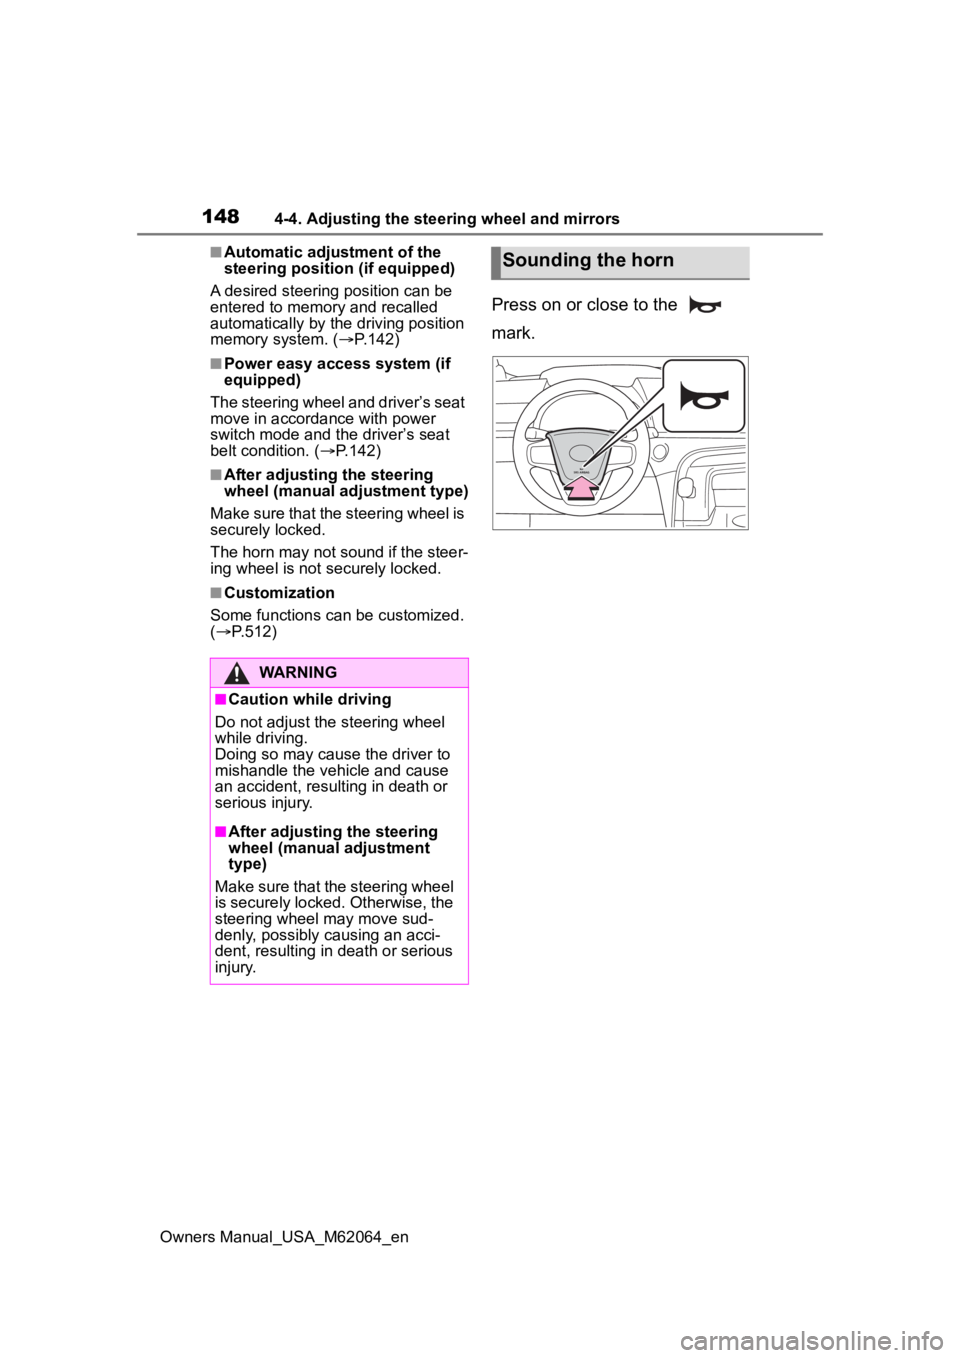
Press on or close to the
mark.
WARNING
■Caution while driving
Do not adjust the steering wheel
while driving.
Doing so may cause the driver to
mishandle the vehicle and cause
an accident, resul ting in death or
serious injury.
■After adjusting the steering
wheel (manual adjustment
type)
Make sure that the steering wheel
is securely locked. Otherwise, the
steering wheel may move sud-
denly, possibly causing an acci-
dent, resulting in death or serious
injury.
Sounding the horn
Page 152 of 572
1524-4. Adjusting the steering wheel and mirrors
Owners Manual_USA_M62064_endisplayed image are bothering
you, change to optical mirror
mode.
●When the trunk is open, the Digital
Rear-view Mirror image may not
display properly. Before driving,
make sure the trunk is closed.
●If the display is difficult to see due
to reflected light, close the elec-
tronic sunshade for the panoramic
moon roof (if equipped).
●Any of the following conditions
may occur when d
riving in the
dark, such as at night. None of
them indicates that a malfunction
has occurred.
• Colors of objects in the displayed image may differ f rom their actual
color.
• Depending on the height of the lights of the vehicle behind, the
area around the vehicle may
appear white and blurry.
• Automatic image adjustment for
brighter surrounding image may
cause flickering.
If it is difficult to see the displayed
image or flickering bothers you,
change to optical mirror mode.
●The Digital Rear-view Mirror may
become hot while it is in digital
mirror mode.
This is not a malfunction.
●Depending on your physical con-
dition or age, it may take longer
than usual to focus on the dis-
played image. In this case,
change to optical mirror mode.
●Do not let passengers stare at the
displayed image when the vehicle
is being driven, as doing so may
cause motion sickness.
■When the system malfunctions
If the symbol show n in the illustra-
tion is displayed when using the
Digital Rear-view Mirror in digital
mirror mode, the system may be
malfunctioning. The symbol will dis-
appear in a few seconds. Operate
the lever, change to optical mirror mode and have the vehicle
inspected by your Toyota dealer.
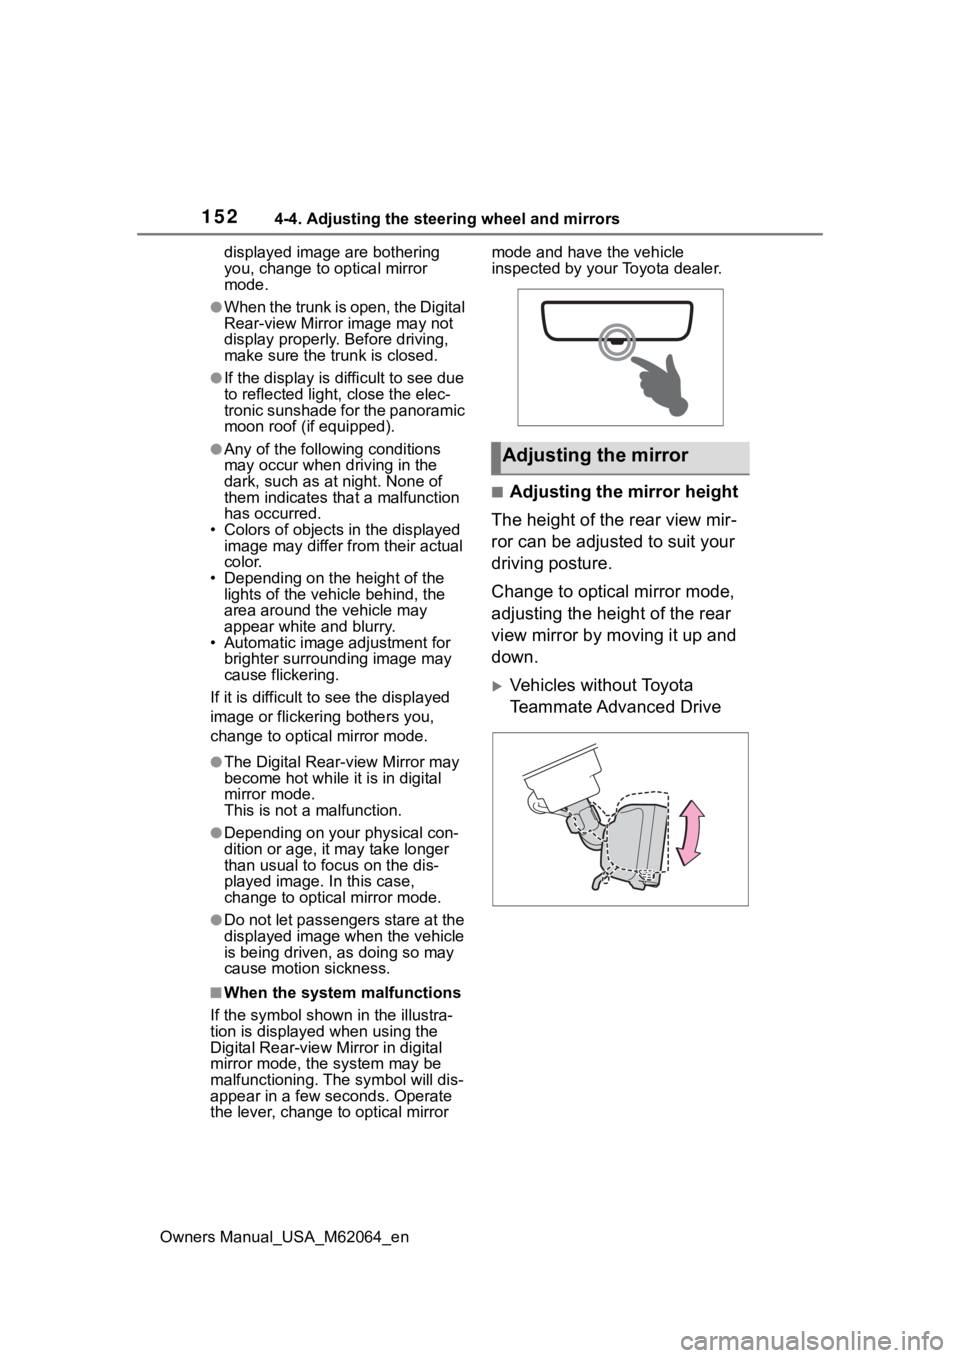
■Adjusting the mirror height
The height of the rear view mir-
ror can be adjusted to suit your
driving posture.
Change to optical mirror mode,
adjusting the height of the rear
view mirror by moving it up and
down.
Vehicles without Toyota
Teammate Advanced Drive
Adjusting the mirror
Page 160 of 572
1604-4. Adjusting the steering wheel and mirrors
Owners Manual_USA_M62064_en
■When using the outside rear
view mirrors in a cold weather
When it is cold and the outside rear
view mirrors are frozen, it may not
be possible to fold /extend them or
adjust the mirror surface. Remove
the ice, snow, etc. covering the out-
side rear view mirrors.
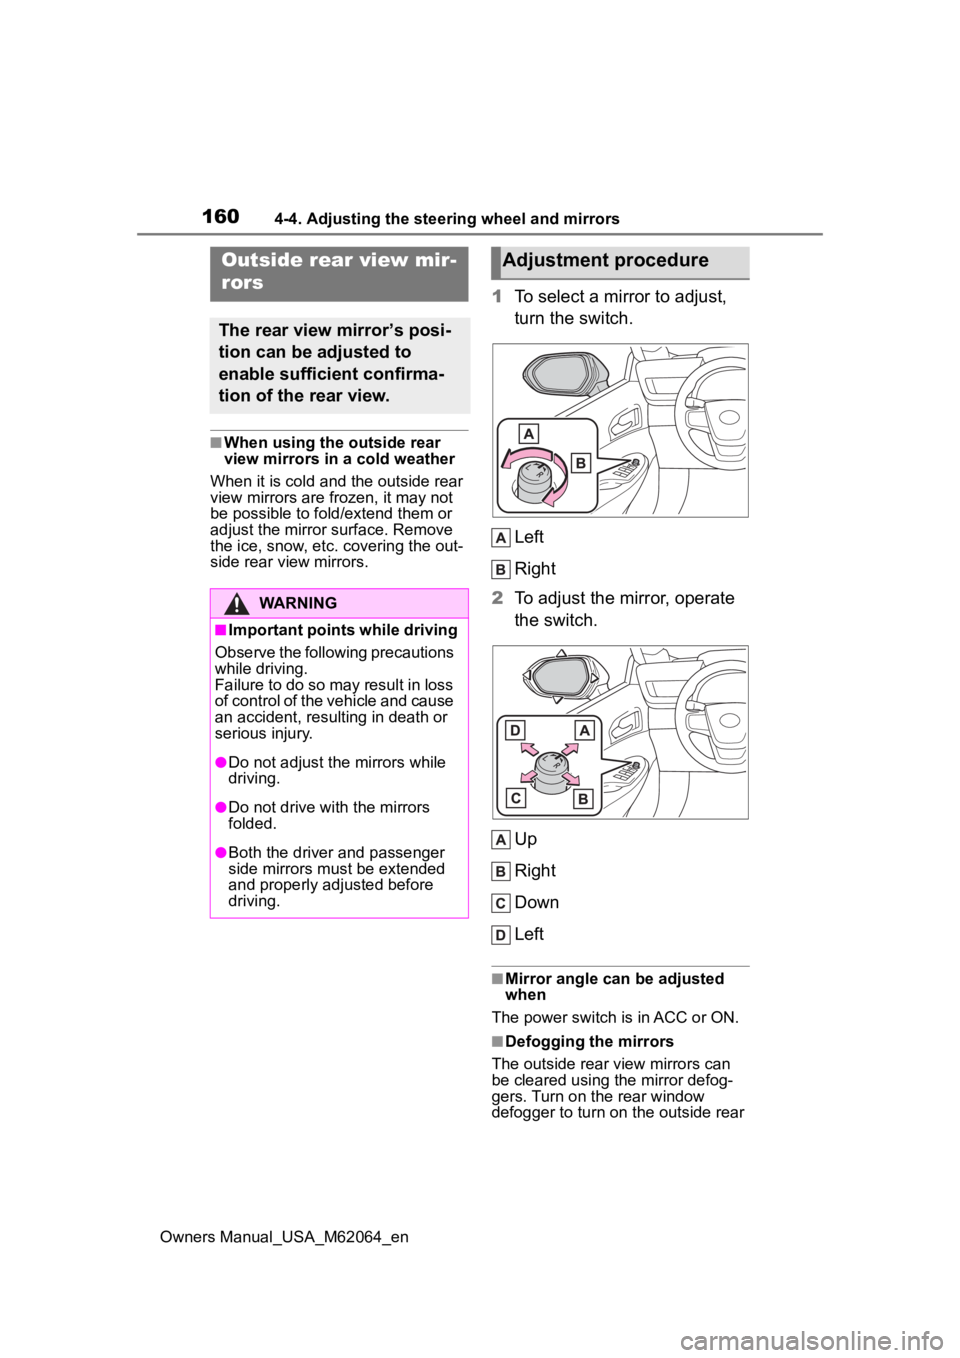
1 To select a mirror to adjust,
turn the switch.
Left
Right
2 To adjust the mirror, operate
the switch.
Up
Right
Down
Left
■Mirror angle can be adjusted
when
The power switch is in ACC or ON.
■Defogging the mirrors
The outside rear view mirrors can
be cleared using the mirror defog-
gers. Turn on the rear window
defogger to turn on the outside rear
Outside rear view mir-
rors
The rear view mirror’s posi-
tion can be adjusted to
enable sufficient confirma-
tion of the rear view.
WARNING
■Important points while driving
Observe the following precautions
while driving.
Failure to do so may result in loss
of control of the vehicle and cause
an accident, resul ting in death or
serious injury.
●Do not adjust the mirrors while
driving.
●Do not drive with the mirrors
folded.
●Both the driver and passenger
side mirrors must be extended
and properly adjusted before
driving.
Adjustment procedure
Page 161 of 572
1614-4. Adjusting the steering wheel and mirrors
Owners Manual_USA_M62064_en
4
Before driving
view mirror defoggers. ( P.335,
342)
■Automatic adjustment of the
mirror angle (if equipped)
A desired mirror face angle can be
entered to memory and recalled
automatically by the driving position
memory. ( P.142)
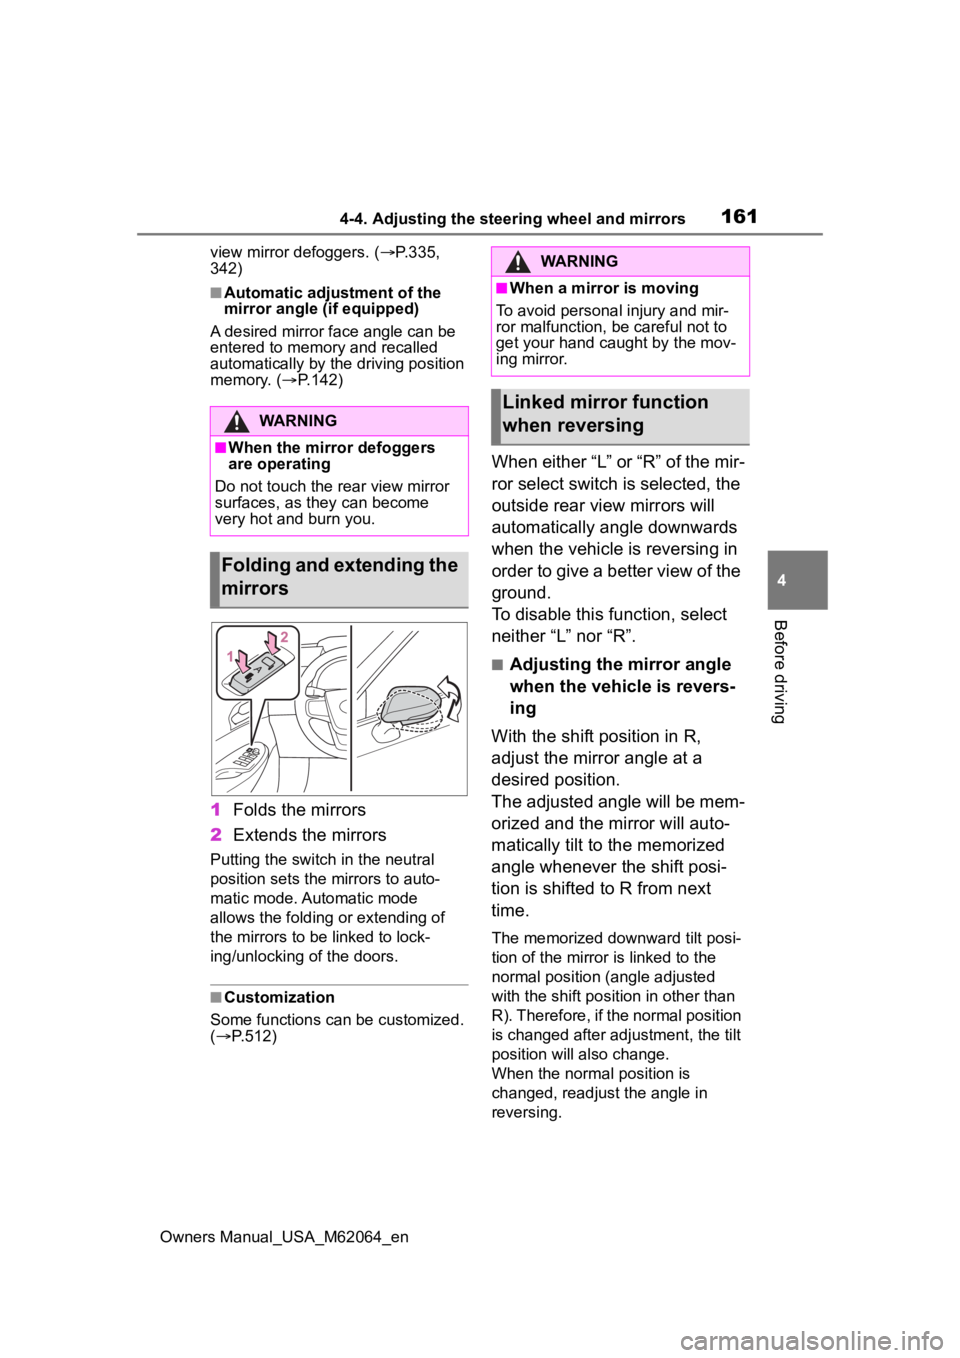
1Folds the mirrors
2 Extends the mirrors
Putting the switch in the neutral
position sets the mirrors to auto-
matic mode. Automatic mode
allows the folding or extending of
the mirrors to be linked to lock-
ing/unlocking of the doors.
■Customization
Some functions can be customized.
( P.512)
When either “L” or “R” of the mir-
ror select switch is selected, the
outside rear view mirrors will
automatically angle downwards
when the vehicle is reversing in
order to give a better view of the
ground.
To disable this function, select
neither “L” nor “R”.
■Adjusting the mirror angle
when the vehicle is revers-
ing
With the shift position in R,
adjust the mirror angle at a
desired position.
The adjusted angle will be mem-
orized and the mirror will auto-
matically tilt to the memorized
angle whenever the shift posi-
tion is shifted to R from next
time.
The memorized downward tilt posi-
tion of the mirror is linked to the
normal position (angle adjusted
with the shift posit ion in other than
R). Therefore, if the normal position
is changed after adjustment, the tilt
position will also change.
When the normal position is
changed, readjust the angle in
reversing.
WARNING
■When the mirror defoggers
are operating
Do not touch the rear view mirror
surfaces, as they can become
very hot and burn you.
Folding and extending the
mirrors
WARNING
■When a mirror is moving
To avoid personal injury and mir-
ror malfunction, be careful not to
get your hand caught by the mov-
ing mirror.
Linked mirror function
when reversing
Page 462 of 572
4628-2. Steps to take in an emergency
Owners Manual_USA_M62064_enat the specified level and perform
initialization. (
P.420)
■The tire pressure warning light
may come on due to natural
causes
The tire pressure warning light may
come on due to natural causes such
as natural air leaks and tire inflation
pressure changes caused by tem-
perature. In this case, adjusting the
tire inflation pressure will turn off the
warning light (after a few minutes).
■Conditions that the tire pres-
sure warning system may not
function properly
P. 4 1 9
WARNING
■If both the ABS and the brake
system warning lights remain
on
Stop your vehicle in a safe place
immediately and contact your Toy-
ota dealer.
The vehicle will become
extremely unstable during brak-
ing, and the ABS system may fail,
which could cause an accident
resulting in death or serious injury.
■When the electric power
steering system warning light
comes on
When the light comes on yellow,
the assist to the power steering is
restricted. When the light comes
on red, the assist to the power
steering is lost and handling oper-
ations of the steering wheel
become extremely heavy.
When steering wheel operations
are heavier than usual, grip the
steering wheel firmly and operate
it using more force than usual.
■If the tire pr essure warning
light comes on
Be sure to observe the following
precautions.
Failure to do so could cause a
loss of vehicle control and result
in death or serious injury.
●Check and adjust the tire infla-
tion pressure immediately.
●If the tire pressure warning light
comes on even after tire infla-
tion pressure adjustment, it is
probable that you have a flat
tire. Have the flat tire replaced
by the nearest Toyota dealer.
●Avoid abrupt maneuvering and
braking.
If the vehicle tires deteriorate,
you could lose control of the
steering wheel or the brakes.
■If a blowout or sudden air
leakage should occur
The tire pressure warning system
may not activate immediately.
■Maintenance of the tires
Each tire, includi ng the spare (if
provided), should be checked
monthly when cold and inflated to
the inflation pressure recom-
mended by the vehicle manufac-
turer on the vehicle placard or tire
inflation pressure label (tire and
load information label). (If your
vehicle has tires of a different size
than the size indicated on the
vehicle placard or tire inflation
pressure label [tire and load infor-
mation label], you should deter-
mine the proper tire inflation
pressure for those tires.)
Page 554 of 572

554Alphabetical Index
Owners Manual_USA_M62064_en
Speedometer .................... 99, 102
Steering wheel Adjustment ........................... 147
Heated steering wheel ......... 351
Meter control switches ......... 106
Power easy access system .. 142
Steering wheel position memory........................................... 142
Stop lights Replacing light bulbs ............ 443
Storage features ..................... 358
Storage precautions .............. 358
Stuck If the vehicle becomes stuck 494
Suggestion function............... 112
Sun visors ............................... 379
Sunshade ................................ 363
Switch Rear automatic air conditioning system ........................ 348, 349
Switches Activating the Automatic High Beam .................................. 200
ASC switch ........................... 196
Automatic High Beam .......... 200
Brake Hold switch ................ 194
Display change button.. 100, 104
Door lock switches ............... 130
Driving mode select switch... 320
Driving position memory switches ............................. 142
Dynamic radar cruise control with full-speed range switch245
Electronic sunshade switch .. 363
Emergency flashers switch .. 446
Garage door opener switches ........................................... 382
H
2O switch ........................... 196
Heated steering wheel switch ........................................... 351
HUD (Head-up display) switch ........................................... 116 Light switches .......................198
LTA (Lane Tracing Assist) switch
...........................................236
Meter control switches..........106
Outside rear v iew mirror
switches..............................160
Parking brake switch ............191
Power door lock switch.........130
Power switch ........................180
Power window switches .......162
Rear sunshade switch ..........381
Rear window and outside rear view mirror defoggers switch...................................335, 342
Seat heater switches ............351
Seat ventilator switches........351
Snow mode switch ...............321
“SOS” button ..........................65
Tilt and telescopic steering con- trol switch ...........................147
Tire pressure warning reset switch .................................420
Trunk opener main switch ....135
Trunk opener switch .............133
Vehicle-to-vehicle distance switch .................................245
VSC OFF switch ...................323
Window lock switch ..............164
Windshield defogger switch 334, 342
Windshield wiper and washer switch .................................204
Windshield wiper de-icer switch ...................................337, 347
T
Tail lights Light switch...........................198
Replacing light bulbs ............443
Tailpipe ......................................84
The Secondary Collision Brake ...............................................323