TOYOTA PRIUS 2001 Service Repair Manual
PRIUS 2001
TOYOTA
TOYOTA
https://www.carmanualsonline.info/img/14/57461/w960_57461-0.png
TOYOTA PRIUS 2001 Service Repair Manual
Trending: boot, flat tire, belt, differential, tyre pressure, navigation system, tire size
Page 1621 of 1943
D09718
D09719
D09720
D09721
D09722
HT±20
± HYBRID TRANSAXLEHYBRID TRANSAXLE ASSEMBLY
2001 PRIUS (RM778U)
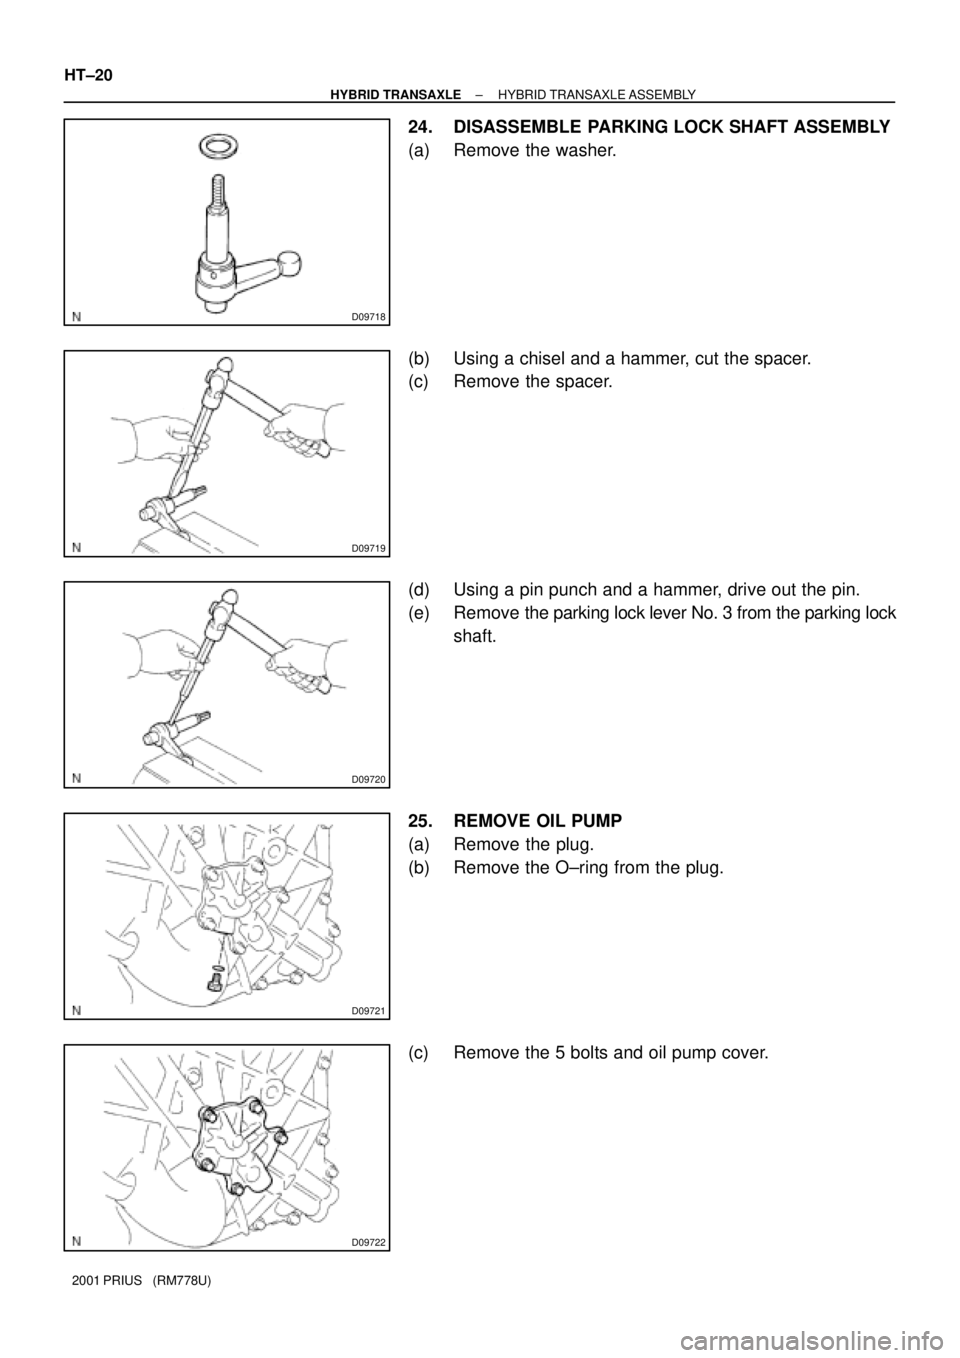
24. DISASSEMBLE PARKING LOCK SHAFT ASSEMBLY
(a) Remove the washer.
(b) Using a chisel and a hammer, cut the spacer.
(c) Remove the spacer.
(d) Using a pin punch and a hammer, drive out the pin.
(e) Remove the parking lock lever No. 3 from the parking lock
shaft.
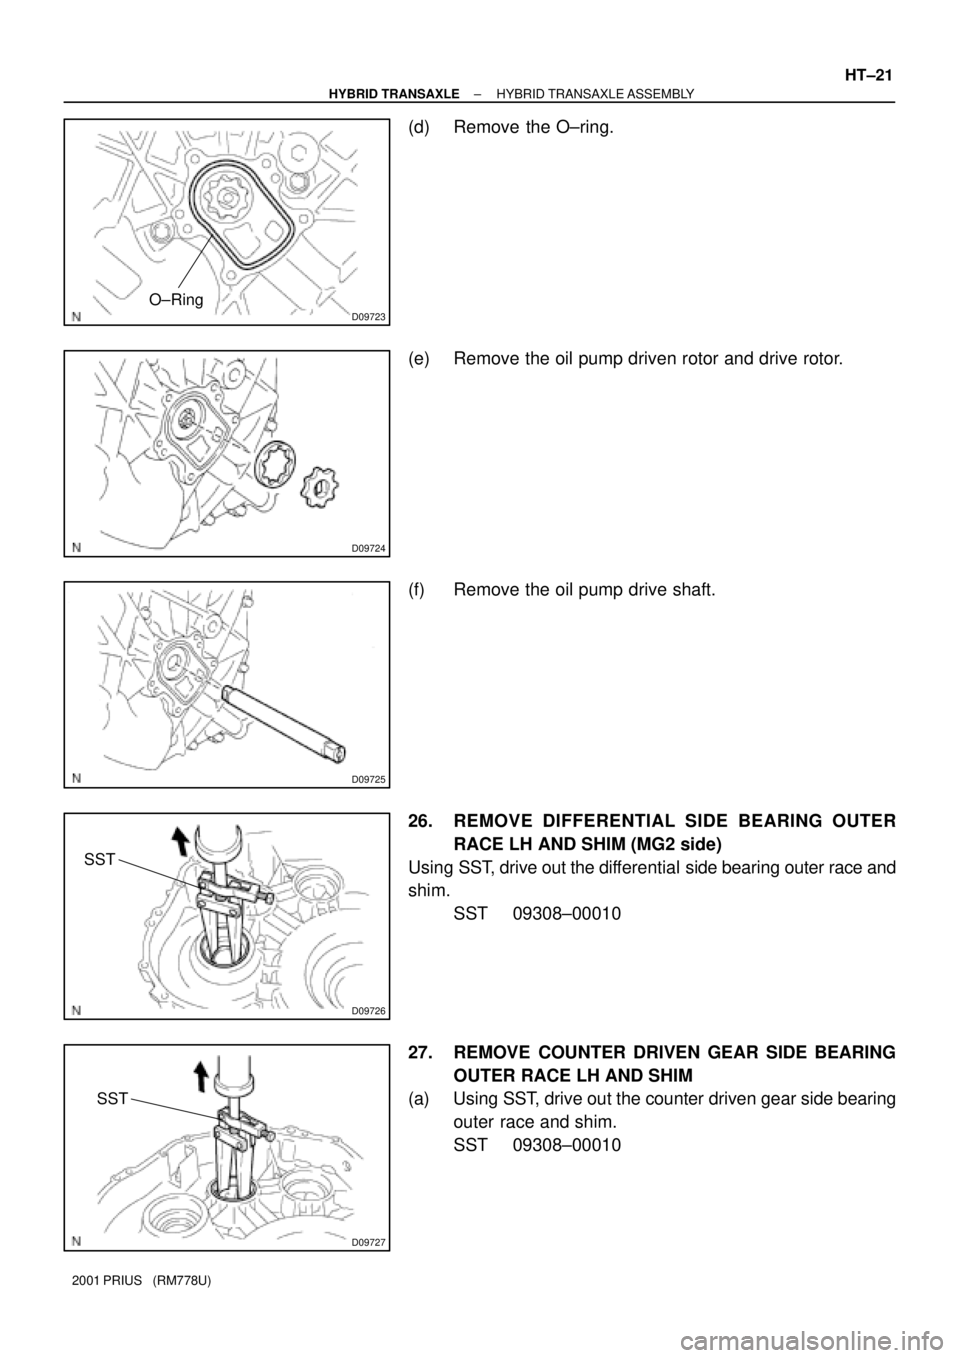
25. REMOVE OIL PUMP
(a) Remove the plug.
(b) Remove the O±ring from the plug.
(c) Remove the 5 bolts and oil pump cover.
Page 1622 of 1943
D09723O±Ring
D09724
D09725
D09726
SST
D09727
SST
± HYBRID TRANSAXLEHYBRID TRANSAXLE ASSEMBLY
HT±21
2001 PRIUS (RM778U)
(d) Remove the O±ring.
(e) Remove the oil pump driven rotor and drive rotor.
(f) Remove the oil pump drive shaft.
26. REMOVE DIFFERENTIAL SIDE BEARING OUTER
RACE LH AND SHIM (MG2 side)
Using SST, drive out the differential side bearing outer race and
shim.
SST 09308±00010
27. REMOVE COUNTER DRIVEN GEAR SIDE BEARING
OUTER RACE LH AND SHIM
(a) Using SST, drive out the counter driven gear side bearing
outer race and shim.
SST 09308±00010
Page 1623 of 1943
D09924
D09729
D09793
Screw Plug
Filler Plug
D09936
D09730
HT±22
± HYBRID TRANSAXLEHYBRID TRANSAXLE ASSEMBLY
2001 PRIUS (RM778U)
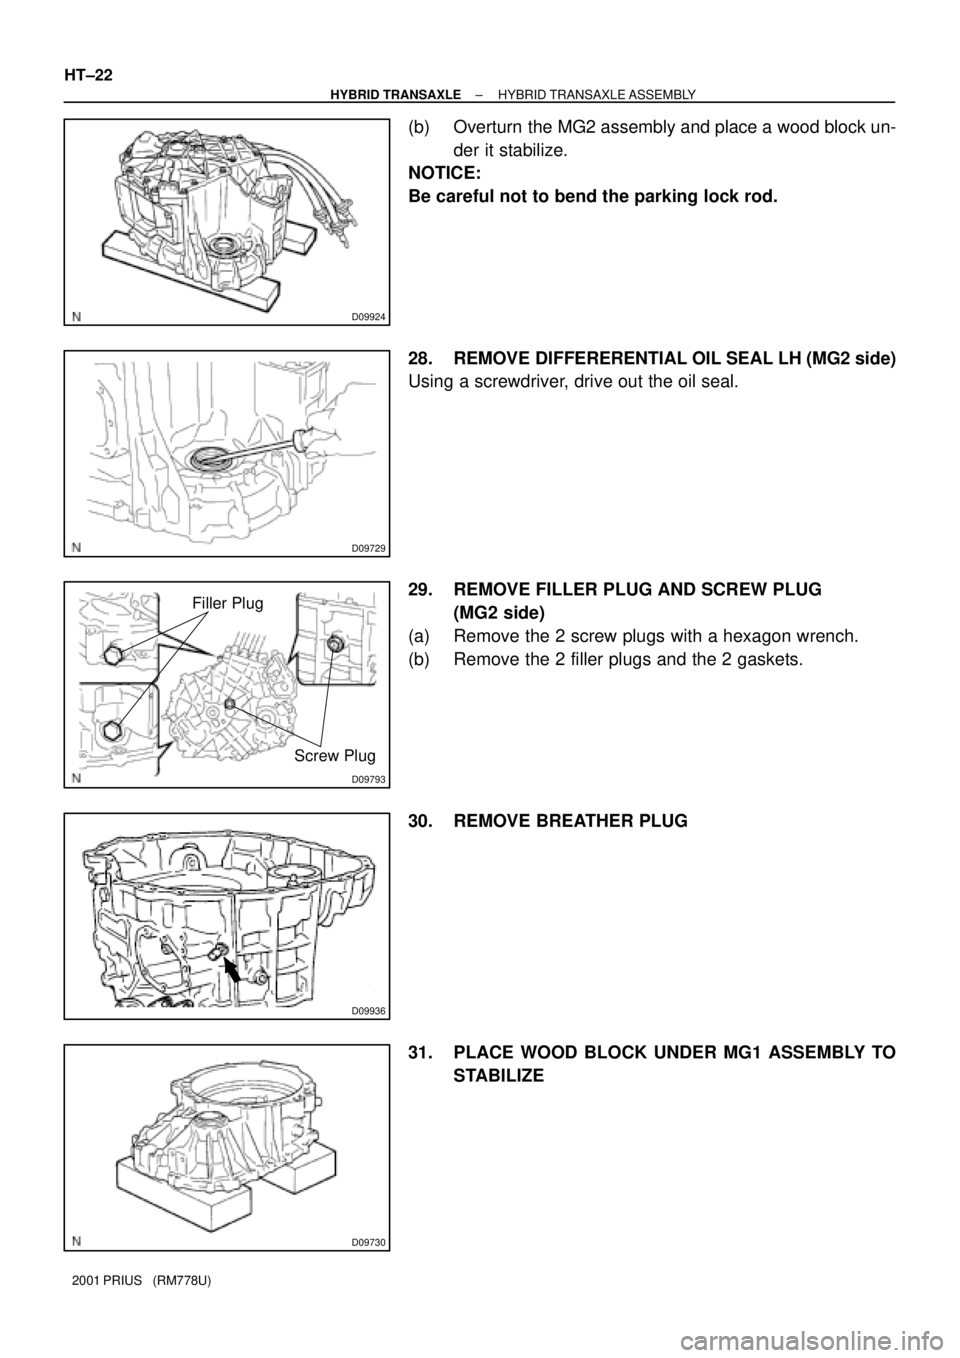
(b) Overturn the MG2 assembly and place a wood block un-
der it stabilize.
NOTICE:
Be careful not to bend the parking lock rod.
28. REMOVE DIFFERERENTIAL OIL SEAL LH (MG2 side)
Using a screwdriver, drive out the oil seal.
29. REMOVE FILLER PLUG AND SCREW PLUG
(MG2 side)
(a) Remove the 2 screw plugs with a hexagon wrench.
(b) Remove the 2 filler plugs and the 2 gaskets.
30. REMOVE BREATHER PLUG
31. PLACE WOOD BLOCK UNDER MG1 ASSEMBLY TO
STABILIZE
Page 1624 of 1943
D09731
D09732
D09733
D09734
D09735
± HYBRID TRANSAXLEHYBRID TRANSAXLE ASSEMBLY
HT±23
2001 PRIUS (RM778U)
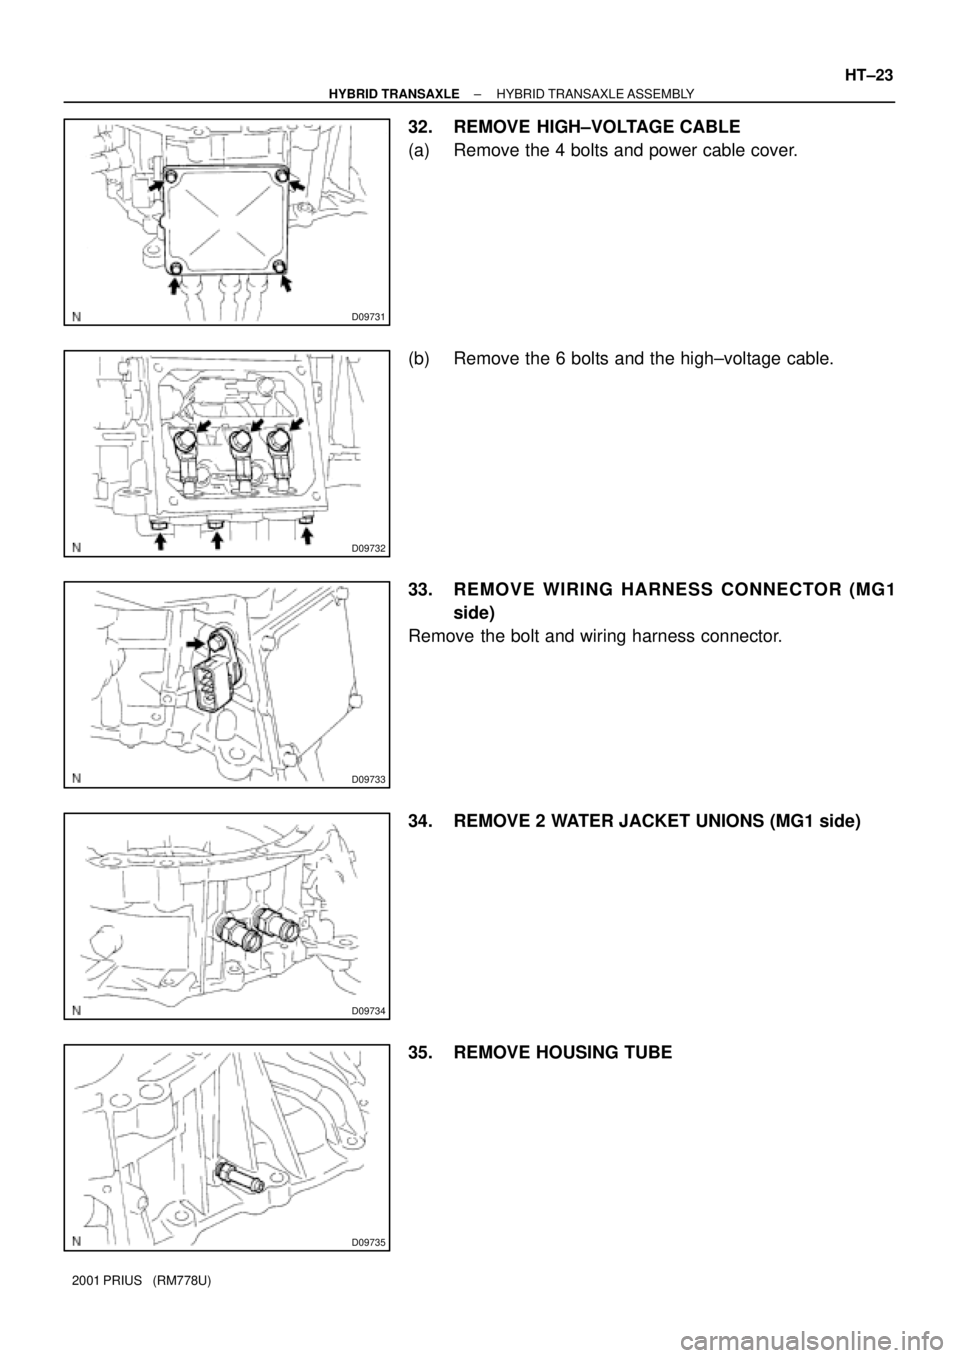
32. REMOVE HIGH±VOLTAGE CABLE
(a) Remove the 4 bolts and power cable cover.
(b) Remove the 6 bolts and the high±voltage cable.
33. REMOVE WIRING HARNESS CONNECTOR (MG1
side)
Remove the bolt and wiring harness connector.
34. REMOVE 2 WATER JACKET UNIONS (MG1 side)
35. REMOVE HOUSING TUBE
Page 1625 of 1943
D09736
SST
D09737
D09739
D09740
D09741
HT±24
± HYBRID TRANSAXLEHYBRID TRANSAXLE ASSEMBLY
2001 PRIUS (RM778U)
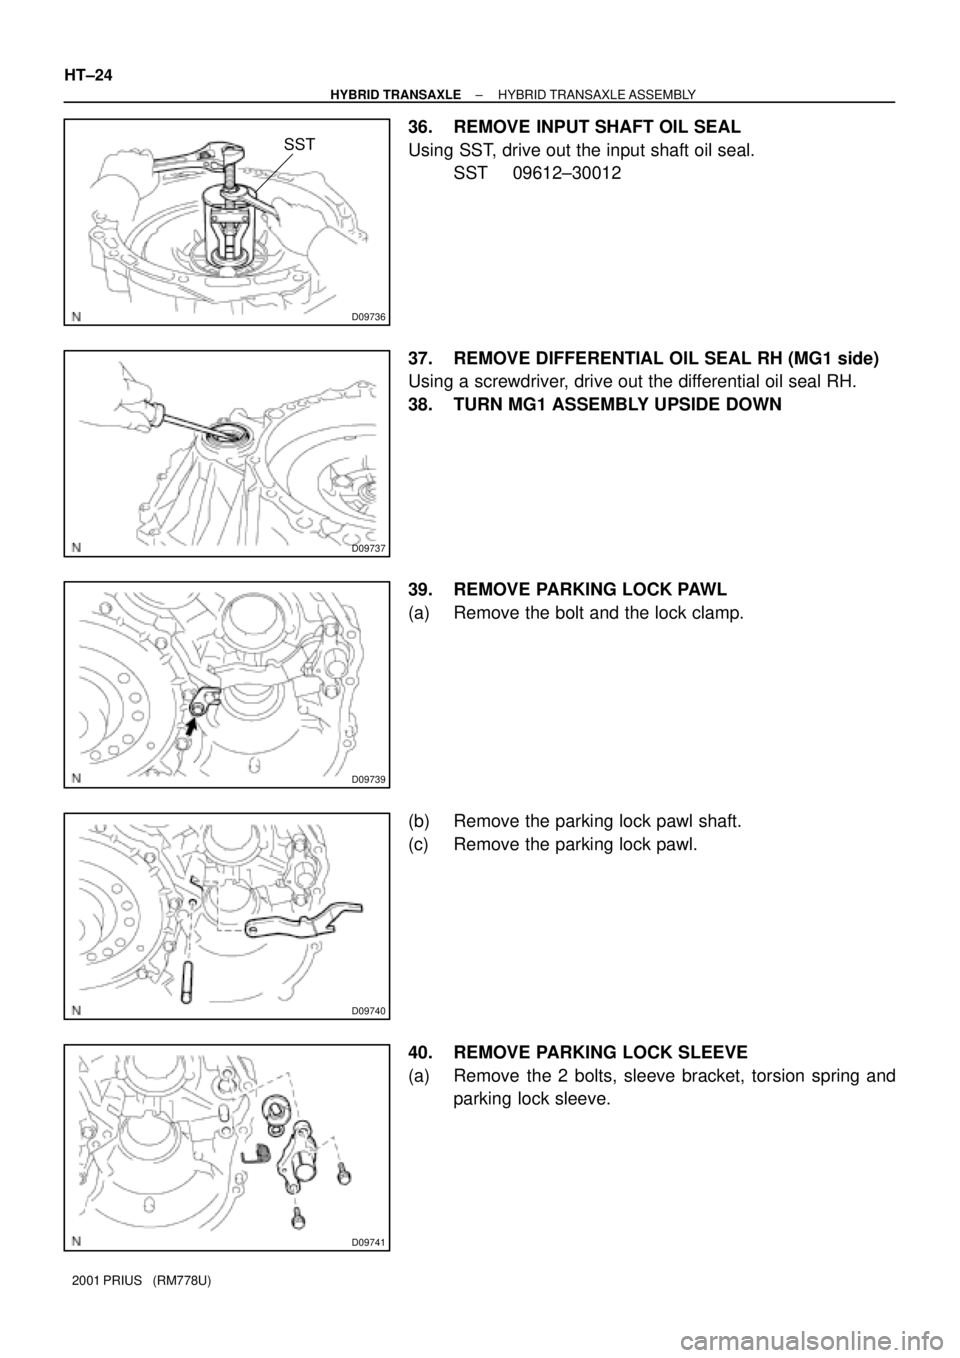
36. REMOVE INPUT SHAFT OIL SEAL
Using SST, drive out the input shaft oil seal.
SST 09612±30012
37. REMOVE DIFFERENTIAL OIL SEAL RH (MG1 side)
Using a screwdriver, drive out the differential oil seal RH.
38. TURN MG1 ASSEMBLY UPSIDE DOWN
39. REMOVE PARKING LOCK PAWL
(a) Remove the bolt and the lock clamp.
(b) Remove the parking lock pawl shaft.
(c) Remove the parking lock pawl.
40. REMOVE PARKING LOCK SLEEVE
(a) Remove the 2 bolts, sleeve bracket, torsion spring and
parking lock sleeve.
Page 1626 of 1943
D09742
D09743
SST
D09744SST
D09792
Drain Plug
Screw Plug
± HYBRID TRANSAXLEHYBRID TRANSAXLE ASSEMBLY
HT±25
2001 PRIUS (RM778U)
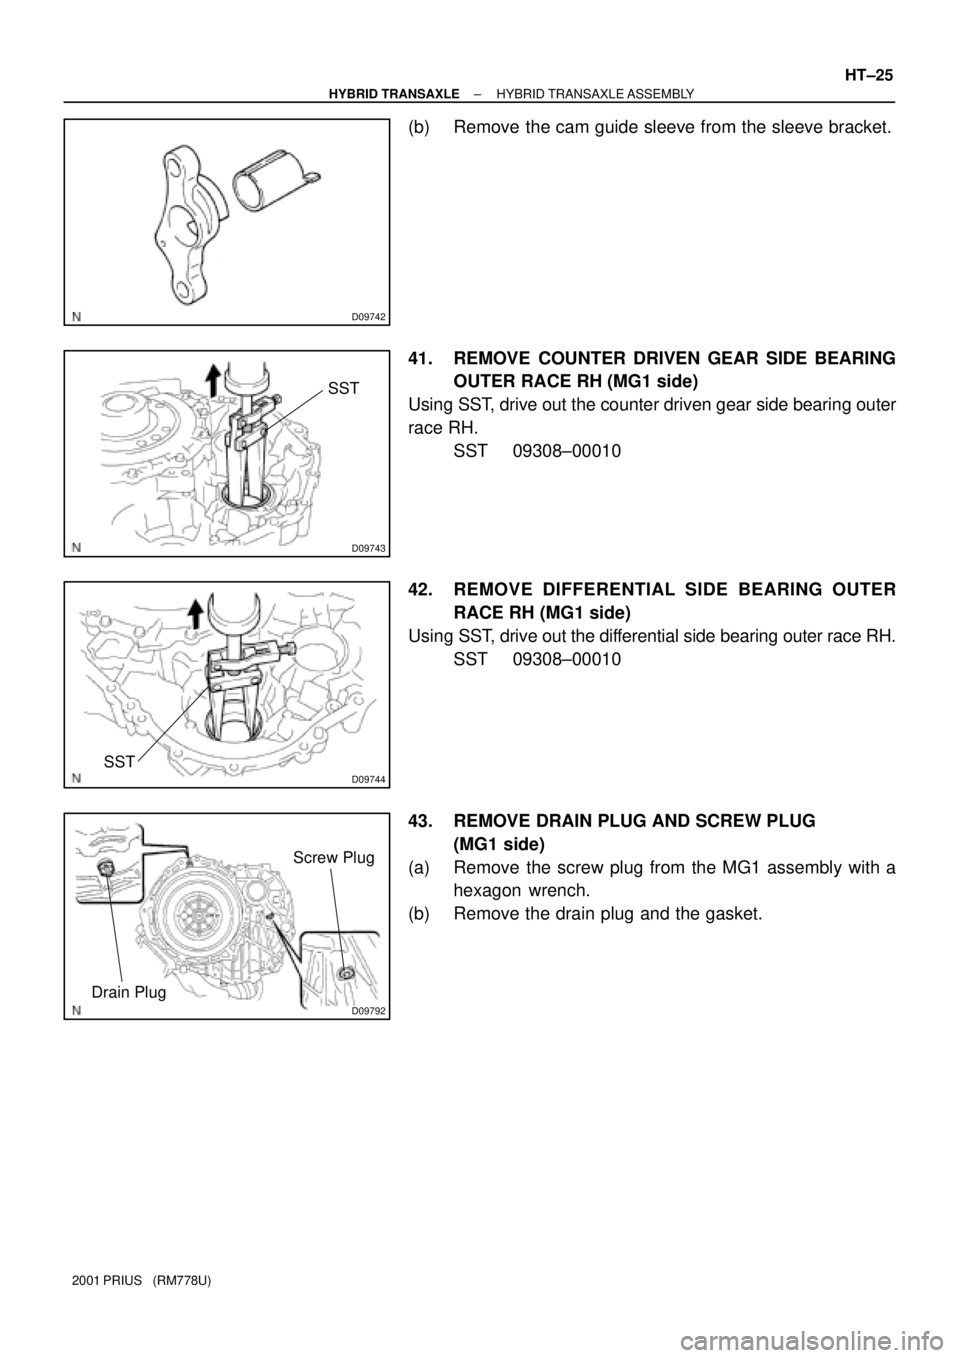
(b) Remove the cam guide sleeve from the sleeve bracket.
41. REMOVE COUNTER DRIVEN GEAR SIDE BEARING
OUTER RACE RH (MG1 side)
Using SST, drive out the counter driven gear side bearing outer
race RH.
SST 09308±00010
42. REMOVE DIFFERENTIAL SIDE BEARING OUTER
RACE RH (MG1 side)
Using SST, drive out the differential side bearing outer race RH.
SST 09308±00010
43. REMOVE DRAIN PLUG AND SCREW PLUG
(MG1 side)
(a) Remove the screw plug from the MG1 assembly with a
hexagon wrench.
(b) Remove the drain plug and the gasket.
Page 1627 of 1943
HT00C±02
D09935
D09730
D09928
Drain Plug
Screw Plug
D09937
HT±26
± HYBRID TRANSAXLEHYBRID TRANSAXLE ASSEMBLY
2001 PRIUS (RM778U)
REASSEMBLY
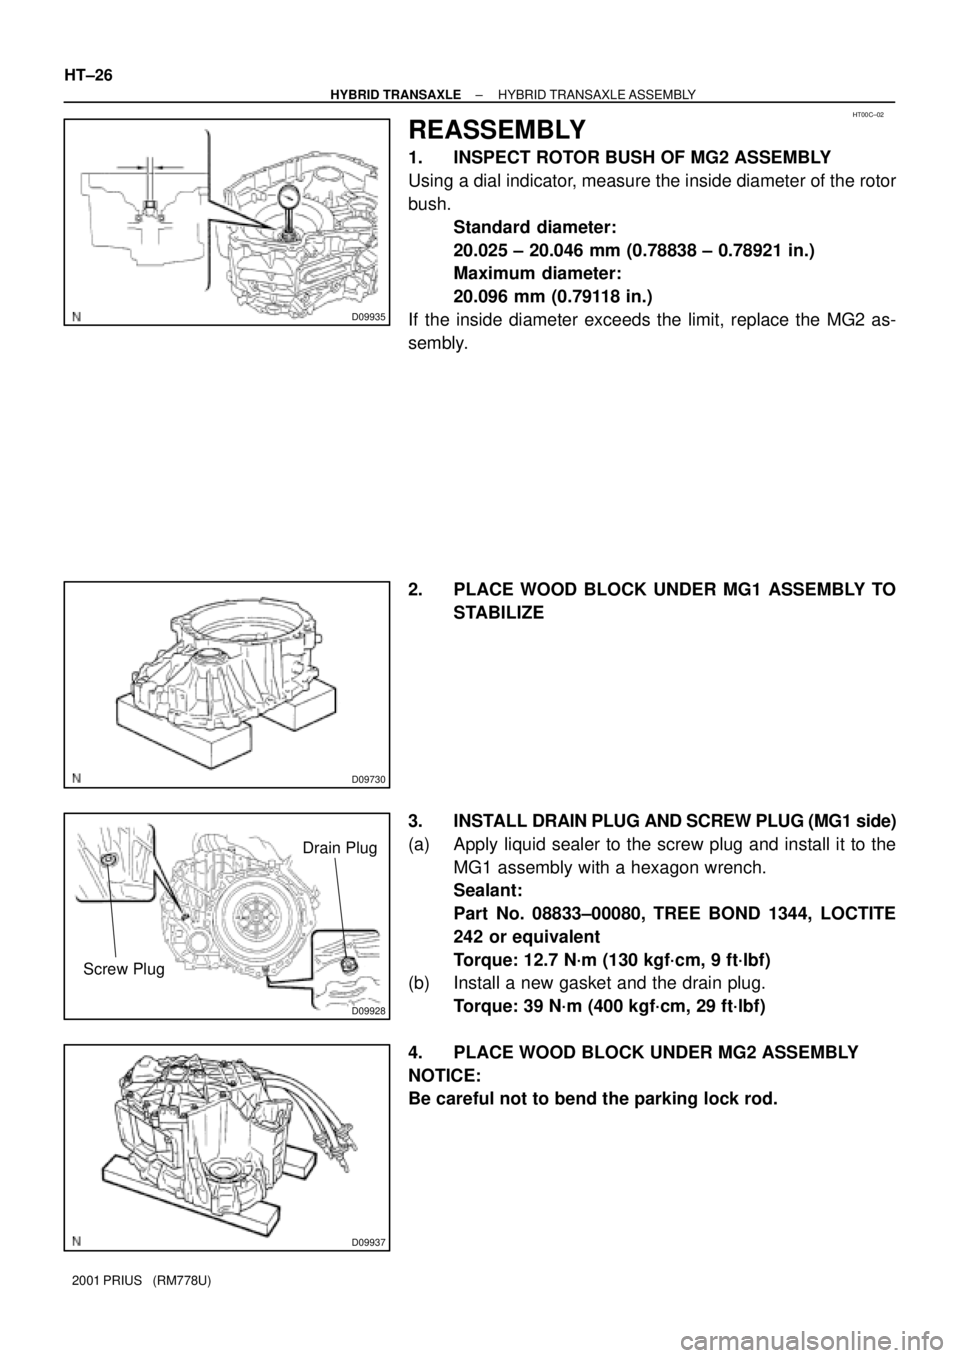
1. INSPECT ROTOR BUSH OF MG2 ASSEMBLY
Using a dial indicator, measure the inside diameter of the rotor
bush.
Standard diameter:
20.025 ± 20.046 mm (0.78838 ± 0.78921 in.)
Maximum diameter:
20.096 mm (0.79118 in.)
If the inside diameter exceeds the limit, replace the MG2 as-
sembly.
2. PLACE WOOD BLOCK UNDER MG1 ASSEMBLY TO
STABILIZE
3. INSTALL DRAIN PLUG AND SCREW PLUG (MG1 side)
(a) Apply liquid sealer to the screw plug and install it to the
MG1 assembly with a hexagon wrench.
Sealant:
Part No. 08833±00080, TREE BOND 1344, LOCTITE
242 or equivalent
Torque: 12.7 N´m (130 kgf´cm, 9 ft´lbf)
(b) Install a new gasket and the drain plug.
Torque: 39 N´m (400 kgf´cm, 29 ft´lbf)
4. PLACE WOOD BLOCK UNDER MG2 ASSEMBLY
NOTICE:
Be careful not to bend the parking lock rod.
Page 1628 of 1943
D09793
Filler Plug
Screw Plug B
Screw Plug A
D09882
SST
D09728
SST
D09936
± HYBRID TRANSAXLEHYBRID TRANSAXLE ASSEMBLY
HT±27
2001 PRIUS (RM778U)
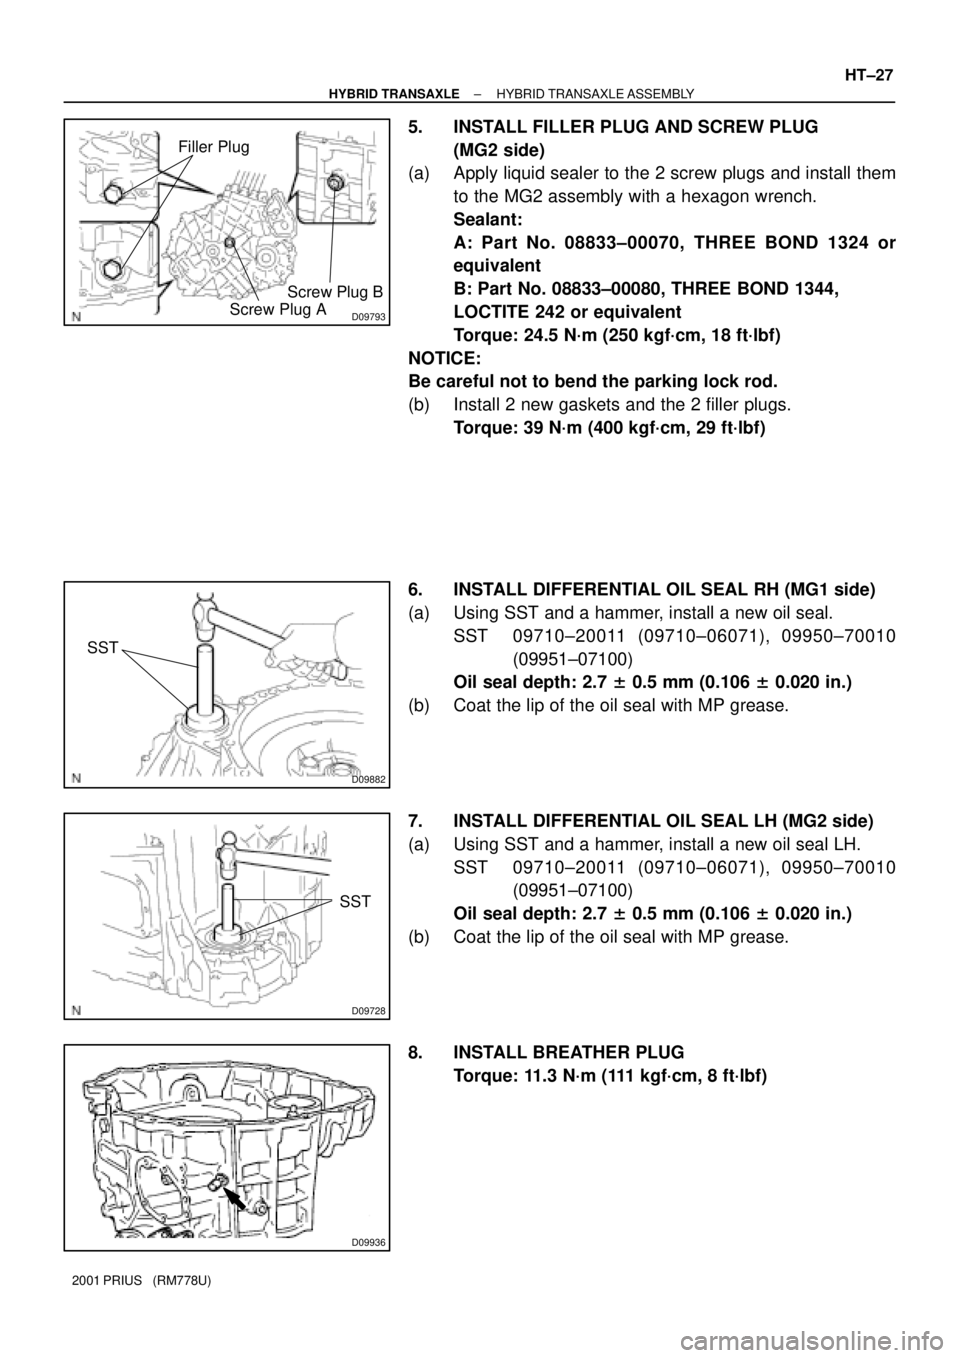
5. INSTALL FILLER PLUG AND SCREW PLUG
(MG2 side)
(a) Apply liquid sealer to the 2 screw plugs and install them
to the MG2 assembly with a hexagon wrench.
Sealant:
A: Part No. 08833±00070, THREE BOND 1324 or
equivalent
B: Part No. 08833±00080, THREE BOND 1344,
LOCTITE 242 or equivalent
Torque: 24.5 N´m (250 kgf´cm, 18 ft´lbf)
NOTICE:
Be careful not to bend the parking lock rod.
(b) Install 2 new gaskets and the 2 filler plugs.
Torque: 39 N´m (400 kgf´cm, 29 ft´lbf)
6. INSTALL DIFFERENTIAL OIL SEAL RH (MG1 side)
(a) Using SST and a hammer, install a new oil seal.
SST 09710±20011 (09710±06071), 09950±70010
(09951±07100)
Oil seal depth: 2.7 ± 0.5 mm (0.106 ± 0.020 in.)
(b) Coat the lip of the oil seal with MP grease.
7. INSTALL DIFFERENTIAL OIL SEAL LH (MG2 side)
(a) Using SST and a hammer, install a new oil seal LH.
SST 09710±20011 (09710±06071), 09950±70010
(09951±07100)
Oil seal depth: 2.7 ± 0.5 mm (0.106 ± 0.020 in.)
(b) Coat the lip of the oil seal with MP grease.
8. INSTALL BREATHER PLUG
Torque: 11.3 N´m (111 kgf´cm, 8 ft´lbf)
Page 1629 of 1943
D09852
D09853
SST
D09854
SST
D08194
SST
D09855
SST
HT±28
± HYBRID TRANSAXLEHYBRID TRANSAXLE ASSEMBLY
2001 PRIUS (RM778U)
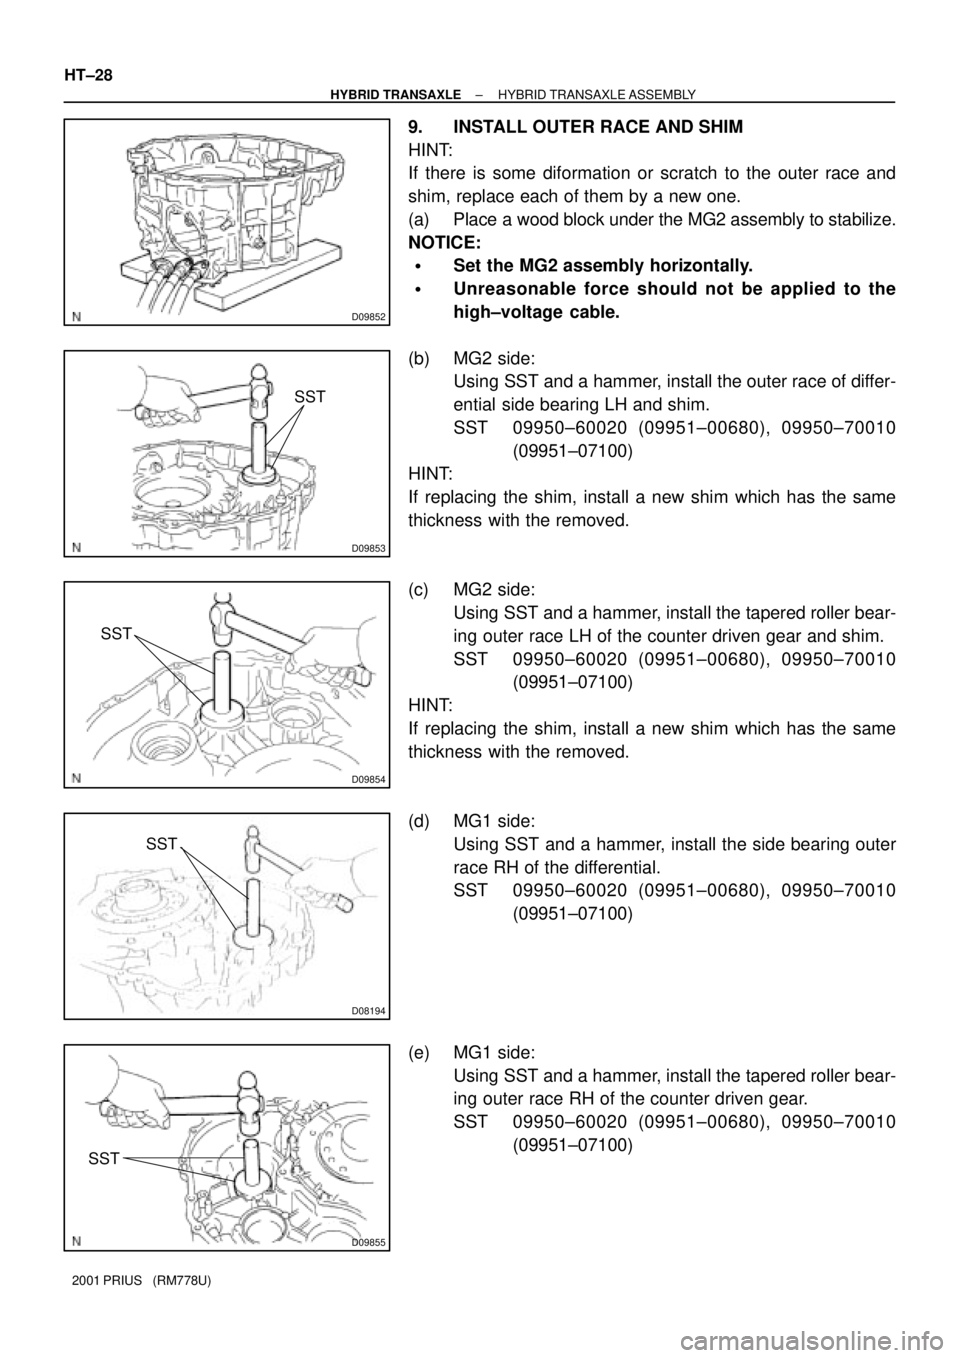
9. INSTALL OUTER RACE AND SHIM
HINT:
If there is some diformation or scratch to the outer race and
shim, replace each of them by a new one.
(a) Place a wood block under the MG2 assembly to stabilize.
NOTICE:
�Set the MG2 assembly horizontally.
�Unreasonable force should not be applied to the
high±voltage cable.
(b) MG2 side:
Using SST and a hammer, install the outer race of differ-
ential side bearing LH and shim.
SST 09950±60020 (09951±00680), 09950±70010
(09951±07100)
HINT:
If replacing the shim, install a new shim which has the same
thickness with the removed.
(c) MG2 side:
Using SST and a hammer, install the tapered roller bear-
ing outer race LH of the counter driven gear and shim.
SST 09950±60020 (09951±00680), 09950±70010
(09951±07100)
HINT:
If replacing the shim, install a new shim which has the same
thickness with the removed.
(d) MG1 side:
Using SST and a hammer, install the side bearing outer
race RH of the differential.
SST 09950±60020 (09951±00680), 09950±70010
(09951±07100)
(e) MG1 side:
Using SST and a hammer, install the tapered roller bear-
ing outer race RH of the counter driven gear.
SST 09950±60020 (09951±00680), 09950±70010
(09951±07100)
Page 1630 of 1943
D09857
D09694
D09695
D09858
SST
± HYBRID TRANSAXLEHYBRID TRANSAXLE ASSEMBLY
HT±29
2001 PRIUS (RM778U)
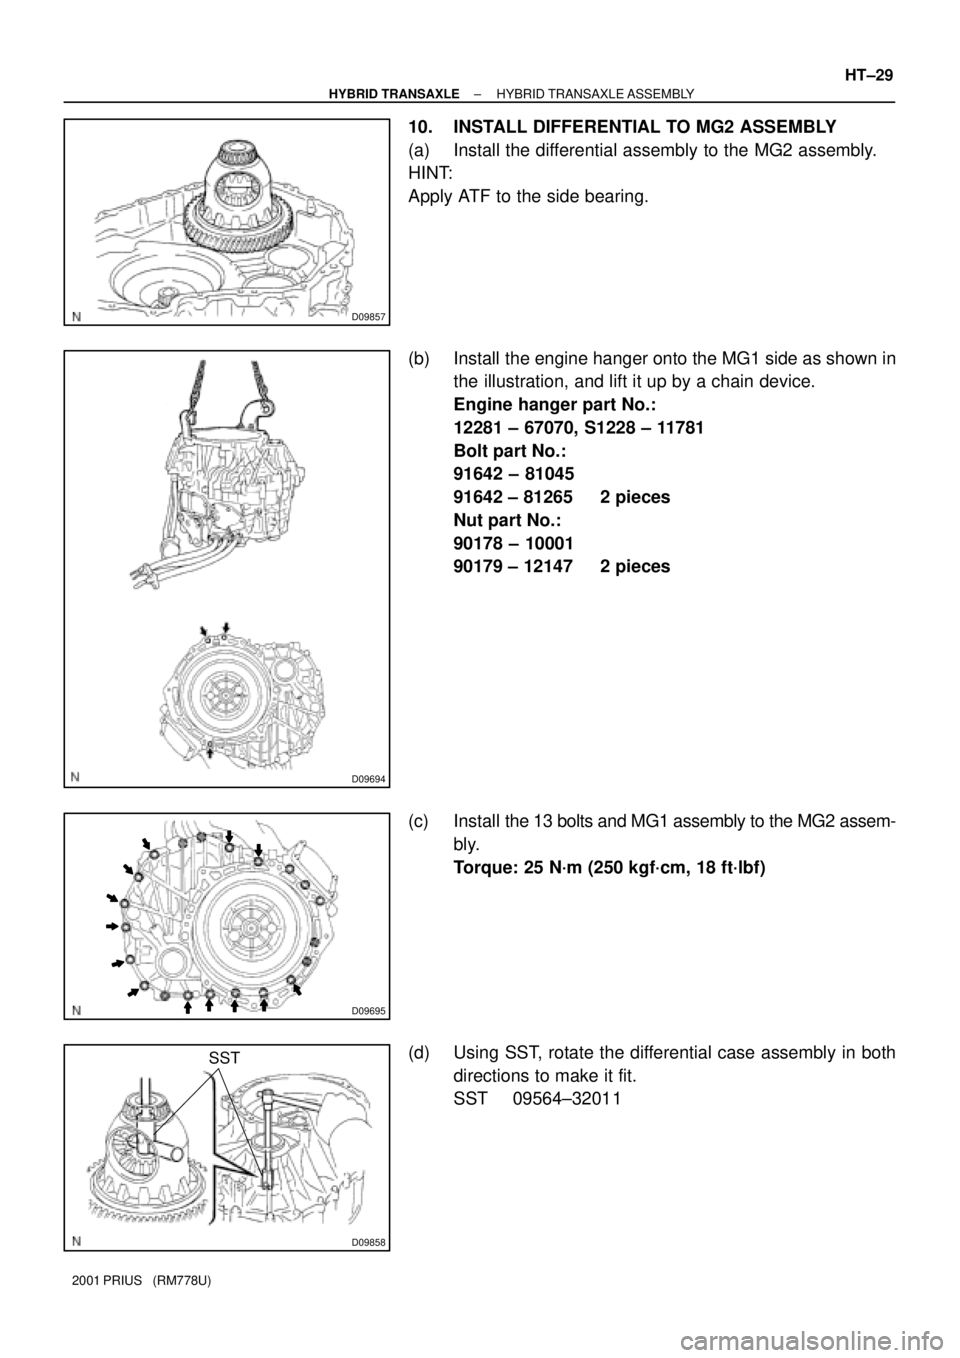
10. INSTALL DIFFERENTIAL TO MG2 ASSEMBLY
(a) Install the differential assembly to the MG2 assembly.
HINT:
Apply ATF to the side bearing.
(b) Install the engine hanger onto the MG1 side as shown in
the illustration, and lift it up by a chain device.
Engine hanger part No.:
12281 ± 67070, S1228 ± 11781
Bolt part No.:
91642 ± 81045
91642 ± 81265 2 pieces
Nut part No.:
90178 ± 10001
90179 ± 12147 2 pieces
(c) Install the 13 bolts and MG1 assembly to the MG2 assem-
bly.
Torque: 25 N´m (250 kgf´cm, 18 ft´lbf)
(d) Using SST, rotate the differential case assembly in both
directions to make it fit.
SST 09564±32011
Trending: battery capacity, boot, weight, washer fluid, check engine, oil pressure, air filter
