TOYOTA PRIUS PHV 2012 Owners Manual
Manufacturer: TOYOTA, Model Year: 2012, Model line: PRIUS PHV, Model: TOYOTA PRIUS PHV 2012Pages: 684, PDF Size: 12.16 MB
Page 491 of 684
491
4-3. Do-it-yourself maintenance
PRIUS PHV_OM_OM47818U_(U)
4
Maintenance and care
■When replacing wheels
The wheels of your vehicle are equipped with tire pressure warning
valves and transmitters that allow the tire pressure warning system to
provide advance warning in the event of a loss in tire inflation pressure.
Whenever wheels are replaced, tire pressure warning valves and trans-
mitters must be installed. (
P. 477)
CAUTION
■When replacing wheels
●Do not use wheels that are a different size from those recommended in
the Owner’s Manual, as this may resu lt in a loss of handling control.
●Never use an inner tube in a leaking wheel which is designed for a
tubeless tire. Doing so may result in an accident, causing death or seri-
ous injury.
■When installing the wheel nuts
●Never use oil or grease on the wheel bolts or wheel nuts.
Oil and grease may cause the wheel nuts to be excessively tightened,
leading to bolt or disc wheel damage. In addition, the oil or grease can
cause the wheel nuts to loosen and the wheel may fall off, causing an
accident and resulting in death or serious injury. Remove any oil or
grease from the wheel bolts or wheel nuts.
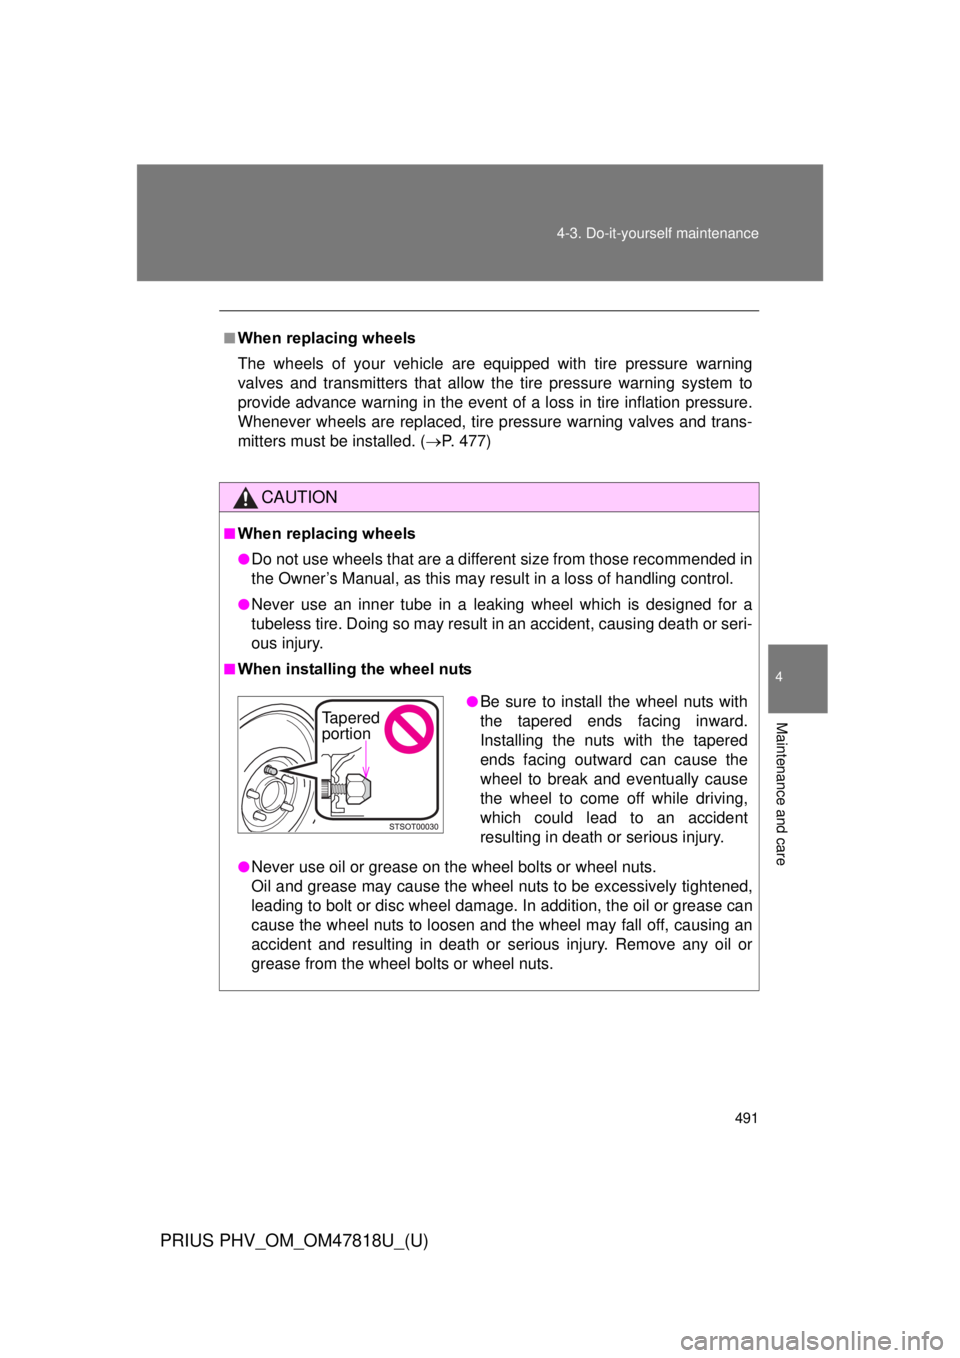
●Be sure to install the wheel nuts with
the tapered ends facing inward.
Installing the nuts with the tapered
ends facing outward can cause the
wheel to break and eventually cause
the wheel to come off while driving,
which could lead to an accident
resulting in death or serious injury.
Tapered
portion
Page 492 of 684

492 4-3. Do-it-yourself maintenance
PRIUS PHV_OM_OM47818U_(U)
CAUTION
■Use of defective wheels prohibited
Do not use cracked or deformed wheels.
Doing so could cause the tire to leak air during driving, possibly causing
an accident.
NOTICE
■Replacing tire pressure warning valves and transmitters
●Because tire repair or replacement may affect the tire pressure warn-
ing valves and transmitters, make sure to have tires serviced by your
Toyota dealer or other qualified service shop. In addition, make sure to
purchase your tire pressure warning valves and transmitters at your
Toyota dealer.
●Ensure that only genuine Toyota wheels are used on your vehicle.
Tire pressure warning valves and transmitters may not work properly
with non-genuine wheels.
Page 493 of 684
493
4-3. Do-it-yourself maintenance
PRIUS PHV_OM_OM47818U_(U)
4
Maintenance and care
Electronic key batter y
Replace the battery with a new one if it is depleted.
■You will need the following items:
●Flathead screwdriver
● Lithium battery CR1632
■ Replacing the battery
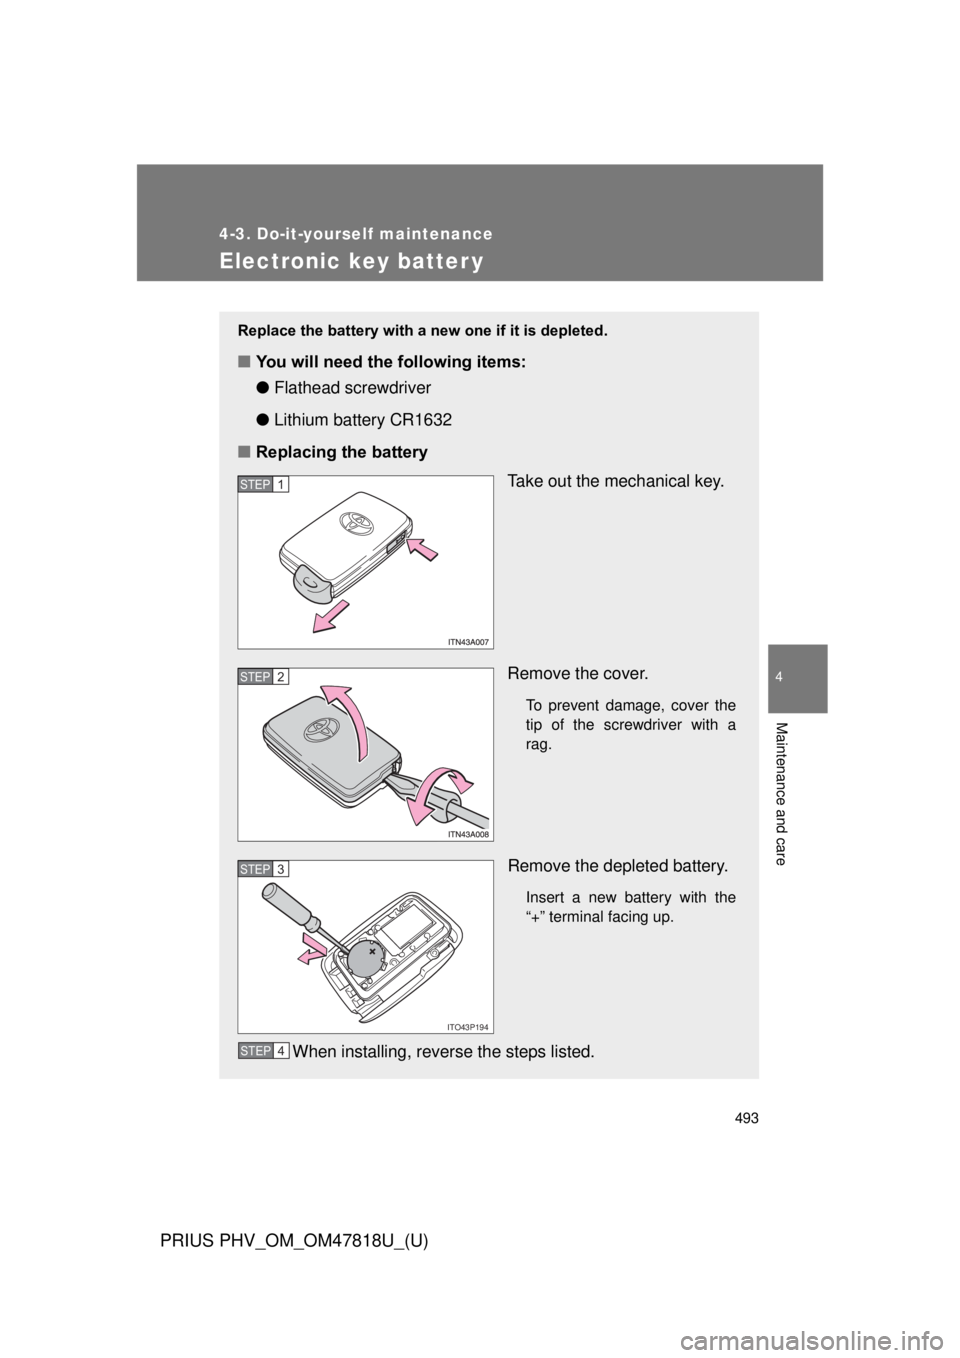
Take out the mechanical key.
Remove the cover.
To prevent damage, cover the
tip of the screwdriver with a
rag.
Remove the depleted battery.
Insert a new battery with the
“+” terminal facing up.
When installing, reverse the steps listed.
STEP 1
STEP 2
ITO43P194
STEP 3
STEP 4
Page 494 of 684

494 4-3. Do-it-yourself maintenance
PRIUS PHV_OM_OM47818U_(U)
■Use a CR1632 lithium battery
● Batteries can be purchased at your Toyota dealer, local electrical appli-
ance shops or camera stores.
● Replace only with the same or equivalent type recommended by the
manufacturer.
● Dispose of used batteries according to local laws.
■ If the electronic key battery is depleted
The following symptoms may occur:
● The smart key system and wireless remote control will not function prop-
erly.
● The operational range will be reduced.
CAUTION
■Removed battery and other parts
These parts are small and if swallowed by a child, they can cause choking.
Keep away from children. Failure to do so could result in death or serious
injury.
NOTICE
■For normal operation after replacing the battery
Observe the following precautions to prevent accidents:
● Always work with dry hands.
Moisture may cause the battery to rust.
● Do not touch or move any other component inside the remote control.
● Do not bend either of the battery terminals.
Page 495 of 684
495
4-3. Do-it-yourself maintenance
PRIUS PHV_OM_OM47818U_(U)
4
Maintenance and care
Checking and replacing fuses
If any of the electrical components do not operate, a fuse may have
blown. If this happens, check and replace the fuses as necessary.
Turn the “POWER” switch off.
Vehicles with Solar Ventilation Sy stem: Turn the Solar Ventilation
System off and make sure not to operate the Remote Air Condi-
tioning System.
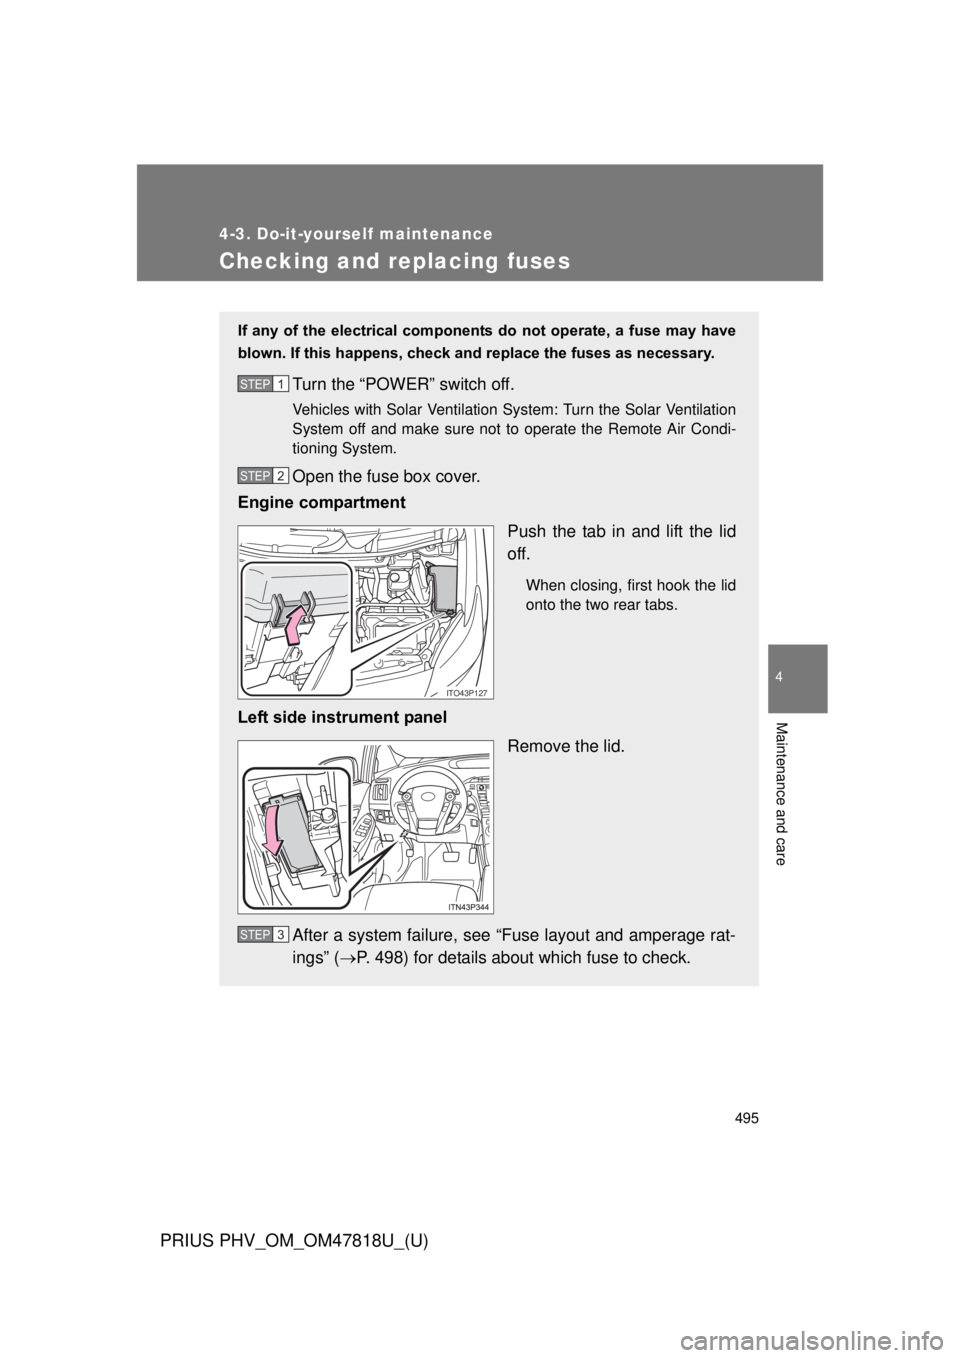
Open the fuse box cover.
Engine compartment
Push the tab in and lift the lid
off.
When closing, first hook the lid
onto the two rear tabs.
Left side instrument panelRemove the lid.
After a system failure, see “Fuse layout and amperage rat-
ings” ( P. 498) for details about which fuse to check.
STEP 1
STEP 2
ITO43P127
STEP 3
Page 496 of 684
496 4-3. Do-it-yourself maintenance
PRIUS PHV_OM_OM47818U_(U)
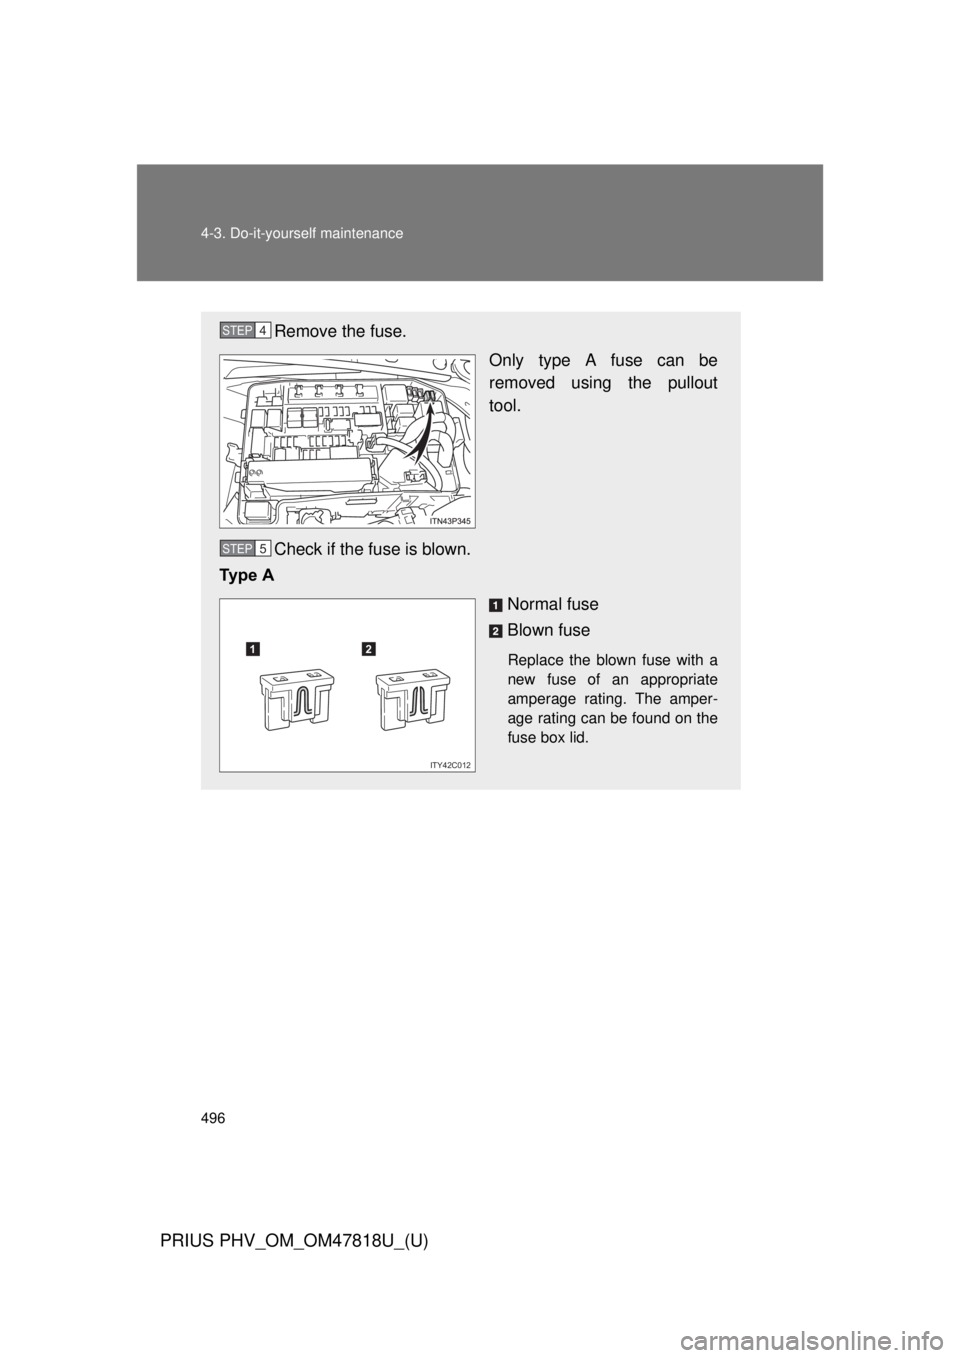
Remove the fuse.Only type A fuse can be
removed using the pullout
tool.
Check if the fuse is blown.
Ty p e A
Normal fuse
Blown fuse
Replace the blown fuse with a
new fuse of an appropriate
amperage rating. The amper-
age rating can be found on the
fuse box lid.
STEP 4
STEP 5
12
ITY42C012
Page 497 of 684
497
4-3. Do-it-yourself maintenance
PRIUS PHV_OM_OM47818U_(U)
4
Maintenance and care
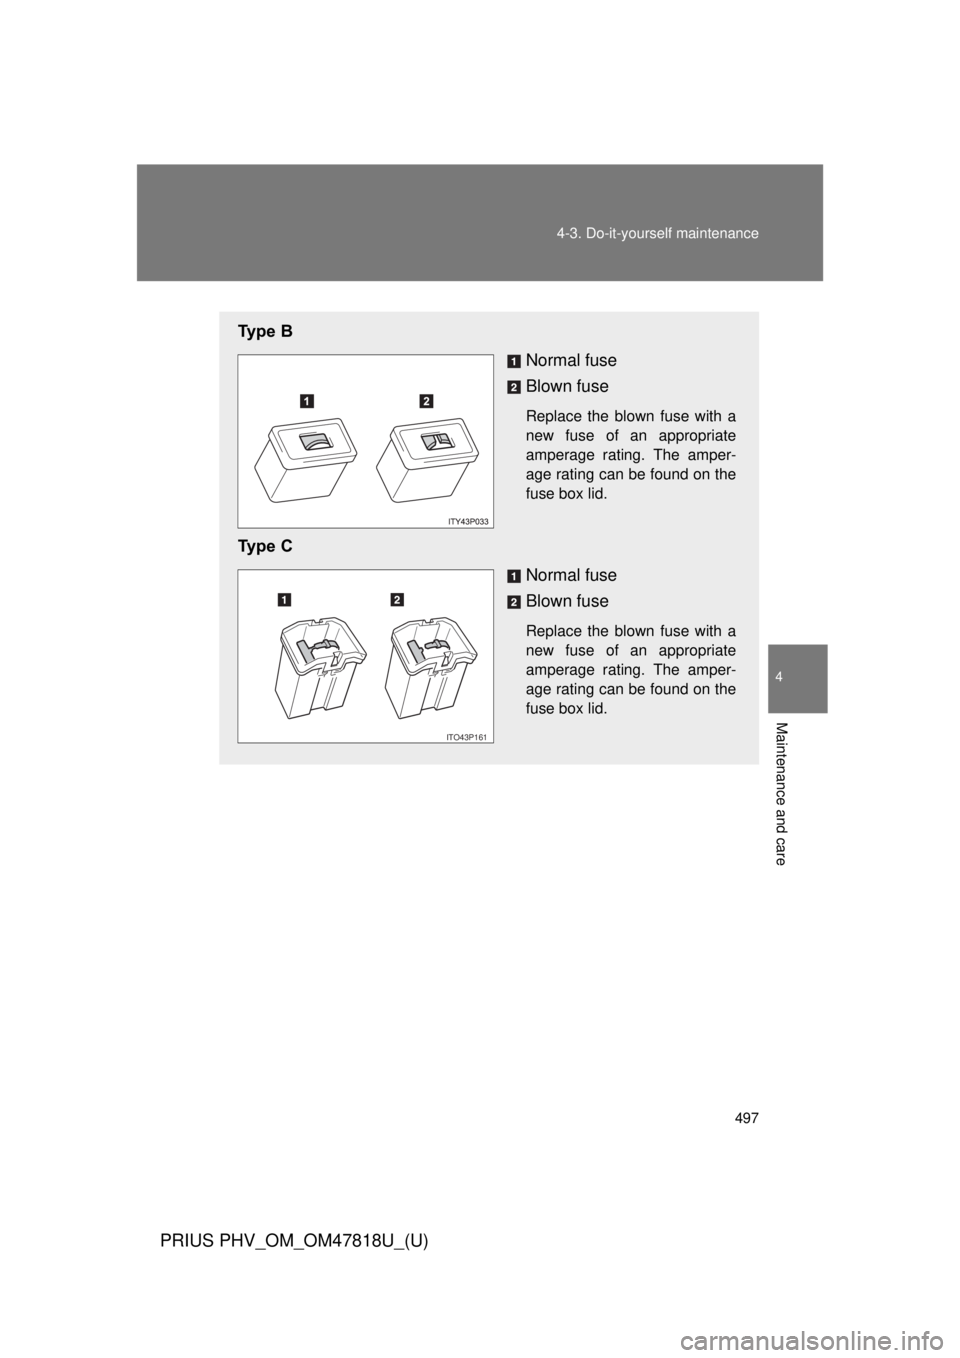
Ty p e B
Normal fuse
Blown fuse
Replace the blown fuse with a
new fuse of an appropriate
amperage rating. The amper-
age rating can be found on the
fuse box lid.
Ty p e CNormal fuse
Blown fuse
Replace the blown fuse with a
new fuse of an appropriate
amperage rating. The amper-
age rating can be found on the
fuse box lid.
ITO43P161
Page 498 of 684
498 4-3. Do-it-yourself maintenance
PRIUS PHV_OM_OM47818U_(U)
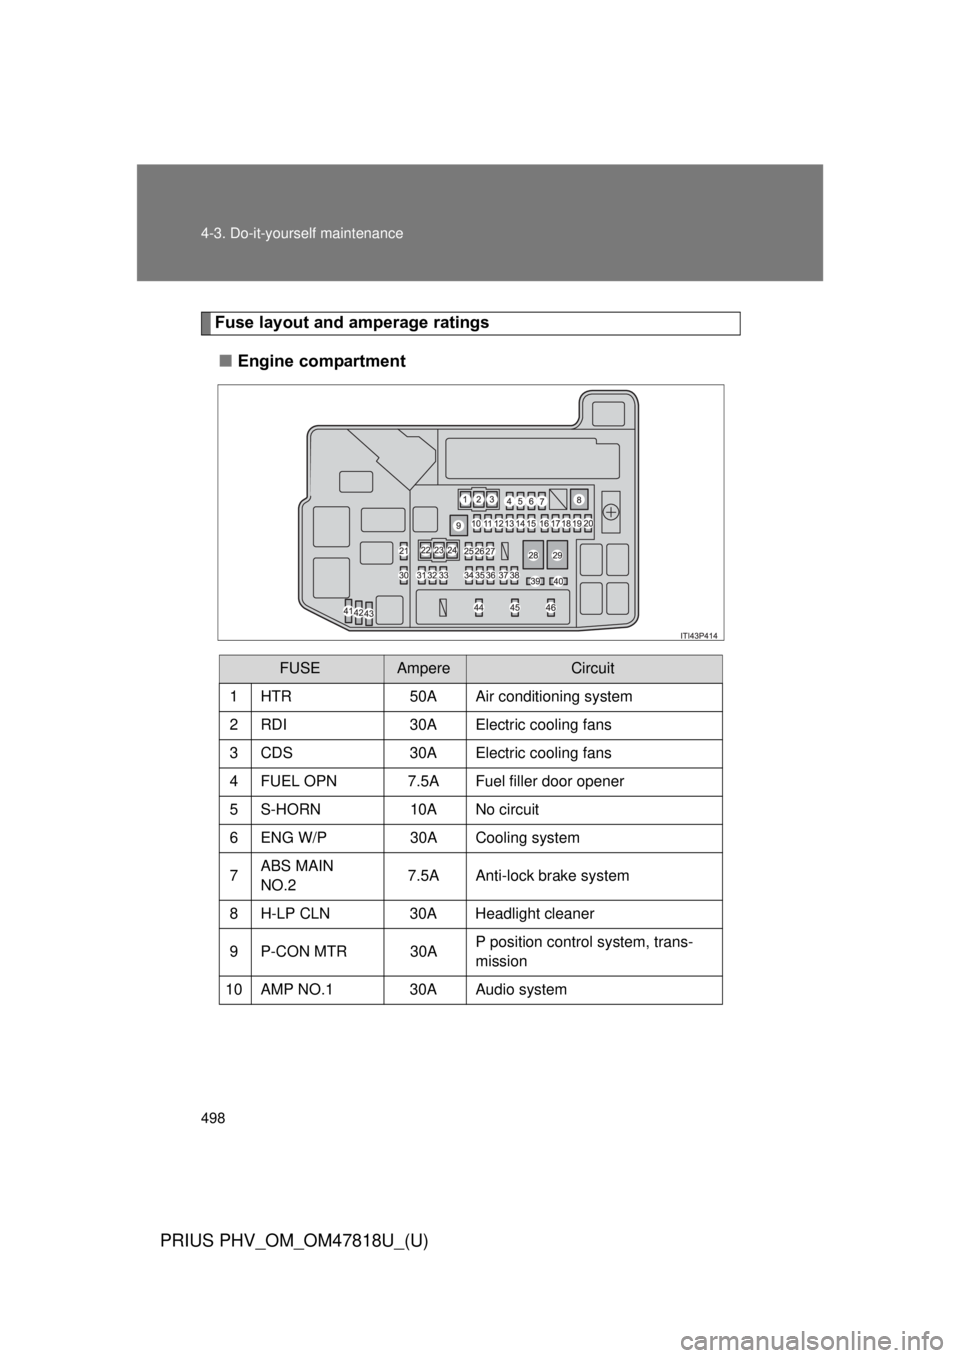
Fuse layout and amperage ratings■ Engine compartment
FUSEAmpereCircuit
1 HTR 50A Air conditioning system
2 RDI 30A Electric cooling fans
3 CDS 30A Electric cooling fans
4 FUEL OPN 7.5A Fuel filler door opener
5 S-HORN 10A No circuit
6 ENG W/P 30A Cooling system
7 ABS MAIN
NO.2 7.5A Anti-lock brake system
8 H-LP CLN 30A Headlight cleaner
9 P-CON MTR 30A P position control system, trans-
mission
10 AMP NO.1 30A Audio system
Page 499 of 684

499
4-3. Do-it-yourself maintenance
PRIUS PHV_OM_OM47818U_(U)
4
Maintenance and care
FUSEAmpereCircuit
11 IGCT 30A PCU, IGCT NO.2, IGCT NO.3
12 DC/DC-S 5A Inverter and converter
13 P CON MAIN 7.5A P position control system, P posi-
tion switch
14 AM2 7.5A Power management system
15 ECU-B2 7.5A Smart key system, hybrid system
16 MAYDAY/DCM 10A MAYDAY/DCM
17 PIMR 10A Charge system
18 TURN & HAZ 10A Turn signal lights
19 ETCS 10AMultiport fuel injection system/
sequential multiport fuel injection
system
20 ABS MAIN
NO.1 20A Anti-lock brake system
21 H-LP LH LO 15A Left-hand headlight (low beam)
22 P/I 2 40AP position control system, horn,
headlight low beams, back-up
lights
23 ABS MTR 1 30A Anti-lock brake system
24 ABS MTR 2 30A Anti-lock brake system
25 H-LP HI MAIN 20A Headlight high beams, daytime
running lights
26 DRL 7.5A Daytime running lights
27 AMP NO.2 30A Audio system, navigation system
28 P/I 1 60A IG2, EFI MAIN, BATT FAN
29 EPS 60A Electric power steering
Page 500 of 684

500 4-3. Do-it-yourself maintenance
PRIUS PHV_OM_OM47818U_(U)
FUSEAmpereCircuit
30 H-LP RH LO 15A Right-hand headlight (low beam)
31 PCU 10A Inverter and converter
32 IGCT NO.2 10A Hybrid system, P position control
system, power management sys-
tem, multiport fuel injection sys-
tem/sequential multiport fuel
injection system
33 MIR HTR 10A Outside rear view mirror defoggers
34 RAD NO.1 15A Audio system, navigation system
35 DOME 10ADoor courtesy lights, luggage
compartment light, personal light,
interior light, foot lights, vanity
lights, inside rear view mirror,
garage door opener
36 ECU-B 7.5ASmart key system, personal lights,
gauges and meters
37 H-LP LH HI 10A Left-hand headlight (high beam)
38 H-LP RH HI 10A Right-hand headlight (high beam)
39 EFI NO.2 10AMultiport fuel injection system/
sequential multiport fuel injection
system
40 IGCT NO.3 10A Cooling system
41 SPARE 30A Spare fuse
42 SPARE 10A Spare fuse