TOYOTA PRIUS PRIME 2017 2.G Quick Reference Guide
Manufacturer: TOYOTA, Model Year: 2017, Model line: PRIUS PRIME, Model: TOYOTA PRIUS PRIME 2017 2.GPages: 40, PDF Size: 0.8 MB
Page 11 of 40
PRIUS PRIME_QG_OM47B04U_(U)
111. Charging operation
1
Charging operation
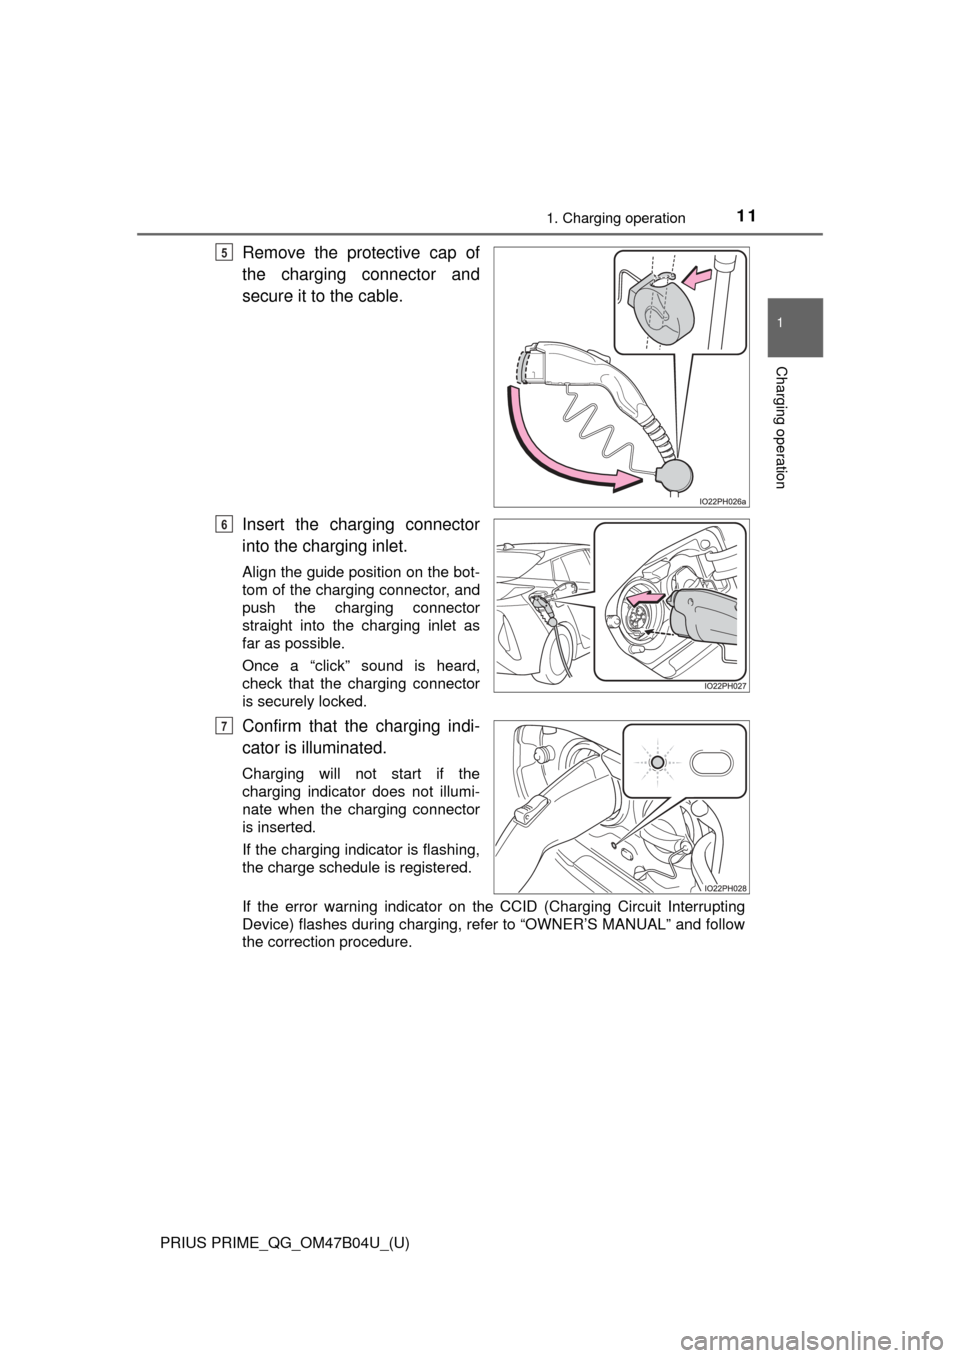
Remove the protective cap of
the charging connector and
secure it to the cable.
Insert the charging connector
into the charging inlet.
Align the guide position on the bot-
tom of the charging connector, and
push the charging connector
straight into the charging inlet as
far as possible.
Once a “click” sound is heard,
check that the charging connector
is securely locked.
Confirm that the charging indi-
cator is illuminated.
Charging will not start if the
charging indicator does not illumi-
nate when the charging connector
is inserted.
If the charging indicator is flashing,
the charge schedule is registered.
If the error warning indicator on the CCID (Charging Circuit Interrupting
Device) flashes during charging, refer to “OWNER’S MANUAL” and follow
the correction procedure.
5
6
7
Page 12 of 40
12
PRIUS PRIME_QG_OM47B04U_(U)
1. Charging operation
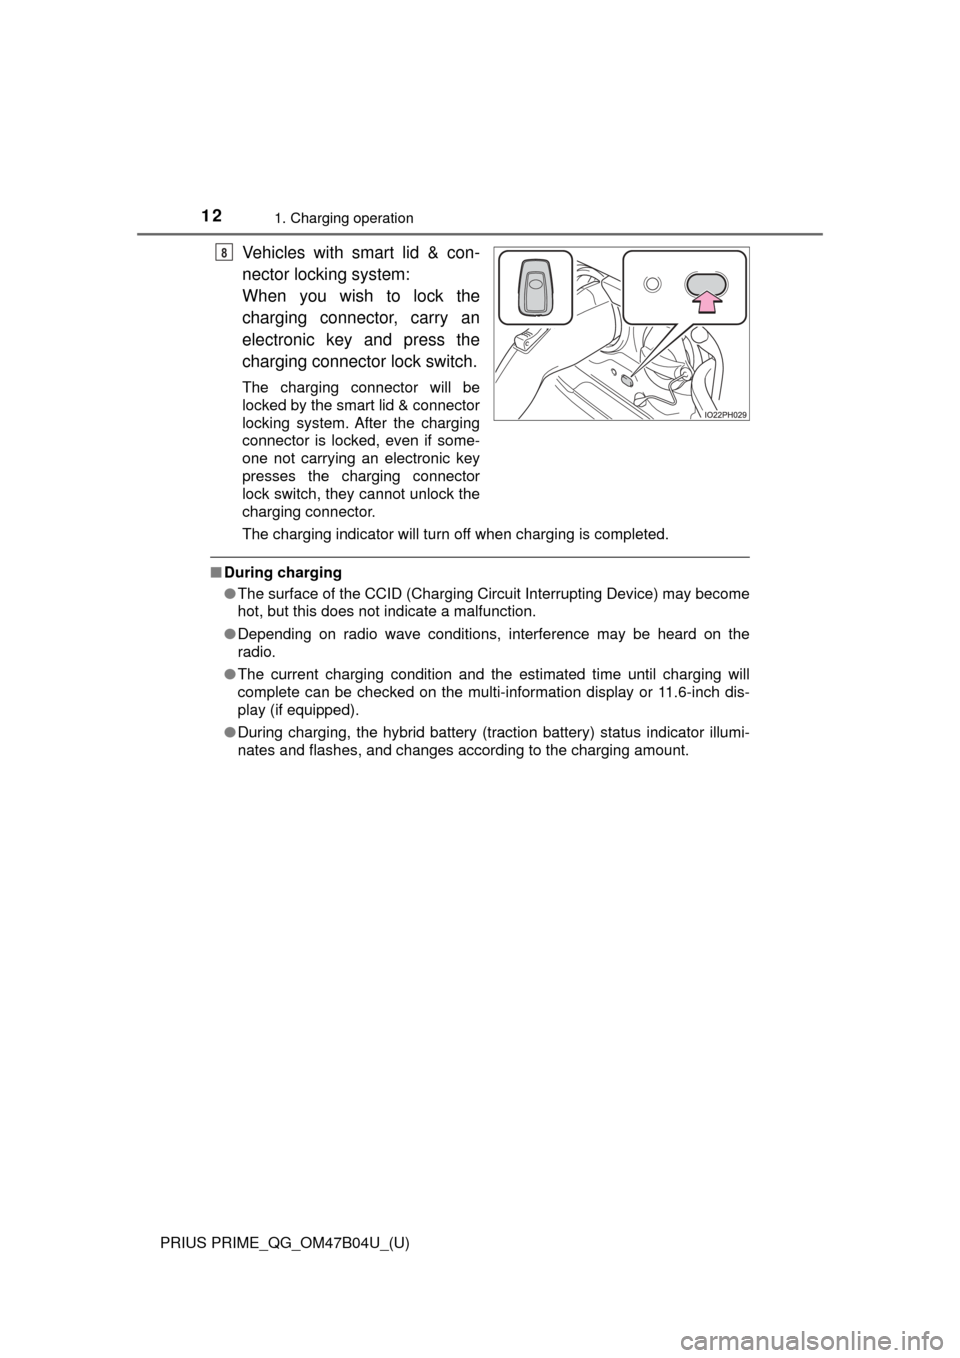
Vehicles with smart lid & con-
nector locking system:
When you wish to lock the
charging connector, carry an
electronic key and press the
charging connector lock switch.
The charging connector will be
locked by the smart lid & connector
locking system. After the charging
connector is locked, even if some-
one not carrying an electronic key
presses the charging connector
lock switch, they cannot unlock the
charging connector.
The charging indicator will turn off when charging is completed.
■During charging
●The surface of the CCID (Charging Circuit Interrupting Device) may become
hot, but this does not indicate a malfunction.
● Depending on radio wave conditions, interference may be heard on the
radio.
● The current charging condition and the estimated time until charging will
complete can be checked on the multi-information display or 11.6-inch dis-
play (if equipped).
● During charging, the hybrid battery (traction battery) status indicator illumi-
nates and flashes, and changes according to the charging amount.
8
Page 13 of 40
PRIUS PRIME_QG_OM47B04U_(U)
131. Charging operation
1
Charging operation
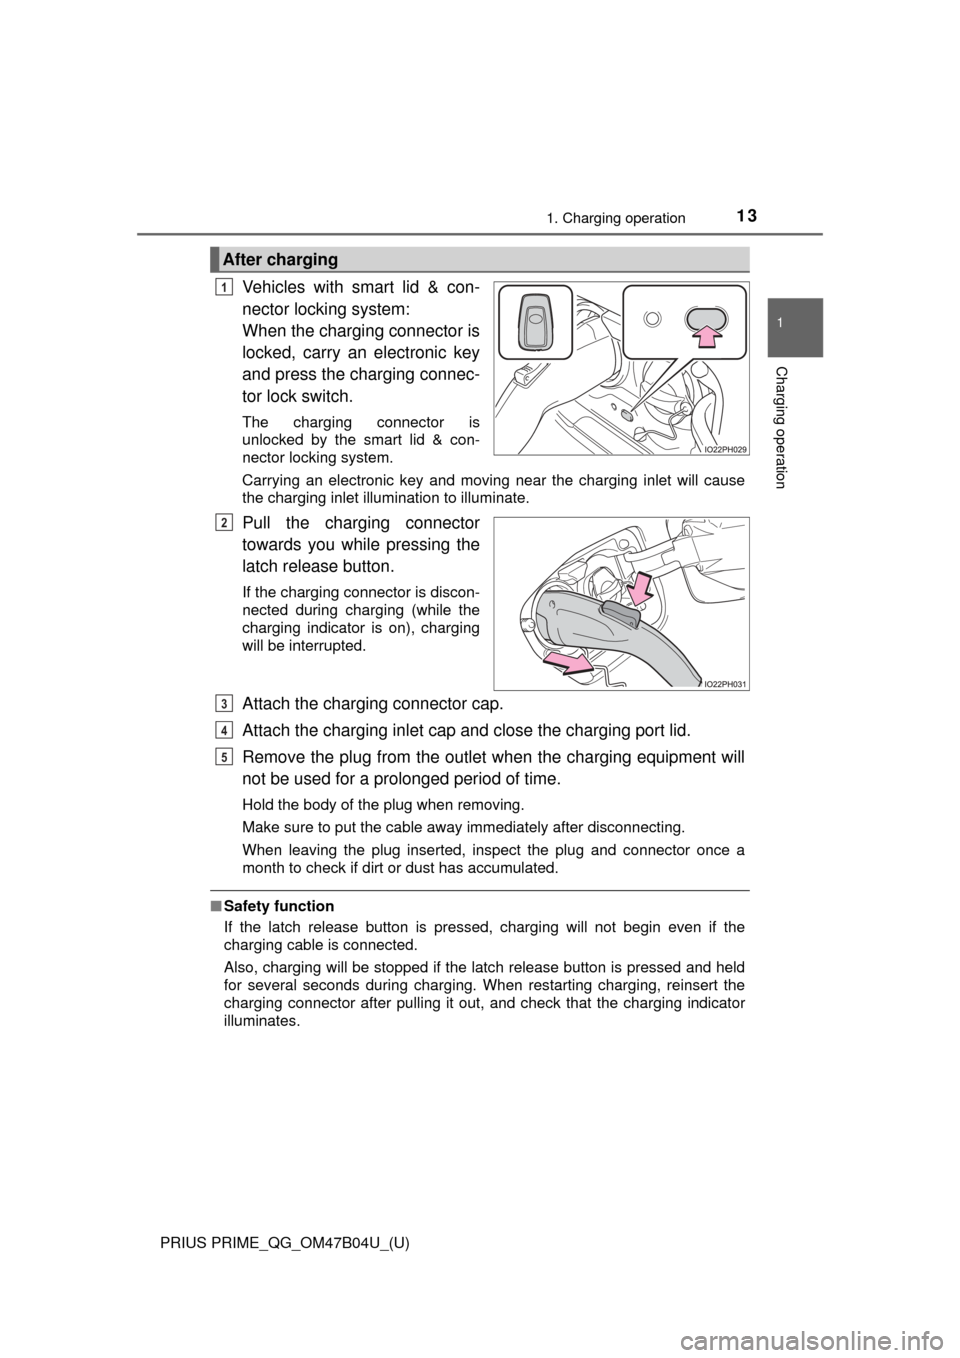
Vehicles with smart lid & con-
nector locking system:
When the charging connector is
locked, carry an electronic key
and press the charging connec-
tor lock switch.
The charging connector is
unlocked by the smart lid & con-
nector locking system.
Carrying an electronic key and moving near the charging inlet will cause
the charging inlet illumination to illuminate.
Pull the charging connector
towards you while pressing the
latch release button.
If the charging connector is discon-
nected during charging (while the
charging indicator is on), charging
will be interrupted.
Attach the charging connector cap.
Attach the charging inlet cap and close the charging port lid.
Remove the plug from the outlet when the charging equipment will
not be used for a prolonged period of time.
Hold the body of the plug when removing.
Make sure to put the cable away immediately after disconnecting.
When leaving the plug inserted, inspect the plug and connector once a
month to check if dirt or dust has accumulated.
■Safety function
If the latch release button is pressed, charging will not begin even if the
charging cable is connected.
Also, charging will be stopped if the latch release button is pressed and held
for several seconds during charging. When restarting charging, reinsert the
charging connector after pulling it out, and check that the charging indicator
illuminates.
After charging
1
2
3
4
5
Page 14 of 40
14
PRIUS PRIME_QG_OM47B04U_(U)
1. Charging operation
WARNING
■When charging
Observe the following precautions.
Failure to do so may cause an unexpected accident, resulting in death or\
serious injury.
● Connect to a power source suitable for charging.
● Check that the charging inlet, charging cable, plug and outlet are free of
foreign matter.
● Only use outlets where the plug can be securely inserted.
● Do not charge if the charging cable is coiled or bundled.
● Wrapping 120 V charging cable while in-use is not recommended because
cable may overheat. Failure to rewrap charging cable when not in-use
could result in strangulation or tripping hazard.
● Do not wash the vehicle while the charging cable is connected to the vehi-
cle and when the charging lid is open.
● Do not touch the terminals of the charging connector and charging inlet
with a sharp metal objects (needles etc.) or hands, or short them with for-
eign objects.
● When charging outdoors, make sure to connect to a weatherproof outlet
for outdoor use.
● Do not insert the plug if the outlet is submerged in water or snow.
● Follow these points when charging while it is raining or snowing.
• Check that no snow, water or ice has accumulated around the charging
connector terminals and the vehicle charging inlet. Tap snow, water or
ice gently from connector prior to inserting charging connector into the
vehicle’s charging inlet.
• Do not connect the plug if your hands are wet. Also, do not get the plug or outlet wet.
● Do not charge the vehicle during a lightning storm.
● Do not let the wheels on the charging cable, plug, charging connector and
CCID (Charging Circuit Interrupting Device).
● Firmly insert the plug into the outlet.
● Do not use an extension cord and converting adaptor.
Page 15 of 40

PRIUS PRIME_QG_OM47B04U_(U)
151. Charging operation
1
Charging operation
WARNING
■After charging
Remove the plug if it will not be used for a long time.
Dirt and dust may accumulate plug or outlet, which could cause a malfunc-
tion or fire, possibly leading to death or serious injury.
■ Charging equipment
There is charging equipment under the rear seats. Make sure to observe
the following precautions regarding the charging equipment. Failure to
observe these precautions may result in death or serious injury such as
burns and electric shocks.
● The charging equipment is hot during charging. Do not touch the charging
equipment, as doing so may result in burns.
● Do not disassemble, repair or modify the charging equipment.
When the charging equipment needs to be repaired, consult your Toyota
dealer.
NOTICE
■When use the charging cable and related parts
To prevent damage to the charging cable and related parts, observe the fol-
lowing precautions.
● When interrupting or canceling charging, remove the charging connector
before removing the plug.
● Vehicles with smart lid & connector locking system: When removing the
charging cable, check that the charging connector is unlocked.
● Do not forcefully pull the connector cap and charging inlet cap.
● Do not apply a vibration to the charging connector while charging.
Charging may be stopped.
● Do not insert anything but the charging connector.
● When inserting the plug into or removing the plug from the outlet, make
sure to hold the body of the plug.
● Do not damage the charging inlet cap with a sharp object.
● Do not forcefully pull the charging cable that is caught or entangled.
If the cable is entangled, disentangle it before using.
● When charging from the external device, use the charging cable equipped
with the vehicle.
■ When charging
Do not insert the plug into the charging inlet.
The charging inlet may be damaged.
Page 16 of 40
16
PRIUS PRIME_QG_OM47B04U_(U)
1. Charging operation
NOTICE
■After charging
● After disconnecting the charging connector from the charging inlet, make
sure to put on the charging inlet cap and close the charging port lid.
If the charging inlet cap is not put on, water or foreign objects may enter
the charging inlet, which could lead to vehicle damage.
• Vehicles without smart lid & connector locking system: The charging
port lid does not have a lock. Take care not to press and open the door
accidentally.
• Vehicles with smart lid & connector locking system: If the charging port lid is not locked, take care as it may open if unintentionally touched.
● After removing the plug from the outlet, keep it in a safe place free from
moisture and dust.
The charging cable or plug may be damaged if the cable is stepped on or
ridden over by the vehicle.
■ Using private power generator
Do not use private power generators as a power source for charging.
Doing so may make charging unstable, the voltage may be insufficient, and
the error warning indicator on the CCID (Charging Circuit Interrupting
Device) of the charging cable may flash.
■ Usable temperature range
● Do not charge if the outside temperature is -22 °F (-30 °C) or below, as it is
likely that charging will take longer, and equipment related to charging will
be damaged.
● Do not leave the vehicle or the charging cable in areas where the outside
temperature is lower than -40 °F (-40 °C). The vehicle or charging cable will
probably be damaged.
■ Charging equipment
Due to the environment in which the power equipment is located, charging
may be unstable due to noise, the voltage may be insufficient, and the error
warning indicator on the CCID (Charging Circuit Interrupting Device) of the
charging cable may flash.
Page 17 of 40
17
PRIUS PRIME_QG_OM47B04U_(U)
1. Charging operation
1
Charging operation
Using the charging timer function
Charging can be carried out at the desired time by registering the
charge schedule. When registering th e charge schedule, the following
settings can be changed.
● Select the charging mode (“Start”/“Departure”)
● Repeated setting
● Air conditioning-linked setting (“Climate Prep”)
● Turning “Charge Now” on and off
● Changing “Next Charging Event”
For details of each settings , refer to “OWNER’S MANUAL”.
The charge schedule can be registered on the multi-information dis-
play or 11.6-inch display (if equipped).
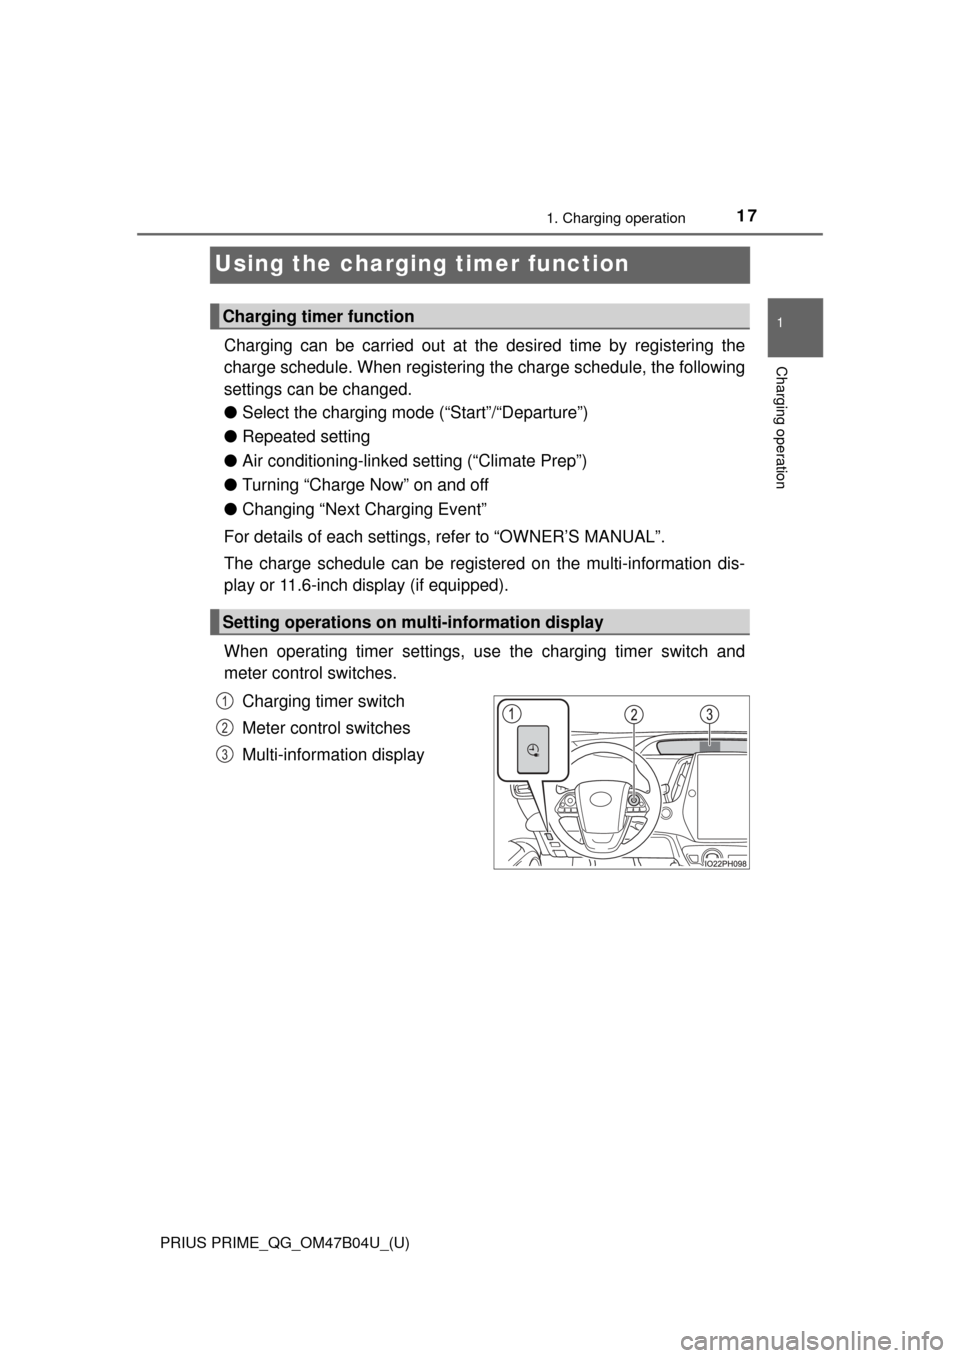
When operating timer settings, use the charging timer switch and
meter control switches.
Charging timer switch
Meter control switches
Multi-information display
Charging timer function
Setting operations on mult i-information display
1
2
3
Page 18 of 40
18
PRIUS PRIME_QG_OM47B04U_(U)
1. Charging operation
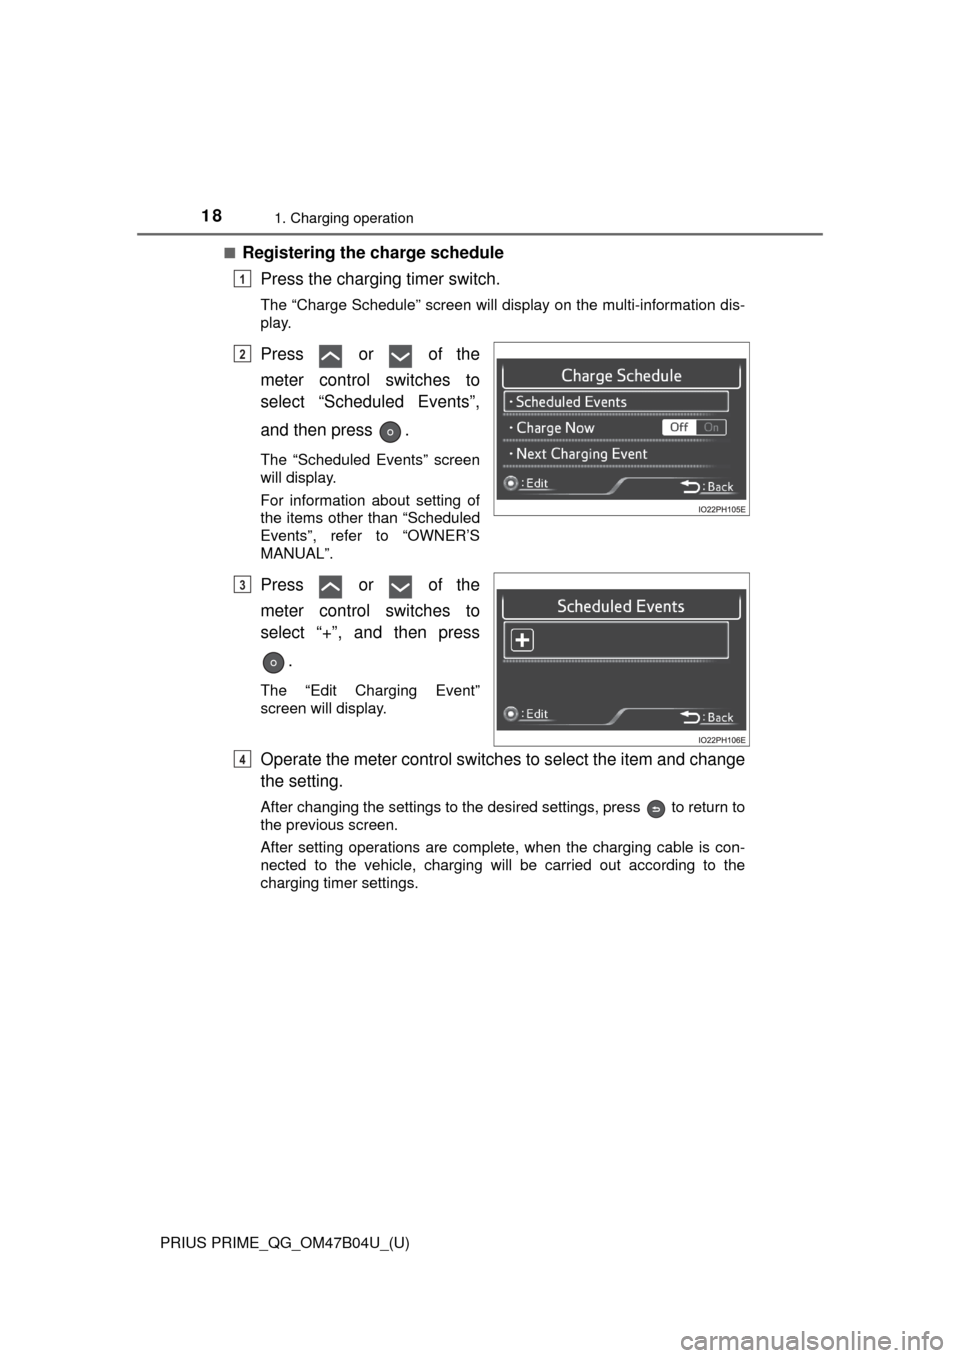
■Registering the charge schedulePress the charging timer switch.
The “Charge Schedule” screen will display on the multi-information dis-
play.
Press or of the
meter control switches to
select “Scheduled Events”,
and then press .
The “Scheduled Events” screen
will display.
For information about setting of
the items other than “Scheduled
Events”, refer to “OWNER’S
MANUAL”.
Press or of the
meter control switches to
select “+”, and then press
.
The “Edit Charging Event”
screen will display.
Operate the meter control switches to select the item and change
the setting.
After changing the settings to the desired settings, press to return to
the previous screen.
After setting operations are complete, when the charging cable is con-
nected to the vehicle, charging will be carried out according to the
charging timer settings.
1
2
3
4
Page 19 of 40
PRIUS PRIME_QG_OM47B04U_(U)
191. Charging operation
1
Charging operation
■Changing the registered charge schedules
The registered charge schedules can be turned on, off, deleted or
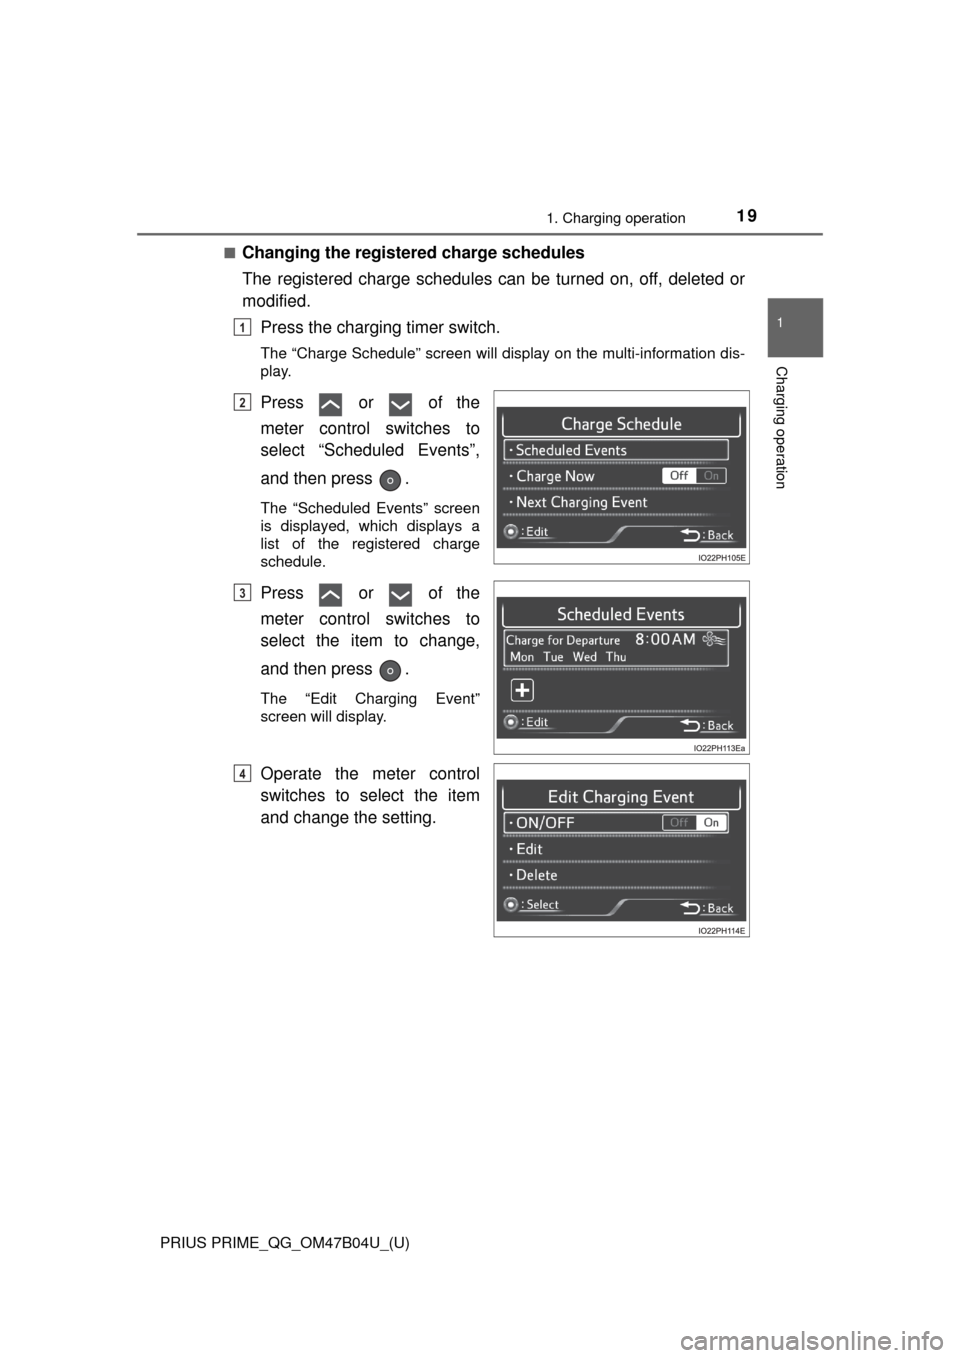
modified.Press the charging timer switch.
The “Charge Schedule” screen will display on the multi-information dis-
play.
Press or of the
meter control switches to
select “Scheduled Events”,
and then press .
The “Scheduled Events” screen
is displayed, which displays a
list of the registered charge
schedule.
Press or of the
meter control switches to
select the item to change,
and then press .
The “Edit Charging Event”
screen will display.
Operate the meter control
switches to select the item
and change the setting.
1
2
3
4
Page 20 of 40
20
PRIUS PRIME_QG_OM47B04U_(U)
1. Charging operation
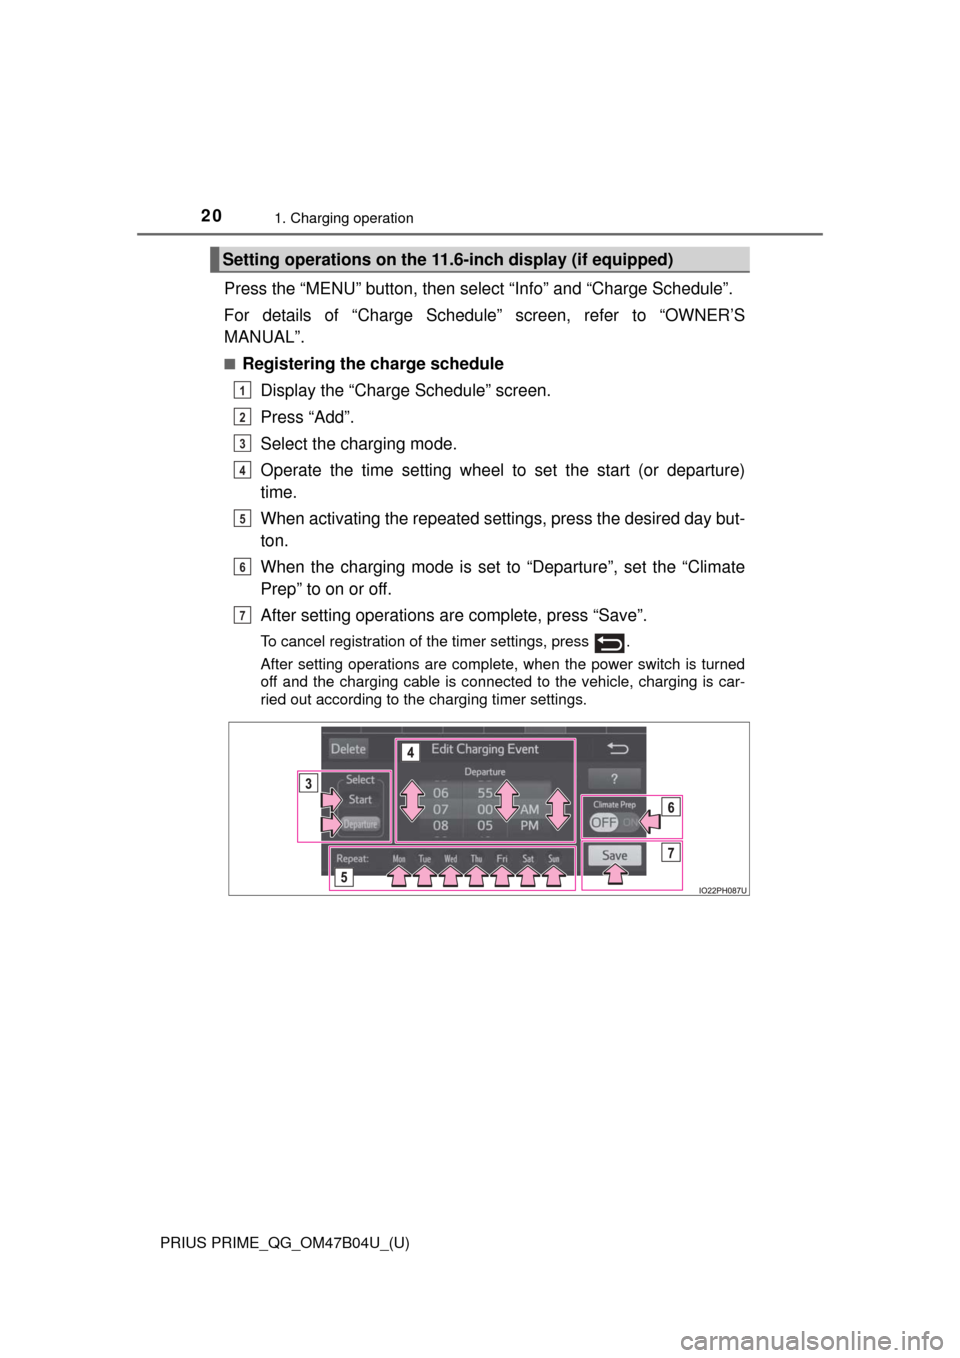
Press the “MENU” button, then select “Info” and “Charge Schedule”.
For details of “Charge Schedule” screen, refer to “OWNER’S
MANUAL”.
■Registering the charge schedule Display the “Charge Schedule” screen.
Press “Add”.
Select the charging mode.
Operate the time setting wheel to set the start (or departure)
time.
When activating the repeated settings, press the desired day but-
ton.
When the charging mode is set to “Departure”, set the “Climate
Prep” to on or off.
After setting operations are complete, press “Save”.
To cancel registration of the timer settings, press .
After setting operations are complete, when the power switch is turned
off and the charging cable is connected to the vehicle, charging is car-
ried out according to the charging timer settings.
Setting operations on the 11.6 -inch display (if equipped)
1
2
3
4
5
6
7