air condition TOYOTA PRIUS PRIME 2023 Workshop Manual
[x] Cancel search | Manufacturer: TOYOTA, Model Year: 2023, Model line: PRIUS PRIME, Model: TOYOTA PRIUS PRIME 2023Pages: 680, PDF Size: 14.97 MB
Page 502 of 680
5027-3. Do-it-yourself maintenance
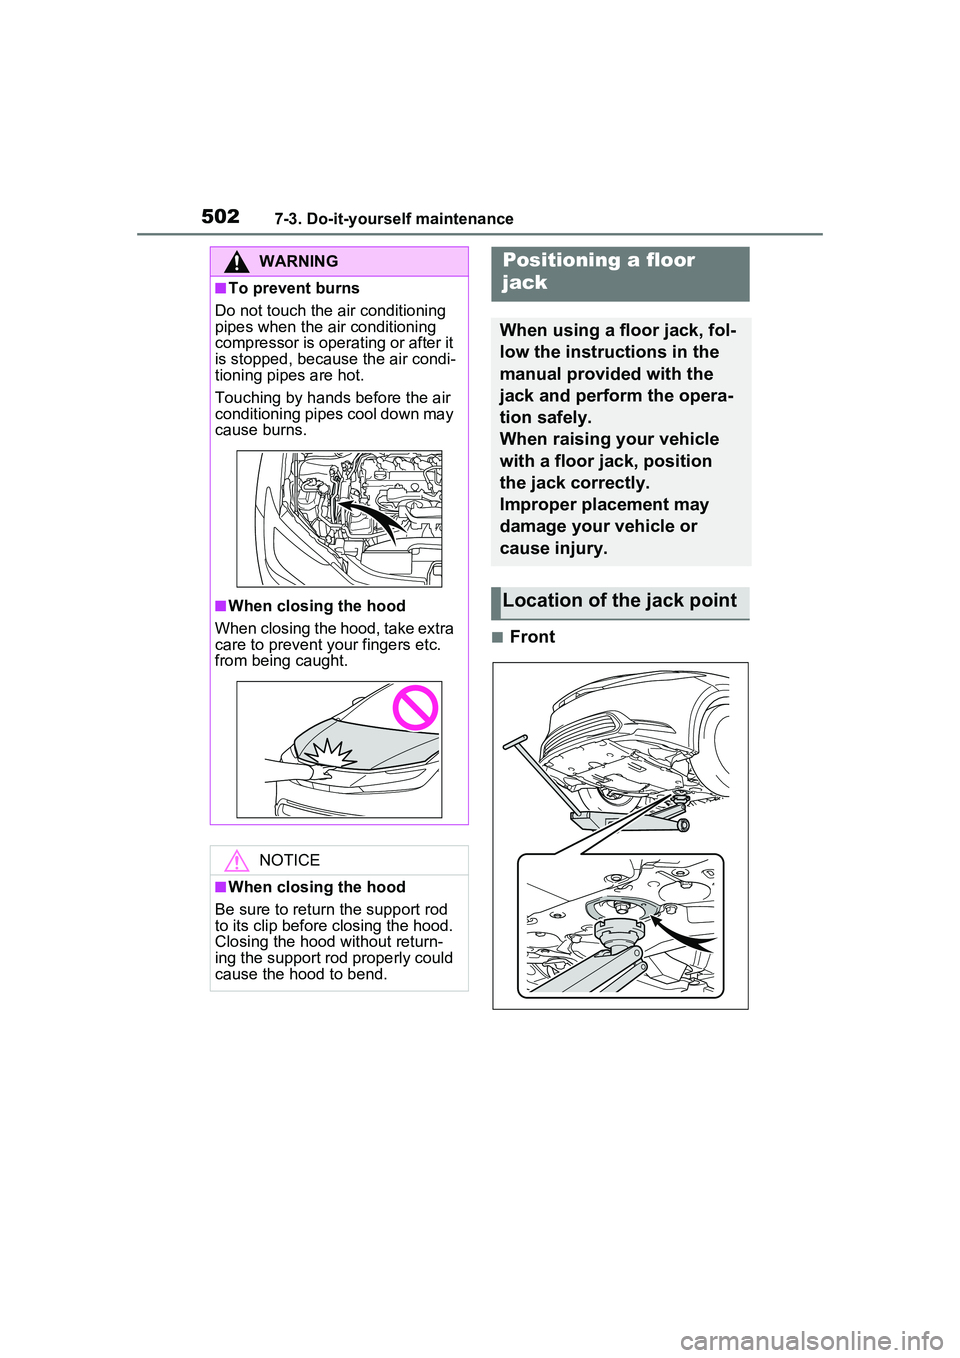
■Front
WARNING
■To prevent burns
Do not touch the air conditioning
pipes when the air conditioning
compressor is operating or after it
is stopped, because the air condi-
tioning pipes are hot.
Touching by hands before the air
conditioning pipes cool down may
cause burns.
■When closing the hood
When closing the hood, take extra
care to prevent your fingers etc.
from being caught.
NOTICE
■When closing the hood
Be sure to return the support rod
to its clip before closing the hood.
Closing the hood without return-
ing the support rod properly could
cause the hood to bend.
Positioning a floor
jack
When using a floor jack, fol-
low the instructions in the
manual provided with the
jack and perform the opera-
tion safely.
When raising your vehicle
with a floor jack, position
the jack correctly.
Improper placement may
damage your vehicle or
cause injury.
Location of the jack point
Page 514 of 680
5147-3. Do-it-yourself maintenance
indicators are showing on a tire.
■When to replace your vehicle’s
tires
Tires should be replaced if:
●The treadwear indicators are
showing on a tire.
●You have tire damage such as
cuts, splits, cracks deep enough
to expose the fabric, and bulges
indicating internal damage
●A tire goes flat repeatedly or can-
not be properly repaired due to
the size or location of a cut or
other damage
If you are not sure, consult your
Toyota dealer.
■Tire life
Any tire over 6 years old must be
checked by a qualified technician
even if it has seldom or never been
used or damage is not obvious.
■Low profile tires (vehicles with
195/50R19 tires)
Generally, low profile tires will wear
more rapidly and tire grip perfor-
mance will be reduced on snowy
and/or icy roads when compared to
standard tires. Be sure to use snow
tires on snowy and/or icy roads and
drive carefully at a speed appropri-
ate for road and weather conditions.
■Maximum load of tire
Check that the maximum load of the
replacement tire is greater than 1/2
of the Gross Axle Weight Ratings
(GAWR) of either the front axle or
the rear axle, whic hever is greater.
For the GAWR, see the Certification
Label. For the maximum load of the
tire, see the load limit at maximum
cold tire inflation pressure men-
tioned on the sidewall of the tire.
( P.609)
■Tire types
●Summer tires
Summer tires are high-speed per-
formance tires best suited to high-
way driving under dry conditions.
Since summer tires do not have
the same traction performance as
snow tires, summer tires are inad-
equate for driving on snow-cov-
ered or icy roads. For driving on
snow-covered roads or icy roads,
the use of snow tires is recom-
mended. When installing snow
tires, be sure to replace all four
tires.
●All season tires
All season tires are designed to
provide better traction in snow and
to be adequate for driving in most
winter conditions as well as for
use year-round. All season tires,
however, do not have adequate
traction performance compared
with snow tires in heavy or loose
snow. Also, all season tires fall
short in acceleration and handling
performance compared with sum-
mer tires in highway driving.
●Snow tires
For driving on snow-covered
roads or icy roads, we recom-
mend using snow tires. If you
need snow tires, select tires of the
same size, construction and load
capacity as the originally installed
tires. Since your vehicle has radial
tires as original equipment, make
sure your snow tires also have
radial construction. Do not install
studded tires without first checking
local regulation s for possible
restrictions. Snow tires should be
installed on all wheels. ( P.429)
Page 517 of 680
5177-3. Do-it-yourself maintenance
7
Maintenance and care
3Use the meter control
switches ( P.162) to select
( P.166).
4 Use the meter control
switches to select , then
press and hold .
5 Use the meter control
switches to select “TPWS
setting”, then press .
6 Use the meter control
switches to select “Pressure
unit setting”, then press .
7 Use the meter control
switches to select the desired
unit and then press .
■Routine tire inflation pressure
checks
The tire pressure warning system
does not replace routine tire inflation
pressure checks. Make sure to
check tire inflation pressure as part
of your routine of daily vehicle
checks.
■Tire inflation pressure
●It may take a few minutes to dis-
play the tire inflation pressure
after the power switch is turned to
ON.
It may also take a few minutes to
display the tire in flation pressure
after inflation pressure has been
adjusted.
●Tire inflation pressure changes
with temperature. The displayed
values may also be different from
the values measured using a tire
pressure gauge.
■Situations in which the tire
pressure warning system may
not operate properly
●In the following cases, the tire pressure warning system may not
operate properly.
• If non-genuine Toyota wheels are
used.
• A tire has been replaced with a tire that is not an OE (Original
Equipment) tire.
• A tire has been replaced with a tire that is not of the specified size.
• Tire chains etc. are equipped.
• If a window tint that affects the radio wave signals is installed.
• If there is a lot of snow or ice on the vehicle, particularly around the
wheels or wheel housings.
• If the tire inflation pressure is extremely higher than the speci-
fied level.
• If wheel without tire pressure
warning valves and transmitters
are used.
• If the ID code on the tire pressure warning valves and transmitters is
not registered in the tire pressure
warning computer.
●Performance may be affected in
the following situations.
• Near a TV tower, electric power plant, gas station, radio station,
large display, airport or other facil-
ity that generates strong radio
waves or electrical noise
• When carrying a portable radio, cellular phone, cordless phone or
other wireless communication
device
If tire position in formation is not cor-
rectly displayed due to the radio
wave conditions, the display may be
corrected by changing the location
of the vehicle as the radio wave
conditions may change.
●When the vehicle is parked, the
time taken for the warning to start
or go off could be extended.
●When tire inflation pressure
declines rapidly for example when
a tire has burst, the warning may
not function.
Page 518 of 680
5187-3. Do-it-yourself maintenance
■Warning performance of the tire
pressure warning system
The warning of the tire pressure
warning system will change in
accordance with driving conditions.
For this reason, the system may
give a warning even if the tire pres-
sure does not reach a low enough
level, or if the pressure is higher
than the pressure that was adjusted
to when the system was initialized.
When replacing tires or wheels,
tire pressure warning valves and
transmitters must also be
installed.
When new tire pressure warning
valves and transmitters are
installed, new ID codes must be
registered in the tire pressure
warning computer. ( P.522)
■When replacing the tires and
wheels
If the ID code of the tire pressure
warning valve and transmitter is not
registered, the tire pressure warning
system will not work properly. In this
case, after driving for about 20 min-
utes, the tire pressure warning light
blinks for 1 minute and stays on to
indicate a system malfunction.
It is necessary to register the
position of each wheel after per-
forming a tire rotation.
Wheel position registration can
be performed by oneself. Wheel
Installing tire pressure
warning valves and trans-
mitters
NOTICE
■Repairing or replacing tires,
wheels, tire pressure warn-
ing valves, transmitters and
tire valve caps
●When removing or fitting the
wheels, tires or the tire pressure
warning valves and transmit-
ters, contact your Toyota dealer
as the tire pressure warning
valves and transmitters may be
damaged if not handled cor-
rectly.
●Make sure to install the tire
valve caps. If the tire valve caps
are not installed, water could
enter the tire pressure warning
valves, corrode the valve, and
cause sticking and air leaks.
●When replacing tire valve caps,
do not use tire valve caps other
than those specified. The cap
may become stuck.
■To avoid damage to the tire
pressure warning valves and
transmitters
When a tire is repaired with liquid
sealants, the tire pressure warn-
ing valve and transmitter may not
operate properly. If a liquid seal-
ant is used, contact your Toyota
dealer or other qualified service
shop as soon as possible. Make
sure to replace the tire pressure
warning valve and transmitter
when replacing the tire. ( P.518)
Registration of the posi-
tion of each wheel after
performing a tire rotation
Page 533 of 680
5337-3. Do-it-yourself maintenance
7
Maintenance and care
Do not forget to check the spare.
■Effects of incorrect tire inflation
pressure
Driving with incorrec t tire inflation
pressure may result in the following:
●Reduced fuel economy
●Reduced driving comfort and poor
handling
●Reduced tire life due to wear
●Reduced safety
●Damage to the drive train
If a tire needs frequent inflating,
have it checked by your Toyota
dealer.
■Instructions for checking tire
inflation pressure
When checking tire inflation pres-
sure, observe the following:
●Check only when the tires are
cold.
If your vehicle has been parked
for at least 3 hours or has not
been driven for more than 1 mile
or 1.5 km, you will get an accurate
cold tire inflation pressure reading.
●Always use a tire pressure gauge.
It is difficult to judge if a tire is
properly inflated based only on its
appearance.
●It is normal for the tire inflation
pressure to be higher after driving
as heat is generated in the tire. Do
not reduce tire inflation pressure
after driving.
●Never exceed the vehicle capacity
weight. Passengers and luggage
weight should be placed so that
the vehicle is balanced.
WARNING
■Proper inflation is critical to
save tire performance
Keep your tires properly inflated.
If the tires are not properly
inflated, the following conditions
may occur which could lead to an
accident resulting in death or seri-
ous injury:
●Excessive wear
●Uneven wear
●Poor handling
●Possibility of blow outs resulting
from overheated tires
●Air leaking from between tire
and wheel
●Wheel deformation and/or tire
damage
●Greater possibility of tire dam-
age while driving (due to road
hazards, expansion joints,
sharp edges in the road, etc.)
NOTICE
■When inspecting and adjust-
ing tire inflation pressure
Be sure to put the tire valve caps
back on.
If a valve cap is not installed, dirt
or moisture may get into the valve
and cause an air leak, resulting in
decreased tire inflation pressure.
Page 535 of 680
5357-3. Do-it-yourself maintenance
7
Maintenance and care
Use only Toyota wheel nuts
and wrenches designed for
use with your aluminum
wheels.
When rotating, repairing or
changing your tires, check
that the wheel nuts are still
tight after driving 1000 miles
(1600 km).
Be careful not to damage the
aluminum wheels when using
tire chains.
Use only Toyota genuine bal-
ance weights or equivalent
and a plastic or rubber ham-
mer when balancing your
wheels. 1
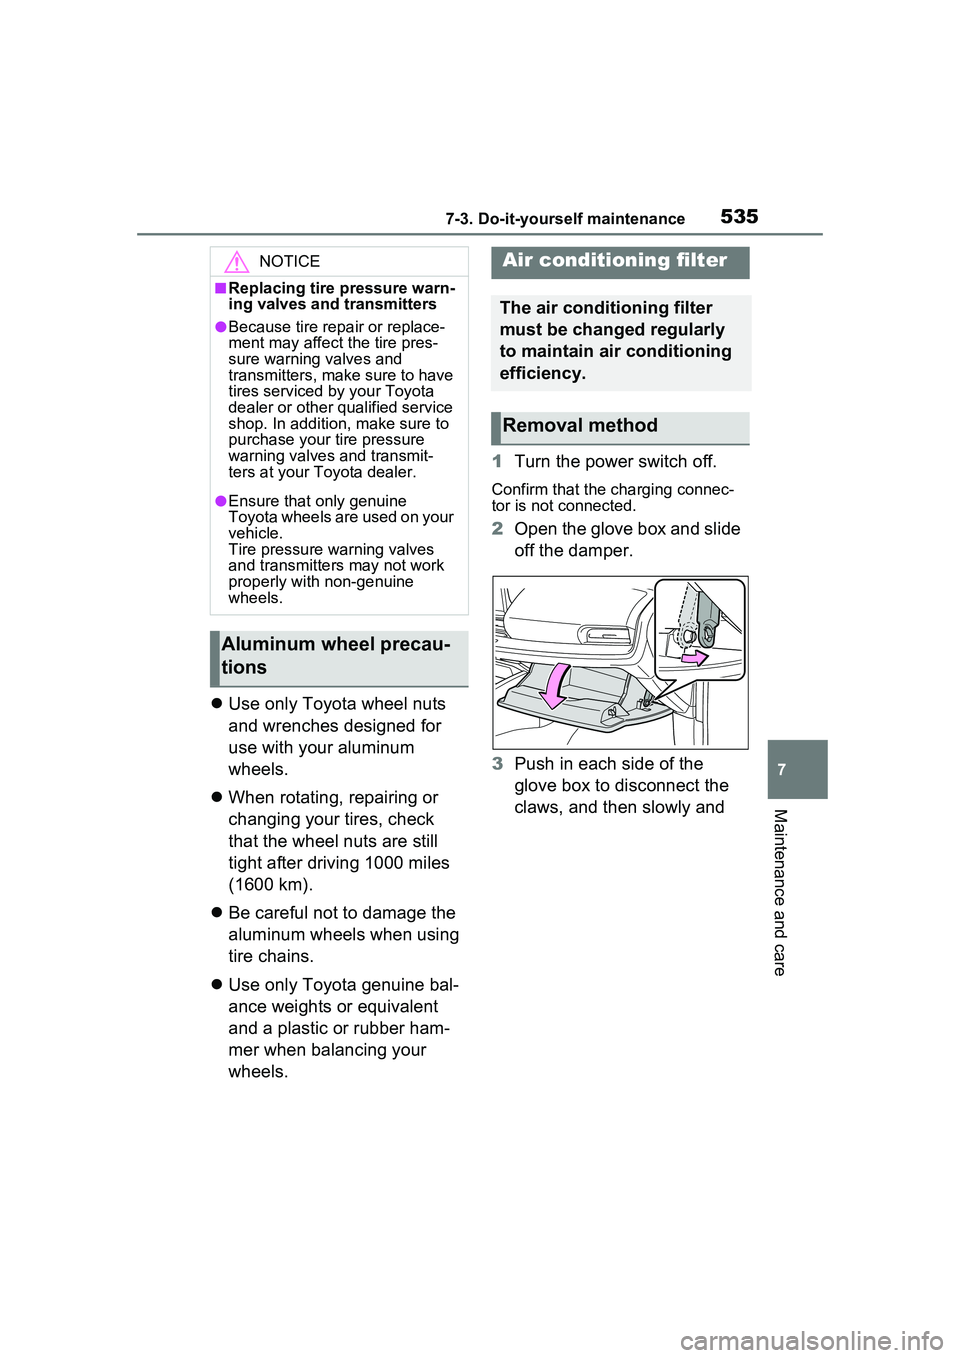
Turn the power switch off.
Confirm that the charging connec-
tor is not connected.
2Open the glove box and slide
off the damper.
3 Push in each side of the
glove box to disconnect the
claws, and then slowly and
NOTICE
■Replacing tire pressure warn-
ing valves and transmitters
●Because tire repair or replace-
ment may affect the tire pres-
sure warning valves and
transmitters, make sure to have
tires serviced by your Toyota
dealer or other qualified service
shop. In addition, make sure to
purchase your tire pressure
warning valves and transmit-
ters at your Toyota dealer.
●Ensure that only genuine
Toyota wheels are used on your
vehicle.
Tire pressure warning valves
and transmitters may not work
properly with non-genuine
wheels.
Aluminum wheel precau-
tions
Air conditioning filter
The air conditioning filter
must be changed regularly
to maintain air conditioning
efficiency.
Removal method
Page 536 of 680
5367-3. Do-it-yourself maintenance
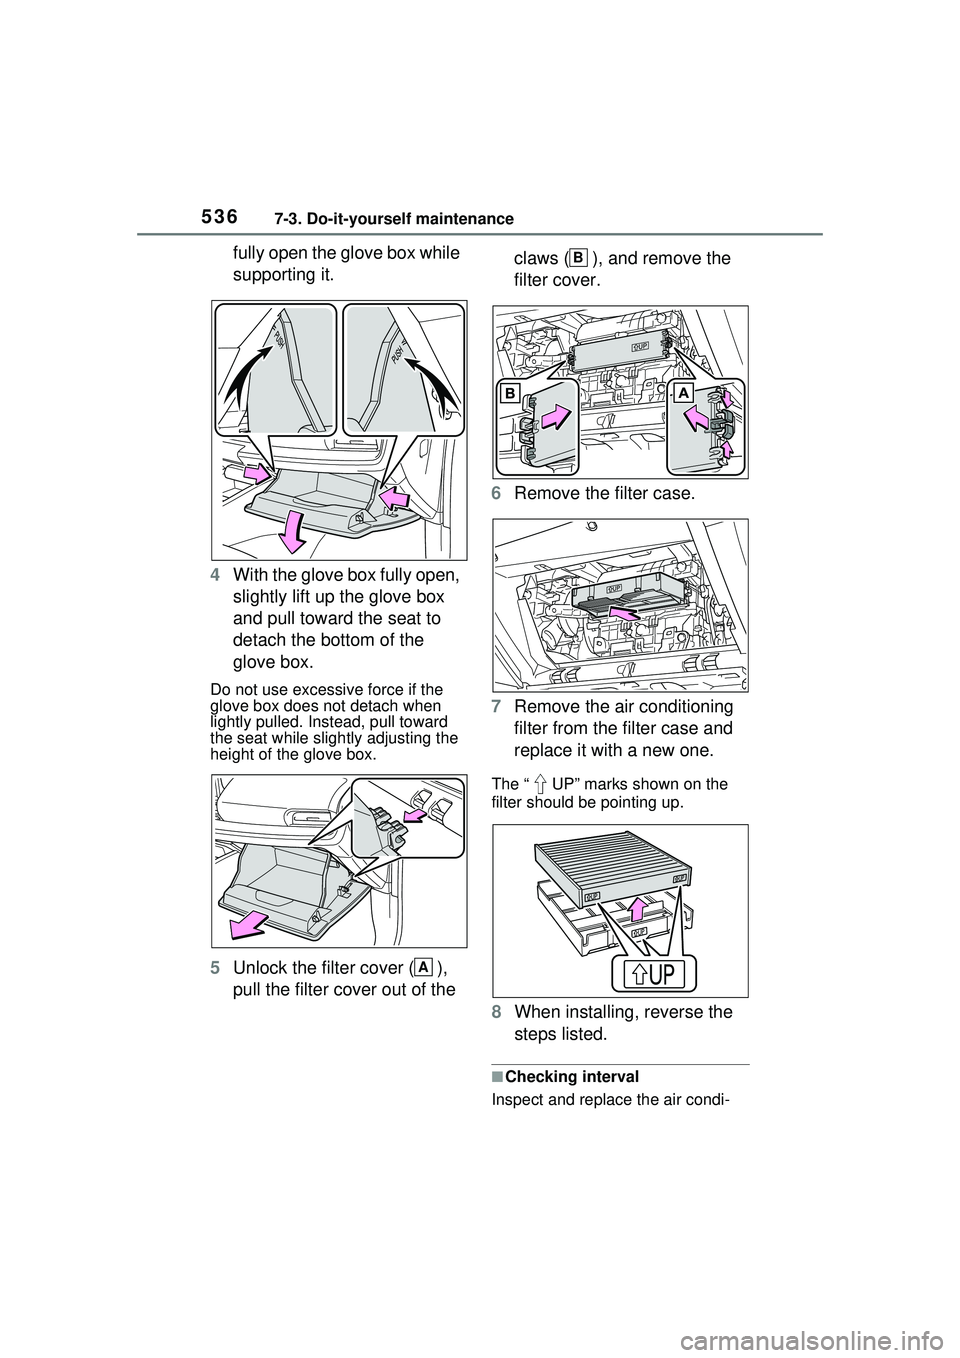
fully open the glove box while
supporting it.
4 With the glove box fully open,
slightly lift up the glove box
and pull toward the seat to
detach the bottom of the
glove box.
Do not use excessive force if the
glove box does not detach when
lightly pulled. Instead, pull toward
the seat while slightly adjusting the
height of the glove box.
5Unlock the filter cover ( ),
pull the filter cover out of the claws ( ), and remove the
filter cover.
6 Remove the filter case.
7 Remove the air conditioning
filter from the filter case and
replace it with a new one.
The “ UP” marks shown on the
filter should be pointing up.
8When installing, reverse the
steps listed.
■Checking interval
Inspect and replace the air condi-
A
B
Page 537 of 680
5377-3. Do-it-yourself maintenance
7
Maintenance and care
tioning filter according to the mainte-
nance schedule. In dusty areas or
areas with heavy traffic flow, early
replacement may be required. (For
scheduled maintenance information,
please refer to the “Owner’s Manual
Supplement” or “Scheduled Mainte-
nance”.)
■If air flow from the vents
decreases dramatically
The filter may be clogged. Check
the filter and replace if necessary.
WARNING
■When replacing the air condi-
tioning filter
Check that the charging connec-
tor is not connected. Failure to do
so may result in the air condition-
ing system operating during the
procedure due to the “Battery
Cooler”, possibly resulting in
injury.
NOTICE
■When using the air condition-
ing system
Make sure that a filter is always
installed. Using the air condition-
ing system without a filter may
cause damage to the system.
■When removing the glove box
Always follow the specified proce-
dure to remove the glove box
( P.535). If the glove box is
removed without following the
specified procedure, the hinge of
the glove box may become dam-
aged.
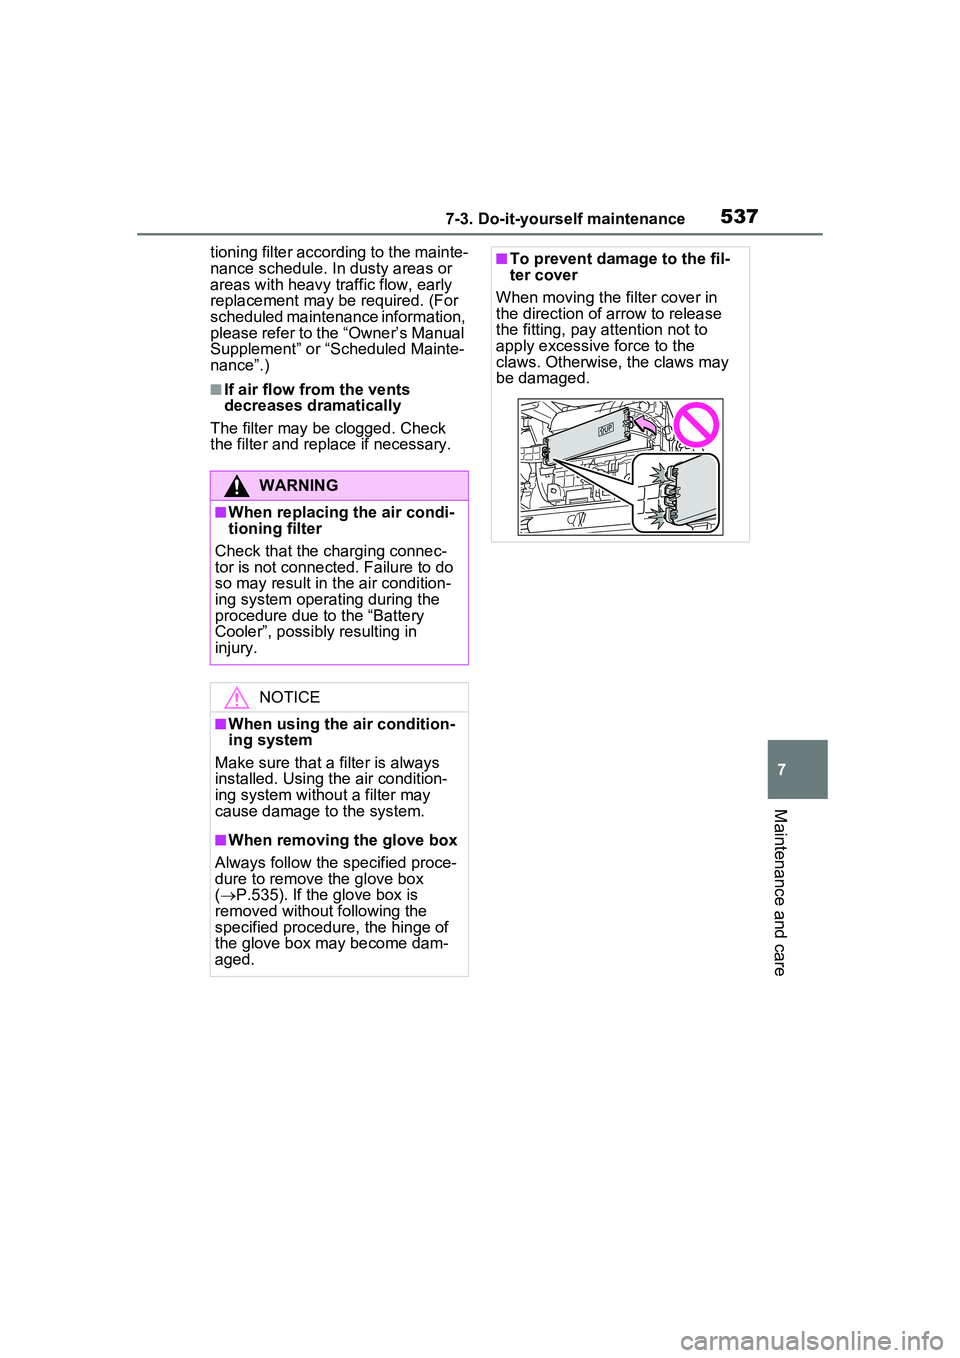
■To prevent damage to the fil-
ter cover
When moving the filter cover in
the direction of arrow to release
the fitting, pay attention not to
apply excessive force to the
claws. Otherwise, the claws may
be damaged.
Page 546 of 680
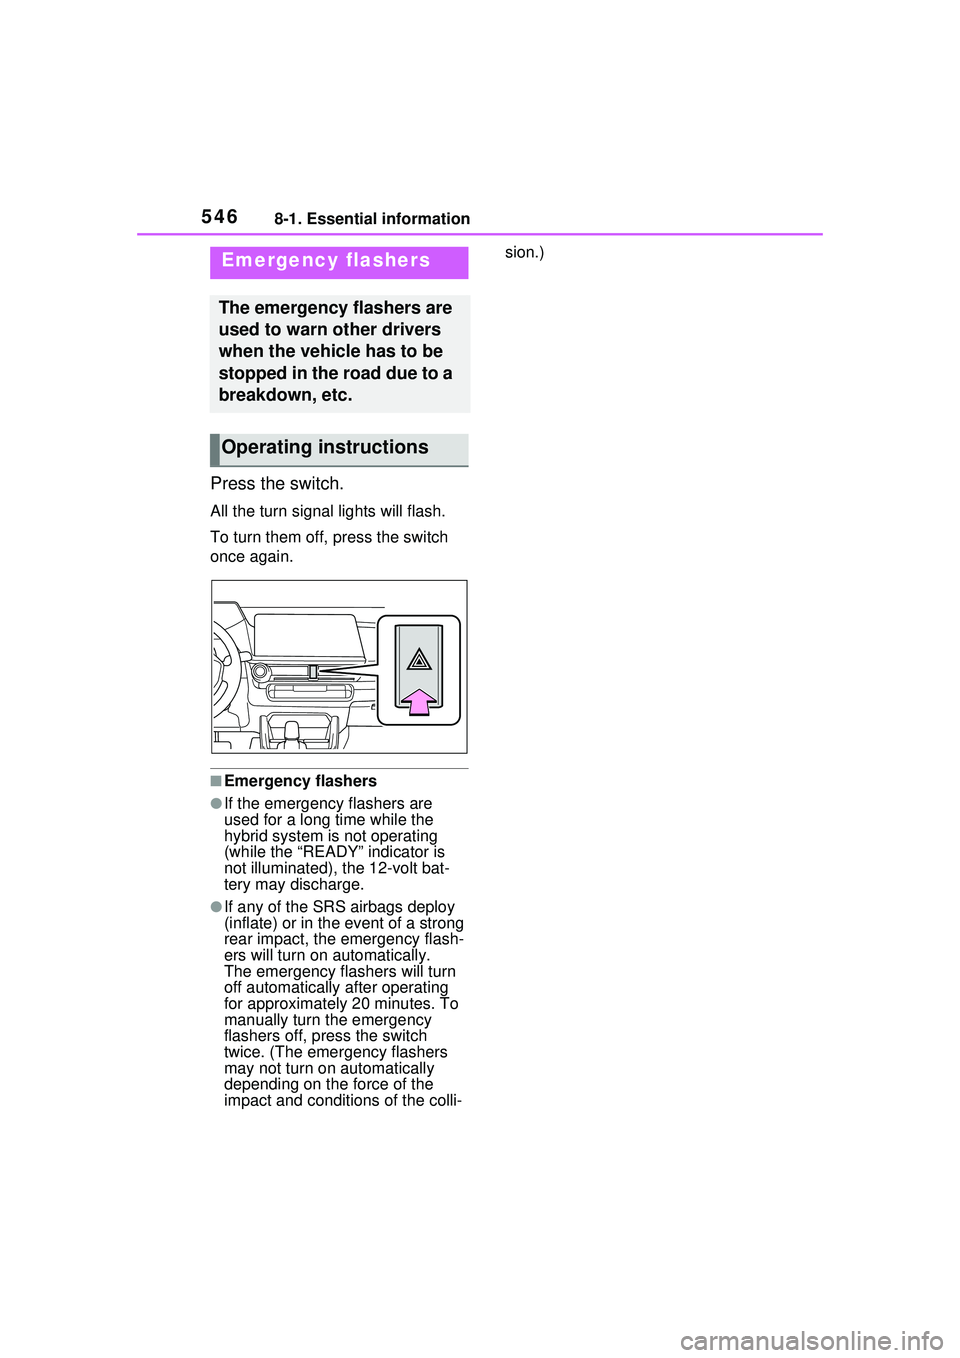
5468-1. Essential information
8-1.Essential information
Press the switch.
All the turn signal lights will flash.
To turn them off, press the switch
once again.
■Emergency flashers
●If the emergency flashers are
used for a long time while the
hybrid system is not operating
(while the “READY” indicator is
not illuminated), the 12-volt bat-
tery may discharge.
●If any of the SRS airbags deploy
(inflate) or in the event of a strong
rear impact, the emergency flash-
ers will turn on automatically.
The emergency flashers will turn
off automatically after operating
for approximately 20 minutes. To
manually turn the emergency
flashers off, press the switch
twice. (The emergency flashers
may not turn on automatically
depending on the force of the
impact and conditions of the colli- sion.)
Emergency flashers
The emergency flashers are
used to warn other drivers
when the vehicle has to be
stopped in the road due to a
breakdown, etc.
Operating instructions
Page 547 of 680

5478-1. Essential information
8
When trouble arises
1Steadily step on the brake
pedal with both feet and
firmly depress it.
Do not pump the brake pedal
repeatedly as this will increase the
effort required to slow the vehicle.
2Shift the shift position to N.
If the shift position is shifted to
N
3 After slowing down, stop the
vehicle in a safe place by the
road.
4 Stop the hybrid system.
If the shift position cannot be
shifted to N
3 Keep depressing the brake
pedal with both feet to reduce
vehicle speed as much as
possible.
4 To stop the hybrid system,
press and hold the power
switch for 2 consecutive sec-
onds or more, or press it briefly 3 times or more in suc-
cession.
5 Stop the vehicle in a safe
place by the road.
■If emergency stopped
The functions of the air conditioning,
etc. may be partially limited in order
to reduce the power consumption of
the 12-volt battery.
If your vehicle has to
be stopped in an emer-
gency
Only in an emergency, such
as if it becomes impossible
to stop the vehicle in the
normal way, stop the vehi-
cle using the following pro-
cedure:
Stopping the vehicle
WARNING
■If the hybrid system has to be
turned off while driving
Turning the hybrid system off
while driving will not cause loss of
steering or braking control. How-
ever, power assist for the steering
wheel may be lost making it diffi-
cult to steer smoothly before stop-
ping the vehicle depending on the
remaining charge in the 12-volt
battery or usage conditions.
Decelerate as much as possible
before turning off the hybrid sys-
tem.