TOYOTA PRIUS V 2012 Accessories, Audio & Navigation (in English)
Manufacturer: TOYOTA, Model Year: 2012, Model line: PRIUS V, Model: TOYOTA PRIUS V 2012Pages: 131, PDF Size: 5.2 MB
Page 101 of 131
101
1. SETUP OPERATION
5
SETUP
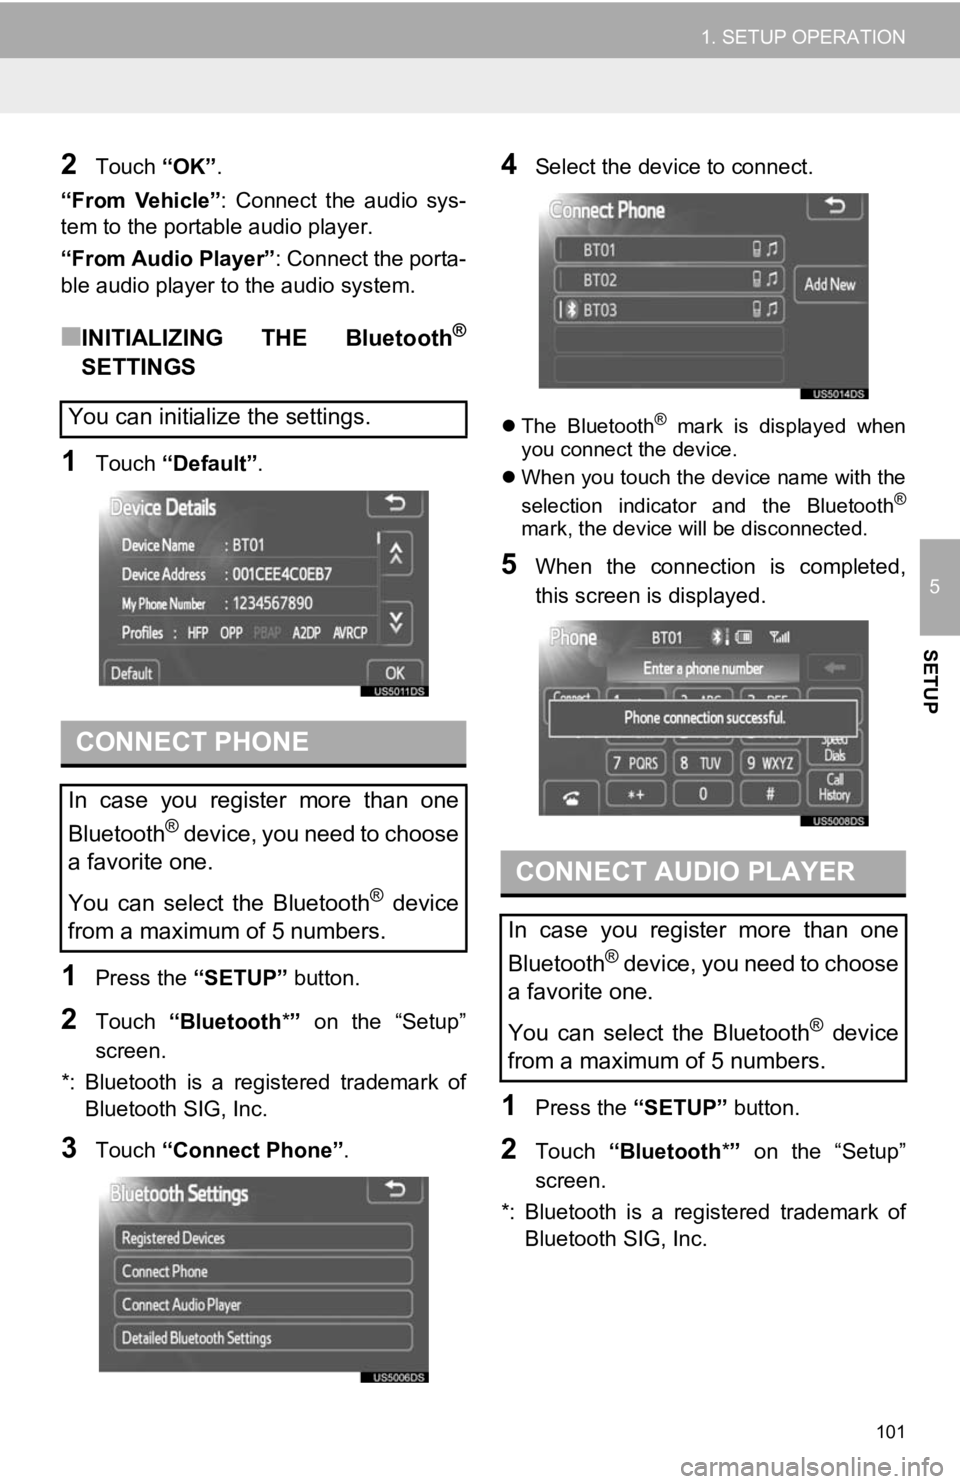
2Touch “OK”.
“From Vehicle” : Connect the audio sys-
tem to the portable audio player.
“From Audio Player” : Connect the porta-
ble audio player to the audio system.
■INITIALIZING THE Bluetooth®
SETTINGS
1Touch “Default”.
1Press the “SETUP” button.
2Touch “Bluetooth *” on the “Setup”
screen.
*: Bluetooth is a registered trademark of Bluetooth SIG, Inc.
3Touch “Connect Phone” .
4Select the device to connect.
The Bluetooth® mark is displayed when
you connect the device.
When you touch the device name with the
selection indicator and the Bluetooth
®
mark, the device will be disconnected.
5When the connection is completed,
this screen is displayed.
1Press the “SETUP” button.
2Touch “Bluetooth *” on the “Setup”
screen.
*: Bluetooth is a registered trademark of Bluetooth SIG, Inc.
You can initialize the settings.
CONNECT PHONE
In case you register more than one
Bluetooth
® device, you need to choose
a favorite one.
You can select the Bluetooth
® device
from a maximum of 5 numbers.
CONNECT AUDIO PLAYER
In case you register more than one
Bluetooth
® device, you need to choose
a favorite one.
You can select the Bluetooth
® device
from a maximum of 5 numbers.
Page 102 of 131
102
1. SETUP OPERATION
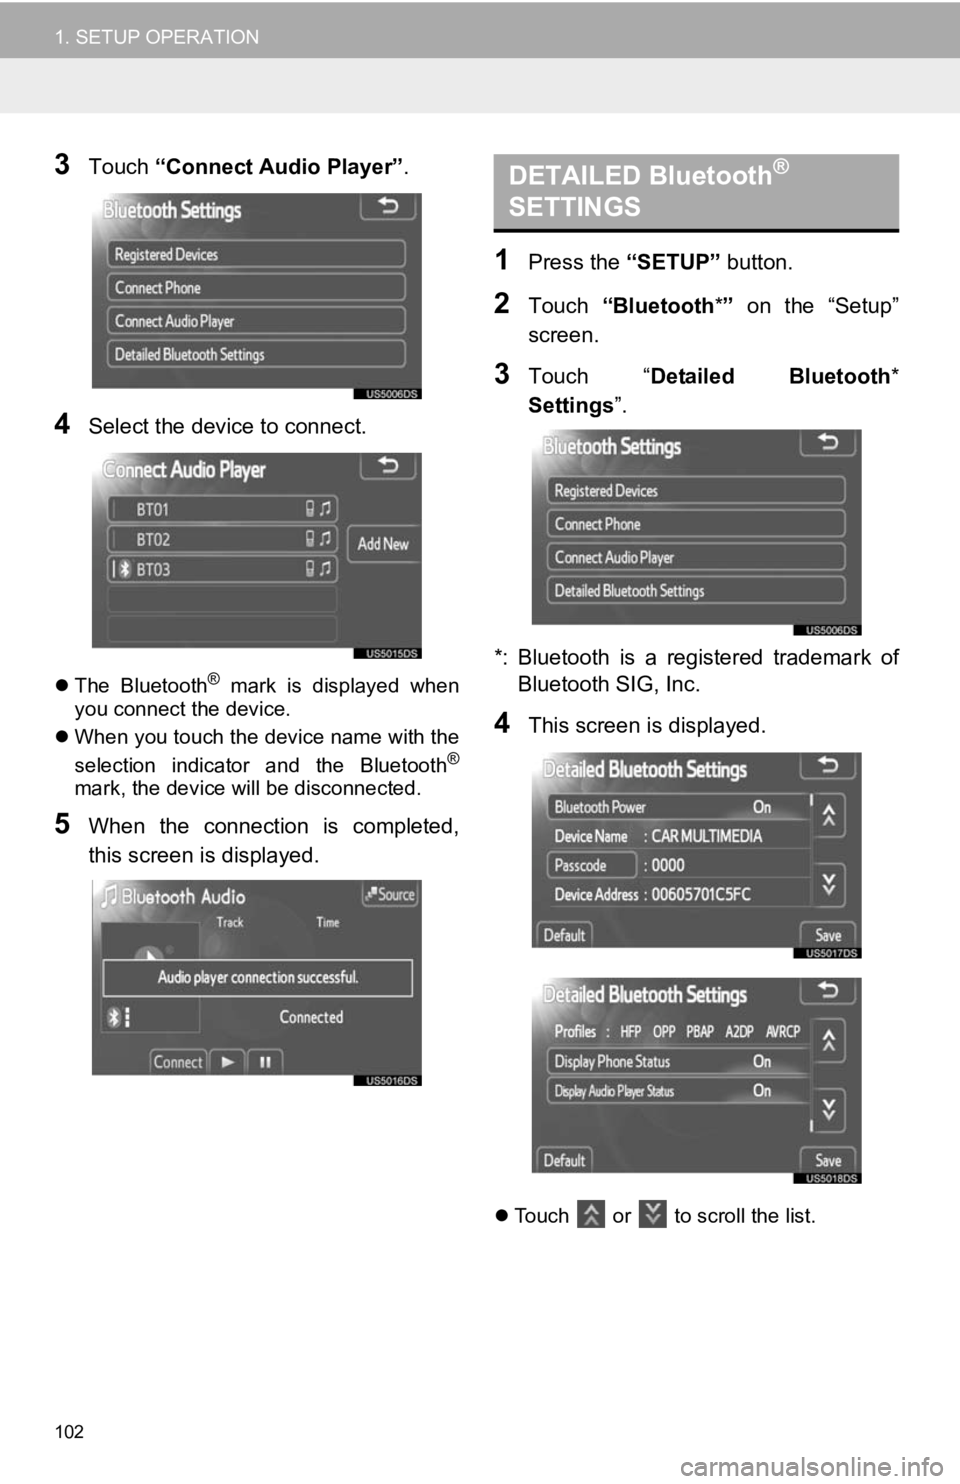
3Touch “Connect Audio Player” .
4Select the device to connect.
The Bluetooth® mark is displayed when
you connect the device.
When you touch the device name with the
selection indicator and the Bluetooth
®
mark, the device will be disconnected.
5When the connection is completed,
this screen is displayed.
1Press the “SETUP” button.
2Touch “Bluetooth *” on the “Setup”
screen.
3Touch “ Detailed Bluetooth *
Settings ”.
*: Bluetooth is a registered trademark of Bluetooth SIG, Inc.
4This screen is displayed.
Touch or to scroll the list.
DETAILED Bluetooth®
SETTINGS
Page 103 of 131
103
1. SETUP OPERATION
5
SETUP
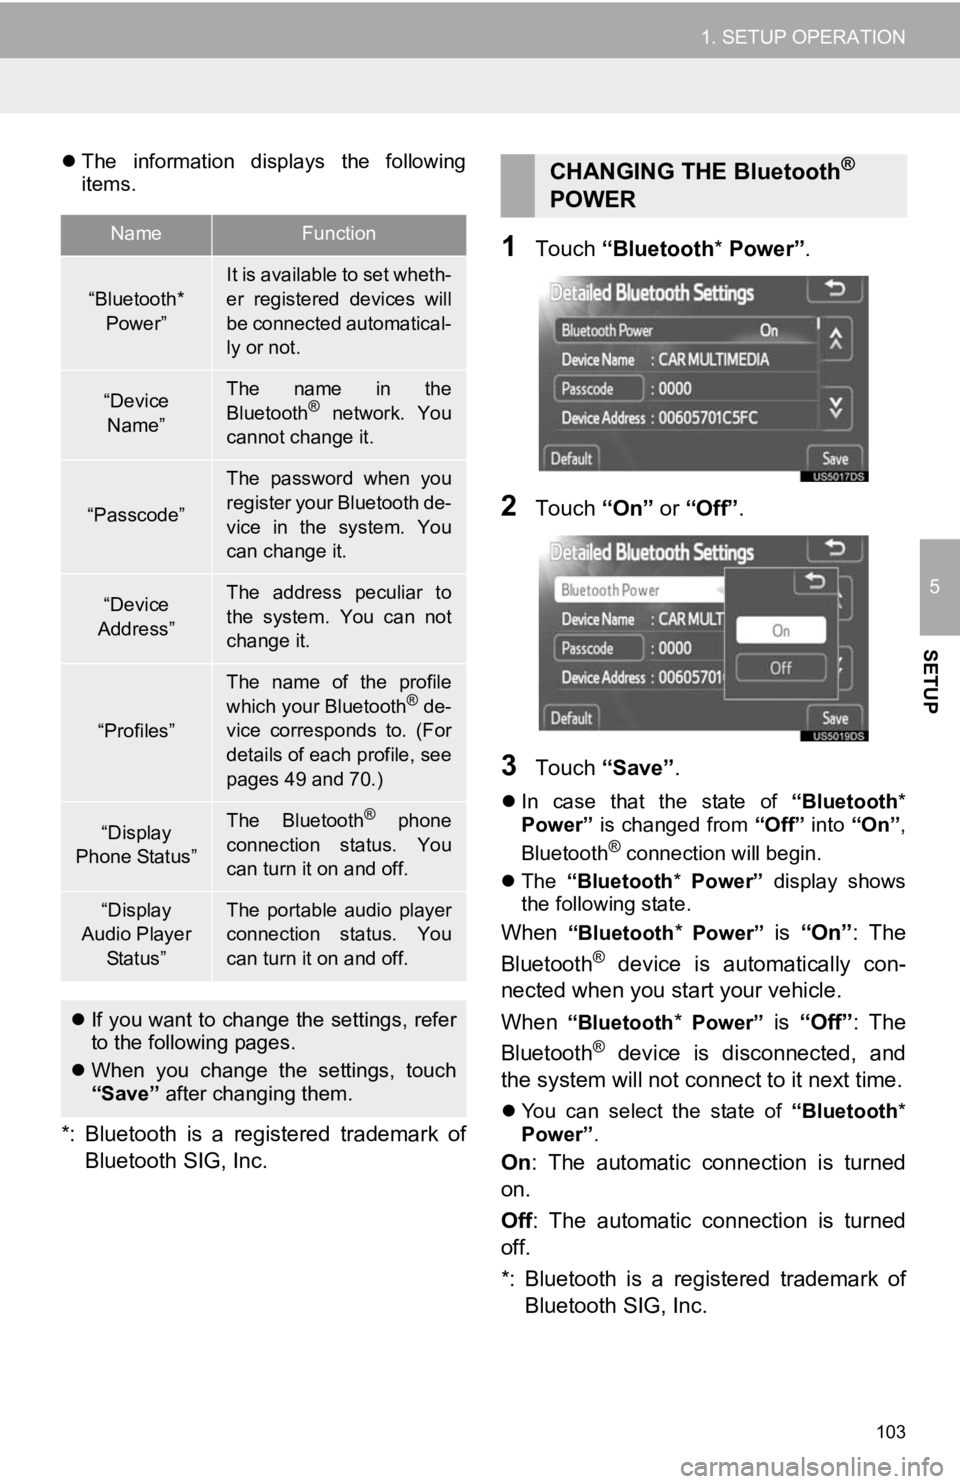
The information displays the following
items.
*: Bluetooth is a registered trademark of
Bluetooth SIG, Inc.
1Touch “Bluetooth * Power” .
2Touch “On” or “Off” .
3Touch “Save” .
In case that the state of “Bluetooth*
Power” is changed from “Off” into “On”,
Bluetooth
® connection will begin.
The “Bluetooth* Power” display shows
the following state.
When “Bluetooth* Power” is “On” : The
Bluetooth® device is automatically con-
nected when you start your vehicle.
When
“Bluetooth* Power” is “Off”: The
Bluetooth® device is disconnected, and
the system will not connect to it next time.
You can select the state of “Bluetooth*
Power” .
On: The automatic connection is turned
on.
Off : The automatic connection is turned
off.
*: Bluetooth is a registered trademark of Bluetooth SIG, Inc.
NameFunction
“Bluetooth*
Power”It is available to set wheth-
er registered devices will
be connected automatical-
ly or not.
“Device Name”The name in the
Bluetooth® network. You
cannot change it.
“Passcode”
The password when you
register your Bluetooth de-
vice in the system. You
can change it.
“Device
Address”The address peculiar to
the system. You can not
change it.
“Profiles”
The name of the profile
which your Bluetooth® de-
vice corresponds to. (For
details of each profile, see
pages 49 and 70.)
“Display
Phone Status”The Bluetooth® phone
connection status. You
can turn it on and off.
“Display
Audio Player
Status”The portable audio player
connection status. You
can turn it on and off.
If you want to change the settings, refer
to the following pages.
When you change the settings, touch
“Save” after changing them.
CHANGING THE Bluetooth®
POWER
Page 104 of 131
104
1. SETUP OPERATION
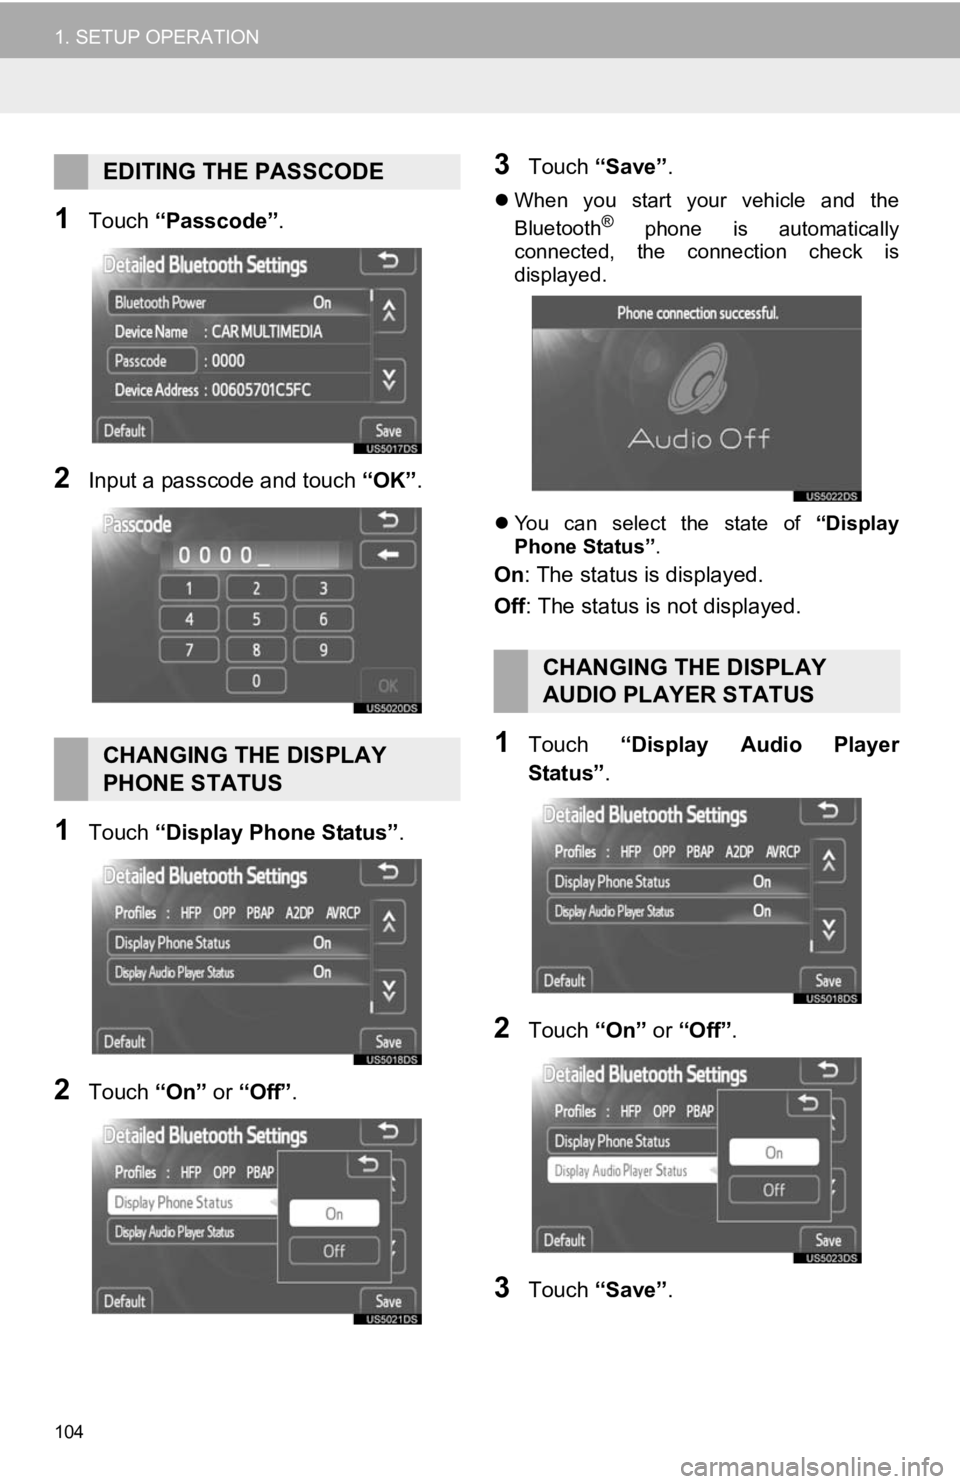
1Touch “Passcode” .
2Input a passcode and touch “OK”.
1Touch “Display Phone Status” .
2Touch “On” or “Off” .
3Touch “Save” .
When you start your vehicle and the
Bluetooth® phone is automatically
connected, the connection check is
displayed.
You can select the state of “Display
Phone Status” .
On: The status is displayed.
Off: The status is not displayed.
1Touch “Display Audio Player
Status” .
2Touch “On” or “Off” .
3Touch “Save” .
EDITING THE PASSCODE
CHANGING THE DISPLAY
PHONE STATUS
CHANGING THE DISPLAY
AUDIO PLAYER STATUS
Page 105 of 131
105
1. SETUP OPERATION
5
SETUP
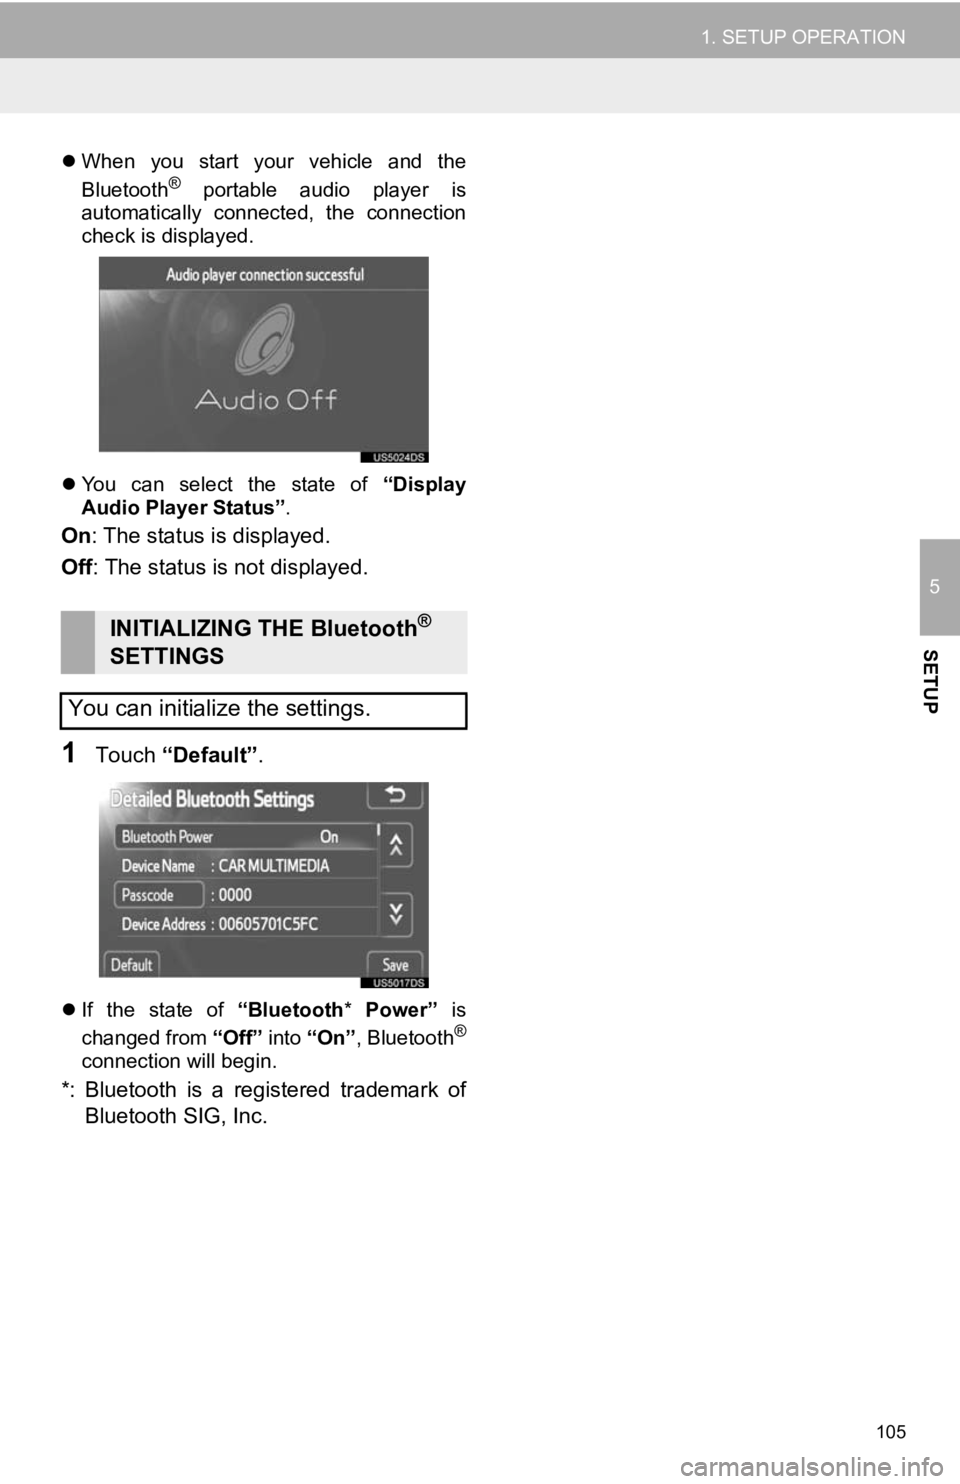
When you start your vehicle and the
Bluetooth® portable audio player is
automatically connected, the connection
check is displayed.
You can select the state of “Display
Audio Player Status” .
On: The status is displayed.
Off : The status is not displayed.
1Touch “Default” .
If the state of “Bluetooth* Power” is
changed from “Off” into “On”, Bluetooth®
connection will begin.
*: Bluetooth is a registered trademark of
Bluetooth SIG, Inc.
INITIALIZING THE Bluetooth®
SETTINGS
You can initialize the settings.
Page 106 of 131
106
1. SETUP OPERATION
6. PHONE SETTINGS
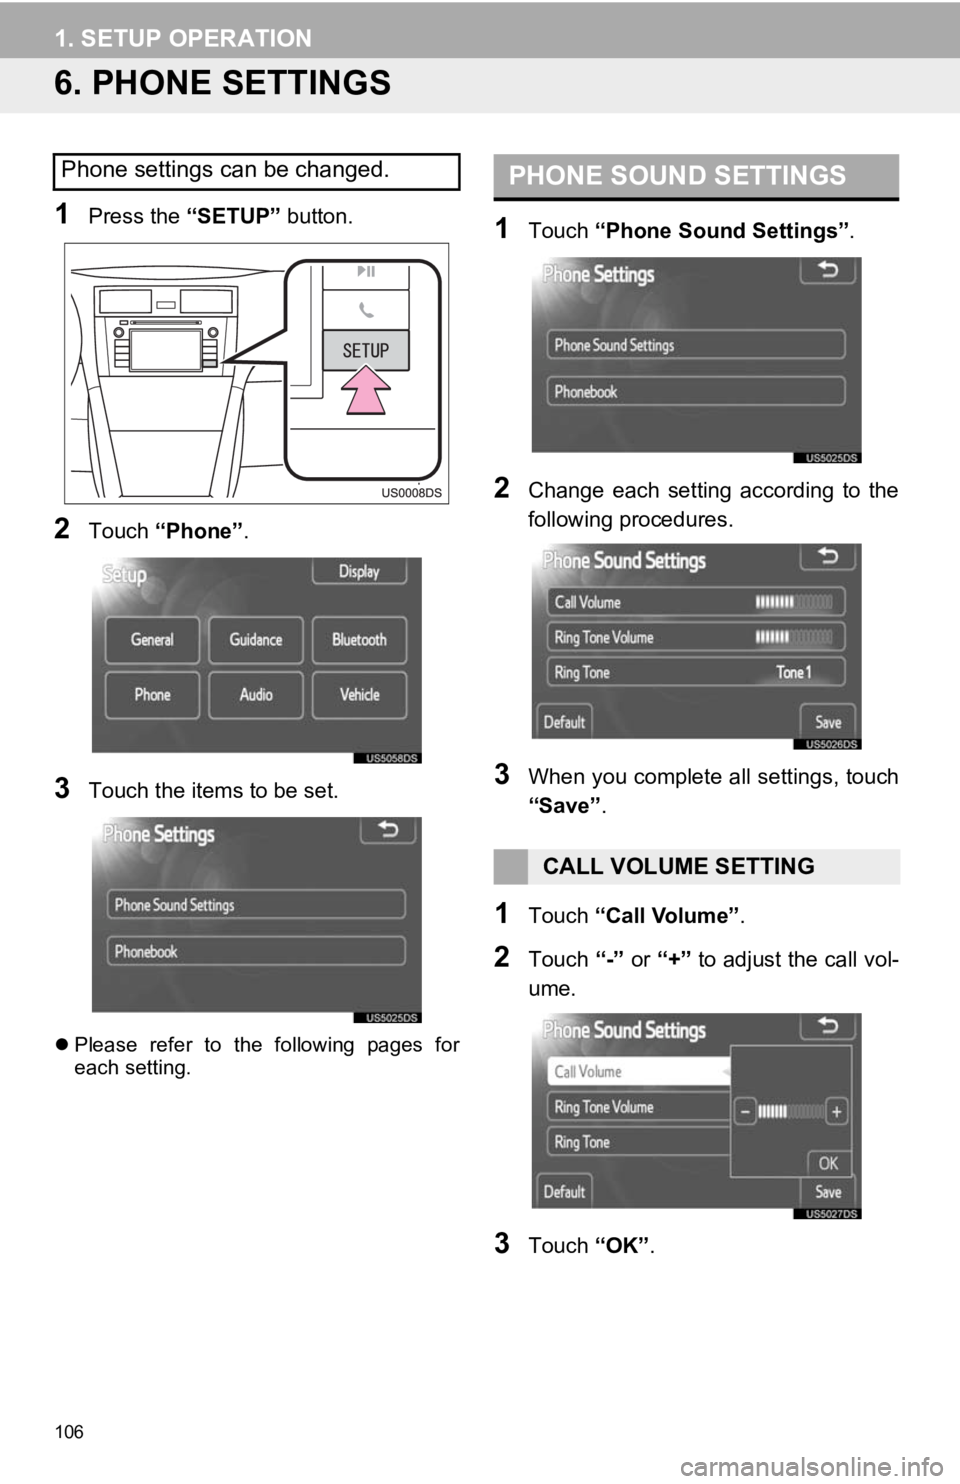
1Press the “SETUP” button.
2Touch “Phone” .
3Touch the items to be set.
Please refer to the following pages for
each setting.
1Touch “Phone Sound Settings” .
2Change each setting according to the
following procedures.
3When you complete all settings, touch
“Save”.
1Touch “Call Volume” .
2Touch “-” or “+” to adjust the call vol-
ume.
3Touch “OK”.
Phone settings can be changed.PHONE SOUND SETTINGS
CALL VOLUME SETTING
Page 107 of 131
107
1. SETUP OPERATION
5
SETUP
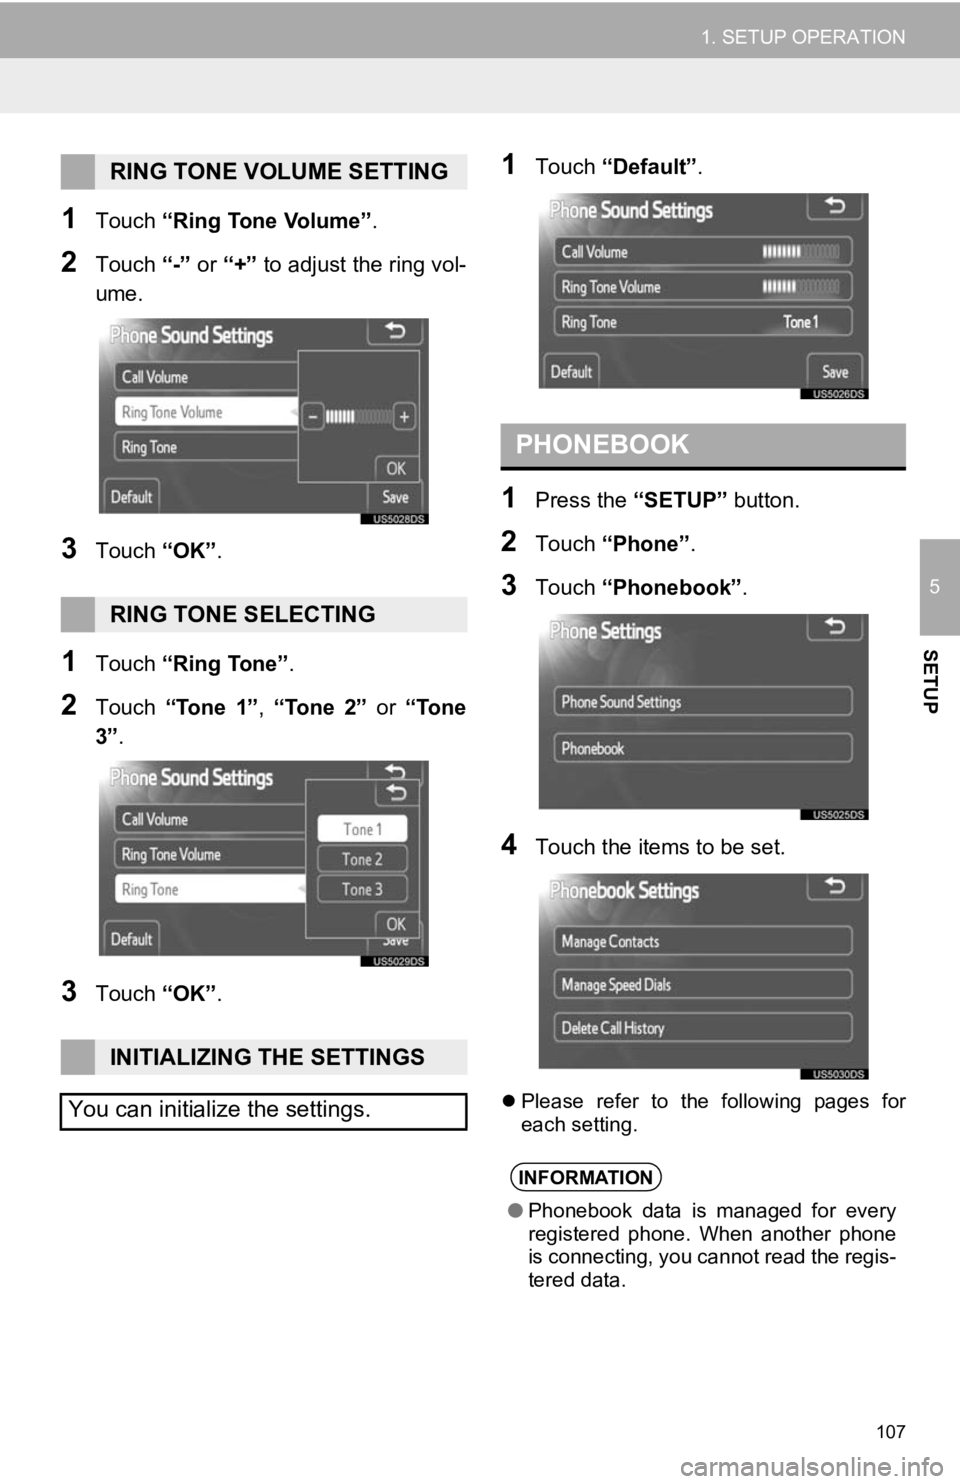
1Touch “Ring Tone Volume” .
2Touch “-” or “+” to adjust the ring vol-
ume.
3Touch “OK”.
1Touch “Ring Tone” .
2Touch “Tone 1” , “Tone 2” or “Tone
3” .
3Touch “OK”.
1Touch “Default” .
1Press the “SETUP” button.
2Touch “Phone” .
3Touch “Phonebook” .
4Touch the items to be set.
Please refer to the following pages for
each setting.
RING TONE VOLUME SETTING
RING TONE SELECTING
INITIALIZING THE SETTINGS
You can initialize the settings.
PHONEBOOK
INFORMATION
● Phonebook data is managed for every
registered phone. When another phone
is connecting, you cannot read the regis-
tered data.
Page 108 of 131
108
1. SETUP OPERATION
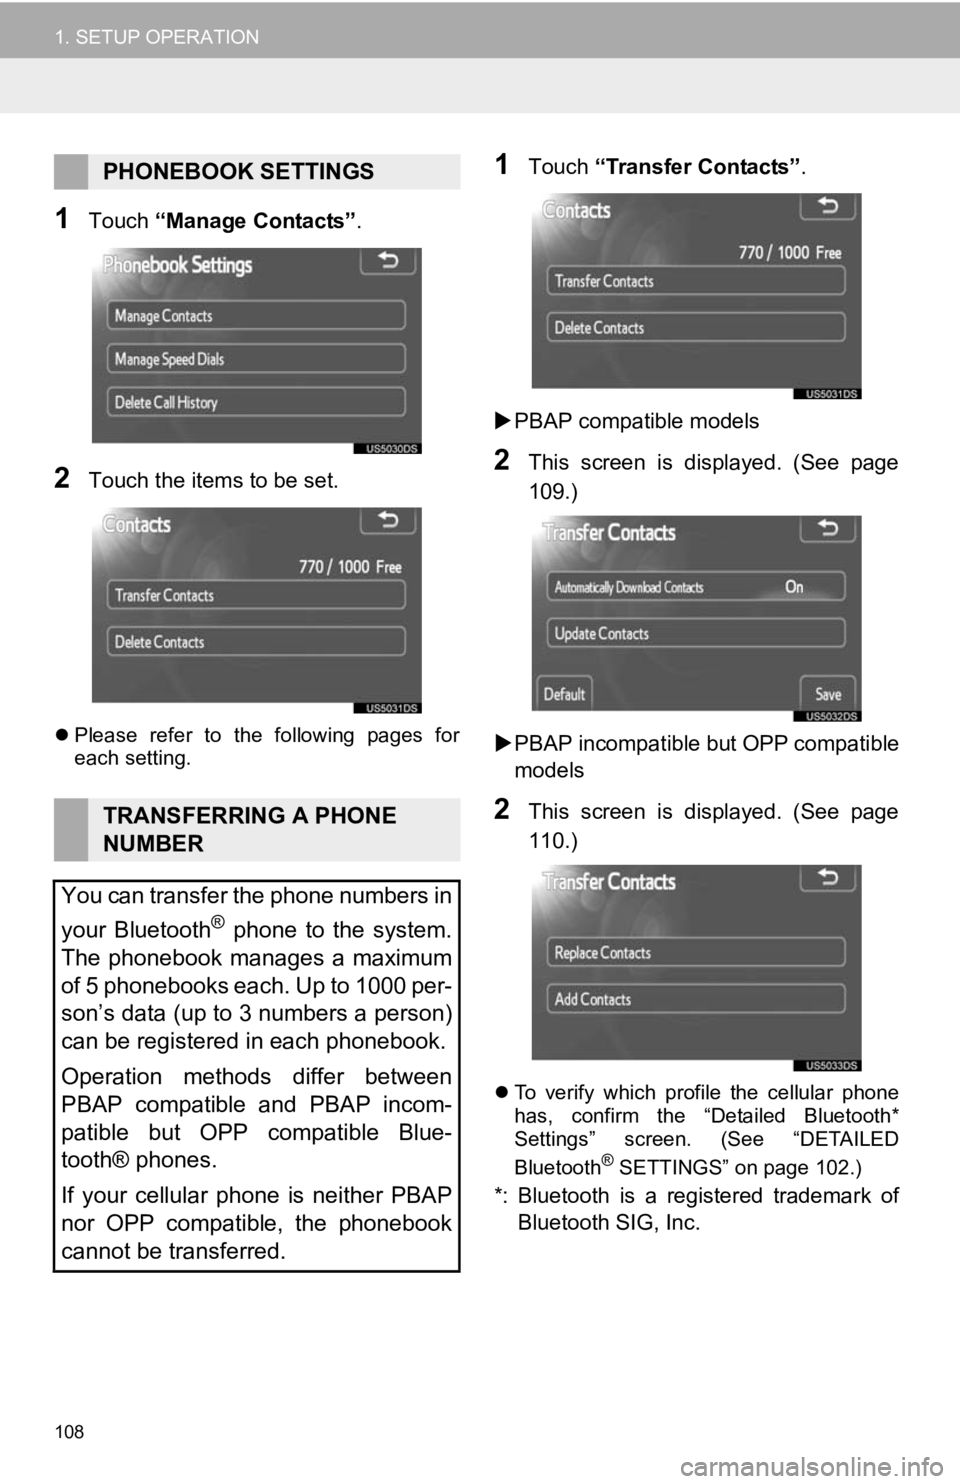
1Touch “Manage Contacts” .
2Touch the items to be set.
Please refer to the following pages for
each setting.
1Touch “Transfer Contacts” .
PBAP compatible models
2This screen is displayed. (See page
109.)
PBAP incompatible but OPP compatible
models
2This screen is displayed. (See page
110.)
To verify which profile the cellular phone
has, confirm the “Detailed Bluetooth*
Settings” screen. (See “DETAILED
Bluetooth
® SETTINGS” on page 102.)
*: Bluetooth is a registered trademark of
Bluetooth SIG, Inc.
PHONEBOOK SETTINGS
TRANSFERRING A PHONE
NUMBER
You can transfer the phone numbers in
your Bluetooth
® phone to the system.
The phonebook manages a maximum
of 5 phonebooks each. Up to 1000 per-
son’s data (up to 3 numbers a person)
can be registered in each phonebook.
Operation methods differ between
PBAP compatible and PBAP incom-
patible but OPP compatible Blue-
tooth® phones.
If your cellular phone is neither PBAP
nor OPP compatible, the phonebook
cannot be transferred.
Page 109 of 131
109
1. SETUP OPERATION
5
SETUP
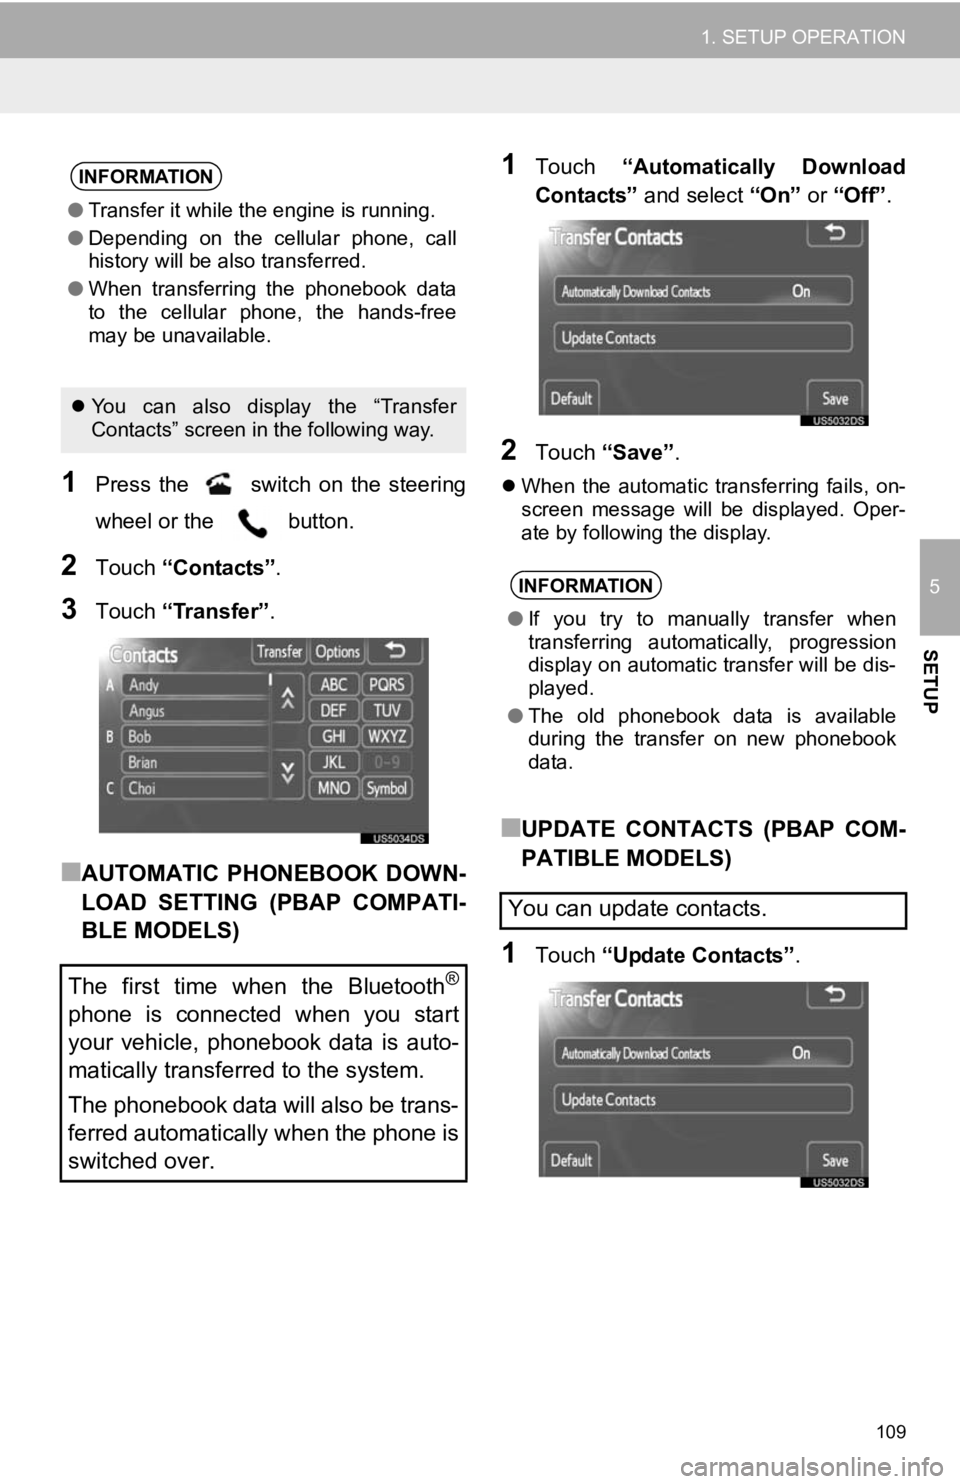
1Press the switch on the steering
wheel or the button.
2Touch “Contacts” .
3Touch “Transfer” .
■AUTOMATIC PHONEBOOK DOWN-
LOAD SETTING (PBAP COMPATI-
BLE MODELS)
1Touch “Automatically Download
Contacts” and select “On” or “Off” .
2Touch “Save” .
When the automatic transferring fails, on-
screen message will be displayed. Oper-
ate by following the display.
■UPDATE CONTACTS (PBAP COM-
PATIBLE MODELS)
1Touch “Update Contacts” .
INFORMATION
●Transfer it while the engine is running.
● Depending on the cellular phone, call
history will be also transferred.
● When transferring the phonebook data
to the cellular phone, the hands-free
may be unavailable.
You can also display the “Transfer
Contacts” screen in the following way.
The first time when the Bluetooth®
phone is connected when you start
your vehicle, phonebook data is auto-
matically transferred to the system.
The phonebook data will also be trans-
ferred automatically when the phone is
switched over.
INFORMATION
● If you try to manually transfer when
transferring automatically, progression
display on automatic transfer will be dis-
played.
● The old phonebook data is available
during the transfer on new phonebook
data.
You can update contacts.
Page 110 of 131
110
1. SETUP OPERATION
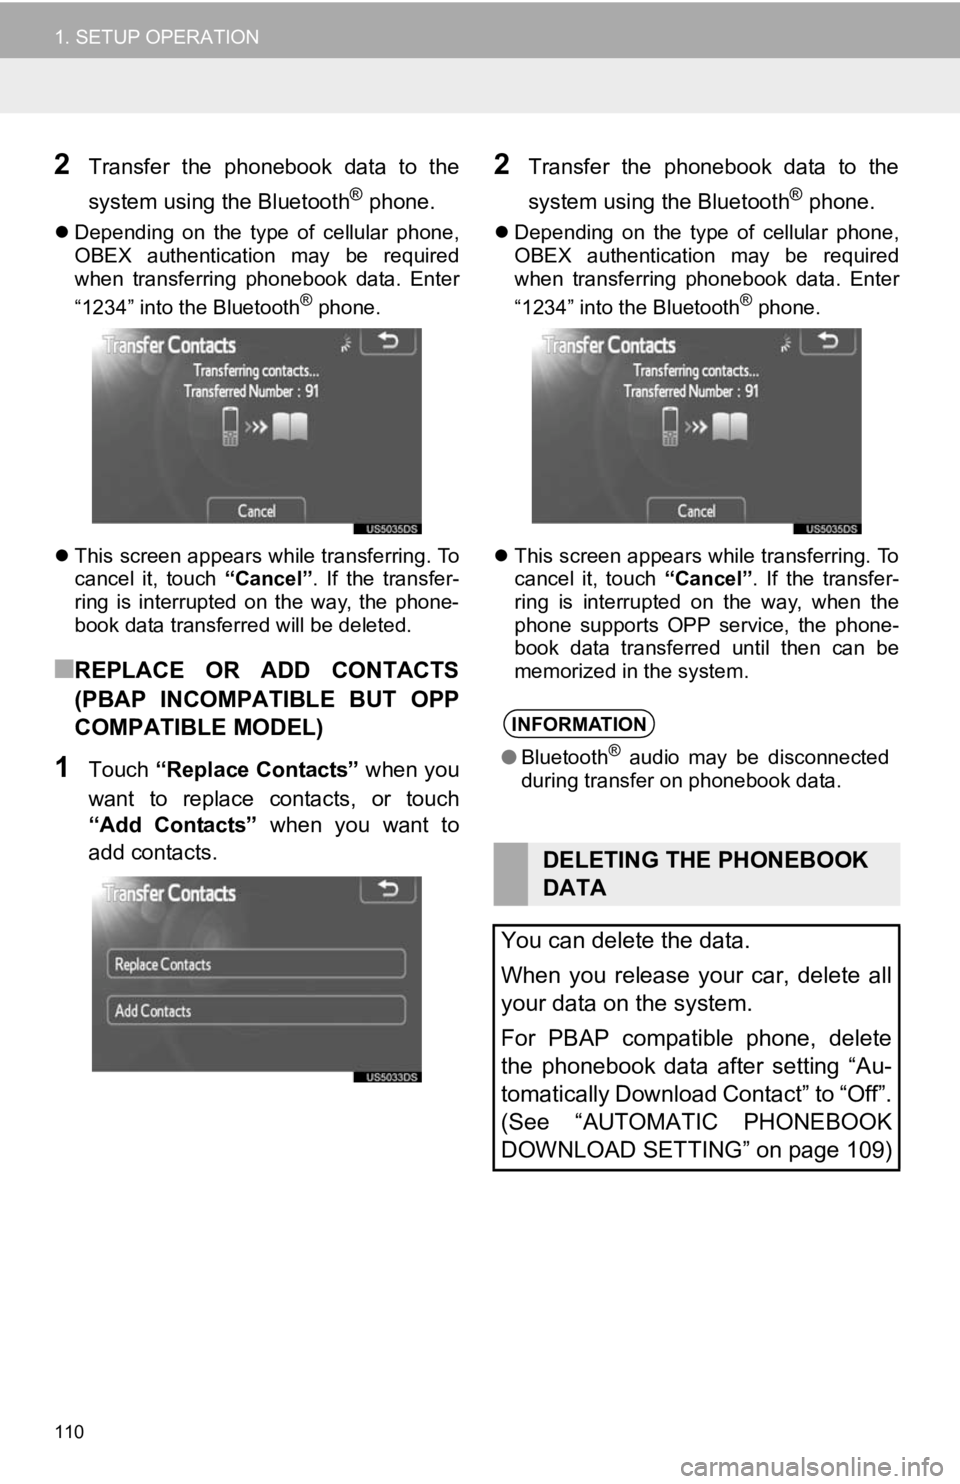
2Transfer the phonebook data to the
system using the Bluetooth
® phone.
Depending on the type of cellular phone,
OBEX authentication may be required
when transferring phonebook data. Enter
“1234” into the Bluetooth
® phone.
This screen appears while transferring. To
cancel it, touch “Cancel”. If the transfer-
ring is interrupted on the way, the phone-
book data transferred will be deleted.
■REPLACE OR ADD CONTACTS
(PBAP INCOMPATIBLE BUT OPP
COMPATIBLE MODEL)
1Touch “Replace Contacts” when you
want to replace contacts, or touch
“Add Contacts” when you want to
add contacts.
2Transfer the phonebook data to the
system using the Bluetooth
® phone.
Depending on the type of cellular phone,
OBEX authentication may be required
when transferring phonebook data. Enter
“1234” into the Bluetooth
® phone.
This screen appears while transferring. To
cancel it, touch “Cancel”. If the transfer-
ring is interrupted on the way, when the
phone supports OPP service, the phone-
book data transferred until then can be
memorized in the system.
INFORMATION
● Bluetooth® audio may be disconnected
during transfer on phonebook data.
DELETING THE PHONEBOOK
DATA
You can delete the data.
When you release your car, delete all
your data on the system.
For PBAP compatible phone, delete
the phonebook data after setting “Au-
tomatically Download Contact” to “Off”.
(See “AUTOMATIC PHONEBOOK
DOWNLOAD SETTING” on page 109)