engine TOYOTA PRIUS V 2013 Accessories, Audio & Navigation (in English)
[x] Cancel search | Manufacturer: TOYOTA, Model Year: 2013, Model line: PRIUS V, Model: TOYOTA PRIUS V 2013Pages: 228, PDF Size: 3.73 MB
Page 162 of 228
162
1. BASIC INFORMATION BEFORE OPERATION
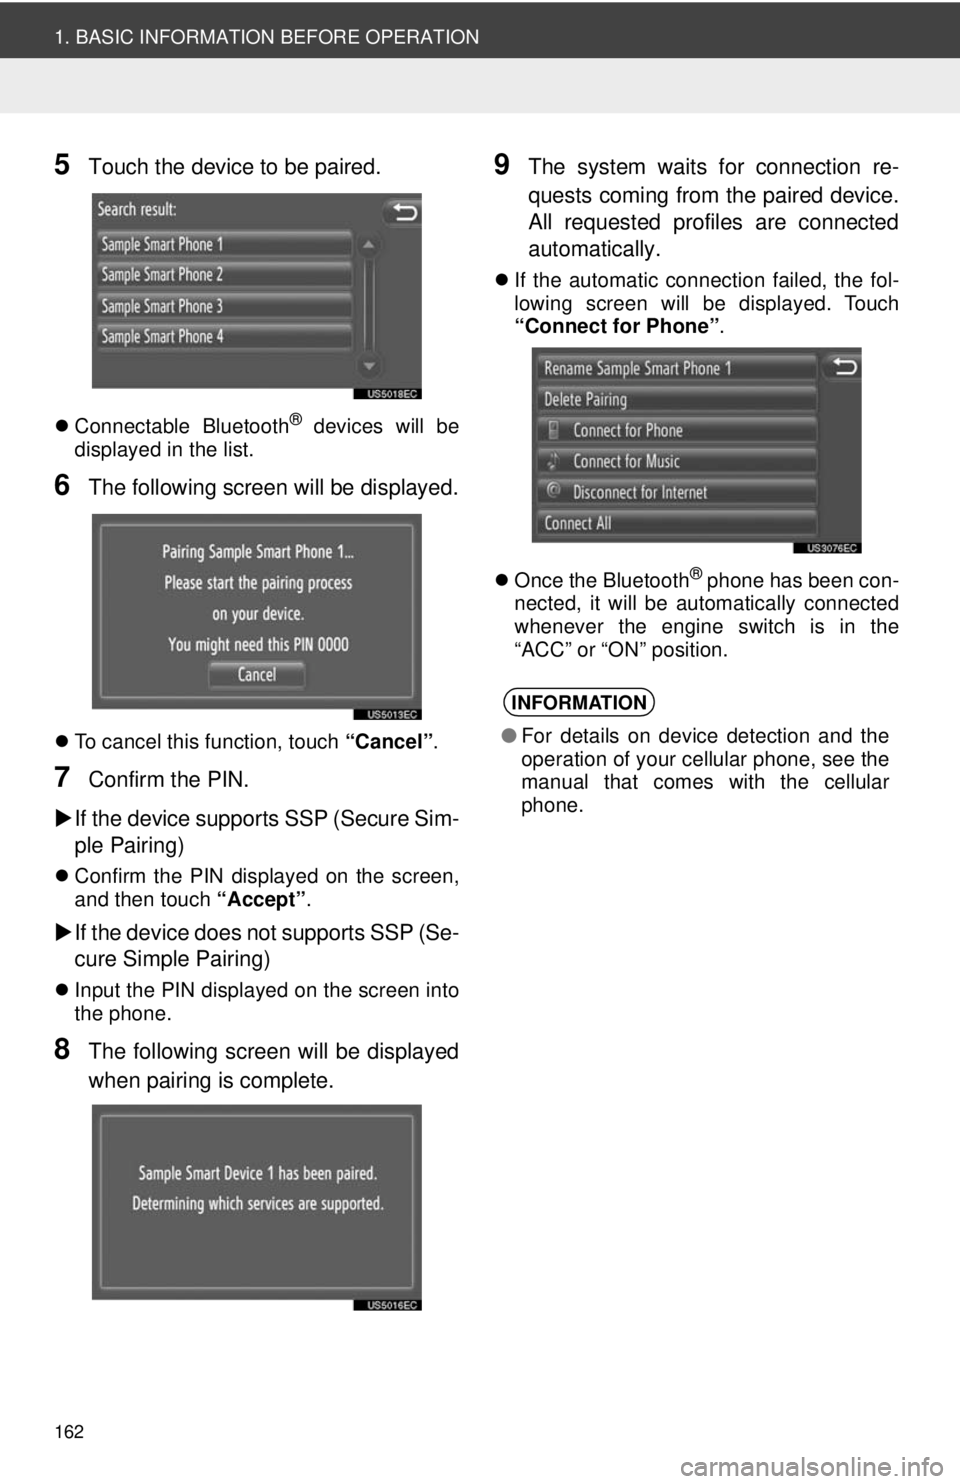
5Touch the device to be paired.
Connectable Bluetooth® devices will be
displayed in the list.
6The following screen will be displayed.
To cancel this function, touch “Cancel”.
7Confirm the PIN.
If the device supports SSP (Secure Sim-
ple Pairing)
Confirm the PIN displayed on the screen,
and then touch “Accept”.
If the device does not supports SSP (Se-
cure Simple Pairing)
Input the PIN displayed on the screen into
the phone.
8The following screen will be displayed
when pairing is complete.
9The system waits for connection re-
quests coming from the paired device.
All requested profiles are connected
automatically.
If the automatic connection failed, the fol-
lowing screen will be displayed. Touch
“Connect for Phone” .
Once the Bluetooth
® phone has been con-
nected, it will be automatically connected
whenever the engine switch is in the
“ACC” or “ON” position.
INFORMATION
● For details on device detection and the
operation of your cellular phone, see the
manual that comes with the cellular
phone.
Page 164 of 228
164
1. BASIC INFORMATION BEFORE OPERATION
If the Bluetooth® phone is disconnected
on purpose, such as it was turned off, this
does not happen. Reconnect it manually
using either of the following methods:
• Select the Bluetooth
® phone again. (See
page 206.)
• Connect the phone profile. (See page 203.)
RECONNECTING THE
Bluetooth® PHONE
If a Bluetooth
® phone is disconnected
due to poor reception from the
Bluetooth
® network when the engine
switch is in the “ACC” or “ON” position,
the system will automatically
reconnect the Bluetooth
® phone.
Page 189 of 228
7
189
1
2
3
4
5
6
7
8
9
1. QUICK REFERENCE .................. 190
2. FUEL CONSUMPTION................ 191
FUEL CONSUMPTION (VEHICLES WITH HYBRID
SYSTEM) .......................................... 191
FUEL CONSUMPTION (VEHICLES WITH GASOLINE
ENGINE) ........................................... 191
3. TIRE PRESSURE WARNING SYSTEM .......... ....................... ... 193
SHOWING THE TIRE PRESSURE
SCREEN ........................................... 193
1VEHICLE INFORMATION
VEHICLE INFORMATION
Page 191 of 228
191
7
VEHICLE INFORMATION
1. VEHICLE INFORMATION
2. FUEL CONSUMPTION∗
Energy monitor
Trip consumption
History
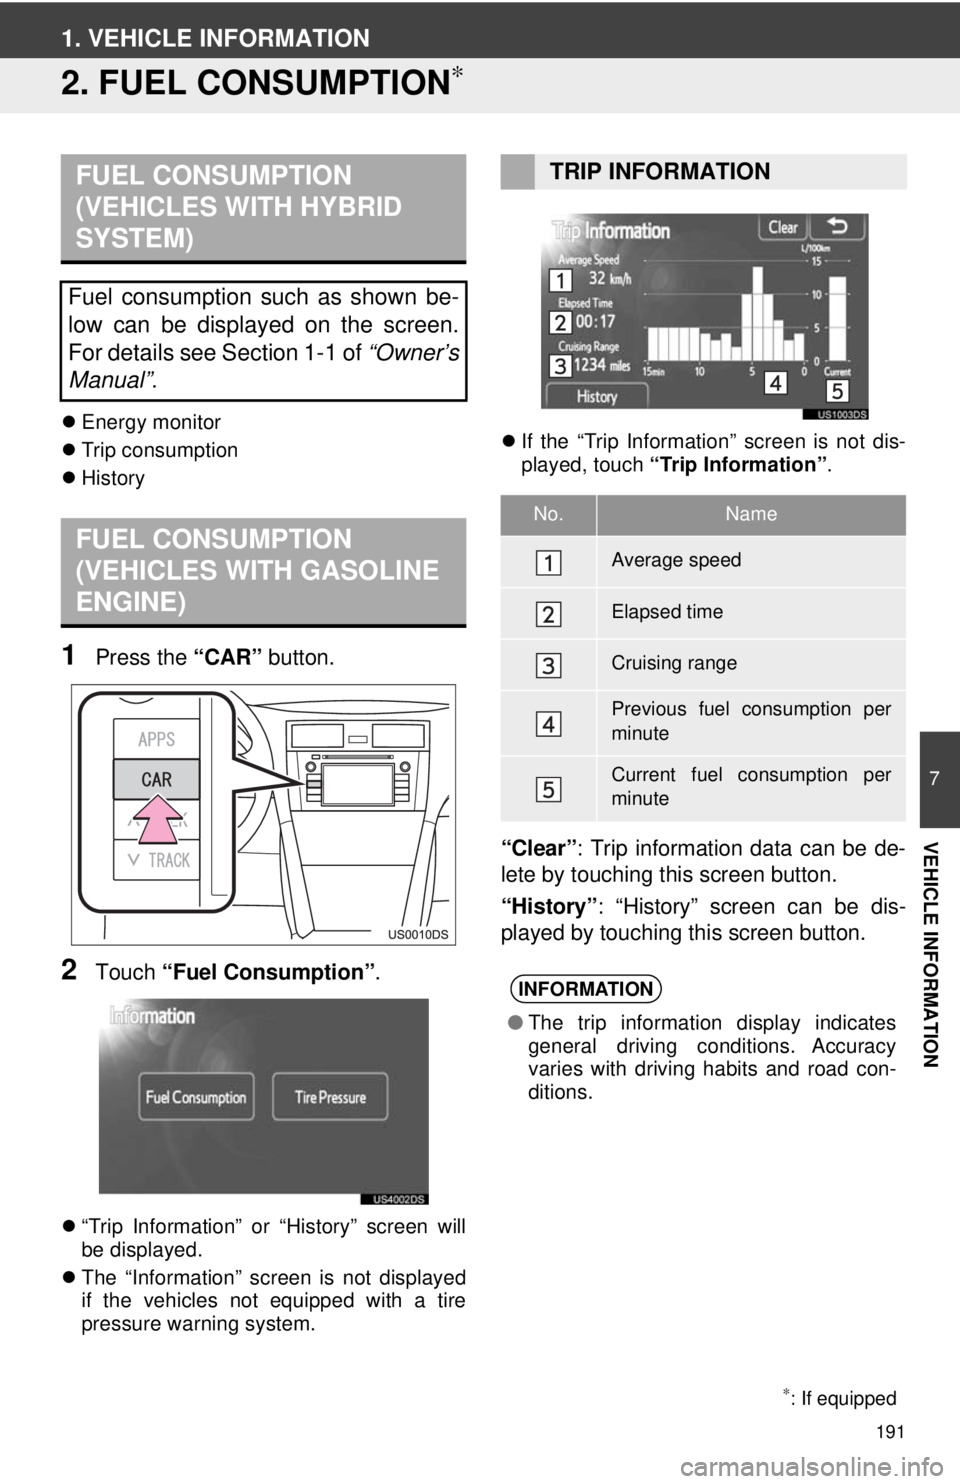
1Press the “CAR” button.
2Touch “Fuel Consumption” .
“Trip Information” or “History” screen will
be displayed.
The “Information” screen is not displayed
if the vehicles not equipped with a tire
pressure warning system.
If the “Trip Information” screen is not dis-
played, touch “Trip Information” .
“Clear”: Trip information data can be de-
lete by touching this screen button.
“History” : “History” screen can be dis-
played by touching this screen button.
FUEL CONSUMPTION
(VEHICLES WITH HYBRID
SYSTEM)
Fuel consumption such as shown be-
low can be displayed on the screen.
For details see Section 1-1 of “Owner’s
Manual” .
FUEL CONSUMPTION
(VEHICLES WITH GASOLINE
ENGINE)
∗: If equipped
TRIP INFORMATION
No.Name
Average speed
Elapsed time
Cruising range
Previous fuel consumption per
minute
Current fuel consumption per
minute
INFORMATION
●The trip information display indicates
general driving conditions. Accuracy
varies with driving habits and road con-
ditions.
Page 201 of 228
201
1. SETUP OPERATION
8
SETUP
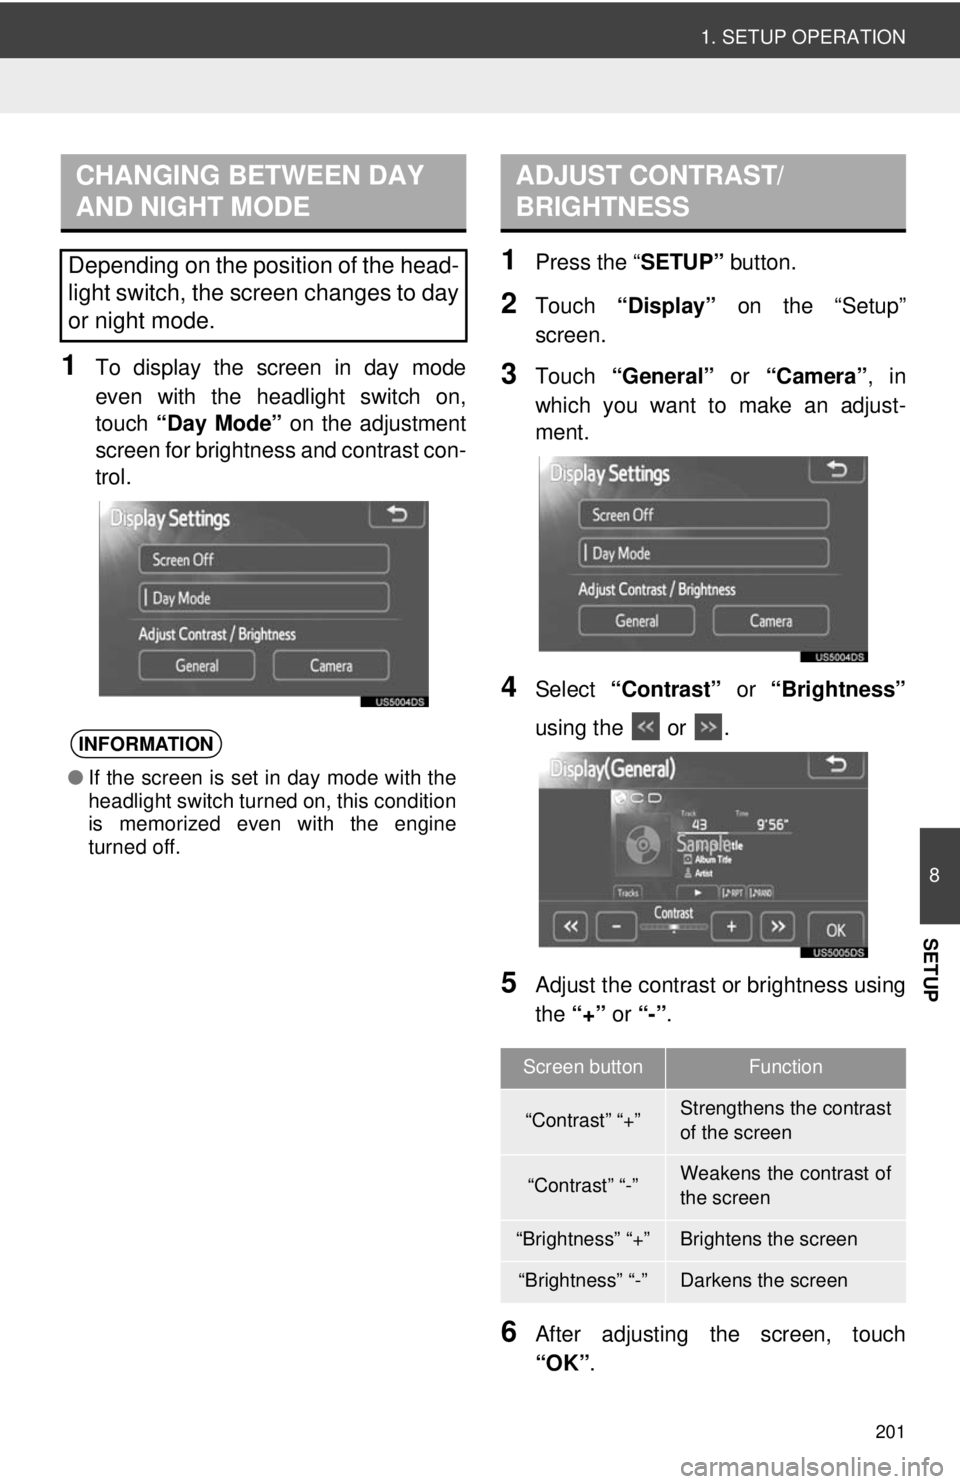
1To display the screen in day mode
even with the headlight switch on,
touch “Day Mode” on the adjustment
screen for brightness and contrast con-
trol.
1Press the “ SETUP” button.
2Touch “Display” on the “Setup”
screen.
3Touch “General” or “Camera” , in
which you want to make an adjust-
ment.
4Select “Contrast” or “Brightness”
using the or .
5Adjust the contrast or brightness using
the “+” or “-”.
6After adjusting the screen, touch
“OK” .
CHANGING BETWEEN DAY
AND NIGHT MODE
Depending on the position of the head-
light switch, the screen changes to day
or night mode.
INFORMATION
●If the screen is set in day mode with the
headlight switch turned on, this condition
is memorized even with the engine
turned off.
ADJUST CONTRAST/
BRIGHTNESS
Screen buttonFunction
“Contrast” “+”Strengthens the contrast
of the screen
“Contrast” “-”Weakens the contrast of
the screen
“Brightness” “+”Brightens the screen
“Brightness” “-”Darkens the screen
Page 204 of 228
204
1. SETUP OPERATION
7The system waits for connection re-
quests coming from the paired device.
All requested profiles are connected
automatically.
Internet profile is not connected automati-
cally. For details on connecting internet
profile, see “LOGIN PROCESS INTER-
NET PROFILE” on page 205.
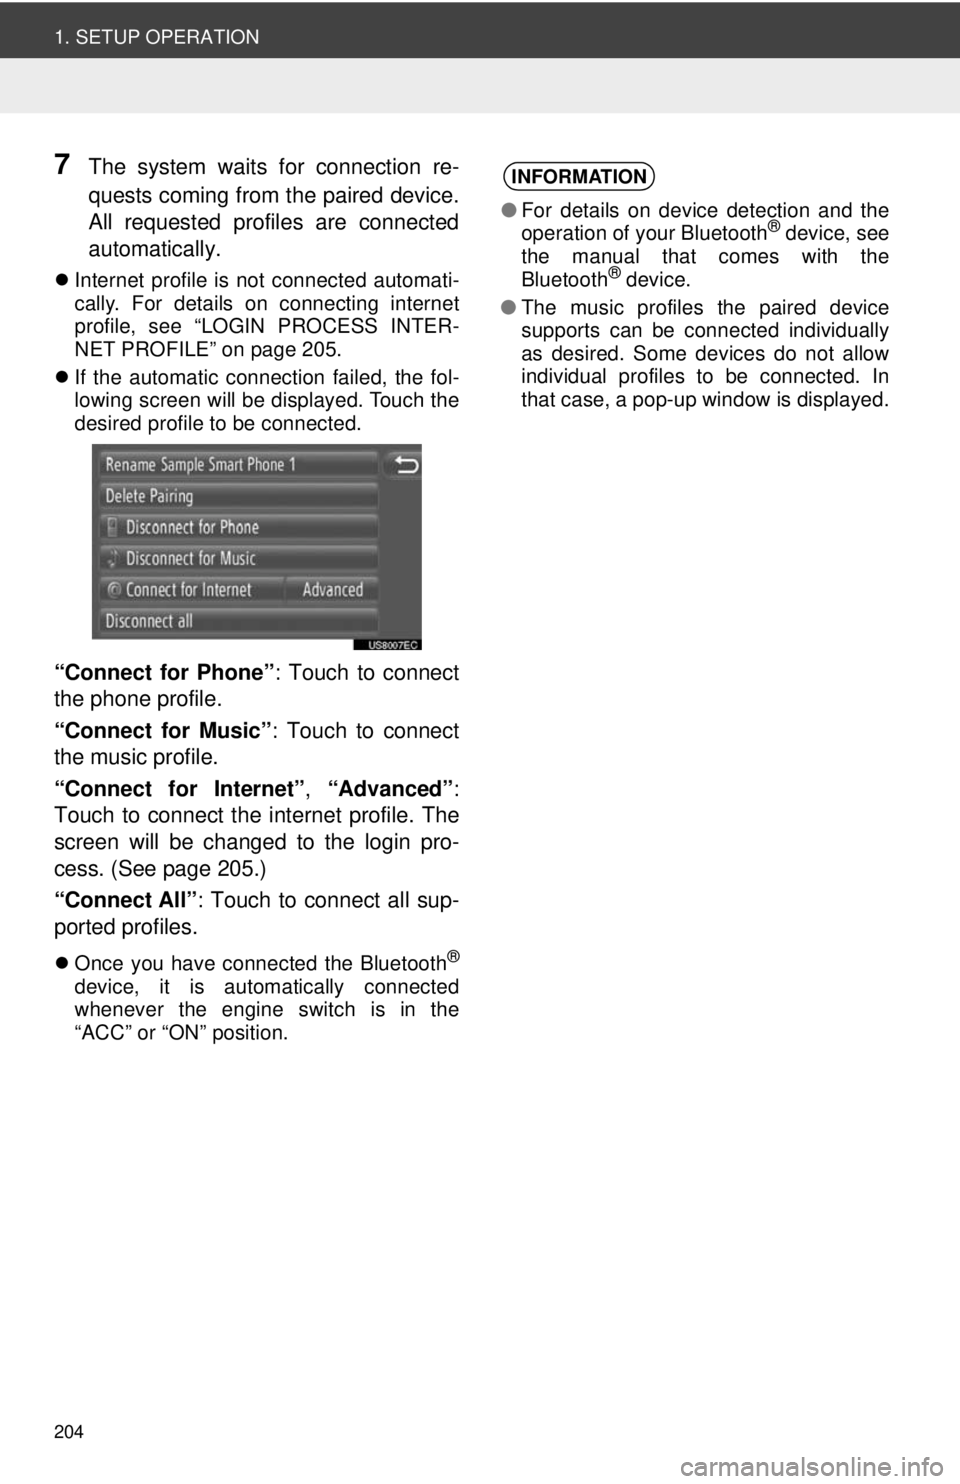
If the automatic connection failed, the fol-
lowing screen will be displayed. Touch the
desired profile to be connected.
“Connect for Phone” : Touch to connect
the phone profile.
“Connect for Music” : Touch to connect
the music profile.
“Connect for Internet” , “Advanced” :
Touch to connect the internet profile. The
screen will be changed to the login pro-
cess. (See page 205.)
“Connect All” : Touch to connect all sup-
ported profiles.
Once you have connected the Bluetooth®
device, it is automatically connected
whenever the engine switch is in the
“ACC” or “ON” position.
INFORMATION
●For details on device detection and the
operation of your Bluetooth® device, see
the manual that comes with the
Bluetooth
® device.
● The music profiles the paired device
supports can be connected individually
as desired. Some devices do not allow
individual profiles to be connected. In
that case, a pop-up window is displayed.
Page 214 of 228
214
1. REAR VIEW MONITOR SYSTEM
1. REAR VIEW MONITOR SYSTEM OPERATION
1To display the rear view image on the
screen, the shift lever is in the “R” posi-
tion when the engine switch is in the
“ON” position.
If you move the shift lever out of the “R”
position, the screen returns to the previ-
ous screen.
The rear view monitor system assists
the driver by displaying an image of the
view behind the vehicle while backing
up.
The image is displayed in reverse on
the screen. This allows the image to
appear in the same manner as that of
the rear view mirror.CAUTION
●Never depend on the rear view monitor
system entirely when backing up.
Always make sure your intended path is
clear.
Use caution, just as you would when
backing up any vehicle.
● Never back up while looking only at the
screen. The image on the screen is dif-
ferent from actual conditions. Depicted
distances between objects and flat sur-
faces will differ from the actual dis-
tances. If you back up while looking only
at the screen, you may hit a vehicle, a
person or an object. When backing up,
be sure to check behind and all around
the vehicle visually and with mirrors
before proceeding.
● Do not use the system when the back
door, trunk or tailgate is not completely
closed.
● Use your own eyes to confirm the vehi-
cle’s surroundings, as the displayed
image may become faint or dark, and
moving images will be distorted, or not
entirely visible when the outside tem-
perature is low. When backing up, be
sure to check behind and all around the
vehicle visually and with mirror before
proceeding.
● Do not use the system in the following
cases:
• On icy or slick road surfaces, or in
snow.
• When using tire chains or emergency tires.
• On an uneven road, such as a slope.
With rear view monitor guide lines (If
equipped)
● Always check the vehicle surrounding
area, because the guide lines are ancil-
lary lines.
● The guide lines are ancillary lines and
do not change even if the steering wheel
is turned.