ECU TOYOTA PRIUS V 2013 Accessories, Audio & Navigation (in English)
[x] Cancel search | Manufacturer: TOYOTA, Model Year: 2013, Model line: PRIUS V, Model: TOYOTA PRIUS V 2013Pages: 228, PDF Size: 3.73 MB
Page 87 of 228
87
2. ENTUNE SERVICE
3
APPLICATION-THE OTHERS
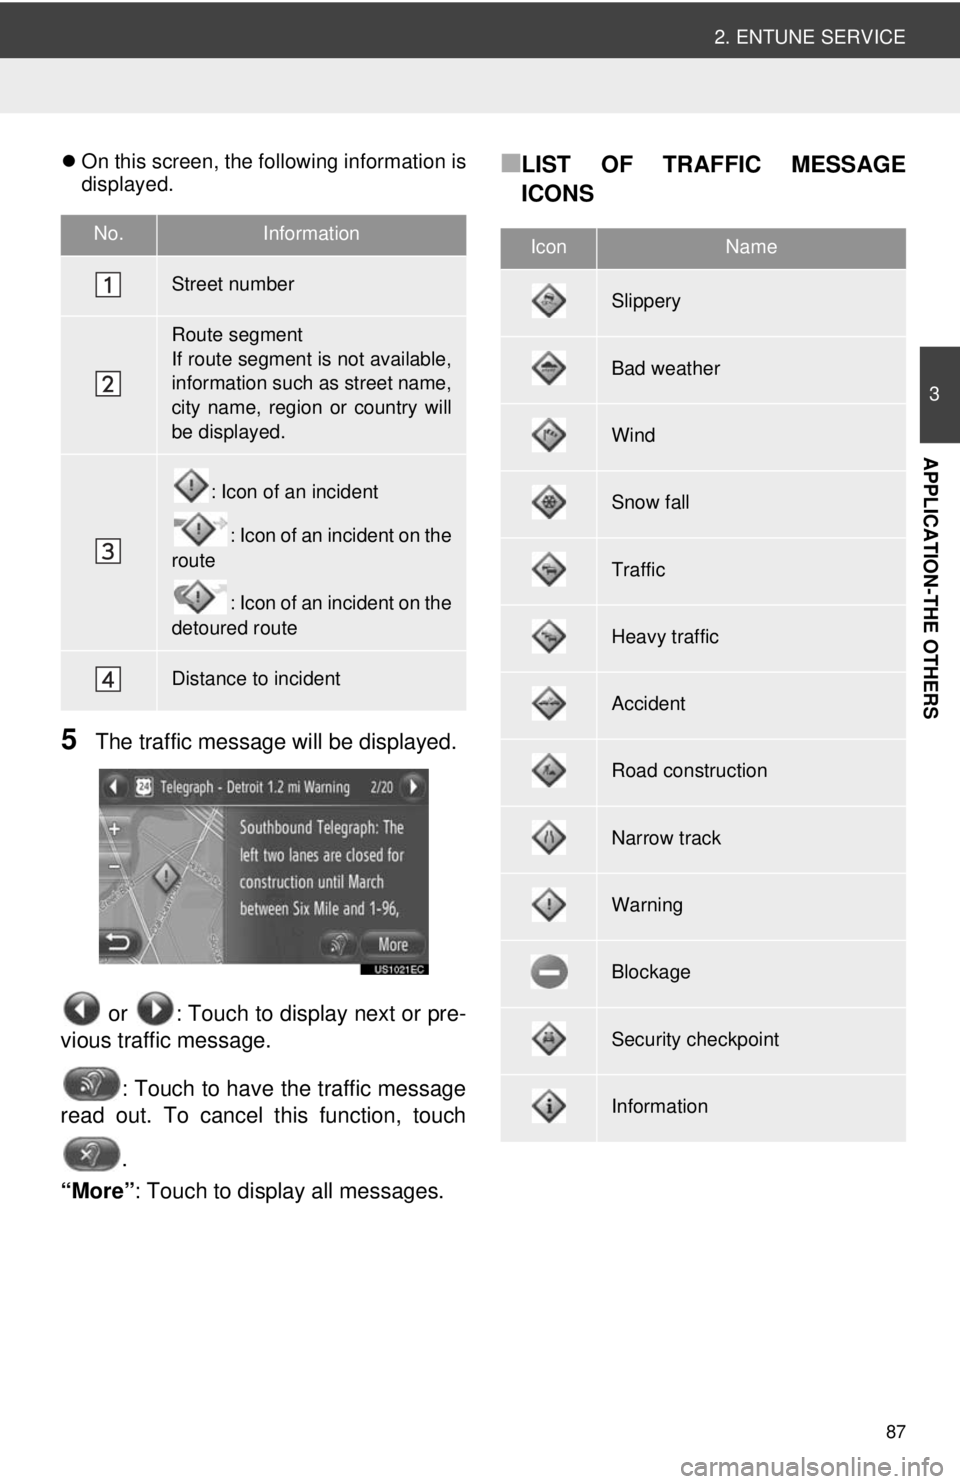
On this screen, the following information is
displayed.
5The traffic message will be displayed.
or : Touch to display next or pre-
vious traffic message.
: Touch to have the traffic message
read out. To cancel this function, touch
.
“More” : Touch to display all messages.
■LIST OF TRAFFIC MESSAGE
ICONS
No.Information
Street number
Route segment
If route segment is not available,
information such as street name,
city name, region or country will
be displayed.
: Icon of an incident
: Icon of an incident on the
route
: Icon of an incident on the
detoured route
Distance to incident
IconName
Slippery
Bad weather
Wind
Snow fall
Traffic
Heavy traffic
Accident
Road construction
Narrow track
Warning
Blockage
Security checkpoint
Information
Page 115 of 228
115
1. AUDIO SYSTEM OPERATION
4
AUDIO SYSTEM
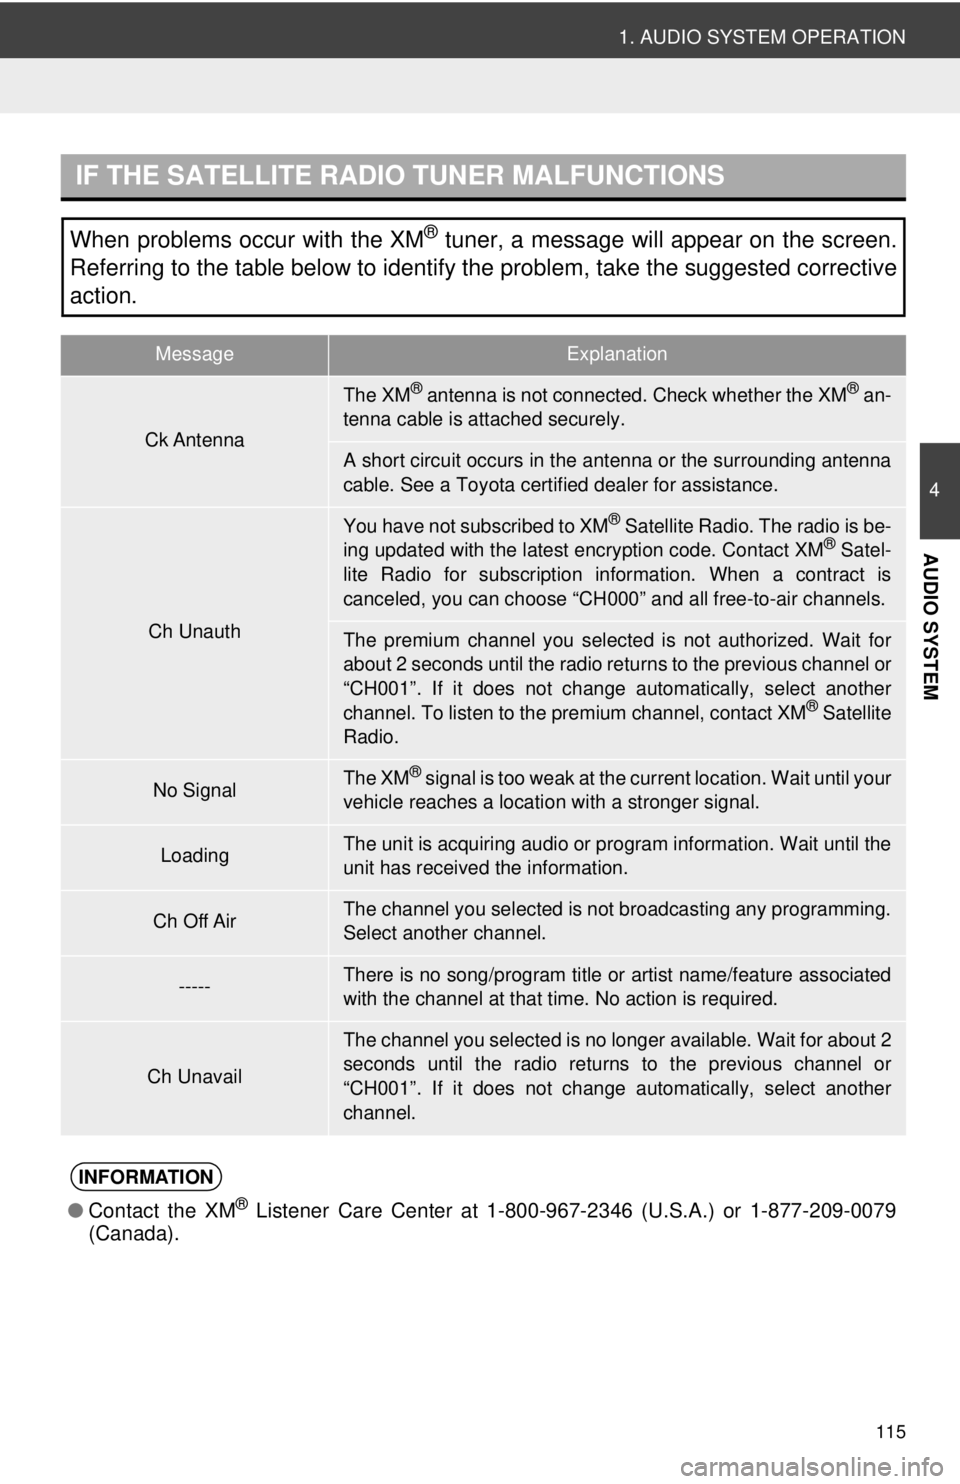
IF THE SATELLITE RADIO TUNER MALFUNCTIONS
When problems occur with the XM® tuner, a message will appear on the screen.
Referring to the table below to identify the problem, take the suggested corrective
action.
MessageExplanation
Ck Antenna
The XM® antenna is not connected. Check whether the XM® an-
tenna cable is attached securely.
A short circuit occurs in the antenna or the surrounding antenna
cable. See a Toyota cert ified dealer for assistance.
Ch Unauth
You have not subscribed to XM® Satellite Radio. The radio is be-
ing updated with the latest encryption code. Contact XM® Satel-
lite Radio for subscription information. When a contract is
canceled, you can choose “CH 000” and all free-to-air channels.
The premium channel you selected is not authorized. Wait for
about 2 seconds until the radio re turns to the previous channel or
“CH001”. If it does not change automatically, select another
channel. To listen to the premium channel, contact XM
® Satellite
Radio.
No SignalThe XM® signal is too weak at the current location. Wait until your
vehicle reaches a locati on with a stronger signal.
LoadingThe unit is acquiring audio or program information. Wait until the
unit has received the information.
Ch Off AirThe channel you selected is not broadcasting any programming.
Select another channel.
-----There is no song/program title or artist name/feature associated
with the channel at that time. No action is required.
Ch Unavail
The channel you selected is no longer available. Wait for about 2
seconds until the radio returns to the previous channel or
“CH001”. If it does not change automatically, select another
channel.
INFORMATION
● Contact the XM® Listener Care Center at 1-800- 967-2346 (U.S.A.) or 1-877-209-0079
(Canada).
Page 135 of 228
135
1. AUDIO SYSTEM OPERATION
4
AUDIO SYSTEM
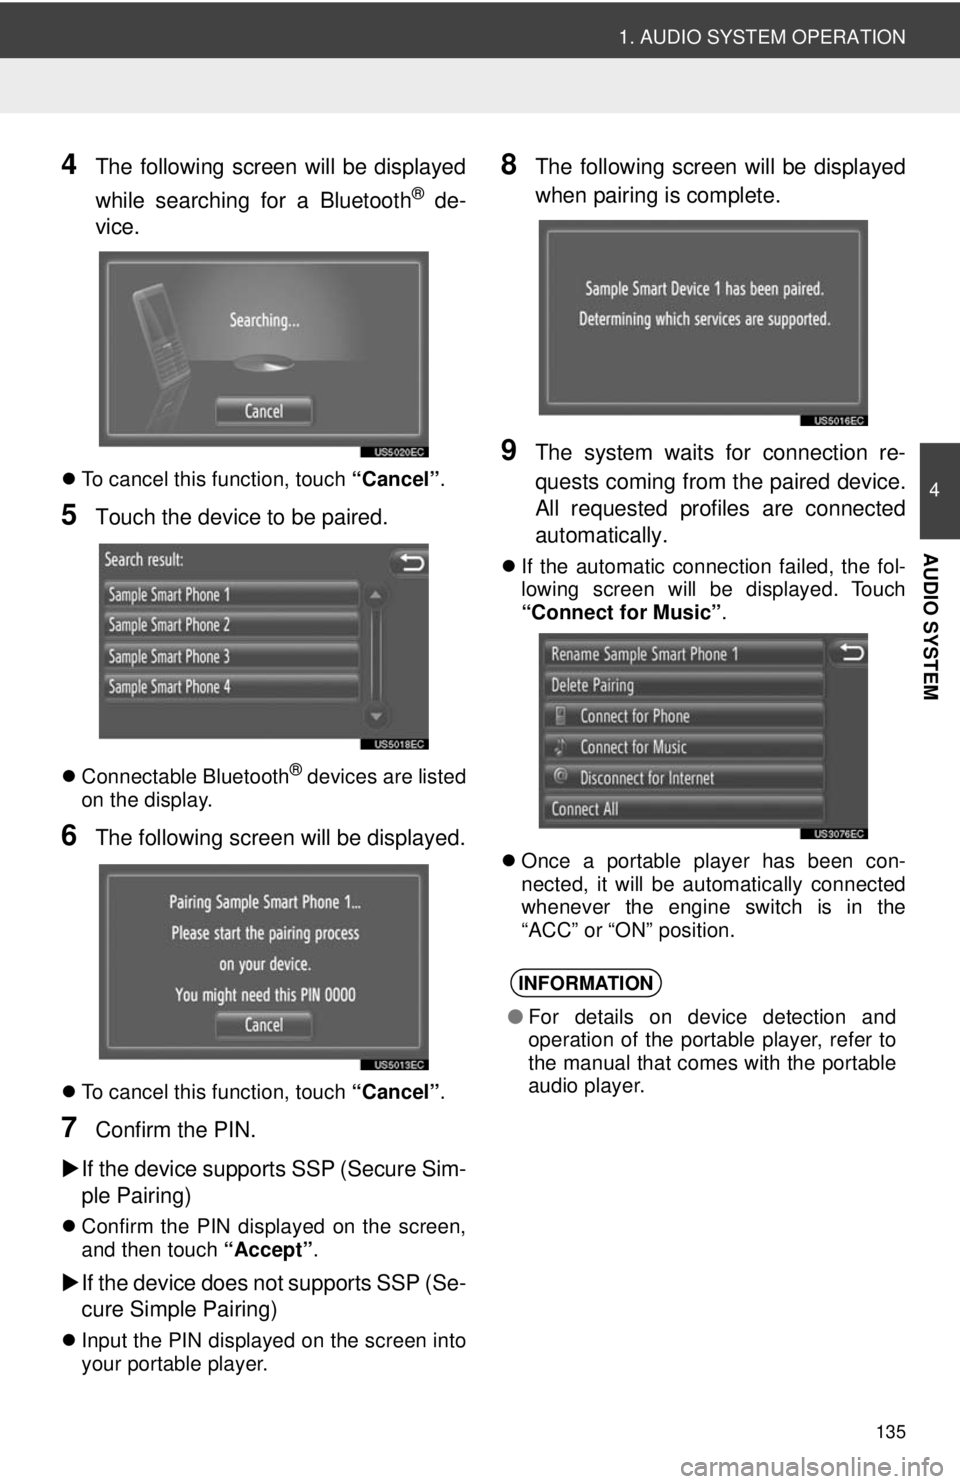
4The following screen will be displayed
while searching for a Bluetooth
® de-
vice.
To cancel this function, touch “Cancel”.
5Touch the device to be paired.
Connectable Bluetooth® devices are listed
on the display.
6The following screen will be displayed.
To cancel this function, touch “Cancel”.
7Confirm the PIN.
If the device supports SSP (Secure Sim-
ple Pairing)
Confirm the PIN displayed on the screen,
and then touch “Accept” .
If the device does not supports SSP (Se-
cure Simple Pairing)
Input the PIN displayed on the screen into
your portable player.
8The following screen will be displayed
when pairing is complete.
9The system waits for connection re-
quests coming from the paired device.
All requested profiles are connected
automatically.
If the automatic connection failed, the fol-
lowing screen will be displayed. Touch
“Connect for Music” .
Once a portable player has been con-
nected, it will be automatically connected
whenever the engine switch is in the
“ACC” or “ON” position.
INFORMATION
● For details on device detection and
operation of the portable player, refer to
the manual that comes with the portable
audio player.
Page 136 of 228
136
1. AUDIO SYSTEM OPERATION
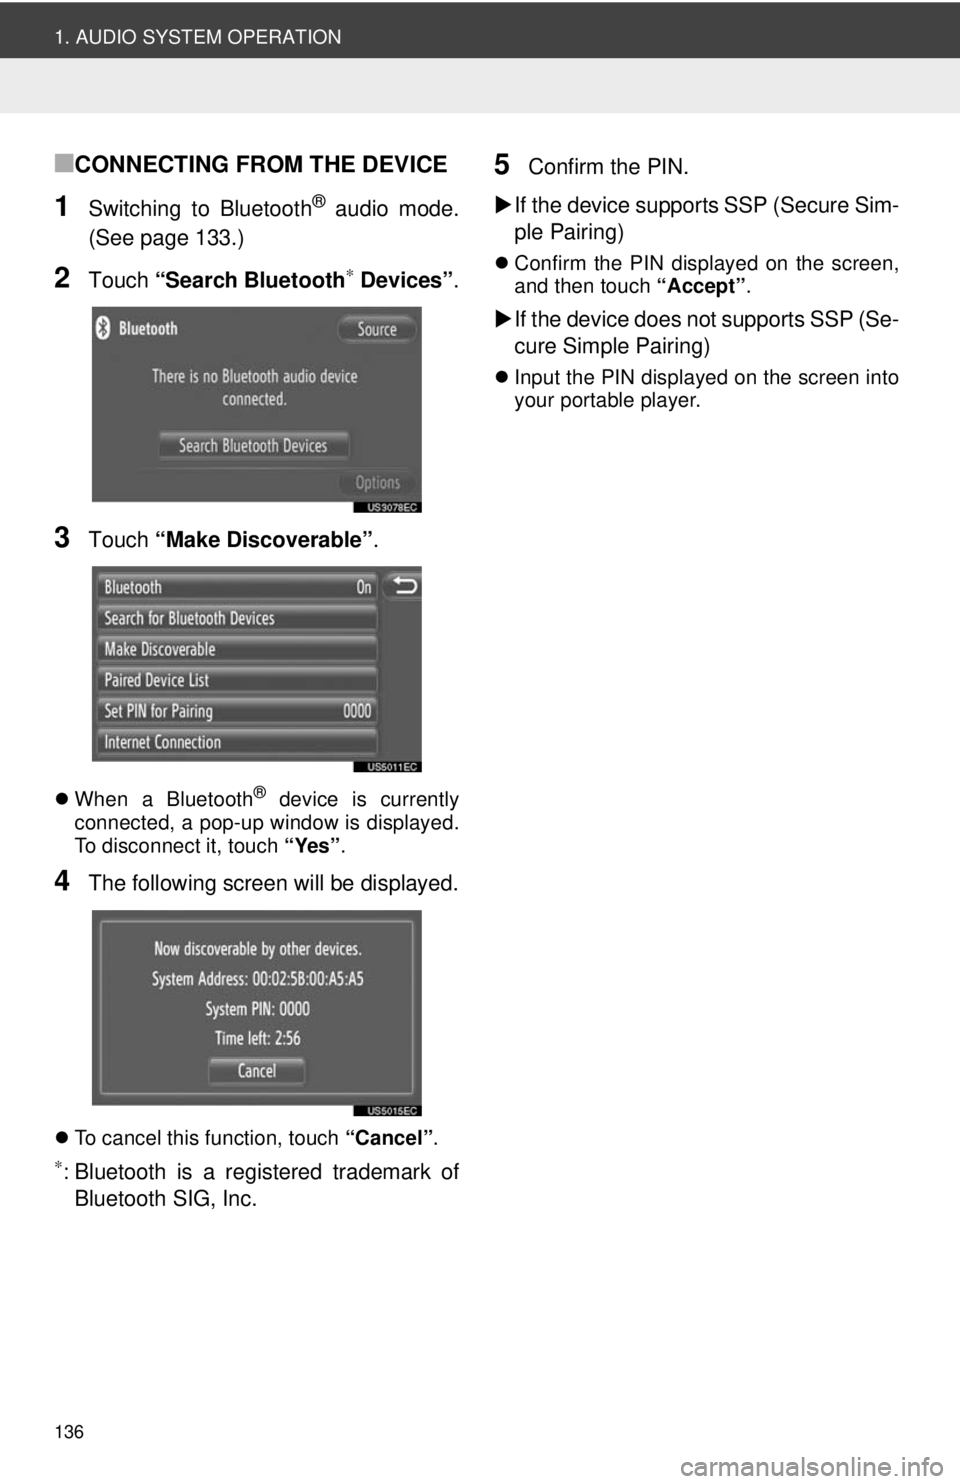
■CONNECTING FROM THE DEVICE
1Switching to Bluetooth® audio mode.
(See page 133.)
2Touch “Search Bluetooth∗ Devices” .
3Touch “Make Discoverable” .
When a Bluetooth® device is currently
connected, a pop-up window is displayed.
To disconnect it, touch “Yes”.
4The following screen will be displayed.
To cancel this function, touch “Cancel”.
∗: Bluetooth is a registered trademark of
Bluetooth SIG, Inc.
5Confirm the PIN.
If the device supports SSP (Secure Sim-
ple Pairing)
Confirm the PIN displayed on the screen,
and then touch “Accept”.
If the device does not supports SSP (Se-
cure Simple Pairing)
Input the PIN displayed on the screen into
your portable player.
Page 162 of 228
162
1. BASIC INFORMATION BEFORE OPERATION
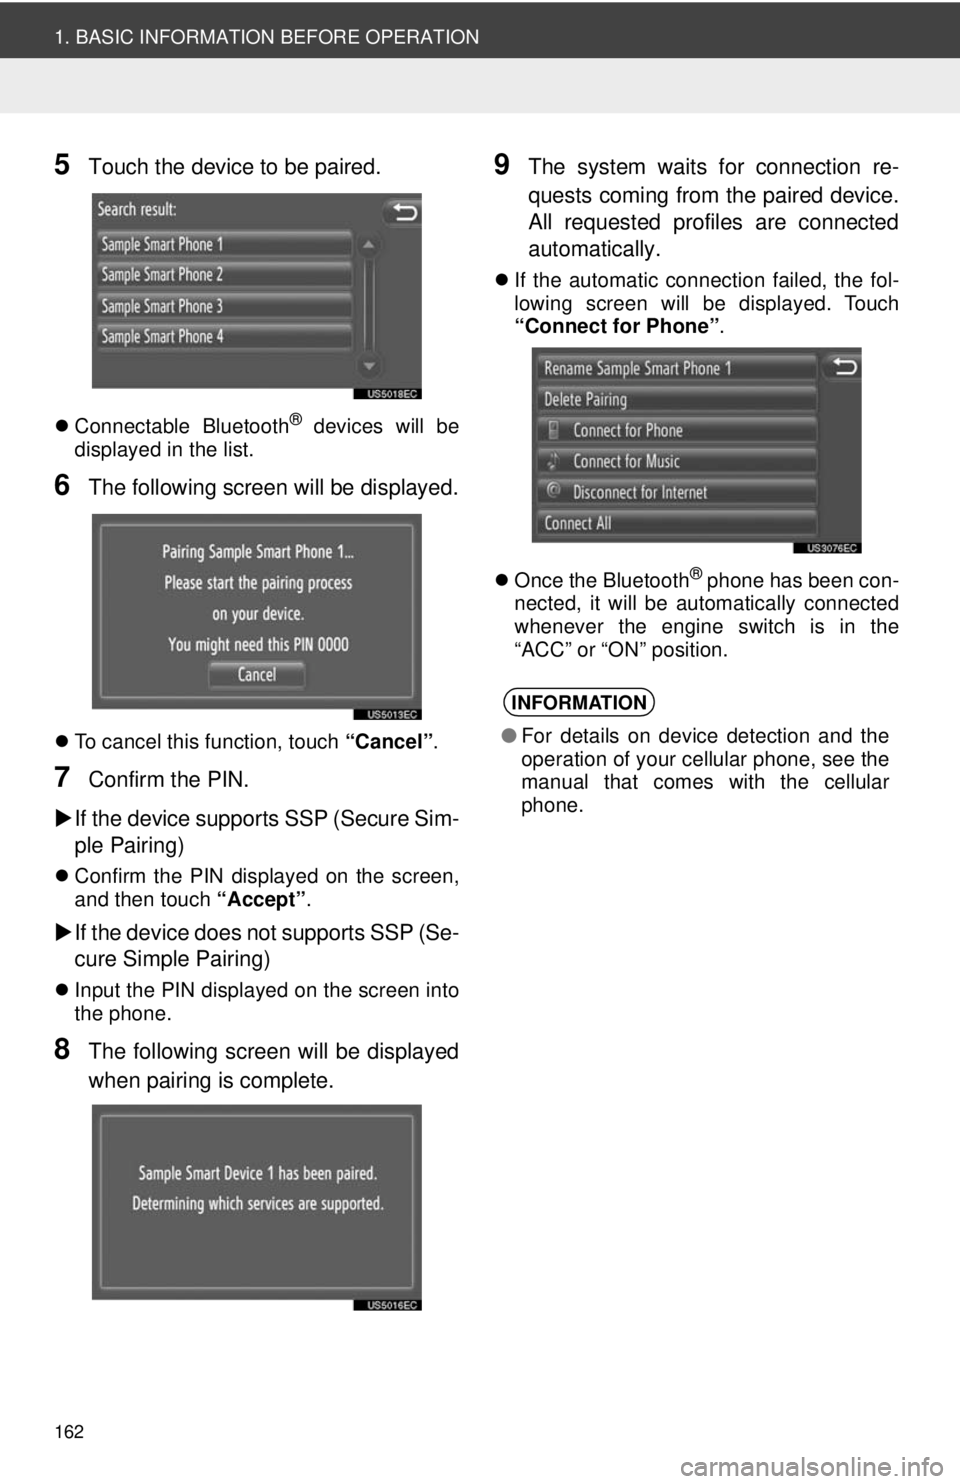
5Touch the device to be paired.
Connectable Bluetooth® devices will be
displayed in the list.
6The following screen will be displayed.
To cancel this function, touch “Cancel”.
7Confirm the PIN.
If the device supports SSP (Secure Sim-
ple Pairing)
Confirm the PIN displayed on the screen,
and then touch “Accept”.
If the device does not supports SSP (Se-
cure Simple Pairing)
Input the PIN displayed on the screen into
the phone.
8The following screen will be displayed
when pairing is complete.
9The system waits for connection re-
quests coming from the paired device.
All requested profiles are connected
automatically.
If the automatic connection failed, the fol-
lowing screen will be displayed. Touch
“Connect for Phone” .
Once the Bluetooth
® phone has been con-
nected, it will be automatically connected
whenever the engine switch is in the
“ACC” or “ON” position.
INFORMATION
● For details on device detection and the
operation of your cellular phone, see the
manual that comes with the cellular
phone.
Page 163 of 228
163
1. BASIC INFORMATION BEFORE OPERATION
5
Bluetooth
® HANDS-FREE SYSTEM
■CONNECTING FROM THE DEVICE
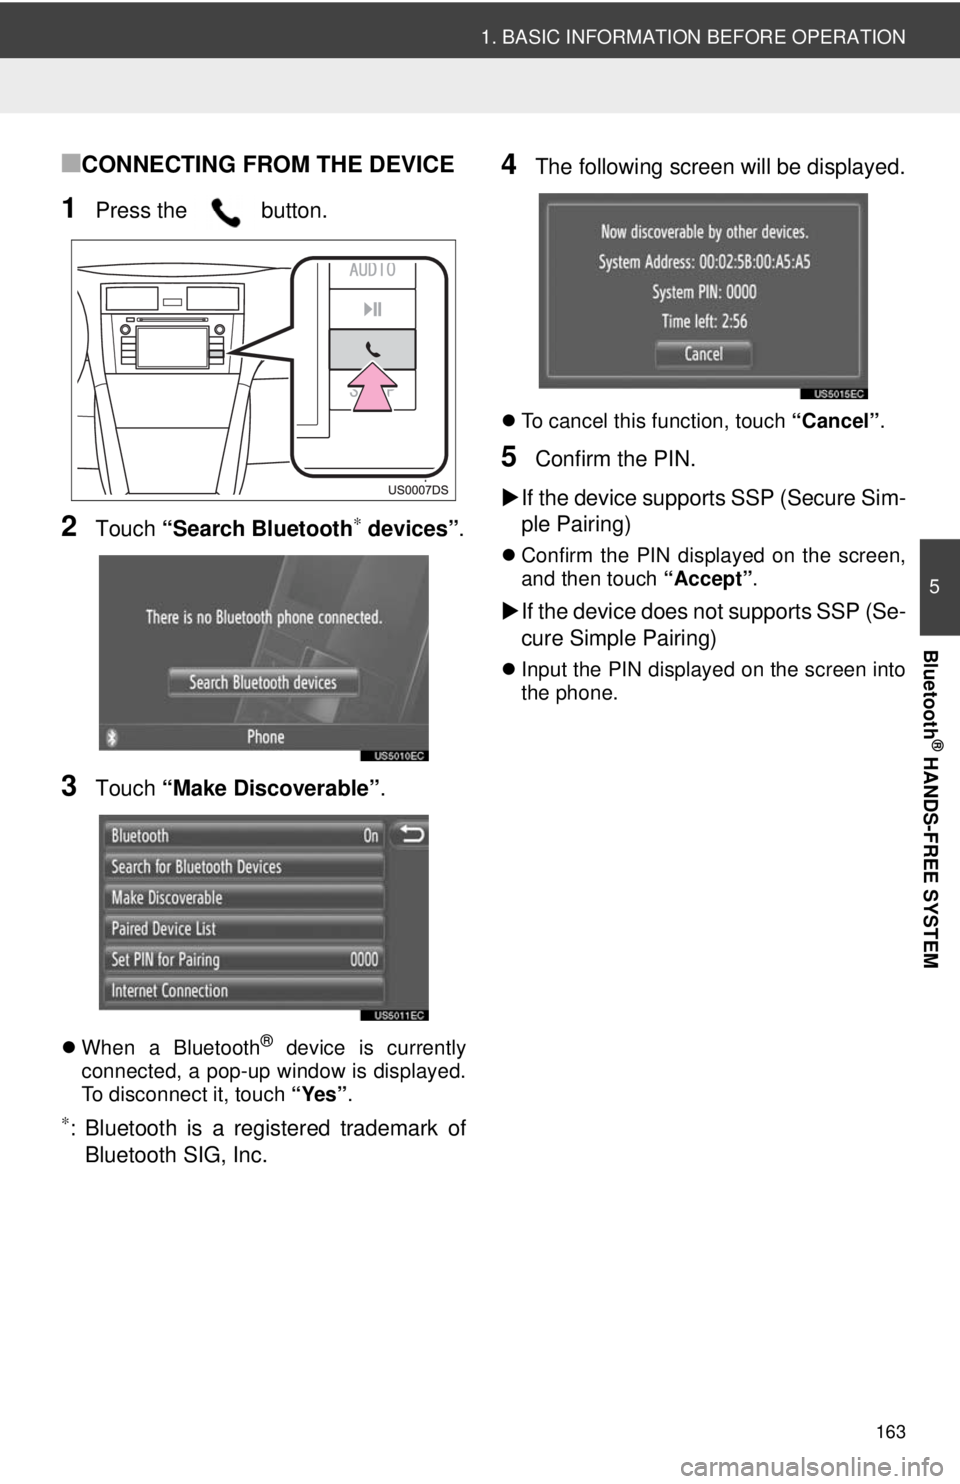
1Press the button.
2Touch “Search Bluetooth∗ devices” .
3Touch “Make Discoverable” .
When a Bluetooth® device is currently
connected, a pop-up window is displayed.
To disconnect it, touch “Yes”.
∗: Bluetooth is a registered trademark of
Bluetooth SIG, Inc.
4The following screen will be displayed.
To cancel this function, touch “Cancel”.
5Confirm the PIN.
If the device supports SSP (Secure Sim-
ple Pairing)
Confirm the PIN displayed on the screen,
and then touch “Accept”.
If the device does not supports SSP (Se-
cure Simple Pairing)
Input the PIN displayed on the screen into
the phone.
Page 203 of 228
203
1. SETUP OPERATION
8
SETUP
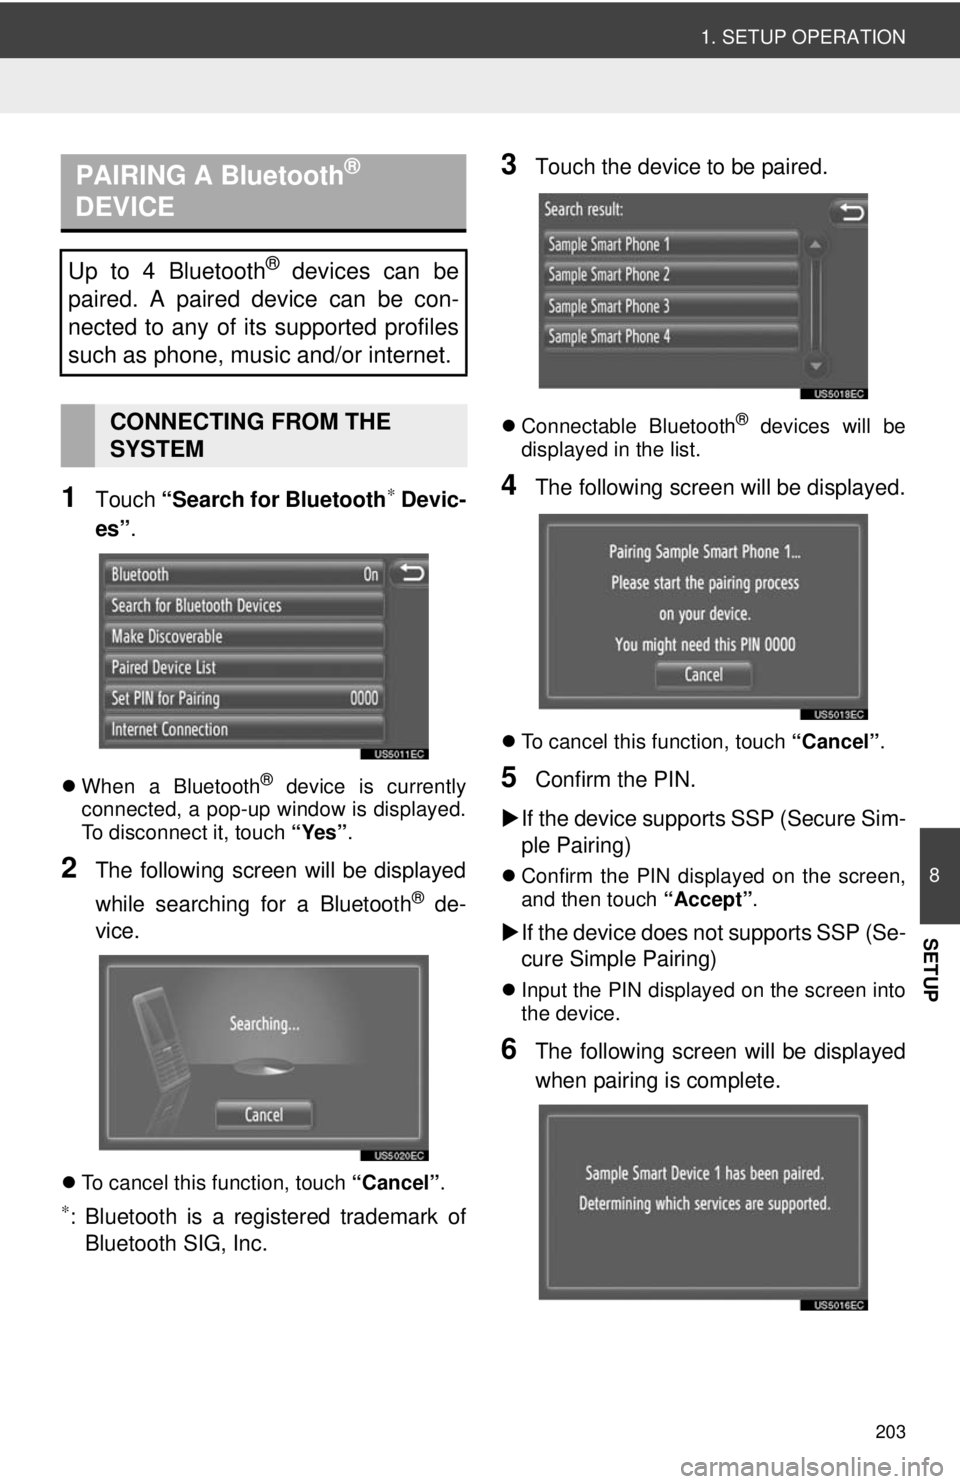
1Touch “Search for Bluetooth∗ Devic-
es” .
When a Bluetooth® device is currently
connected, a pop-up window is displayed.
To disconnect it, touch “Yes”.
2The following screen will be displayed
while searching for a Bluetooth
® de-
vice.
To cancel this function, touch “Cancel”.
∗: Bluetooth is a registered trademark of
Bluetooth SIG, Inc.
3Touch the device to be paired.
Connectable Bluetooth® devices will be
displayed in the list.
4The following screen will be displayed.
To cancel this function, touch “Cancel”.
5Confirm the PIN.
If the device supports SSP (Secure Sim-
ple Pairing)
Confirm the PIN displayed on the screen,
and then touch “Accept”.
If the device does not supports SSP (Se-
cure Simple Pairing)
Input the PIN displayed on the screen into
the device.
6The following screen will be displayed
when pairing is complete.
PAIRING A Bluetooth®
DEVICE
Up to 4 Bluetooth® devices can be
paired. A paired device can be con-
nected to any of its supported profiles
such as phone, music and/or internet.
CONNECTING FROM THE
SYSTEM
Page 205 of 228
205
1. SETUP OPERATION
8
SETUP
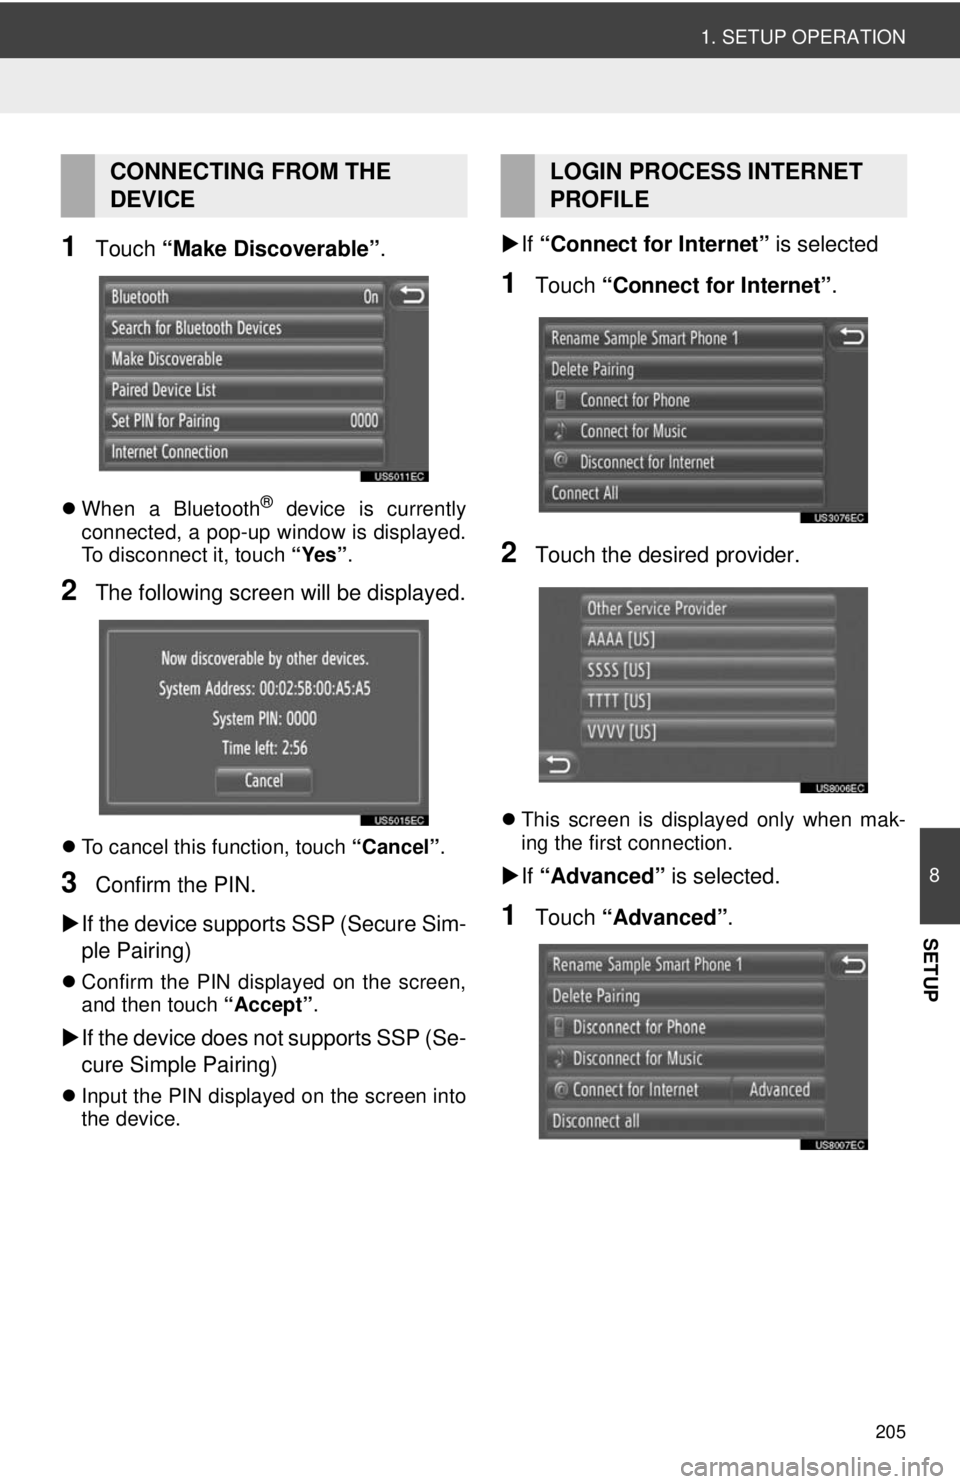
1Touch “Make Discoverable” .
When a Bluetooth® device is currently
connected, a pop-up window is displayed.
To disconnect it, touch “Yes”.
2The following screen will be displayed.
To cancel this function, touch “Cancel”.
3Confirm the PIN.
If the device supports SSP (Secure Sim-
ple Pairing)
Confirm the PIN displayed on the screen,
and then touch “Accept” .
If the device does not supports SSP (Se-
cure Simple Pairing)
Input the PIN displayed on the screen into
the device.
If “Connect for Internet” is selected
1Touch “Connect for Internet” .
2Touch the desired provider.
This screen is displayed only when mak-
ing the first connection.
If “Advanced” is selected.
1Touch “Advanced” .
CONNECTING FROM THE
DEVICELOGIN PROCESS INTERNET
PROFILE
Page 217 of 228
217
1. REAR VIEW MONITOR SYSTEM
9
REAR VIEW MONITOR SYSTEM
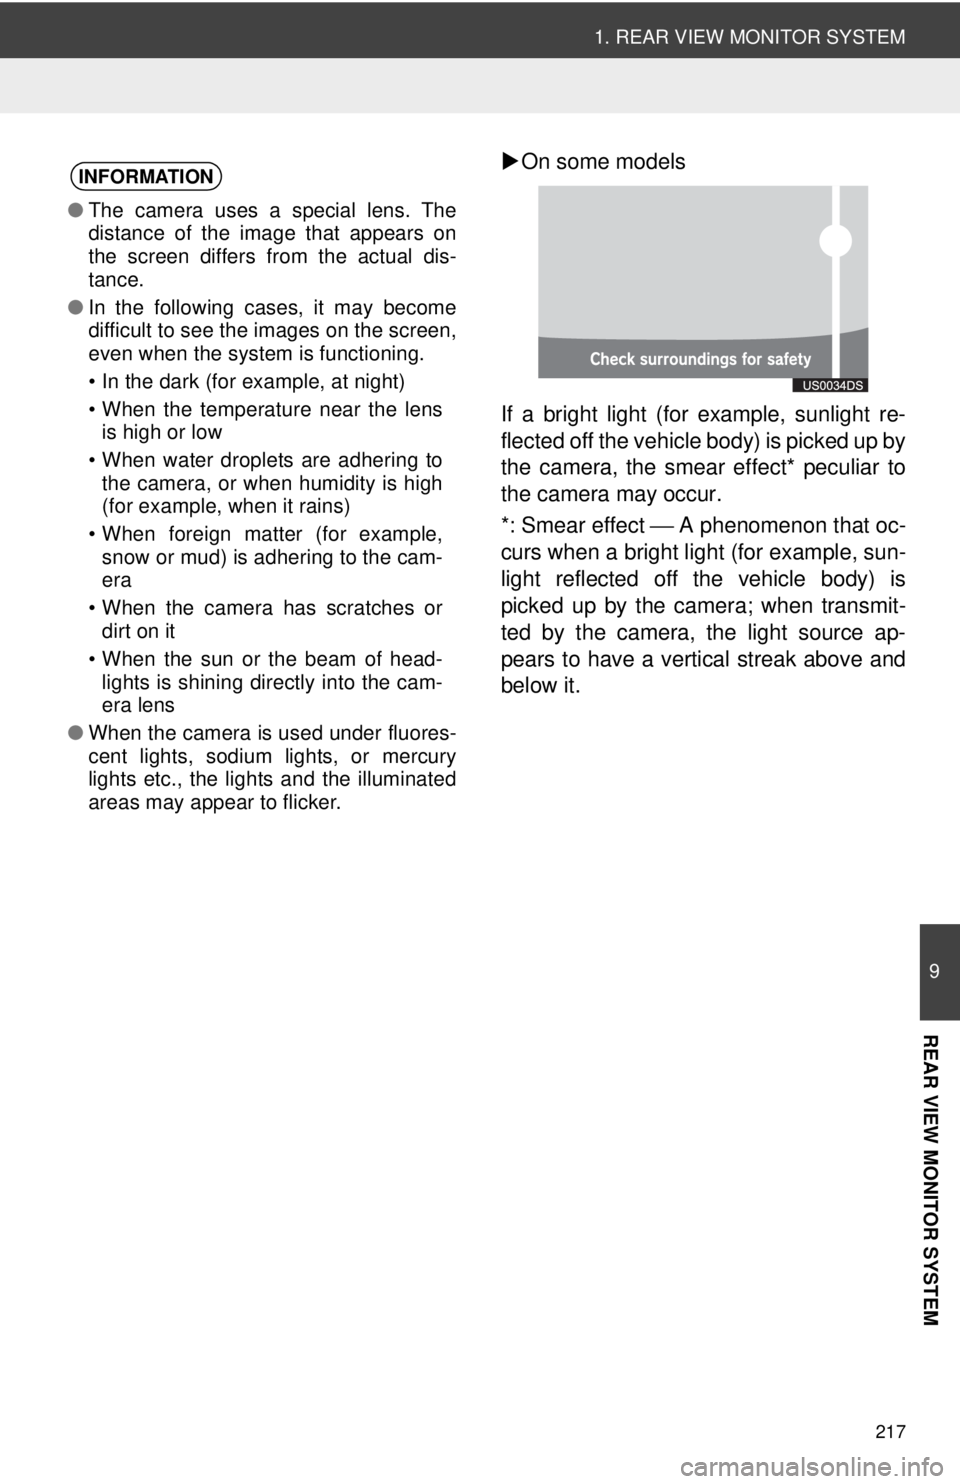
On some models
If a bright light (for example, sunlight re-
flected off the vehicle body) is picked up by
the camera, the smear effect* peculiar to
the camera may occur.
*: Smear effect ⎯ A phenomenon that oc-
curs when a bright light (for example, sun-
light reflected off the vehicle body) is
picked up by the camera; when transmit-
ted by the camera, the light source ap-
pears to have a vertical streak above and
below it.INFORMATION
● The camera uses a special lens. The
distance of the image that appears on
the screen differs from the actual dis-
tance.
● In the following cases, it may become
difficult to see the images on the screen,
even when the system is functioning.
• In the dark (for example, at night)
• When the temperature near the lens
is high or low
• When water droplets are adhering to the camera, or when humidity is high
(for example, when it rains)
• When foreign matter (for example, snow or mud) is adhering to the cam-
era
• When the camera has scratches or dirt on it
• When the sun or the beam of head- lights is shining directly into the cam-
era lens
● When the camera is used under fluores-
cent lights, sodium lights, or mercury
lights etc., the lights and the illuminated
areas may appear to flicker.