wheel TOYOTA PRIUS V 2013 Accessories, Audio & Navigation (in English)
[x] Cancel search | Manufacturer: TOYOTA, Model Year: 2013, Model line: PRIUS V, Model: TOYOTA PRIUS V 2013Pages: 131, PDF Size: 5.2 MB
Page 82 of 131
82
1. Bluetooth® HANDS-FREE SYSTEM OPERATION
5. RECEIVE ON THE Bluetooth® PHONE
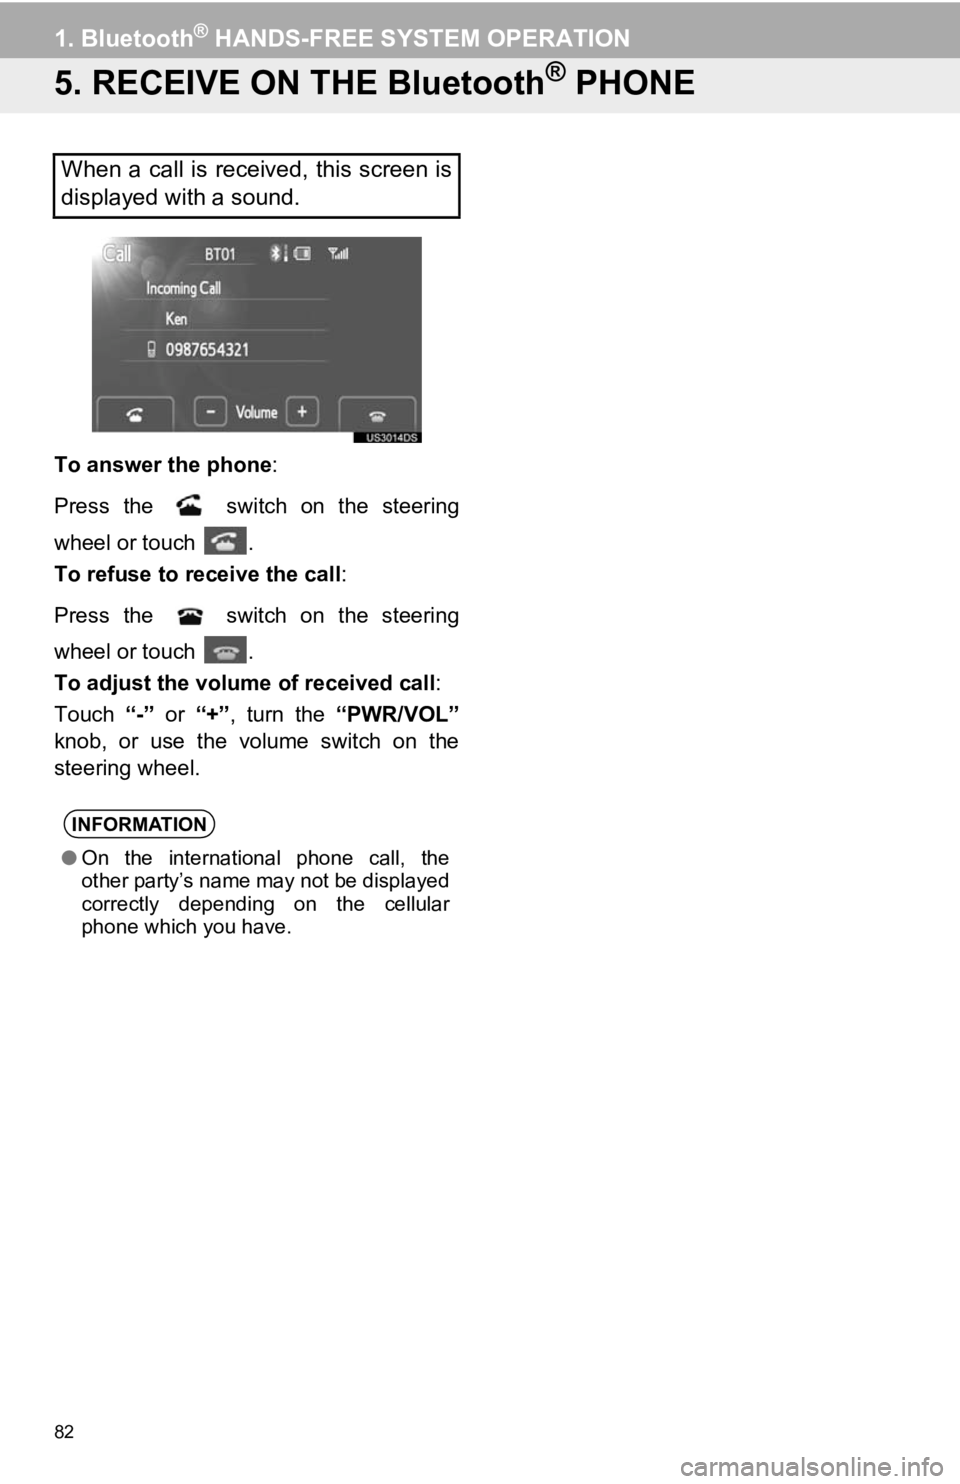
To answer the phone:
Press the switch on the steering
wheel or touch .
To refuse to receive the call :
Press the switch on the steering
wheel or touch .
To adjust the volume of received call :
Touch “-” or “+”, turn the “PWR/VOL”
knob, or use the volume switch on the
steering wheel.
When a call is received, this screen is
displayed with a sound.
INFORMATION
● On the international phone call, the
other party’s name may not be displayed
correctly depending on the cellular
phone which you have.
Page 83 of 131
83
1. Bluetooth® HANDS-FREE SYSTEM OPERATION
3
Bluetooth
® HANDS-FREE SYSTEM
6. TALK ON THE Bluetooth® PHONE
To adjust the volume of the other par-
ty’s voice: Touch “-” or “+”, turn the
“PWR/VOL” knob, or use the volume
switch on the steering wheel.
To hang up the phone : Press the
switch on the steering wheel or touch
.
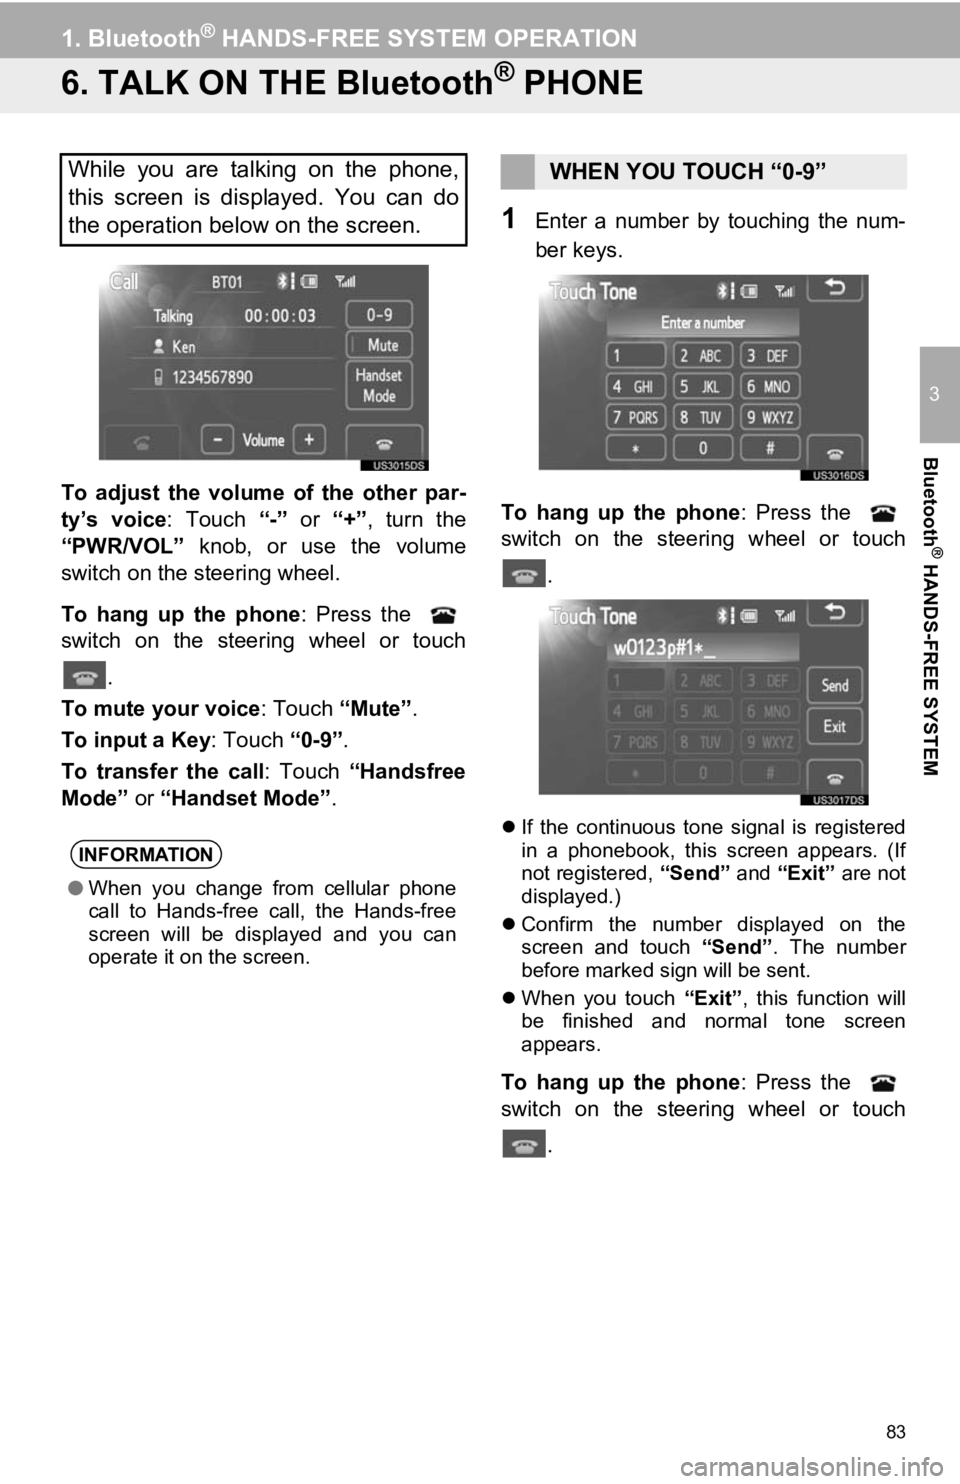
To mute your voice : Touch “Mute”.
To input a Key: Touch “0-9”.
To transfer the call : Touch “Handsfree
Mode” or “Handset Mode” .
1Enter a number by touching the num-
ber keys.
To hang up the phone : Press the
switch on the steering wheel or touch
.
If the continuous tone signal is registered
in a phonebook, this screen appears. (If
not registered, “Send” and “Exit” are not
displayed.)
Confirm the number displayed on the
screen and touch “Send”. The number
before marked sign will be sent.
When you touch “Exit”, this function will
be finished and normal tone screen
appears.
To hang up the phone : Press the
switch on the steering wheel or touch
.
While you are talking on the phone,
this screen is displayed. You can do
the operation below on the screen.
INFORMATION
●When you change from cellular phone
call to Hands-free call, the Hands-free
screen will be displayed and you can
operate it on the screen.
WHEN YOU TOUCH “0-9”
Page 84 of 131
84
1. Bluetooth® HANDS-FREE SYSTEM OPERATION
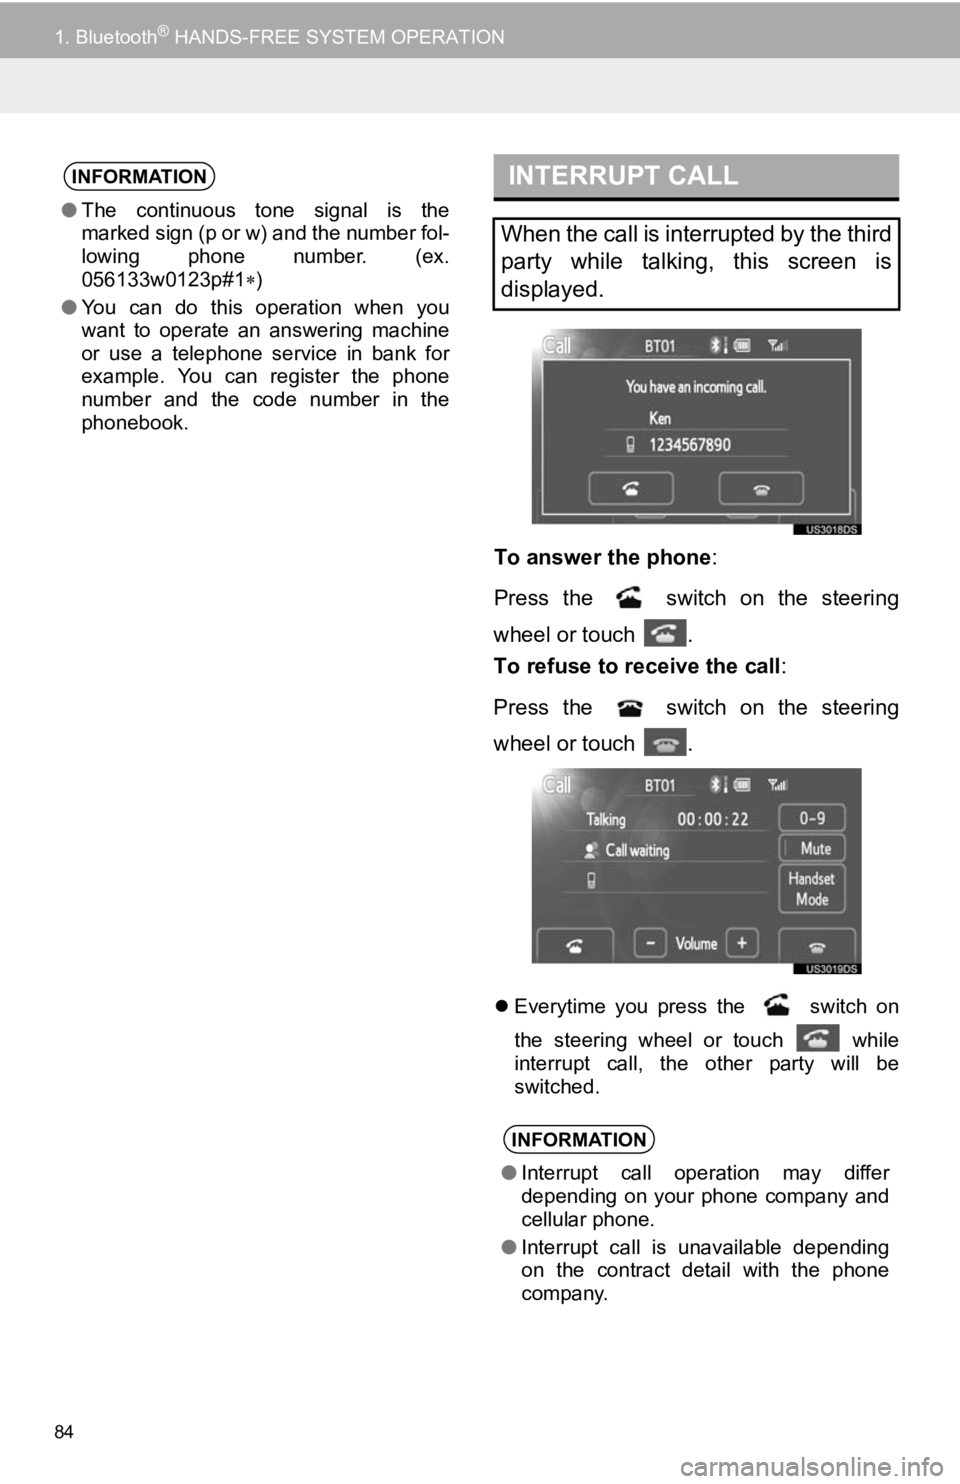
To answer the phone:
Press the switch on the steering
wheel or touch .
To refuse to receive the call :
Press the switch on the steering
wheel or touch .
Everytime you press the switch on
the steering wheel or touch
while
interrupt call, the other party will be
switched.
INFORMATION
● The continuous tone signal is the
marked sign (p or w) and the number fol-
lowing phone number. (ex.
056133w0123p#1 )
● You can do this operation when you
want to operate an answering machine
or use a telephone service in bank for
example. You can register the phone
number and the code number in the
phonebook.
INTERRUPT CALL
When the call is interrupted by the third
party while talking, this screen is
displayed.
INFORMATION
●Interrupt call operation may differ
depending on your phone company and
cellular phone.
● Interrupt call is unavailable depending
on the contract detail with the phone
company.
Page 109 of 131
109
1. SETUP OPERATION
5
SETUP
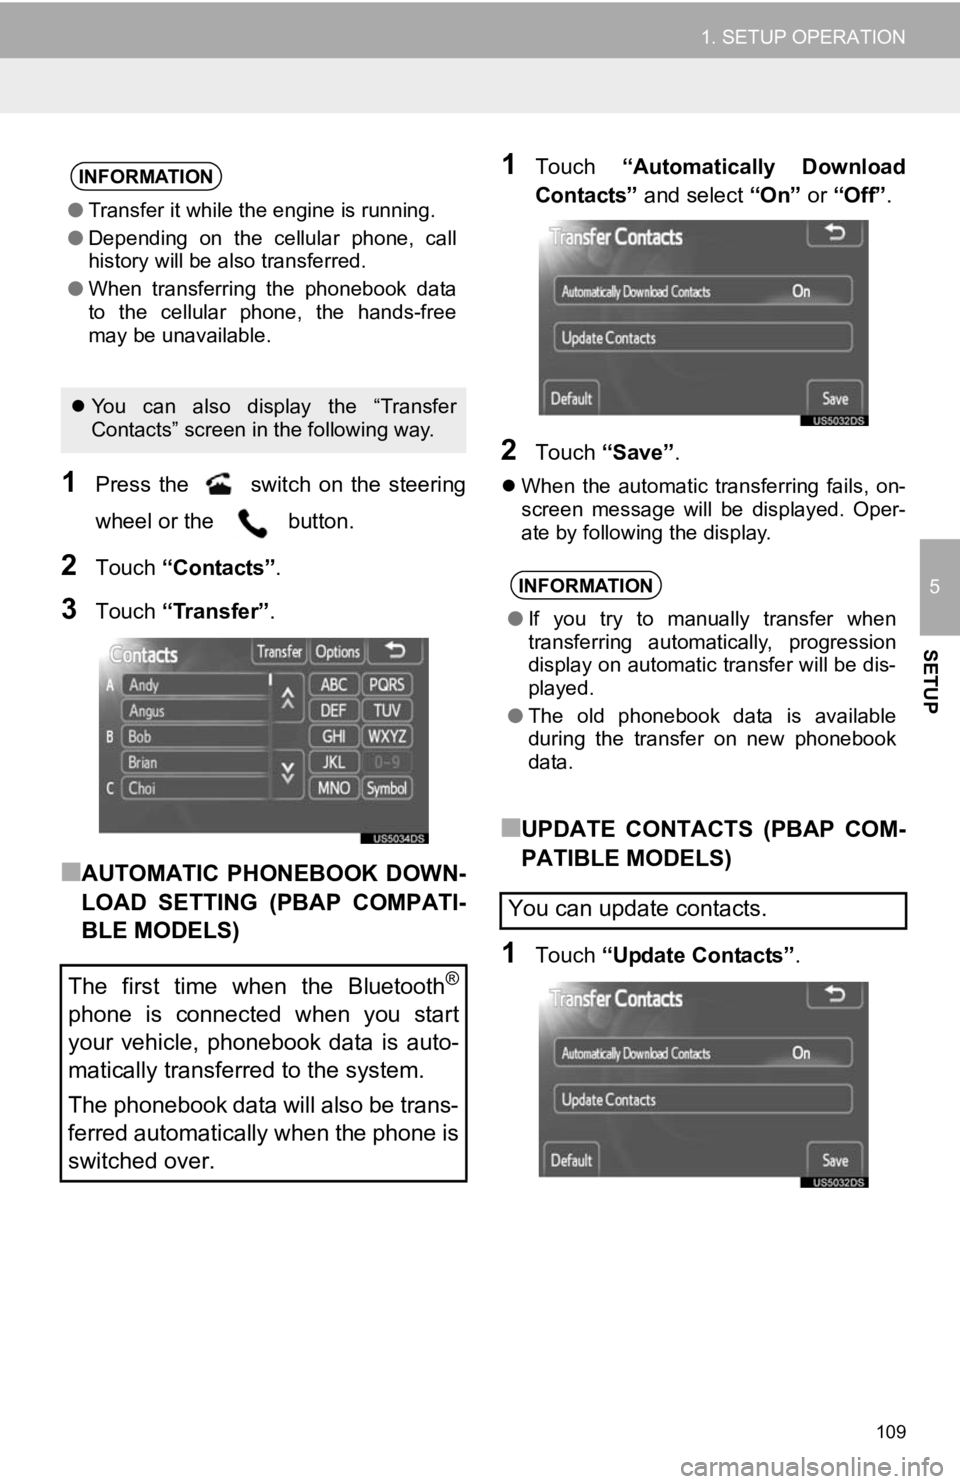
1Press the switch on the steering
wheel or the button.
2Touch “Contacts” .
3Touch “Transfer” .
■AUTOMATIC PHONEBOOK DOWN-
LOAD SETTING (PBAP COMPATI-
BLE MODELS)
1Touch “Automatically Download
Contacts” and select “On” or “Off” .
2Touch “Save” .
When the automatic transferring fails, on-
screen message will be displayed. Oper-
ate by following the display.
■UPDATE CONTACTS (PBAP COM-
PATIBLE MODELS)
1Touch “Update Contacts” .
INFORMATION
●Transfer it while the engine is running.
● Depending on the cellular phone, call
history will be also transferred.
● When transferring the phonebook data
to the cellular phone, the hands-free
may be unavailable.
You can also display the “Transfer
Contacts” screen in the following way.
The first time when the Bluetooth®
phone is connected when you start
your vehicle, phonebook data is auto-
matically transferred to the system.
The phonebook data will also be trans-
ferred automatically when the phone is
switched over.
INFORMATION
● If you try to manually transfer when
transferring automatically, progression
display on automatic transfer will be dis-
played.
● The old phonebook data is available
during the transfer on new phonebook
data.
You can update contacts.
Page 111 of 131
111
1. SETUP OPERATION
5
SETUP
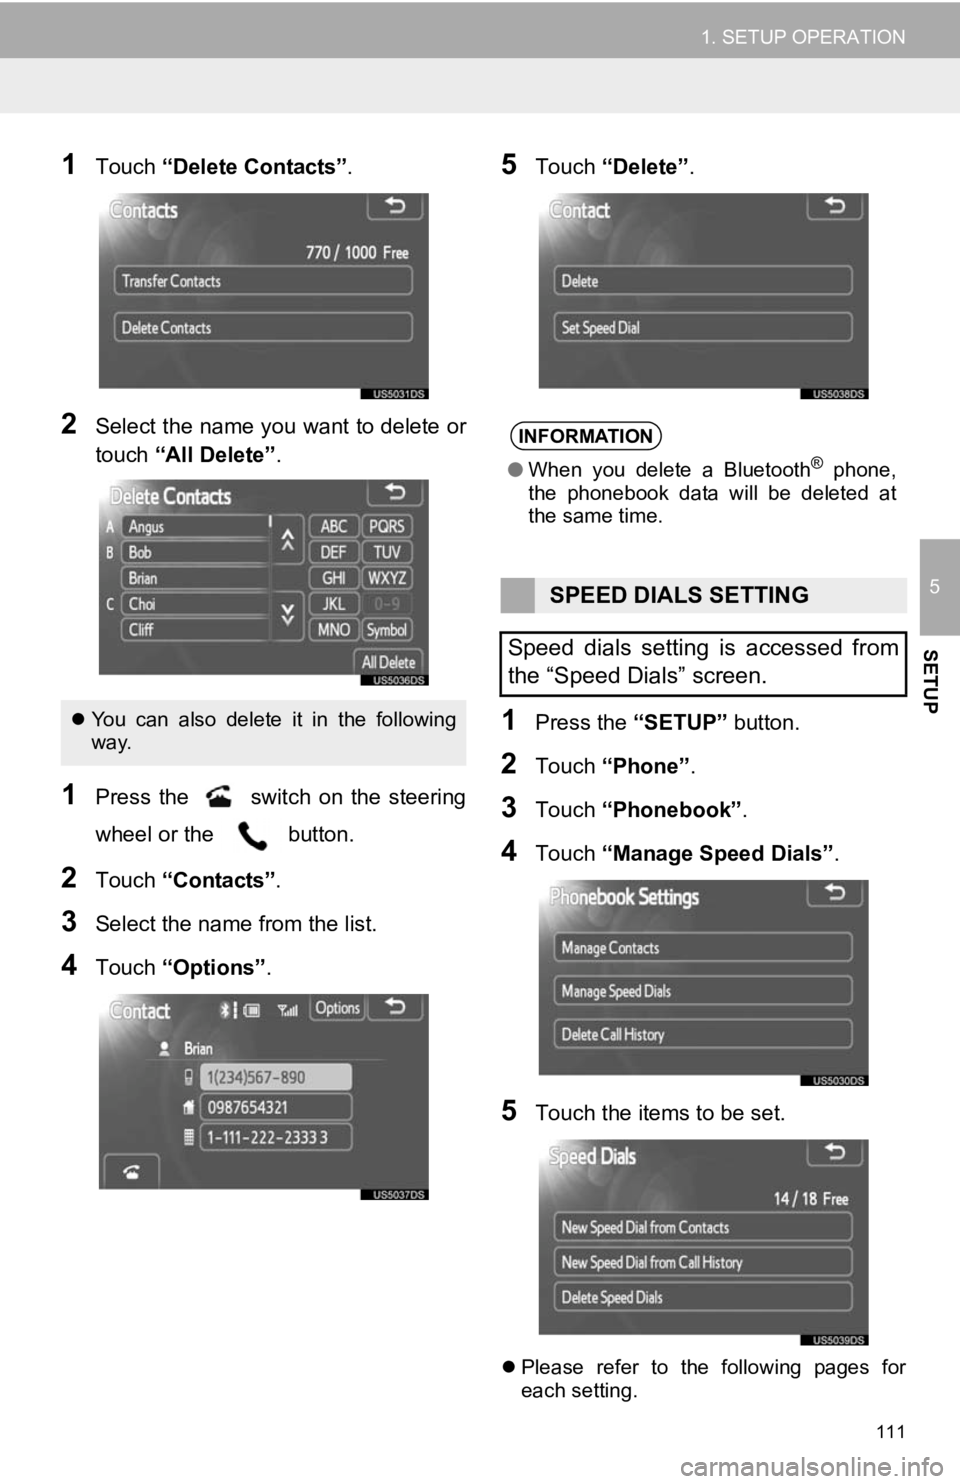
1Touch “Delete Contacts” .
2Select the name you want to delete or
touch “All Delete” .
1Press the switch on the steering
wheel or the button.
2Touch “Contacts” .
3Select the name from the list.
4Touch “Options”.
5Touch “Delete” .
1Press the “SETUP” button.
2Touch “Phone” .
3Touch “Phonebook” .
4Touch “Manage Speed Dials” .
5Touch the items to be set.
Please refer to the following pages for
each setting.
You can also delete it in the following
way.
INFORMATION
● When you delete a Bluetooth® phone,
the phonebook data will be deleted at
the same time.
SPEED DIALS SETTING
Speed dials setting is accessed from
the “Speed Dials” screen.
Page 112 of 131
112
1. SETUP OPERATION
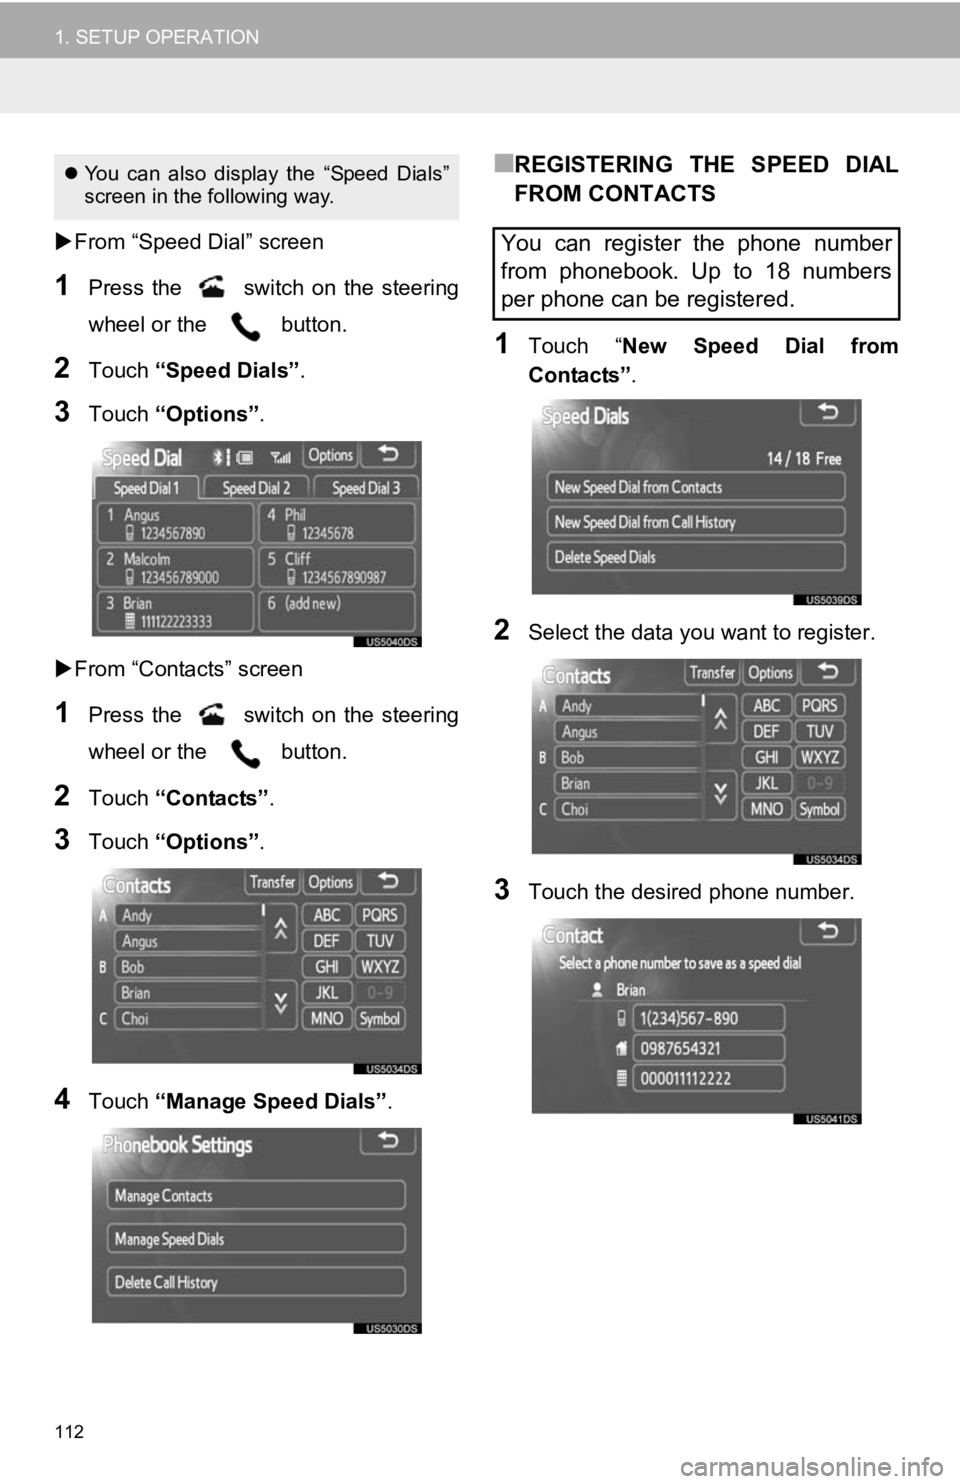
From “Speed Dial” screen
1Press the switch on the steering
wheel or the button.
2Touch “Speed Dials” .
3Touch “Options”.
From “Contacts” screen
1Press the switch on the steering
wheel or the button.
2Touch “Contacts” .
3Touch “Options”.
4Touch “Manage Speed Dials” .
■REGISTERING THE SPEED DIAL
FROM CONTACTS
1Touch “New Speed Dial from
Contacts” .
2Select the data you want to register.
3Touch the desired phone number.
You can also display the “Speed Dials”
screen in the following way.
You can register the phone number
from phonebook. Up to 18 numbers
per phone can be registered.
Page 113 of 131
113
1. SETUP OPERATION
5
SETUP
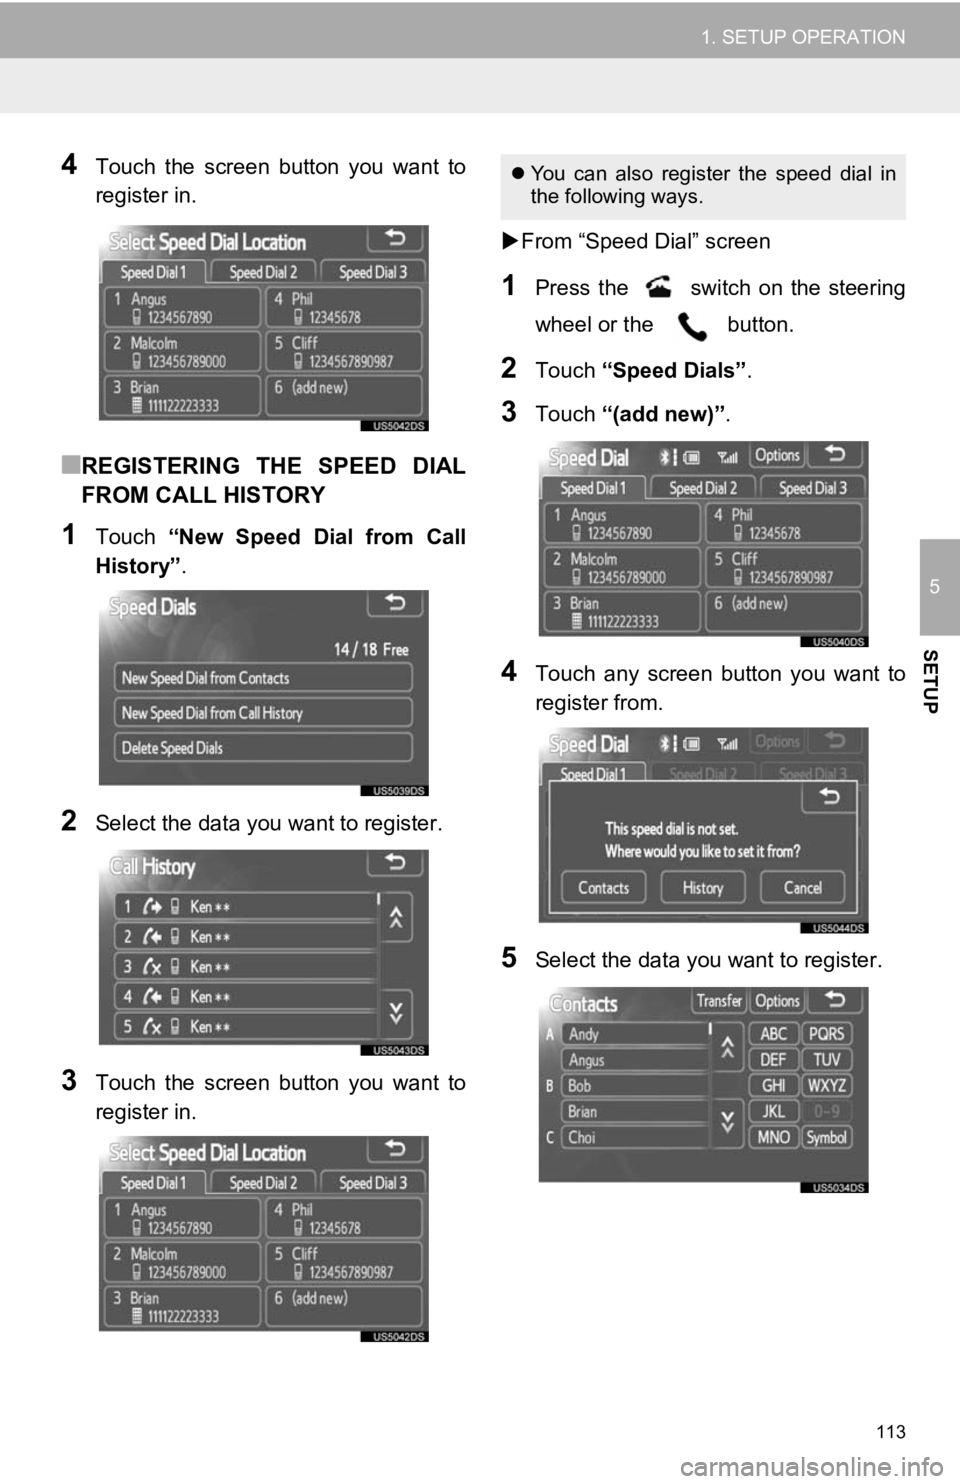
4Touch the screen button you want to
register in.
■REGISTERING THE SPEED DIAL
FROM CALL HISTORY
1Touch “New Speed Dial from Call
History” .
2Select the data you want to register.
3Touch the screen button you want to
register in.
From “Speed Dial” screen
1Press the switch on the steering
wheel or the button.
2Touch “Speed Dials” .
3Touch “(add new)” .
4Touch any screen button you want to
register from.
5Select the data you want to register.
You can also register the speed dial in
the following ways.
Page 114 of 131
114
1. SETUP OPERATION
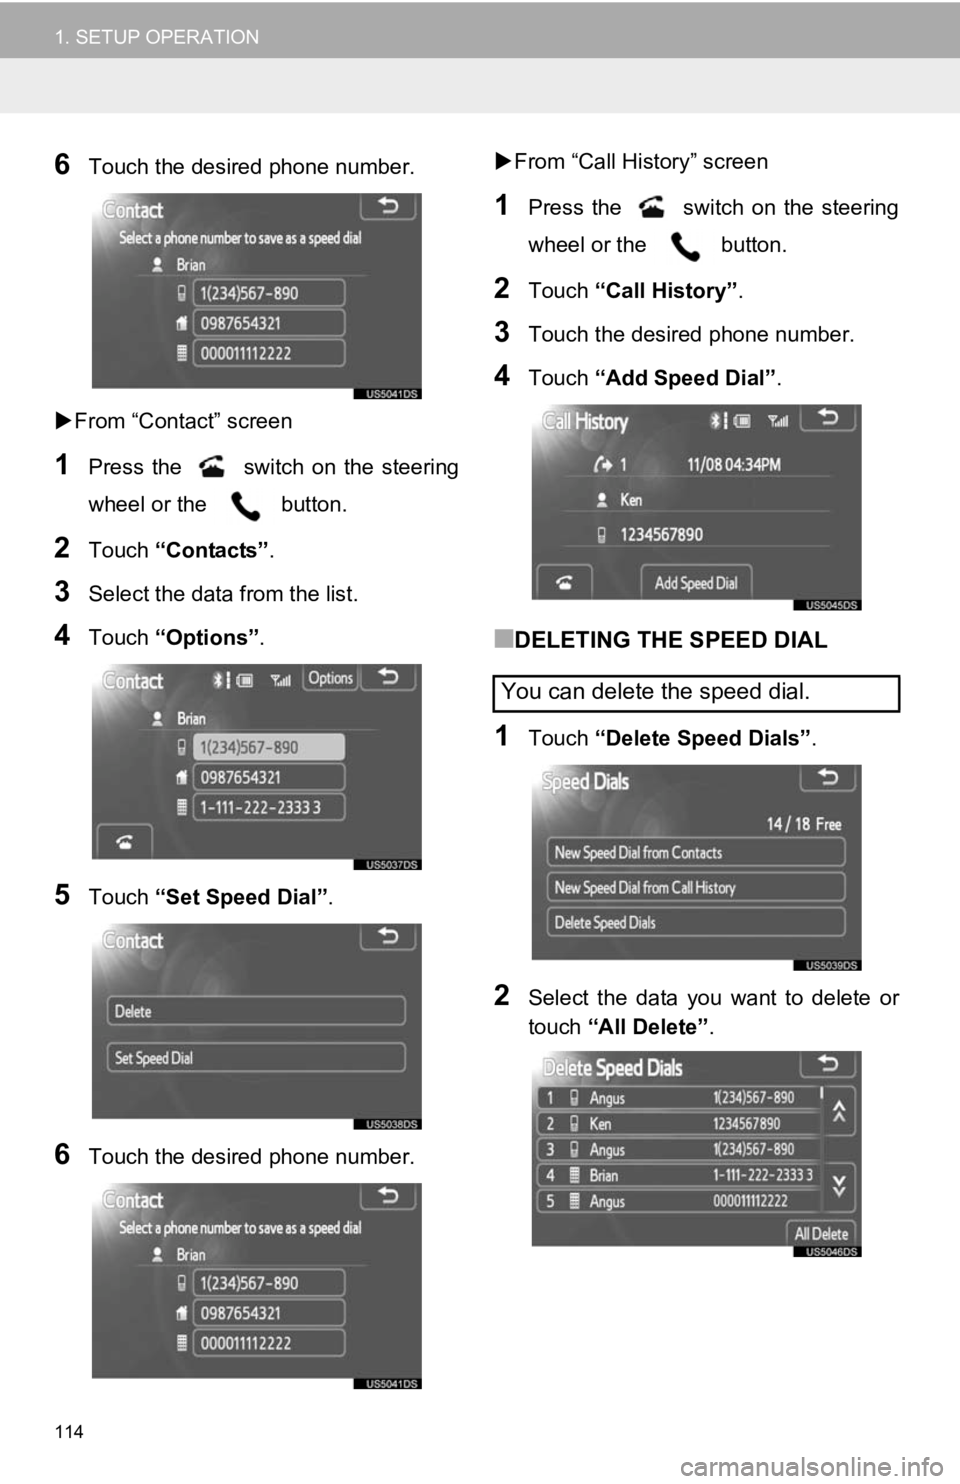
6Touch the desired phone number.
From “Contact” screen
1Press the switch on the steering
wheel or the button.
2Touch “Contacts” .
3Select the data from the list.
4Touch “Options”.
5Touch “Set Speed Dial” .
6Touch the desired phone number.
From “Call History” screen
1Press the switch on the steering
wheel or the button.
2Touch “Call History” .
3Touch the desired phone number.
4Touch “Add Speed Dial” .
■DELETING THE SPEED DIAL
1Touch “Delete Speed Dials” .
2Select the data you want to delete or
touch “All Delete” .
You can delete the speed dial.
Page 115 of 131
115
1. SETUP OPERATION
5
SETUP
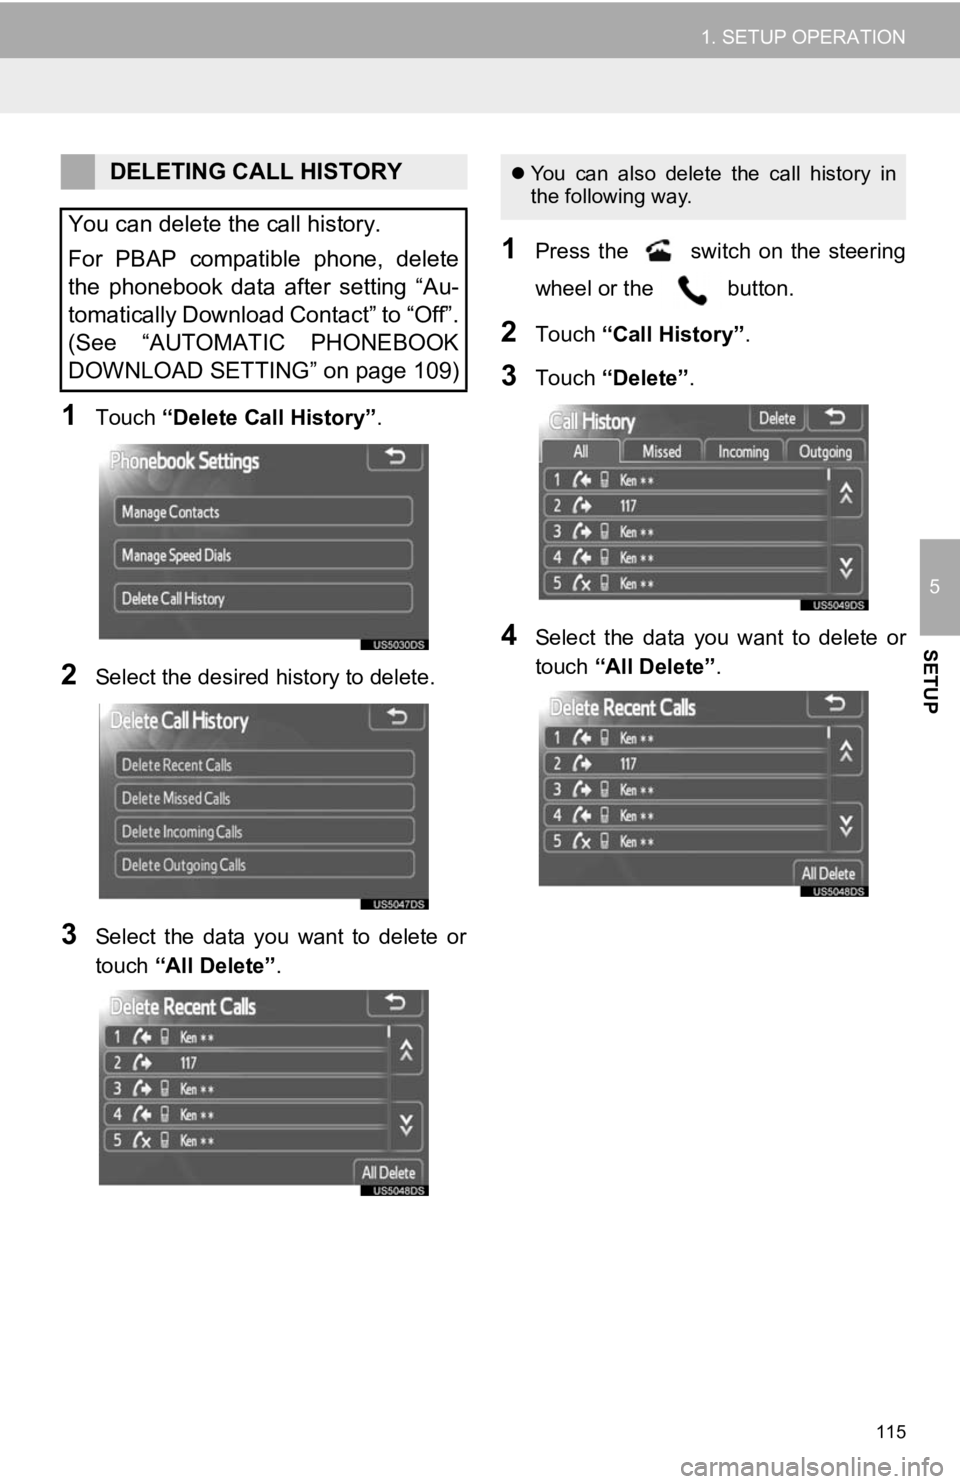
1Touch “Delete Call History” .
2Select the desired history to delete.
3Select the data you want to delete or
touch “All Delete” .
1Press the switch on the steering
wheel or the button.
2Touch “Call History” .
3Touch “Delete” .
4Select the data you want to delete or
touch “All Delete” .
DELETING CALL HISTORY
You can delete the call history.
For PBAP compatible phone, delete
the phonebook data after setting “Au-
tomatically Download Contact” to “Off”.
(See “AUTOMATIC PHONEBOOK
DOWNLOAD SETTING” on page 109) You can also delete the call history in
the following way.
Page 120 of 131
120
1. REAR VIEW MONITOR SYSTEM
1. REAR VIEW MONITOR SYSTEM OPERATION
1To display the rear view image on the
screen, the shift lever is in the “R” posi-
tion when the engine switch is in the
“ON” position.
If you move the shift lever out of the “R”
position, the screen returns to the previ-
ous screen.
The rear view monitor system assists
the driver by displaying an image of the
view behind the vehicle while backing
up.
The image is displayed in reverse on
the screen. This allows the image to
appear in the same manner as that of
the rear view mirror.CAUTION
●Never depend on the rear view monitor
system entirely when backing up.
Always make sure your intended path is
clear.
Use caution, just as you would when
backing up any vehicle.
● Never back up while looking only at the
screen. The image on the screen is dif-
ferent from actual conditions. Depicted
distances between objects and flat sur-
faces will differ from the actual dis-
tances. If you back up while looking only
at the screen, you may hit a vehicle, a
person or an object. When backing up,
be sure to check behind and all around
the vehicle visually and with mirrors
before proceeding.
● Do not use the system when the back
door, trunk or tailgate is not completely
closed.
● Use your own eyes to confirm the vehi-
cle’s surroundings, as the displayed
image may become faint or dark, and
moving images will be distorted, or not
entirely visible when the outside temper-
ature is low. When backing up, be sure
to check behind and all around the vehi-
cle visually and with mirror before pro-
ceeding.
● Do not use the system in the following
cases:
• On icy or slick road surfaces, or in
snow.
• When using tire chains or emergency tires.
• On an uneven road, such as a slope.
With rear view monitor guide lines (If
equipped)
● Always check the vehicle surrounding
area, because the guide lines are ancil-
lary lines.
● The guide lines are ancillary lines and
do not change even if the steering wheel
is turned.