audio TOYOTA PRIUS V 2013 Accessories, Audio & Navigation (in English)
[x] Cancel search | Manufacturer: TOYOTA, Model Year: 2013, Model line: PRIUS V, Model: TOYOTA PRIUS V 2013Pages: 131, PDF Size: 5.2 MB
Page 96 of 131
96
1. SETUP OPERATION
4. DISPLAY SETTINGS
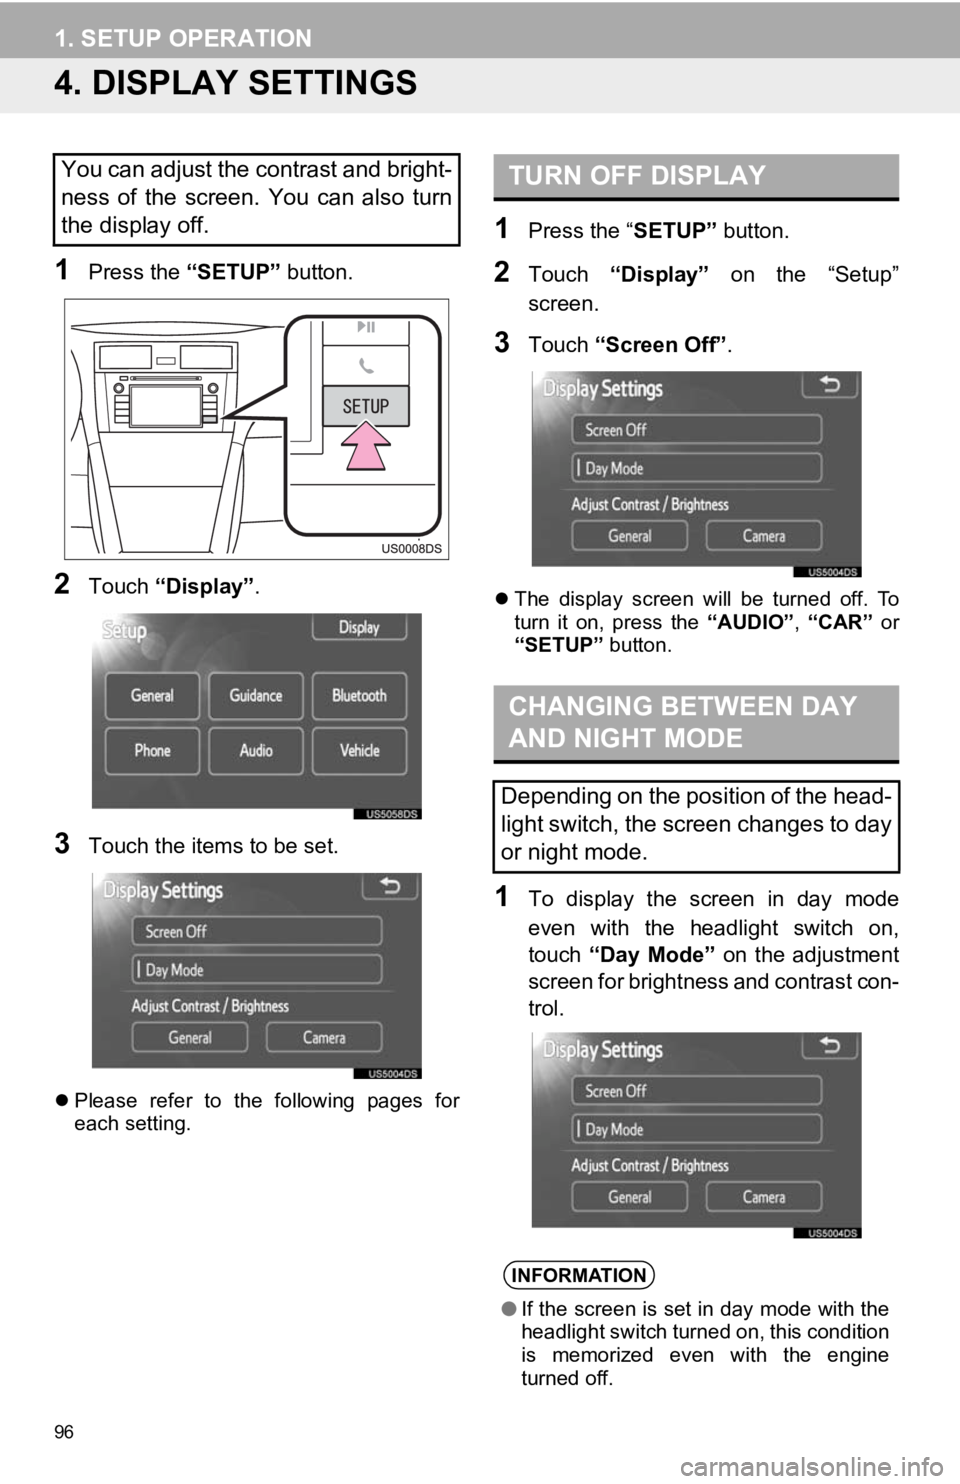
1Press the “SETUP” button.
2Touch “Display” .
3Touch the items to be set.
Please refer to the following pages for
each setting.
1Press the “ SETUP” button.
2Touch “Display” on the “Setup”
screen.
3Touch “Screen Off” .
The display screen will be turned off. To
turn it on, press the “AUDIO”, “CAR” or
“SETUP” button.
1To display the screen in day mode
even with the headlight switch on,
touch “Day Mode” on the adjustment
screen for brightness and contrast con-
trol.
You can adjust the contrast and bright-
ness of the screen. You can also turn
the display off.TURN OFF DISPLAY
CHANGING BETWEEN DAY
AND NIGHT MODE
Depending on the position of the head-
light switch, the screen changes to day
or night mode.
INFORMATION
● If the screen is set in day mode with the
headlight switch turned on, this condition
is memorized even with the engine
turned off.
Page 99 of 131
99
1. SETUP OPERATION
5
SETUP
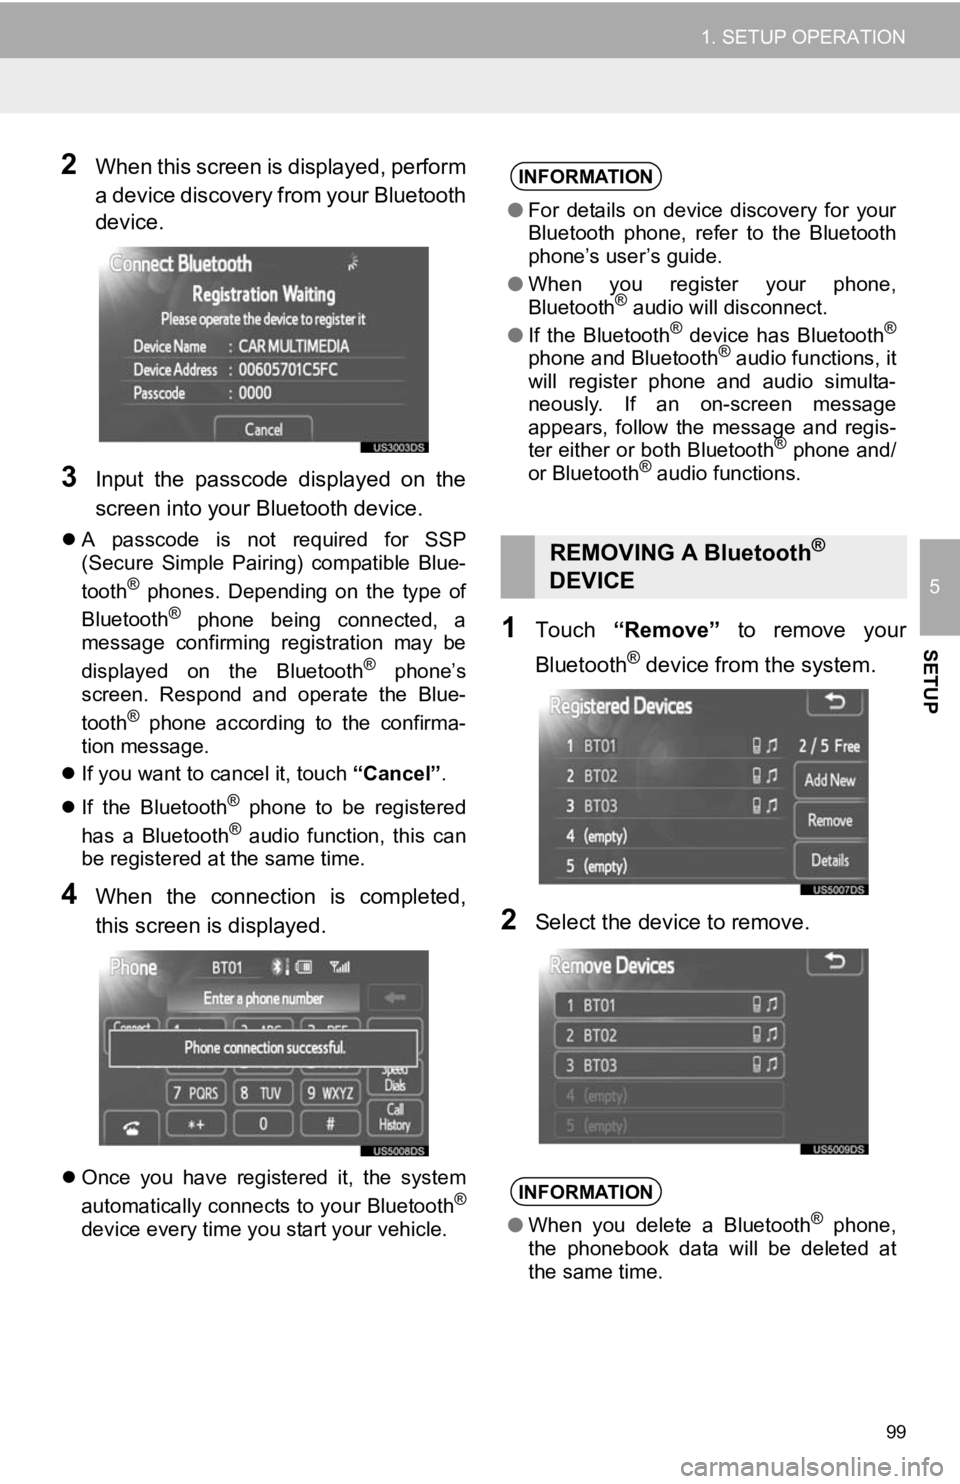
2When this screen is displayed, perform
a device discovery from your Bluetooth
device.
3Input the passcode displayed on the
screen into your Bluetooth device.
A passcode is not required for SSP
(Secure Simple Pairing) compatible Blue-
tooth
® phones. Depending on the type of
Bluetooth® phone being connected, a
message confirming registration may be
displayed on the Bluetooth
® phone’s
screen. Respond and operate the Blue-
tooth
® phone according to the confirma-
tion message.
If you want to cancel it, touch “Cancel”.
If the Bluetooth
® phone to be registered
has a Bluetooth® audio function, this can
be registered at the same time.
4When the connection is completed,
this screen is displayed.
Once you have registered it, the system
automatically connects to your Bluetooth®
device every time you start your vehicle.
1Touch “Remove” to remove your
Bluetooth
® device from the system.
2Select the device to remove.
INFORMATION
● For details on device discovery for your
Bluetooth phone, refer to the Bluetooth
phone’s user’s guide.
● When you register your phone,
Bluetooth
® audio will disconnect.
● If the Bluetooth® device has Bluetooth®
phone and Bluetooth® audio functions, it
will register phone and audio simulta-
neously. If an on-screen message
appears, follow the message and regis-
ter either or both Bluetooth
® phone and/
or Bluetooth® audio functions.
REMOVING A Bluetooth®
DEVICE
INFORMATION
● When you delete a Bluetooth® phone,
the phonebook data will be deleted at
the same time.
Page 100 of 131
100
1. SETUP OPERATION
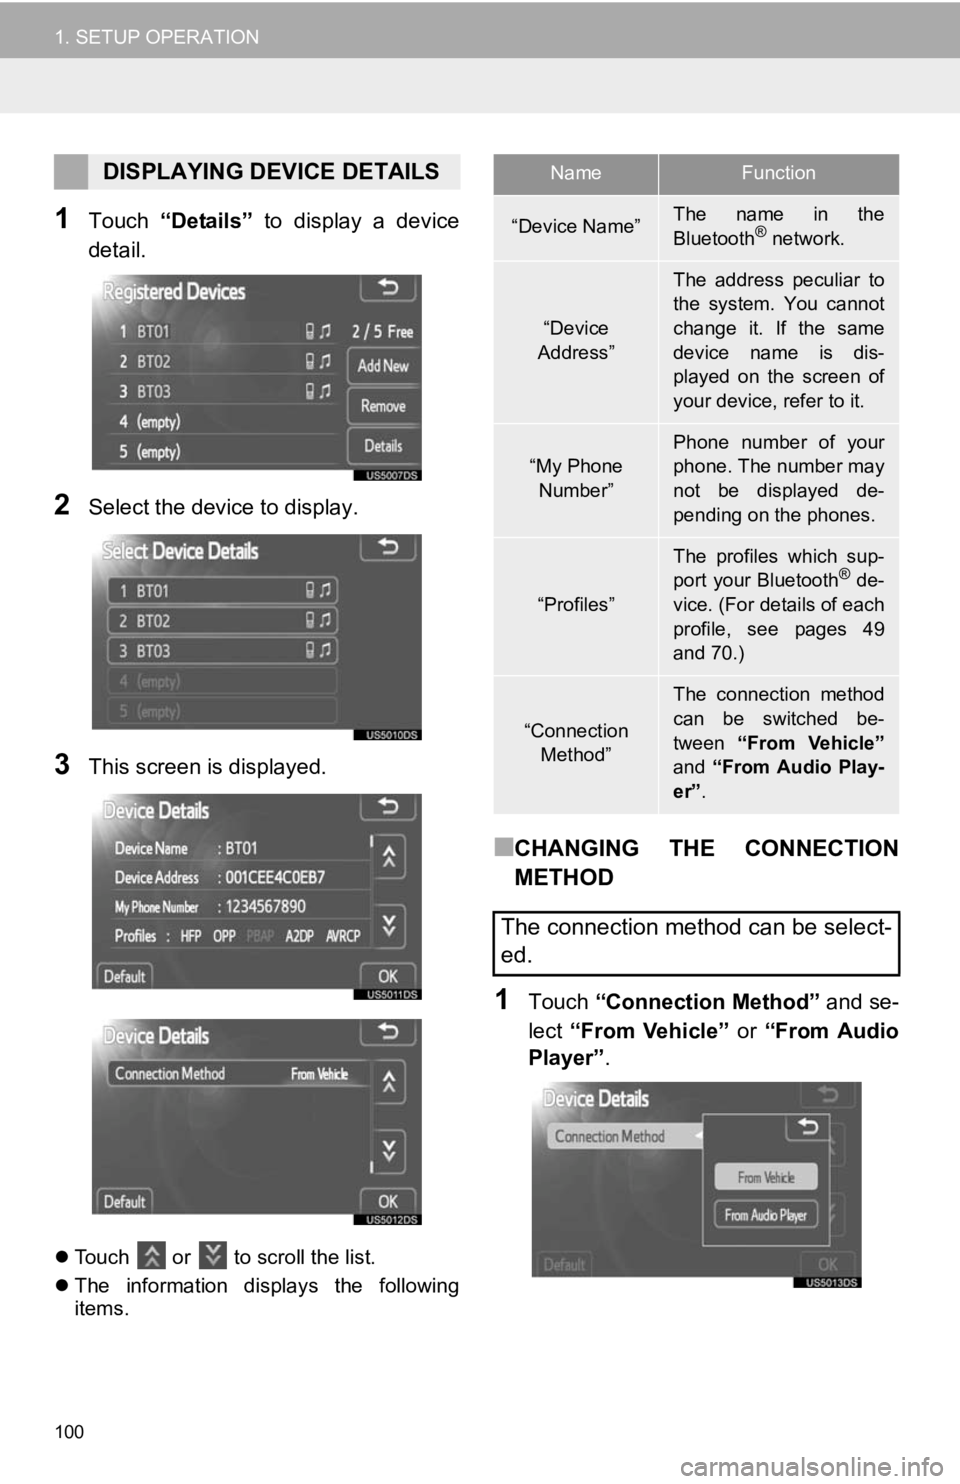
1Touch “Details” to display a device
detail.
2Select the device to display.
3This screen is displayed.
Touch or to scroll the list.
The information displays the following
items.
■CHANGING THE CONNECTION
METHOD
1Touch “Connection Method” and se-
lect “From Vehicle” or “From Audio
Player” .
DISPLAYING DEVICE DETAILSNameFunction
“Device Name”The name in the
Bluetooth® network.
“Device
Address”
The address peculiar to
the system. You cannot
change it. If the same
device name is dis-
played on the screen of
your device, refer to it.
“My Phone Number”Phone number of your
phone. The number may
not be displayed de-
pending on the phones.
“Profiles”
The profiles which sup-
port your Bluetooth® de-
vice. (For details of each
profile, see pages 49
and 70.)
“Connection
Method”
The connection method
can be switched be-
tween “From Vehicle”
and “From Audio Play-
er” .
The connection method can be select-
ed.
Page 101 of 131
101
1. SETUP OPERATION
5
SETUP
2Touch “OK”.
“From Vehicle” : Connect the audio sys-
tem to the portable audio player.
“From Audio Player” : Connect the porta-
ble audio player to the audio system.
■INITIALIZING THE Bluetooth®
SETTINGS
1Touch “Default”.
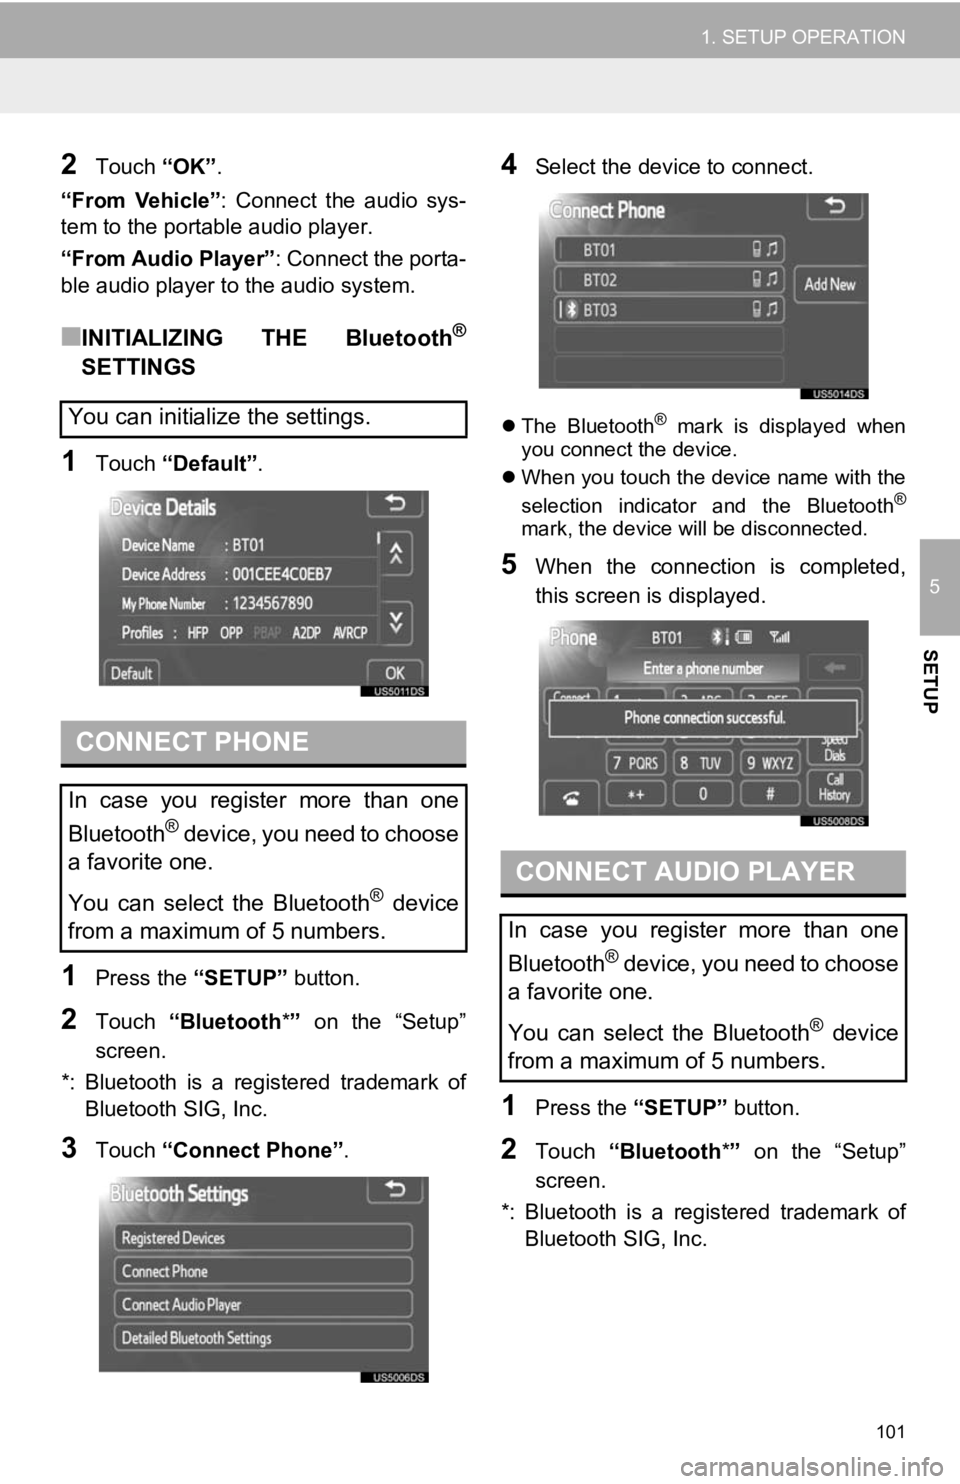
1Press the “SETUP” button.
2Touch “Bluetooth *” on the “Setup”
screen.
*: Bluetooth is a registered trademark of Bluetooth SIG, Inc.
3Touch “Connect Phone” .
4Select the device to connect.
The Bluetooth® mark is displayed when
you connect the device.
When you touch the device name with the
selection indicator and the Bluetooth
®
mark, the device will be disconnected.
5When the connection is completed,
this screen is displayed.
1Press the “SETUP” button.
2Touch “Bluetooth *” on the “Setup”
screen.
*: Bluetooth is a registered trademark of Bluetooth SIG, Inc.
You can initialize the settings.
CONNECT PHONE
In case you register more than one
Bluetooth
® device, you need to choose
a favorite one.
You can select the Bluetooth
® device
from a maximum of 5 numbers.
CONNECT AUDIO PLAYER
In case you register more than one
Bluetooth
® device, you need to choose
a favorite one.
You can select the Bluetooth
® device
from a maximum of 5 numbers.
Page 102 of 131
102
1. SETUP OPERATION
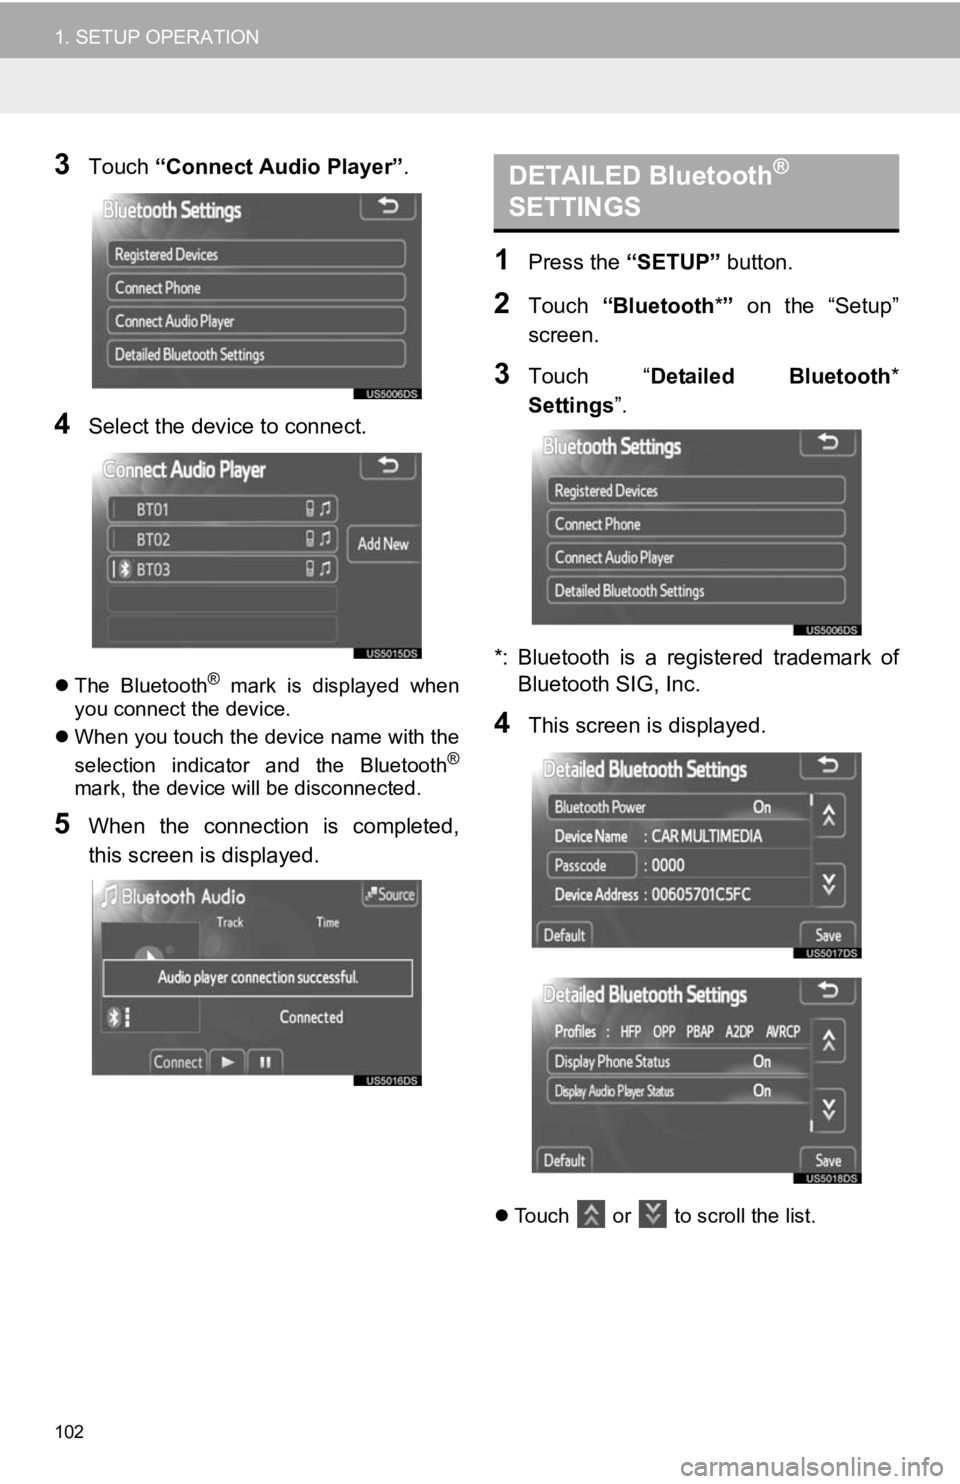
3Touch “Connect Audio Player” .
4Select the device to connect.
The Bluetooth® mark is displayed when
you connect the device.
When you touch the device name with the
selection indicator and the Bluetooth
®
mark, the device will be disconnected.
5When the connection is completed,
this screen is displayed.
1Press the “SETUP” button.
2Touch “Bluetooth *” on the “Setup”
screen.
3Touch “ Detailed Bluetooth *
Settings ”.
*: Bluetooth is a registered trademark of Bluetooth SIG, Inc.
4This screen is displayed.
Touch or to scroll the list.
DETAILED Bluetooth®
SETTINGS
Page 103 of 131
103
1. SETUP OPERATION
5
SETUP
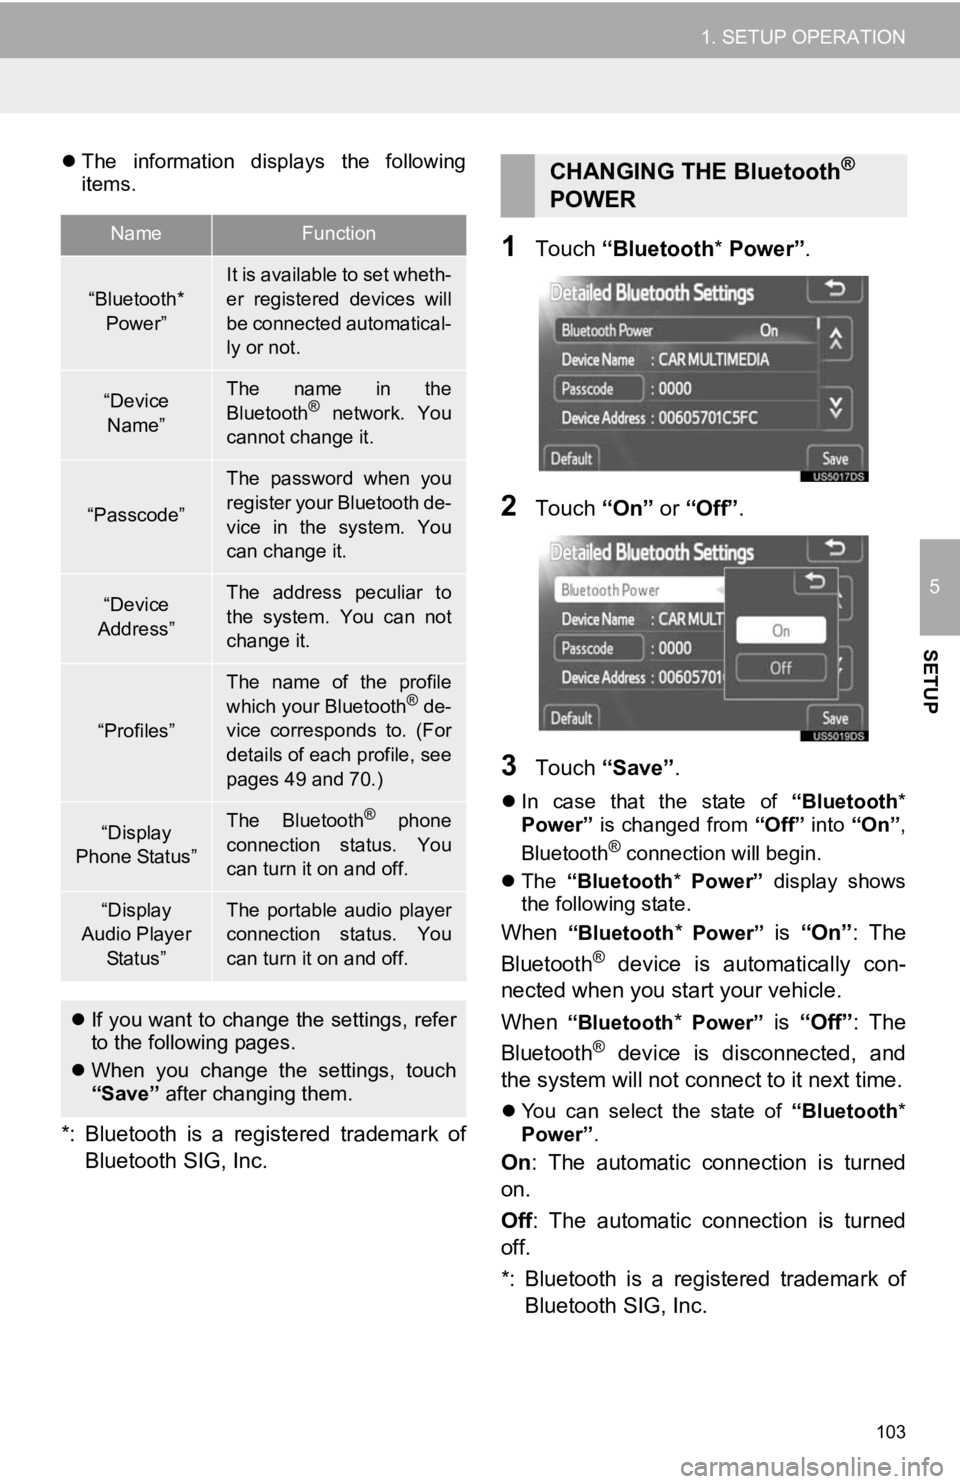
The information displays the following
items.
*: Bluetooth is a registered trademark of
Bluetooth SIG, Inc.
1Touch “Bluetooth * Power” .
2Touch “On” or “Off” .
3Touch “Save” .
In case that the state of “Bluetooth*
Power” is changed from “Off” into “On”,
Bluetooth
® connection will begin.
The “Bluetooth* Power” display shows
the following state.
When “Bluetooth* Power” is “On” : The
Bluetooth® device is automatically con-
nected when you start your vehicle.
When
“Bluetooth* Power” is “Off”: The
Bluetooth® device is disconnected, and
the system will not connect to it next time.
You can select the state of “Bluetooth*
Power” .
On: The automatic connection is turned
on.
Off : The automatic connection is turned
off.
*: Bluetooth is a registered trademark of Bluetooth SIG, Inc.
NameFunction
“Bluetooth*
Power”It is available to set wheth-
er registered devices will
be connected automatical-
ly or not.
“Device Name”The name in the
Bluetooth® network. You
cannot change it.
“Passcode”
The password when you
register your Bluetooth de-
vice in the system. You
can change it.
“Device
Address”The address peculiar to
the system. You can not
change it.
“Profiles”
The name of the profile
which your Bluetooth® de-
vice corresponds to. (For
details of each profile, see
pages 49 and 70.)
“Display
Phone Status”The Bluetooth® phone
connection status. You
can turn it on and off.
“Display
Audio Player
Status”The portable audio player
connection status. You
can turn it on and off.
If you want to change the settings, refer
to the following pages.
When you change the settings, touch
“Save” after changing them.
CHANGING THE Bluetooth®
POWER
Page 104 of 131
104
1. SETUP OPERATION
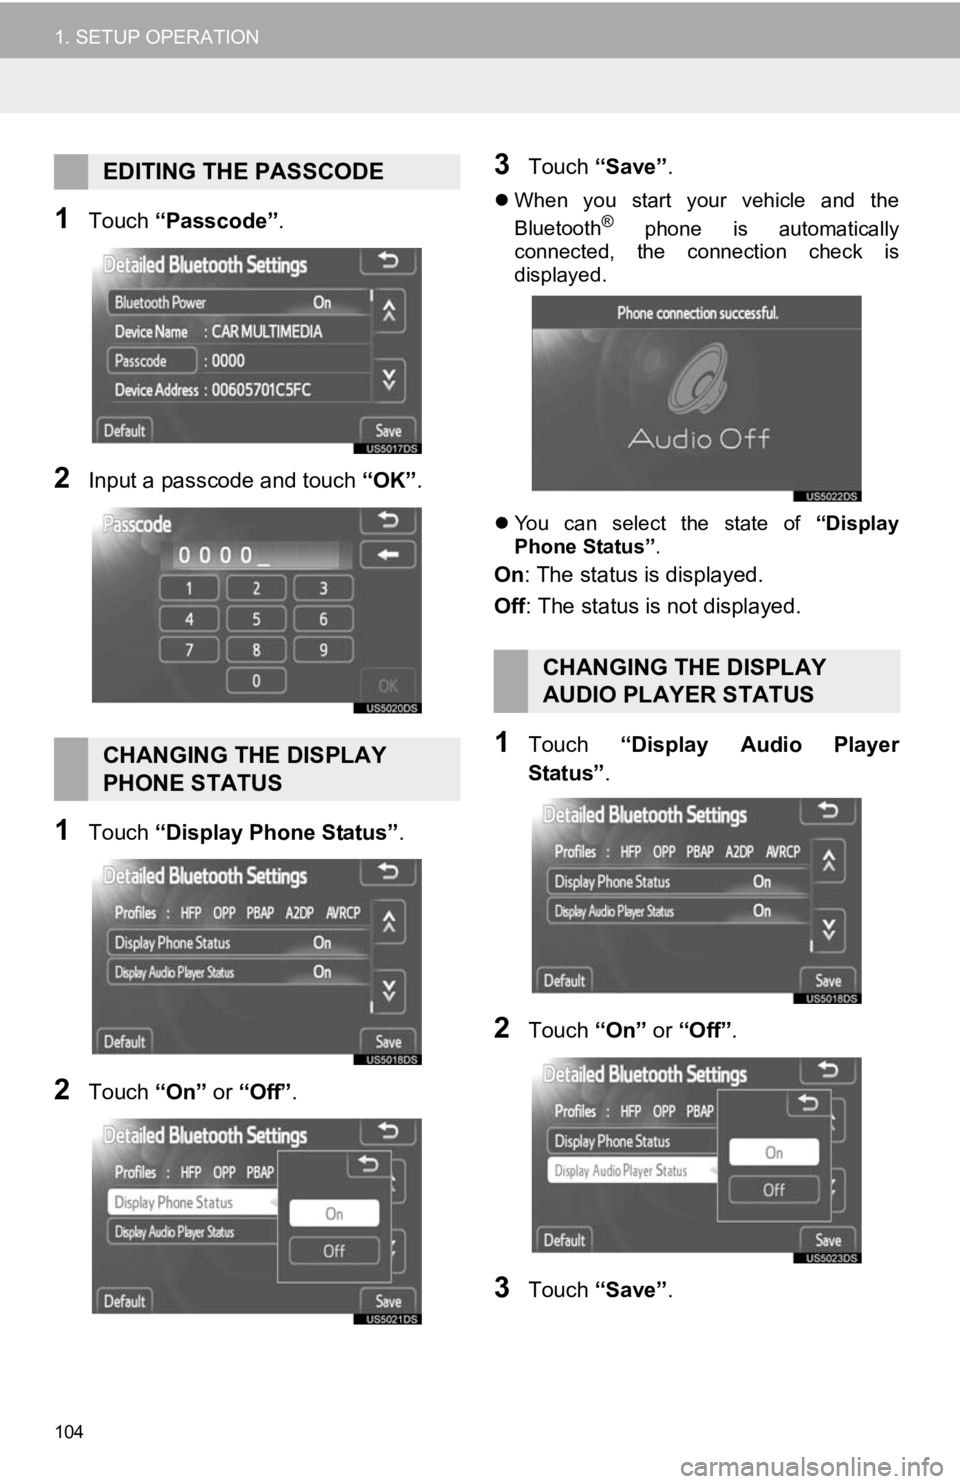
1Touch “Passcode” .
2Input a passcode and touch “OK”.
1Touch “Display Phone Status” .
2Touch “On” or “Off” .
3Touch “Save” .
When you start your vehicle and the
Bluetooth® phone is automatically
connected, the connection check is
displayed.
You can select the state of “Display
Phone Status” .
On: The status is displayed.
Off: The status is not displayed.
1Touch “Display Audio Player
Status” .
2Touch “On” or “Off” .
3Touch “Save” .
EDITING THE PASSCODE
CHANGING THE DISPLAY
PHONE STATUS
CHANGING THE DISPLAY
AUDIO PLAYER STATUS
Page 105 of 131
105
1. SETUP OPERATION
5
SETUP
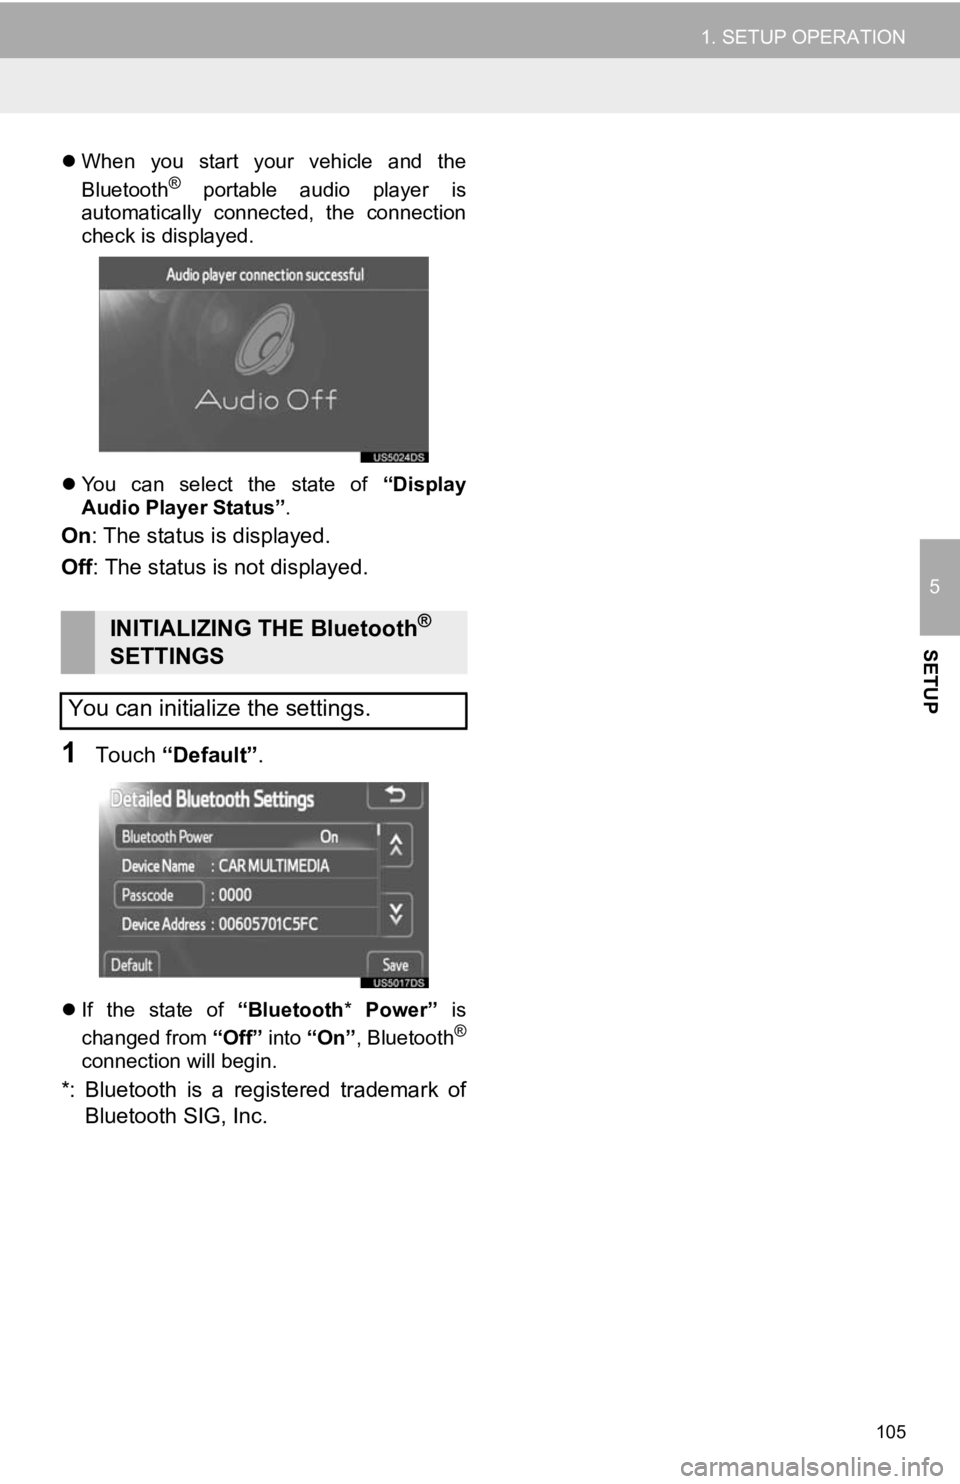
When you start your vehicle and the
Bluetooth® portable audio player is
automatically connected, the connection
check is displayed.
You can select the state of “Display
Audio Player Status” .
On: The status is displayed.
Off : The status is not displayed.
1Touch “Default” .
If the state of “Bluetooth* Power” is
changed from “Off” into “On”, Bluetooth®
connection will begin.
*: Bluetooth is a registered trademark of
Bluetooth SIG, Inc.
INITIALIZING THE Bluetooth®
SETTINGS
You can initialize the settings.
Page 110 of 131
110
1. SETUP OPERATION
2Transfer the phonebook data to the
system using the Bluetooth
® phone.
Depending on the type of cellular phone,
OBEX authentication may be required
when transferring phonebook data. Enter
“1234” into the Bluetooth
® phone.
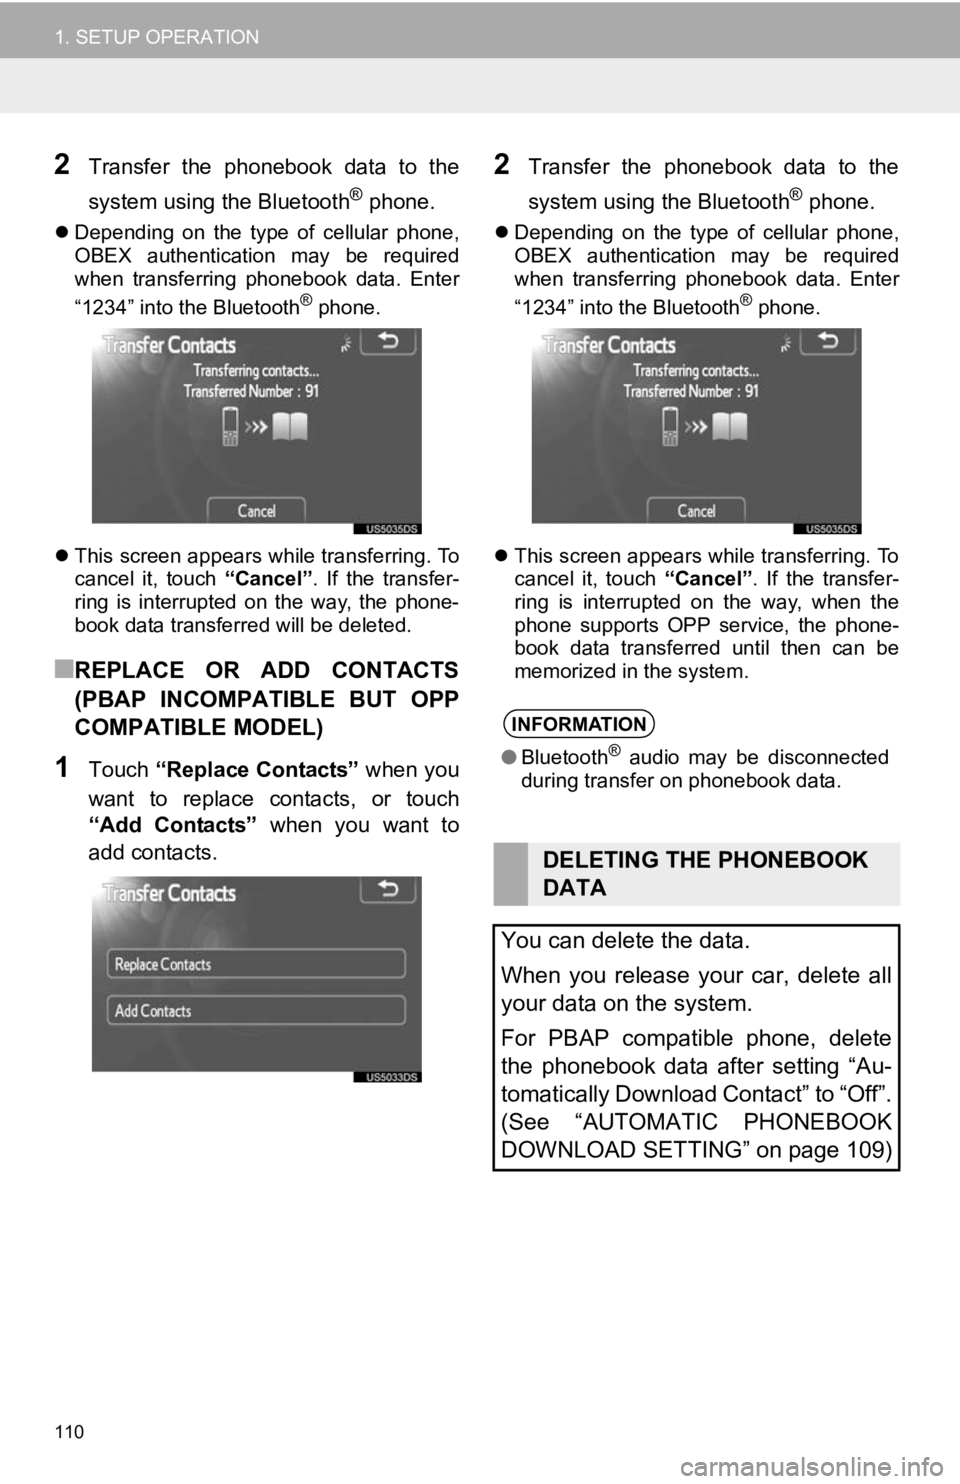
This screen appears while transferring. To
cancel it, touch “Cancel”. If the transfer-
ring is interrupted on the way, the phone-
book data transferred will be deleted.
■REPLACE OR ADD CONTACTS
(PBAP INCOMPATIBLE BUT OPP
COMPATIBLE MODEL)
1Touch “Replace Contacts” when you
want to replace contacts, or touch
“Add Contacts” when you want to
add contacts.
2Transfer the phonebook data to the
system using the Bluetooth
® phone.
Depending on the type of cellular phone,
OBEX authentication may be required
when transferring phonebook data. Enter
“1234” into the Bluetooth
® phone.
This screen appears while transferring. To
cancel it, touch “Cancel”. If the transfer-
ring is interrupted on the way, when the
phone supports OPP service, the phone-
book data transferred until then can be
memorized in the system.
INFORMATION
● Bluetooth® audio may be disconnected
during transfer on phonebook data.
DELETING THE PHONEBOOK
DATA
You can delete the data.
When you release your car, delete all
your data on the system.
For PBAP compatible phone, delete
the phonebook data after setting “Au-
tomatically Download Contact” to “Off”.
(See “AUTOMATIC PHONEBOOK
DOWNLOAD SETTING” on page 109)
Page 116 of 131
116
1. SETUP OPERATION
7. AUDIO SETTINGS (WITH Premium Display Audio SYSTEM)
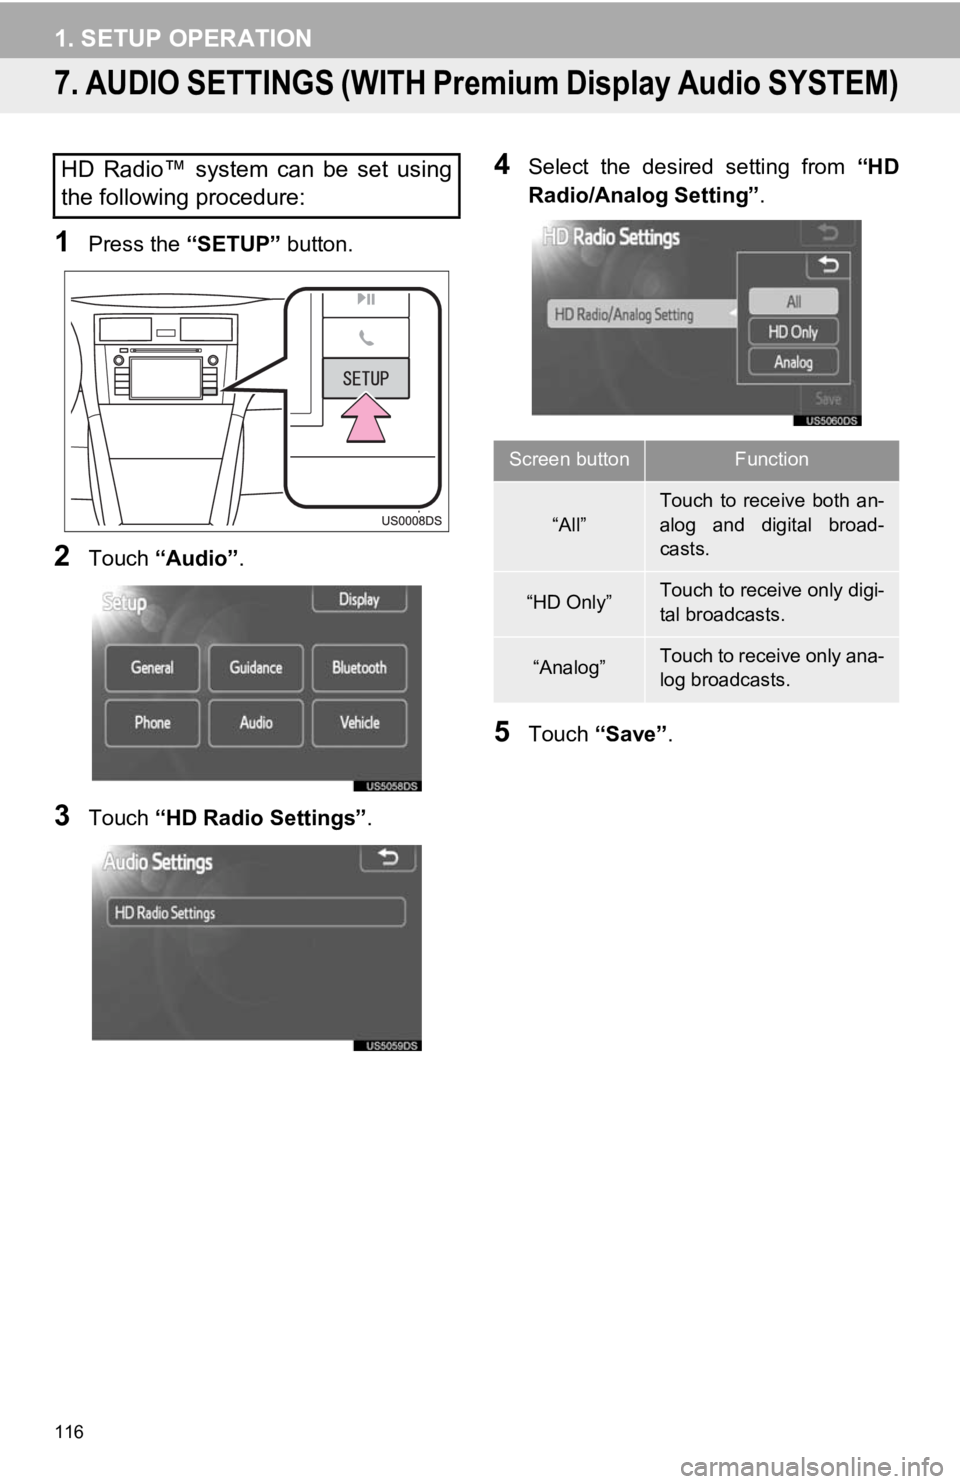
1Press the “SETUP” button.
2Touch “Audio” .
3Touch “HD Radio Settings” .
4Select the desired setting from “HD
Radio/Analog Setting” .
5Touch “Save” .
HD Radio™ system can be set using
the following procedure:
Screen buttonFunction
“All”
Touch to receive both an-
alog and digital broad-
casts.
“HD Only”Touch to receive only digi-
tal broadcasts.
“Analog”Touch to receive only ana-
log broadcasts.