service indicator TOYOTA PROACE 2020 (in English) User Guide
[x] Cancel search | Manufacturer: TOYOTA, Model Year: 2020, Model line: PROACE, Model: TOYOTA PROACE 2020Pages: 430, PDF Size: 48.01 MB
Page 34 of 430
34
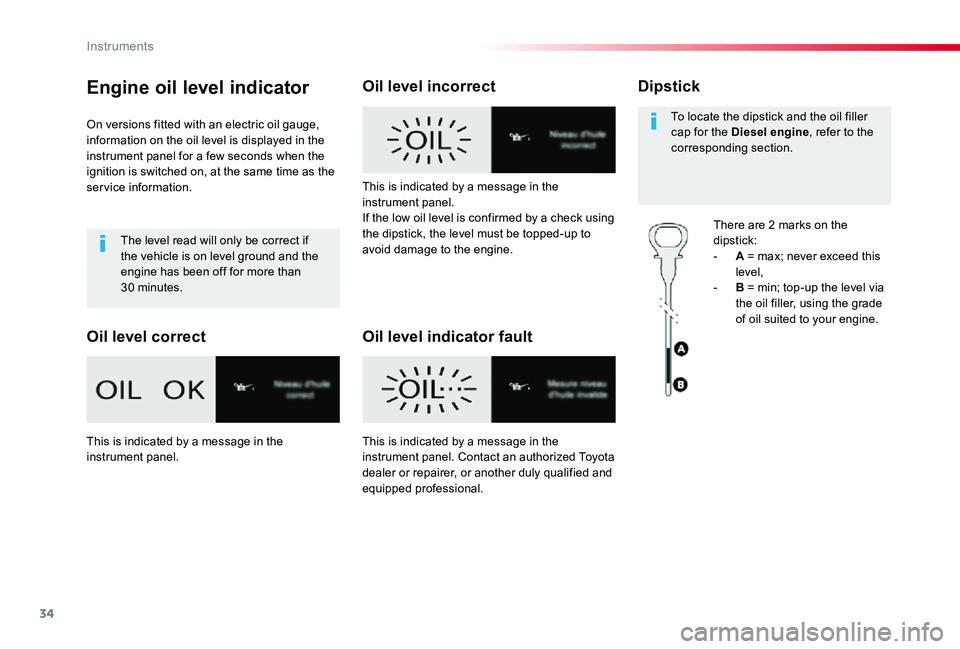
Engine oil level indicator
On versions fitted with an electric oil gauge, information on the oil level is displayed in the instrument panel for a few seconds when the ignition is switched on, at the same time as the service information.
The level read will only be correct if the vehicle is on level ground and the engine has been off for more than 30 minutes.
Oil level correct
Oil level incorrect
Oil level indicator fault
Dipstick
There are 2 marks on the dipstick:- A = max; never exceed this level,- B = min; top-up the level via the oil filler, using the grade of oil suited to your engine.
To locate the dipstick and the oil filler cap for the Diesel engine, refer to the corresponding section.
This is indicated by a message in the instrument panel.If the low oil level is confirmed by a check using the dipstick, the level must be topped-up to avoid damage to the engine.
This is indicated by a message in the
instrument panel.
This is indicated by a message in the
instrument panel. Contact an authorized Toyota dealer or repairer, or another duly qualified and equipped professional.
Instruments
Page 50 of 430
50
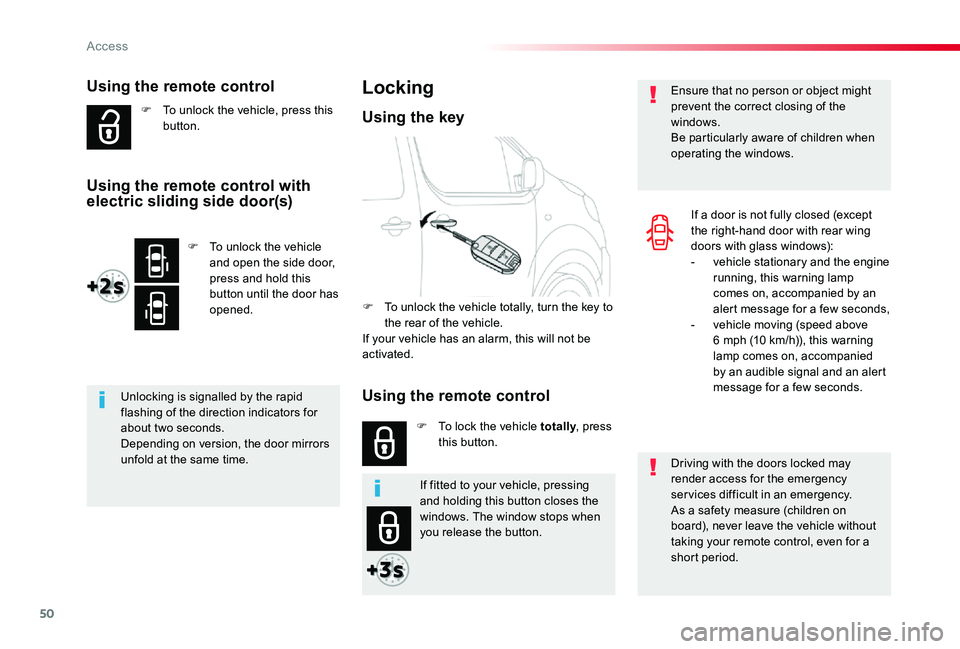
Using the remote control
F To unlock the vehicle, press this button.
Unlocking is signalled by the rapid flashing of the direction indicators for about two seconds.Depending on version, the door mirrors
unfold at the same time.Driving with the doors locked may render access for the emergency services difficult in an emergency.As a safety measure (children on board), never leave the vehicle without taking your remote control, even for a short period.
Ensure that no person or object might prevent the correct closing of the windows.Be particularly aware of children when operating the windows.
Locking
F To unlock the vehicle totally, turn the key to the rear of the vehicle.If your vehicle has an alarm, this will not be activated.
F To lock the vehicle totally, press this button.
Using the key
If a door is not fully closed (except the right-hand door with rear wing doors with glass windows):- vehicle stationary and the engine running, this warning lamp comes on, accompanied by an alert message for a few seconds,- vehicle moving (speed above 6 mph (10 km/h)), this warning lamp comes on, accompanied by an audible signal and an alert message for a few seconds.
If fitted to your vehicle, pressing and holding this button closes the windows. The window stops when you release the button.
F To unlock the vehicle and open the side door, press and hold this button until the door has opened.
Using the remote control with electric sliding side door(s)
Using the remote control
Access
Page 58 of 430
58
Driving with the doors locked may make access to the passenger compartment by the emergency services more difficult in the event of an emergency.As a safety measure (children on board), never leave the vehicle without your remote control, even for a short period.
If your vehicle is not fitted with an alarm, locking is signalled by the fixed illumination of the direction indicators for about two seconds.Depending on version, the door mirrors fold at the same time.
If one of the doors remains open, the central locking does not take place.If the vehicle is inadvertently unlocked, it will automatically lock itself again after about thirty seconds, if no door is opened.And if fitted to your vehicle, the alarm is reactivated (with volumetric monitoring, even if you had deactivated it).
If fitted to your vehicle, pressing and holding this button allows the windows to be closed. The window stops when you release the button.
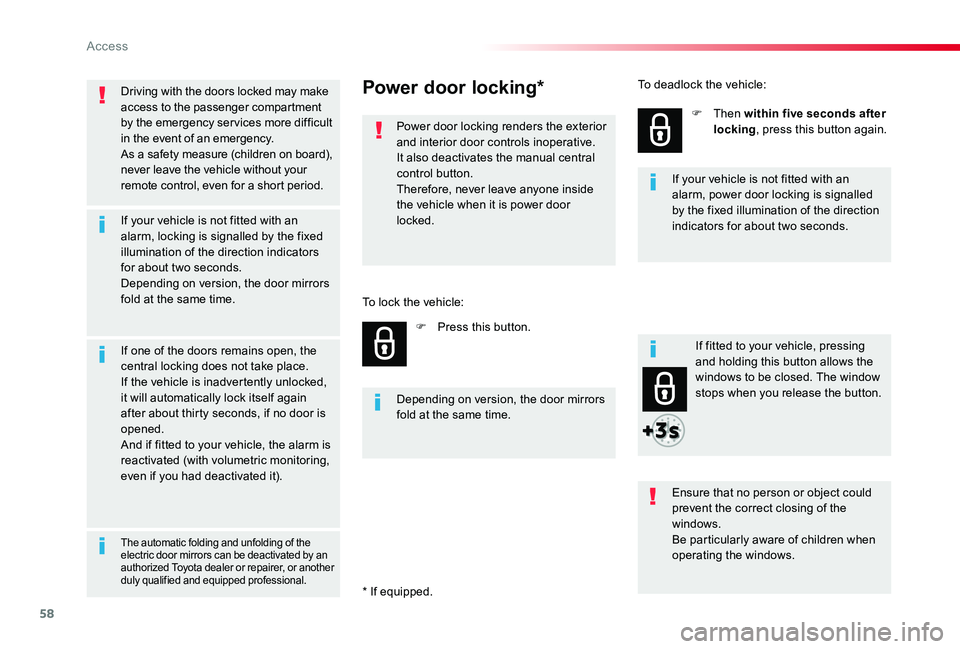
Power door locking*
Power door locking renders the exterior and interior door controls inoperative.It also deactivates the manual central control button.Therefore, never leave anyone inside the vehicle when it is power door locked.
F Press this button.
F Then within five seconds after locking, press this button again.
Ensure that no person or object could prevent the correct closing of the windows.Be particularly aware of children when
operating the windows.
Depending on version, the door mirrors fold at the same time.
The automatic folding and unfolding of the electric door mirrors can be deactivated by an authorized Toyota dealer or repairer, or another duly qualified and equipped professional.
If your vehicle is not fitted with an alarm, power door locking is signalled by the fixed illumination of the direction indicators for about two seconds.
To lock the vehicle:
To deadlock the vehicle:
* If equipped.
Access
Page 65 of 430
65
Driving with the doors locked may render access for the emergency services difficult in an emergency.
If your vehicle is not fitted with an alarm, locking is confirmed by fixed illumination of the direction indicators for about two seconds.Depending on version, the door mirrors fold at the same time.
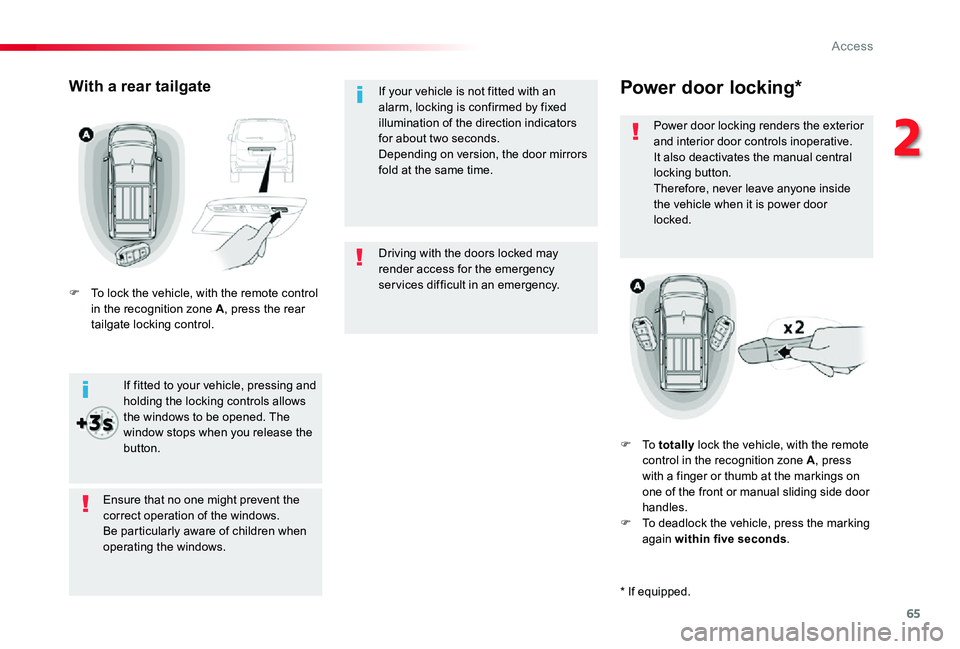
Power door locking*
Power door locking renders the exterior and interior door controls inoperative.It also deactivates the manual central locking button.Therefore, never leave anyone inside the vehicle when it is power door locked.
F To totally lock the vehicle, with the remote control in the recognition zone A, press with a finger or thumb at the markings on one of the front or manual sliding side door handles.F To deadlock the vehicle, press the marking again within five seconds.
Ensure that no one might prevent the correct operation of the windows.Be particularly aware of children when operating the windows.
If fitted to your vehicle, pressing and holding the locking controls allows the windows to be opened. The window stops when you release the button.
With a rear tailgate
F To lock the vehicle, with the remote control in the recognition zone A, press the rear tailgate locking control.
* If equipped.
2
Access
Page 72 of 430
72
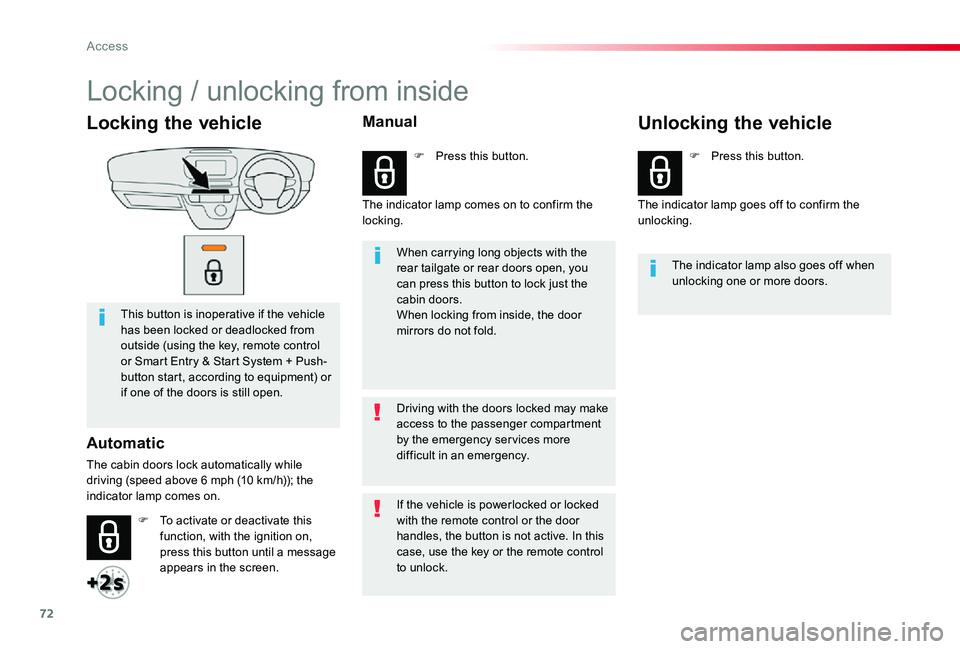
Locking the vehicle
This button is inoperative if the vehicle has been locked or deadlocked from outside (using the key, remote control or Smart Entry & Start System + Push-button start, according to equipment) or if one of the doors is still open.
Automatic
The cabin doors lock automatically while driving (speed above 6 mph (10 km/h)); the indicator lamp comes on.
When carrying long objects with the rear tailgate or rear doors open, you can press this button to lock just the cabin doors.When locking from inside, the door mirrors do not fold.
The indicator lamp also goes off when unlocking one or more doors.
Driving with the doors locked may make access to the passenger compartment by the emergency services more difficult in an emergency.
F To activate or deactivate this function, with the ignition on, press this button until a message appears in the screen.
F Press this button.F Press this button.
If the vehicle is powerlocked or locked with the remote control or the door handles, the button is not active. In this
case, use the key or the remote control to unlock.
Manual
The indicator lamp comes on to confirm the locking.The indicator lamp goes off to confirm the unlocking.
Unlocking the vehicle
Locking / unlocking from inside
Access
Page 73 of 430
73
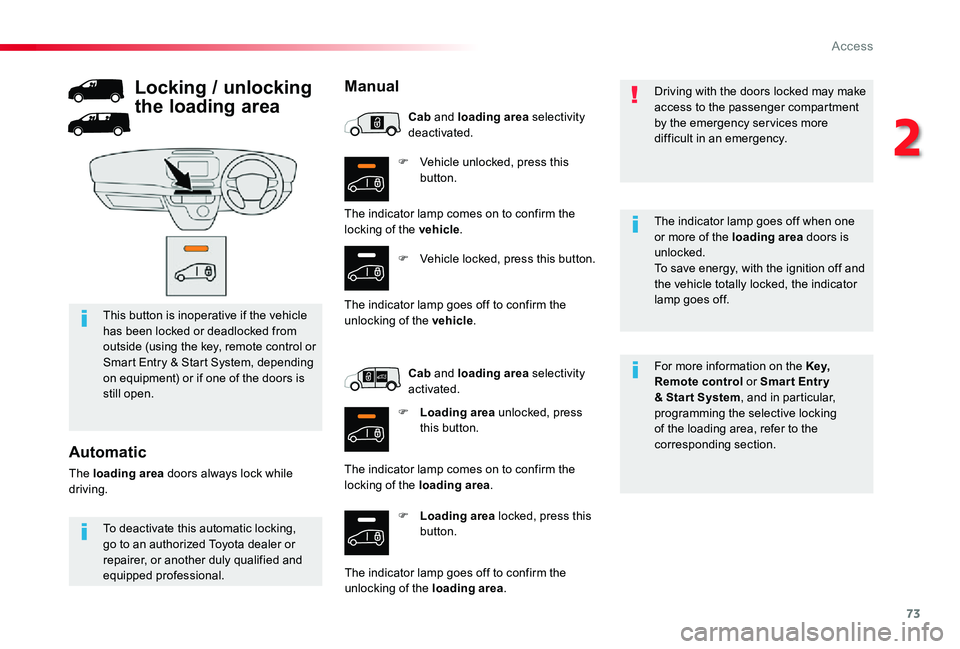
F Vehicle unlocked, press this button.
F Loading area locked, press this button.
For more information on the Key, Remote control or Smar t Entr y & Star t System, and in particular, programming the selective locking of the loading area, refer to the corresponding section.
This button is inoperative if the vehicle has been locked or deadlocked from outside (using the key, remote control or Smart Entry & Start System, depending on equipment) or if one of the doors is still open.
Driving with the doors locked may make access to the passenger compartment by the emergency services more difficult in an emergency.
The indicator lamp goes off when one or more of the loading area doors is unlocked.To save energy, with the ignition off and the vehicle totally locked, the indicator lamp goes off.
To deactivate this automatic locking, go to an authorized Toyota dealer or
repairer, or another duly qualified and equipped professional.
Automatic
The loading area doors always lock while driving.
Locking / unlocking
the loading area
Manual
The indicator lamp comes on to confirm the locking of the vehicle.
F Vehicle locked, press this button.
The indicator lamp goes off to confirm the unlocking of the vehicle.
Cab and loading area selectivity deactivated.
Cab and loading area selectivity activated.
F Loading area unlocked, press this button.
The indicator lamp comes on to confirm the locking of the loading area.
The indicator lamp goes off to confirm the unlocking of the loading area.
2
Access
Page 160 of 430
160
Automatic operation of
hazard warning lamps
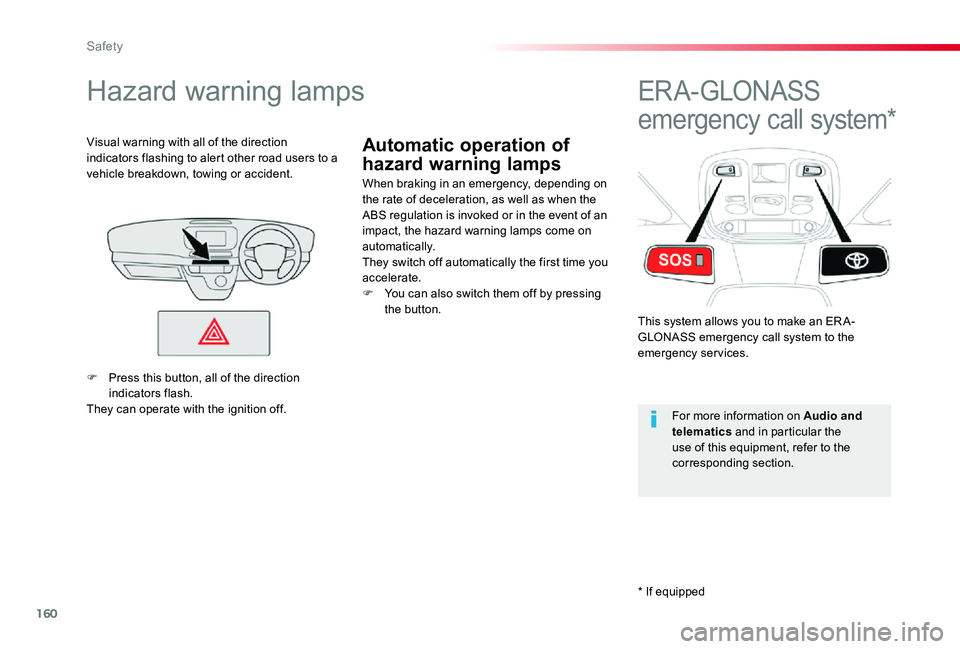
Hazard warning lamps
When braking in an emergency, depending on the rate of deceleration, as well as when the ABS regulation is invoked or in the event of an impact, the hazard warning lamps come on
automatically.They switch off automatically the first time you accelerate.F You can also switch them off by pressing the button.
Visual warning with all of the direction indicators flashing to alert other road users to a vehicle breakdown, towing or accident.
ER A - GLONASS
emergency call system*
This system allows you to make an ER A-GLONASS emergency call system to the emergency services.
For more information on Audio and telematics and in particular the
use of this equipment, refer to the corresponding section.
F Press this button, all of the direction indicators flash.They can operate with the ignition off.
* If equipped
Safety
Page 279 of 430
279
Oil grade
Before topping-up the oil or changing the oil, check that the oil is the correct grade for your engine and conforms to the manufacturer's recommendations.
Topping-up the engine oil level
The location of the oil filler cap is shown in the
corresponding underbonnet layout view.F Unscrew the oil filler cap to reveal the filler aperture.F Add oil in small quantities, avoiding any spills on engine components (risk of fire).F Wait a few minutes before checking the level again using the dipstick.F Add more oil if necessary.F After checking the level, carefully refit the oil filler cap and the dipstick in its tube.
After topping-up the oil, the check when switching on the ignition with the oil level indicator in the instrument panel
is not valid during the 30 minutes after topping-up.
Engine oil change
Refer to the manufacturer's service schedule for details of the inter val for this operation.In order to maintain the reliability of the engine and emission control system, never use additives in the engine oil.
The brake fluid level should be close to the "MA X" mark. If it is not, check the brake pad wear.
Brake fluid level
Changing the fluid
Refer to the manufacturer's service schedule for details of the inter val for this operation.
Fluid specification
The brake fluid must conform to the manufacturer's recommendations.
Coolant level
The coolant level should be close to the "MA X" mark but should never exceed it.
In addition, as the cooling system is pressurised, wait at least one hour after switching off the engine before carrying out any work.To avoid any risk of scalding, unscrew the cap by two turns to allow the pressure to drop. When the pressure has dropped, remove the cap and top up the level.
The cooling fan may star t after switching off the engine: take care with ar ticles and clothing that might be caught by the fan blades.
When the engine is warm, the temperature of the coolant is regulated by the fan.
Check the coolant level regularly, according to the use made of your vehicle (every 3 000 miles or 5 000 kms / 3 months); if necessary, top-up using coolant recommended by the manufacturer.Topping-up the coolant between ser vices is normal.
Power steering
fluid level
The power steering fluid level should be close to the "MA X" mark. With the engine cold, unscrew the cap to check the level.
7
Practical information
Page 338 of 430
338
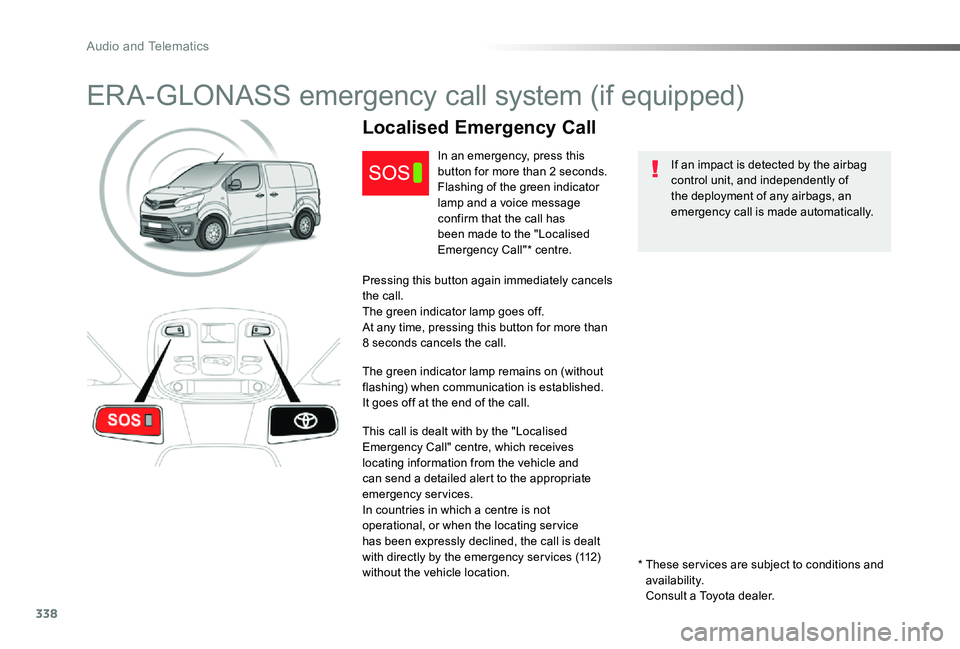
ERA-GLONASS emergency call system (if equipped)
If an impact is detected by the airbag control unit, and independently of the deployment of any airbags, an emergency call is made automatically.
Localised Emergency Call
In an emergency, press this button for more than 2 seconds.Flashing of the green indicator lamp and a voice message confirm that the call has been made to the "Localised Emergency Call"* centre.
Pressing this button again immediately cancels the call.The green indicator lamp goes off.At any time, pressing this button for more than 8 seconds cancels the call.
The green indicator lamp remains on (without flashing) when communication is established.It goes off at the end of the call.
This call is dealt with by the "Localised Emergency Call" centre, which receives locating information from the vehicle and can send a detailed alert to the appropriate emergency services.In countries in which a centre is not operational, or when the locating service has been expressly declined, the call is dealt with directly by the emergency ser vices (112) without the vehicle location.* These ser vices are subject to conditions and availability. Consult a Toyota dealer.
Audio and Telematics
Page 424 of 430
424
Safety, children .....................171, 174 -176 , 18 2 , 187, 188, 190, 193Saturation of the Diesel Particle Filter (DPF) ..........................................................281SCR (Selective Catalytic Reduction) ............283SCR system ..................................................283Screen, instrument panel ..........................4 0 , 41Screenwash ..................................................15 8Screenwash, rear ..........................................157Seat and bench seat, rear, on rails ..............11 6Seat and bench seat, rear, fixed ...........113 , 11 6Seat belts ......................166, 168, 169, 180, 181Seat belts, rear ..............................................167Seat, front bench, 2-seat ......................104, 167Seat, rear bench ...........................................11 6Seats, electric ...............................................102Seats, front bench .........................................105Seats, front ......................................99, 101, 102Seats, heated ........................................103, 105Seats, rear .............................................11 0 , 113Selector, gear ................................................214Serial number, vehicle ..................................337Service (warning lamp) ...................................28Service indicator .......................................31, 3 3Service ............................................................28Servicing .........................................................12Side repeater ................................................305Sidelamps .............146, 304-306, 310, 313, 315Sliding side door, electric ............................49, 57, 64, 65, 78 - 84
S
Sliding side door, hands-free ..............87, 89, 90Sliding side door, manual .........................75 -77Sliding side window ......................................124Smart Cargo ..................................................10 6Smart Entry & Start System ............55, 59, 60, 63 - 65, 68, 70, 71, 74, 75, 202, 205Snow chains .........................................262, 268Snow chains, link ..........................................268Socket, 12 V accessory ................................121Sockets, audio ..............................................12 2Speed limiter .................................224, 227, 229Speedometer .............................................14 -16Stability control (ESC).............................25, 161Starting the engine .......................................19 9Starting the vehicle ......202, 204, 206, 209, 214Stay, bonnet ..................................................276Steering wheel, adjustment ............................99Stop & Start ................22, 29, 42, 132, 135, 218, 220, 265, 276, 281, 321, 324Stop (warning lamp) ........................................18Stop .................................................................18Stopping the vehicle ............202, 204, 209, 214Storage compartments .........................120, 121Storage wells .........................................117, 1 2 0Storage ..................................105, 109, 117, 120Stowing rings ................................................12 2Sun visor .......................................................120Switching off the engine ...............................19 9Synchronising the remote control .............54, 70
Range ..............................................................42Range, AdBlue ................................................35Rear screen, demisting .........................13 3, 13 4Recharging the battery .................................323Recirculation, air ...................125, 126, 128, 131Reduction of electrical load ..........................270Regeneration of the Diesel Particle Filter (DPF) ..........................................................281Reinitialisation of the Tyre Pressure Warning System (TPWS) ..........................................263Reinitialising the remote control ...............54, 70Reminder, key in ignition ...............................201Reminder, lighting on ....................................148Remote control ........................47-50, 52, 55 -59, 67, 68, 71, 74, 75Removing a wheel ........................................299Removing the mat .........................................11 9Replacing bulbs .....3 03, 3 0 4, 310, 311, 313 - 315Replacing fuses ....................................316, 317Replacing the air filter ...................................281Replacing the oil filter ...................................281Replacing the passenger compartment filter .............................................................281Reservoir, headlamp wash ...........................280Reservoir, screenwash .................................280Reset journey ..................................................41Resetting the service indicator .......................33Resetting the trip recorder ..............................38Rev counter ................................................14 -16Reversing camera (on interior mirror) ..........258Reversing camera .........................................259Reversing lamp .............................310, 313, 315Road Sign Assist ..........225, 226, 229, 232, 236Roof bars ...............................................272, 273Roof rack ...............................................272, 273Running out of fuel (Diesel) ..........................327
R
Alphabetical index