mirror controls TOYOTA PROACE 2020 Owners Manual (in English)
[x] Cancel search | Manufacturer: TOYOTA, Model Year: 2020, Model line: PROACE, Model: TOYOTA PROACE 2020Pages: 430, PDF Size: 48.01 MB
Page 6 of 430
6
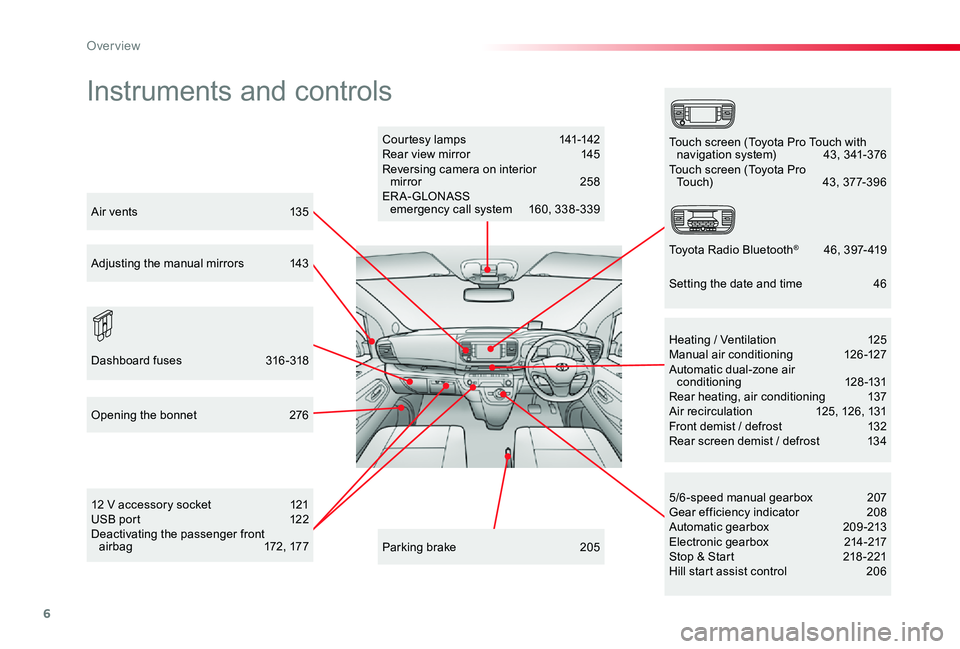
Instruments and controls
Courtesy lamps 141-142Rear view mirror 145Reversing camera on interior mirror 258ER A- GLONASS emergency call system 160, 338 -339
12 V accessory socket 121USB port 122Deactivating the passenger front a i r b a g 172 , 17 7
5/6-speed manual gearbox 207Gear efficiency indicator 208Automatic gearbox 209-213Electronic gearbox 214-217Stop & Start 218 -221Hill start assist control 206
Heating / Ventilation 125Manual air conditioning 126-127Automatic dual-zone air conditioning 128-131Rear heating, air conditioning 137Air recirculation 125, 126, 131Front demist / defrost 132Rear screen demist / defrost 134
Parking brake 205
Opening the bonnet 276
Dashboard fuses 316-318
Touch screen (Toyota Pro Touch with navigation system) 43, 341-376Touch screen (Toyota Pro Touch) 43, 377-396
Toyota Radio Bluetooth® 4 6 , 3 9 7- 419
Air vents 135
Adjusting the manual mirrors 143
Setting the date and time 46
Over view
Page 7 of 430
7
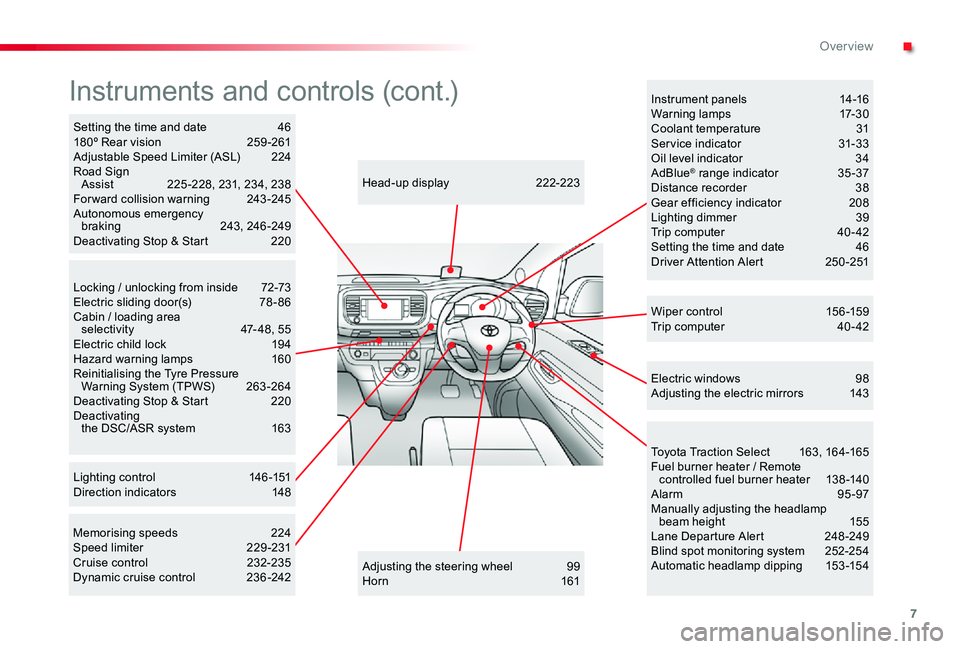
Locking / unlocking from inside 72-73Electric sliding door(s) 78 - 86Cabin / loading area selectivity 47-48, 55Electric child lock 194Hazard warning lamps 160Reinitialising the Tyre Pressure Warning System (TPWS) 263 -264Deactivating Stop & Start 220Deactivating the DSC/ASR system 163
Adjusting the steering wheel 99Horn 161
Head-up display 222-223
Instruments and controls (cont.)
Wiper c ontrol 15 6 -159Trip computer 40 - 42
Memorising speeds 224Speed limiter 229-231Cruise control 232-235Dynamic cruise control 236 -242
Instrument panels 14-16Warning lamps 17-30Coolant temperature 31Service indicator 31-33Oil level indicator 34AdBlue® range indicator 35 -37Distance recorder 38Gear efficiency indicator 208Lighting dimmer 39Trip computer 40 - 42Setting the time and date 46Driver Attention Alert 250-251
Electric windows 98Adjusting the electric mirrors 143
Toyota Traction Select 163, 164-165Fuel burner heater / Remote controlled fuel burner heater 138 -140Alarm 95-97Manually adjusting the headlamp beam height 155Lane Departure Alert 248 -249Blind spot monitoring system 252-254Automatic headlamp dipping 153-154
Setting the time and date 46180º Rear vision 259 -261Adjustable Speed Limiter (ASL) 224Road Sign Assist 225 -228, 231, 234, 238Forward collision warning 243-245Autonomous emergency braking 243, 246 -249Deactivating Stop & Start 220
Lighting control 146-151Direction indicators 148
.
Over view
Page 51 of 430
51
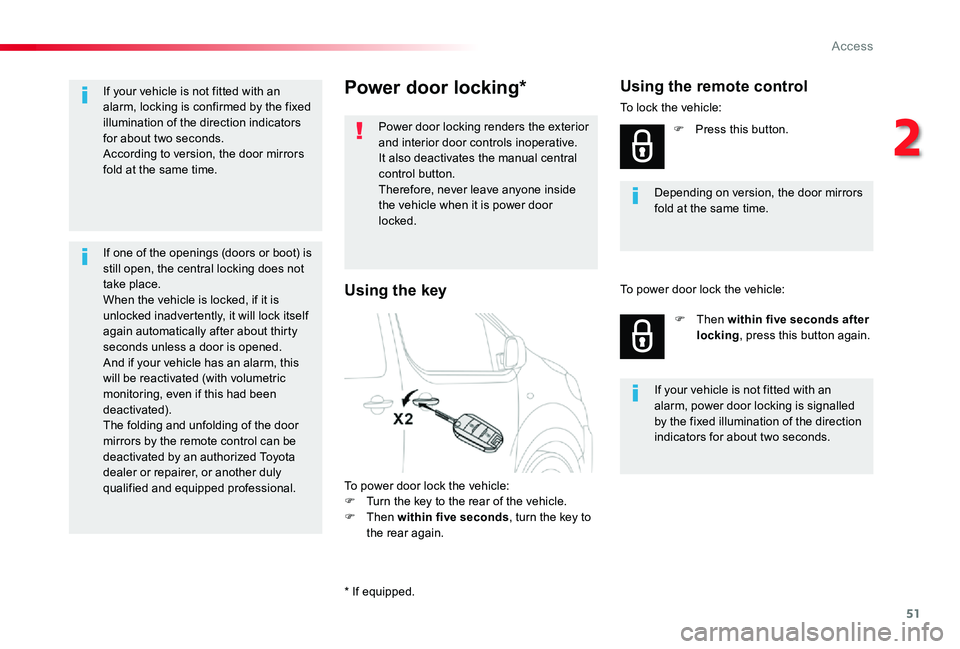
Power door locking*
Power door locking renders the exterior and interior door controls inoperative.It also deactivates the manual central control button.Therefore, never leave anyone inside the vehicle when it is power door locked.
To power door lock the vehicle:F Turn the key to the rear of the vehicle.F Then within five seconds, turn the key to the rear again.
Depending on version, the door mirrors fold at the same time.
Using the remote control
To lock the vehicle:
F Press this button.
F Then within five seconds after locking, press this button again.
If your vehicle is not fitted with an alarm, power door locking is signalled by the fixed illumination of the direction indicators for about two seconds.
To power door lock the vehicle:Using the key
If your vehicle is not fitted with an alarm, locking is confirmed by the fixed illumination of the direction indicators for about two seconds.According to version, the door mirrors fold at the same time.
If one of the openings (doors or boot) is still open, the central locking does not take place.When the vehicle is locked, if it is unlocked inadvertently, it will lock itself again automatically after about thirty seconds unless a door is opened.And if your vehicle has an alarm, this will be reactivated (with volumetric monitoring, even if this had been deactivated).The folding and unfolding of the door mirrors by the remote control can be deactivated by an authorized Toyota dealer or repairer, or another duly qualified and equipped professional.
* If equipped.
2
Access
Page 58 of 430
58
Driving with the doors locked may make access to the passenger compartment by the emergency services more difficult in the event of an emergency.As a safety measure (children on board), never leave the vehicle without your remote control, even for a short period.
If your vehicle is not fitted with an alarm, locking is signalled by the fixed illumination of the direction indicators for about two seconds.Depending on version, the door mirrors fold at the same time.
If one of the doors remains open, the central locking does not take place.If the vehicle is inadvertently unlocked, it will automatically lock itself again after about thirty seconds, if no door is opened.And if fitted to your vehicle, the alarm is reactivated (with volumetric monitoring, even if you had deactivated it).
If fitted to your vehicle, pressing and holding this button allows the windows to be closed. The window stops when you release the button.
Power door locking*
Power door locking renders the exterior and interior door controls inoperative.It also deactivates the manual central control button.Therefore, never leave anyone inside the vehicle when it is power door locked.
F Press this button.
F Then within five seconds after locking, press this button again.
Ensure that no person or object could prevent the correct closing of the windows.Be particularly aware of children when
operating the windows.
Depending on version, the door mirrors fold at the same time.
The automatic folding and unfolding of the electric door mirrors can be deactivated by an authorized Toyota dealer or repairer, or another duly qualified and equipped professional.
If your vehicle is not fitted with an alarm, power door locking is signalled by the fixed illumination of the direction indicators for about two seconds.
To lock the vehicle:
To deadlock the vehicle:
* If equipped.
Access
Page 65 of 430
65
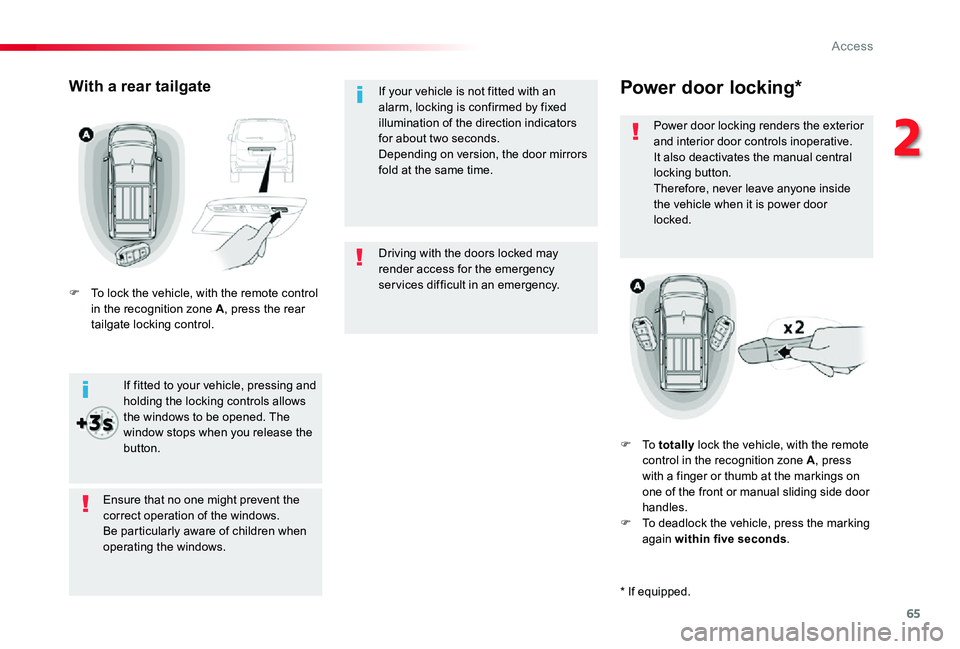
Driving with the doors locked may render access for the emergency services difficult in an emergency.
If your vehicle is not fitted with an alarm, locking is confirmed by fixed illumination of the direction indicators for about two seconds.Depending on version, the door mirrors fold at the same time.
Power door locking*
Power door locking renders the exterior and interior door controls inoperative.It also deactivates the manual central locking button.Therefore, never leave anyone inside the vehicle when it is power door locked.
F To totally lock the vehicle, with the remote control in the recognition zone A, press with a finger or thumb at the markings on one of the front or manual sliding side door handles.F To deadlock the vehicle, press the marking again within five seconds.
Ensure that no one might prevent the correct operation of the windows.Be particularly aware of children when operating the windows.
If fitted to your vehicle, pressing and holding the locking controls allows the windows to be opened. The window stops when you release the button.
With a rear tailgate
F To lock the vehicle, with the remote control in the recognition zone A, press the rear tailgate locking control.
* If equipped.
2
Access
Page 120 of 430
120
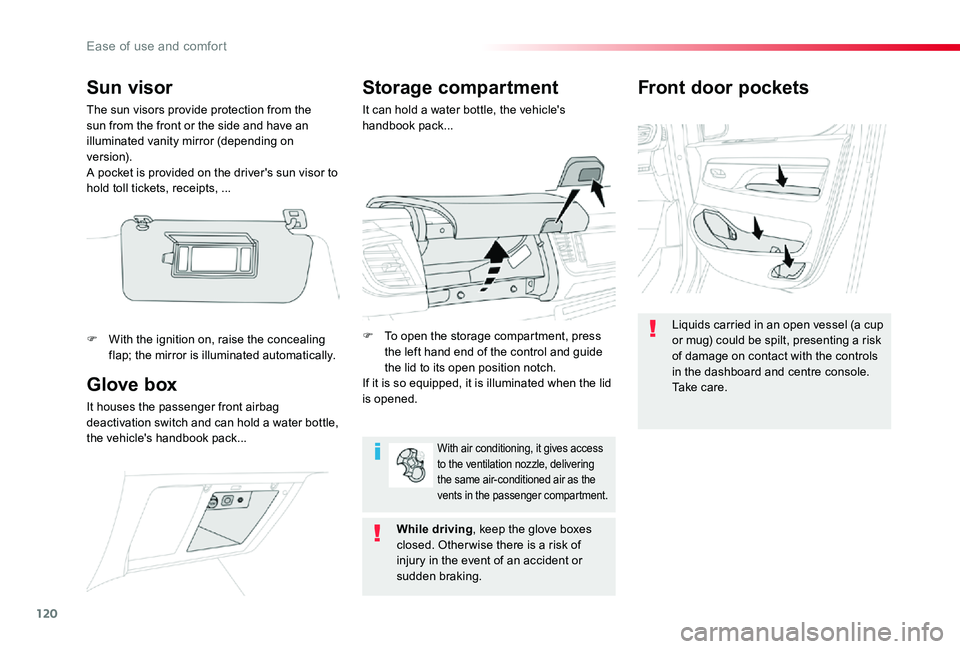
Front door pockets
Liquids carried in an open vessel (a cup or mug) could be spilt, presenting a risk of damage on contact with the controls in the dashboard and centre console. Ta k e c a r e .Glove box
It houses the passenger front airbag deactivation switch and can hold a water bottle, the vehicle's handbook pack...
Storage compartment
It can hold a water bottle, the vehicle's handbook pack...
F To open the storage compartment, press the left hand end of the control and guide the lid to its open position notch.If it is so equipped, it is illuminated when the lid is opened.
While driving, keep the glove boxes closed. Other wise there is a risk of injury in the event of an accident or sudden braking.
Sun visor
The sun visors provide protection from the sun from the front or the side and have an illuminated vanity mirror (depending on ve r s i o n).A pocket is provided on the driver's sun visor to hold toll tickets, receipts, ...
F With the ignition on, raise the concealing flap; the mirror is illuminated automatically.
With air conditioning, it gives access to the ventilation nozzle, delivering the same air-conditioned air as the vents in the passenger compartment.
Ease of use and comfort
Page 318 of 430
318
FuseN°Rating(A)Functions
F110Electric power steering, clutch switch
F415Horn.
F520Front/rear screenwash pump.
F620Front/rear screenwash pump.
F710Rear 12 V accessory socket.
F820Single or double rear wipers.
F10/F1130Front and rear, exterior, interior locks.
F1310Front air conditioning controls, radio controls, gear lever, head-up display.
F145Alarm, ER A-GLONASS emergency call system.
F175Instrument panel.
F193Steering mounted controls.
F213"Smart Entry & Start System" system or ignition switch.
F223Rain and sunshine sensor, multifunction detection camera.
F235Seat belt unfastened or not fastened display screen.
F245Touch screen, reversing camera and parking sensors.
F255Airbags.
F2920Audio system, touch screen, CD player, navigation.
F3115Audio system (battery +).
F3215Front 12 V accessory socket.
F345Blind spot monitoring system, door mirror electric controls.
F355Heated washer jets, headlamp beam height control.
F365Torch charger, rear courtesy lamp.
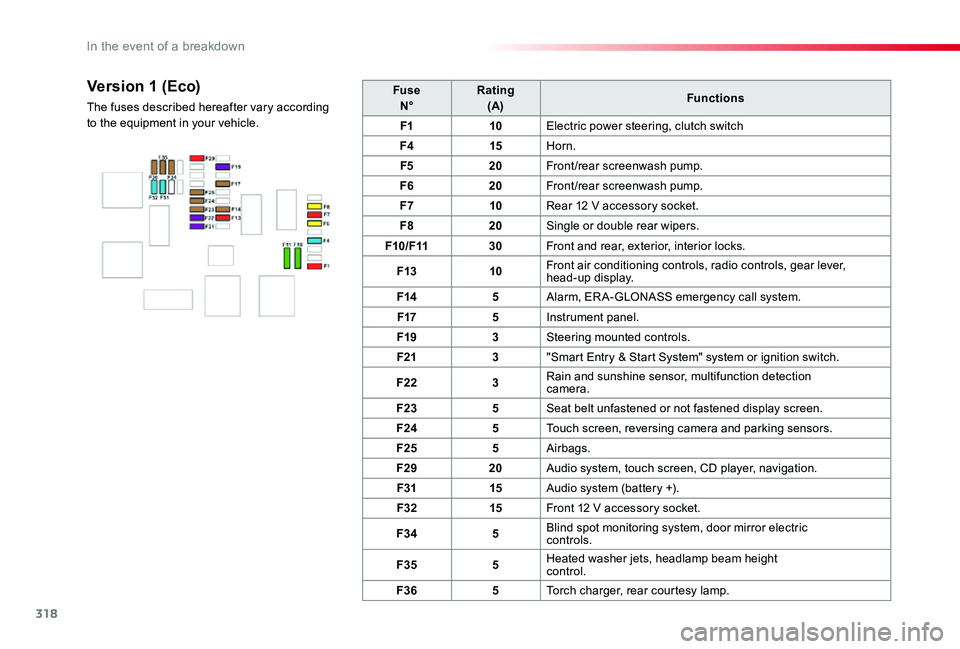
Version 1 (Eco)
The fuses described hereafter vary according to the equipment in your vehicle.
In the event of a breakdown
Page 319 of 430
319
FuseN°Rating(A)Functions
F13"Smart Entry & Start System" system or ignition switch.
F55Touch screen, reversing camera and parking sensors.
F710Rear air conditioning controls, Hi-Fi amplifier.
F820Single or double rear wiper.
F10/F1130Front and rear, exterior, interior locks.
F123Alarm.
F1710Rear 12 V accessory socket.
F185ERA-GLONASS emergency call system.
F213Torch charger, rear courtesy lamp.
F223Glove box lamp, rear courtesy lamps.
F235Blind spot monitoring system, door mirror electric controls.
F245Steering mounted controls.
F255Headlamp beam height control.
F263Seat belt unfastened or not fastened display screen.
F273Rain and sunshine sensor, multifunction detection camera.
F2810Front air conditioning controls, radio controls, gear lever, head-up display.
F30A or B15Audio system (battery +).
F315Airbags.
F3315Front 12 V accessory socket.
F355Instrument panel.
F3620Audio system, touch screen, CD player, navigation.
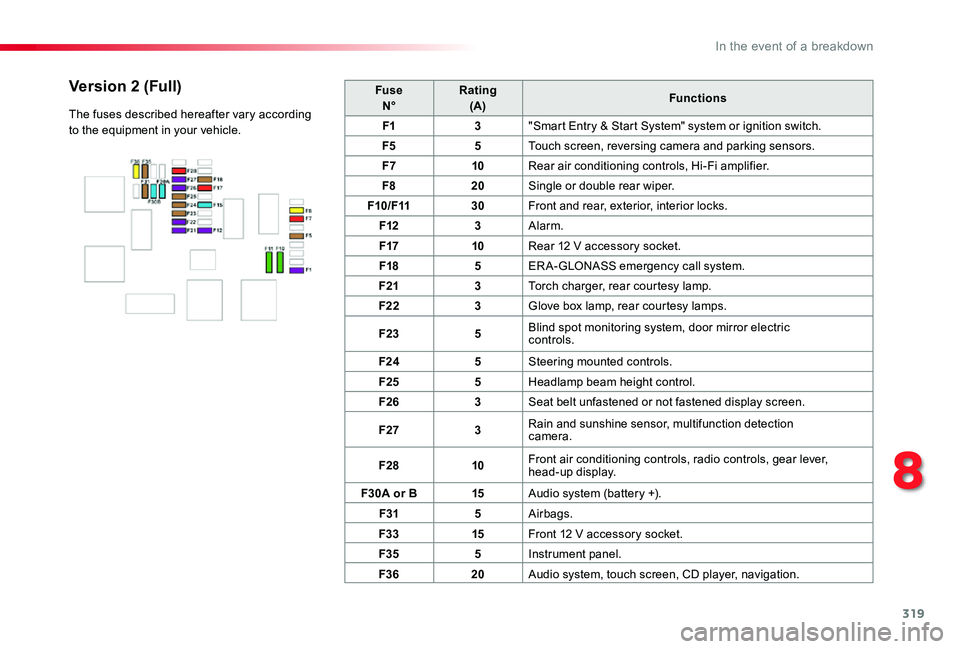
Version 2 (Full)
The fuses described hereafter vary according to the equipment in your vehicle.
8
In the event of a breakdown
Page 341 of 430
341
Toyota Pro Touch with
navigation system
GPS navigation -
Applications - Multimedia
audio system - Bluetooth®
telephone
The various functions and settings described differ according to the version and configuration of the vehicle.
For safety reasons and because they require continued attention on the part of the driver, the following operations must be carried out with the vehicle stationary and the ignition switched off:- Using a smartphone.- Pairing a Bluetooth mobile phone to the hands-free Bluetooth system of the audio system.- Smartphone connection operations for CarPlay®, MirrorLinkTM or Android Auto (certain applications interrupt their display when the vehicle starts to move again).- Watching a video (the video stops when the vehicle starts to move again).- The configuration of profiles.
The system is protected in such a way that it will only operate in the vehicle.The display of the message Energy Economy Mode signals that a change to standby is imminent.
First steps
With the engine running, a press mutes the sound.With the ignition off, a press turns the system on.
Increase or decrease the volume using the wheel or the "plus" or "minus" buttons (depending on the equipment).
Use the menu buttons on either side of or below the touch screen for access to the menus, then press the virtual buttons in the touch screen.
Depending on the model, use the "Source" or "Menu" buttons to access the rolling menus, then press the virtual buttons in the touch screen.
Display the rolling menus at any time by pressing the screen briefly with three fingers.
All of the touch areas of the screen are white.Press the back arrow to go back a level.Press "OK" to confirm.
ContentsFirst steps 341Steering mounted controls 342Menus 343Voice commands 344Navigation 352Connected navigation 354Applications 357Radio 360DAB (Digital Audio Broadcasting) radio 362Media 362Telephone 364Frequently asked questions 370
.
Toyota Pro Touch with navigation system
Page 377 of 430
377
To y o t a P r o To u c h
Multimedia audio system -
Applications - Bluetooth®
telephone
For safety reasons and because they require continued attention on the part of the driver, the following operations must be carried out with the vehicle stationary and the ignition on:- Using a smartphone.- Pairing a Bluetooth mobile phone to the hands-free Bluetooth system of the car radio.- Smartphone connection operations for CarPlay®, MirrorLinkTM or Android Auto (certain applications interrupt their display when the vehicle starts to move again).- The configuration of profiles.
The system is protected in such a way that it will only operate in the vehicle.The display of the message Energy Economy Mode signals that a change to standby is imminent.
First steps
With the engine running, a press mutes the sound.With the ignition off, a press turns the system on.
Increase or decrease the volume using the wheel or the "plus" or "minus" buttons (depending on the equipment).
Use the buttons on either side of or below the touch screen for access to the menus, then press the virtual buttons in the touch screen.
Depending on the model, use the "Source" or "Menu" buttons on the left of the touch screen for access to the menus, then press the virtual buttons in the touch screen.
At all times it is possible to display the rolling menus by pressing the screen briefly with three fingers.
All of the touch areas of the screen are white.For pages with multiple tabs at the bottom of
the screen, it is possible to switch between pages either by tapping the tab for the desired page, or by using a finger, sliding the pages to the left or to the right.Press in the grey zone to go back up a level or to confirm.
Table des matièresFirst steps 377Steering mounted controls 378Menus 379Applications 381Radio 381DAB (Digital Audio Broadcasting) radio 383Media 384Telephone 386Frequently asked questions 392
.
Toyota Pro Touch