seats TOYOTA PROACE 2021 Owners Manual
[x] Cancel search | Manufacturer: TOYOTA, Model Year: 2021, Model line: PROACE, Model: TOYOTA PROACE 2021Pages: 360, PDF Size: 70.79 MB
Page 2 of 360
2
■Overview
Overview 4Labels 6
■Eco-driving
1Instruments
Instrument Panel 10Warning and indicator lamps 12Indicators 18Lighting dimmer 23Trip computer 24Touch screen 26Remotely operable functions (Electric) 28Setting the date and time 28
2Access
Electronic key with remote control function and built-in key, 30Unlocking/Complete or selective unlocking 33Back-up procedures 38Central locking 40Electric sliding side door(s) 42General recommendations for the sliding side doors 44Hands-free sliding side door(s) 46Side-hinged rear doors 48Tailgate 49Tailgate rear screen 49Alarm 50Electric windows 52
3Ease of use and comfort
Front seats 532-seat front bench seat 56
Steering wheel adjustment 58Mirrors 58Smart Cargo 60Precautions for the seats and bench seats 64Fixed one-piece bench seat 65Fixed rear seat and bench seat 67Rear seat and bench seat on rails 69Individual rear seat(s) on rails 71Crew Cab, fixed 74Crew Cab, folding 75Interior fittings 76Loading area fittings 80Seating area fittings 82Panoramic sunroof 84Retractable sliding table 84Heating and Ventilation 88Heating 89Manual air conditioning 89Dual-zone automatic air conditioning 90Front demisting - defrosting 92Rear screen and/or door mirror demisting/de-icing 93Rear heating - air conditioning 94Additional heating/ventilation system 94A/C preconditioning (Electric) 98Courtesy lamp(s) 99
4Lighting and visibility
Lighting control lever 101Direction indicators 102Daytime running lamps/Sidelamps 103Automatic illumination of headlamps 103Guide-me-home and welcome lighting 103Automatic headlamp dipping 104Headlamp beam height adjustment 105Interior ambient lighting 106
Wiper control lever 106Automatic wipers 108Changing a wiper blade 109
5Safety
General safety recommendations 111Hazard warning lamps 11 2Emergency or assistance 11 2Horn 11 4Pedestrian horn (Electric) 11 4Vehicle stability control (VSC) 11 4Toyota Traction Select 11 7Seat belts 11 8Airbags 122Child seats 125Deactivating the front passenger airbag 127ISOFIX and i-Size child seats 133i-Size child seats 144Manual child lock 148Electric child lock 148Child lock on rear windows 149
6Driving
Driving recommendations 150Starting/switching off the engine 152Manual parking brake 157Electric parking brake 157Hill start assist 1606-speed manual gearbox 161Gear efficiency indicator 161Automatic gearbox 162Drive selector (Electric) 166Driving modes (Electric) 167Stop & Start 168Under-inflation detection 170
Page 6 of 360
6
– Accelerated charging in mode 3 using an accelerated charging unit (Wallbox).– Superfast charging in mode 4 using a fast public charger.The 400 V traction battery 2 uses Lithium-Ion technology. It stores and supplies the energy required for the operation of the electric motor, air conditioning and heating. Its charge level is represented by an indicator and a reserve power
warning lamp on the instrument panel.The 12 V accessory battery 3 powers the vehicle’s conventional electrical system. It is recharged automatically by the traction battery via the on-board charger.The on-board charger 4 provides domestic charging (mode 2) and accelerated charging (mode 3) of the traction battery as well as recharging of the 12 V accessory battery.The electric motor 5 provides propulsion in accordance with the selected driving mode and driving conditions. It recovers energy during vehicle braking and deceleration phases.
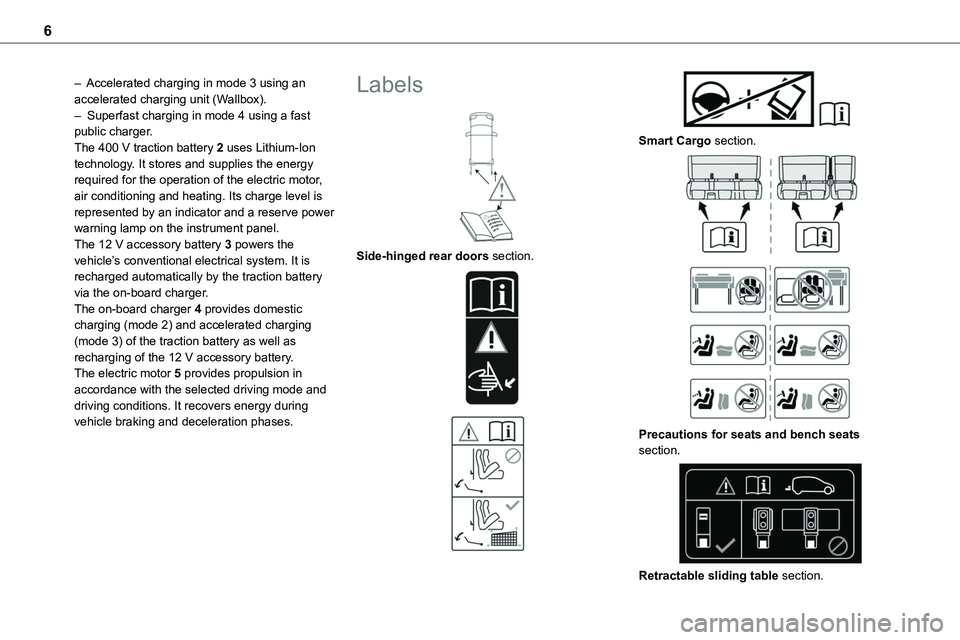
Labels
Side-hinged rear doors section.
Smart Cargo section.
Precautions for seats and bench seats section.
Retractable sliding table section.
Page 7 of 360
7
Overview
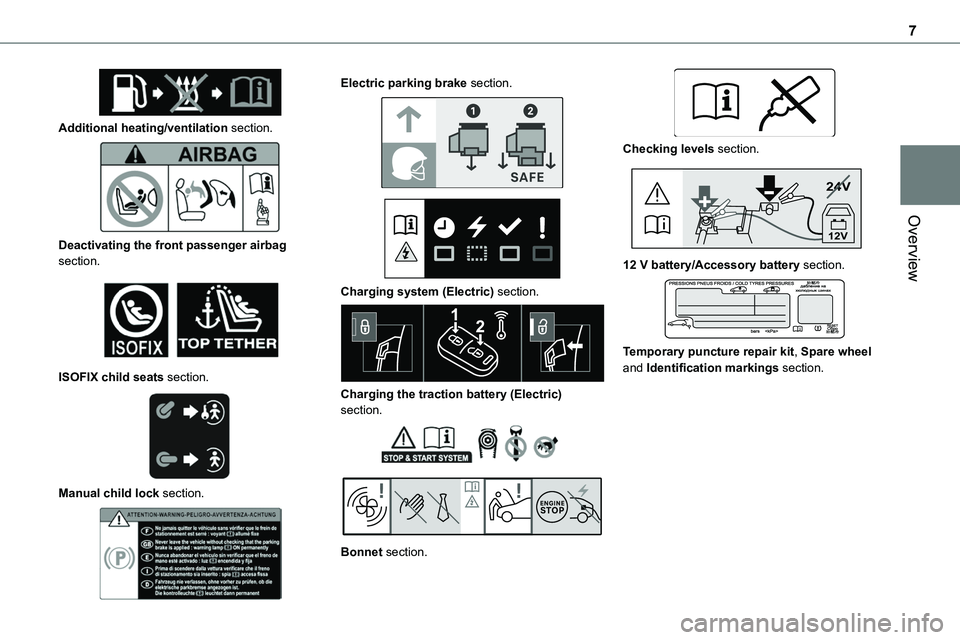
Additional heating/ventilation section.
Deactivating the front passenger airbag section.
ISOFIX child seats section.
Manual child lock section.
Electric parking brake section.
Charging system (Electric) section.
Charging the traction battery (Electric) section.
Bonnet section.
Checking levels section.
24V
12V
12 V battery/Accessory battery section.
Temporary puncture repair kit, Spare wheel and Identification markings section.
Page 8 of 360
8
Eco-driving
Eco-driving refers to a range of everyday practices that allow the motorist to optimise the vehicle's energy consumption (fuel and/or electricity) and CO2 emissions.
Optimise your use of the gearbox
With a manual gearbox, move off gently and change up promptly. While accelerating, change
up early.With an automatic gearbox, favour automatic mode. Do not depress the accelerator pedal heavily or suddenly.The gear shift indicator prompts you to engage the most suitable gear. Whenever this indication is displayed on the instrument panel, follow it straight away.With an automatic gearbox, this indicator appears only in manual mode.
Drive smoothly
Maintain a safe distance between vehicles, use engine braking rather than the brake pedal and press the accelerator gradually. These practices help to save on energy consumption, reduce CO2 emissions and decrease general traffic noise.When the traffic is flowing smoothly, select the cruise control.
Control the use of electrical equipment
Before moving off, if the passenger compartment is too warm, ventilate it by opening the windows and air vents before using the air conditioning.At speeds above 31 mph (50 km/h), close the windows and leave the air vents open.Consider using equipment that can help keep the temperature in the passenger compartment down (e.g. sunroof blind, window blinds).
Unless automatically regulated, switch off the air conditioning as soon as the desired temperature has been reached.Switch off the demisting and defrosting functions, if they are not managed automatically.Switch off the heated seat as soon as possible.Adapt the use of headlamps and/or foglamps to the level of visibility, in accordance with current legislation in the country in which you are driving.Avoid running the engine before moving off, particularly in winter (other than in severe wintry conditions: temperature below -23°C). The vehicle will warm up much faster while driving.As a passenger, avoid connecting your multimedia devices (e.g. film, music, video game) to help reduce the consumption of energy.Disconnect all portable devices before leaving the vehicle.
Limit the causes of excess consumption
Spread loads throughout the vehicle. Place the heaviest items in the boot as close as possible to the rear seats.Limit the loads carried in the vehicle and minimise wind resistance (e.g. roof bars, roof rack, bicycle carrier, trailer). Preferably, use a roof box.Remove roof bars and roof racks after use.
At the end of winter, remove snow tyres and refit summer tyres.
Comply with the servicing instructions
Check tyre pressures regularly, with the tyres cold, referring to the label in the door aperture on the driver's side.Carry out this check in particular:– before a long journey.– at each change of season.– after a long period out of use.Do not forget the spare wheel and, where applicable, the tyres on your trailer or caravan.Have your vehicle serviced regularly (e.g. engine oil, oil filter, air filter, passenger compartment filter, etc.). Observe the schedule of operations in the manufacturer's service schedule.With a Diesel engine, if the SCR system is faulty, your vehicle will emit pollution. Check with any authorized Toyota retailer or Toyota authorized repairer, or any reliable repairer as soon as possible to restore your vehicle's nitrogen oxide emissions to legal levels.
Page 53 of 360
53
Ease of use and comfort
3
Correct driving position
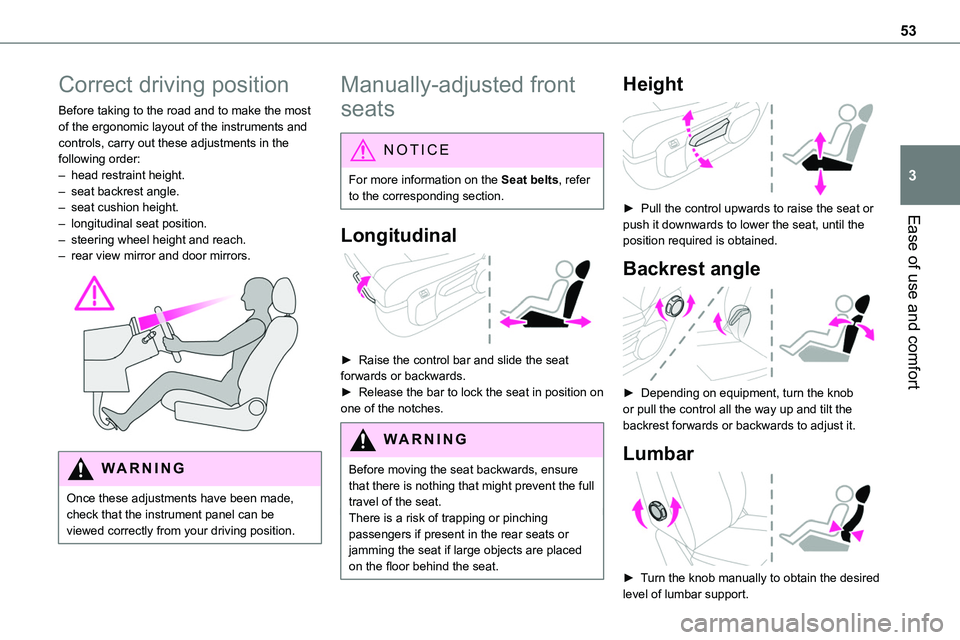
Before taking to the road and to make the most of the ergonomic layout of the instruments and controls, carry out these adjustments in the following order:– head restraint height.– seat backrest angle.– seat cushion height.
– longitudinal seat position.– steering wheel height and reach.– rear view mirror and door mirrors.
WARNI NG
Once these adjustments have been made, check that the instrument panel can be viewed correctly from your driving position.
Manually-adjusted front
seats
NOTIC E
For more information on the Seat belts, refer to the corresponding section.
Longitudinal
► Raise the control bar and slide the seat forwards or backwards.► Release the bar to lock the seat in position on one of the notches.
WARNI NG
Before moving the seat backwards, ensure that there is nothing that might prevent the full travel of the seat.There is a risk of trapping or pinching
passengers if present in the rear seats or jamming the seat if large objects are placed on the floor behind the seat.
Height
► Pull the control upwards to raise the seat or
push it downwards to lower the seat, until the position required is obtained.
Backrest angle
► Depending on equipment, turn the knob or pull the control all the way up and tilt the backrest forwards or backwards to adjust it.
Lumbar
► Turn the knob manually to obtain the desired
level of lumbar support.
Page 54 of 360
54
Table position of the driver's
and/or the front passenger
seat backrest
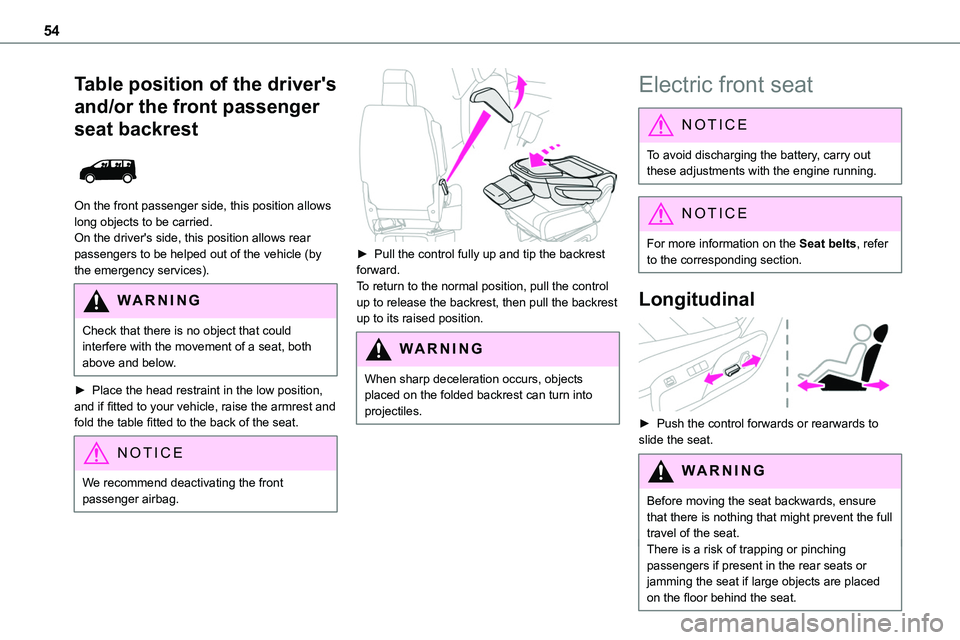
On the front passenger side, this position allows long objects to be carried.
On the driver's side, this position allows rear passengers to be helped out of the vehicle (by the emergency services).
WARNI NG
Check that there is no object that could interfere with the movement of a seat, both above and below.
► Place the head restraint in the low position, and if fitted to your vehicle, raise the armrest and fold the table fitted to the back of the seat.
NOTIC E
We recommend deactivating the front passenger airbag.
► Pull the control fully up and tip the backrest forward.To return to the normal position, pull the control up to release the backrest, then pull the backrest up to its raised position.
WARNI NG
When sharp deceleration occurs, objects placed on the folded backrest can turn into projectiles.
Electric front seat
NOTIC E
To avoid discharging the battery, carry out these adjustments with the engine running.
NOTIC E
For more information on the Seat belts, refer to the corresponding section.
Longitudinal
► Push the control forwards or rearwards to slide the seat.
WARNI NG
Before moving the seat backwards, ensure that there is nothing that might prevent the full travel of the seat.There is a risk of trapping or pinching passengers if present in the rear seats or jamming the seat if large objects are placed on the floor behind the seat.
Page 56 of 360
56
2-seat front bench seat
If fitted in the vehicle, this is fixed and has a seat belt built into the backrest for the seat next to the driver’s seat.
NOTIC E
For more information on the Seat belts, refer to the corresponding section.
Under-seat storage
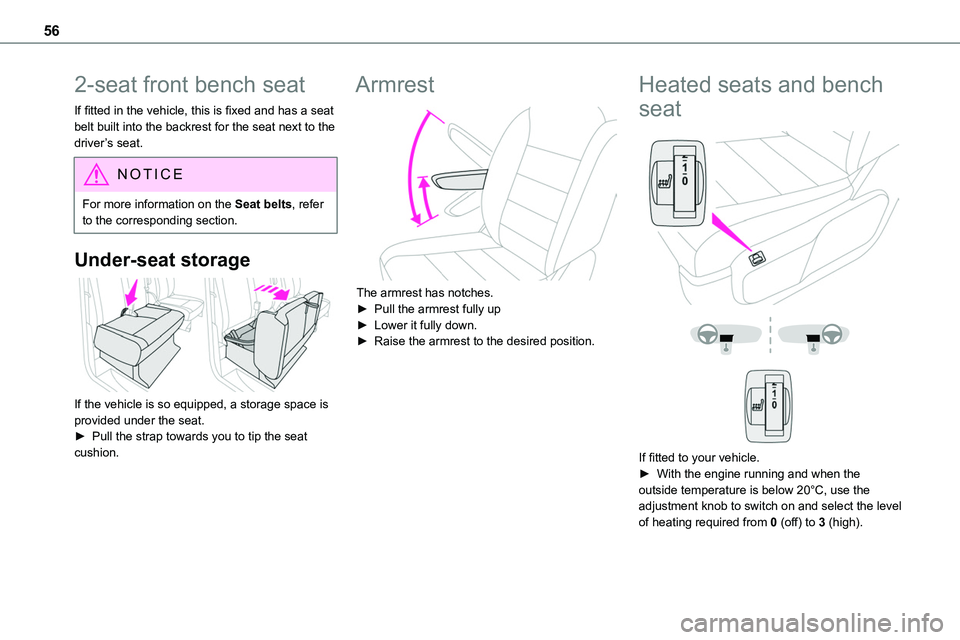
If the vehicle is so equipped, a storage space is provided under the seat.► Pull the strap towards you to tip the seat cushion.
Armrest
The armrest has notches.► Pull the armrest fully up► Lower it fully down.► Raise the armrest to the desired position.
Heated seats and bench
seat
If fitted to your vehicle.► With the engine running and when the outside temperature is below 20°C, use the adjustment knob to switch on and select the level of heating required from 0 (off) to 3 (high).
Page 57 of 360
57
Ease of use and comfort
3
WARNI NG
Prolonged use of heated seats is not recommended for those with sensitive skin.There is a risk of burns for people whose perception of heat is impaired (illness, taking medication, etc.).To keep the heated pad intact and to prevent a short circuit:
– Do not place heavy or sharp objects on the seat.– Do not kneel or stand on the seat.– Do not spill liquids onto the seat.– Never use the heating function if the seat is wet.
EC O
Do not use the function when the seat is not occupied.Reduce the heating intensity as soon as possible.When the seat and passenger compartment have reached a satisfactory temperature, switch the function off; reducing electricity consumption in turn decreases fuel consumption.
Electric lumbar
adjustment
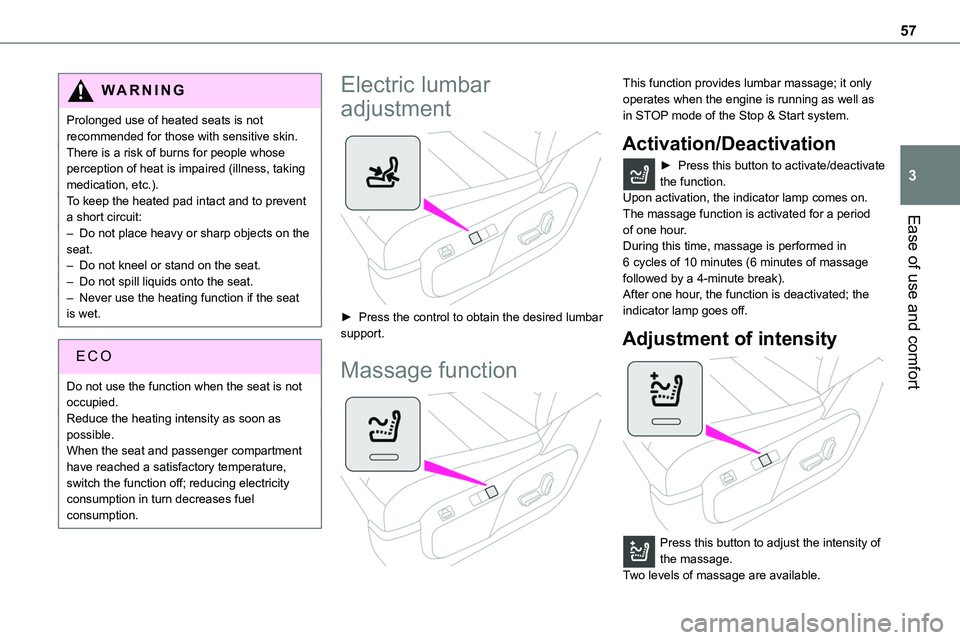
► Press the control to obtain the desired lumbar support.
Massage function
This function provides lumbar massage; it only operates when the engine is running as well as in STOP mode of the Stop & Start system.
Activation/Deactivation
► Press this button to activate/deactivate the function.Upon activation, the indicator lamp comes on. The massage function is activated for a period
of one hour.During this time, massage is performed in 6 cycles of 10 minutes (6 minutes of massage followed by a 4-minute break).After one hour, the function is deactivated; the indicator lamp goes off.
Adjustment of intensity
Press this button to adjust the intensity of the massage.Two levels of massage are available.
Page 64 of 360
64
Precautions for the seats
and bench seats
Do not remove a head restraint without storing it and securing it to a support.Ensure that the passengers can always access the seat belts and fasten them easily.A passenger must not take their seat without adjusting the seat's head restraint correctly and
adjusting and fastening their seat belt.
WARNI NG
Ensure that no object or passenger feet could obstruct the anchorage points or prevent the correct latching of the assembly.
NOTIC E
If removing and storing seats and bench seats out of the vehicle, ensure that they are placed in a clean area, so as to avoid introducing any foreign bodies into the mechanisms.
NOTIC E
The seats and bench seats are not designed for any other use than in the vehicle. They are equipped with mechanisms and features that may be damaged if used improperly or if dropped.
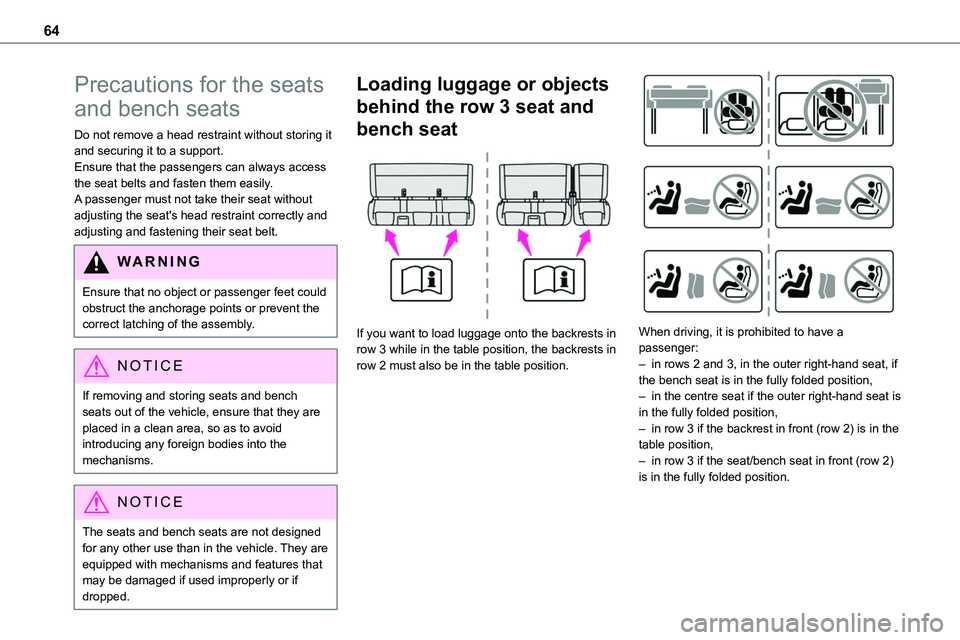
Loading luggage or objects
behind the row 3 seat and
bench seat
If you want to load luggage onto the backrests in row 3 while in the table position, the backrests in row 2 must also be in the table position.
When driving, it is prohibited to have a passenger:– in rows 2 and 3, in the outer right-hand seat, if the bench seat is in the fully folded position,– in the centre seat if the outer right-hand seat is in the fully folded position,– in row 3 if the backrest in front (row 2) is in the table position,– in row 3 if the seat/bench seat in front (row 2) is in the fully folded position.
Page 71 of 360

71
Ease of use and comfort
3
WARNI NG
Do not use the strap to lift the seat or bench seat.
(example of an individual seat)► Check that nothing is obstructing the rails.
► Place the front part of the guides on the rails.► Tip the seat to align the rear of the guides in the rails.► Slide the seat forwards or backwards until it engages in the notches.► Raise the backrest.
NOTIC E
Check that the seat has correctly locked on the floor when returned to the seating position.
Individual rear seat(s) on
rails
PROACE VERSO
The different equipment and settings described hereafter vary according to the version and the configuration of your vehicle.
The individual seat is fitted with a three-point inertia reel seat belt.It can be placed facing forwards or facing
rearwards.
NOTIC E
If there is an individual seat facing rearwards in row 2, ensure that the seat in row 1 (driver or passenger) is not set too far back, in order to avoid contact between the two seats.This could cause significant wear of the parts which are in contact.
NOTIC E
For more information on the Seat belts, refer to the corresponding section.
Armrest(s)
The armrest has notches.
► Pull the armrest fully up.► Lower it fully.► Raise the armrest to the desired notched position.