weight TOYOTA PROACE CITY VERSO 2020 Owners Manual
[x] Cancel search | Manufacturer: TOYOTA, Model Year: 2020, Model line: PROACE CITY VERSO, Model: TOYOTA PROACE CITY VERSO 2020Pages: 272, PDF Size: 58.6 MB
Page 33 of 272
33
Access
2
Always check that it is safe to operate the door and in particular, be sure not to leave children or animals near the door controls without supervision.An audible warning, "door open” warning lamp and onscreen message are there to remind you. Contact a TOYOTA dealer or a qualified workshop if you want to deactivate this warning.Lock the vehicle when you use an automatic car wash.
WARNI NG
Before opening or closing and while moving doors, ensure that no person, animal or object is in the door frame or any other position that would block the desired movement, inside or outside the vehicle.If this advice is not followed, injuries or damage may occur if a person or an object is trapped or caught.
WARNI NG
Take care not to block the guide space on the floor, to allow the door to slide correctly.For safety and functional reasons, do not
drive with the sliding side door open.
NOTIC E
To hold the sliding side door in the open position, open the door fully to engage the latch (located at the bottom of the door).
Doors and door clearances
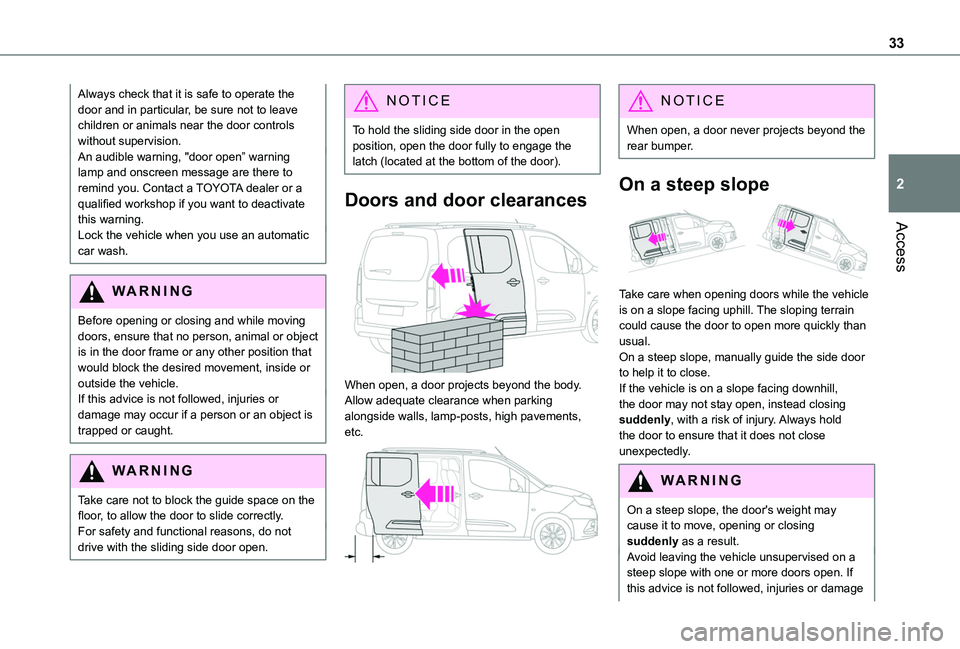
When open, a door projects beyond the body. Allow adequate clearance when parking alongside walls, lamp-posts, high pavements, etc.
NOTIC E
When open, a door never projects beyond the rear bumper.
On a steep slope
Take care when opening doors while the vehicle is on a slope facing uphill. The sloping terrain could cause the door to open more quickly than usual.On a steep slope, manually guide the side door to help it to close.If the vehicle is on a slope facing downhill, the door may not stay open, instead closing suddenly, with a risk of injury. Always hold the door to ensure that it does not close
unexpectedly.
WARNI NG
On a steep slope, the door's weight may cause it to move, opening or closing suddenly as a result.Avoid leaving the vehicle unsupervised on a steep slope with one or more doors open. If this advice is not followed, injuries or damage
Page 39 of 272
39
Ease of use and comfort
3
WARNI NG
Once these adjustments have been made, check that the instrument panel can be viewed correctly from your driving position.
Adjustments
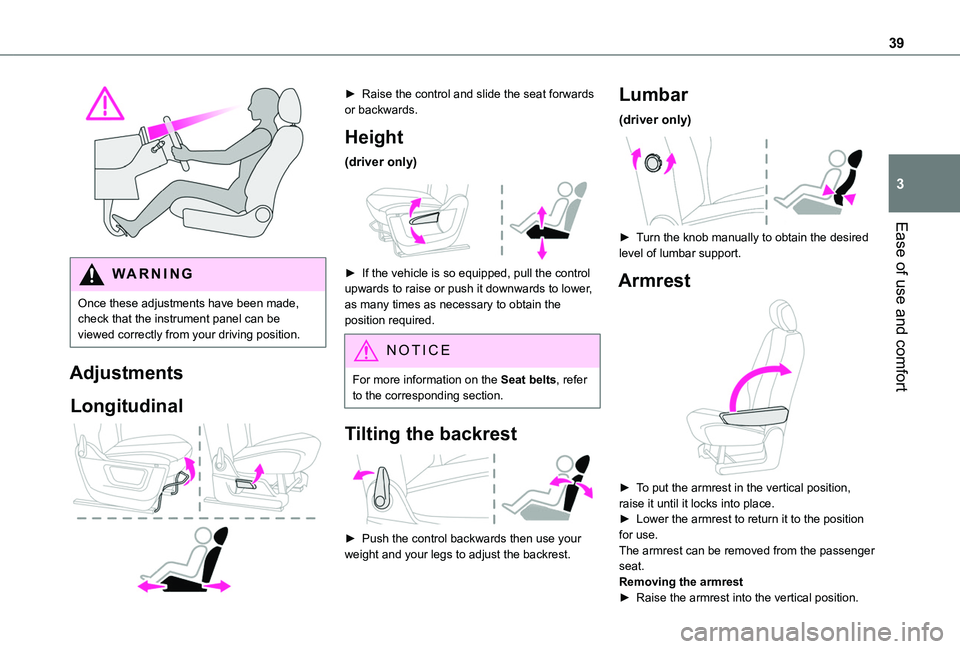
Longitudinal
► Raise the control and slide the seat forwards or backwards.
Height
(driver only)
► If the vehicle is so equipped, pull the control upwards to raise or push it downwards to lower, as many times as necessary to obtain the position required.
NOTIC E
For more information on the Seat belts, refer to the corresponding section.
Tilting the backrest
► Push the control backwards then use your weight and your legs to adjust the backrest.
Lumbar
(driver only)
► Turn the knob manually to obtain the desired level of lumbar support.
Armrest
► To put the armrest in the vertical position, raise it until it locks into place.► Lower the armrest to return it to the position for use.The armrest can be removed from the passenger seat.Removing the armrest
► Raise the armrest into the vertical position.
Page 40 of 272
40
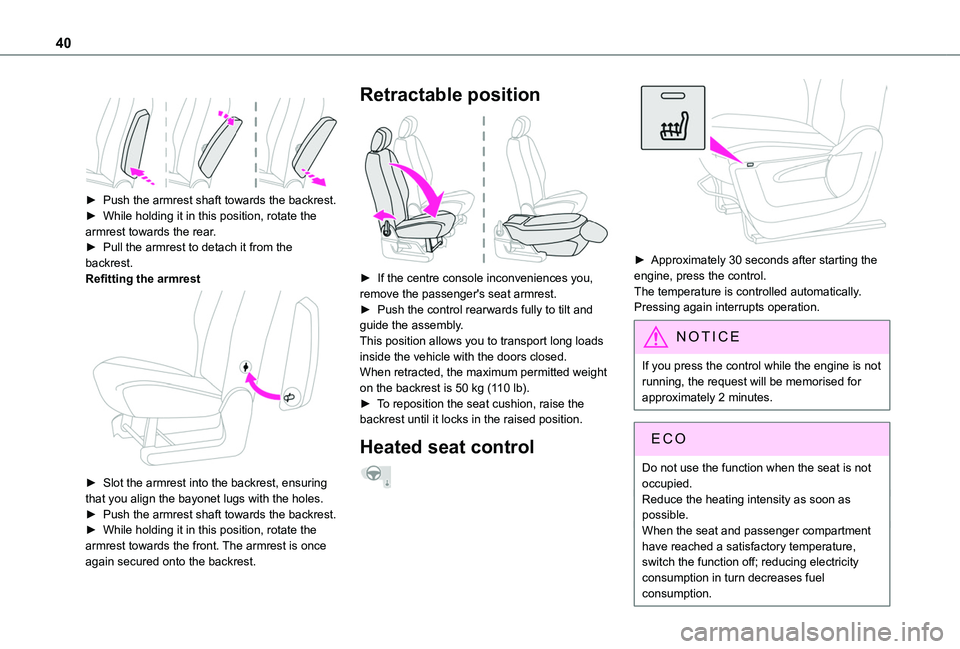
► Push the armrest shaft towards the backrest.► While holding it in this position, rotate the armrest towards the rear.
► Pull the armrest to detach it from the backrest.Refitting the armrest
► Slot the armrest into the backrest, ensuring that you align the bayonet lugs with the holes.► Push the armrest shaft towards the backrest.► While holding it in this position, rotate the armrest towards the front. The armrest is once again secured onto the backrest.
Retractable position
► If the centre console inconveniences you, remove the passenger's seat armrest.► Push the control rearwards fully to tilt and guide the assembly.This position allows you to transport long loads inside the vehicle with the doors closed.When retracted, the maximum permitted weight on the backrest is 50 kg (110 lb).► To reposition the seat cushion, raise the backrest until it locks in the raised position.
Heated seat control
► Approximately 30 seconds after starting the engine, press the control.The temperature is controlled automatically.Pressing again interrupts operation.
NOTIC E
If you press the control while the engine is not running, the request will be memorised for approximately 2 minutes.
ECO
Do not use the function when the seat is not occupied.Reduce the heating intensity as soon as possible.When the seat and passenger compartment have reached a satisfactory temperature, switch the function off; reducing electricity consumption in turn decreases fuel consumption.
Page 52 of 272
52
spring hook to the ring on the corresponding strap.► Fold down the rear seats.► Tighten the straps without raising the bench seat.► Check that the net is hooked and tightened correctly.
Installation behind row 2
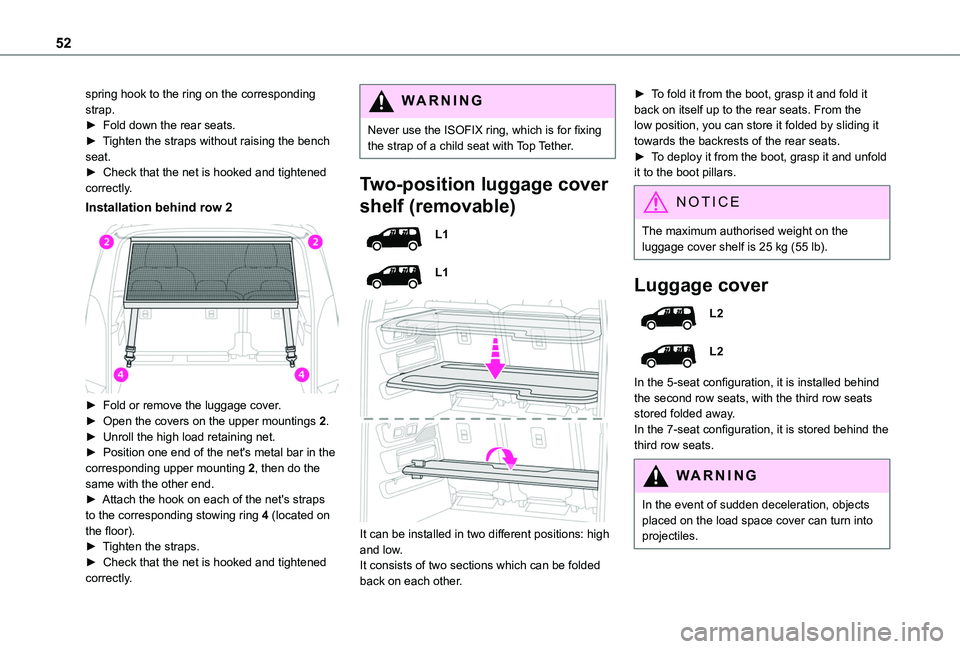
► Fold or remove the luggage cover.► Open the covers on the upper mountings 2.► Unroll the high load retaining net.
► Position one end of the net's metal bar in the corresponding upper mounting 2, then do the same with the other end.► Attach the hook on each of the net's straps to the corresponding stowing ring 4 (located on the floor).► Tighten the straps.► Check that the net is hooked and tightened correctly.
WARNI NG
Never use the ISOFIX ring, which is for fixing the strap of a child seat with Top Tether.
Two-position luggage cover
shelf (removable)
L1
L1
It can be installed in two different positions: high and low.It consists of two sections which can be folded back on each other.
► To fold it from the boot, grasp it and fold it back on itself up to the rear seats. From the low position, you can store it folded by sliding it towards the backrests of the rear seats.► To deploy it from the boot, grasp it and unfold it to the boot pillars.
NOTIC E
The maximum authorised weight on the
luggage cover shelf is 25 kg (55 lb).
Luggage cover
L2
L2
In the 5-seat configuration, it is installed behind the second row seats, with the third row seats stored folded away.In the 7-seat configuration, it is stored behind the third row seats.
WARNI NG
In the event of sudden deceleration, objects placed on the load space cover can turn into projectiles.
Page 76 of 272
76
WARNI NG
ASR / DSCThese systems enhance safety during normal driving, but should not encourage the driver to take extra risks or drive at high speed.It is in conditions of reduced grip (rain, snow, ice) that the risk of loss of grip increases. It is therefore important for your safety to keep these systems activated in all conditions, and particularly in difficult conditions.Correct operation of these systems depends on compliance with the manufacturer's recommendations relating to the wheels (tyres and rims), braking and electronic components, as well as the assembly and repair procedures used by TOYOTA dealers.The use of snow tyres is recommended, to ensure that these systems remain effective in winter conditions. All four wheels must be fitted with tyres approved for the vehicle.
Trailer stability assist (TSA)
When towing, this system reduces the risk of the vehicle or trailer snaking.
Operation
The system is activated automatically when the ignition is switched on.The electronic stability control system (ESC) must not have any faults.
At speeds between 60 and 160 km/h (37 and 99 mph), if the system detects oscillating trailer movements (snaking), it acts on the brakes to stabilise the trailer and, if necessary, reduces engine power to slow the vehicle.This warning lamp flashes on the instrument panel and the brake lamps light up to draw attention to this corrective action.For information on weights and towed loads, refer to the Engine Technical Data and Towed Loads section or your vehicle’s registration certificateTo ensure safe driving with a Towing device, refer to the corresponding section.
Malfunction
If a fault occurs, this warning lamp comes on in the instrument panel, accompanied by a message and an audible signal.If you wish to continue towing a trailer, reduce your speed and drive carefully!Contact a TOYOTA dealer or a qualified workshop to have the system checked.
WARNI NG
The trailer stability assist system offers enhanced safety in normal driving, provided that the recommendations on towing a trailer are observed. It should not encourage the driver to take risks, such as towing a trailer in adverse operating conditions (overloading, failure to observe the trailer nose weight,
worn or under-inflated tyres, faulty braking system, etc.), or to drive at excessive speeds.In certain cases, the system may not detect trailer snaking, particularly with a light trailer.When driving on slippery or poor surfaces, the system may not be able to prevent sudden trailer snaking.
Advanced Grip Control
A special, patented traction control system which improves driveability on snow, mud and sand.This system, optimised for operation in a range of conditions, enables you to manoeuvre in most slippery conditions (encountered during normal passenger car use).When combined with suitable tyres, this system offers a compromise between safety, grip and driveability.The accelerator pedal should be pressed sufficiently to allow the system to harness the power of the engine. Operation at high engine
speeds is completely normal.A five-position selector knob allows you to choose the setting best suited to the driving conditions encountered.An indicator lamp associated with each mode comes on, accompanied by the display of a message to confirm your choice.
Page 84 of 272
84
All work on the airbag systems must only be performed by a TOYOTA dealer or a qualified workshop.Even if all of the precautions mentioned are observed, a risk of injury or of minor burns to the head, chest or arms cannot be ruled out when an airbag is deployed. The airbag inflates almost instantly (within a few milliseconds) then deflates within the same time discharging the hot gas via openings provided for this purpose.
WARNI NG
Front airbagsDo not drive holding the steering wheel by its spokes or resting your hands on the centre part of the wheel.Passengers must not place their feet on the dashboard.Do not smoke as deployment of the airbags can cause burns or the risk of injury from a
cigarette or pipe.Never remove or pierce the steering wheel or hit it violently.Do not fix or attach anything to the steering wheel or dashboard, as this could cause injuries when the airbags are deployed.
WARNI NG
Lateral airbagsUse only approved covers on the seats, compatible with the deployment of the lateral airbags. For information on the range of seat covers suitable for your vehicle, contact a TOYOTA dealer.Do not fix or attach anything to the seat backrests (clothes, etc.), as this could cause injuries to the thorax or arm when the lateral airbag is deployed.Do not sit with the upper part of the body any nearer to the door than necessary.The vehicle's front door panels include side impact sensors.A damaged door or any unauthorised or incorrectly executed work (modification or repair) on the front doors or their interior trim could compromise the operation of these sensors - risk of malfunction of the lateral airbags!Such work must only be done by a TOYOTA
dealer or a qualified workshop.
WARNI NG
Curtain airbagsDo not fix or attach anything to the roof, as this could cause head injuries when the curtain airbag is deployed.Do not remove the grab handles installed on the roof, as they play a part in securing the curtain airbags.
Child seats
NOTIC E
The regulations on carrying children are specific to each country. Refer to the legislation in force in your country.
For maximum safety, please observe the following recommendations:– In accordance with European regulations, all children under the age of 12 or less than 150 cm (4 ft 11”) tall must travel in approved child seats suited to their weight, on seats fitted with a seat belt or ISOFIX mountings.– Statistically, the safest seats in your vehicle for carrying children are the rear seats.– Children weighing less than 9 kg (20 lb) must travel in the "rear facing" position, whether in the front or rear of the vehicle.
Page 89 of 272
89
Safety
5
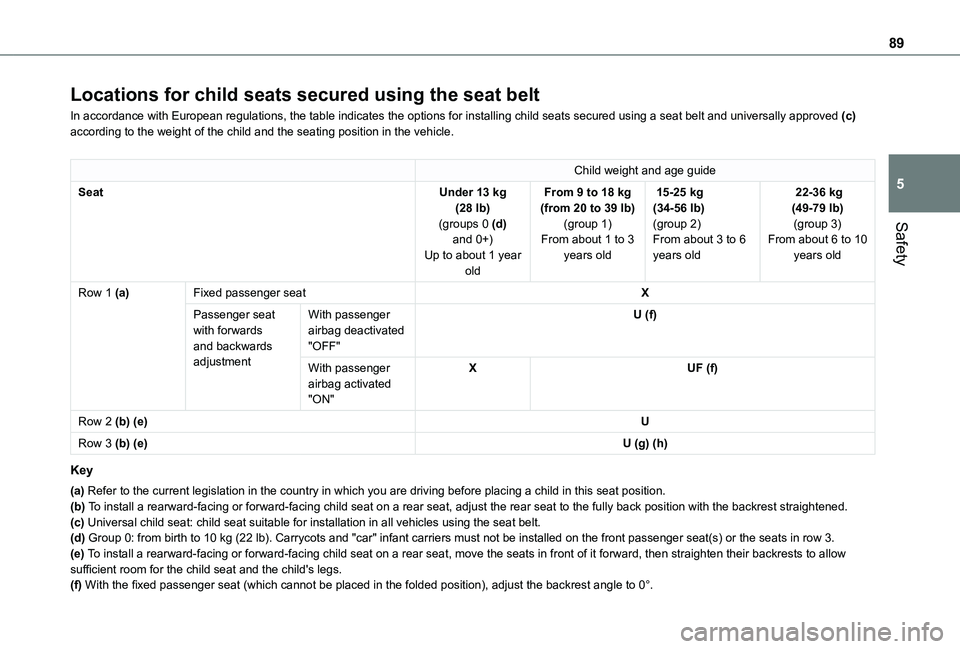
Locations for child seats secured using the seat belt
In accordance with European regulations, the table indicates the options\
for installing child seats secured using a seat belt and universally ap\
proved (c) according to the weight of the child and the seating position in the veh\
icle.
Child weight and age guide
SeatUnder 13 kg (28 lb)(groups 0 (d) and 0+)
Up to about 1 year old
From 9 to 18 kg (from 20 to 39 lb)(group 1)From about 1 to 3
years old
15-25 kg (34-56 lb)(group 2)From about 3 to 6
years old
22-36 kg (49-79 lb)(group 3)From about 6 to 10
years old
Row 1 (a)Fixed passenger seatX
Passenger seat with forwards and backwards adjustment
With passenger airbag deactivated "OFF"
U (f)
With passenger airbag activated "ON"
XUF (f)
Row 2 (b) (e)U
Row 3 (b) (e)U (g) (h)
Key
(a) Refer to the current legislation in the country in which you are drivin\
g before placing a child in this seat position.(b) To install a rearward-facing or forward-facing child seat on a rear seat,\
adjust the rear seat to the fully back position with the backrest strai\
ghtened.(c) Universal child seat: child seat suitable for installation in all vehic\
les using the seat belt.(d) Group 0: from birth to 10 kg (22 lb). Carrycots and "car" infant carriers must not be installed on the f\
ront passenger seat(s) or the seats in row 3.
(e) To install a rearward-facing or forward-facing child seat on a rear seat,\
move the seats in front of it forward, then straighten their backrests \
to allow sufficient room for the child seat and the child's legs.(f) With the fixed passenger seat (which cannot be placed in the folded position), adjust the backrest angle to 0°.
Page 92 of 272
92
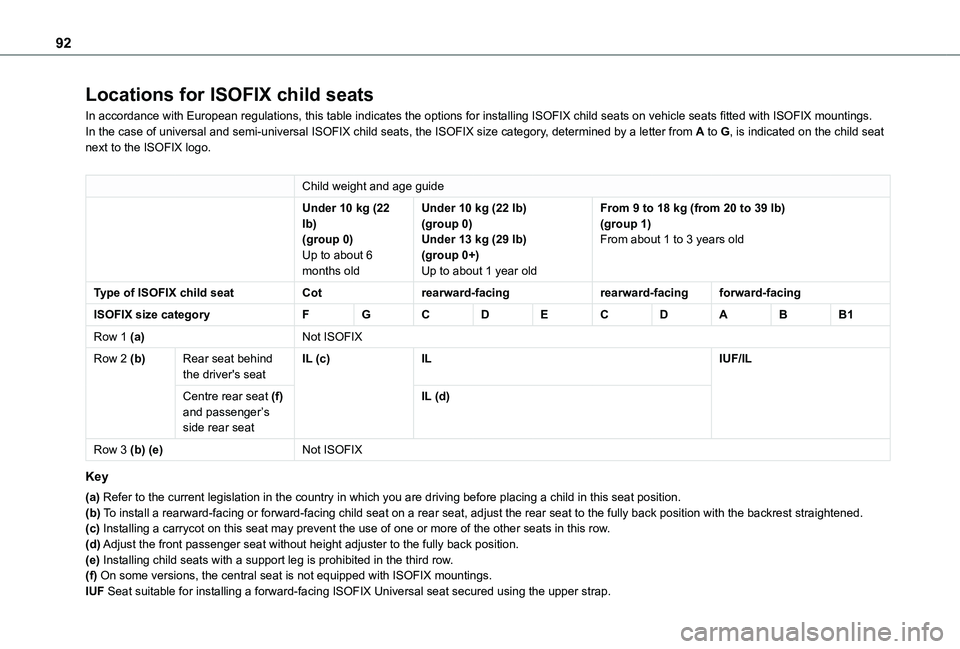
Locations for ISOFIX child seats
In accordance with European regulations, this table indicates the options for installing ISOFIX child seats on vehicle seats fitted with ISOFIX mountings.In the case of universal and semi-universal ISOFIX child seats, the ISOF\
IX size category, determined by a letter from A to G, is indicated on the child seat next to the ISOFIX logo.
Child weight and age guide
Under 10 kg (22 lb)(group 0)
Up to about 6 months old
Under 10 kg (22 lb)(group 0)Under 13 kg (29 lb)
(group 0+)Up to about 1 year old
From 9 to 18 kg (from 20 to 39 lb)(group 1)From about 1 to 3 years old
Type of ISOFIX child seatCotrearward-facingrearward-facingforward-facing
ISOFIX size categoryFGCDECDABB1
Row 1 (a)Not ISOFIX
Row 2 (b)Rear seat behind the driver's seatIL (c)ILIUF/IL
Centre rear seat (f) and passenger’s side rear seat
IL (d)
Row 3 (b) (e)Not ISOFIX
Key
(a) Refer to the current legislation in the country in which you are drivin\
g before placing a child in this seat position.(b) To install a rearward-facing or forward-facing child seat on a rear seat,\
adjust the rear seat to the fully back position with the backrest strai\
ghtened.(c) Installing a carrycot on this seat may prevent the use of one or more o\
f the other seats in this row.(d) Adjust the front passenger seat without height adjuster to the fully bac\
k position.(e) Installing child seats with a support leg is prohibited in the third ro\
w.(f) On some versions, the central seat is not equipped with ISOFIX mounting\
s.IUF Seat suitable for installing a forward-facing ISOFIX Universal seat sec\
ured using the upper strap.
Page 96 of 272
96
In case of towing
WARNI NG
Driving with a trailer places greater demands on the towing vehicle and requires extra care from the driver.
NOTIC E
Respect the maximum towable weights.At altitude: reduce the maximum load by 10% per 1,000 metres (3,280 ft) of altitude; the density of the air decreases with altitude and the performance of the engine reduces.
WARNI NG
New vehicle: do not pull a trailer before having driven at least 1,000 kilometres (620 miles).
NOTIC E
If the outside temperature is high, let the engine idle for 1 to 2 minutes after the vehicle comes to a stop, to help it to cool.
Before setting off
Nose weight
► Distribute the load in the trailer so that the heaviest items are as close as possible to the axle and the nose weight (at the point where it joins your vehicle) approaches the maximum permitted without exceeding it.
Tyres
► Check the tyre pressures of the towing vehicle and of the trailer, observing the recommended pressures.
Lighting
► Check the electrical signalling on the trailer and the headlamp beam height of your vehicle.
NOTIC E
If a genuine TOYOTA towing device is used, the rear parking sensors will be deactivated automatically to avoid the audible signal.
When driving
Cooling
Towing a trailer uphill increases the temperature of the coolant. The maximum towable load depends on the gradient and the exterior temperature. The cooling capacity of the fan does not increase with engine speed.► Reduce speed and lower the engine speed, so as to limit the heating-up.
In all cases, pay attention to the coolant temperature.If this warning lamp and the STOP warning lamp come on, stop the vehicle and switch off the engine as soon as possible.
Brakes
Braking distances are increased when towing a trailer. To avoid overheating of the brakes, the use of engine braking is recommended.
Side wind
Bear in mind the increased susceptibility to the wind that the vehicle will have.
Anti-theft protection
Electronic immobiliser
The remote control contains an electronic chip which has a special code. When the ignition is switched on, this code must be recognised in order for starting to be possible.A few seconds after switching off the ignition,
this system locks the engine control system, therefore preventing the engine from being started in the event of a break-in.In the event of a fault, you are informed by illumination of this warning lamp, an audible signal and a message on the screen.The vehicle will not start; contact a TOYOTA dealer as soon as possible.
Page 117 of 272
11 7
Driving
6
Qualifier plate detectedDisplay of the speed associated with the qualifier plate
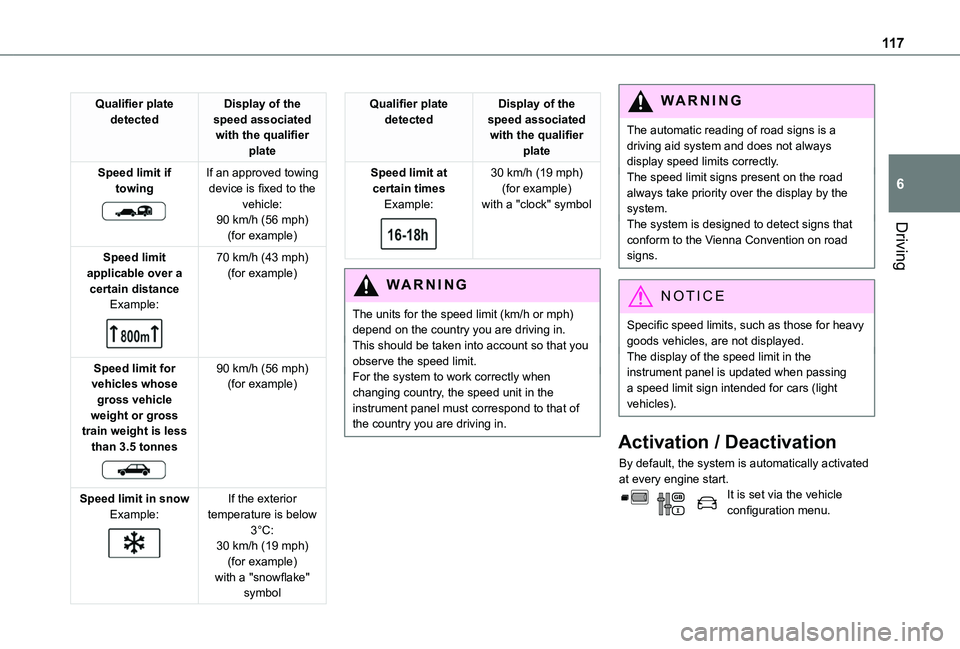
Speed limit if towing
If an approved towing device is fixed to the vehicle:90 km/h (56 mph) (for example)
Speed limit applicable over a certain distanceExample:
70 km/h (43 mph) (for example)
Speed limit for vehicles whose gross vehicle weight or gross train weight is less than 3.5 tonnes
90 km/h (56 mph) (for example)
Speed limit in snowExample:
If the exterior temperature is below 3°C:
30 km/h (19 mph) (for example)with a "snowflake" symbol
Qualifier plate detectedDisplay of the speed associated with the qualifier plate
Speed limit at certain timesExample:
30 km/h (19 mph) (for example)with a "clock" symbol
WARNI NG
The units for the speed limit (km/h or mph) depend on the country you are driving in.This should be taken into account so that you observe the speed limit.For the system to work correctly when changing country, the speed unit in the instrument panel must correspond to that of the country you are driving in.
WARNI NG
The automatic reading of road signs is a driving aid system and does not always display speed limits correctly.The speed limit signs present on the road always take priority over the display by the system. The system is designed to detect signs that conform to the Vienna Convention on road signs.
NOTIC E
Specific speed limits, such as those for heavy goods vehicles, are not displayed.The display of the speed limit in the instrument panel is updated when passing a speed limit sign intended for cars (light vehicles).
Activation / Deactivation
By default, the system is automatically activated at every engine start.It is set via the vehicle configuration menu.