spare wheel TOYOTA PROACE CITY VERSO 2021 User Guide
[x] Cancel search | Manufacturer: TOYOTA, Model Year: 2021, Model line: PROACE CITY VERSO, Model: TOYOTA PROACE CITY VERSO 2021Pages: 272, PDF Size: 57.64 MB
Page 150 of 272
150
– The system may indicate that a space has been found but not engage the manoeuvre because the road is too narrow.– The system is not designed to perform the parking manoeuvre on a sharp bend.– The system does not detect spaces that are much larger than the vehicle or are bounded by obstacles that are very low (pavements, studs, etc.) or very thin (trees, posts, wire fences, etc.).– Certain obstacles located in the sensors’ blind spots may not be detected or may no longer be detected during the manoeuvre.– Certain materials (fabrics) absorb sound waves: pedestrians may not be detected.– A front or rear impact to the vehicle can upset the sensors’ settings, which is not always detected by the system: distance measurements may be distorted.– If the boot is heavily loaded, the vehicle may tilt, affecting distance measurements.The vehicle's sensors and camera(s) may be impaired by:– accumulated snow or fallen leaves on the
road,– adverse weather conditions (heavy rain, thick fog, falling snow),– noise interference from noisy vehicles and machinery (lorries, pneumatic drills, etc.).
WARNI NG
Do not use the function under the following exterior conditions:– Alongside a soft shoulder (e.g. ditch) or quay or on the edge of a drop.– When the road surface is slippery (e.g. ice).
WARNI NG
If any of the following malfunctions occurs, do not use the system:– If a tyre is under-inflated.– If one of the bumpers is damaged.– If one of the cameras is faulty.
WARNI NG
If the vehicle has undergone any of the following modifications, do not use the function:– When carrying an object extending beyond
the dimensions of the vehicle (ladder on the roof bars, bicycle carrier on the tailgate, etc.).– With a non-approved towball in place.– With snow chains fitted.– When driving on a small-diameter or "space-saver" type spare wheel.– When the wheels fitted are a different size from the original ones.– After modifying one or both bumpers
(added protection).
– If the sensors have been repainted other than by the TOYOTA dealer network.– With sensors not approved for the vehicle.
Malfunctions
When the function is not activated, this indicator lamp will flash briefly and an audible signal will be emitted to indicate a system malfunction.If the malfunction occurs while the system is in use, the warning lamp goes off.If the parking sensor malfunction occurs during use, indicated by this warning lamp coming on, it causes the function to deactivate.In the event of a malfunction, have the system checked by a TOYOTA dealer or a qualified workshop.In the event of a power steering malfunction, this warning lamp is displayed on the instrument panel, accompanied by a warning message.You must stop as soon as it is safe to do
so. Contact a TOYOTA dealer or a qualified workshop.
Page 153 of 272
153
Practical information
7
Misfuel prevention (Diesel)
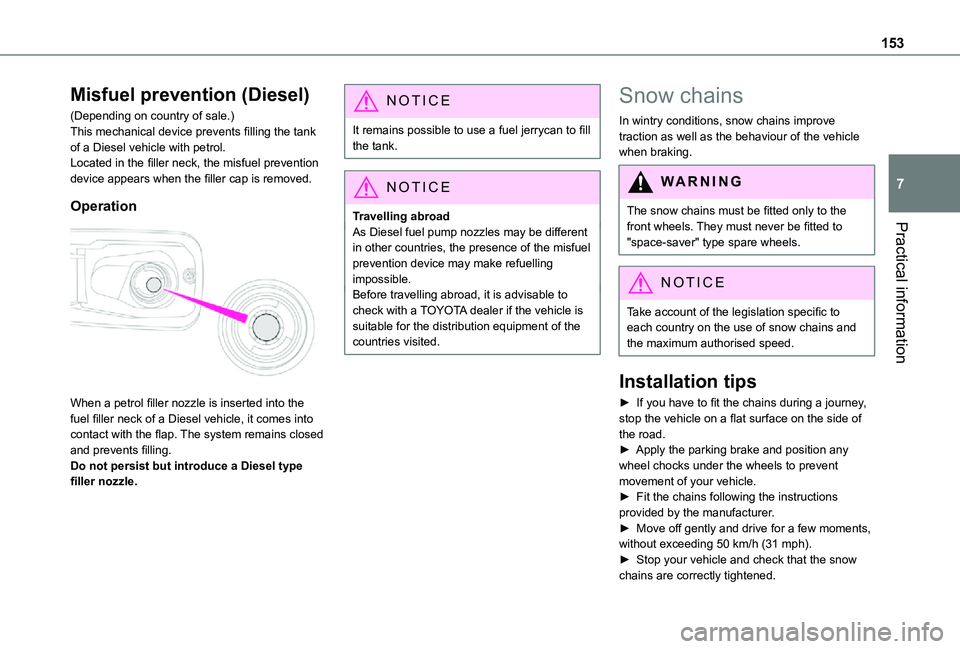
(Depending on country of sale.)This mechanical device prevents filling the tank of a Diesel vehicle with petrol.Located in the filler neck, the misfuel prevention device appears when the filler cap is removed.
Operation
When a petrol filler nozzle is inserted into the fuel filler neck of a Diesel vehicle, it comes into contact with the flap. The system remains closed
and prevents filling.Do not persist but introduce a Diesel type filler nozzle.
NOTIC E
It remains possible to use a fuel jerrycan to fill the tank.
NOTIC E
Travelling abroadAs Diesel fuel pump nozzles may be different in other countries, the presence of the misfuel prevention device may make refuelling impossible.Before travelling abroad, it is advisable to check with a TOYOTA dealer if the vehicle is suitable for the distribution equipment of the countries visited.
Snow chains
In wintry conditions, snow chains improve traction as well as the behaviour of the vehicle when braking.
WARNI NG
The snow chains must be fitted only to the front wheels. They must never be fitted to "space-saver" type spare wheels.
NOTIC E
Take account of the legislation specific to each country on the use of snow chains and the maximum authorised speed.
Installation tips
► If you have to fit the chains during a journey, stop the vehicle on a flat surface on the side of the road.► Apply the parking brake and position any wheel chocks under the wheels to prevent movement of your vehicle.► Fit the chains following the instructions provided by the manufacturer.► Move off gently and drive for a few moments, without exceeding 50 km/h (31 mph).
► Stop your vehicle and check that the snow chains are correctly tightened.
Page 164 of 272
164
Manual parking brake
If you notice excessive brake lever travel or decreased effectiveness, the parking brake must be adjusted, even between two services.This system must be checked by a TOYOTA dealer or a qualified workshop.
Electric parking brake
This system does not require any routine servicing. However, in the event of a problem, do not hesitate to have the system checked by a TOYOTA dealer or a qualified workshop.
NOTIC E
For more information on the Electric parking brake, refer to the corresponding section.
Wheels and tyres
The inflation pressure of all tyres, including the spare wheel, must be checked on "cold” tyres.The pressures indicated on the tyre pressure label are valid for "cold" tyres. If you have driven for more than 10 minutes or more than 10 km (6 miles) at over 50 km/h (31 mph), add 0.3 bar (30 kPa) to the values indicated on the label.
WARNI NG
Under-inflation increases fuel consumption. Non-compliant tyre pressure causes premature wear on tyres and has an adverse effect on the vehicle's road holding - risk of an accident!
Driving with worn or damaged tyres reduces the braking and road holding performance of the vehicle. It is recommended to regularly check the condition of the tyres (tread and sidewalls) and wheel rims as well as the presence of the valves.When the wear indicators no longer appear set back from the tread, the depth of the grooves is less than 1.6 mm; it is imperative to replace the tyres.Using different size wheels and tyres from those specified can affect the lifetime of tyres, wheel rotation, ground clearance, the speedometer reading and have an adverse effect on road holding.Fitting different tyres on the front and rear axles
can cause the ESC to mistime.
AdBlue® (Diesel engines)
To respect the environment and ensure compliance with the Euro 6 standard, without adversely affecting the performance or fuel consumption of its Diesel engines, TOYOTA has taken the decision to equip its vehicles with a system that associates SCR (Selective Catalytic Reduction) with a Diesel particle filter (DPF) for the treatment of exhaust gases.
SCR System SCR
Using a liquid called AdBlue® that contains urea, a catalytic converter turns up to 85% of the nitrogen oxides (NOx) into nitrogen and water, which are harmless to health and the environment.The AdBlue® is contained in a special tank holding about 17 litres. Its capacity allows a driving range of approximately 6,000 km (3,700 miles), (which may vary considerably depending on your driving style and the vehicle). An alert system
is automatically triggered when the remaining range reaches 2,400 km (1,500 miles), i.e. once the reserve level has been reached.Several alerts are triggered successively during the remaining 2,400 km (1,500 miles) before the tank is empty and the vehicle blocked.
Page 169 of 272
169
In the event of a breakdown
8
Running out of fuel
(Diesel)
On vehicles fitted with Diesel engines, the fuel system must be primed if you run out of fuel.If the engine does not start first time, do not keep trying, but start the procedure again from the beginning.
NOTIC E
For more information on Misfuel prevention (Diesel), refer to the corresponding section.
With Euro 6.2/6.3 engines
► Switch on the ignition (without starting the engine).► Wait around 1 minute and switch off the ignition.► Operate the starter motor to start the engine.If the engine does not start at the first attempt, do not keep trying, but restart the procedure.
Tool kit
► For easier access, move the seat(s) forward.
Accessing the tools
With a temporary puncture repair kit
The kit is located under the right-hand front seat.
With spare wheel
The jack is located under the right-hand front seat.The tools are located under the left-hand front seat.
Description of tools
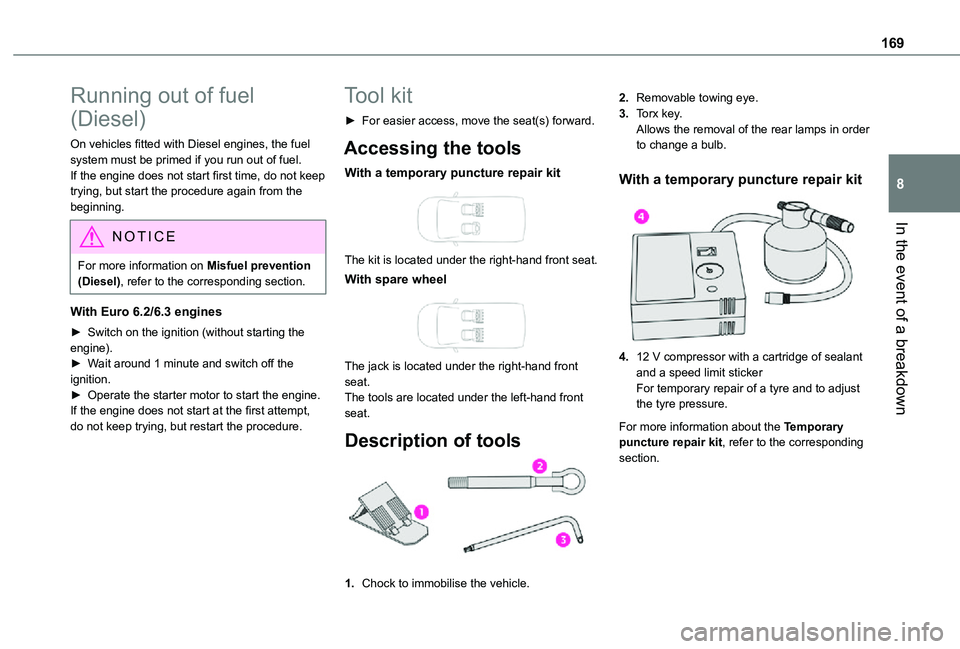
1.Chock to immobilise the vehicle.
2.Removable towing eye.
3.Torx key.Allows the removal of the rear lamps in order to change a bulb.
With a temporary puncture repair kit
4.12 V compressor with a cartridge of sealant and a speed limit stickerFor temporary repair of a tyre and to adjust the tyre pressure.
For more information about the Temporary puncture repair kit, refer to the corresponding section.
Page 170 of 272
170
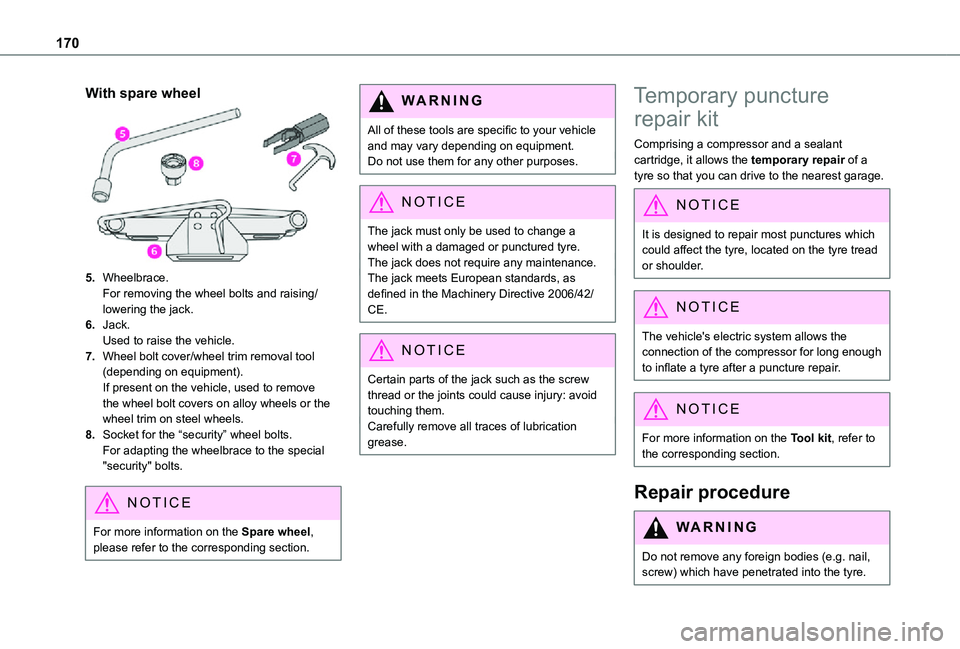
With spare wheel
5.Wheelbrace.For removing the wheel bolts and raising/lowering the jack.
6.Jack.Used to raise the vehicle.
7.Wheel bolt cover/wheel trim removal tool (depending on equipment).If present on the vehicle, used to remove the wheel bolt covers on alloy wheels or the wheel trim on steel wheels.
8.Socket for the “security” wheel bolts.For adapting the wheelbrace to the special "security" bolts.
NOTIC E
For more information on the Spare wheel, please refer to the corresponding section.
WARNI NG
All of these tools are specific to your vehicle and may vary depending on equipment.Do not use them for any other purposes.
NOTIC E
The jack must only be used to change a
wheel with a damaged or punctured tyre.The jack does not require any maintenance.The jack meets European standards, as defined in the Machinery Directive 2006/42/CE.
NOTIC E
Certain parts of the jack such as the screw thread or the joints could cause injury: avoid touching them.Carefully remove all traces of lubrication grease.
Temporary puncture
repair kit
Comprising a compressor and a sealant cartridge, it allows the temporary repair of a tyre so that you can drive to the nearest garage.
NOTIC E
It is designed to repair most punctures which
could affect the tyre, located on the tyre tread or shoulder.
NOTIC E
The vehicle's electric system allows the connection of the compressor for long enough to inflate a tyre after a puncture repair.
NOTIC E
For more information on the Tool kit, refer to the corresponding section.
Repair procedure
WARNI NG
Do not remove any foreign bodies (e.g. nail, screw) which have penetrated into the tyre.
Page 173 of 272
173
In the event of a breakdown
8
Spare wheel
Procedure for changing a damaged wheel with the spare wheel using the tools provided with the vehicle.
NOTIC E
For more information on the Tool kit, refer to the corresponding section.
► Park the vehicle, taking care to avoid obstructing traffic, and apply the parking brake.► Follow the safety instructions (hazard warning lamps, warning triangle, wearing high visibility vest, etc.) according to the legislation in force in the country where you are driving.► Switch off the ignition.
Access to the spare wheel
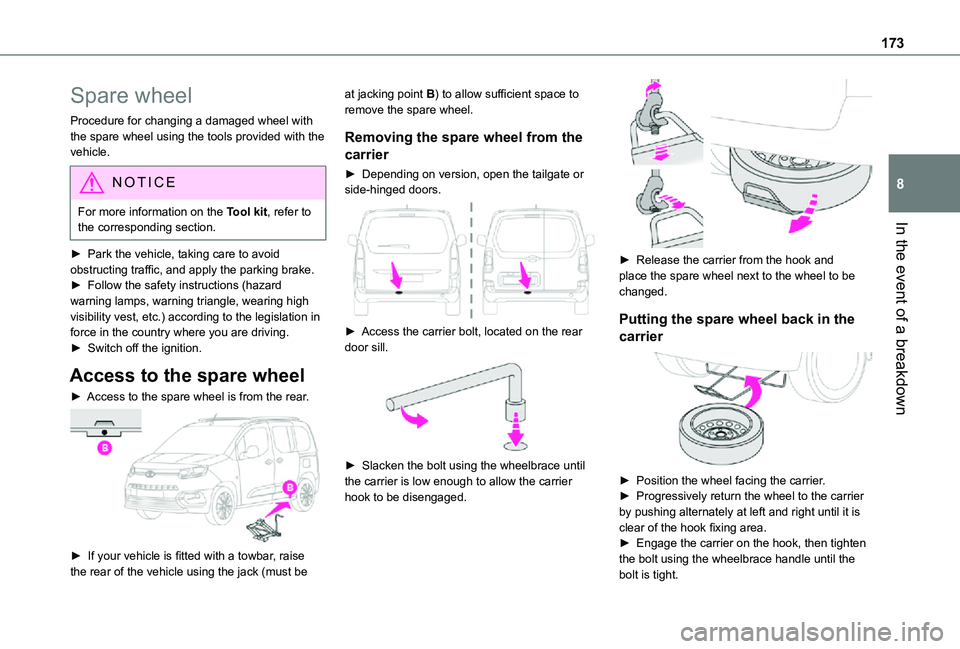
► Access to the spare wheel is from the rear.
► If your vehicle is fitted with a towbar, raise the rear of the vehicle using the jack (must be
at jacking point B) to allow sufficient space to remove the spare wheel.
Removing the spare wheel from the
carrier
► Depending on version, open the tailgate or side-hinged doors.
► Access the carrier bolt, located on the rear door sill.
► Slacken the bolt using the wheelbrace until the carrier is low enough to allow the carrier hook to be disengaged.
► Release the carrier from the hook and place the spare wheel next to the wheel to be changed.
Putting the spare wheel back in the
carrier
► Position the wheel facing the carrier.► Progressively return the wheel to the carrier by pushing alternately at left and right until it is clear of the hook fixing area.► Engage the carrier on the hook, then tighten the bolt using the wheelbrace handle until the bolt is tight.
Page 175 of 272

175
In the event of a breakdown
8
► Extend jack 6 until its head comes into contact with jacking point A or B, whichever is used; the contact surface A or B of the vehicle must be correctly engaged with the central part of the head of the jack.► Raise the vehicle until there is sufficient space between the wheel and the ground to admit the spare (not punctured) wheel easily.
WARNI NG
Risk of injury!
Ensure that the jack is stable. If the ground is slippery or loose, the jack may slip or collapse.Ensure that the jack is positioned strictly at one of the jacking points A or B under the vehicle, making sure that the vehicle's contact surface is correctly centred on the head of the jack. Otherwise, there is a risk of damage to the vehicle and/or of the jack collapsing.
► Remove the bolts and store them in a clean place.► Remove the wheel.
Fitting a wheel
► Fit the wheel on the hub.► Screw in the bolts by hand as far as possible.► Pre-tighten the security bolt using the wheelbrace 5 equipped with a security socket 8.► Pre-tighten the other bolts using the wheelbrace 5 only.
► Lower the vehicle again fully.► Fold jack 6 and remove it.
► If your vehicle is so equipped, tighten the security bolt using the wheelbrace 5 equipped with a security socket 8.► Tighten the other bolts using the wheelbrace 5 only.► Store the tools.
Page 176 of 272
176
NOTIC E
Fitting a steel or "space-saver" type spare wheelIf the vehicle is equipped with alloy wheels, the washers do not make contact with the steel or "space-saver" type spare wheel. The wheel is secured by the conical contact of each bolt.
WARNI NG
After changing a wheelStow the punctured wheel in the carrier.Go to a TOYOTA dealer or a qualified workshop as soon as possible.Have the punctured tyre examined. After inspection, the technician will advise you on whether the tyre can be repaired or if it must be replaced.
NOTIC E
Some driving aid functions should be disabled, e.g. the Active Safety Brake.
NOTIC E
If your vehicle has tyre under-inflation detection, check the tyre pressures and reinitialise the system.For more information on Under-inflation detection, refer to the corresponding section.
NOTIC E
Wheel with wheel trimWhen refitting the wheel, refit the wheel trim, starting by aligning the cutout with the valve and then pushing the trim into place all round its edge with the palm of your hand.
NOTIC E
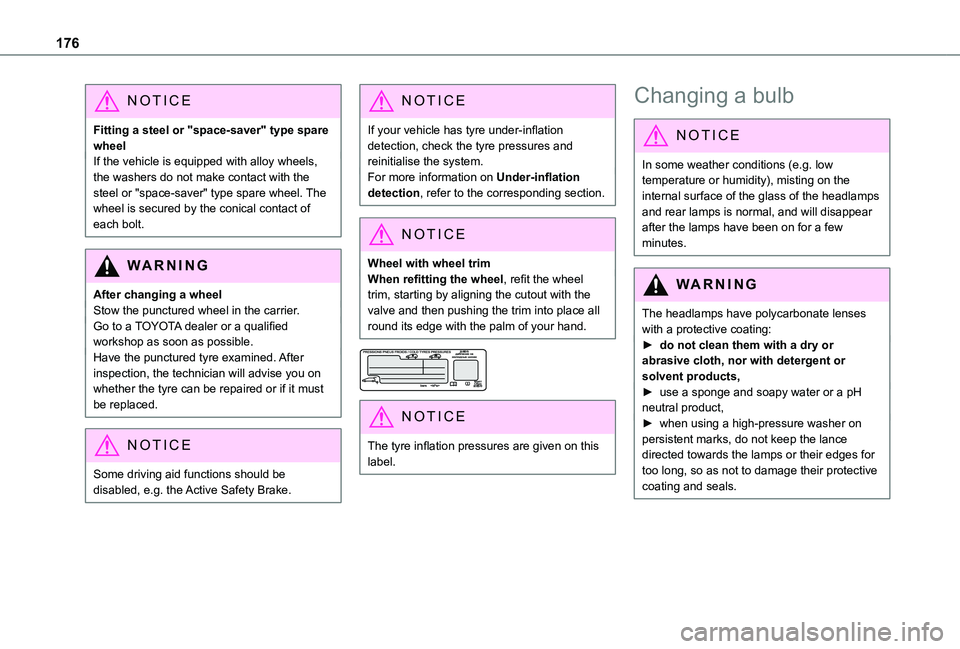
The tyre inflation pressures are given on this label.
Changing a bulb
NOTIC E
In some weather conditions (e.g. low temperature or humidity), misting on the internal surface of the glass of the headlamps and rear lamps is normal, and will disappear after the lamps have been on for a few minutes.
WARNI NG
The headlamps have polycarbonate lenses with a protective coating:► do not clean them with a dry or abrasive cloth, nor with detergent or solvent products,► use a sponge and soapy water or a pH neutral product,► when using a high-pressure washer on persistent marks, do not keep the lance
directed towards the lamps or their edges for too long, so as not to damage their protective coating and seals.
Page 194 of 272
194
Identification markings
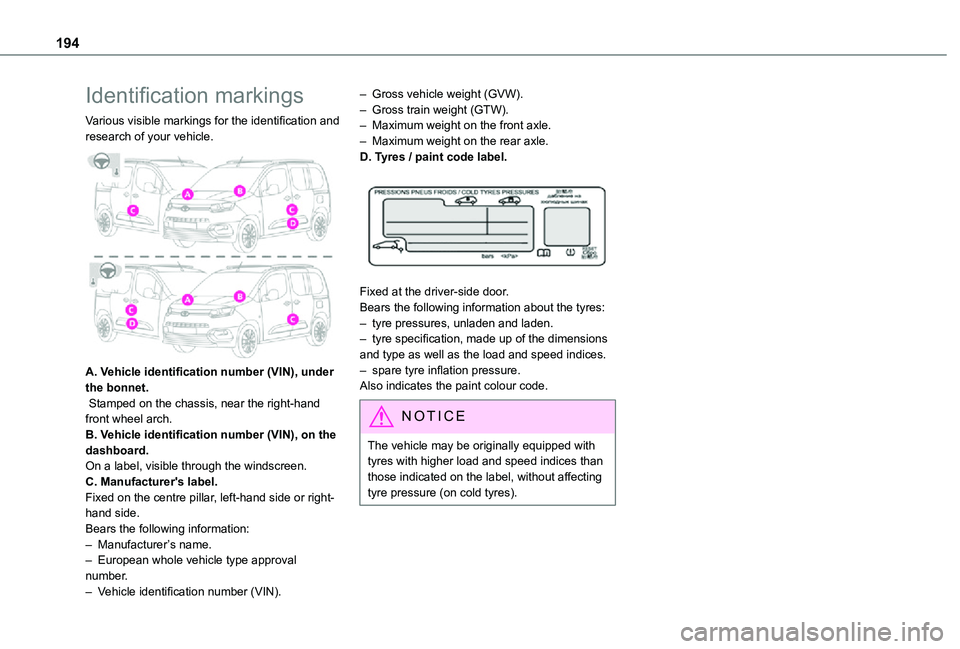
Various visible markings for the identification and research of your vehicle.
A. Vehicle identification number (VIN), under the bonnet. Stamped on the chassis, near the right-hand front wheel arch.B. Vehicle identification number (VIN), on the dashboard.On a label, visible through the windscreen.C. Manufacturer's label.Fixed on the centre pillar, left-hand side or right-hand side.Bears the following information:– Manufacturer’s name.
– European whole vehicle type approval number.– Vehicle identification number (VIN).
– Gross vehicle weight (GVW).– Gross train weight (GTW).– Maximum weight on the front axle.– Maximum weight on the rear axle.D. Tyres / paint code label.
Fixed at the driver-side door.Bears the following information about the tyres:– tyre pressures, unladen and laden.– tyre specification, made up of the dimensions and type as well as the load and speed indices.– spare tyre inflation pressure.Also indicates the paint colour code.
NOTIC E
The vehicle may be originally equipped with tyres with higher load and speed indices than those indicated on the label, without affecting tyre pressure (on cold tyres).
Page 250 of 272
250
A
ABS 78Accessories 75, 104Access to the 3rd row 46Access to the spare wheel 173Active Safety Brake 133–135AdBlue® 164AdBlue® tank 166Additive, Diesel 162–163Adjusting headlamps 70Adjusting head restraints 47Adjusting seat 40, 46Adjusting the air distribution 57–58Adjusting the air flow 57–58Adjusting the date 220, 246Adjusting the height and reach of the steering wheel 42Adjusting the lumbar support 40Adjusting the temperature 57–58Adjusting the time 220, 246Advanced Grip Control 80–81
Advice on care and maintenance 167Advice on driving 7, 99–100Airbags 86, 88–89, 91Airbags, curtain 87, 89Airbags, front 86, 88, 92Airbags, lateral 87–88Air conditioning 55, 58, 59, 61Air conditioning, digital 60Air conditioning, dual-zone automatic 57–58
Air conditioning, electronic (with display screen) 61Air conditioning, manual 56–57Air intake 57–58Air vents 55Alarm 34–36Android Auto connection 236Anti-lock braking system (ABS) 78–79Antitheft / Immobiliser 25Apple CarPlay connection 216, 235Applications 237Armrest 40Armrest, front 48Assistance call 76–77Assistance, emergency braking 79, 135Audible warning 78Audio streaming (Bluetooth) 201, 214, 241
B
Battery 157, 184, 187
Battery, 12 V 162, 184–186Battery, charging 186Battery, remote control 30, 64Bench seat, one-piece, fixed 46Blind spot monitoring system 140Blind spot monitoring system, active 141Blind spot sensors 139, 141Bluetooth (hands-free) 202–203, 217–218, 242Bluetooth (telephone) 217–218, 242–243
Bodywork 168Bonnet 158–159Boot lid 27, 29Bottle holder 48Brake discs 163Brake lamps 180Brakes 163Braking assistance system 78–79Braking, automatic emergency 133–135Braking, dynamic emergency 106–108Brightness 219Bulbs 177Bulbs (changing) 176–178Bulbs (changing, type) 177
C
Capacity, fuel tank 151–152Cap, fuel filler 152Care of the bodywork 168CD 201, 214
CD, MP3 201, 214Central locking 24, 27Changing a bulb 176–178Changing a fuse 182–184Changing a wheel 170, 173Changing a wiper blade 72–73Changing the remote control battery 30Charger, induction 51Charger, wireless 51Checking the levels 160–161