settings TOYOTA PROACE EV 2021 User Guide
[x] Cancel search | Manufacturer: TOYOTA, Model Year: 2021, Model line: PROACE EV, Model: TOYOTA PROACE EV 2021Pages: 360, PDF Size: 68.91 MB
Page 70 of 360

70
Refitting
NOTIC E
Before refitting the seat or bench seat in the vehicle, pull the strap fully to ensure that the latching mechanism has engaged.
WARNI NG
Do not use the strap to lift the seat or bench seat.
(example of an individual seat)► Check that nothing is obstructing the rails.
► Place the front part of the guides on the rails.► Tip the seat to align the rear of the guides in the rails.► Slide the seat forwards or backwards until it engages in the notches.► Raise the backrest.
NOTIC E
Check that the seat has correctly locked on the floor when returned to the seating position.
Individual rear seat(s) on
rails
PROACE VERSO
The different equipment and settings described hereafter vary according to the version and the configuration of your vehicle.
The individual seat is fitted with a three-point inertia reel seat belt.It can be placed facing forwards or facing rearwards.
NOTIC E
If there is an individual seat facing rearwards in row 2, ensure that the seat in row 1 (driver or passenger) is not set too far back, in order to avoid contact between the two seats.This could cause significant wear of the parts which are in contact.
Page 93 of 360

93
Ease of use and comfort
1
Activation/Deactivation
Depending on version, this button is accessible at the front, from the dual-zone automatic air conditioning control panel.► Press this button to activate/deactivate the operation of the rear controls.
Additional heating/
ventilation system
Heating
This is an additional and separate system which
heats the passenger compartment and improves defrosting performance.
This indicator lamp is lit while the system is programmed or set in operation remotely via the remote control.It flashes during the whole duration of the heating and goes off at the end of the heating cycle or when stopped using the remote control.
Ventilation
This system allows ventilation of the passenger compartment with exterior air to improve the temperature experienced on entering the vehicle in summer.
Programming
With a TOYOTA Pro Touch with navigation system, use the remote control to start/stop the additional heating.With a Bluetooth® audio system or a TOYOTA Pro Touch, use the remote control to start/stop the additional heating and/or adjust the pre-heating times.
With Bluetooth® audio system
► Press the MENU button to access the main menu. ► Select "Pre-heat. / Pre-ventil.".► Select "Activation" and, if necessary, for programming, “Parameters".
► Select "Heating" to heat the engine and passenger compartment or "Ventilation" to ventilate the passenger compartment.
► Select:• the first clock to set/save the time at which the pre-heating temperature will be reached,
• the second clock to set/save a second time at which the pre-heating temperature will be reached,
N OTIC E
Using these two clocks and depending on the season you can, for example, select one or the other start time.A message on the screen confirms your choice.
With TOYOTA Pro Touch
Press Connect-App to display the main page.Then press "Programmable heating/ventilation".► Select the "Status" tab to activate/deactivate the system.► Select the "Other settings" tab to choose the "Heating" mode, to heat the engine and
Page 94 of 360

94
passenger compartment, or "Ventilation" to ventilate the passenger compartment.► Then set/save the time at which the preheating temperature will be reached for each selection.Press this button to save.
With TOYOTA Pro Touch with
navigation system
In the Applications > Vehicle apps menu:► Select AIR CON programming.
► Press the Status tab to activate/deactivate the system.► Press the Settings tab to select Heating mode to heat the engine and passenger compartment or Ventilation mode to ventilate the passenger compartment.► Then programme/save the activation time for each selection.► Press OK to confirm.
NOTIC E
You must allow at least 60 minutes between programming operations.
NOTIC E
Depending on the outside temperature, a certain amount of pre-conditioning time is necessary in order to reach the programmed temperature by the stored activation time.This pre-conditioning time lasts up to 45 min.
Long range remote control
This enables you to switch the heating in the passenger compartment on or off from a distance.The remote control has a range of about 1 km (0.6 miles) in open country.
On
► Pressing and holding this button starts the heating immediately (confirmed by the green indicator lamp coming on briefly).
Off
► Pressing and holding this button stops the heating immediately (confirmed by the red indicator lamp coming on briefly).
NOTIC E
The indicator lamp in the remote control flashes for about 2 seconds if the vehicle has not received the signal, in which case
you should move to a different location and repeat the command.
Changing the battery
The indicator lamp in the remote control will change to orange if the battery charge is low.If the indicator lamp is not on, the battery is discharged.
► Use a coin to unscrew the cap and replace the battery.
Page 102 of 360

102
Exterior welcome lighting
The remote operation of the lighting makes your approach to the vehicle easier in poor light. It is activated when the lighting control is in the "AUTO" position and the level of light detected by the sunshine sensor is low.
Switching on
Press this button on the remote control or on one of the front door handles with the "Smart Entry & Start" system.The dipped beam headlamps and sidelamps come on; your vehicle is also unlocked.
Switching off
The exterior welcome lighting switches off automatically after a set time, when the ignition is switched on or on locking the vehicle.
Programming
With audio system or touch screen
The activation, deactivation and
duration of the welcome lighting can be set via the vehicle configuration menu.
Cornering lighting
This system makes use of the beam from a front foglamp to illuminate the inside of a bend, when the main or dipped beam headlamps are on and the vehicle speed is below 25 mph (40 km/h) (urban driving, winding road, junctions, parking manoeuvres).
Without/With cornering lighting
Switching on / off
This system starts:– when the corresponding direction indicator is switched on.or– from a certain angle of rotation of the steering wheel.It becomes inactive:– below a certain angle of rotation of the steering wheel.– above 25 mph (40 km/h).– when reverse gear is engaged.
Programming
With audio system or touch screen
The system's settings are adjusted via the vehicle configuration menu.
Automatic headlamp
dipping
When the ring is in the "AUTO” position, this system automatically switches between dipped and main beam headlamps according to the lighting and traffic conditions, using a camera located at the top of the windscreen.
Page 103 of 360

103
Lighting and visibility
4
WARNI NG
This system is a driving aid.The driver remains responsible for the vehicle's lighting, its correct use for the prevailing conditions of light, visibility and traffic, and for observation of driving and vehicle regulations.
NOTIC E
The system will be operational as soon as you exceed 25 km/h (16 mph).If the speed drops below 15 km/h (9 mph), the system no longer operates.
Activation/Deactivation
With/without audio system
► To activate or deactivate the system, press this button.The indicator lamp in the button is on when the function is activated.
With touch screen
The settings are adjusted via the vehicle configuration menu.► Then put the lighting control stalk ring in the "AUTO" or "Dipped/main beam position".
Pause
If the situation requires a change of headlamp beam, the driver can take over at any time.► A "headlamp flash" pauses the function and the lighting system switches to "automatic illumination of lamps" mode:– If the "AUTO" and "Dipped beam" indicator lamps were on, the system changes to main beam.– If the "AUTO" and "Main beam" indicator lamps were on, the system changes to dipped beam.► To reactivate the function, once again switch the headlamps manually between dipped and main beam.
NOTIC E
Flashing the headlamps does not deactivate the system.The state of the system is stored when the ignition is switched off.
NOTIC E
The system may suffer interference or not work correctly:– under conditions of poor visibility (snow, heavy rain, etc.),– if the windscreen in front of the camera is dirty, misted or obscured (for example, by a sticker, etc.),– if the vehicle is facing highly reflective signs.When the system detects thick fog, it temporarily deactivates the function.The system is not able to detect:– road users that do not have their own lighting, such as pedestrians,– vehicles whose lighting is obscured (for example: vehicles running behind a safety barrier on a motorway),– vehicles at the top or bottom of a steep slope, on winding roads, on crossroads.
Page 107 of 360

107
Lighting and visibility
4
Operating fault
If a fault occurs with the automatic windscreen wipers, the wipers will operate in intermittent mode.Have it checked by any authorized Toyota retailer or Toyota authorized repairer, or any reliable repairer.
WARNI NG
Do not cover the rain/sunshine sensor.Switch off the automatic windscreen wipers when using an automatic car wash.In winter, it is advisable to wait until the windscreen is completely clear of ice before activating the automatic rain sensitive wipers.
Rear wiper
Off.
Intermittent wipe.
Wash-wipe (set duration).
Reverse gear
When reverse gear is engaged, the rear wiper will come into operation automatically if the windscreen wipers are operating.
Activation/Deactivation
With audio system or touch screen
The system's settings are adjusted via the vehicle configuration menu.
NOTIC E
This function is activated by default.
WARNI NG
In the event of accumulation of snow or hard frost or if a bicycle carrier is fitted to the tailgate, deactivate the automatic rear wiper via the vehicle configuration menu.
Rear screenwash
► Turn the ring all the way towards the dashboard and hold.The screenwash and the wiper operate for as long as the ring remains turned.A final wiping cycle is performed when screenwashing ends.
Special position of the
windscreen wipers
This maintenance position is used while cleaning or replacing the wiper blades. It can also be useful, in wintry weather (ice, snow), to release the wiper blades from the windscreen.
NOTIC E
To maintain the effectiveness of the flat wiper blades, it is advisable to:– handle them with care.– clean them regularly using soapy water.– avoid using them to hold cardboard on the windscreen.– replace them at the first signs of wear.
Before removing a windscreen wiper blade
► Operating the wiper control stalk within one minute after switching off the ignition will place the wiper blades in a vertical position.
Page 166 of 360
 and limiting both motor torque and power.
Power
Provides equivalen")
166
Eco
Optimises energy consumption, by reducing the output of the heating and air conditioning (without actually deactivating them) and limiting both motor torque and power.
Power
Provides equivalent vehicle performance when fully laden (GVW) to when the vehicle is in Normal mode and when unladen.
Stop & Start
The Stop & Start function puts the engine temporarily into standby - STOP mode - during phases when the vehicle is stopped (red lights, queues, etc.). The engine restarts automatically - START mode - as soon as the driver wishes to move off again.Primarily designed for urban use, the function is intended to reduce fuel consumption and exhaust emissions as well as the noise level when stationary.
The function does not affect the functionalities of the vehicle, in particular the braking.
WARNI NG
Driving on flooded roadsBefore entering into a flooded area, it is strongly recommended that you deactivate the Stop & Start system.For more information on Driving recommendations, particularly on flooded roads, refer to the corresponding section.
Deactivation/Reactivation
With/without audio system
► To deactivate or reactivate the system, press this button.The indicator lamp is lit when the system is deactivated.
With touch screen
The settings are changed via the vehicle configuration menu.
WARNI NG
If the system has been deactivated in STOP mode, the engine restarts immediately.
NOTIC E
The system is reactivated automatically whenever the engine is started by the driver.
Operation
Main conditions for operation
– The driver’s door must be closed.– The sliding side door must be closed.– The driver's seat belt must be fastened.– The state of charge of the battery must be sufficient.– The temperature of the engine must be within its nominal operating range.– The outside temperature must be between 0°C and 35°C.
Putting the engine into standby
(STOP mode)
The engine automatically enters standby mode as soon as the driver indicates their intention to stop.With a manual gearbox: at speeds below 12 mph (20 km/h) or with the vehicle stationary (depending on engine), with the gear lever in neutral and the clutch pedal released.
Page 171 of 360
 displayed on the touch screen or on the instrument panel may be distorted by the relief.In the presence of areas in shade, or in condit")
171
Driving
6
NOTIC E
Other camerasThe images from the camera(s) displayed on the touch screen or on the instrument panel may be distorted by the relief.In the presence of areas in shade, or in conditions of bright sunlight or inadequate lighting, the image may be darkened and with lower contrast.Obstacles may appear further away than they actually are.
WARNI NG
SensorsThe operation of the sensors as well as the associated functions may be disturbed by sound interference such as that emitted by noisy vehicles and machinery (e.g. lorries, pneumatic drills), by the accumulation of snow or dead leaves on the road or in the event of damaged bumpers and mirrors.When reverse gear is engaged, an audible signal (long beep) indicates that the sensors may be dirty.A front or rear impact to the vehicle can upset the sensors’ settings, which is not always detected by the system: distance measurements may be distorted.The sensors do not systematically detect obstacles that are too low (pavements, studs) or too thin (trees, posts, wire fences).Certain obstacles located in the sensors’ blind spots may not be detected or may no longer be detected during the manoeuvre.
Certain materials (fabrics) absorb sound waves: pedestrians may not be detected.
NOTIC E
MaintenanceClean the bumpers and door mirrors and the field of vision of the cameras regularly.When washing your vehicle at high pressure, direct the spray from at least 30 cm away from the radar, sensors and cameras.
WARNI NG
MatsThe use of mats not approved by TOYOTA may interfere with the operation of the speed limiter or cruise control.To avoid any risk of jamming the pedals:– Ensure that the mat is secured correctly.– Never fit one mat on top of another.
NOTIC E
Units of speed
Ensure that the units of speed displayed on the instrument panel (km/h or mph) are those for the country you are driving in.If this is not the case, when the vehicle is stationary, set the display to the required units of speed so that it complies with what is authorised locally.In case of doubt, contact any authorized Toyota retailer or Toyota authorized repairer,
or any reliable repairer.
Page 173 of 360
173
Driving
6
Brightness adjustment
► With the engine running, adjust the brightness of the information display using the buttons 3:• on the "sun" to increase the brightness,• on the "moon" to decrease the brightness.
W ARNI NG
When stationary or while driving, no objects
should be placed around the projection blade (or in its recess) so as not to impede its movement and correct operation.
NOTIC E
In certain extreme weather conditions (rain and/or snow, bright sunshine, etc.), the head-up display may not be legible or may suffer temporary interference.Some sunglasses may hamper reading of the information.To clean the projection blade, use a clean, soft cloth (such as a spectacles cloth or microfibre cloth). Do not use a dry or abrasive cloth, or detergent or solvent products, due to the risk of scratching the projection blade or damaging the non-reflective coating.
NOTIC E
This system operates when the engine is running, and the settings are saved when the ignition is switched off.
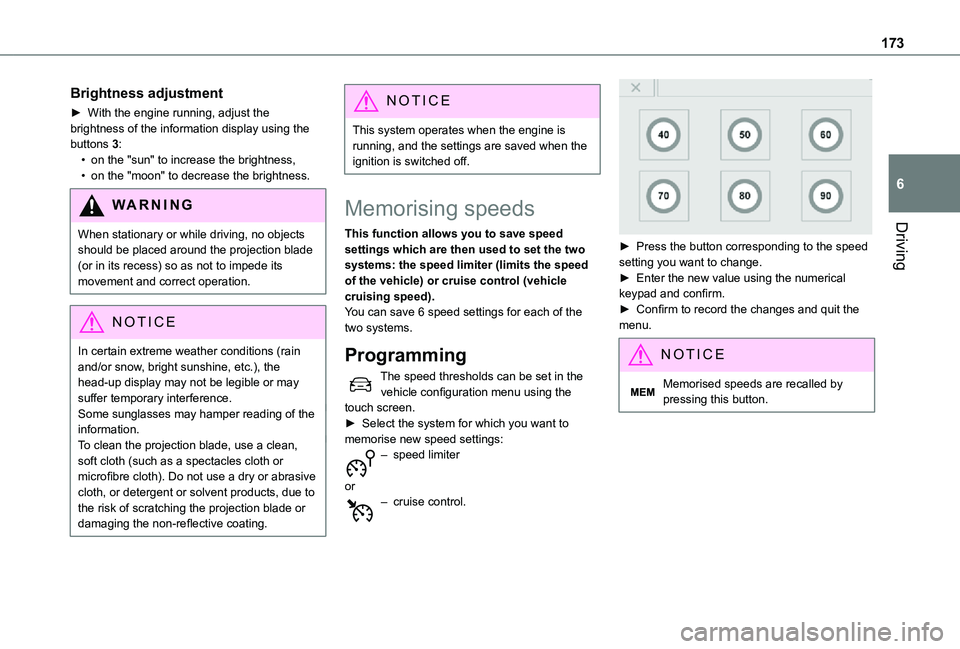
Memorising speeds
This function allows you to save speed settings which are then used to set the two systems: the speed limiter (limits the speed of the vehicle) or cruise control (vehicle cruising speed).You can save 6 speed settings for each of the two systems.
Programming
The speed thresholds can be set in the vehicle configuration menu using the touch screen.► Select the system for which you want to memorise new speed settings:
– speed limiter
or– cruise control.
► Press the button corresponding to the speed setting you want to change.► Enter the new value using the numerical keypad and confirm.► Confirm to record the changes and quit the menu.
NOTIC E
Memorised speeds are recalled by pressing this button.
Page 174 of 360

174
Speed Limit Recognition
and Recommendation
WARNI NG
Refer to the General recommendations on the use of driving and manoeuvring aids.
This system displays the maximum authorised speed in the instrument panel, according to the speed limits in the country in which you are driving, using:– Speed limit signs detected by the camera.– Speed limit details from the navigation system mapping.
WARNI NG
Navigation mapping should be regularly updated in order to receive accurate speed
limit information from the system.
WARNI NG
The units for the speed limit (km/h or mph) depend on the country you are driving in.This should be taken into account so that you observe the speed limit.For the system to work correctly when changing country, the speed unit in the instrument panel must correspond to that of the country you are driving in.
WARNI NG
The automatic reading of road signs is a driving aid system and does not always display speed limits correctly.The speed limit signs present on the road always take priority over the display by the system. The system is designed to detect signs that conform to the Vienna Convention on road signs.
Activation/Deactivation
The settings are changed via the vehicle configuration menu.
Information displayed on
the instrument panel
Head-up display
1.Speed limit indication