sensor TOYOTA RAV4 2006 Service Repair Manual
[x] Cancel search | Manufacturer: TOYOTA, Model Year: 2006, Model line: RAV4, Model: TOYOTA RAV4 2006Pages: 2000, PDF Size: 45.84 MB
Page 650 of 2000
2AZ-FE ENGINE MECHANICAL – ENGINE UNITEM–123
EM
DISASSEMBLY
1. REMOVE IDLER PULLEY (See page EM-23)
2. REMOVE OIL DIPSTICK
3. REMOVE OIL DIPSTICK GUIDE (See page EM-57)
4. REMOVE MANIFOLD STAY (See page EM-57)
5. REMOVE NO. 2 MANIFOLD STAY (See page EM-58)
6. REMOVE NO. 1 EXHAUST MANIFOLD HEAT
INSULATOR (See page EM-58)
7. REMOVE EXHAUST MANIFOLD CONVERTER SUB-
ASSEMBLY (See page EM-58)
8. REMOVE WATER INLET (See page CO-15)
9. REMOVE THERMOSTAT
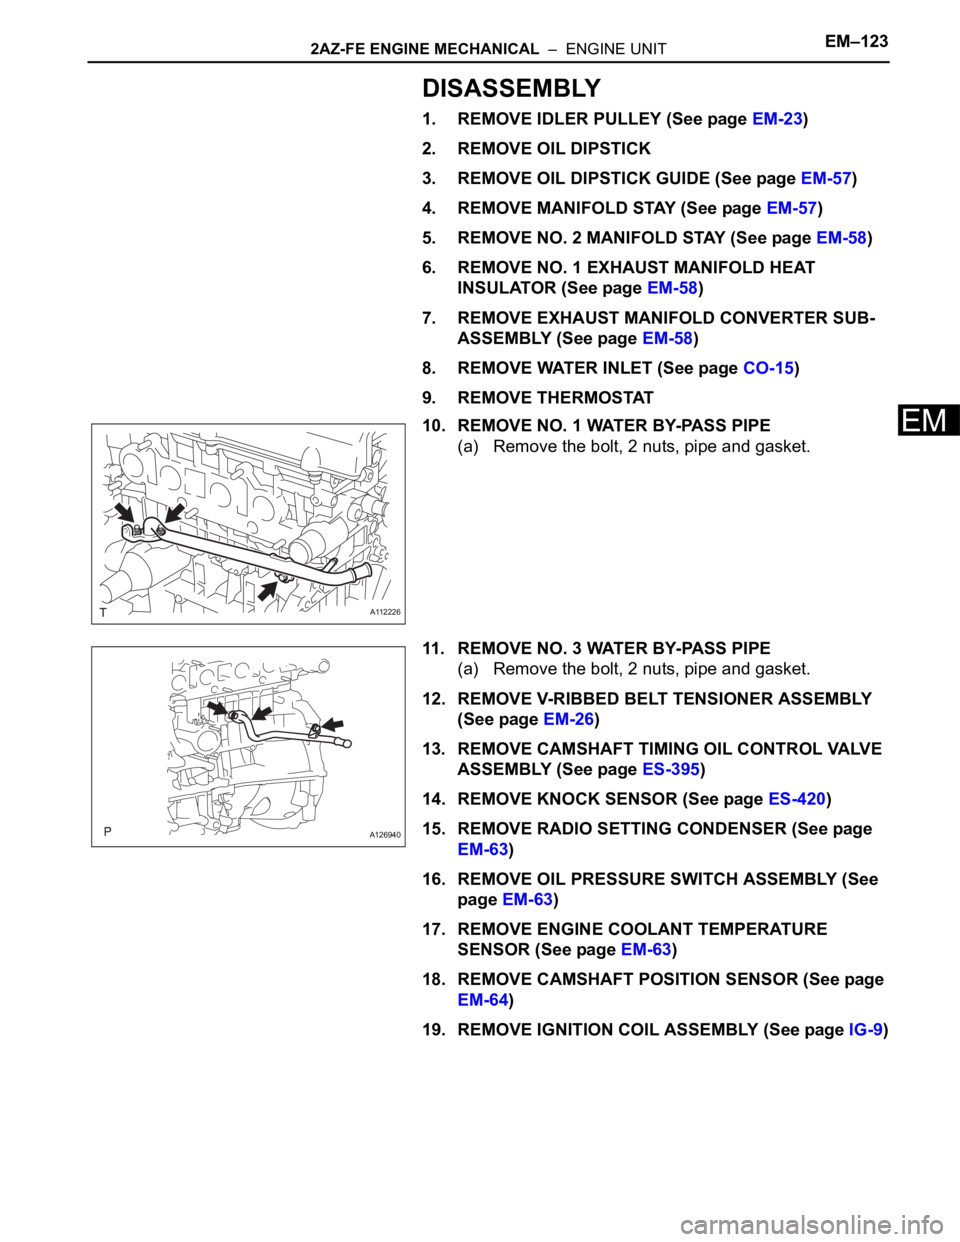
10. REMOVE NO. 1 WATER BY-PASS PIPE
(a) Remove the bolt, 2 nuts, pipe and gasket.
11. REMOVE NO. 3 WATER BY-PASS PIPE
(a) Remove the bolt, 2 nuts, pipe and gasket.
12. REMOVE V-RIBBED BELT TENSIONER ASSEMBLY
(See page EM-26)
13. REMOVE CAMSHAFT TIMING OIL CONTROL VALVE
ASSEMBLY (See page ES-395)
14. REMOVE KNOCK SENSOR (See page ES-420)
15. REMOVE RADIO SETTING CONDENSER (See page
EM-63)
16. REMOVE OIL PRESSURE SWITCH ASSEMBLY (See
page EM-63)
17. REMOVE ENGINE COOLANT TEMPERATURE
SENSOR (See page EM-63)
18. REMOVE CAMSHAFT POSITION SENSOR (See page
EM-64)
19. REMOVE IGNITION COIL ASSEMBLY (See page IG-9)
A112226
A126940
Page 651 of 2000
EM–1242AZ-FE ENGINE MECHANICAL – ENGINE UNIT
EM
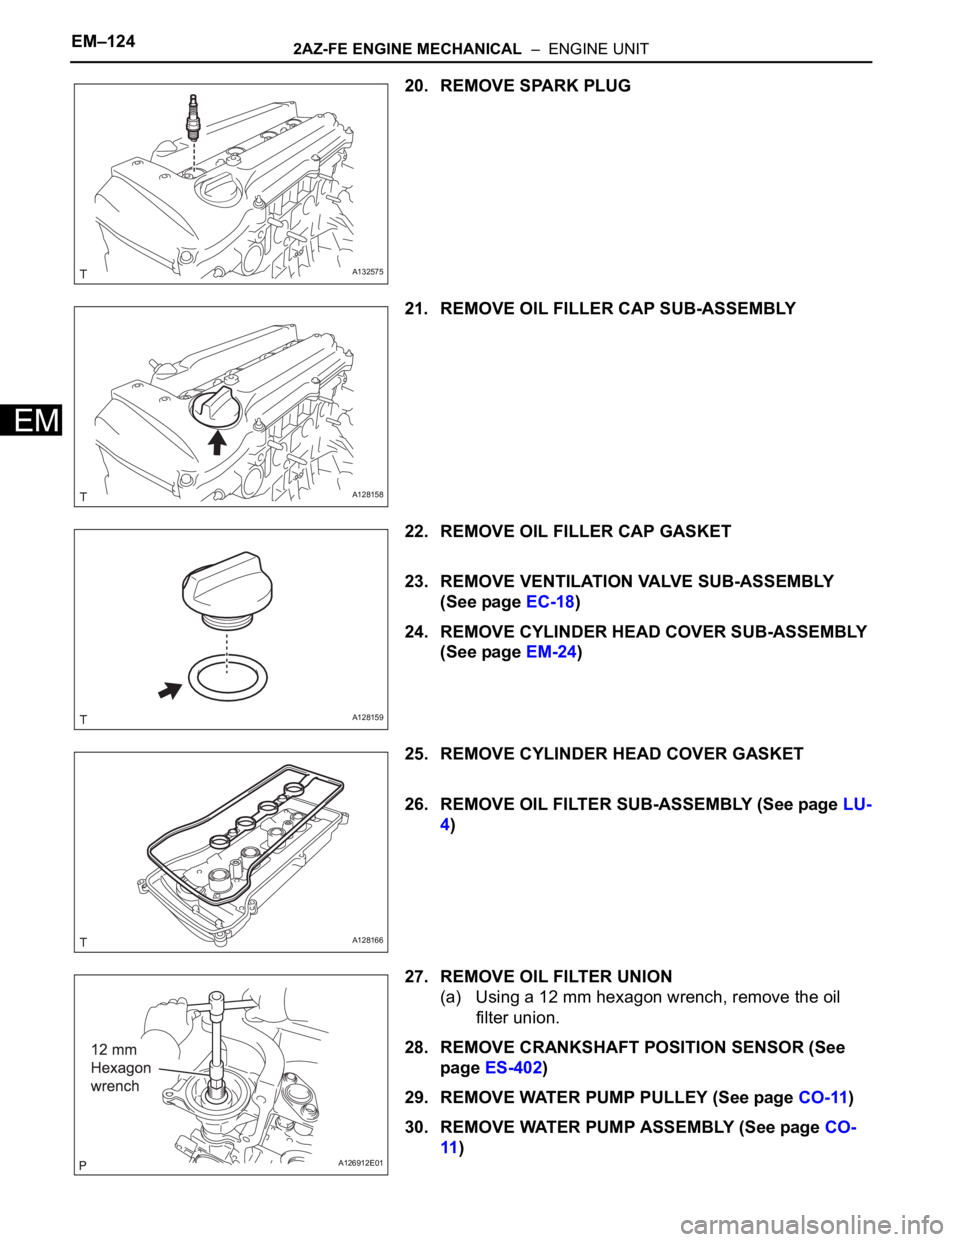
20. REMOVE SPARK PLUG
21. REMOVE OIL FILLER CAP SUB-ASSEMBLY
22. REMOVE OIL FILLER CAP GASKET
23. REMOVE VENTILATION VALVE SUB-ASSEMBLY
(See page EC-18)
24. REMOVE CYLINDER HEAD COVER SUB-ASSEMBLY
(See page EM-24)
25. REMOVE CYLINDER HEAD COVER GASKET
26. REMOVE OIL FILTER SUB-ASSEMBLY (See page LU-
4)
27. REMOVE OIL FILTER UNION
(a) Using a 12 mm hexagon wrench, remove the oil
filter union.
28. REMOVE CRANKSHAFT POSITION SENSOR (See
page ES-402)
29. REMOVE WATER PUMP PULLEY (See page CO-11)
30. REMOVE WATER PUMP ASSEMBLY (See page CO-
11)
A132575
A128158
A128159
A128166
A126912E01
Page 652 of 2000
2AZ-FE ENGINE MECHANICAL – ENGINE UNITEM–125
EM
31. REMOVE OIL PAN DRAIN PLUG
(a) Remove the oil pan drain plug and gasket.
32. REMOVE OIL PAN SUB-ASSEMBLY (See page EM-
24)
33. REMOVE CRANKSHAFT PULLEY (See page EM-25)
34. REMOVE NO. 1 CHAIN TENSIONER ASSEMBLY (See
page EM-26)
35. REMOVE TIMING CHAIN COVER SUB-ASSEMBLY
(See page EM-26)
36. REMOVE NO. 1 CRANKSHAFT POSITION SENSOR
PLATE
37. REMOVE TIMING CHAIN GUIDE (See page EM-28)
38. REMOVE CHAIN TENSIONER SLIPPER (See page
EM-28)
39. REMOVE NO. 1 CHAIN VIBRATION DAMPER (See
page EM-28)
40. REMOVE CHAIN SUB-ASSEMBLY
41. REMOVE CRANKSHAFT TIMING SPROCKET
42. REMOVE NO. 2 CHAIN SUB-ASSEMBLY (See page
EM-29)
43. REMOVE OIL PUMP DRIVE GEAR
44. REMOVE OIL PUMP ASSEMBLY (See page LU-12)
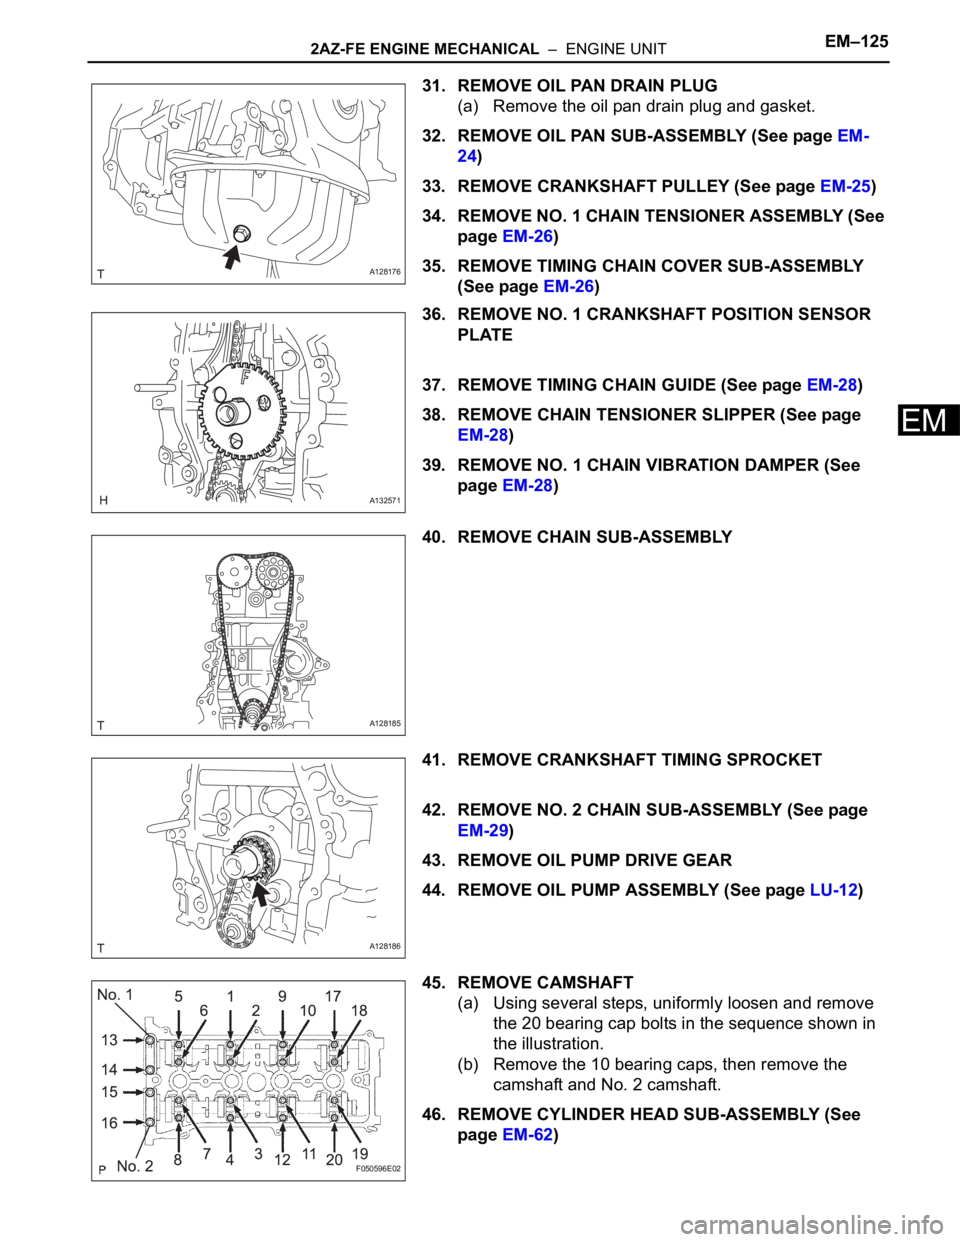
45. REMOVE CAMSHAFT
(a) Using several steps, uniformly loosen and remove
the 20 bearing cap bolts in the sequence shown in
the illustration.
(b) Remove the 10 bearing caps, then remove the
camshaft and No. 2 camshaft.
46. REMOVE CYLINDER HEAD SUB-ASSEMBLY (See
page EM-62)
A128176
A132571
A128185
A128186
F050596E02
Page 677 of 2000
2GR-FE ENGINE MECHANICAL – ENGINE ASSEMBLYEM–31
EM
INSTALLATION
1. INSTALL ENGINE COOLANT TEMPERATURE
SENSOR
(a) Using a 19 mm deep socket wrench, install the
sensor and a new gasket.
Torque: 20 N*m (204 kgf*cm, 14 ft.*lbf)
2. INSTALL KNOCK SENSOR (See page ES-459)
3. INSTALL ENGINE OIL PRESSURE SWITCH
ASSEMBLY
(a) Clean the threads of the oil pressure switch. Apply
adhesive to 2 or 3 threads of the oil pressure switch.
Adhesive:
Toyota Genuine Adhesive 1344, Three Bond
1344 or Equivalent
(b) Using a 24 mm deep socket wrench, install the oil
pressure switch.
Torque: 21 N*m (214 kgf*cm, 15 ft.*lbf)
4. INSTALL NO. 1 FRONT ENGINE MOUNTING
BRACKET LH
(a) Install the mounting bracket with the 6 bolts.
Torque: 54 N*m (551 kgf*cm, 40 ft.*lbf)
5. INSTALL WATER PUMP PULLEY (See page CO-14)
6. INSTALL NO. 2 IDLER PULLEY SUB-ASSEMBLY
(a) Install the idler pulley and cover plate with the bolt.
Torque: 43 N*m (438 kgf*cm, 32 ft.*lbf)
7. INSTALL NO. 2 TIMING GEAR COVER
(a) Install the gear cover with the 2 bolts.
Torque: 6.0 N*m (61 kgf*cm, 53 in.*lbf)
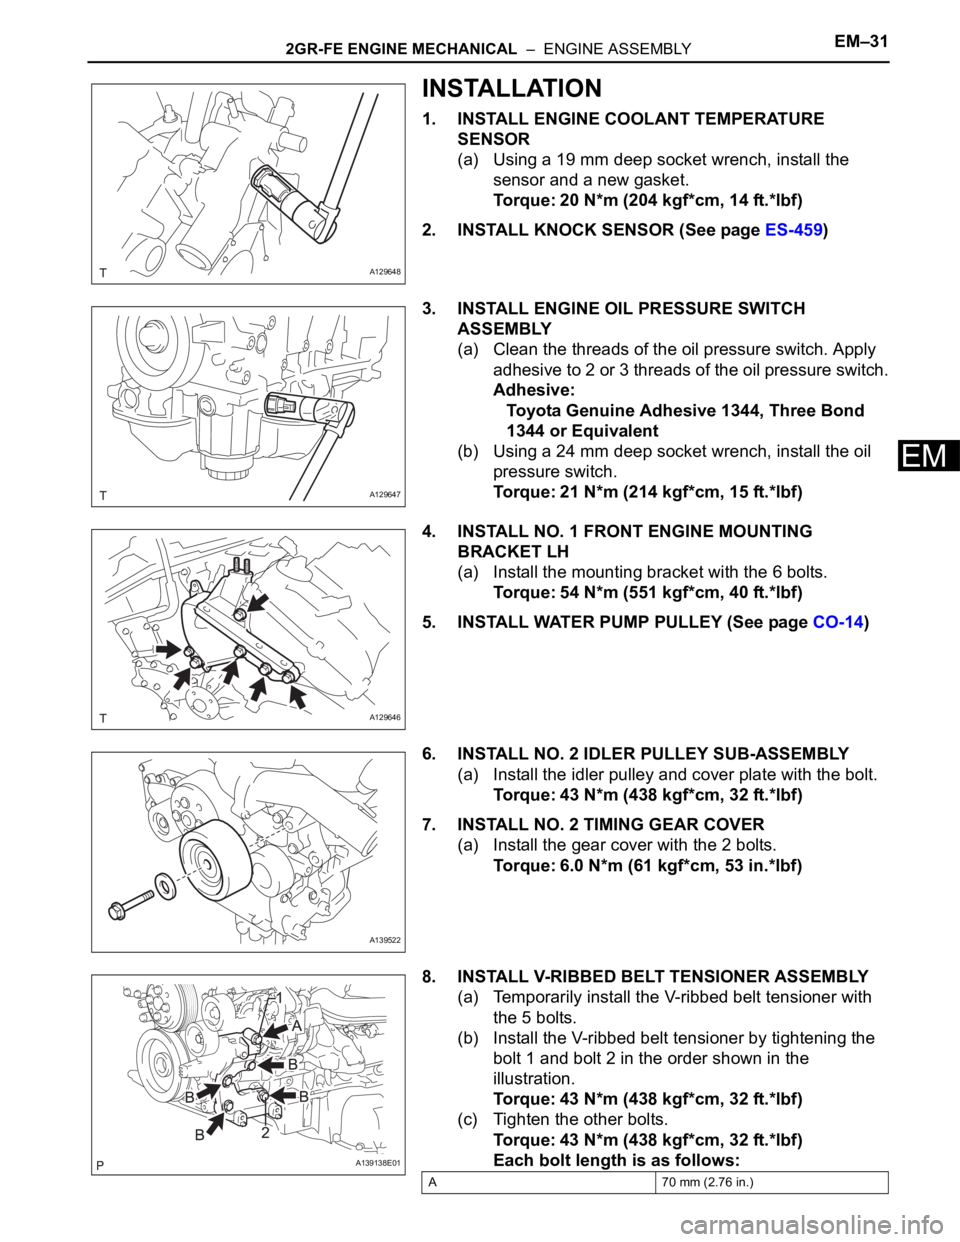
8. INSTALL V-RIBBED BELT TENSIONER ASSEMBLY
(a) Temporarily install the V-ribbed belt tensioner with
the 5 bolts.
(b) Install the V-ribbed belt tensioner by tightening the
bolt 1 and bolt 2 in the order shown in the
illustration.
Torque: 43 N*m (438 kgf*cm, 32 ft.*lbf)
(c) Tighten the other bolts.
Torque: 43 N*m (438 kgf*cm, 32 ft.*lbf)
Each bolt length is as follows:
A129648
A129647
A129646
A139522
A139138E01
A 70 mm (2.76 in.)
Page 689 of 2000
EM–522GR-FE ENGINE MECHANICAL – ENGINE UNIT
EM
DISASSEMBLY
1. REMOVE OIL FILLER CAP SUB-ASSEMBLY
2. REMOVE SPARK PLUG
3. REMOVE CAMSHAFT TIMING CONTROL VALVE
ASSEMBLY (See page ES-440)
4. REMOVE VVT SENSOR (See page ES-443)
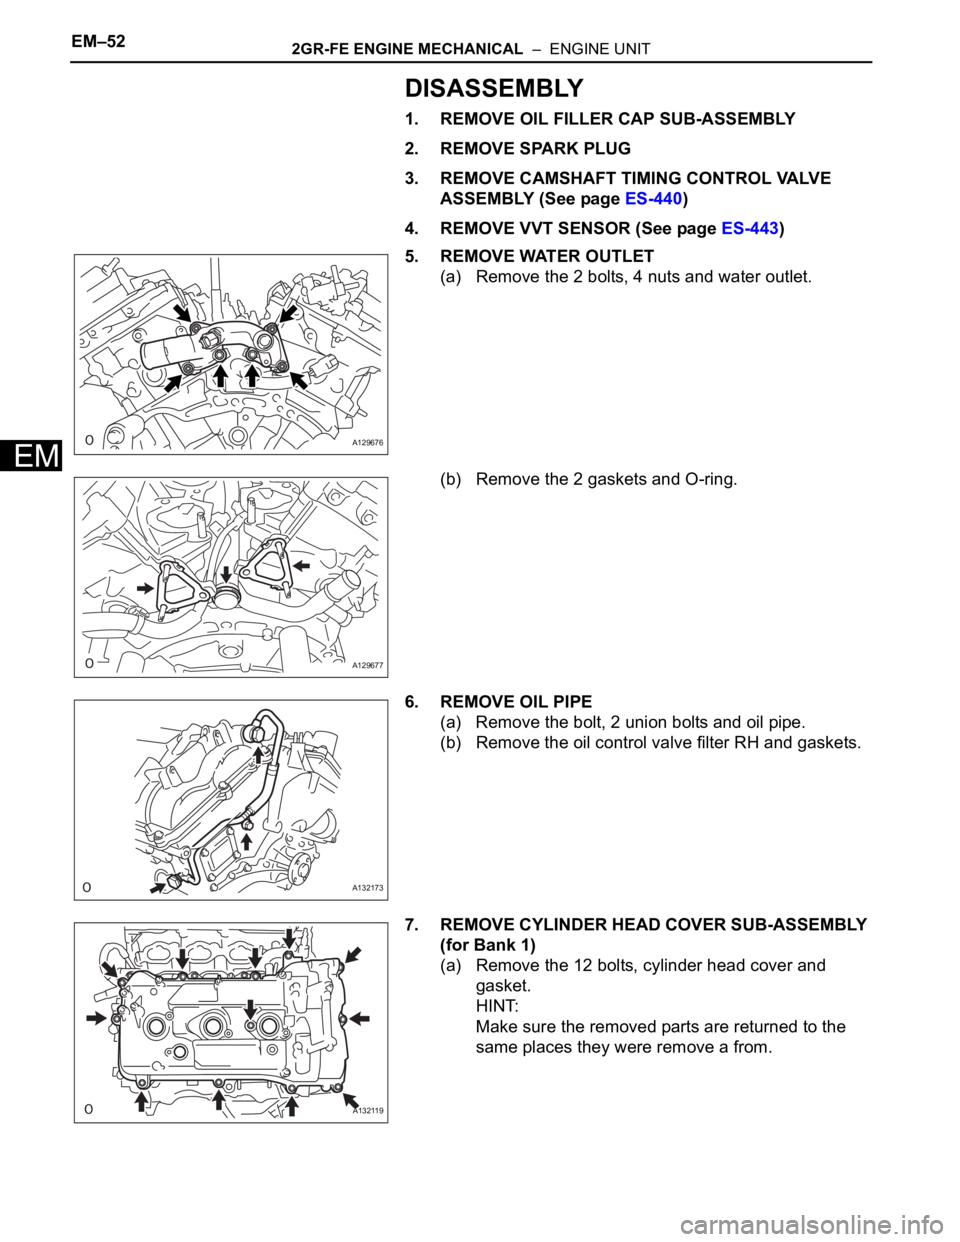
5. REMOVE WATER OUTLET
(a) Remove the 2 bolts, 4 nuts and water outlet.
(b) Remove the 2 gaskets and O-ring.
6. REMOVE OIL PIPE
(a) Remove the bolt, 2 union bolts and oil pipe.
(b) Remove the oil control valve filter RH and gaskets.
7. REMOVE CYLINDER HEAD COVER SUB-ASSEMBLY
(for Bank 1)
(a) Remove the 12 bolts, cylinder head cover and
gasket.
HINT:
Make sure the removed parts are returned to the
same places they were remove a from.
A129676
A129677
A132173
A132119
Page 692 of 2000
2GR-FE ENGINE MECHANICAL – ENGINE UNITEM–55
EM
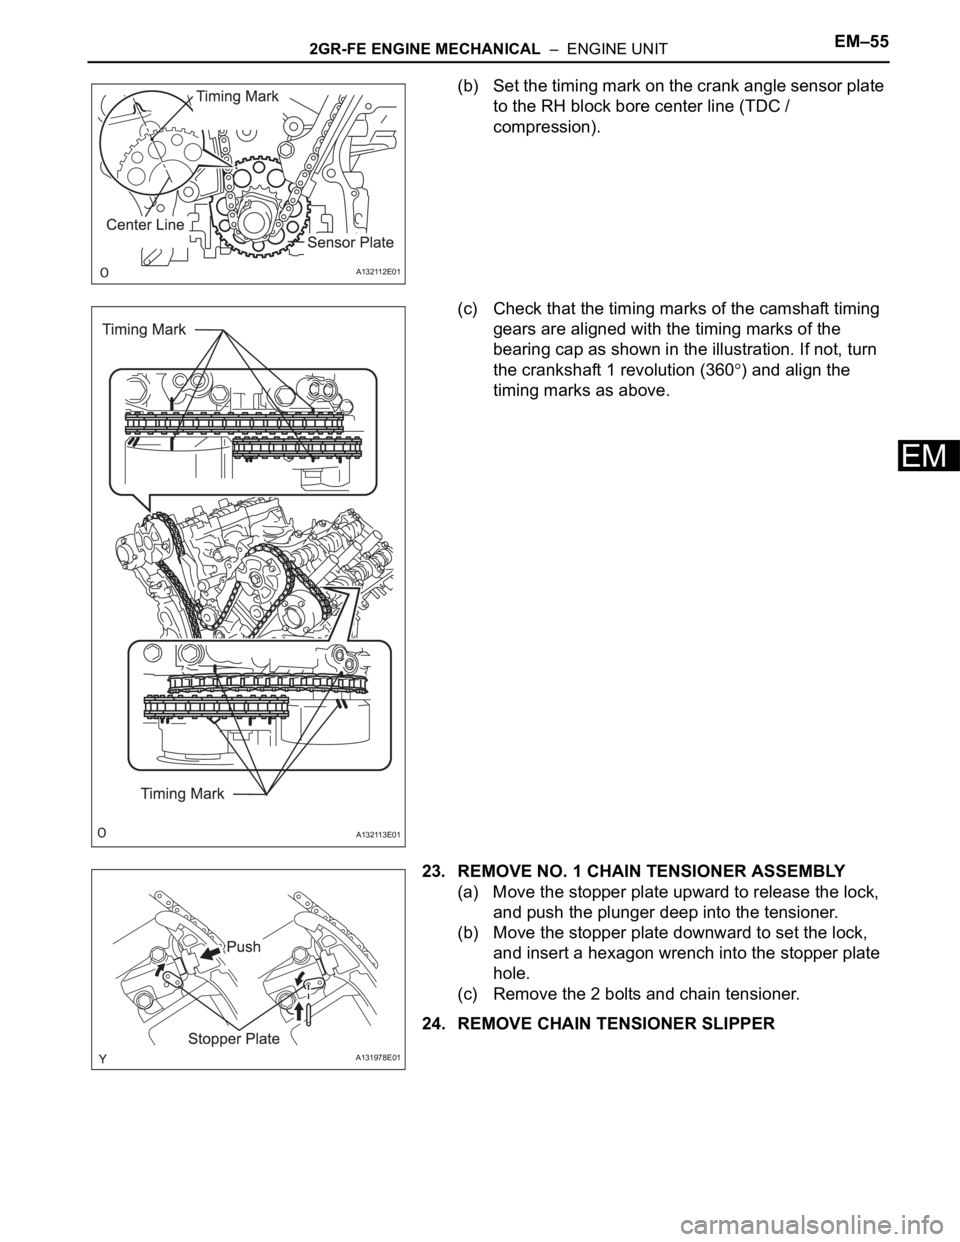
(b) Set the timing mark on the crank angle sensor plate
to the RH block bore center line (TDC /
compression).
(c) Check that the timing marks of the camshaft timing
gears are aligned with the timing marks of the
bearing cap as shown in the illustration. If not, turn
the crankshaft 1 revolution (360
) and align the
timing marks as above.
23. REMOVE NO. 1 CHAIN TENSIONER ASSEMBLY
(a) Move the stopper plate upward to release the lock,
and push the plunger deep into the tensioner.
(b) Move the stopper plate downward to set the lock,
and insert a hexagon wrench into the stopper plate
hole.
(c) Remove the 2 bolts and chain tensioner.
24. REMOVE CHAIN TENSIONER SLIPPER
A132112E01
A132113E01
A131978E01
Page 698 of 2000
2GR-FE ENGINE MECHANICAL – ENGINE UNITEM–61
EM
39. REMOVE VALVE LASH ADJUSTER ASSEMBLY
(a) Remove the 24 valve lash adjusters from the
cylinder head.
HINT:
Arrange the removed parts in the correct order.
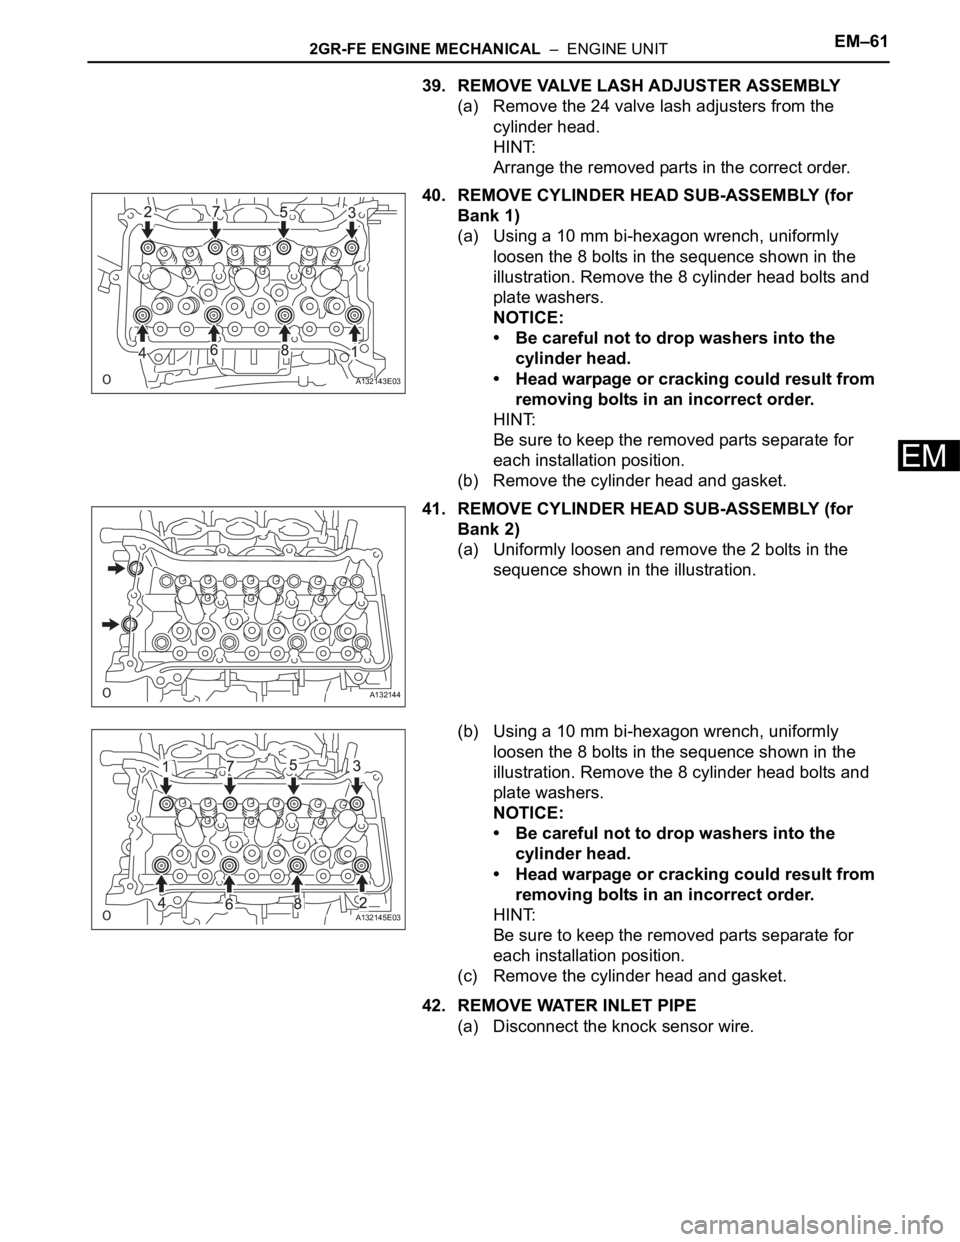
40. REMOVE CYLINDER HEAD SUB-ASSEMBLY (for
Bank 1)
(a) Using a 10 mm bi-hexagon wrench, uniformly
loosen the 8 bolts in the sequence shown in the
illustration. Remove the 8 cylinder head bolts and
plate washers.
NOTICE:
• Be careful not to drop washers into the
cylinder head.
• Head warpage or cracking could result from
removing bolts in an incorrect order.
HINT:
Be sure to keep the removed parts separate for
each installation position.
(b) Remove the cylinder head and gasket.
41. REMOVE CYLINDER HEAD SUB-ASSEMBLY (for
Bank 2)
(a) Uniformly loosen and remove the 2 bolts in the
sequence shown in the illustration.
(b) Using a 10 mm bi-hexagon wrench, uniformly
loosen the 8 bolts in the sequence shown in the
illustration. Remove the 8 cylinder head bolts and
plate washers.
NOTICE:
• Be careful not to drop washers into the
cylinder head.
• Head warpage or cracking could result from
removing bolts in an incorrect order.
HINT:
Be sure to keep the removed parts separate for
each installation position.
(c) Remove the cylinder head and gasket.
42. REMOVE WATER INLET PIPE
(a) Disconnect the knock sensor wire.
A132143E03
A132144
A132145E03
Page 700 of 2000
2GR-FE ENGINE MECHANICAL – ENGINE UNITEM–63
EM
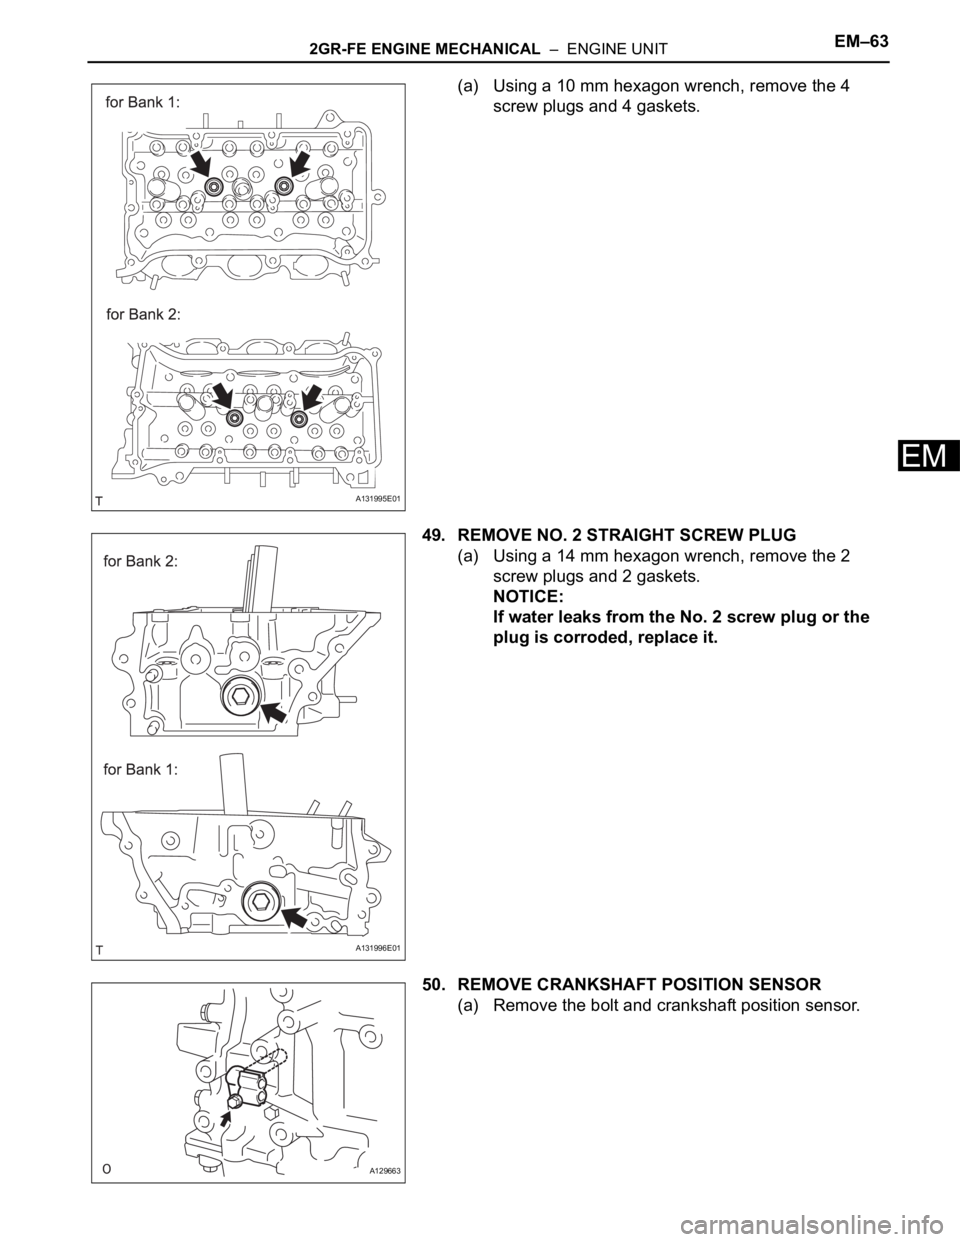
(a) Using a 10 mm hexagon wrench, remove the 4
screw plugs and 4 gaskets.
49. REMOVE NO. 2 STRAIGHT SCREW PLUG
(a) Using a 14 mm hexagon wrench, remove the 2
screw plugs and 2 gaskets.
NOTICE:
If water leaks from the No. 2 screw plug or the
plug is corroded, replace it.
50. REMOVE CRANKSHAFT POSITION SENSOR
(a) Remove the bolt and crankshaft position sensor.
A131995E01
A131996E01
A129663
Page 750 of 2000
2GR-FE ENGINE MECHANICAL – ENGINE UNITEM–113
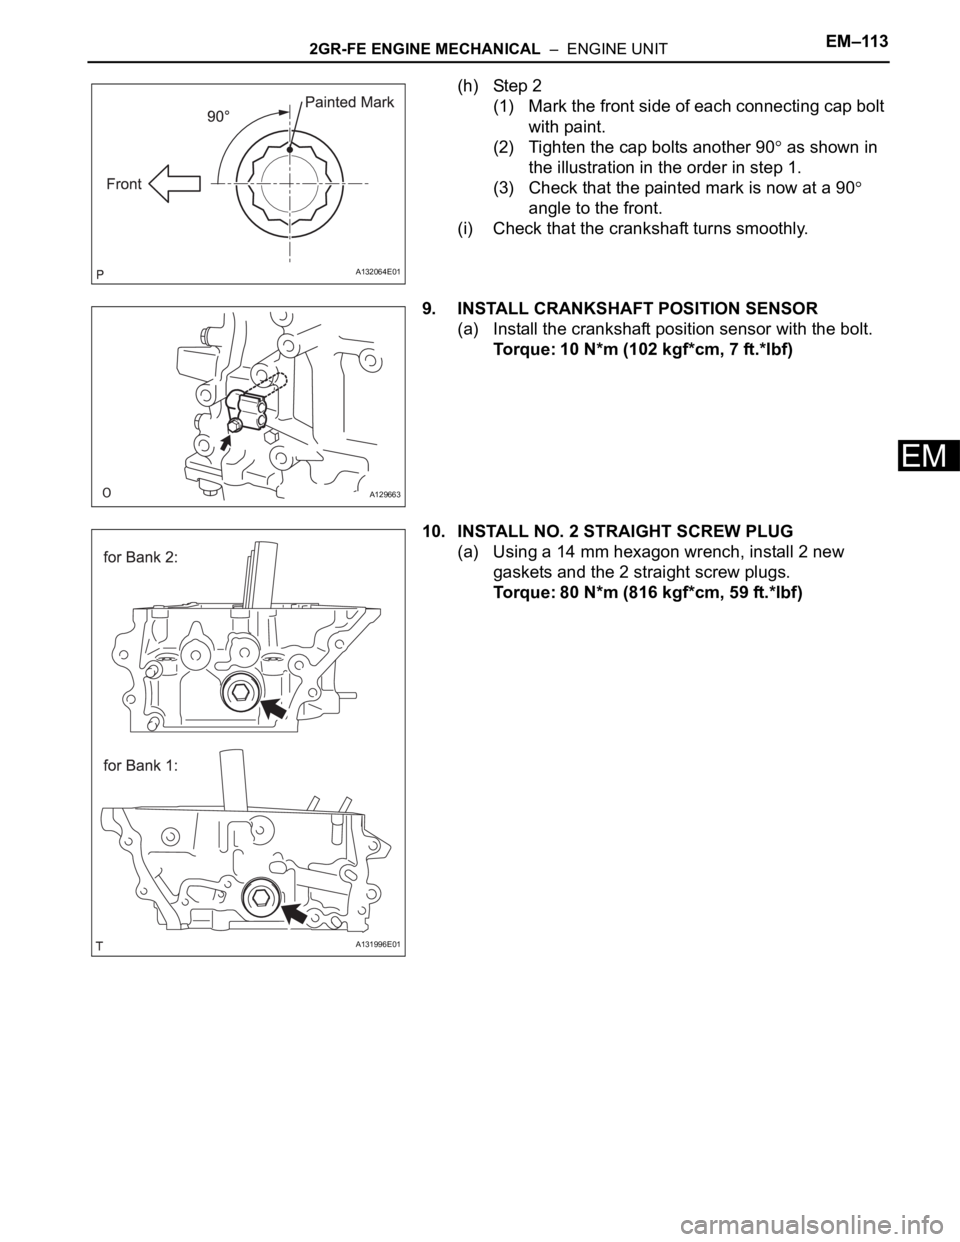
EM
(h) Step 2
(1) Mark the front side of each connecting cap bolt
with paint.
(2) Tighten the cap bolts another 90
as shown in
the illustration in the order in step 1.
(3) Check that the painted mark is now at a 90
angle to the front.
(i) Check that the crankshaft turns smoothly.
9. INSTALL CRANKSHAFT POSITION SENSOR
(a) Install the crankshaft position sensor with the bolt.
Torque: 10 N*m (102 kgf*cm, 7 ft.*lbf)
10. INSTALL NO. 2 STRAIGHT SCREW PLUG
(a) Using a 14 mm hexagon wrench, install 2 new
gaskets and the 2 straight screw plugs.
Torque: 80 N*m (816 kgf*cm, 59 ft.*lbf)
A132064E01
A129663
A131996E01
Page 767 of 2000
EM–1302GR-FE ENGINE MECHANICAL – ENGINE UNIT
EM
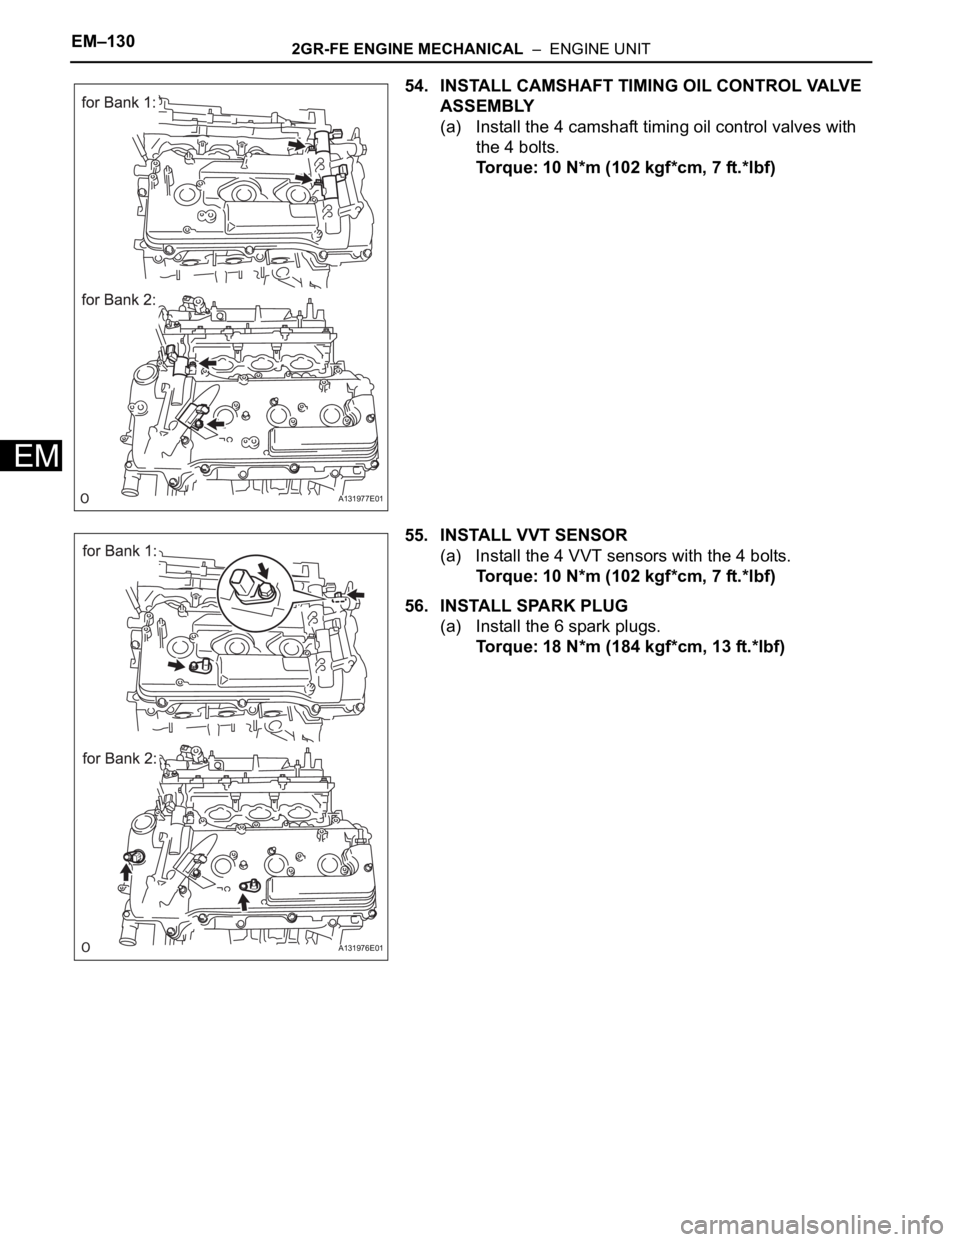
54. INSTALL CAMSHAFT TIMING OIL CONTROL VALVE
ASSEMBLY
(a) Install the 4 camshaft timing oil control valves with
the 4 bolts.
Torque: 10 N*m (102 kgf*cm, 7 ft.*lbf)
55. INSTALL VVT SENSOR
(a) Install the 4 VVT sensors with the 4 bolts.
Torque: 10 N*m (102 kgf*cm, 7 ft.*lbf)
56. INSTALL SPARK PLUG
(a) Install the 6 spark plugs.
Torque: 18 N*m (184 kgf*cm, 13 ft.*lbf)
A131977E01
A131976E01