Washer TOYOTA RAV4 2006 Service Owner's Guide
[x] Cancel search | Manufacturer: TOYOTA, Model Year: 2006, Model line: RAV4, Model: TOYOTA RAV4 2006Pages: 2000, PDF Size: 45.84 MB
Page 990 of 2000
AX–196U140F AUTOMATIC TRANSAXLE – AUTOMATIC TRANSAXLE UNIT
AX
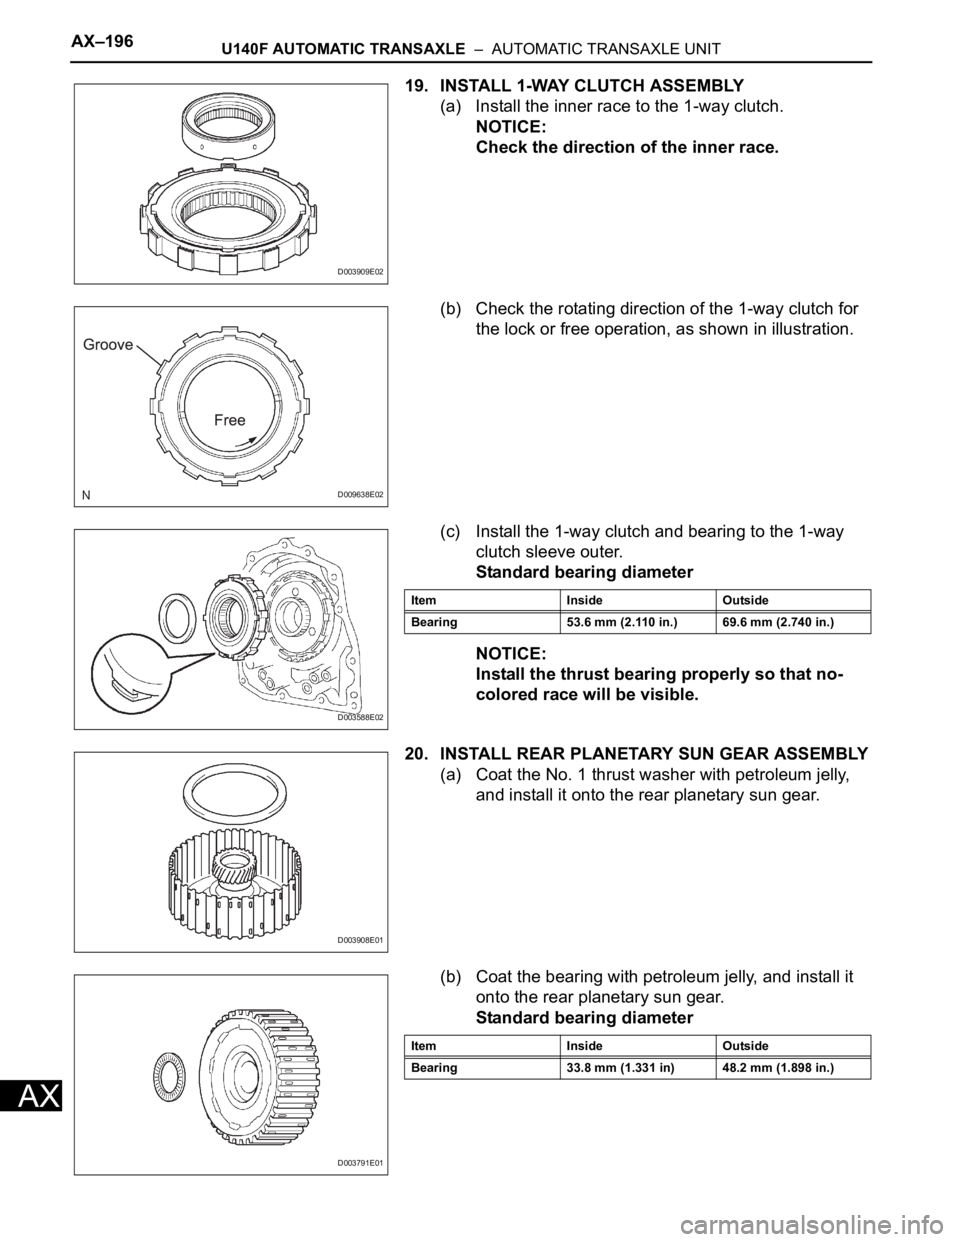
19. INSTALL 1-WAY CLUTCH ASSEMBLY
(a) Install the inner race to the 1-way clutch.
NOTICE:
Check the direction of the inner race.
(b) Check the rotating direction of the 1-way clutch for
the lock or free operation, as shown in illustration.
(c) Install the 1-way clutch and bearing to the 1-way
clutch sleeve outer.
Standard bearing diameter
NOTICE:
Install the thrust bearing properly so that no-
colored race will be visible.
20. INSTALL REAR PLANETARY SUN GEAR ASSEMBLY
(a) Coat the No. 1 thrust washer with petroleum jelly,
and install it onto the rear planetary sun gear.
(b) Coat the bearing with petroleum jelly, and install it
onto the rear planetary sun gear.
Standard bearing diameter
D003909E02
D009638E02
D003588E02
Item Inside Outside
Bearing 53.6 mm (2.110 in.) 69.6 mm (2.740 in.)
D003908E01
D003791E01
Item Inside Outside
Bearing 33.8 mm (1.331 in) 48.2 mm (1.898 in.)
Page 1009 of 2000
U140F AUTOMATIC TRANSAXLE – AUTOMATIC TRANSAXLE UNITAX–215
AX
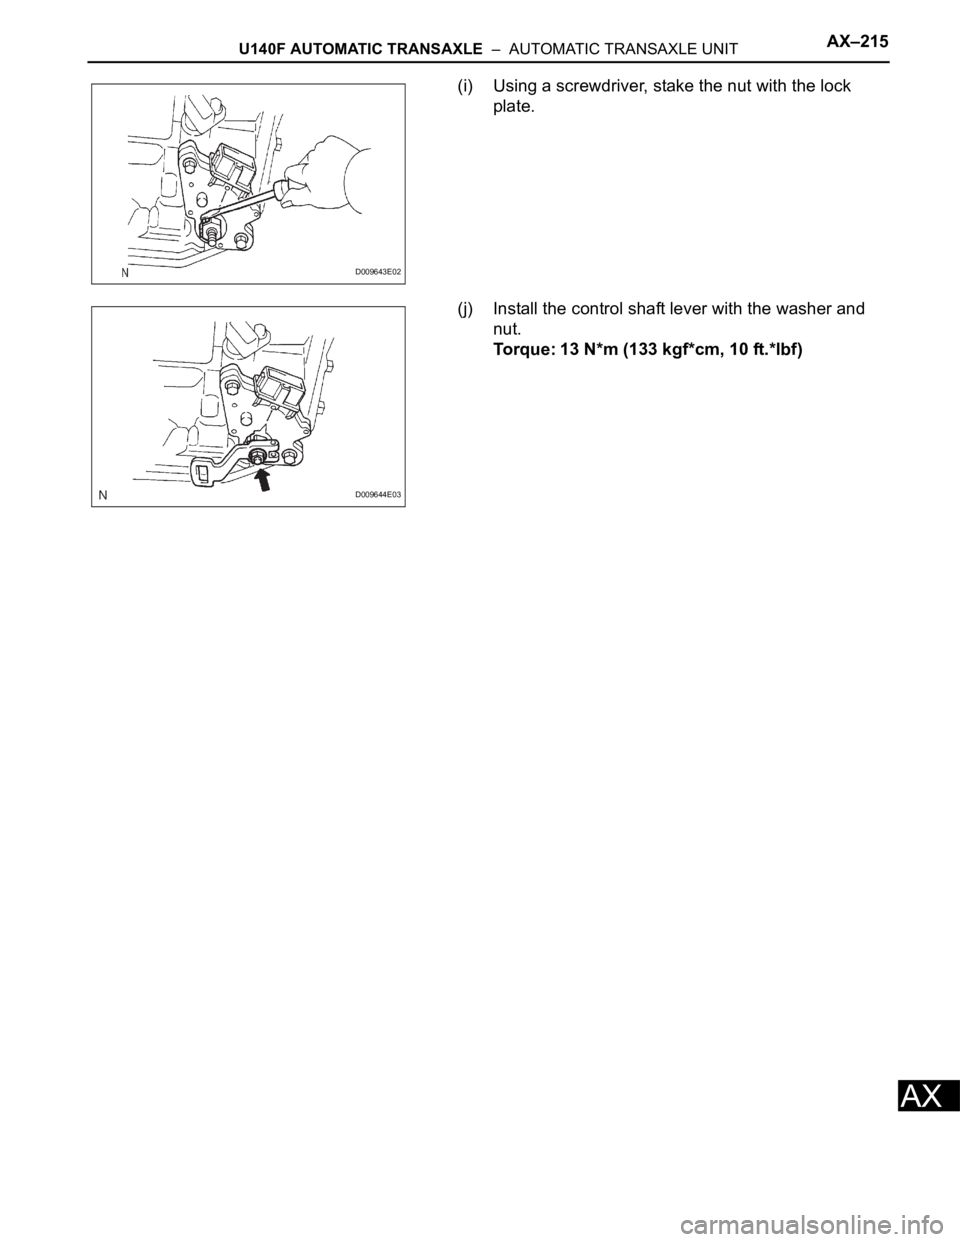
(i) Using a screwdriver, stake the nut with the lock
plate.
(j) Install the control shaft lever with the washer and
nut.
Torque: 13 N*m (133 kgf*cm, 10 ft.*lbf)
D009643E02
D009644E03
Page 1017 of 2000
U140F AUTOMATIC TRANSAXLE – DIFFERENTIAL CASEAX–257
AX
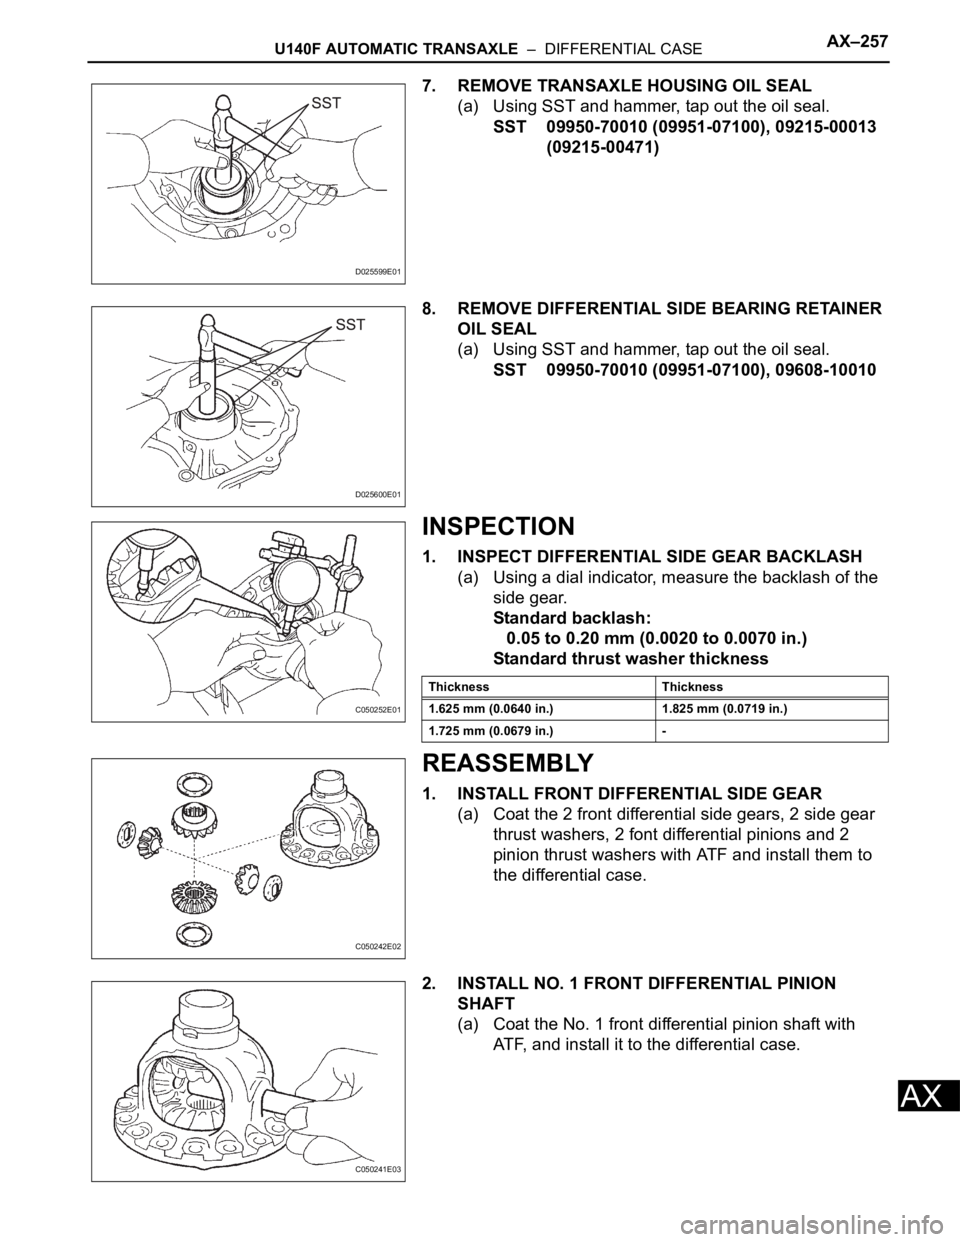
7. REMOVE TRANSAXLE HOUSING OIL SEAL
(a) Using SST and hammer, tap out the oil seal.
SST 09950-70010 (09951-07100), 09215-00013
(09215-00471)
8. REMOVE DIFFERENTIAL SIDE BEARING RETAINER
OIL SEAL
(a) Using SST and hammer, tap out the oil seal.
SST 09950-70010 (09951-07100), 09608-10010
INSPECTION
1. INSPECT DIFFERENTIAL SIDE GEAR BACKLASH
(a) Using a dial indicator, measure the backlash of the
side gear.
Standard backlash:
0.05 to 0.20 mm (0.0020 to 0.0070 in.)
Standard thrust washer thickness
REASSEMBLY
1. INSTALL FRONT DIFFERENTIAL SIDE GEAR
(a) Coat the 2 front differential side gears, 2 side gear
thrust washers, 2 font differential pinions and 2
pinion thrust washers with ATF and install them to
the differential case.
2. INSTALL NO. 1 FRONT DIFFERENTIAL PINION
SHAFT
(a) Coat the No. 1 front differential pinion shaft with
ATF, and install it to the differential case.
D025599E01
D025600E01
C050252E01
Thickness Thickness
1.625 mm (0.0640 in.) 1.825 mm (0.0719 in.)
1.725 mm (0.0679 in.) -
C050242E02
C050241E03
Page 1020 of 2000
AX–260U140F AUTOMATIC TRANSAXLE – DIFFERENTIAL CASE
AX
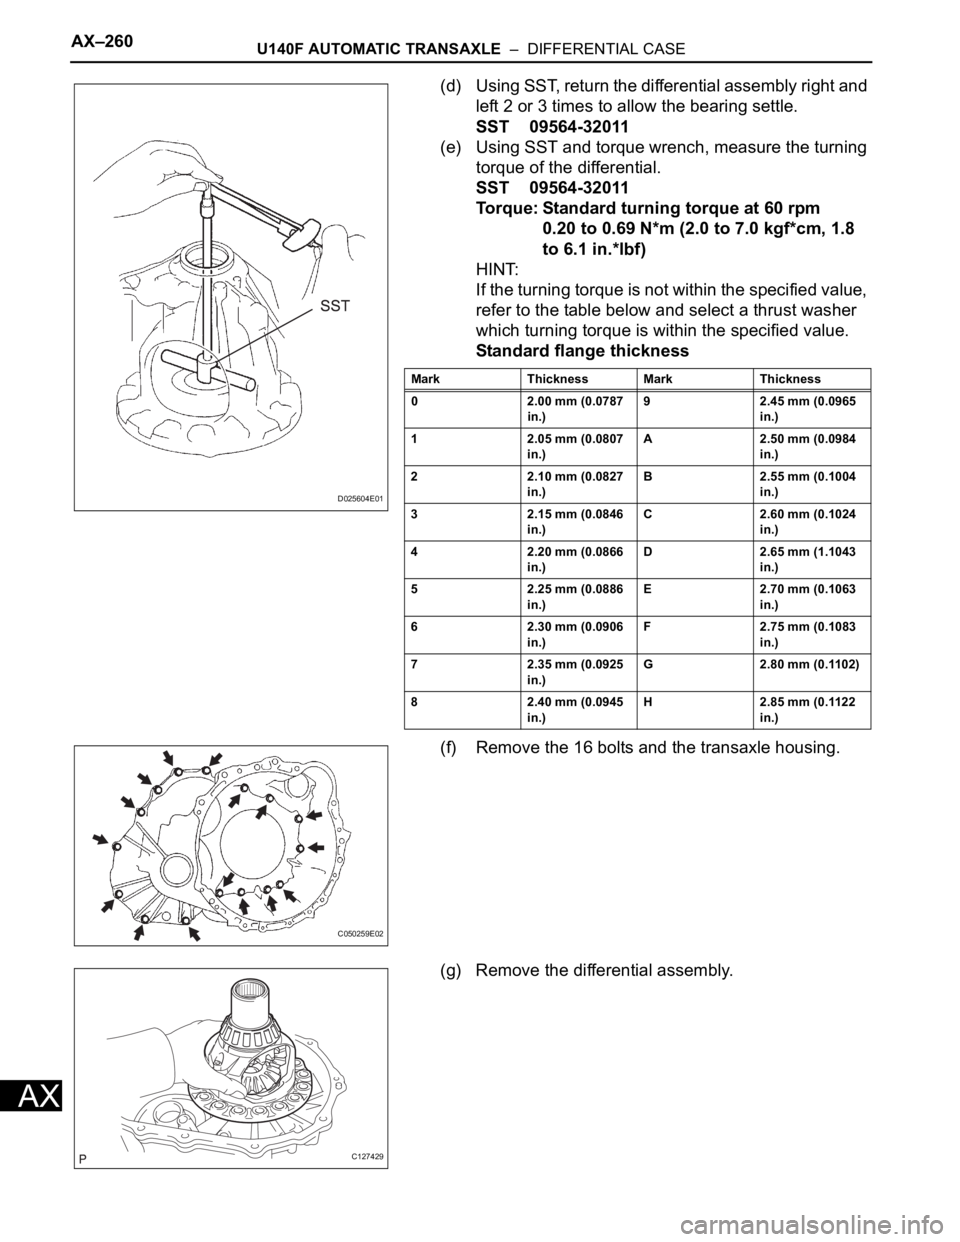
(d) Using SST, return the differential assembly right and
left 2 or 3 times to allow the bearing settle.
SST 09564-32011
(e) Using SST and torque wrench, measure the turning
torque of the differential.
SST 09564-32011
Torque: Standard turning torque at 60 rpm
0.20 to 0.69 N*m (2.0 to 7.0 kgf*cm, 1.8
to 6.1 in.*lbf)
HINT:
If the turning torque is not within the specified value,
refer to the table below and select a thrust washer
which turning torque is within the specified value.
Standard flange thickness
(f) Remove the 16 bolts and the transaxle housing.
(g) Remove the differential assembly.
D025604E01
Mark Thickness Mark Thickness
0 2.00 mm (0.0787
in.)9 2.45 mm (0.0965
in.)
1 2.05 mm (0.0807
in.)A 2.50 mm (0.0984
in.)
2 2.10 mm (0.0827
in.)B 2.55 mm (0.1004
in.)
3 2.15 mm (0.0846
in.)C 2.60 mm (0.1024
in.)
4 2.20 mm (0.0866
in.)D 2.65 mm (1.1043
in.)
5 2.25 mm (0.0886
in.)E 2.70 mm (0.1063
in.)
6 2.30 mm (0.0906
in.)F 2.75 mm (0.1083
in.)
7 2.35 mm (0.0925
in.)G 2.80 mm (0.1102)
8 2.40 mm (0.0945
in.)H 2.85 mm (0.1122
in.)
C050259E02
C127429
Page 1063 of 2000
U151E AUTOMATIC TRANSAXLE – AUTOMATIC TRANSAXLE UNITAX–189
AX
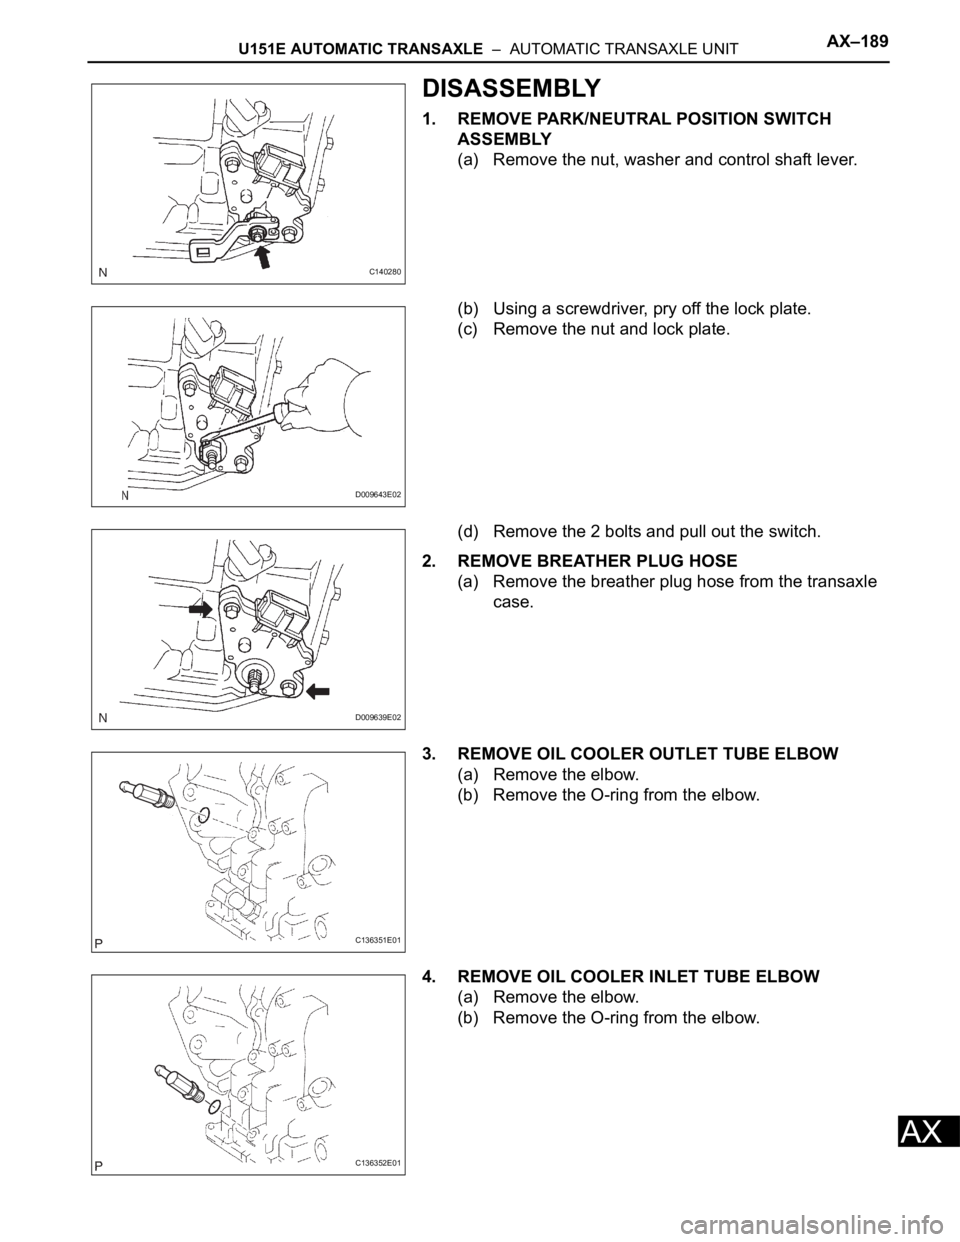
DISASSEMBLY
1. REMOVE PARK/NEUTRAL POSITION SWITCH
ASSEMBLY
(a) Remove the nut, washer and control shaft lever.
(b) Using a screwdriver, pry off the lock plate.
(c) Remove the nut and lock plate.
(d) Remove the 2 bolts and pull out the switch.
2. REMOVE BREATHER PLUG HOSE
(a) Remove the breather plug hose from the transaxle
case.
3. REMOVE OIL COOLER OUTLET TUBE ELBOW
(a) Remove the elbow.
(b) Remove the O-ring from the elbow.
4. REMOVE OIL COOLER INLET TUBE ELBOW
(a) Remove the elbow.
(b) Remove the O-ring from the elbow.
C140280
D009643E02
D009639E02
C136351E01
C136352E01
Page 1076 of 2000
AX–202U151E AUTOMATIC TRANSAXLE – AUTOMATIC TRANSAXLE UNIT
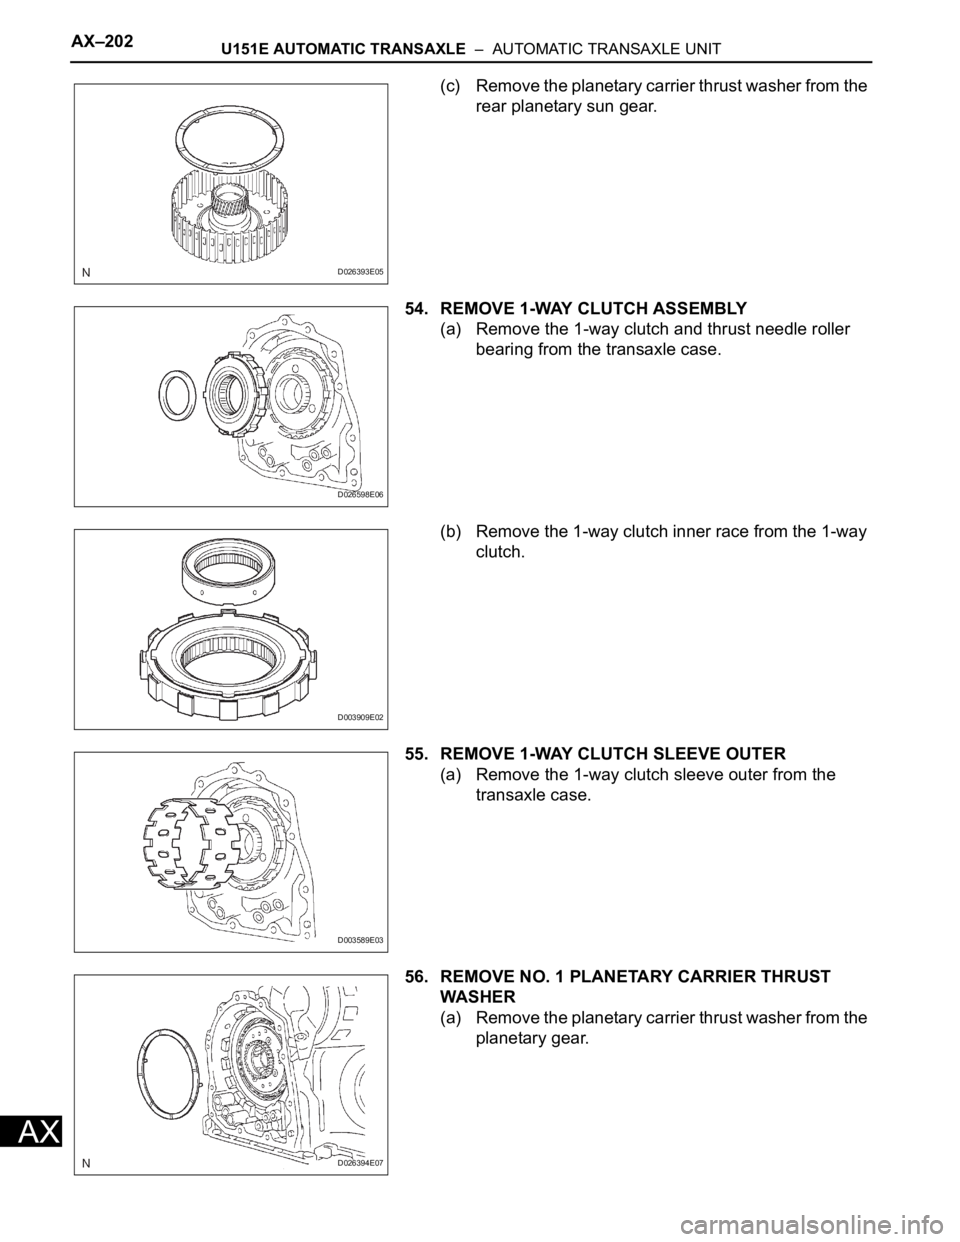
AX
(c) Remove the planetary carrier thrust washer from the
rear planetary sun gear.
54. REMOVE 1-WAY CLUTCH ASSEMBLY
(a) Remove the 1-way clutch and thrust needle roller
bearing from the transaxle case.
(b) Remove the 1-way clutch inner race from the 1-way
clutch.
55. REMOVE 1-WAY CLUTCH SLEEVE OUTER
(a) Remove the 1-way clutch sleeve outer from the
transaxle case.
56. REMOVE NO. 1 PLANETARY CARRIER THRUST
WA S HE R
(a) Remove the planetary carrier thrust washer from the
planetary gear.
D026393E05
D026598E06
D003909E02
D003589E03
D026394E07
Page 1078 of 2000
AX–204U151E AUTOMATIC TRANSAXLE – AUTOMATIC TRANSAXLE UNIT
AX
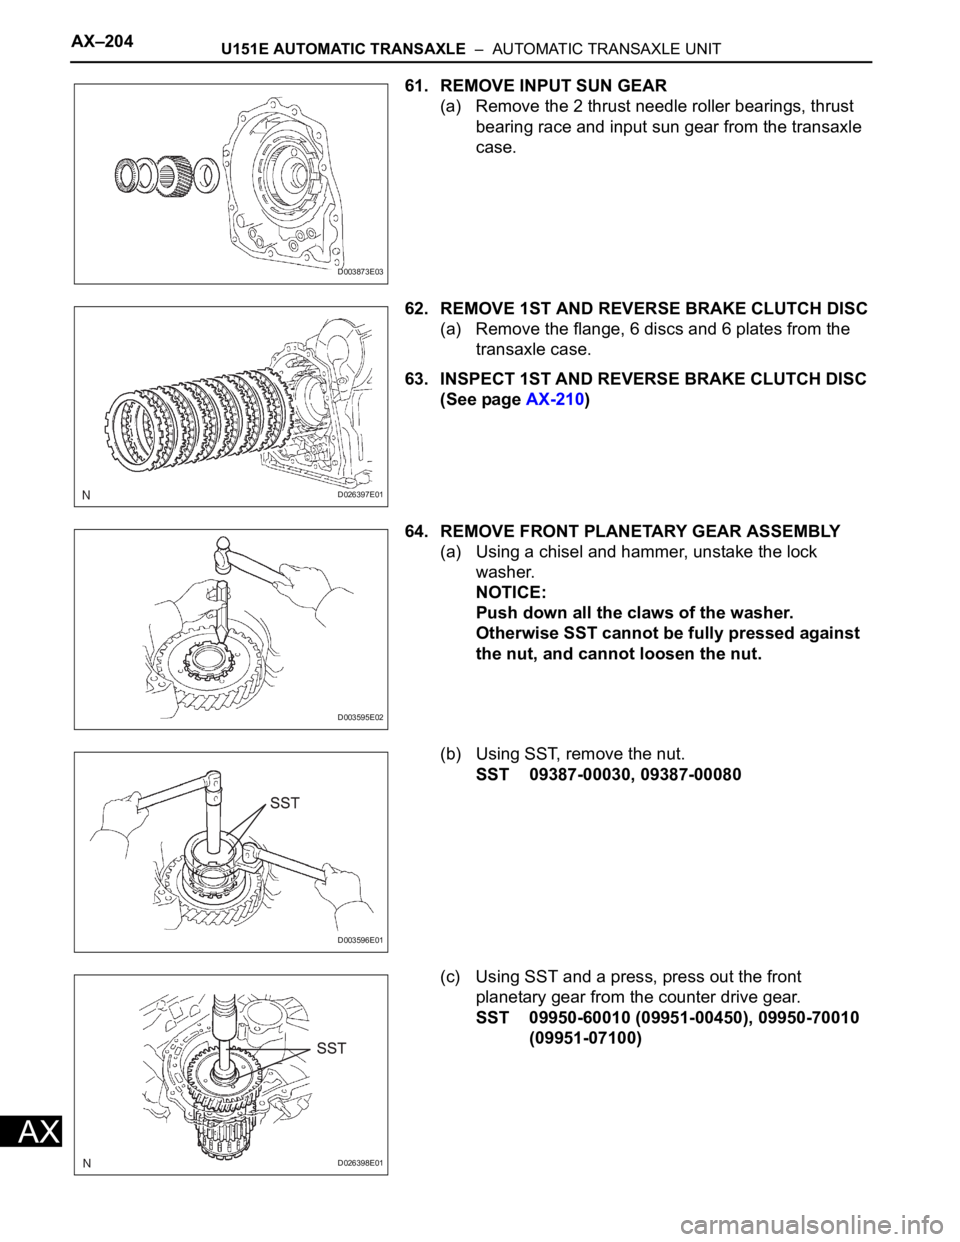
61. REMOVE INPUT SUN GEAR
(a) Remove the 2 thrust needle roller bearings, thrust
bearing race and input sun gear from the transaxle
case.
62. REMOVE 1ST AND REVERSE BRAKE CLUTCH DISC
(a) Remove the flange, 6 discs and 6 plates from the
transaxle case.
63. INSPECT 1ST AND REVERSE BRAKE CLUTCH DISC
(See page AX-210)
64. REMOVE FRONT PLANETARY GEAR ASSEMBLY
(a) Using a chisel and hammer, unstake the lock
washer.
NOTICE:
Push down all the claws of the washer.
Otherwise SST cannot be fully pressed against
the nut, and cannot loosen the nut.
(b) Using SST, remove the nut.
SST 09387-00030, 09387-00080
(c) Using SST and a press, press out the front
planetary gear from the counter drive gear.
SST 09950-60010 (09951-00450), 09950-70010
(09951-07100)
D003873E03
D026397E01
D003595E02
D003596E01
D026398E01
Page 1093 of 2000
U151E AUTOMATIC TRANSAXLE – AUTOMATIC TRANSAXLE UNITAX–219
AX
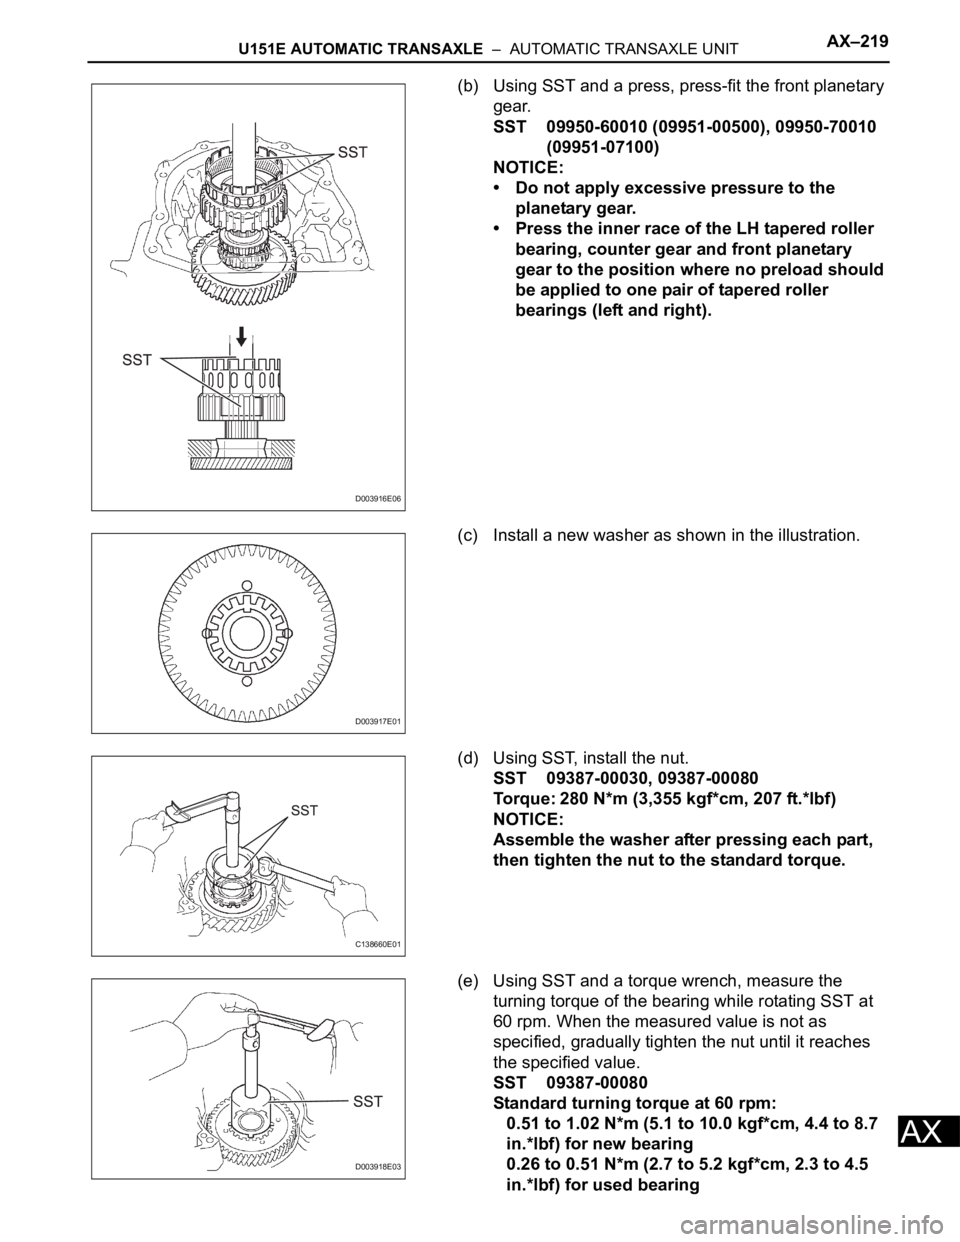
(b) Using SST and a press, press-fit the front planetary
gear.
SST 09950-60010 (09951-00500), 09950-70010
(09951-07100)
NOTICE:
• Do not apply excessive pressure to the
planetary gear.
• Press the inner race of the LH tapered roller
bearing, counter gear and front planetary
gear to the position where no preload should
be applied to one pair of tapered roller
bearings (left and right).
(c) Install a new washer as shown in the illustration.
(d) Using SST, install the nut.
SST 09387-00030, 09387-00080
Torque: 280 N*m (3,355 kgf*cm, 207 ft.*lbf)
NOTICE:
Assemble the washer after pressing each part,
then tighten the nut to the standard torque.
(e) Using SST and a torque wrench, measure the
turning torque of the bearing while rotating SST at
60 rpm. When the measured value is not as
specified, gradually tighten the nut until it reaches
the specified value.
SST 09387-00080
Standard turning torque at 60 rpm:
0.51 to 1.02 N*m (5.1 to 10.0 kgf*cm, 4.4 to 8.7
in.*lbf) for new bearing
0.26 to 0.51 N*m (2.7 to 5.2 kgf*cm, 2.3 to 4.5
in.*lbf) for used bearing
D003916E06
D003917E01
C138660E01
D003918E03
Page 1094 of 2000
AX–220U151E AUTOMATIC TRANSAXLE – AUTOMATIC TRANSAXLE UNIT
AX
(f) Tighten the nut gradually until the specified turning
torque of the tapered roller bearing is measured.
Torque: 350 N*m (3,569 kgf*cm, 258 ft.*lbf)
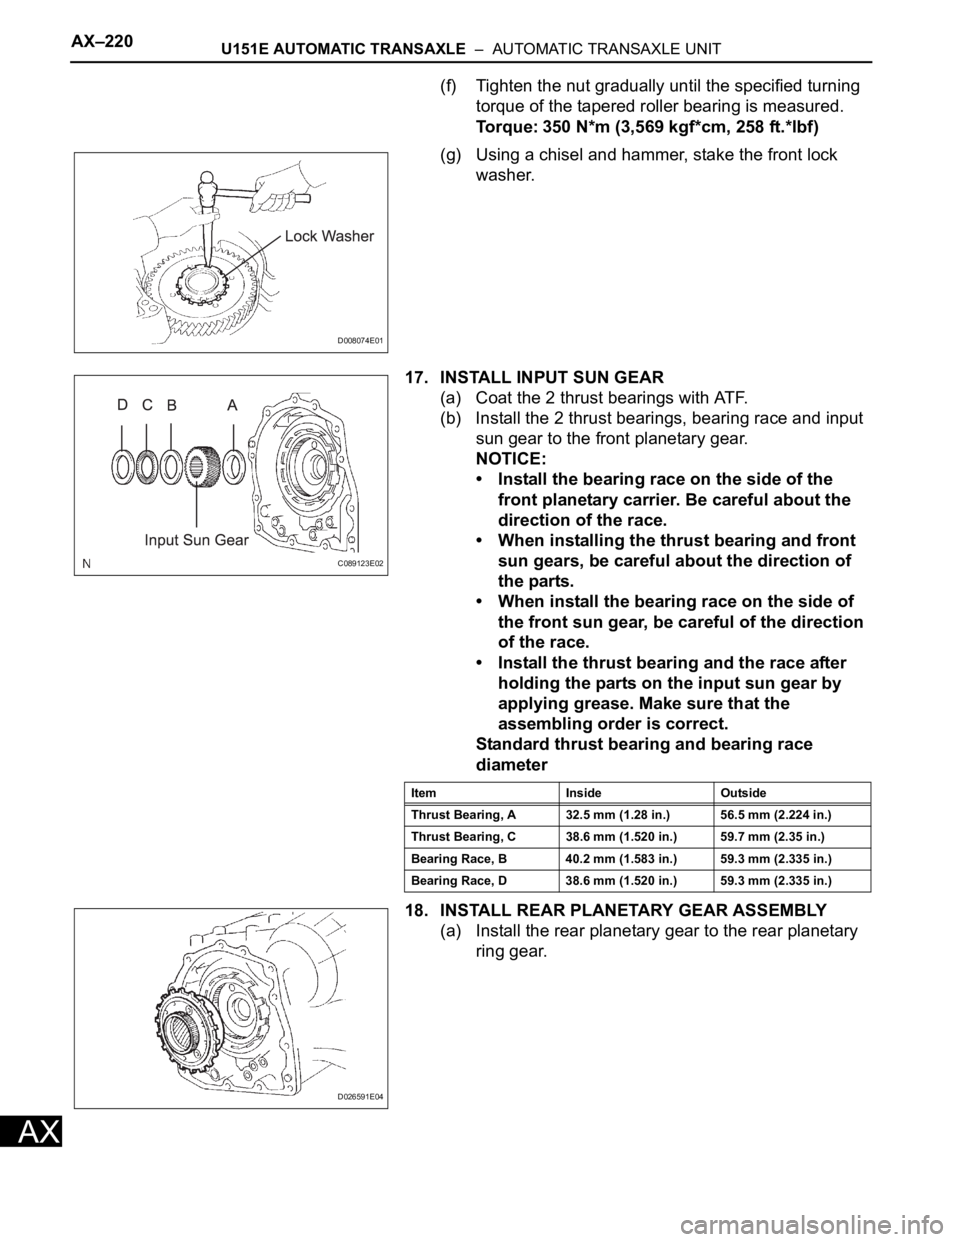
(g) Using a chisel and hammer, stake the front lock
washer.
17. INSTALL INPUT SUN GEAR
(a) Coat the 2 thrust bearings with ATF.
(b) Install the 2 thrust bearings, bearing race and input
sun gear to the front planetary gear.
NOTICE:
• Install the bearing race on the side of the
front planetary carrier. Be careful about the
direction of the race.
• When installing the thrust bearing and front
sun gears, be careful about the direction of
the parts.
• When install the bearing race on the side of
the front sun gear, be careful of the direction
of the race.
• Install the thrust bearing and the race after
holding the parts on the input sun gear by
applying grease. Make sure that the
assembling order is correct.
Standard thrust bearing and bearing race
diameter
18. INSTALL REAR PLANETARY GEAR ASSEMBLY
(a) Install the rear planetary gear to the rear planetary
ring gear.
D008074E01
C089123E02
Item Inside Outside
Thrust Bearing, A 32.5 mm (1.28 in.) 56.5 mm (2.224 in.)
Thrust Bearing, C 38.6 mm (1.520 in.) 59.7 mm (2.35 in.)
Bearing Race, B 40.2 mm (1.583 in.) 59.3 mm (2.335 in.)
Bearing Race, D 38.6 mm (1.520 in.) 59.3 mm (2.335 in.)
D026591E04
Page 1097 of 2000
U151E AUTOMATIC TRANSAXLE – AUTOMATIC TRANSAXLE UNITAX–223
AX
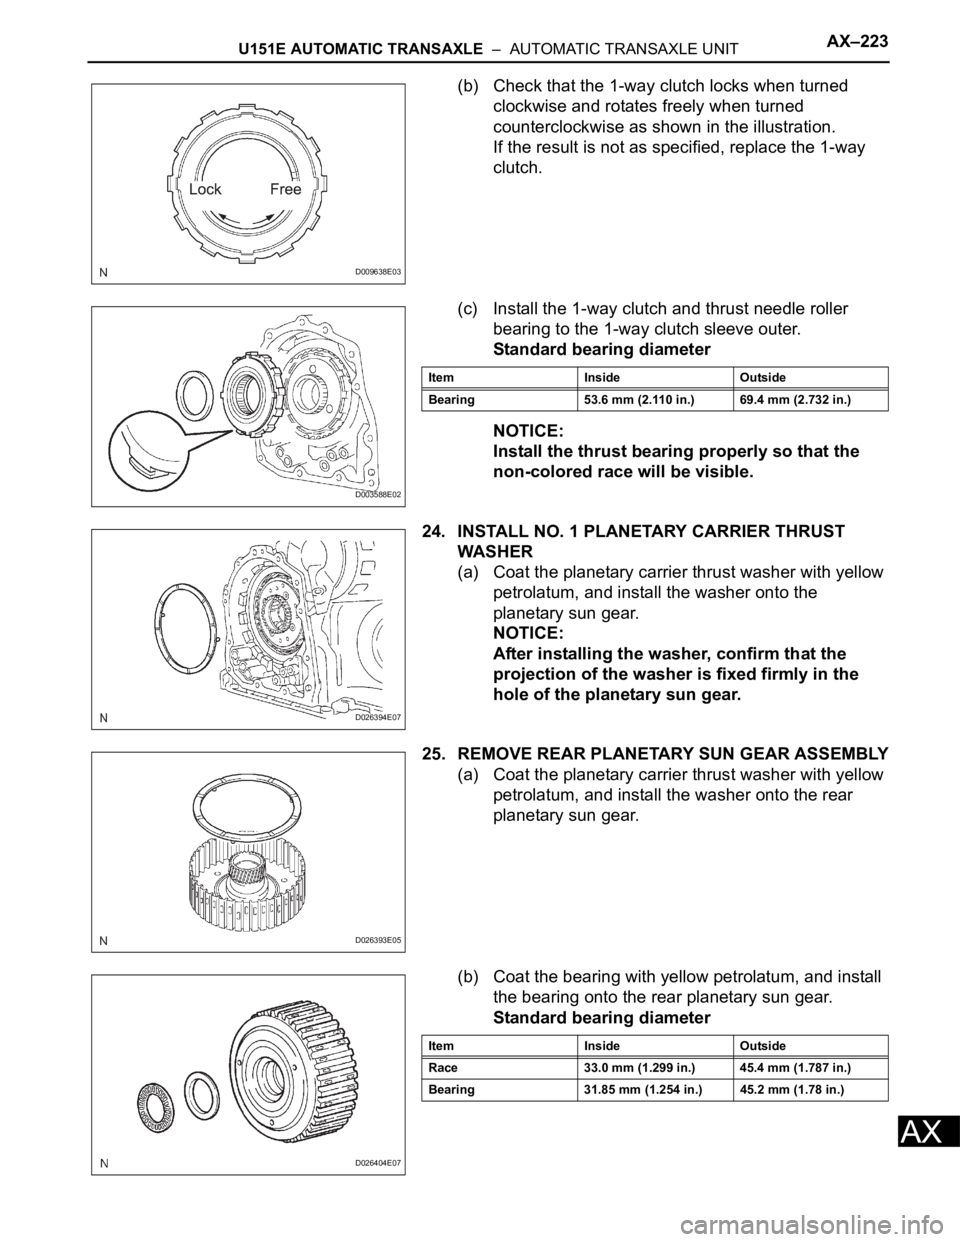
(b) Check that the 1-way clutch locks when turned
clockwise and rotates freely when turned
counterclockwise as shown in the illustration.
If the result is not as specified, replace the 1-way
clutch.
(c) Install the 1-way clutch and thrust needle roller
bearing to the 1-way clutch sleeve outer.
Standard bearing diameter
NOTICE:
Install the thrust bearing properly so that the
non-colored race will be visible.
24. INSTALL NO. 1 PLANETARY CARRIER THRUST
WASHER
(a) Coat the planetary carrier thrust washer with yellow
petrolatum, and install the washer onto the
planetary sun gear.
NOTICE:
After installing the washer, confirm that the
projection of the washer is fixed firmly in the
hole of the planetary sun gear.
25. REMOVE REAR PLANETARY SUN GEAR ASSEMBLY
(a) Coat the planetary carrier thrust washer with yellow
petrolatum, and install the washer onto the rear
planetary sun gear.
(b) Coat the bearing with yellow petrolatum, and install
the bearing onto the rear planetary sun gear.
Standard bearing diameter
D009638E03
D003588E02
Item Inside Outside
Bearing 53.6 mm (2.110 in.) 69.4 mm (2.732 in.)
D026394E07
D026393E05
D026404E07
Item Inside Outside
Race 33.0 mm (1.299 in.) 45.4 mm (1.787 in.)
Bearing 31.85 mm (1.254 in.) 45.2 mm (1.78 in.)