display TOYOTA RAV4 2019 (in English) Workshop Manual
[x] Cancel search | Manufacturer: TOYOTA, Model Year: 2019, Model line: RAV4, Model: TOYOTA RAV4 2019Pages: 728, PDF Size: 21.09 MB
Page 203 of 728
2034-2. Driving procedures
4
Driving
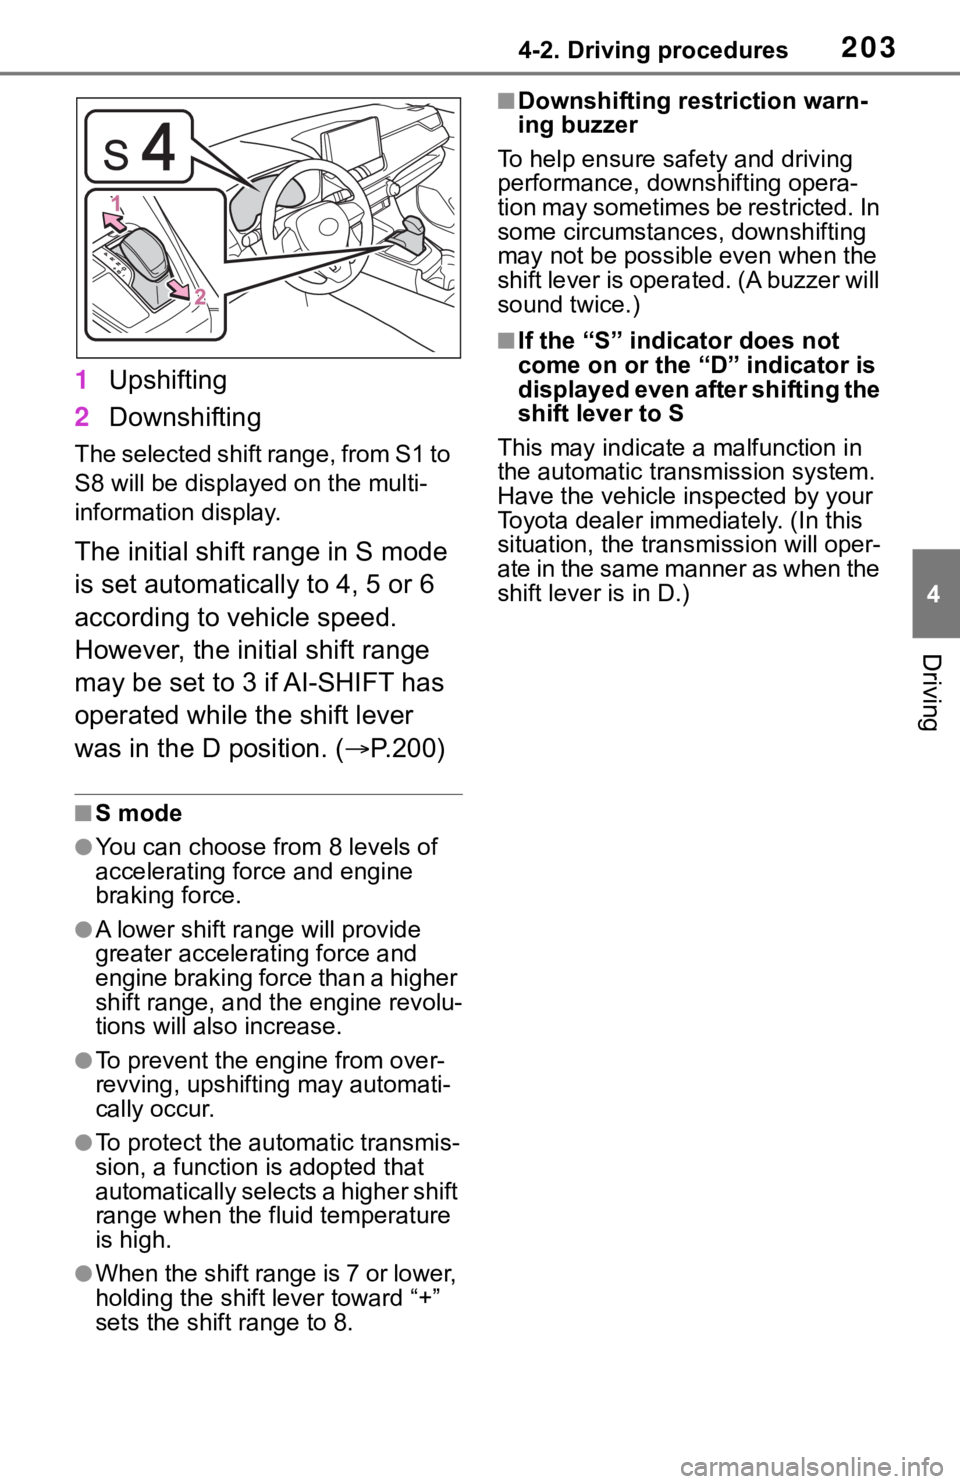
1Upshifting
2 Downshifting
The selected shift range, from S1 to
S8 will be display ed on the multi-
information display.
The initial shift range in S mode
is set automatically to 4, 5 or 6
according to vehicle speed.
However, the initial shift range
may be set to 3 if AI-SHIFT has
operated while the shift lever
was in the D position. ( P.200)
■S mode
●You can choose from 8 levels of
accelerating force and engine
braking force.
●A lower shift ra nge will provide
greater accelerating force and
engine braking force than a higher
shift range, and t he engine revolu-
tions will also increase.
●To prevent the e ngine from over-
revving, upshifti ng may automati-
cally occur.
●To protect the automatic transmis-
sion, a function is adopted that
automatically selec t s a h i g h e r s h i f t
range when the fluid temperature
is high.
●When the shift range is 7 or lower,
holding the shift lever toward “+”
sets the shift range to 8.
■Downshifting restriction warn-
ing buzzer
To help ensure sa fety and driving
performance, dow nshifting opera-
tion may sometimes be restricted. In
some circumstances, downshifting
may not be possible even when the
shift lever is operated. (A buzzer will
sound twice.)
■If the “S” indi cator does not
come on or the “D” indicator is
displayed even after shifting the
shift lever to S
This may indicate a malfunction in
the automatic transmission system.
Have the vehicle inspected by your
Toyota dealer imme diately. (In this
situation, the tran smission will oper-
ate in the same manner as when the
shift lever is in D.)
Page 205 of 728
2054-2. Driving procedures
4
Driving
■Using the manual mode
The parking brake can be set
and released manually.
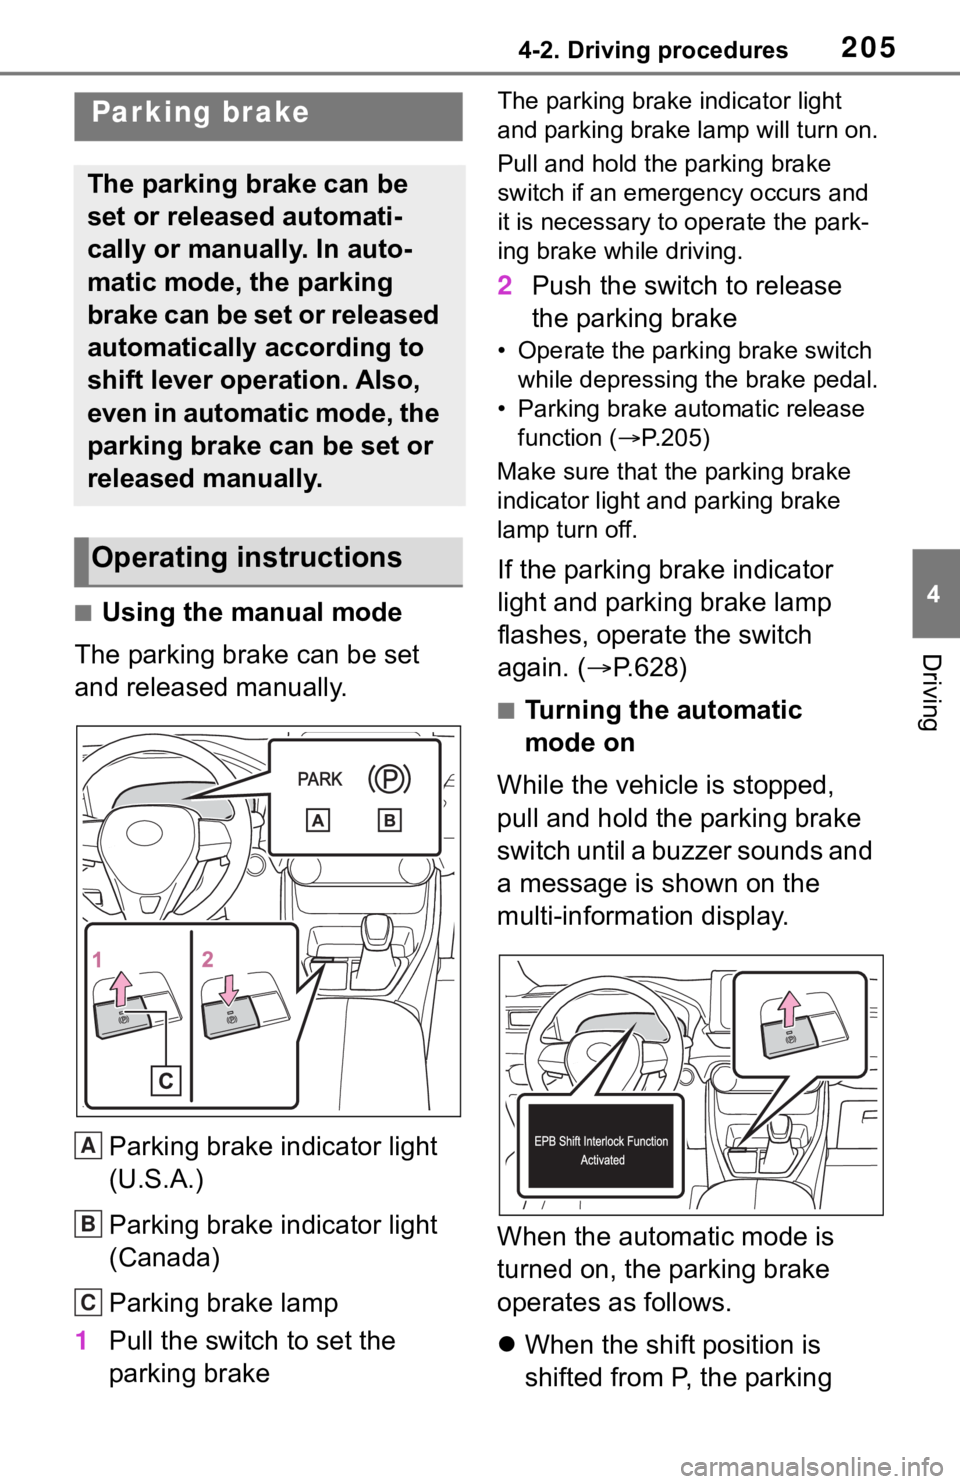
Parking brake indicator light
(U.S.A.)
Parking brake indicator light
(Canada)
Parking brake lamp
1 Pull the switch to set the
parking brake
The parking brake indicator light
and parking brake lamp will turn on.
Pull and hold the parking brake
switch if an emergency occurs and
it is necessary to operate the park-
ing brake while driving.
2 Push the switch to release
the parking brake
• Operate the parking brake switch
while depressing the brake pedal.
• Parking brake automatic release function ( P.205)
Make sure that the parking brake
indicator light and parking brake
lamp turn off.
If the parking brake indicator
light and parking brake lamp
flashes, operate the switch
again. ( P.628)
■Turning the automatic
mode on
While the vehicle is stopped,
pull and hold the parking brake
switch until a buzzer sounds and
a message is shown on the
multi-information display.
When the automatic mode is
turned on, the parking brake
operates as follows.
When the shift position is
shifted from P, the parking
Parking brake
The parking brake can be
set or released automati-
cally or manually. In auto-
matic mode, the parking
brake can be set or released
automatically according to
shift lever operation. Also,
even in automatic mode, the
parking brake can be set or
released manually.
Operating instructions
A
B
C
Page 206 of 728
2064-2. Driving procedures
brake will be released, and
the parking brake indicator
light and parking brake lamp
will turn off.
When the shift position is
shifted to P, the parking brake
will be set, and the parking
brake indicator light and park-
ing brake lamp will turn on.
Operate the shift lever with the
vehicle stopped and the brake
pedal depressed.
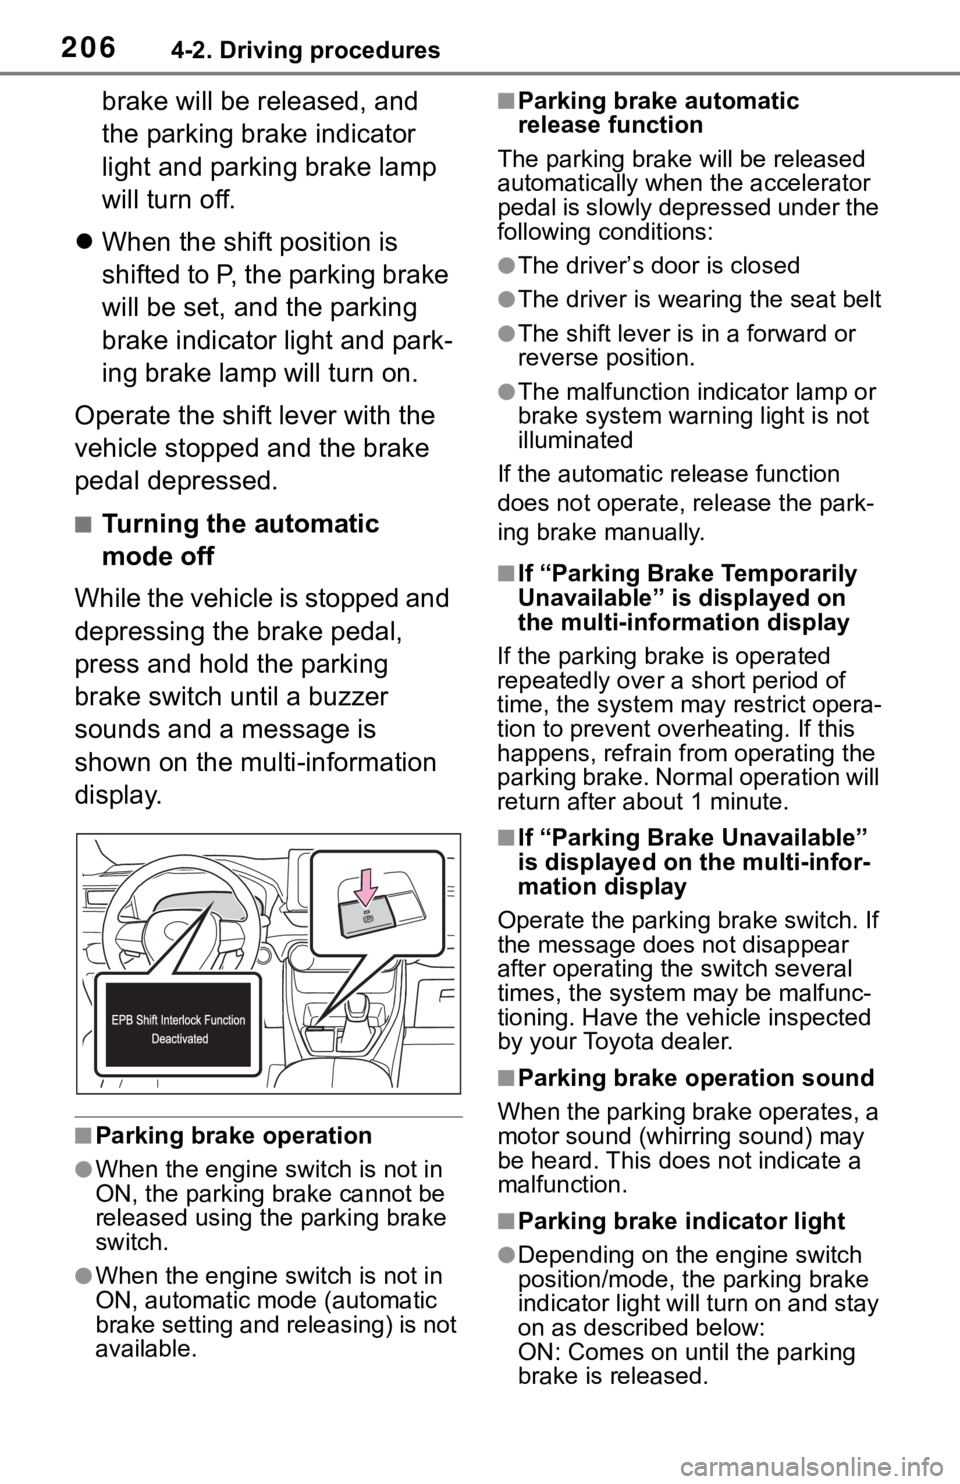
■Turning the automatic
mode off
While the vehicle is stopped and
depressing the brake pedal,
press and hold the parking
brake switch until a buzzer
sounds and a message is
shown on the multi-information
display.
■Parking brake operation
●When the engine switch is not in
ON, the parking brake cannot be
released using the parking brake
switch.
●When the engine switch is not in
ON, automatic mode (automatic
brake setting and releasing) is not
available.
■Parking brake automatic
release function
The parking brake will be released
automatically when the accelerator
pedal is slowly depressed under the
following conditions:
●The driver’s door is closed
●The driver is wearing the seat belt
●The shift lever is in a forward or
reverse position.
●The malfunction in dicator lamp or
brake system warning light is not
illuminated
If the automatic release function
does not operate, release the park-
ing brake manually.
■If “Parking Brake Temporarily
Unavailable” is displayed on
the multi-info rmation display
If the parking brake is operated
repeatedly over a short period of
time, the system may restrict opera-
tion to prevent ove rheating. If this
happens, refrain from operating the
parking brake. Normal operation will
return after about 1 minute.
■If “Parking Brake Unavailable”
is displayed on the multi-infor-
mation display
Operate the parking brake switch. If
the message does not disappear
after operating the switch several
times, the system may be malfunc-
tioning. Have the vehicle inspected
by your Toyota dealer.
■Parking brake operation sound
When the parking brake operates, a
motor sound (whirr ing sound) may
be heard. This does not indicate a
malfunction.
■Parking brake indicator light
●Depending on the engine switch
position/mode, the parking brake
indicator light will turn on and stay
on as described below:
ON: Comes on until the parking
brake is released.
Page 208 of 728
2084-2. Driving procedures
Press the brake hold switch to
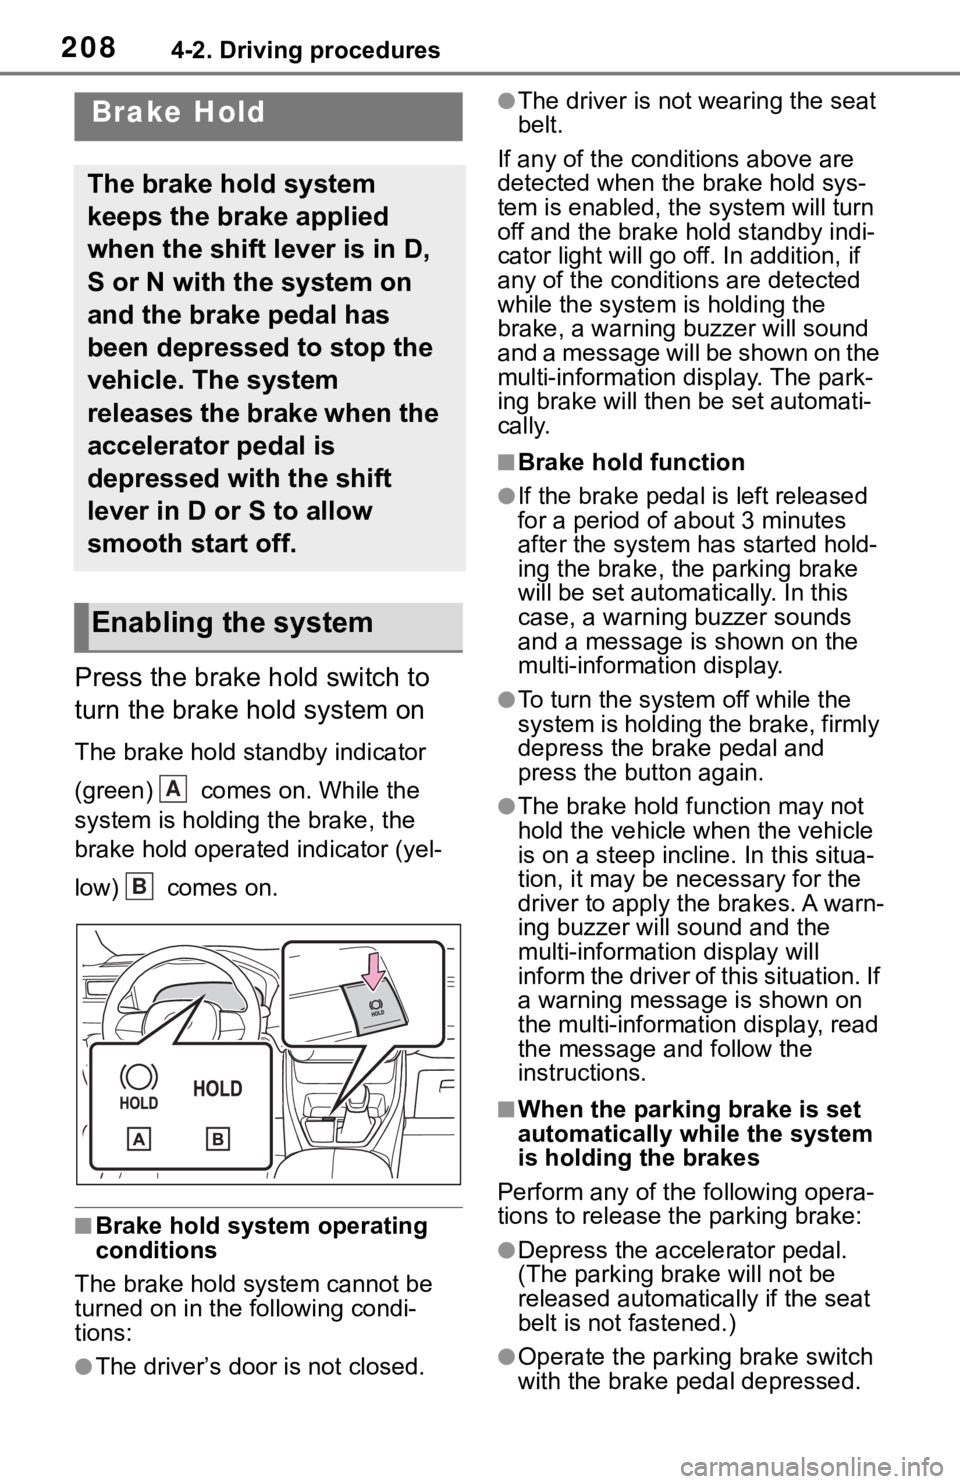
turn the brake hold system on
The brake hold standby indicator
(green) comes on. While the
system is holding the brake, the
brake hold operated indicator (yel-
low) comes on.
■Brake hold system operating
conditions
The brake hold system cannot be
turned on in the following condi-
tions:
●The driver’s doo r is not closed.
●The driver is not wearing the seat
belt.
If any of the cond itions above are
detected when the brake hold sys-
tem is enabled, the system will turn
off and the brake hold standby indi-
cator light will go off. In addition, if
any of the conditions are detected
while the system is holding the
brake, a warning buzzer will sound
and a message will be shown on the
multi-information display. The park-
ing brake will then be set automati-
cally.
■Brake hold function
●If the brake pedal is left released
for a period of about 3 minutes
after the system has started hold-
ing the brake, the parking brake
will be set automatically. In this
case, a warning buzzer sounds
and a message is shown on the
multi-information display.
●To turn the system off while the
system is holding the brake, firmly
depress the brake pedal and
press the button again.
●The brake hold function may not
hold the vehicle when the vehicle
is on a steep incline. In this situa-
tion, it may be ne cessary for the
driver to apply the brakes. A warn-
ing buzzer will sound and the
multi-information display will
inform the driver of this situation. If
a warning message is shown on
the multi-information display, read
the message and follow the
instructions.
■When the parking brake is set
automatically while the system
is holding the brakes
Perform any of the following opera-
tions to release the parking brake:
●Depress the accelerator pedal.
(The parking brake will not be
released automatically if the seat
belt is not fastened.)
●Operate the parkin g brake switch
with the brake pedal depressed.
Brake Hold
The brake hold system
keeps the brake applied
when the shift lever is in D,
S or N with the system on
and the brake pedal has
been depressed to stop the
vehicle. The system
releases the brake when the
accelerator pedal is
depressed with the shift
lever in D or S to allow
smooth start off.
Enabling the system
A
B
Page 209 of 728
2094-2. Driving procedures
4
Driving
Make sure that the parking brake
indicator light goes off. ( P.204)
■When an inspection at your
Toyota dealer is necessary
When the brake hold standby indi-
cator (green ) does not illuminate
even when the brake hold switch is
pressed with the brake hold system
operating conditions met, the sys-
tem may be malfunctioning. Have
the vehicle inspected at your Toyota
dealer.
■If “Brake Hold Malfunction
Press Brake to Deactivate Visit
Your Dealer” or “Brake Hold
Malfunction Visit Your Dealer”
is displayed on the multi-infor-
mation display
The system may be malfunctioning.
Have the vehicle inspected by your
Toyota dealer.
■Warning messages and buzzers
Warning messages and buzzers are
used to indicate a system malfunc-
tion or to inform the driver of the
need for caution. If a warning mes-
sage is shown on th e multi-informa-
tion display, read the message and
follow the instructions.
■If the brake hold operated indi-
cator flashes
P. 6 2 7
WA R N I N G
■When the vehicle is on a
steep incline
When using the brake hold sys-
tem on a steep in cline, exercise
caution. The brake hold function
may not hold the vehicle in such a
situation.
■When stopped on a slippery
road
The system cannot stop the vehi-
cle when the gripping ability of the
tires has been exceeded. Do not
use the system w hen stopped on
a slippery road.
NOTICE
■When parking the vehicle
The brake hold system is not
designed for use when parking
the vehicle for a long period of
time. Turning the engine switch off
while the system is holding the
brake may release the brake,
which would cause the vehicle to
move. When operating the engine
switch, depress the brake pedal,
shift the shift lever to P and set
the parking brake.
Page 212 of 728
2124-3. Operating the lights and wipers
after several seconds to help
enhance the visibility of your vehi-
cle.
■Battery-saving function
In order to prevent the battery of the
vehicle from discharging, if the
headlights and/or t ail lights are on
when the engine swi tch is turned to
OFF, the battery sav ing function will
operate and automatically turn off all
the lights after approximately 20
minutes.
When any of the fo llowing are per-
formed, the battery -saving function
is canceled once and then reacti-
vated. All the light s will turn off auto-
matically 20 minutes after the
battery-saving function has been
reactivated:
●When the headlight switch is oper-
ated
●When a door is opened or closed
■If “Headlight System Malfunc-
tion Visit Your Dealer” is dis-
played on the multi-information
display
The system may be malfunctioning.
Have the vehicle inspected by your
Toyota dealer.
■Customization
Settings (e.g. light sensor sensitiv-
ity) can be changed.
(Customizable features: P.687)
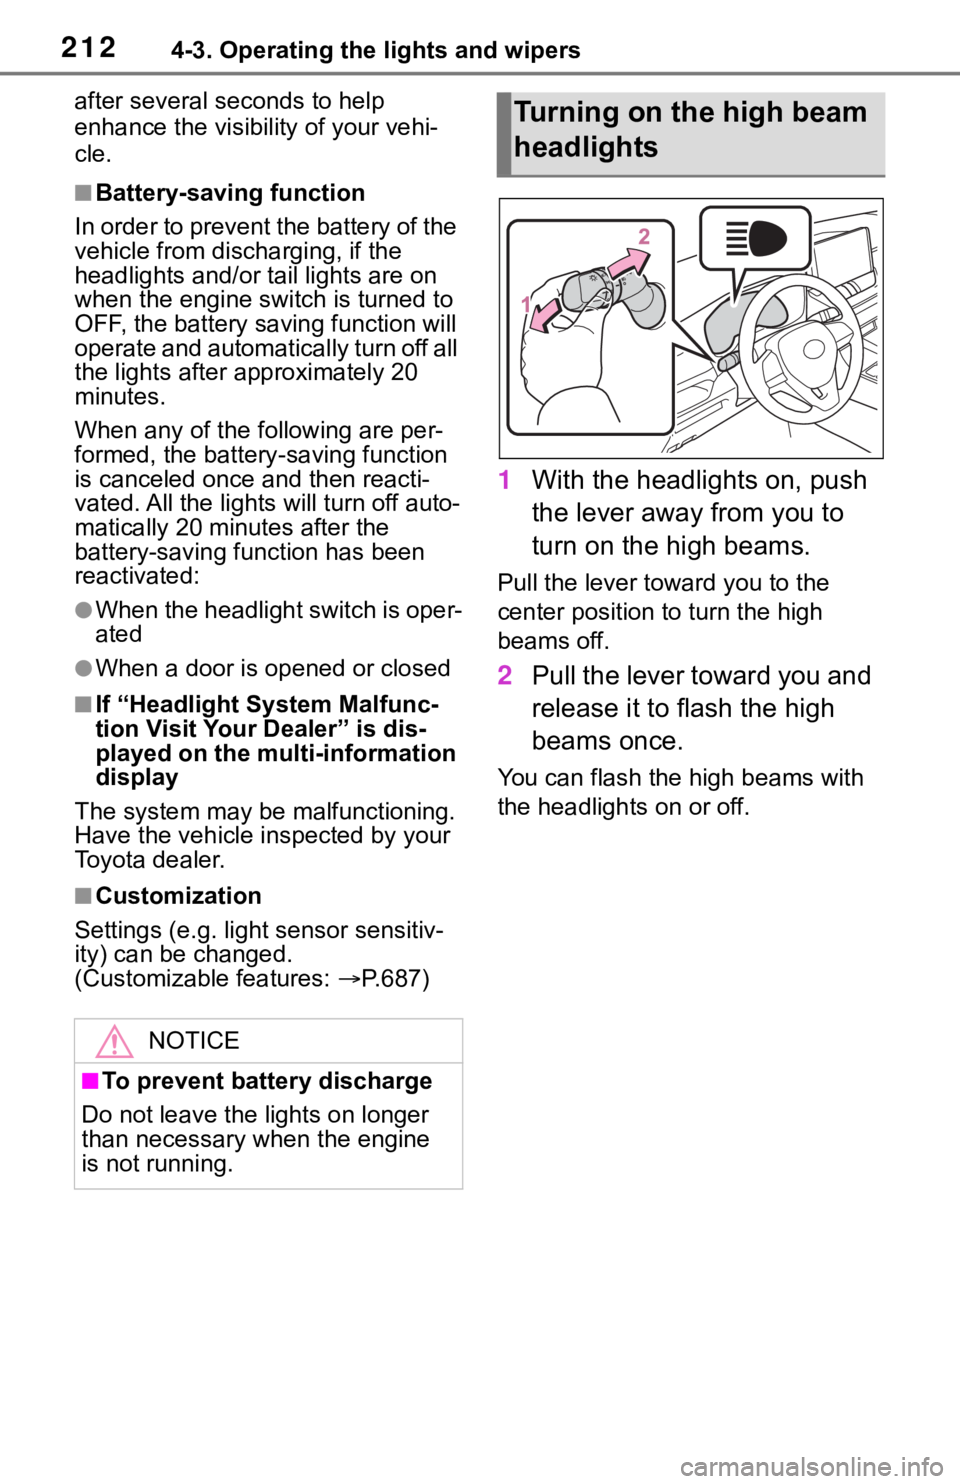
1 With the headlights on, push
the lever away from you to
turn on the high beams.
Pull the lever toward you to the
center position to turn the high
beams off.
2Pull the lever toward you and
release it to flash the high
beams once.
You can flash the high beams with
the headlights on or off.
NOTICE
■To prevent battery discharge
Do not leave the lights on longer
than necessary when the engine
is not running.
Turning on the high beam
headlights
Page 215 of 728
2154-3. Operating the lights and wipers
4
Driving
■If “Headlight System Malfunc-
tion Visit Your Dealer” is dis-
played on the multi-information
display
The system may be malfunctioning.
Have the vehicle inspected by your
Toyota dealer.
■Temporarily lowering sensor
sensitivity
The sensitivity of the sensor can be
temporarily lowered.
1 Turn the engine s witch off while
the following cond itions are met.
●The headlight switch is in or
position.
●The headlight switch lever is in
high beam position.
●Automatic High Beam switch is
on.
2 Turn the engine switch to ON.
3 Within 30 seconds after step 2,
repeat pulling the headlight
switch lever to the original posi-
tion then pushing it to the high
beam position qu ickly 10 times,
then leave the lever in high beam
position.
4 If the sensitivity is changed, the
Automatic High Beam indicator
is turn on and off 3 times.
Automatic High Beam (headlights)
may turn on even w hen the vehicle
is stopped.
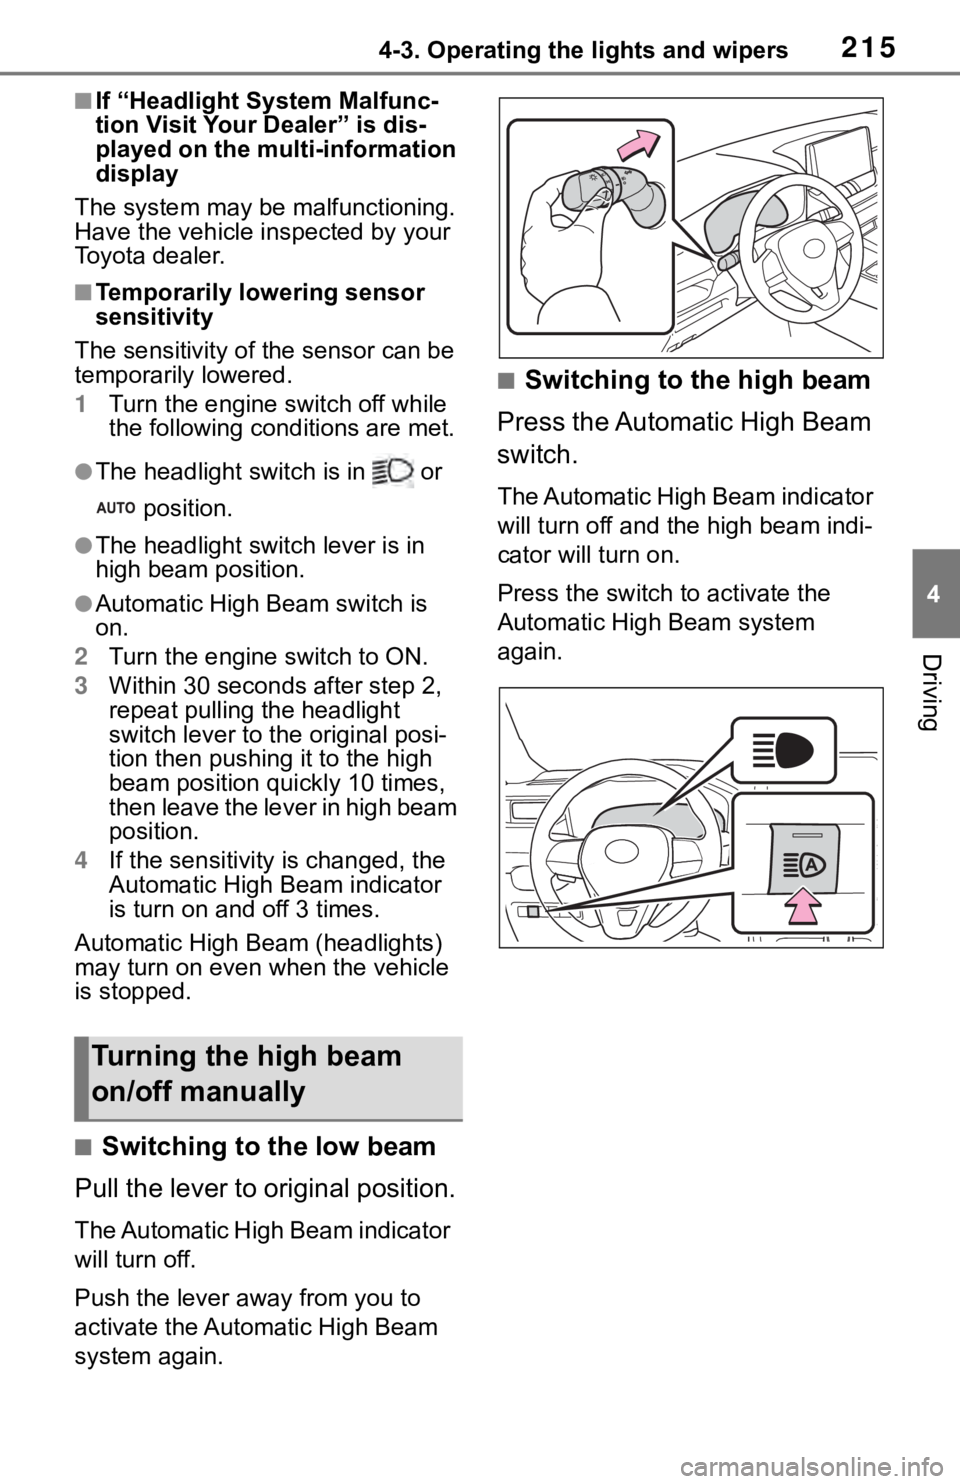
■Switching to the low beam
Pull the lever to original position.
The Automatic High Beam indicator
will turn off.
Push the lever away from you to
activate the Automatic High Beam
system again.
■Switching to the high beam
Press the Automatic High Beam
switch.
The Automatic High Beam indicator
will turn off and the high beam indi-
cator will turn on.
Press the switch to activate the
Automatic High Beam system
again.
Turning the high beam
on/off manually
Page 222 of 728
2224-4. Refueling
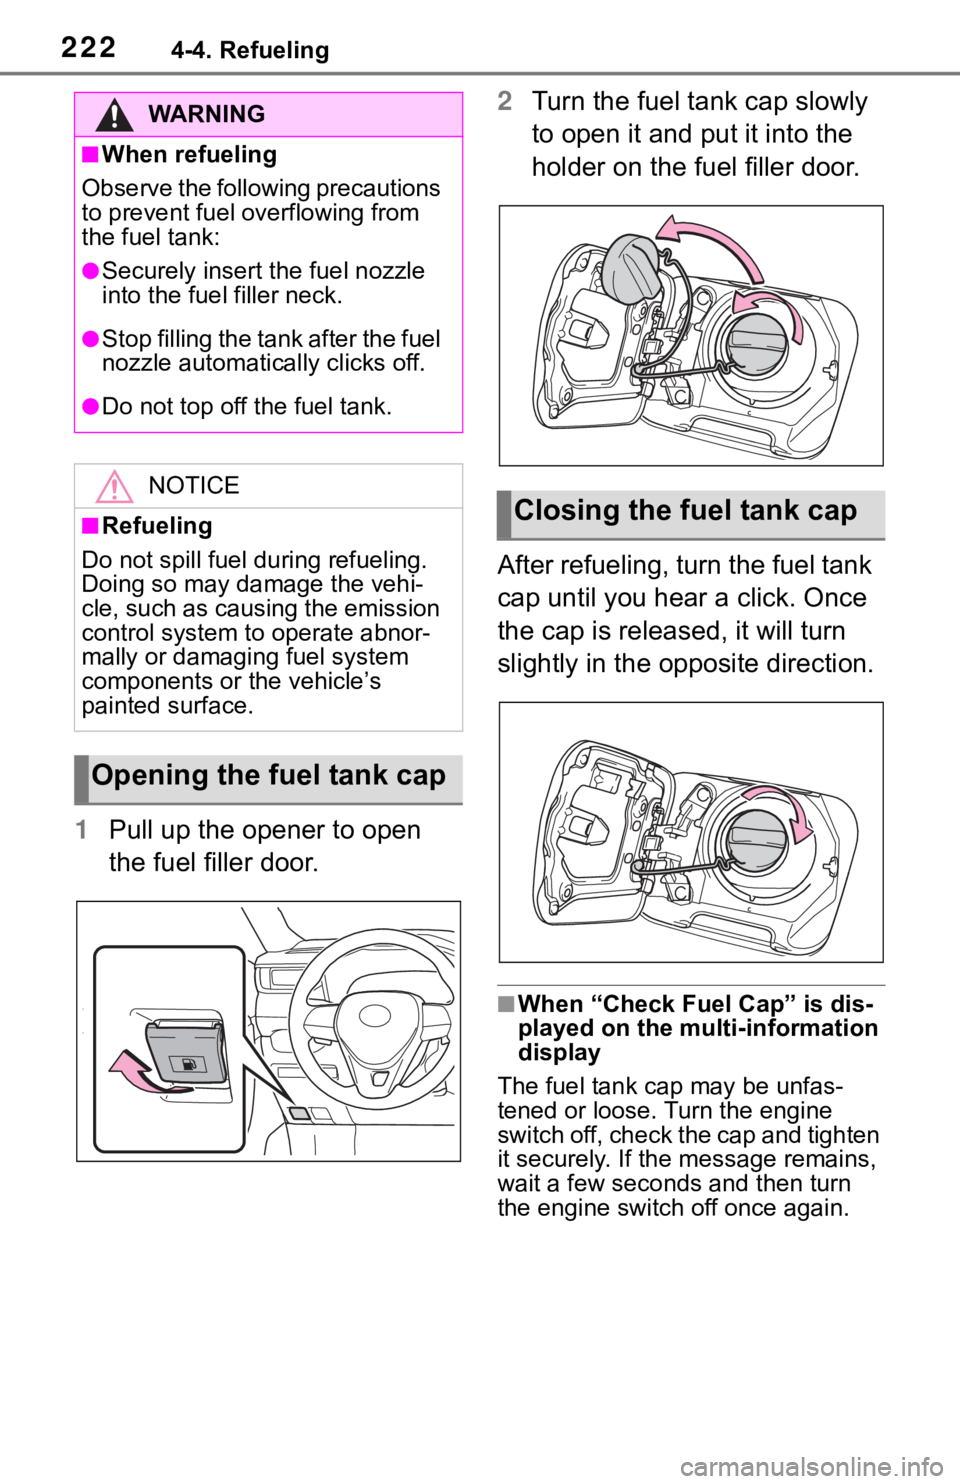
1Pull up the opener to open
the fuel filler door. 2
Turn the fuel tank cap slowly
to open it and put it into the
holder on the fuel filler door.
After refueling, turn the fuel tank
cap until you hear a click. Once
the cap is released, it will turn
slightly in the opposite direction.
■When “Check Fuel Cap” is dis-
played on the multi-information
display
The fuel tank ca p may be unfas-
tened or loose. Turn the engine
switch off, check the cap and tighten
it securely. If the message remains,
wait a few seconds and then turn
the engine switch off once again.
WA R N I N G
■When refueling
Observe the following precautions
to prevent fuel overflowing from
the fuel tank:
●Securely insert the fuel nozzle
into the fuel filler neck.
●Stop filling the tank after the fuel
nozzle automatically clicks off.
●Do not top off the fuel tank.
NOTICE
■Refueling
Do not spill fuel during refueling.
Doing so may damage the vehi-
cle, such as causing the emission
control system to operate abnor-
mally or damaging fuel system
components or the vehicle’s
painted surface.
Opening the fuel tank cap
Closing the fuel tank cap
Page 229 of 728
2294-5. Using the driving support systems
4
Driving
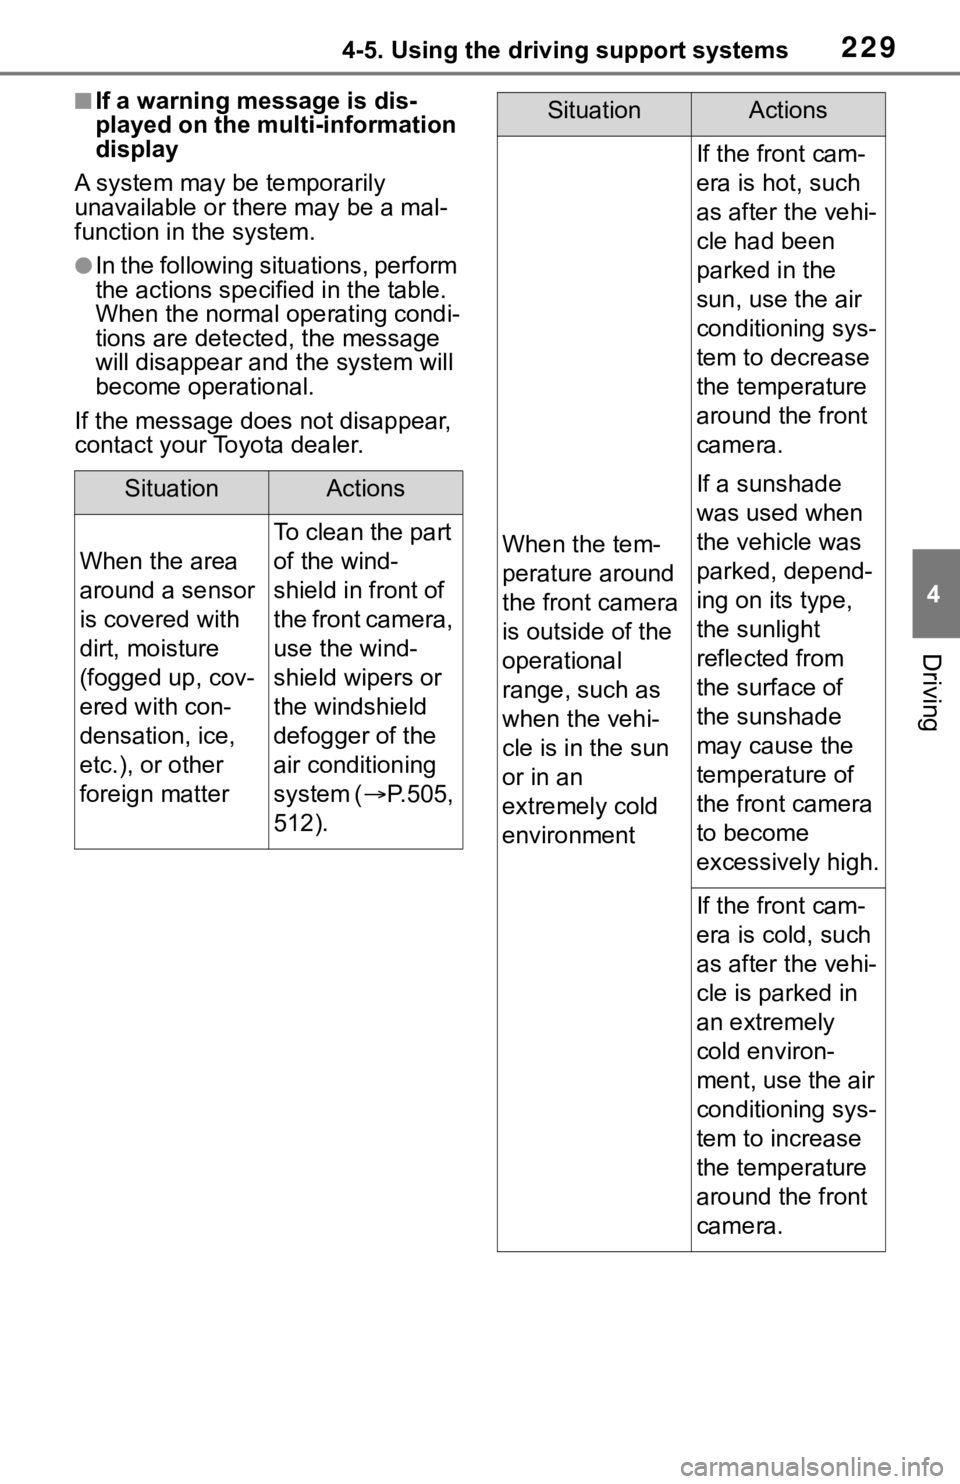
■If a warning message is dis-
played on the multi-information
display
A system may be temporarily
unavailable or there may be a mal-
function in the system.
●In the following situations, perform
the actions specif ied in the table.
When the normal operating condi-
tions are detecte d, the message
will disappear and the system will
become operational.
If the message does not disappear,
contact your Toyota dealer.
SituationActions
When the area
around a sensor
is covered with
dirt, moisture
(fogged up, cov-
ered with con-
densation, ice,
etc.), or other
foreign matter
To clean the part
of the wind-
shield in front of
the front camera,
use the wind-
shield wipers or
the windshield
defogger of the
air conditioning
system ( P.505,
512).When the tem-
perature around
the front camera
is outside of the
operational
range, such as
when the vehi-
cle is in the sun
or in an
extremely cold
environment
If the front cam-
era is hot, such
as after the vehi-
cle had been
parked in the
sun, use the air
conditioning sys-
tem to decrease
the temperature
around the front
camera.
If a sunshade
was used when
the vehicle was
parked, depend-
ing on its type,
the sunlight
reflected from
the surface of
the sunshade
may cause the
temperature of
the front camera
to become
excessively high.
If the front cam-
era is cold, such
as after the vehi-
cle is parked in
an extremely
cold environ-
ment, use the air
conditioning sys-
tem to increase
the temperature
around the front
camera.
SituationActions
Page 231 of 728
2314-5. Using the driving support systems
4
Driving
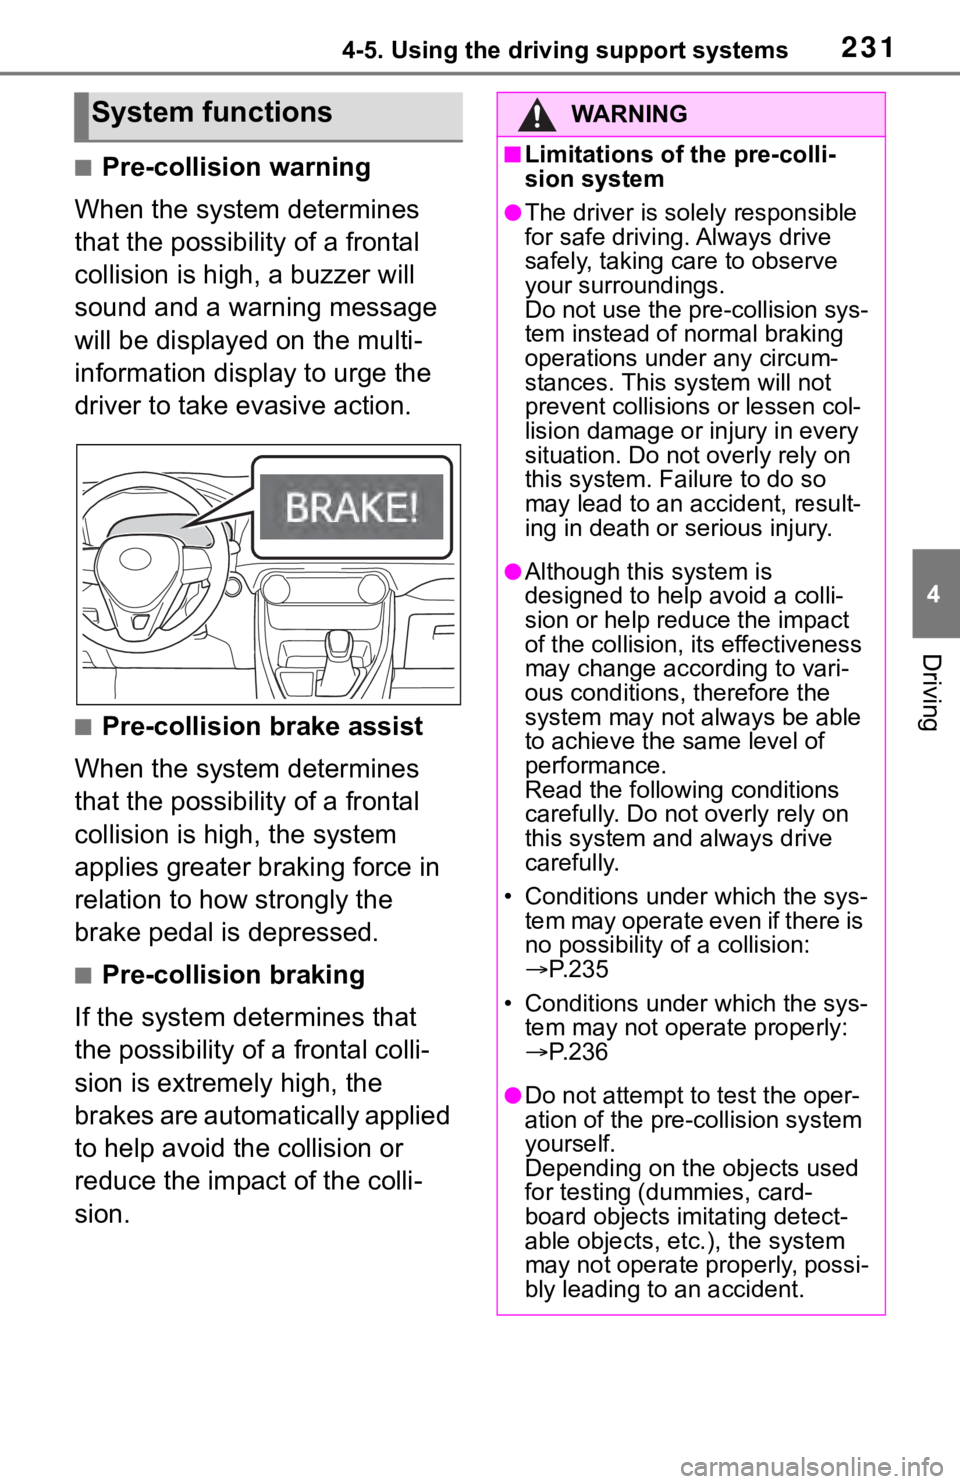
■Pre-collision warning
When the system determines
that the possibility of a frontal
collision is high, a buzzer will
sound and a warning message
will be displayed on the multi-
information display to urge the
driver to take evasive action.
■Pre-collision brake assist
When the system determines
that the possibility of a frontal
collision is high, the system
applies greater braking force in
relation to how strongly the
brake pedal is depressed.
■Pre-collision braking
If the system determines that
the possibility of a frontal colli-
sion is extremely high, the
brakes are automatically applied
to help avoid the collision or
reduce the impact of the colli-
sion.
System functionsWA R N I N G
■Limitations of the pre-colli-
sion system
●The driver is solely responsible
for safe driving. Always drive
safely, taking care to observe
your surroundings.
Do not use the pre-collision sys-
tem instead of normal braking
operations under any circum-
stances. This system will not
prevent collisions or lessen col-
lision damage or injury in every
situation. Do no t overly rely on
this system. Failure to do so
may lead to an accident, result-
ing in death or serious injury.
●Although this system is
designed to help avoid a colli-
sion or help reduce the impact
of the collision, its effectiveness
may change according to vari-
ous conditions, therefore the
system may not always be able
to achieve the same level of
performance.
Read the followin g conditions
carefully. Do not overly rely on
this system and always drive
carefully.
• Conditions under which the sys- tem may operate even if there is
no possibility o f a collision:
P.235
• Conditions under which the sys- tem may not operate properly:
P.236
●Do not attempt to test the oper-
ation of the pre -collision system
yourself.
Depending on the objects used
for testing (dummies, card-
board objects imitating detect-
able objects, etc.), the system
may not operate properly, possi-
bly leading to an accident.