wiper blades TOYOTA RAV4 2019 Owners Manual (in English)
[x] Cancel search | Manufacturer: TOYOTA, Model Year: 2019, Model line: RAV4, Model: TOYOTA RAV4 2019Pages: 728, PDF Size: 21.09 MB
Page 226 of 728
2264-5. Using the driving support systems
WA R N I N G
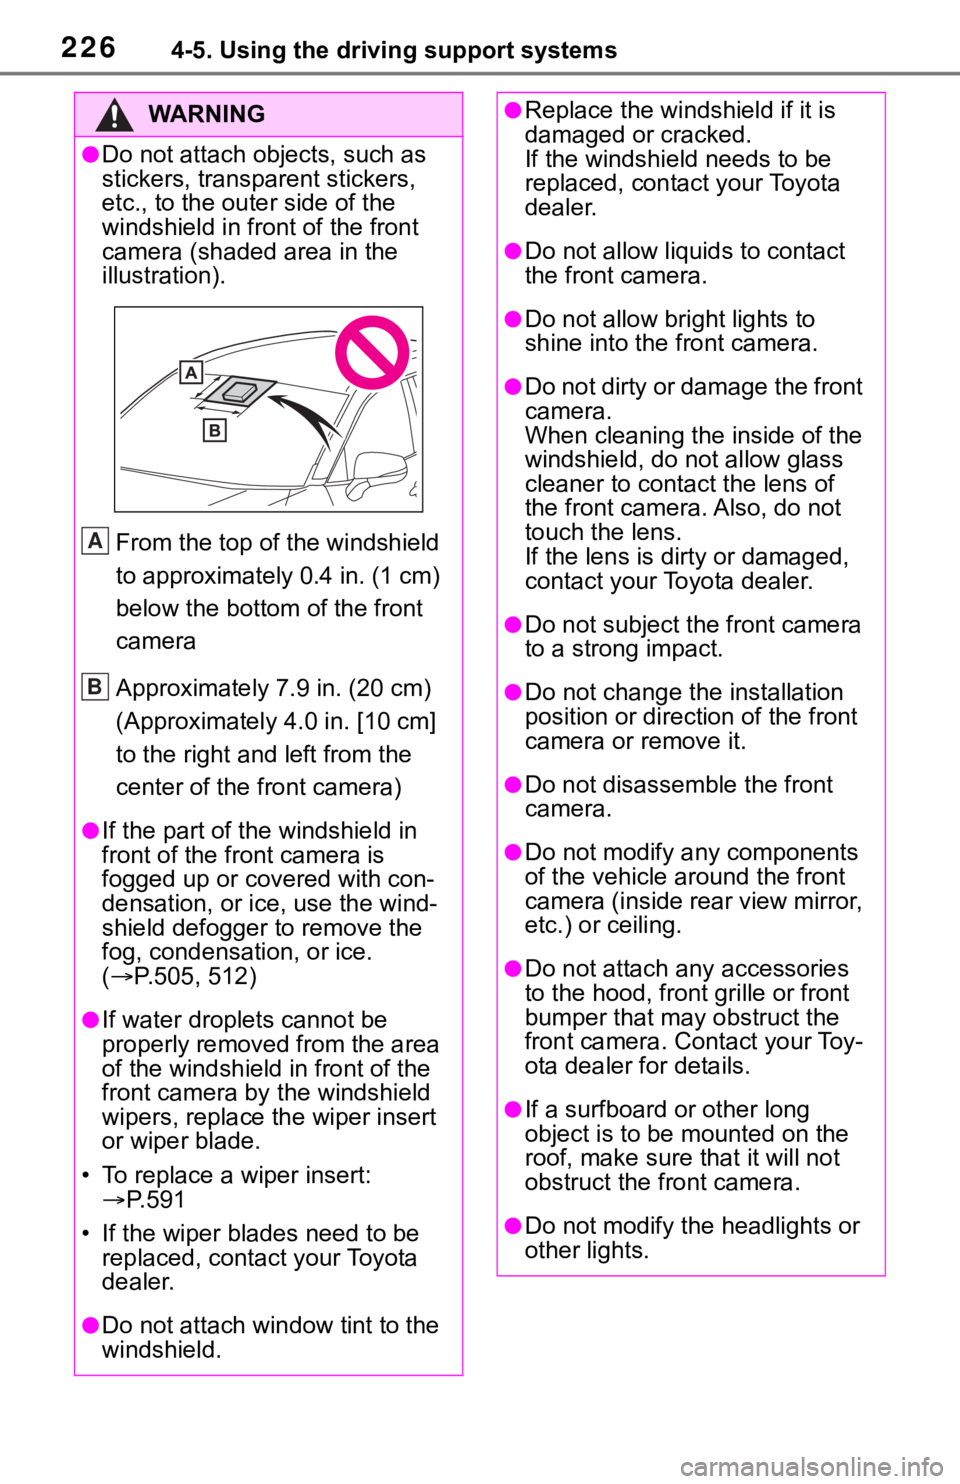
●Do not attach objects, such as
stickers, transparent stickers,
etc., to the outer side of the
windshield in fr ont of the front
camera (shaded area in the
illustration).
From the top of the windshield
to approximately 0.4 in. (1 cm)
below the bottom of the front
camera
Approximately 7.9 in. (20 cm)
(Approximately 4.0 in. [10 cm]
to the right and left from the
center of the front camera)
●If the part of the windshield in
front of the front camera is
fogged up or covered with con-
densation, or ice, use the wind-
shield defogger to remove the
fog, condensation, or ice.
( P.505, 512)
●If water droplets cannot be
properly removed from the area
of the windshield in front of the
front camera by the windshield
wipers, replace the wiper insert
or wiper blade.
• To replace a wiper insert: P. 5 9 1
• If the wiper blades need to be replaced, contact your Toyota
dealer.
●Do not attach win dow tint to the
windshield.
A
B
●Replace the windshield if it is
damaged or cracked.
If the windshield needs to be
replaced, contact your Toyota
dealer.
●Do not allow liquids to contact
the front camera.
●Do not allow bright lights to
shine into the front camera.
●Do not dirty or damage the front
camera.
When cleaning the inside of the
windshield, do not allow glass
cleaner to contact the lens of
the front camera. Also, do not
touch the lens.
If the lens is dirty or damaged,
contact your Toyota dealer.
●Do not subject the front camera
to a strong impact.
●Do not change the installation
position or direction of the front
camera or remove it.
●Do not disasse mble the front
camera.
●Do not modify any components
of the vehicle around the front
camera (inside rear view mirror,
etc.) or ceiling.
●Do not attach a ny accessories
to the hood, front grille or front
bumper that may obstruct the
front camera. Contact your Toy-
ota dealer for details.
●If a surfboard or other long
object is to be mounted on the
roof, make sure that it will not
obstruct the front camera.
●Do not modify the headlights or
other lights.
Page 515 of 728
5156-1. Using the air conditioning system and defogger
6
Interior features
This feature is used to prevent
ice from building up on the wind-
shield and wiper blades.
Press the switch to turn the sys-
tem on/off.
The indicator comes on when
the system is on.
The windshield wiper de-icer will
automatically turn of f after a period
of time.
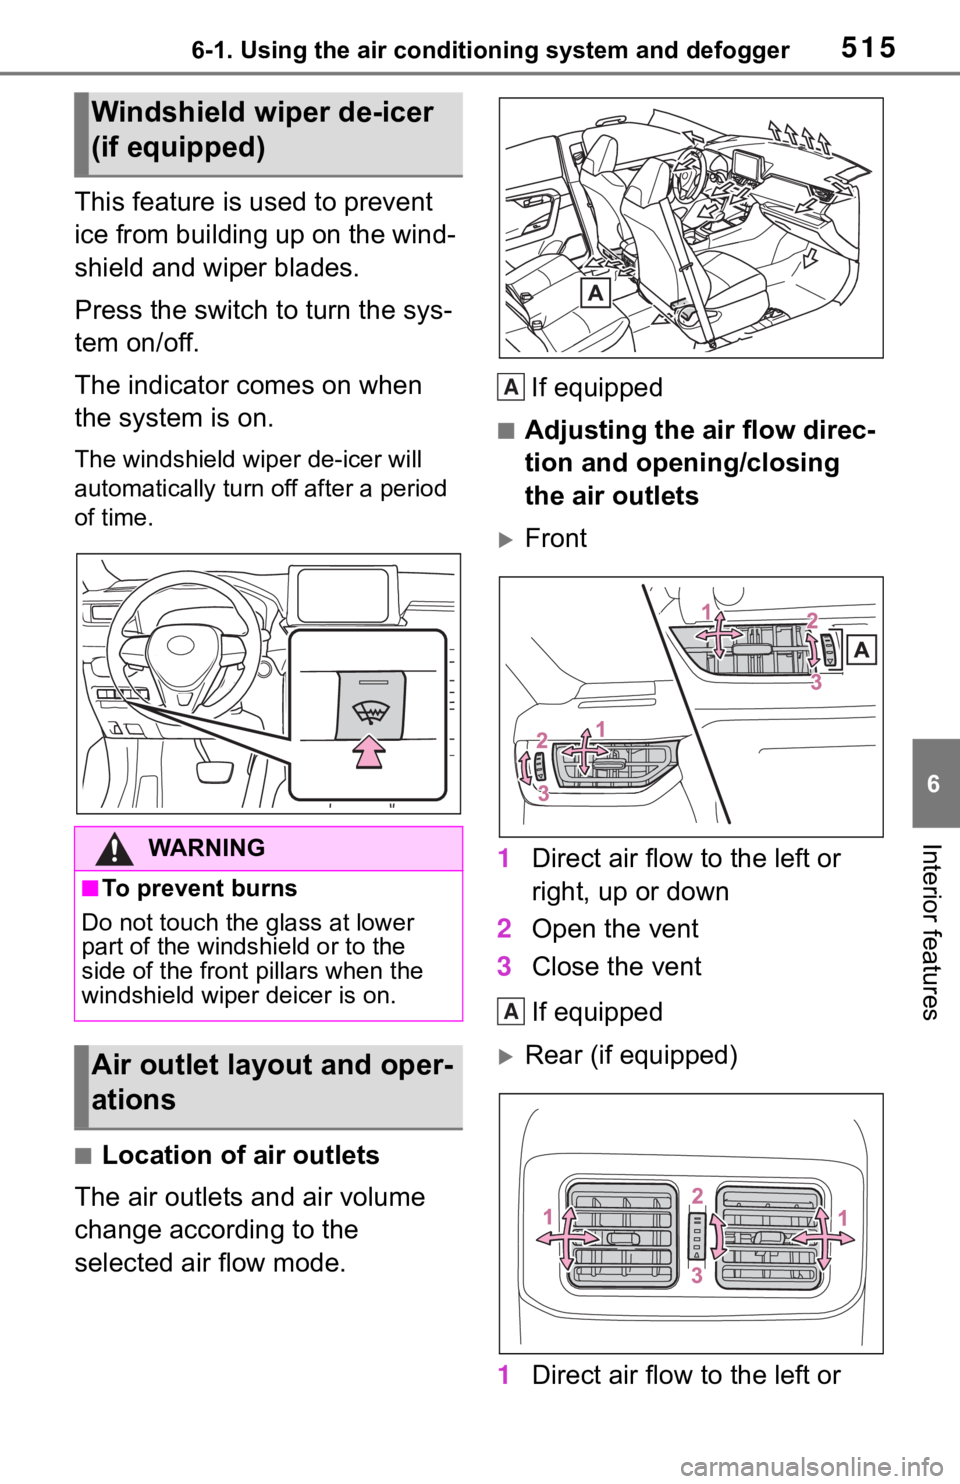
■Location of air outlets
The air outlets and air volume
change according to the
selected air flow mode. If equipped
■Adjusting the air flow direc-
tion and opening/closing
the air outlets
Front
1 Direct air flow to the left or
right, up or down
2 Open the vent
3 Close the vent
If equipped
Rear (if equipped)
1 Direct air flow to the left or
Windshield wiper de-icer
(if equipped)
WA R N I N G
■To prevent burns
Do not touch the glass at lower
part of the windshield or to the
side of the front pillars when the
windshield wiper deicer is on.
Air outlet layout and oper-
ations
A
A
Page 551 of 728
5517-1. Maintenance and care
7
Maintenance and care
dealer.
• When washing the vehicle, use water to wash off dirt. If the vehi-
cle is particularly dirty, use a
diluted neutral detergent and a
sponge or a soft cloth and wash
off the dirt by hand.
• Wash detergent off with water immediately after use. After using
detergent, wash the detergent off
with water and wipe the vehicle
dry with a soft cloth.
●For vehicles with 19-inch matte
painted wheels: Make sure to
observe the followi ng precautions
to prevent damage to the matte
paint.
• Do not polish or scrub with dry
cloths, brushes, etc.
• Do not use detergents containing coatings or abrasives.
• If using an automatic car wash,
make sure it does not include ded-
icated wheel brushes.
• Do not use high-pressure spray
guns or steam cleaners.
• Do not use det ergent on the
wheels when they are hot, such
as after driving or parking in hot
weather.
■Bumpers
Do not scrub with abrasive cleaners.
WA R N I N G
■When washing the vehicle
Do not apply water to the inside of
the engine compartment. Doing
so may cause the electrical com-
ponents, etc. to catch fire.
■When cleaning the windshield
(vehicles with rain-sensing
windshield wipers)
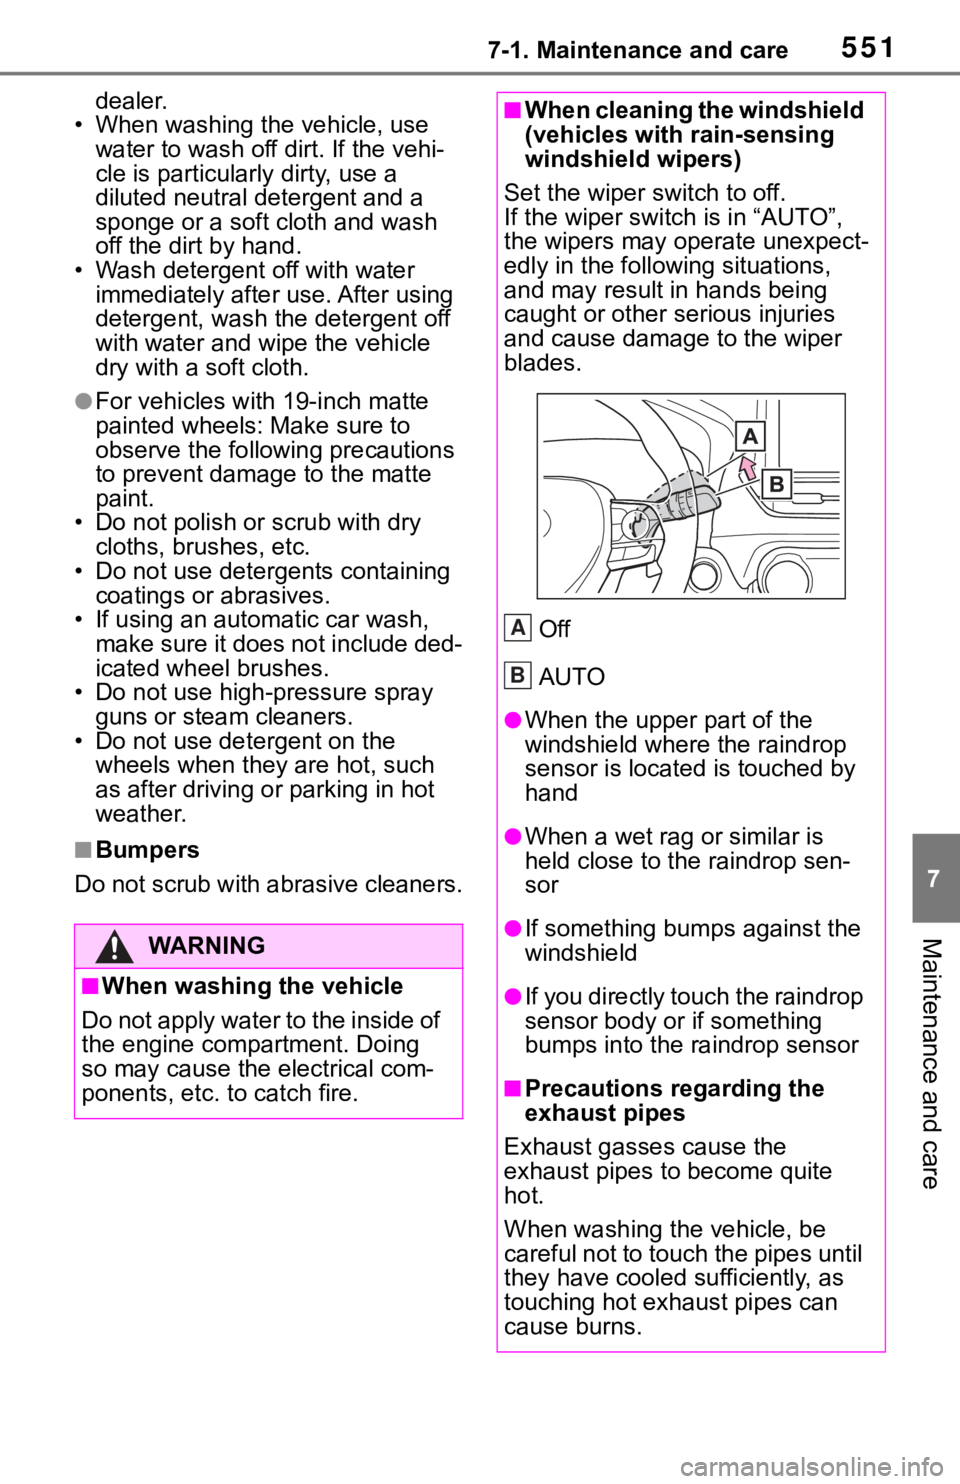
Set the wiper switch to off.
If the wiper switch is in “AUTO”,
the wipers may operate unexpect-
edly in the following situations,
and may result in hands being
caught or other serious injuries
and cause damage to the wiper
blades.
Off
AUTO
●When the upper part of the
windshield where the raindrop
sensor is located is touched by
hand
●When a wet rag or similar is
held close to the raindrop sen-
sor
●If something bumps against the
windshield
●If you directly touch the raindrop
sensor body or if something
bumps into the ra indrop sensor
■Precautions regarding the
exhaust pipes
Exhaust gasses cause the
exhaust pipes to become quite
hot.
When washing the vehicle, be
careful not to touch the pipes until
they have cooled su fficiently, as
touching hot exhaust pipes can
cause burns.
A
B
Page 552 of 728
5527-1. Maintenance and care
WA R N I N G
■Precaution regarding the rear
bumper with Blind Spot Moni-
tor (if equipped)
If the paint of the rear bumper is
chipped or scratched, the system
may malfunction. If this occurs,
consult your Toyota dealer.
NOTICE
■To prevent paint deteriora-
tion and corrosion on the
body and components (alumi-
num wheels, etc.)
●Wash the vehicle immediately in
the following cases:
• After driving near the sea coast
• After driving on salted roads
• If coal tar or tre e sap is present
on the paint surface
• If dead insects, insect droppings or bird droppings are present on
the paint surface
• After driving in an area contami- nated with soot, oily smoke,
mine dust, iron powder or chem-
ical substances
• If the vehicle becomes heavily soiled with dust or mud
• If liquids such as benzene and gasoline are spilled on the paint
surface
●If the paint is chipped or
scratched, have it repaired
immediately.
●To prevent the wheels from cor-
roding, remove any dirt and
store in a place with low humid-
ity when storing the wheels.
■Cleaning the exterior lights
●Wash carefully. Do not use
organic substances or scrub
with a hard brush.
This may damage the surfaces
of the lights.
●Do not apply wax to the sur-
faces of the lights.
Wax may cause damage to the
lenses.
■When using an automatic car
wash (vehicles with rain-
sensing windshield wipers)
Set the wiper switch to off posi-
tion.
If the wiper switch is in “AUTO”,
the wipers may operate and the
wiper blades may be damaged.
■When using a high pressure
car wash
●When washing the vehicle, do
not let water from the high-pres-
sure washer directly hit the
camera or the area around the
camera. Due to the shock from
the high pressure water, it is
possible that the device may not
operate normally.
●Do not bring the nozzle tip close
to boots (rubber or resin manu-
factured cover), or connectors
or the following parts.
The parts may be damaged if
they come into contact with
high-pressure water.
• Traction related parts
• Steering parts
• Suspension parts
• Brake parts
Page 559 of 728
5597-2. Maintenance
7
Maintenance and care
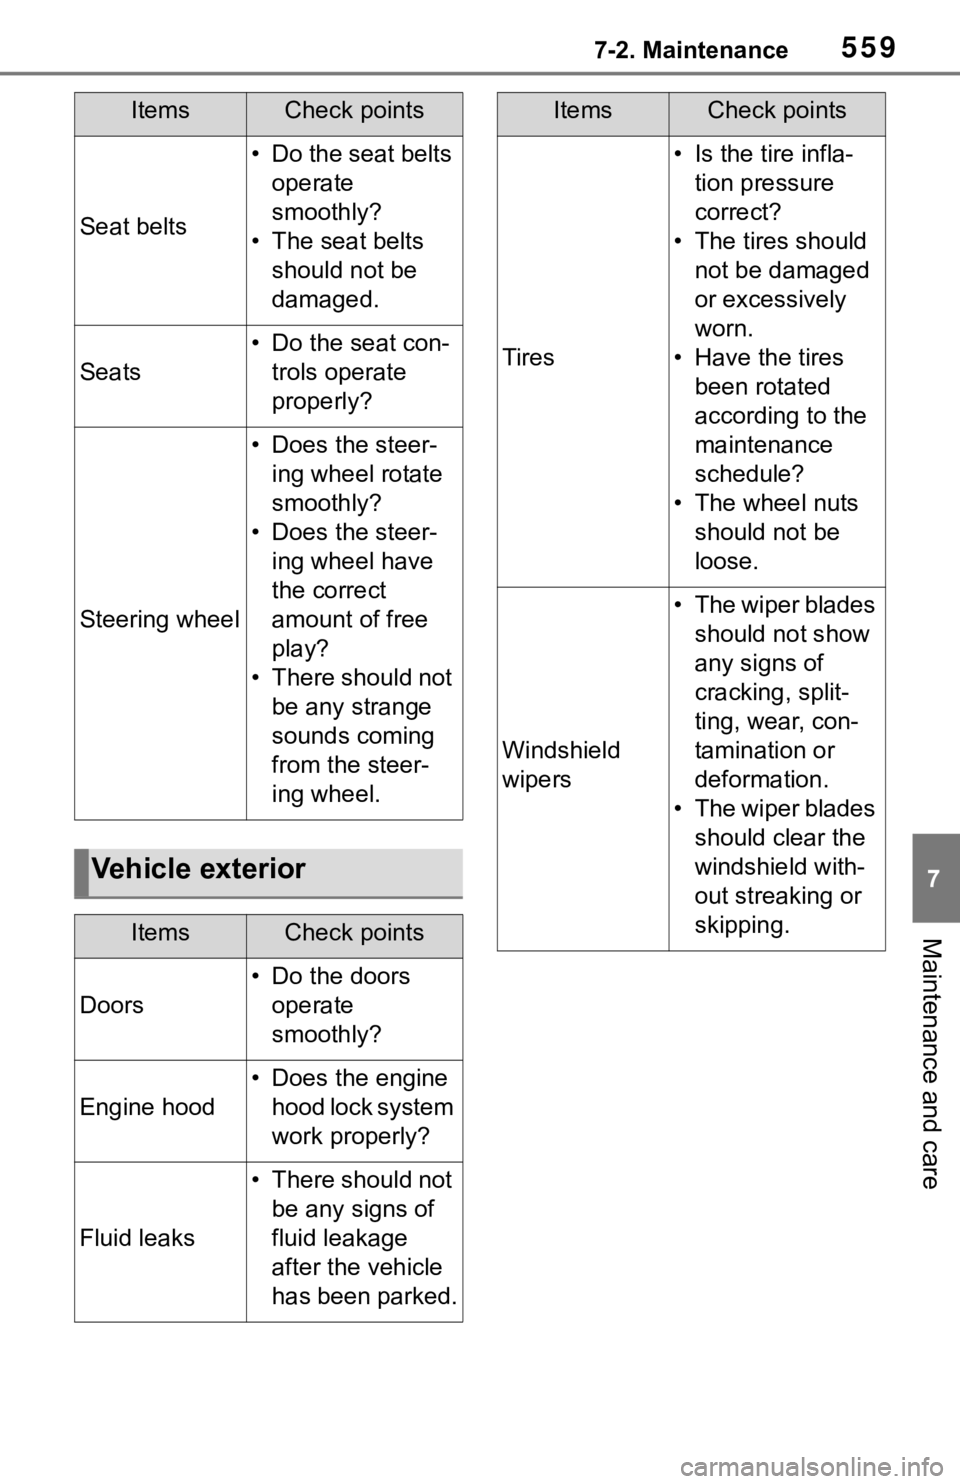
Seat belts
• Do the seat belts operate
smoothly?
• The seat belts should not be
damaged.
Seats
• Do the seat con-trols operate
properly?
Steering wheel
• Does the steer-ing wheel rotate
smoothly?
• Does the steer- ing wheel have
the correct
amount of free
play?
• There should not be any strange
sounds coming
from the steer-
ing wheel.
Vehicle exterior
ItemsCheck points
Doors
• Do the doors operate
smoothly?
Engine hood
• Does the engine hood lock system
work properly?
Fluid leaks
• There should not be any signs of
fluid leakage
after the vehicle
has been parked.
ItemsCheck points
Tires
• Is the tire infla-tion pressure
correct?
• The tires should not be damaged
or excessively
worn.
• Have the tires been rotated
according to the
maintenance
schedule?
• The wheel nuts should not be
loose.
Windshield
wipers
• The wiper blades should not show
any signs of
cracking, split-
ting, wear, con-
tamination or
deformation.
• The wiper blades should clear the
windshield with-
out streaking or
skipping.
ItemsCheck points
Page 592 of 728
5927-3. Do-it-yourself maintenance
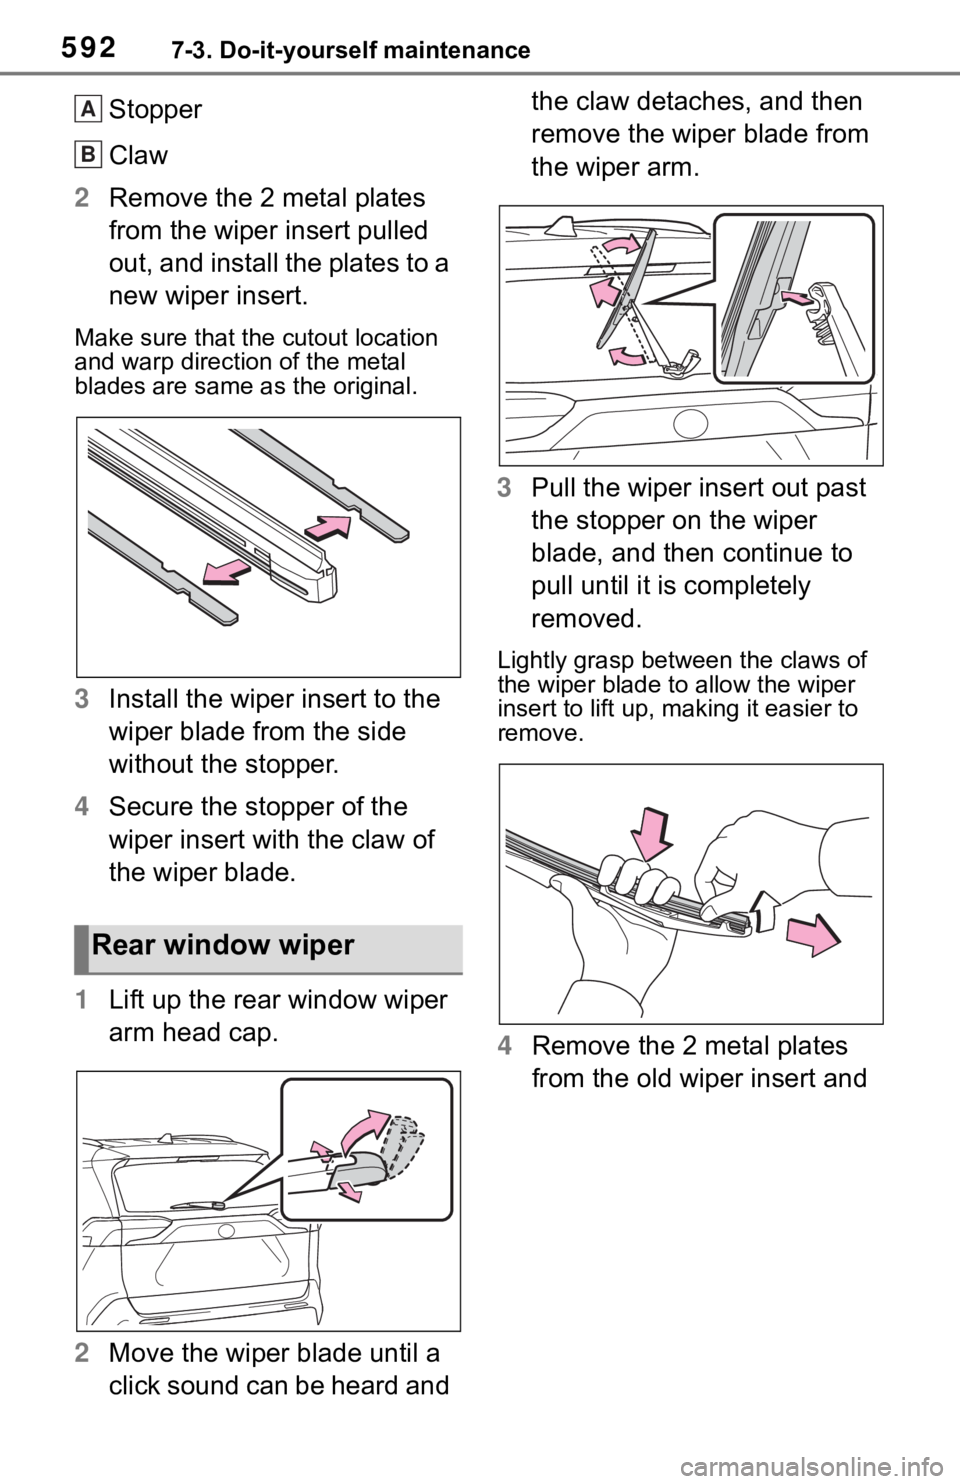
Stopper
Claw
2 Remove the 2 metal plates
from the wiper insert pulled
out, and install the plates to a
new wiper insert.
Make sure that the cutout location
and warp direction of the metal
blades are same as the original.
3Install the wiper insert to the
wiper blade from the side
without the stopper.
4 Secure the stopper of the
wiper insert with the claw of
the wiper blade.
1 Lift up the rear window wiper
arm head cap.
2 Move the wiper blade until a
click sound can be heard and the claw detaches, and then
remove the wiper blade from
the wiper arm.
3 Pull the wiper insert out past
the stopper on the wiper
blade, and then continue to
pull until it is completely
removed.
Lightly grasp between the claws of
the wiper blade to allow the wiper
insert to lift up, making it easier to
remove.
4 Remove the 2 metal plates
from the old wiper insert and
Rear window wiper
A
B
Page 593 of 728
5937-3. Do-it-yourself maintenance
7
Maintenance and care
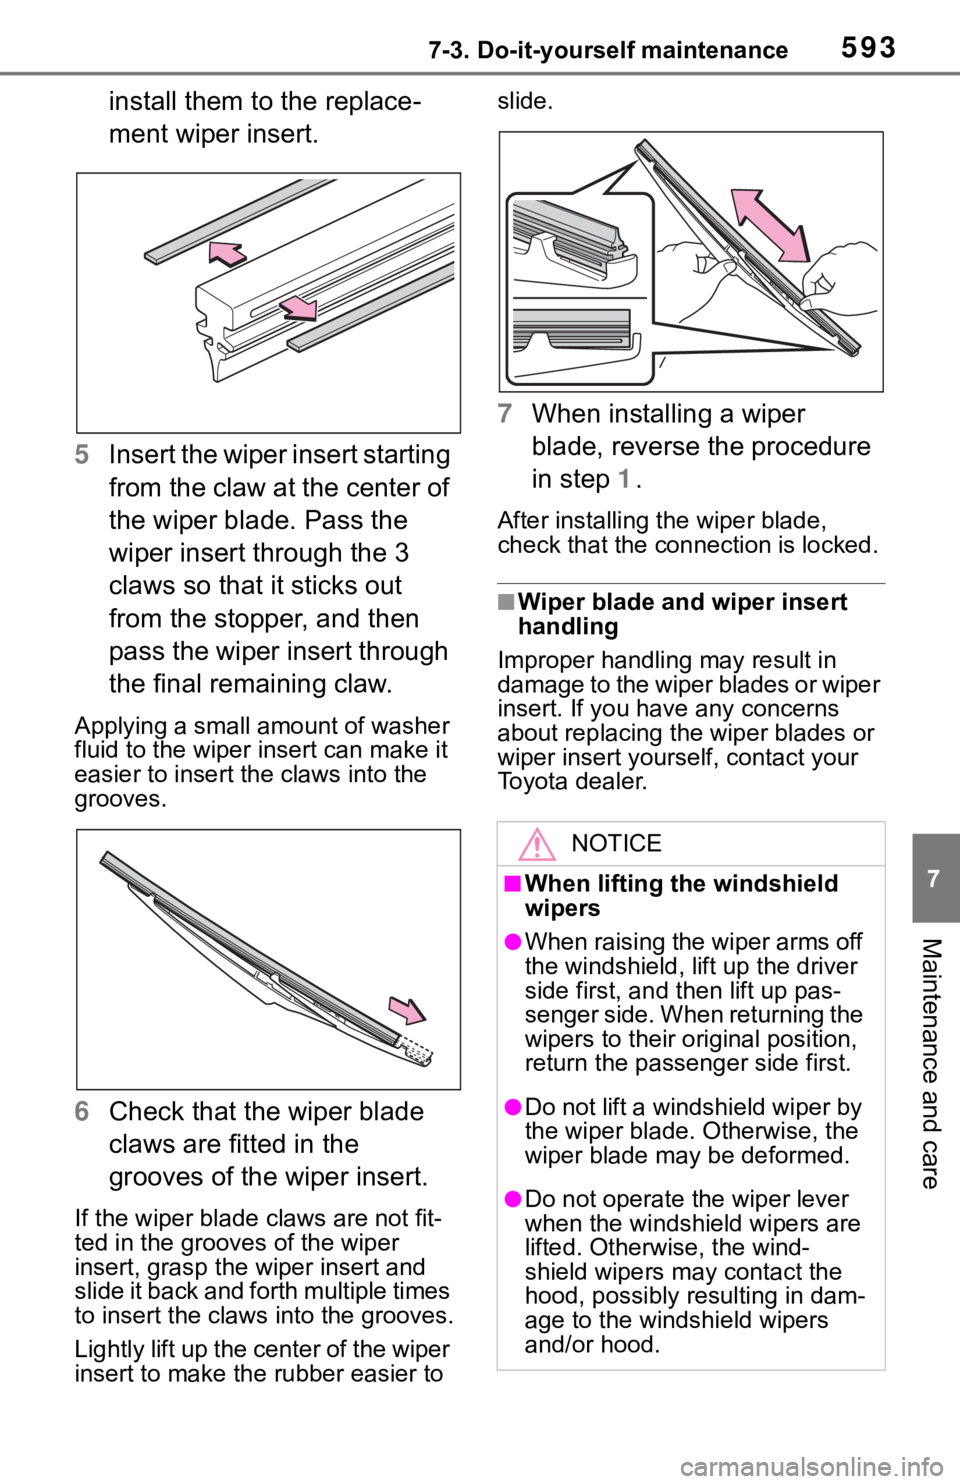
install them to the replace-
ment wiper insert.
5 Insert the wiper insert starting
from the claw at the center of
the wiper blade. Pass the
wiper insert through the 3
claws so that it sticks out
from the stopper, and then
pass the wiper insert through
the final remaining claw.
Applying a small amount of washer
fluid to the wiper insert can make it
easier to insert the claws into the
grooves.
6Check that the wiper blade
claws are fitted in the
grooves of the wiper insert.
If the wiper blade claws are not fit-
ted in the grooves of the wiper
insert, grasp the wiper insert and
slide it back and fo rth multiple times
to insert the claws into the grooves.
Lightly lift up the center of the wiper
insert to make the rubber easier to slide.
7
When installing a wiper
blade, reverse the procedure
in step 1.
After installing the wiper blade,
check that the connection is locked.
■Wiper blade and wiper insert
handling
Improper handling may result in
damage to the wiper blades or wiper
insert. If you have any concerns
about replacing the wiper blades or
wiper insert yourself, contact your
Toyota dealer.
NOTICE
■When lifting the windshield
wipers
●When raising the wiper arms off
the windshield, lift up the driver
side first, and then lift up pas-
senger side. When returning the
wipers to their original position,
return the passenger side first.
●Do not lift a windshield wiper by
the wiper blade. Otherwise, the
wiper blade may be deformed.
●Do not operate the wiper lever
when the windshield wipers are
lifted. Otherwise, the wind-
shield wipers may contact the
hood, possibly resulting in dam-
age to the windshield wipers
and/or hood.