display TOYOTA RAV4 2021 (in English) Workshop Manual
[x] Cancel search | Manufacturer: TOYOTA, Model Year: 2021, Model line: RAV4, Model: TOYOTA RAV4 2021Pages: 748, PDF Size: 30.79 MB
Page 201 of 748
2014-2. Driving procedures
4
Driving
*1: Shifting to the D position allows the system to select a gear suit-
able for the driving conditions.
Setting the shift lever to the D
position is recommended for nor-
mal driving.
*2: Selecting shift ranges using S mode restricts the upper limit of
the possible gear ranges, con-
trols engine brak ing force, and
prevents unnecessary upshifting.
■When driving with dynamic
radar cruise control with full-
speed range activated
Even when performing the following
actions with the in tent of enabling
engine braking, e ngine braking will
not activate because dynamic radar
cruise control with full-speed range will not be canceled.
●While driving in S mode, down-
shifting to 7, 6
, 5, or 4. (P.203)
●When switching th e driving mode
to sport mode while driving in D.
( P.355)
■If “High Transmission Fluid
Temp See Owner’s Manual” is
displayed on the multi-informa-
tion display (AWD models)
Make sure to return to D position
driving and reduce speed by easing
off the accelerato r pedal. Stop the
vehicle in a safe place, shift the shift
lever to P and let the engine idle
until the warning message goes out.
When the warning message goes
out, the vehicle can be driven again.
If the warning message does not go
out after waiting a while, have your
vehicle inspected by your Toyota
dealer.
■Restraining sudden start (Drive-
Start Control)
P.172
■AI-SHIFT
The AI-SHIFT automa tically selects
the suitable gear according to driver
performance and driving conditions.
The AI-SHIFT automatically oper-
ates when the shift lever is in D.
(Shifting the shift lever to S cancels
the function.)
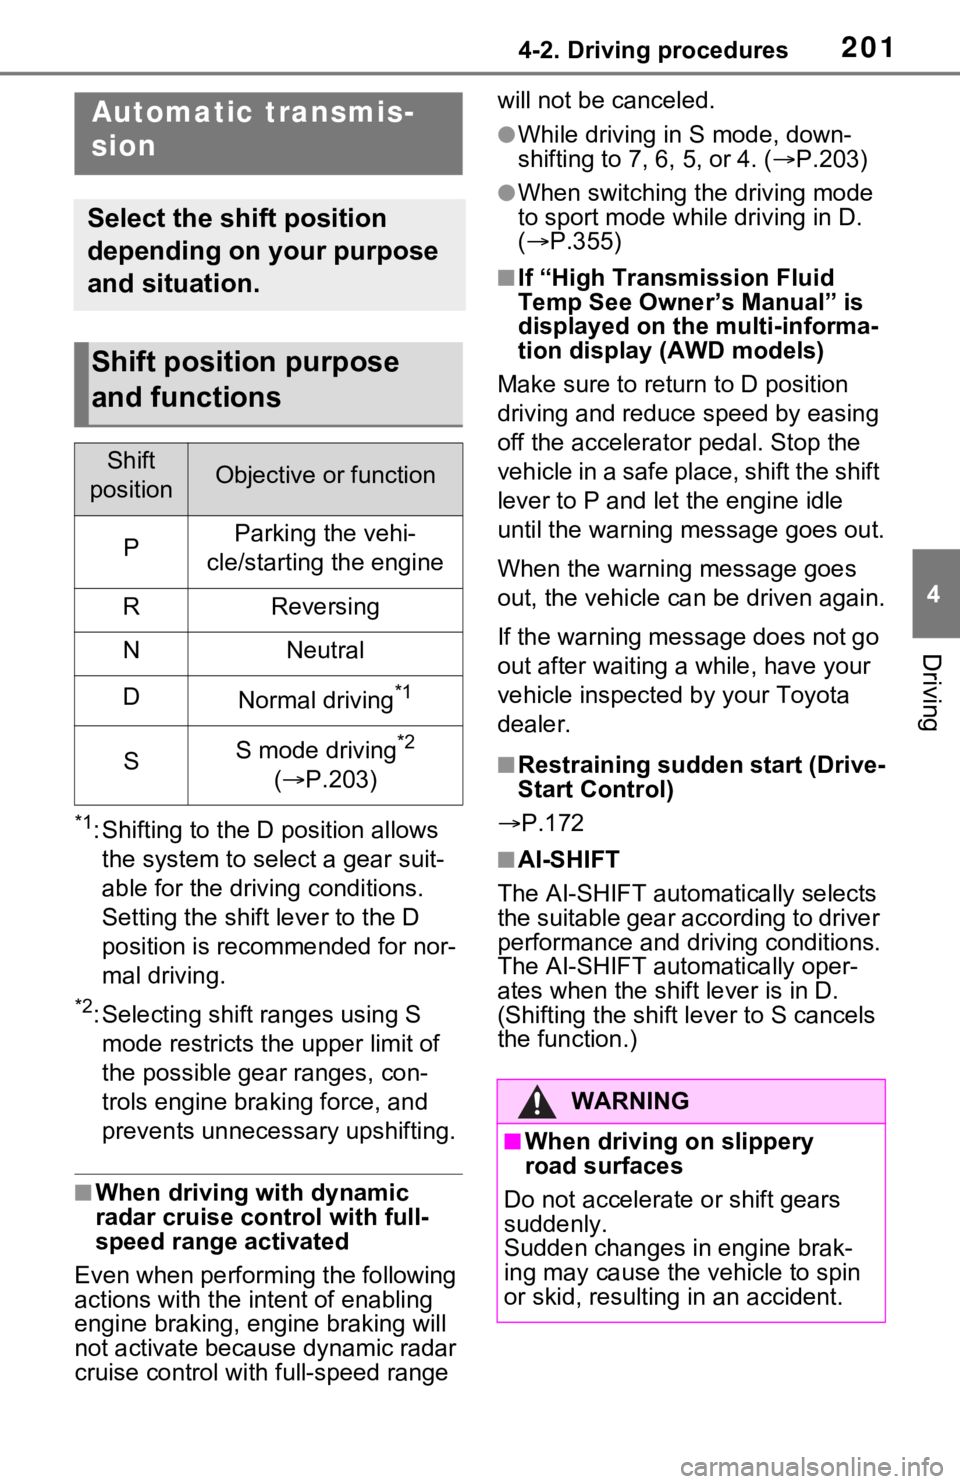
Automatic transmis-
sion
Select the shift position
depending on your purpose
and situation.
Shift position purpose
and functions
Shift
positionObjective or function
PParking the vehi-
cle/starting the engine
RReversing
NNeutral
DNormal driving*1
SS mode driving*2
( P.203)
WARNING
■When driving on slippery
road surfaces
Do not accelerate or shift gears
suddenly.
Sudden changes in engine brak-
ing may cause the vehicle to spin
or skid, resulting in an accident.
Page 203 of 748
2034-2. Driving procedures
4
Driving
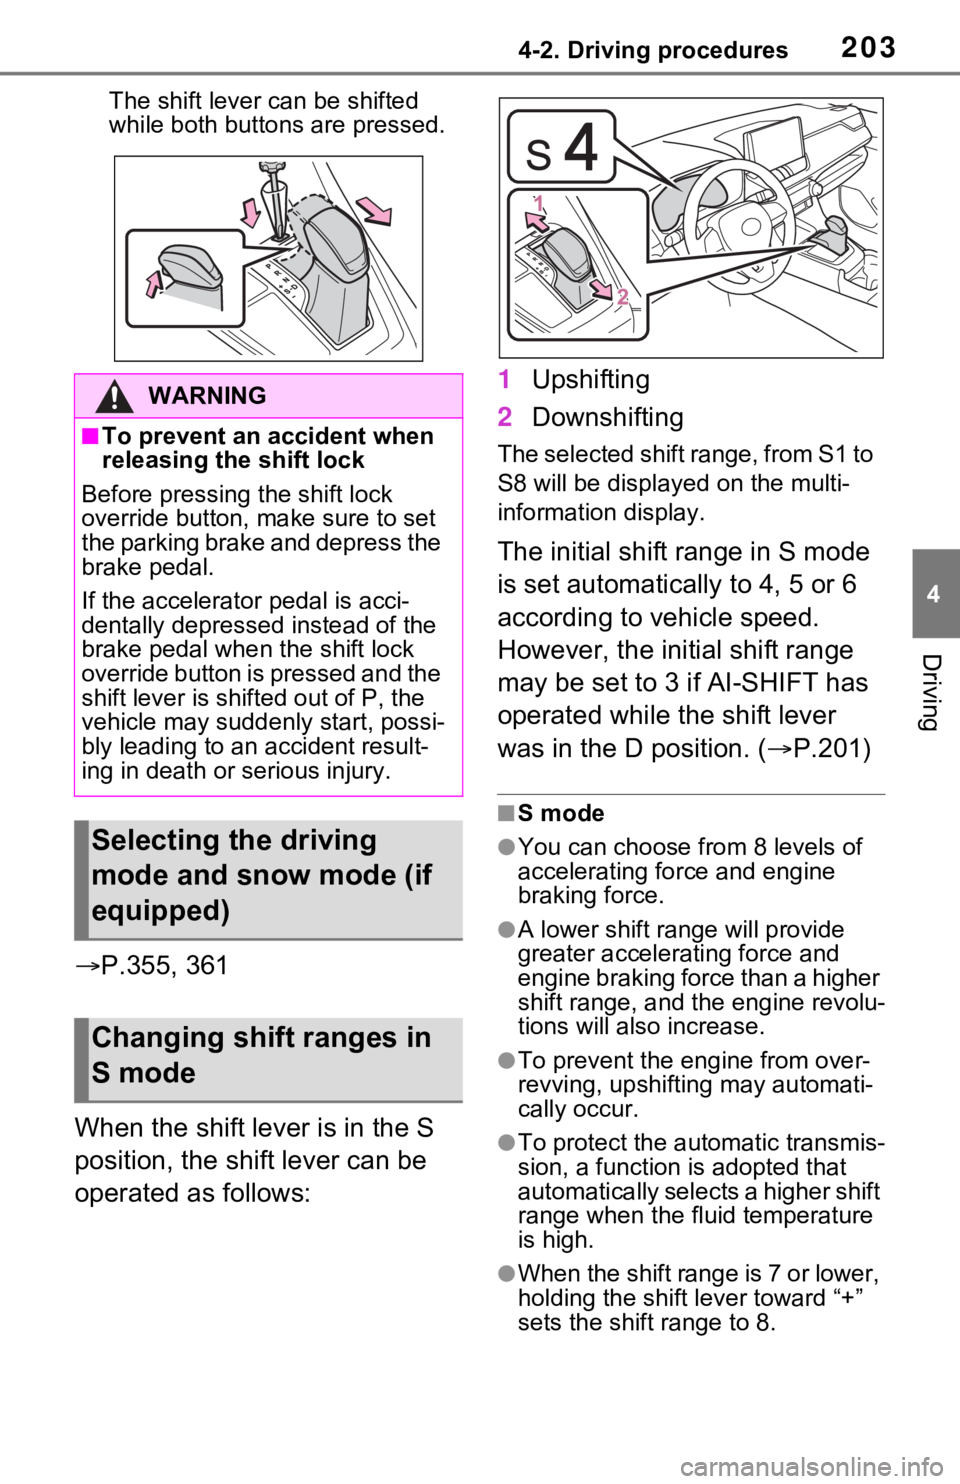
The shift lever can be shifted
while both buttons are pressed.
P.355, 361
When the shift lever is in the S
position, the shift lever can be
operated as follows: 1
Upshifting
2 Downshifting
The selected shift range, from S1 to
S8 will be display ed on the multi-
information display.
The initial shift range in S mode
is set automatically to 4, 5 or 6
according to vehicle speed.
However, the initial shift range
may be set to 3 if AI-SHIFT has
operated while the shift lever
was in the D position. ( P.201)
■S mode
●You can choose from 8 levels of
accelerating force and engine
braking force.
●A lower shift range will provide
greater accelerating force and
engine braking force than a higher
shift range, and t he engine revolu-
tions will also increase.
●To prevent the e ngine from over-
revving, upshifting may automati-
cally occur.
●To protect the automatic transmis-
sion, a function is adopted that
automatically selects a higher shift
range when the fluid temperature
is high.
●When the shift range is 7 or lower,
holding the shift lever toward “+”
sets the shift range to 8.
WARNING
■To prevent an accident when
releasing the shift lock
Before pressing the shift lock
override button, make sure to set
the parking brake and depress the
brake pedal.
If the accelerator pedal is acci-
dentally depressed instead of the
brake pedal when the shift lock
override button is pressed and the
shift lever is shifted out of P, the
vehicle may suddenly start, possi-
bly leading to an accident result-
ing in death or serious injury.
Selecting the driving
mode and snow mode (if
equipped)
Changing shift ranges in
S mode
Page 204 of 748
2044-2. Driving procedures
■Downshifting restriction warn-
ing buzzer
To help ensure safety and driving
performance, downshifting opera-
tion may sometimes b e restricted. In
some circumstances, downshifting
may not be possible even when the
shift lever is operated. (A buzzer will
sound twice.)
■If the “S” indicator does not
come on or the “D” indicator is
displayed even after shifting the
shift lever to S
This may indicate a malfunction in
the automatic tra nsmission system.
Have the vehicle inspected by your
Toyota dealer imme diately. (In this
situation, the transmission will oper-
ate in the same manner as when the
shift lever is in D.)
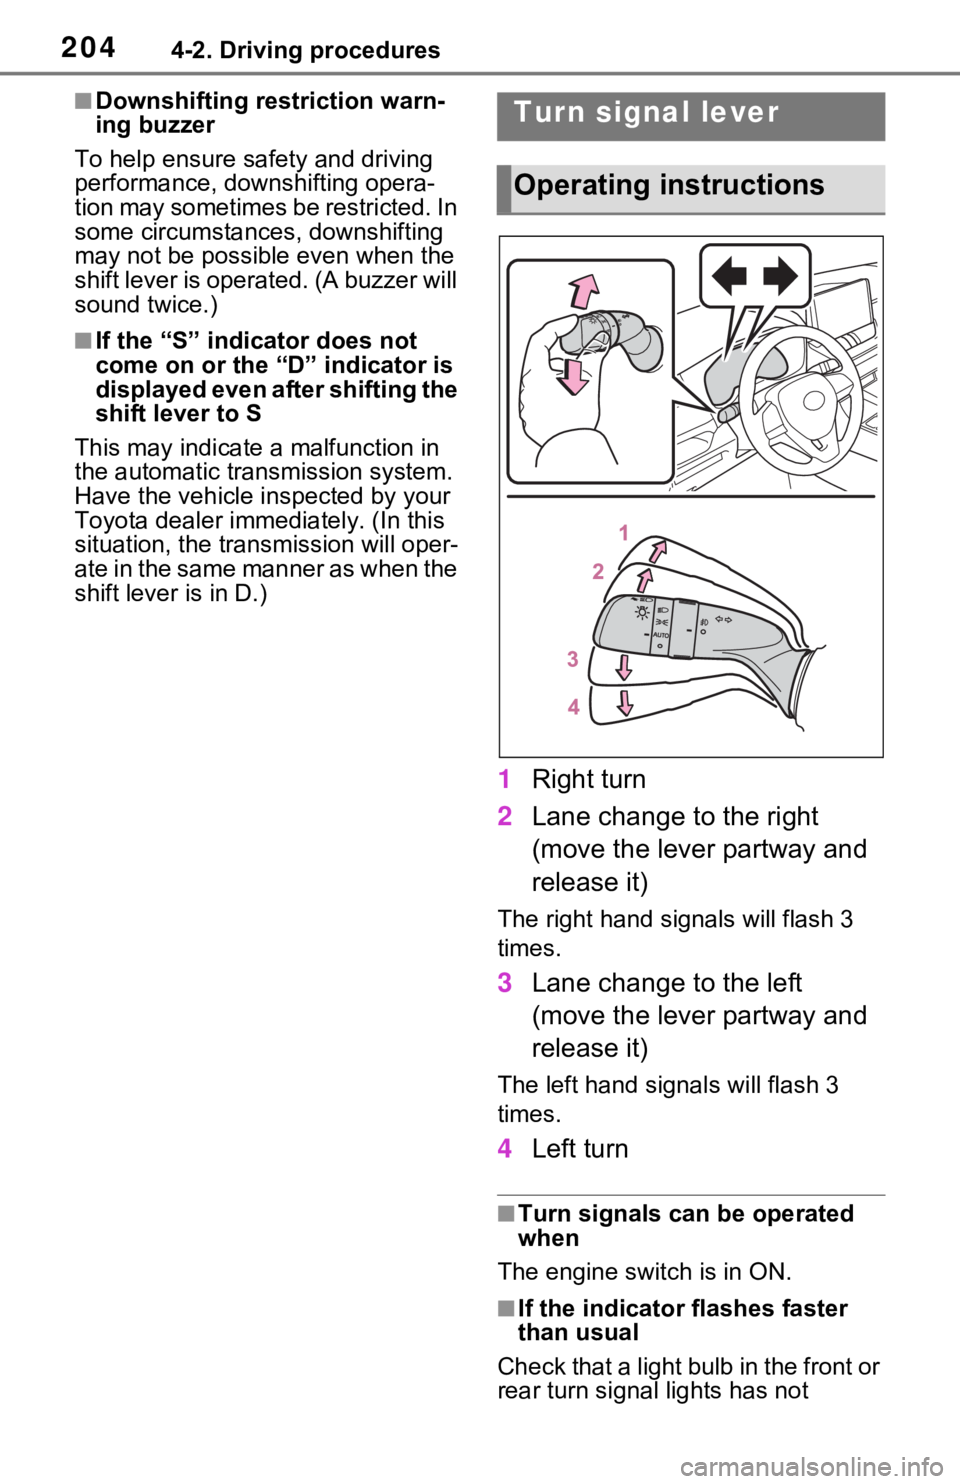
1 Right turn
2 Lane change to the right
(move the lever partway and
release it)
The right hand s ignals will flash 3
times.
3 Lane change to the left
(move the lever partway and
release it)
The left hand signals will flash 3
times.
4Left turn
■Turn signals can be operated
when
The engine switch is in ON.
■If the indicator flashes faster
than usual
Check that a light bulb in the front or
rear turn signal lights has not
Turn signal lever
Operating instructions
Page 206 of 748
2064-2. Driving procedures
parking brake.
The parking brake indicator light
and parking brake switch indicator
will turn on.
Pull and hold the parking brake
switch if an emergency occurs and
it is necessary to operate the park-
ing brake while driving.
2Push the switch to release
the parking brake.
• Operate the parking brake switch
while depressing the brake pedal.
• Parking brake automatic release function ( P.207)
Make sure that t he parking brake
indicator light and parking brake
switch indicator turn off.
If the parking brake indicator
light and parking brake switch
indicator flash, operate the
switch again. ( P.644)
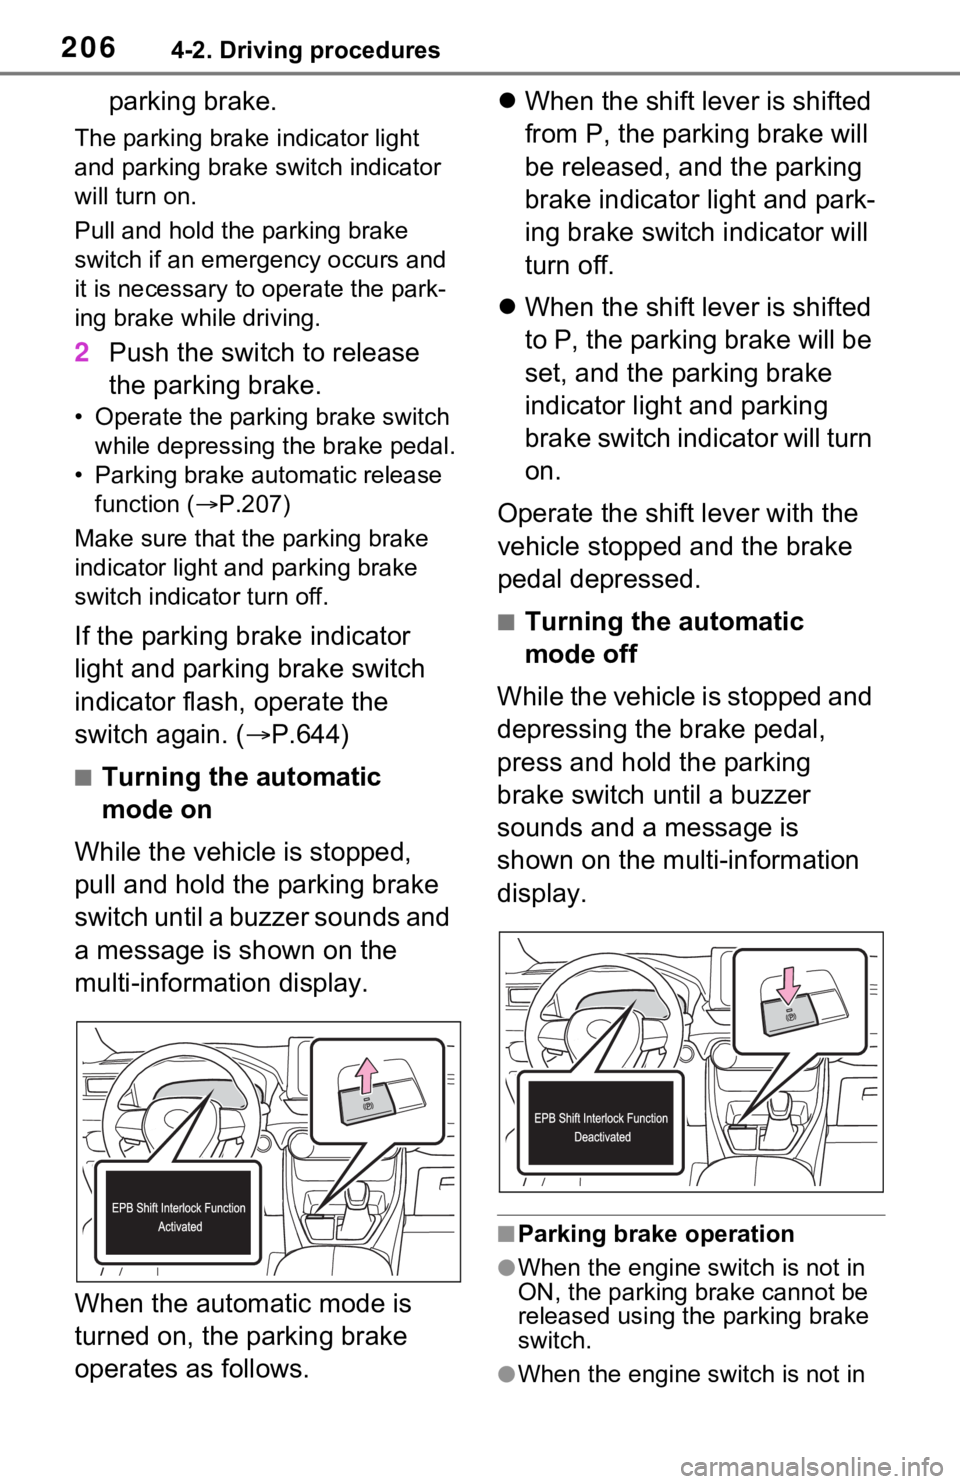
■Turning the automatic
mode on
While the vehicle is stopped,
pull and hold the parking brake
switch until a buzzer sounds and
a message is shown on the
multi-information display.
When the automatic mode is
turned on, the parking brake
operates as follows.
When the shift lever is shifted
from P, the parking brake will
be released, and the parking
brake indicator light and park-
ing brake switch indicator will
turn off.
When the shift lever is shifted
to P, the parking brake will be
set, and the parking brake
indicator light and parking
brake switch indicator will turn
on.
Operate the shift lever with the
vehicle stopped and the brake
pedal depressed.
■Turning the automatic
mode off
While the vehicle is stopped and
depressing the brake pedal,
press and hold the parking
brake switch until a buzzer
sounds and a message is
shown on the multi-information
display.
■Parking brake operation
●When the engine switch is not in
ON, the parking brake cannot be
released using the parking brake
switch.
●When the engine switch is not in
Page 207 of 748
2074-2. Driving procedures
4
Driving
ON, automatic mode (automatic
brake setting and releasing) is not
available.
■Parking brake automatic
release function
The parking brake will be released
automatically when the accelerator
pedal is slowly depressed under the
following conditions:
●The driver’s door is closed
●The driver is wearing the seat belt
●The shift lever is in a forward or
reverse position.
●The malfunction in dicator lamp or
brake system warning light is not
illuminated
If the automatic release function
does not operate, release the park-
ing brake manually.
■If “Parking Brake Temporarily
Unavailable” i s displayed on
the multi-information display
If the parking brake is operated
repeatedly over a short period of
time, the system may restrict opera-
tion to prevent overheating. If this
happens, refrain from operating the
parking brake. Nor mal operation will
return after about 1 minute.
■If “Parking Brake Unavailable”
is displayed on the multi-infor-
mation display
Operate the parking brake switch. If
the message does not disappear
after operating the switch several
times, the system may be malfunc-
tioning. Have the vehicle inspected
by your Toyota dealer.
■Parking brake operation sound
When the parking brake operates, a
motor sound (whirring sound) may
be heard. This does not indicate a
malfunction.
■Parking brake indicator light
●Depending on the engine switch
position/mode, the parking brake
indicator light will turn on and stay on as described below:
ON: Comes on until the parking
brake is released.
Not in ON: Stays
on for approxi-
mately 15 seconds.
●When the engine switch is turned
off with the parking brake set, the
parking brake i ndicator light will
stay on for about 15 seconds. This
does not indicate a malfunction.
■When the parking brake switch
malfunctions
Automatic mode (automatic brake
setting and releas ing) will be turned
on automatically.
■Parking the vehicle
P.171
■Parking brake engaged warning
buzzer
A buzzer will sound if the vehicle is
driven with the parking brake
engaged. “Parking Brake ON” is dis-
played on the multi-information dis-
play (with the vehicle reaching a
speed of 5 km/h [3 mph]).
■If the brake system warning
light comes on
P.638
■Usage in winter time
P.371
WARNING
■When parking the vehicle
Do not leave a child in the vehicle
alone. The parking brake may be
released unintentionally by a child
and there is the danger of the
vehicle moving that may lead to
an accident resulting in death or
serious injury.
■Parking brake switch
Do not set any objects near the
parking brake switch. Objects
may interfere with the switch and
may lead the parking brake to
unexpectedly operate.
Page 209 of 748
2094-2. Driving procedures
4
Driving
●The driver is not wearing the seat
belt.
If any of the conditions above are
detected when the brake hold sys-
tem is enabled, the system will turn
off and the brake hold standby indi-
cator light will go o ff. In addition, if
any of the conditions are detected
while the system is holding the
brake, a warning buzzer will sound
and a message will be shown on the
multi-information display. The park-
ing brake will then be set automati-
cally.
■Brake hold function
●If the brake pedal is left released
for a period of about 3 minutes
after the system has started hold-
ing the brake, the parking brake
will be set automat ically. In this
case, a warning buzzer sounds
and a message is shown on the
multi-informat ion display.
●To turn the syste m off while the
system is holding the brake, firmly
depress the brake pedal and
press the button again.
●The brake hold function may not
hold the vehicle wh en the vehicle
is on a steep inclin e. In this situa-
tion, it may be necessary for the
driver to apply the brakes. A warn-
ing buzzer will sound and the
multi-informatio n display will
inform the driver of this situation. If
a warning message is shown on
the multi-information display, read
the message and follow the
instructions.
■When the parking brake is set
automatically while the system
is holding the brakes
Perform any of the following opera-
tions to release the parking brake:
●Depress the accelerator pedal.
(The parking brake will not be
released automatic ally if the seat
belt is not fastened.)
●Operate the parking brake switch
with the brake pedal depressed. Make sure that the parking brake
indicator light goes off. (
P.205)
■When an inspection at your
Toyota dealer is necessary
When the brake hold standby indi-
cator (green) does not illuminate
even when the brake hold switch is
pressed with the brake hold system
operating conditions met, the sys-
tem may be malf unctioning. Have
the vehicle inspected at your Toyota
dealer.
■If “Brake Hold Malfunction
Press Brake to Deactivate Visit
Your Dealer” or “Brake Hold
Malfunction Visit Your Dealer”
is displayed on the multi-infor-
mation display
The system may be malfunctioning.
Have the vehicle inspected by your
Toyota dealer.
■Warning messages and buzzers
Warning messages and buzzers are
used to indicate a system malfunc-
tion or to inform the driver of the
need for caution. If a warning mes-
sage is shown on the multi-informa-
tion display, read the message and
follow the instructions.
■If the brake hold operated indi-
cator flashes
P.643
WARNING
■When the vehicle is on a
steep incline
When using the br ake hold sys-
tem on a steep incline, exercise
caution. The brake hold function
may not hold the vehicle in such a
situation.
Page 213 of 748
2134-3. Operating the lights and wipers
4
Driving
pressed after all the doors are
closed.)
●When only the tail lights are on:
The tail lights turn off automati-
cally if the engine switch is turned
to ACC or OFF and the driver’s
door is opened.
To turn the lights on again, turn the
engine switch to ON, or turn the light
switch off once and then back to
or position.
■Light reminder buzzer
Vehicles without smart key system
A buzzer sounds when the engine
switch is turned to ACC or OFF, the
key is removed and the driver’s door
is opened while the lights are turned
on.
Vehicles with smart key system
A buzzer sounds when the engine
switch is turned to ACC or OFF and
the driver’s door is opened while the
lights are turned on.
■Windshield wiper linked head-
light illumination (if equipped)
When driving during daytime with
the headlight switch turned to , if
the windshield wipers are used, the
headlights will turn on automatically
after several seconds to help
enhance the visibility of your vehi-
cle.
■Battery-saving function
In order to prevent the battery of the
vehicle from discharging, if the
headlights and/or t ail lights are on
when the engine swi tch is turned to
OFF, the battery saving function will
operate and automatically turn off all
the lights after approximately 20
minutes.
When any of the fo llowing are per-
formed, the battery -saving function
is canceled once and then reacti-
vated. All the light s will turn off auto- matically 20 minutes after the
battery-saving function has been
reactivated:
●When the headlight switch is oper-
ated
●When a door is opened or closed
■If “Headlight System Malfunc-
tion Visit Your Dealer” is dis-
played on the multi-information
display
The system may be malfunctioning.
Have the vehicle inspected by your
Toyota dealer.
■Customization
Settings (e.g. light sensor sensitiv-
ity) can be changed.
(Customizable features: P.707)
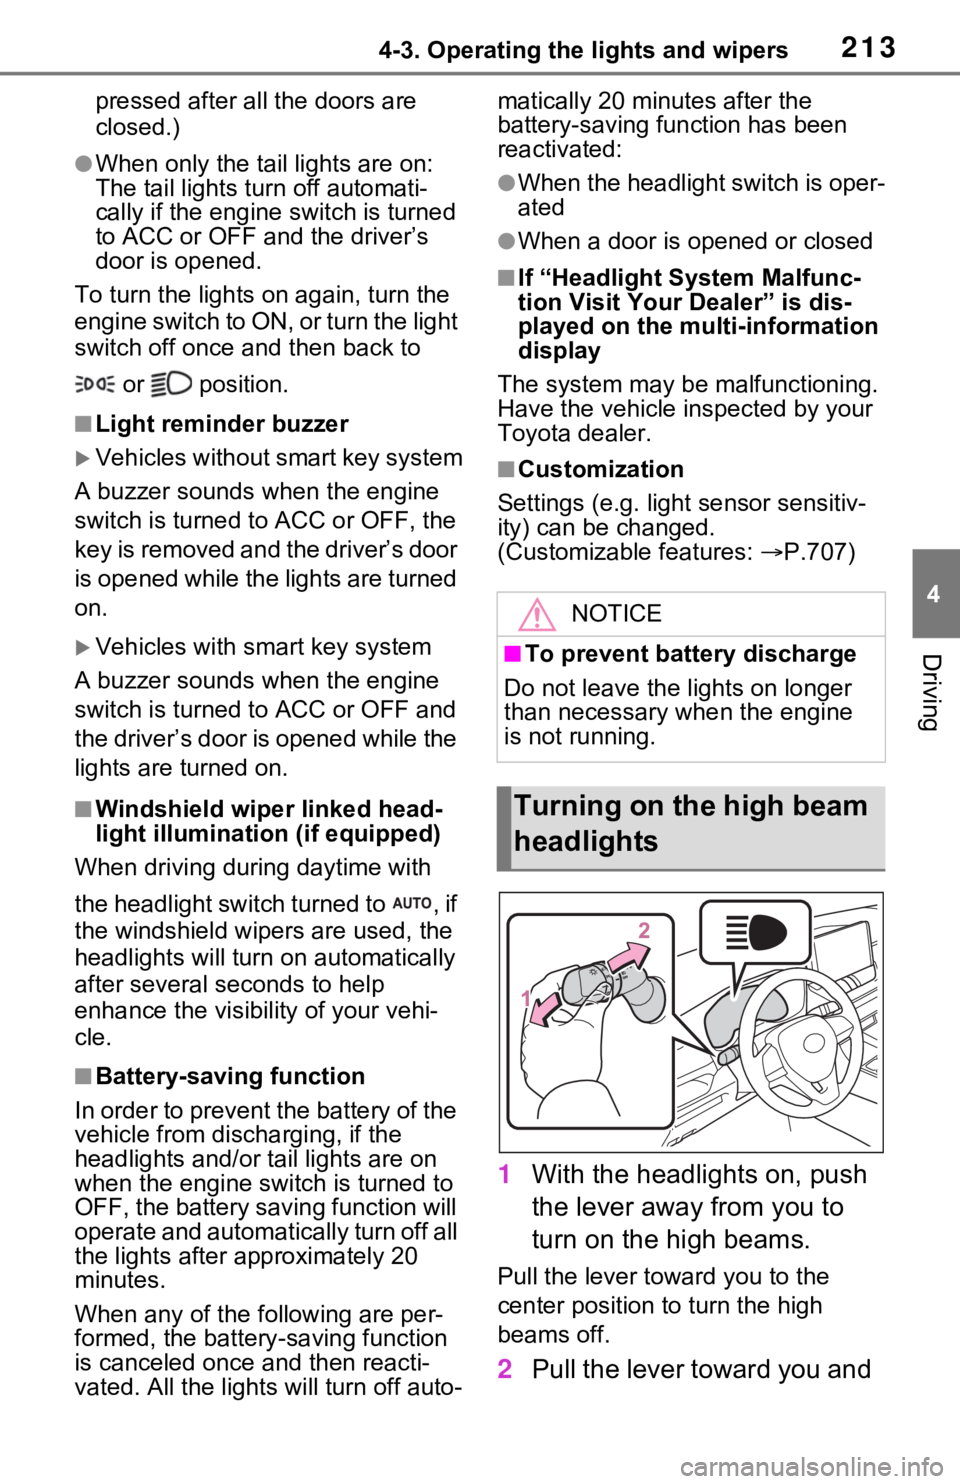
1 With the headlights on, push
the lever away from you to
turn on the high beams.
Pull the lever toward you to the
center position to turn the high
beams off.
2Pull the lever toward you and
NOTICE
■To prevent battery discharge
Do not leave the lights on longer
than necessary w hen the engine
is not running.
Turning on the high beam
headlights
Page 216 of 748
2164-3. Operating the lights and wipers
• The windshield is obscured by fog, mist, ice, dirt, etc.
• The windshield is cracked or dam- aged
• The front camera is deformed or
dirty
• When the temperature of the front
camera is extremely high
• Surrounding brightness levels are equal to those of h eadlights, tail
lights or fog lights
• When headlights or tail lights of vehicles ahead are turned off,
dirty, changing color, or not aimed
properly
• When the vehicle is hit by water,
snow, dust, etc. fr om a preceding
vehicle
• When driving thr ough an area of
intermittently changing brightness
and darkness
• When frequently and repeatedly driving ascending/descending
roads, or roads with rough, bumpy
or uneven surfaces (such as
stone-paved roads, gravel roads,
etc.)
• When frequently and repeatedly taking curves or driving on a wind-
ing road
• There is a highly reflective object
ahead of the vehicle, such as a
sign or mirror
• The back of a vehicle ahead is highly reflective, such as a con-
tainer on a truck
• The vehicle’s headlights are dam- aged or dirty, or are not aimed
properly
• The vehicle is listing or titling due to a flat tire, a trailer being towed,
etc.
• The high beam and low beam are repeatedly being switched
between in an abnormal manner
• The driver believes that the high beam may be causing problems
or distress to other drivers or
pedestrians nearby■If “Headlight System Malfunc-
tion Visit Your Dealer” is dis-
played on the multi-information
display
The system may be malfunctioning.
Have the vehicle inspected by your
Toyota dealer.
■Temporarily lowering sensor
sensitivity
The sensitivity of the sensor can be
temporarily lowered.
1 Turn the engine switch to OFF
while the following conditions are
met.
●The headlight switch is in or
position.
●The headlight switch lever is in
high beam position.
●Automatic High Beam switch is
on.
2 Turn the engine switch to ON.
3 Within 60 second s after step 2,
repeat pulling the headlight
switch lever to the original posi-
tion then pushing it to the high
beam position qui ckly 10 times,
then leave the lever in high beam
position.
4 If the sensitivity is changed, the
Automatic High Beam indicator
is turn on and off 3 times.
Automatic High Beam (headlights)
may turn on even when the vehicle
is stopped.
■Switching to the low beam
Pull the lever to original position.
The Automatic High Beam indicator
will turn off.
Push the lever away from you to
activate the Automatic High Beam
system again.
Turning the high beam
on/off manually
Page 224 of 748

2244-4. Refueling
1Pull up the opener to open
the fuel filler door. 2
Turn the fuel tank cap slowly
to open it and put it into the
holder on the fuel filler door.
After refueling, turn the fuel tank
cap until you hear a click. Once
the cap is released, it will turn
slightly in the opposite direction.
■When “Check Fuel Cap” is dis-
played on the multi-information
display
The fuel tank ca p may be unfas-
tened or loose. Turn the engine
switch to OFF, check the cap and
tighten it securely. If the message
remains, wait a few seconds and
then turn the engine switch to OFF
once again.
WARNING
■When refueling
Observe the following precautions
to prevent fuel overflowing from
the fuel tank:
●Securely insert the fuel nozzle
into the fuel filler neck.
●Stop filling the tank after the fuel
nozzle automatically clicks off.
●Do not top off the fuel tank.
NOTICE
■Refueling
Do not spill fuel during refueling.
Doing so may damage the vehi-
cle, such as causing the emission
control system to operate abnor-
mally or damaging fuel system
components or the vehicle’s
painted surface.
Opening the fuel tank cap
Closing the fuel tank cap
Page 230 of 748
2304-5. Using the driving support systems
■If a warning message is displayed on the multi-information display
A system may be temporarily unava ilable or there may be a malfunction in
the system.
●In the following situations, perform the actions specified in t he table. When
the normal operating conditions are detected, the message will disappear
and the system will be come operational.
If the message does not disapp ear, contact your Toyota dealer.
SituationActions
When the area around a sensor is
covered with dirt, moisture (fogged
up, covered with condensation, ice,
etc.), or other foreign matterTo clean the part of the windshield in
front of the front c amera, use the
windshield wipers or the windshield
defogger of the air conditioning sys-
tem ( P.517, 524).