display TOYOTA RAV4 2022 Owner's Manual
[x] Cancel search | Manufacturer: TOYOTA, Model Year: 2022, Model line: RAV4, Model: TOYOTA RAV4 2022Pages: 748, PDF Size: 22.93 MB
Page 94 of 748
942-1. Instrument cluster
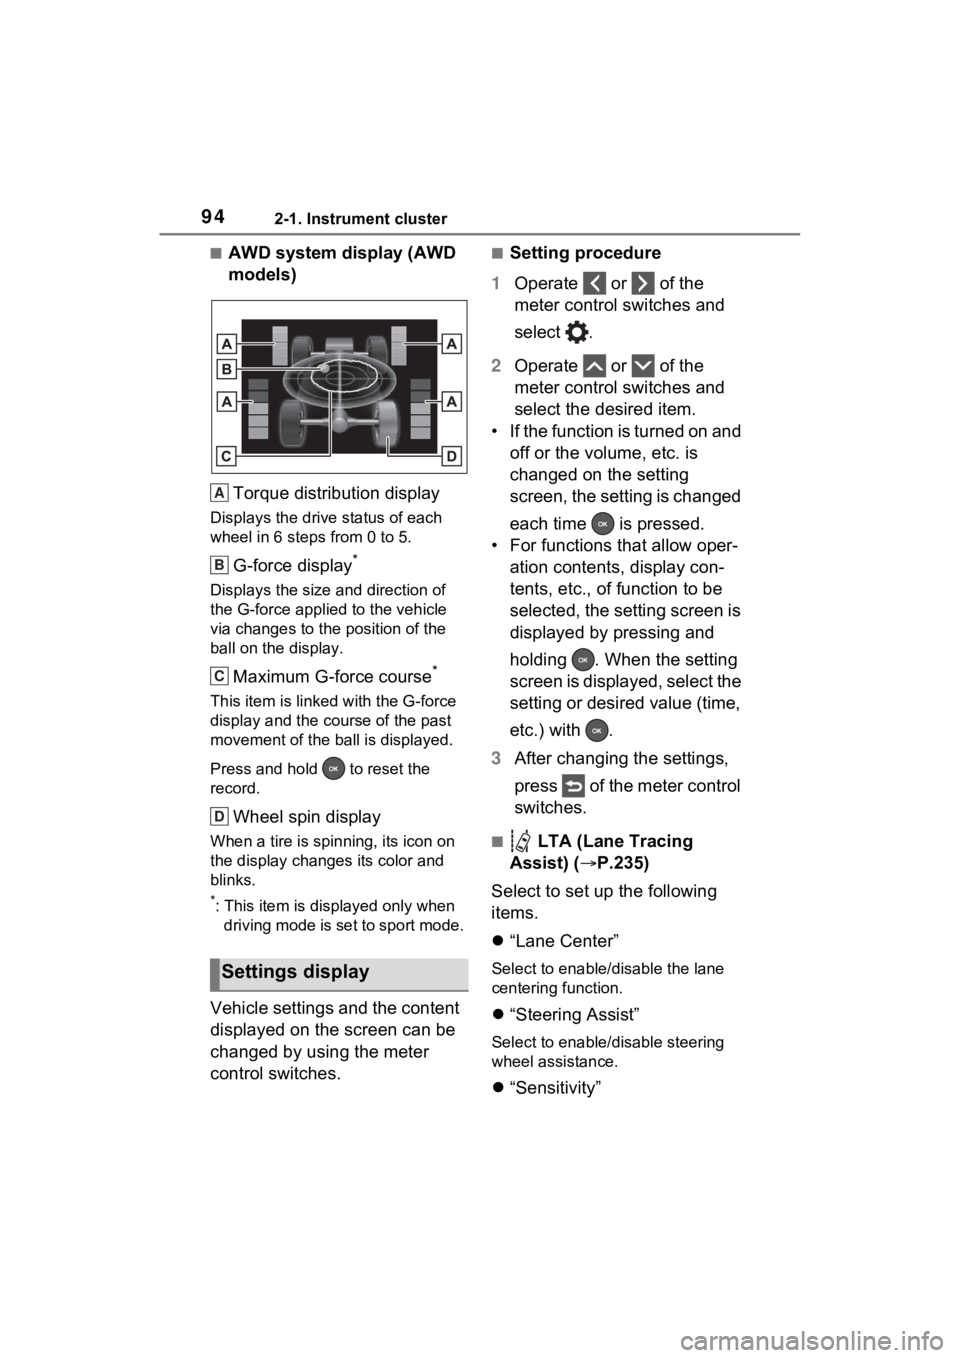
■AWD system display (AWD
models)Torque distribution display
Displays the drive status of each
wheel in 6 steps from 0 to 5.
G-force display*
Displays the size and direction of
the G-force applie d to the vehicle
via changes to the position of the
ball on the display.
Maximum G-force course*
This item is linke d with the G-force
display and the course of the past
movement of the ball is displayed.
Press and hold to reset the
record.
Wheel spin display
When a tire is spin ning, its icon on
the display change s its color and
blinks.
*: This item is displayed only when driving mode is set to sport mode.
Vehicle settings and the content
displayed on the screen can be
changed by using the meter
control switches.
■Setting procedure
1 Operate or of the
meter control switches and
select .
2 Operate or of the
meter control switches and
select the desired item.
• If the function is turned on and off or the volume, etc. is
changed on the setting
screen, the setting is changed
each time is pressed.
• For functions that allow oper- ation contents, display con-
tents, etc., of function to be
selected, the setting screen is
displayed by pressing and
holding . When the setting
screen is displayed, select the
setting or desired value (time,
etc.) with .
3 After changing the settings,
press of the meter control
switches.
■ LTA (Lane Tracing
Assist) ( P.235)
Select to set up the following
items.
“Lane Center”
Select to enable /disable the lane
centering function.
“Steering Assist”
Select to enable/d isable steering
wheel assistance.
“Sensitivity”
Settings display
A
B
C
D
Page 96 of 748
962-1. Instrument cluster
“Notification method”
Select to change e ach notification
method used to notify the driver
when the system recognizes
excess speed and Do Not Enter
sign.
“Notification Level”
Select to change e ach notification
level used to notify the driver when
the system recognizes a speed limit
sign.
■ Vehicle Settings
PBD (Power Back Door)
(if equipped) ( P.117)
Select to set up the following items.
• System settings
Select to enable/disable the power
back door system.
• “Hands Free”
*
Select to enable/disable the Hands
Free Power Back Door.
• “Opening Adjustment”
Select the open position when
power back door is fully open.
•“Volume”
Select to set the volume of the
buzzer which sounds when the
power back door system operates.
*: Vehicles with Hands Free Power
Back Door
(Stop & Start system) (if
equipped) ( P.341)
Select to set the length of time the
Stop & Start system will operate
when the “A/C” switch of the air
conditioning system is on.
“TPWS” (Tire Pressure Warn- ing System) (if equipped)
(
P.582)
• “Set Pressure”
Select to initialize the tire pressure
warning system.
• “Change Wheel”
Select to register the ID codes of
the tire pressure se nsors to the tire
pressure warning system.
“Rear Seat Reminder”
( P.110)
Select to enable/disable the rear
seat reminder function.
“Scheduled Maintenance”
( P.563)
Select to reset the scheduled main-
tenance information (message indi-
cating maintenance is required and
distance until the next mainte-
nance) after all ma intenance is per-
formed.
■ Settings
“Language”
Select to change the language on
the multi-information display.
“Units”
Select to change the units of mea-
sure displayed.
“Meter Type” (7-inch display)
Select to change the speedometer
display.
(Eco Driving Indicator
Light) ( P.92)
Select to activate/deactivate the
Eco Driving Indicator Light.
(Driving information dis-
Page 97 of 748
972-1. Instrument cluster
2
Vehicle status information and indicators
play settings)
Select to change the display on
Fuel Economy (P.91).
(Audio settings) (if
equipped)
Select to enable/disable
screen.
(Vehicle information dis-
play settings)
• “Display Contents”
Select to enable/disable the AWD
system display ( P.94). (AWD
models)
• “Drive Info Type”
Select to change the drive informa-
tion type display between trip and
total. ( P.93).
• “Drive Info Items”
Select to set the items on the upper
and lower side of the drive informa-
tion screen from three items, aver-
age speed, distance and total time.
“Pop-Up Display”
Select to enable/d isable the follow-
ing pop-up displays, which may
appear in some situations.
• Intersection guidance display of the navigation system-linked sys-
tem (if equipped)
• Incoming call display of the hands-free phone system (if
equipped)
• Audio operation (if equipped)
• Volume operation (if equipped)
• Voice control (if equipped)
• Stop & Start system duration (if equipped) • Stop & Start system status (if
equipped)
“MID OFF”
A blank screen is displayed
“Default Settings”
Select to reset the meter display
settings.
■Suspension of the settings dis-
play
●In the following situations, opera-
tion of the settings display will be
temporarily suspended.
• When a warning message appears on the multi-information
display
• When the vehicle begins to move
●Settings for functions not
equipped to the vehicle are not
displayed.
●When a function is turned off, the
related settings for that function
are not selectable.
WARNING
■Cautions during setting up
the display
As the engine needs to be run-
ning during setting up the display,
ensure that the vehicle is parked
in a place with adequate ventila-
tion. In a closed area such as a
garage, exhaust gases including
harmful carbon monoxide (CO)
may collect and enter the vehicle.
This may lead to death or a seri-
ous health hazard.
NOTICE
■During setting up the display
To prevent battery discharge,
ensure that the engine is running
while setting up the display fea-
tures.
Page 98 of 748
982-1. Instrument cluster
Select to display warning mes-
sages and measures to be
taken if a malfunction is
detected. (P.633)
Displays suggestions to the
driver in the following situations.
To select a response to a dis-
played suggestion, use the
meter control switches.
■Suggestion to turn on the
headlights
If the headlight switch is in other
than or , and the vehicle
speed is 3 mph (5 km/h) or
higher for a certain amount of
time when the surroundings are
dark, a suggestion message will
be displayed.
■Suggestion to turn off the
headlights
If the headlights are left on for a
certain amount of time after the
engine switch has been turned
off, a suggestion message will
be displayed.
When the headlight switch is in
the AUTO position: The mes-
sage asking if you wish to turn
the headlights off is displayed.
To turn the headlights off, select
“Yes”.
If the driver’s door is opened after the engine switch is turned off, this
suggestion message will not be dis-
played.
■Customization
Convenience Services (Suggestion
function) can be tur ned on/off. (Cus-
tomizable features: P.685)
Warning message display
Convenience Services
(Suggestion function)
Page 99 of 748
992-1. Instrument cluster
2
Vehicle status information and indicators
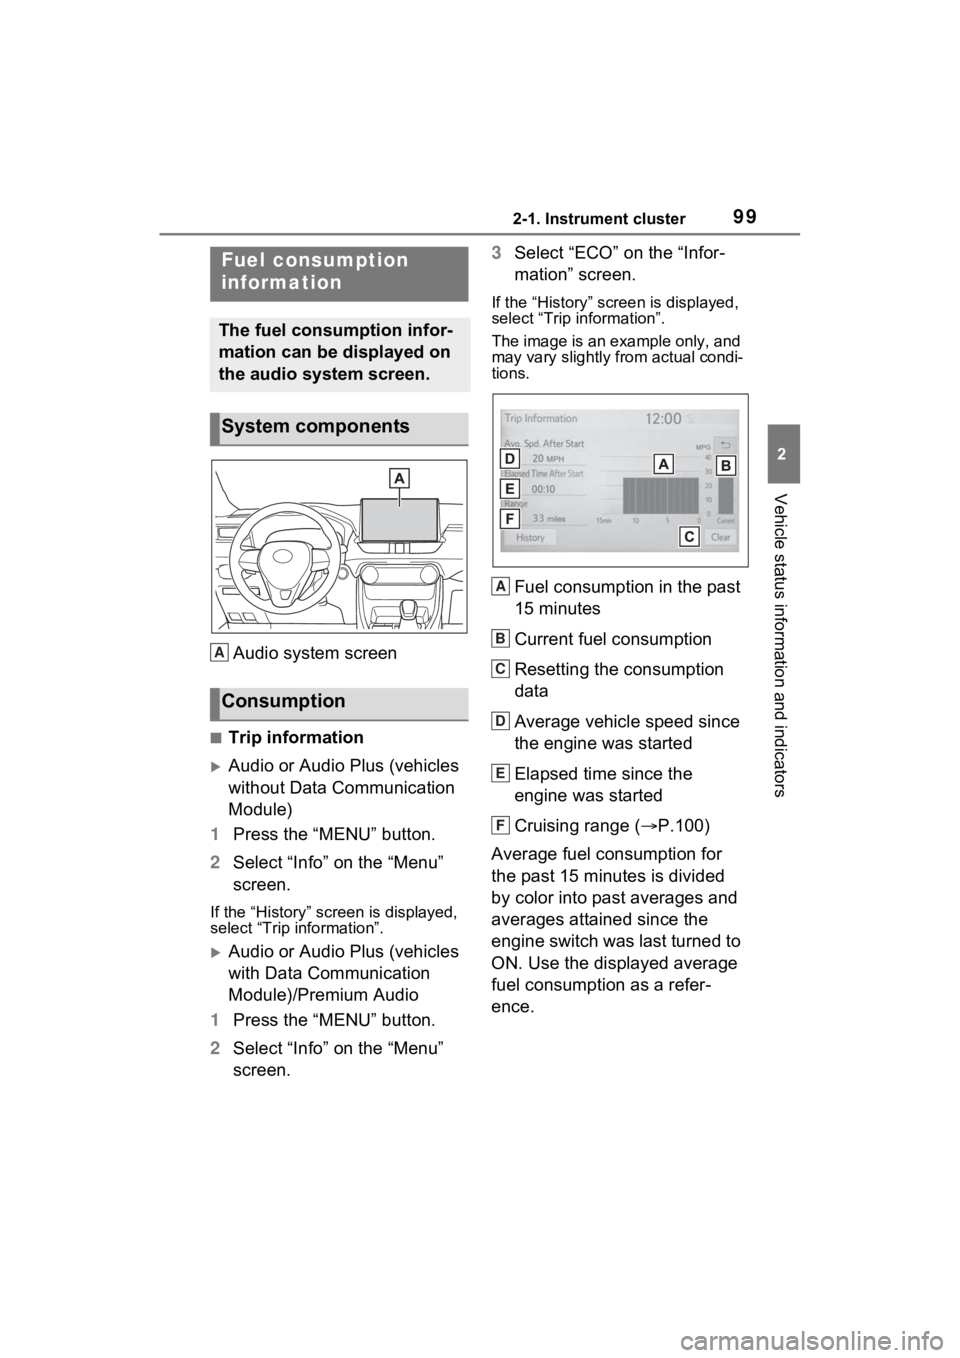
Audio system screen
■Trip information
Audio or Audio Plus (vehicles
without Data Communication
Module)
1 Press the “MENU” button.
2 Select “Info” on the “Menu”
screen.
If the “History” screen is displayed,
select “Trip information”.
Audio or Audio Plus (vehicles
with Data Communication
Module)/Premium Audio
1 Press the “MENU” button.
2 Select “Info” on the “Menu”
screen. 3
Select “ECO” on the “Infor-
mation” screen.
If the “History” screen is displayed,
select “Trip information”.
The image is an example only, and
may vary slightly from actual condi-
tions.
Fuel consumption in the past
15 minutes
Current fuel consumption
Resetting the consumption
data
Average vehicle speed since
the engine was started
Elapsed time since the
engine was started
Cruising range ( P.100)
Average fuel consumption for
the past 15 minutes is divided
by color into past averages and
averages attained since the
engine switch was last turned to
ON. Use the displayed average
fuel consumption as a refer-
ence.
Fuel consumption
information
The fuel consumption infor-
mation can be displayed on
the audio system screen.
System components
Consumption
A
A
B
C
D
E
F
Page 100 of 748
1002-1. Instrument cluster
■History
Audio or Audio Plus (vehicles
without Data Communication
Module)
1 Press the “MENU” button.
2 Select “Info” on the “Menu”
screen.
If the “Trip Information” screen is
displayed, select “History”.
Audio or Audio Plus (vehicles
with Data Communication
Module)/Premium Audio
1 Press the “MENU” button.
2 Select “Info” on the “Menu”
screen.
3 Select “ECO” on the “Infor-
mation” screen.
If the “Trip Information” screen is
displayed, select “History”.
The image is an example only, and
may vary slightly f rom actual condi-
tions.
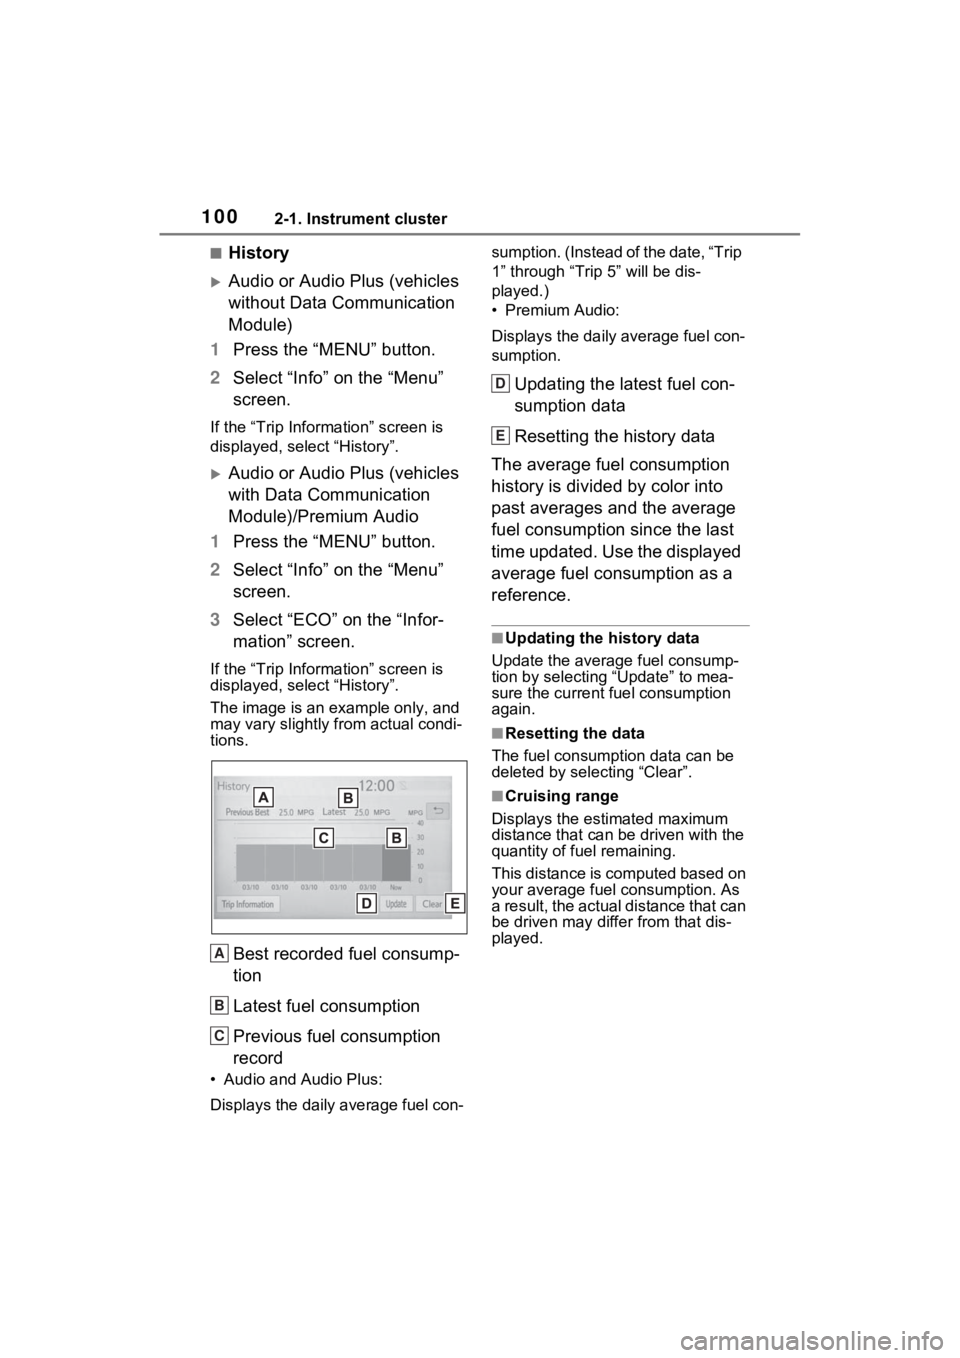
Best recorded fuel consump-
tion
Latest fuel consumption
Previous fuel consumption
record
• Audio and Audio Plus:
Displays the daily average fuel con- sumption. (Instead of the date, “Trip
1” through “Trip
5” will be dis-
played.)
• Premium Audio:
Displays the daily average fuel con-
sumption.
Updating the latest fuel con-
sumption data
Resetting the history data
The average fuel consumption
history is divided by color into
past averages and the average
fuel consumption since the last
time updated. Use the displayed
average fuel consumption as a
reference.
■Updating the history data
Update the average fuel consump-
tion by selecting “Update” to mea-
sure the current fuel consumption
again.
■Resetting the data
The fuel consumption data can be
deleted by selecting “Clear”.
■Cruising range
Displays the estimated maximum
distance that can be driven with the
quantity of fuel remaining.
This distance is computed based on
your average fuel consumption. As
a result, the actual distance that can
be driven may differ from that dis-
played.
A
B
C
D
E
Page 102 of 748
1023-1. Key information
3-1.Key information
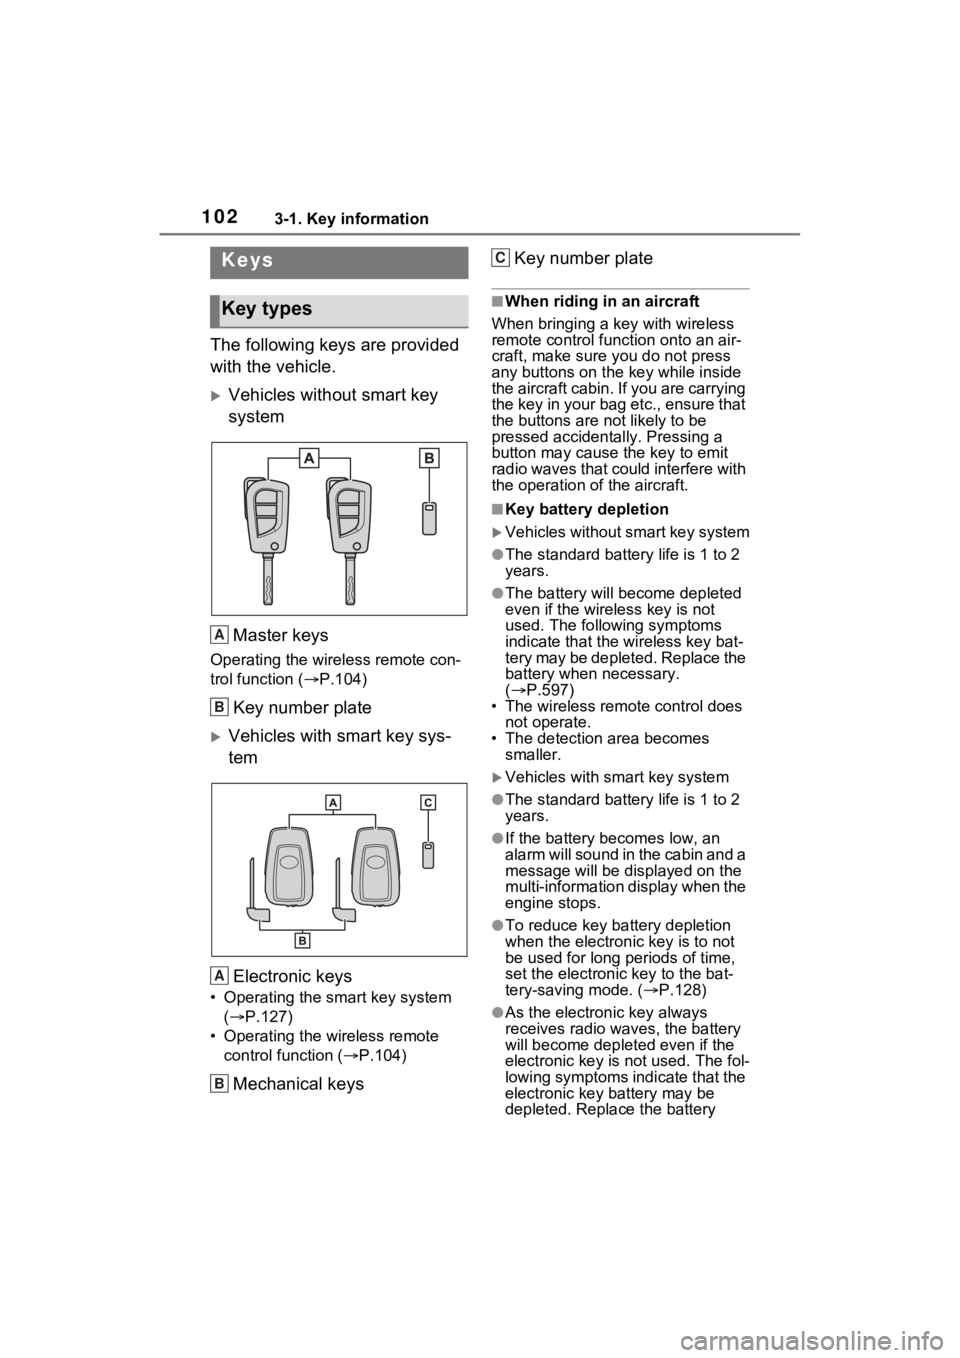
The following keys are provided
with the vehicle.
Vehicles without smart key
systemMaster keys
Operating the wireless remote con-
trol function ( P.104)
Key number plate
Vehicles with smart key sys-
tem
Electronic keys
• Operating the smart key system ( P.127)
• Operating the wireless remote control function ( P.104)
Mechanical keys Key number plate
■When riding in an aircraft
When bringing a ke y with wireless
remote control func tion onto an air-
craft, make sure you do not press
any buttons on the key while inside
the aircraft cabin. If you are carrying
the key in your bag etc., ensure that
the buttons are not likely to be
pressed accidentally. Pressing a
button may cause the key to emit
radio waves that could interfere with
the operation of the aircraft.
■Key battery depletion
Vehicles without smart key system
●The standard battery life is 1 to 2
years.
●The battery will be come depleted
even if the wireless key is not
used. The following symptoms
indicate that the wireless key bat-
tery may be depleted. Replace the
battery when necessary.
( P.597)
• The wireless remote control does not operate.
• The detection area becomes
smaller.
Vehicles with smart key system
●The standard battery life is 1 to 2
years.
●If the battery bec omes low, an
alarm will sound in the cabin and a
message will be disp layed on the
multi-information display when the
engine stops.
●To reduce key battery depletion
when the electronic key is to not
be used for long periods of time,
set the electronic key to the bat-
tery-saving mode. ( P.128)
●As the electronic key always
receives radio waves, the battery
will become depleted even if the
electronic key is not used. The fol-
lowing symptoms indicate that the
electronic key battery may be
depleted. Replace the battery
Keys
Key types
A
B
A
B
C
Page 103 of 748

1033-1. Key information
3
Before driving
when necessary.
• The smart key system or the wire- less remote control does not oper-
ate.
• The detection area becomes smaller.
• The LED indicator on the key sur- face does not turn on.
You can replace the battery by your-
self ( P.597). However, as there is
a danger that the electronic key may
be damaged, it is recommended
that replacement is carried out by
your Toyota dealer.
●To avoid serious deterioration, do
not leave the electronic key within
3 ft. (1 m) of the following electri-
cal appliances t hat produce a
magnetic field:
• TVs
• Personal computers
• Cellular phones, cordless phones and battery chargers
• Table lamps
• Induction cookers
■If a message regarding the state
of the electronic key or engine
switch mode, etc. is shown
(vehicles with smart key sys-
tem)
To prevent trapping the electronic
key inside the vehicle, leaving the
vehicle carrying the electronic key
on your person without turning the
engine switch to OFF or other pas-
sengers from unintentionally taking
the key out of the vehicle, etc., a
message that prompts the user to
confirm the state of the electronic
key or engine switch mode may be
shown on the multi -information dis-
play. In those cases, follow the
instructions on the display immedi-
ately.
■If “Key Battery Low Replace
Key Battery” is displayed on
the multi-information display
(vehicles with smart key sys-
tem)
The electronic key has a low bat- tery. Replace the electronic key bat-
tery. (
P.597)
■Replacing the battery
P.597
■Confirmation of the registered
key number
The number of keys already regis-
tered to the vehi cle can be con-
firmed. Ask your Toyota dealer for
details.
■If “A New Key has been Regis-
tered Contact Your Dealer for
Details” is dis played on the
multi-information display (vehi-
cles with smart key system)
This message will be displayed
each time the driver’s door is
opened when the doors are
unlocked from the outside for
approximately 10 days after a new
electronic key has been registered.
If this message is displayed but you
have not had a new electronic key
registered, ask your Toyota dealer
to check if an unknown electronic
key (other than those in your pos-
session) has been registered.
NOTICE
■To prevent key damage
●Do not drop the keys, subject
them to strong shocks or bend
them.
●Do not expose the keys to high
temperatures for long periods of
time.
●Do not get the keys wet or wash
them in an ultrasonic washer,
etc.
●Do not attach m etallic or mag-
netic materials to the keys or
place the keys close to such
materials.
●Do not disassemble the keys.
Page 105 of 748
1053-1. Key information
3
Before driving
Opens and closes the power
back door
*2 ( P.117)
Sounds the alarm ( P.105)
*1: These settings must be custom-
ized at your Toyota dealer.
*2: If equipped
■Theft deterrent panic mode
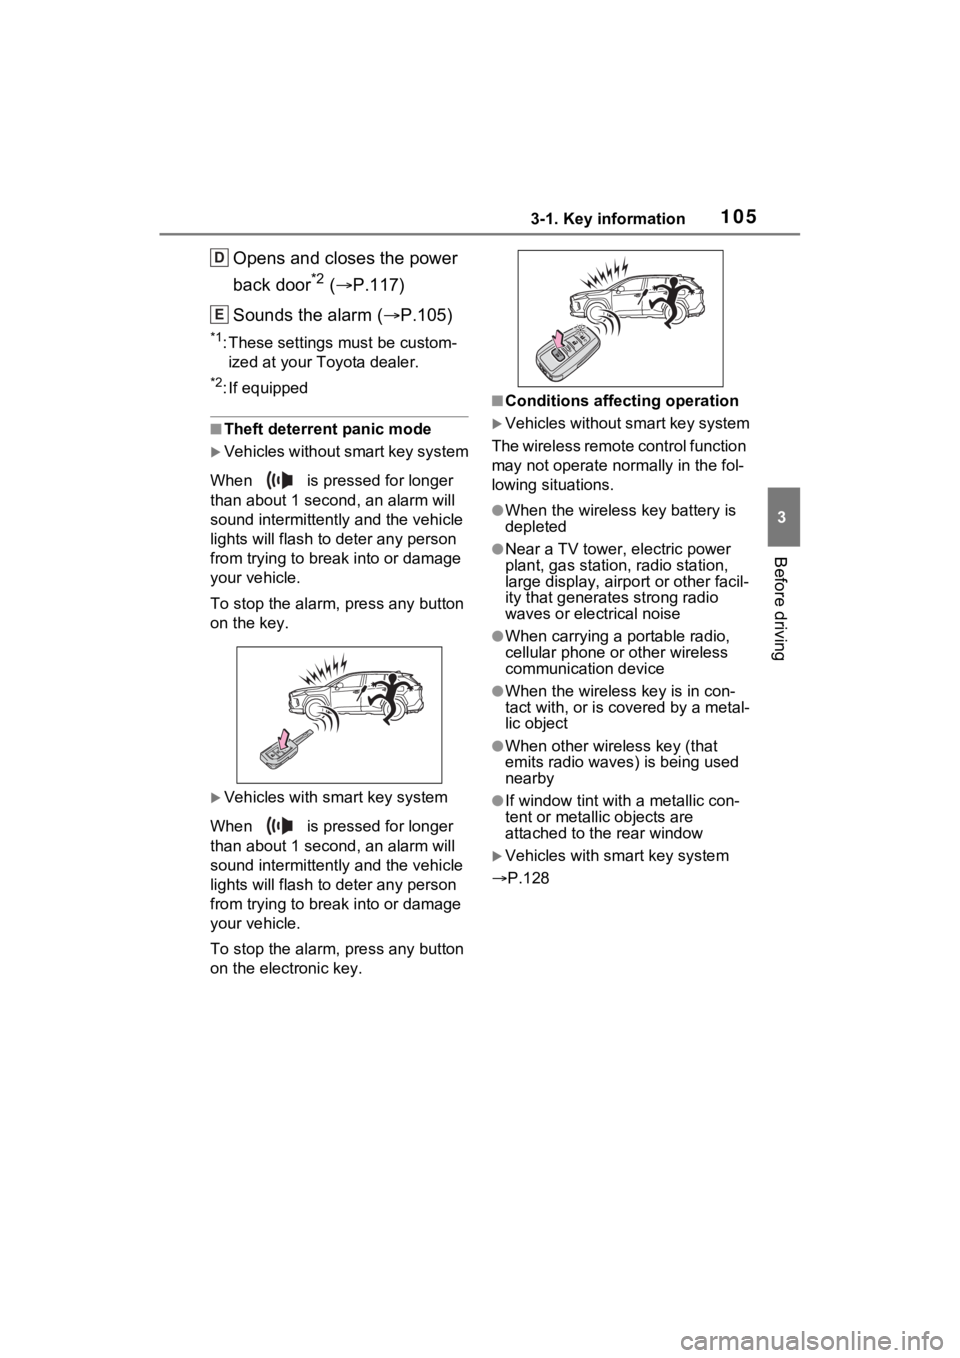
Vehicles without smart key system
When is pressed for longer
than about 1 seco nd, an alarm will
sound intermittentl y and the vehicle
lights will flash to deter any person
from trying to break into or damage
your vehicle.
To stop the alarm, press any button
on the key.
Vehicles with smart key system
When is pressed for longer
than about 1 seco nd, an alarm will
sound intermittentl y and the vehicle
lights will flash to deter any person
from trying to break into or damage
your vehicle.
To stop the alarm, press any button
on the electronic key.
■Conditions affecting operation
Vehicles without smart key system
The wireless remote control function
may not operate normally in the fol-
lowing situations.
●When the wireles s key battery is
depleted
●Near a TV tower, electric power
plant, gas station, radio station,
large display, airpo rt or other facil-
ity that generates strong radio
waves or electrical noise
●When carrying a portable radio,
cellular phone or other wireless
communication device
●When the wireless key is in con-
tact with, or is c overed by a metal-
lic object
●When other wireless key (that
emits radio waves) is being used
nearby
●If window tint wit h a metallic con-
tent or metallic objects are
attached to the rear window
Vehicles with smart key system
P.128
D
E
Page 110 of 748
1103-2. Opening, closing and locking the doors
continuously for 5 seconds. Fully
close all the doors, and lock the
vehicle once more.
■Setting the alarm (if equipped)
Locking the doors will set the alarm
system. ( P.72)
■Conditions affecting the opera-
tion of the smart key system or
wireless remo te control
Vehicles without smart key system
P.105
Vehicles with smart key system
P.128
■If the smart key system (if
equipped) or the wireless
remote control does not oper-
ate properly
●Vehicles with smart key system:
Use the mechanical key to lock
and unlock the doors. ( P.649)
●Replace the key battery with a
new one if it is depleted. ( P.597)
■If the battery is discharged
The doors cannot be locked and
unlocked using the smart key sys-
tem (if equipped) or wireless remote
control. Lock or unlock the doors
using the key (vehicles without
smart key system) or mechanical
key (vehicles with smart key sys-
tem). ( P.108, 649)
■Rear seat reminder function
●In order to remind you not to for-
get luggage, etc. in the rear seat,
when the engine switch is turned
to OFF after any of the following
conditions are met, a buzzer will
sound and a message will be dis-
played on the multi-information
display for approximately 6 sec-
onds.
• The engine is started within 10 minutes after opening and closing
a rear door.
• A rear door has been opened and closed after the engine was
started. However, if a rear door is opened
and then closed within approxi-
mately 2 seconds, the rear seat
reminder function may not operate.
●The rear seat reminder function
determines that luggage, etc. has
been placed in a rear seat based
on opening and closing of a rear
door. Therefore, depending on the
situation, the rear seat reminder
function may not operate and you
may still forget luggage, etc. in the
rear seat, or it may operate unnec-
essarily.
●The rear seat reminder function
can be enabled/disabled.
(
P.685)
■Customization
Settings (e.g. unlocking function
using a key) can be changed.
(Customizable features: P.687)
WARNING
■To prevent an accident
Observe the following precautions
while driving the vehicle.
Failure to do so may result in a
door opening and an occupant
could be thrown out of the vehicle,
resulting in dea th or serious
injury.
●Ensure that all doors are prop-
erly closed and locked.
●Do not pull the inside handle of
the doors while driving.
Be especially careful for the
front doors, as the doors may
be opened even if the inside
lock buttons are in locked posi-
tion.
●Set the rear door child-protector
locks when children are seated
in the rear seats.