warning light TOYOTA RAV4 2022 Manual PDF
[x] Cancel search | Manufacturer: TOYOTA, Model Year: 2022, Model line: RAV4, Model: TOYOTA RAV4 2022Pages: 748, PDF Size: 22.93 MB
Page 558 of 748
5587-1. Maintenance and care
WARNING
■Precautions regarding the
exhaust pipes
Exhaust gasses cause the
exhaust pipes to become quite
hot.
When washing the vehicle, be
careful not to tou ch the pipes until
they have cooled sufficiently, as
touching hot exhaust pipes can
cause burns.
■Precaution regarding the rear
bumper with Blind Spot Moni-
tor (if equipped)
If the paint of the rear bumper is
chipped or scratched, the system
may malfunction. If this occurs,
consult your Toyota dealer.
NOTICE
■To prevent paint deterioration
and corrosion on the body
and components (aluminum
wheels, etc.)
●Wash the vehicle immediately in
the following cases:
• After driving near the sea coast
• After driving on salted roads
• If coal tar or tre e sap is present
on the paint surface
• If dead insects, insect droppings or bird droppings are present on
the paint surface
• After driving in an area contami- nated with soot, oily smoke,
mine dust, iron powder or chem-
ical substances
• If the vehicle becomes heavily soiled with dust or mud
• If liquids such as benzene and gasoline are spilled on the paint
surface
●If the paint is chipped or
scratched, have it repaired
immediately.
●To prevent the wheels from cor-
roding, remove any dirt and
store in a place with low humid-
ity when storing the wheels.
■Cleaning the exterior lights
●Wash carefully. Do not use
organic substances or scrub
with a hard brush.
This may damage the surfaces
of the lights.
●Do not apply wax to the sur-
faces of the lights.
Wax may cause damage to the
lenses.
■When using an automatic car
wash (vehicles with rain-
sensing windshield wipers)
Set the wiper switch to off posi-
tion.
If the wiper switch is in “AUTO”,
the wipers may operate and the
wiper blades may be damaged.
■When using a high pressure
car wash
●When washing the vehicle, do
not let water from the high-pres-
sure washer directly hit the
camera or the area around the
camera. Due to the shock from
the high pressure water, it is
possible that the device may not
operate normally.
●Do not spray water directly on
the radar which is equipped
behind the emblem. Otherwise
it may cause the device to be
damaged.
Page 560 of 748
5607-1. Maintenance and care
WARNING
■Water in the vehicle
●Do not splash or spill liquid in
the vehicle.
Doing so may cause electrical
components, etc., to malfunc-
tion or catch fire.
●Do not get any of the SRS com-
ponents or wiring in the vehicle
interior wet.
( P.36)
An electrical malfunction may
cause the airbags to deploy or
not function properly, resulting
in death or serious injury.
●Vehicles with wireless charger:
Do not let the wireless charger
( P.545) get wet. Failure to do
so may cause the charger to
become hot and cause burns or
could cause electric shock
resulting in death or serious
injury.
■Cleaning the interior (espe-
cially instrument panel)
Do not use a polis h wax or polish
cleaner. The instrument panel
may reflect off the windshield,
obstructing the dr iver’s view and
leading to an accident, resulting in
death or serious injury.
NOTICE
■Cleaning detergents
●Do not use the following types
of detergent, as they may dis-
color the vehicle interior or
cause streaks or damage to
painted surfaces:
• Non-seat portions: Organic sub- stances such as benzene or
gasoline, alkaline or acidic solu-
tions, dye, and bleach
• Seats: Alkaline or acidic solu- tions, such as thinner, benzene,
and alcohol
●Do not use a polish wax or pol-
ish cleaner. The instrument
panel’s or other interior part’s
painted surface may be dam-
aged.
■Preventing damage to leather
surfaces
Observe the following precautions
to avoid damage to and deteriora-
tion of leather surfaces:
●Remove any dust or dirt from
leather surfaces immediately.
●Do not expose the vehicle to
direct sunlight for extended peri-
ods of time. Park the vehicle in
the shade, especially during
summer.
●Do not place items made of
vinyl, plastic, or containing wax
on the upholstery, as they may
stick to the leather surface if the
vehicle interior heats up signifi-
cantly.
■Water on the floor
Do not wash the v ehicle floor with
water.
Vehicle systems such as the
audio system may be damaged if
water comes into contact with
electrical components such as the
audio system above or under the
floor of the vehicle. Water may
also cause the body to rust.
■When cleaning the inside of
the windshield
Do not allow glass cleaner to con-
tact the lens. Also, do not touch
the lens. ( P.222)
Page 563 of 748
5637-2. Maintenance
7
Maintenance and care
■Resetting the message indicat-
ing maintenance is required
After the required maintenance is
performed according to the mainte-
nance schedule, please reset the
reminder light or message.
To reset the reminder light or mes-
sage, follow the procedure
described below:
1 Press or of the meter
control switches and select
on the multi-information display.
2 Press or of the meter
control switches and select
“Vehicle Settings”. Then press
and hold .
3 Press or of the meter
control switches and select
“Scheduled Maintenance”. Then
press .
4 Select “Yes” and press .
You can perform some mainte-
nance procedures by yourself.
Please be aware that do-it-your-
self maintenance may affect
warranty coverage.
The use of Toyota Repair Manuals
is recommended.
For details about warranty cover-
age, refer to the separate “Owner’s
Warranty Information Booklet” or
“Owner’s Manual Supplement”.
Do-it-yourself mainte-
nance
General maintenance
Listed below are the general
maintenance items that
should be performed at the
intervals specified in the
“Owner’s Warranty Informa-
tion Booklet” or “Owner’s
Manual Supplement/Sched-
uled Maintenance Guide”. It
is recommended that any
problem you notice should
be brought to the attention
of your Toyota dealer or
qualified service shop for
advice.
WARNING
■If the engine is running
Turn the engine o ff and ensure
that there is adequate ventilation
before performing maintenance
checks.
Engine compartment
ItemsCheck points
BatteryCheck the connec-
tions. ( P.577)
Brake fluid
Is the brake fluid at
the correct level?
( P.575)
Engine coolant
Is the engine cool-
ant at the correct
level? ( P.574)
Engine oil
Is the engine oil at
the correct level?
( P.572)
Page 568 of 748
5687-3. Do-it-yourself maintenance
Light bulbs
( P.604)
• Bulb with same
number and watt-
age rating as origi-
nal
• Phillips-head screwdriver
• Flathead screw- driver
• Wrench
Headlight aim
( P.603)• Phillips-head
screwdriver
Radiator and
condenser
( P.575)
Tire inflation
pressure
( P.588)• Tire pressure
gauge
• Compressed air source
Washer fluid
( P.578)
• Water or washer
fluid containing
antifreeze (for win-
ter use)
• Funnel (used only for adding water or
washer fluid)
WARNING
The engine compartment contains
many mechanisms and fluids that
may move suddenly, become hot,
or become electrically energized.
To avoid death or serious injury,
observe the following precautions.
■When working on the engine
compartment
●Keep hands, clothing and tools
away from the moving fan and
engine drive belt.
ItemsParts and tools●Be careful not to touch the
engine, radiator, exhaust mani-
fold, etc., right after driving as
they may be hot. Oil and other
fluids may also be hot.
●Do not leave anything that may
burn easily, such as paper and
rags, in the engine compart-
ment.
●Do not smoke, cause sparks or
expose an open flame to fuel or
the battery. Fuel and battery
fumes are flammable.
●Be extremely cautious when
working on the battery. It con-
tains poisonous and corrosive
sulfuric acid.
■When working near the elec-
tric cooling fan or radiator
grille
Be sure the engine switch is off.
With the engine switch in ON, the
electric cooling fa n may automati-
cally start to run if the air condi-
tioning is on and/or the coolant
temperature is high. ( P.575)
■Safety glasses
Wear safety gla sses to prevent
flying or falling material, fluid
spray, etc., from getting in your
eyes.
NOTICE
■If you remove the air cleaner
filter
Driving with the air cleaner filter
removed may cause excessive
engine wear due to dirt in the air.
Page 569 of 748
5697-3. Do-it-yourself maintenance
7
Maintenance and care
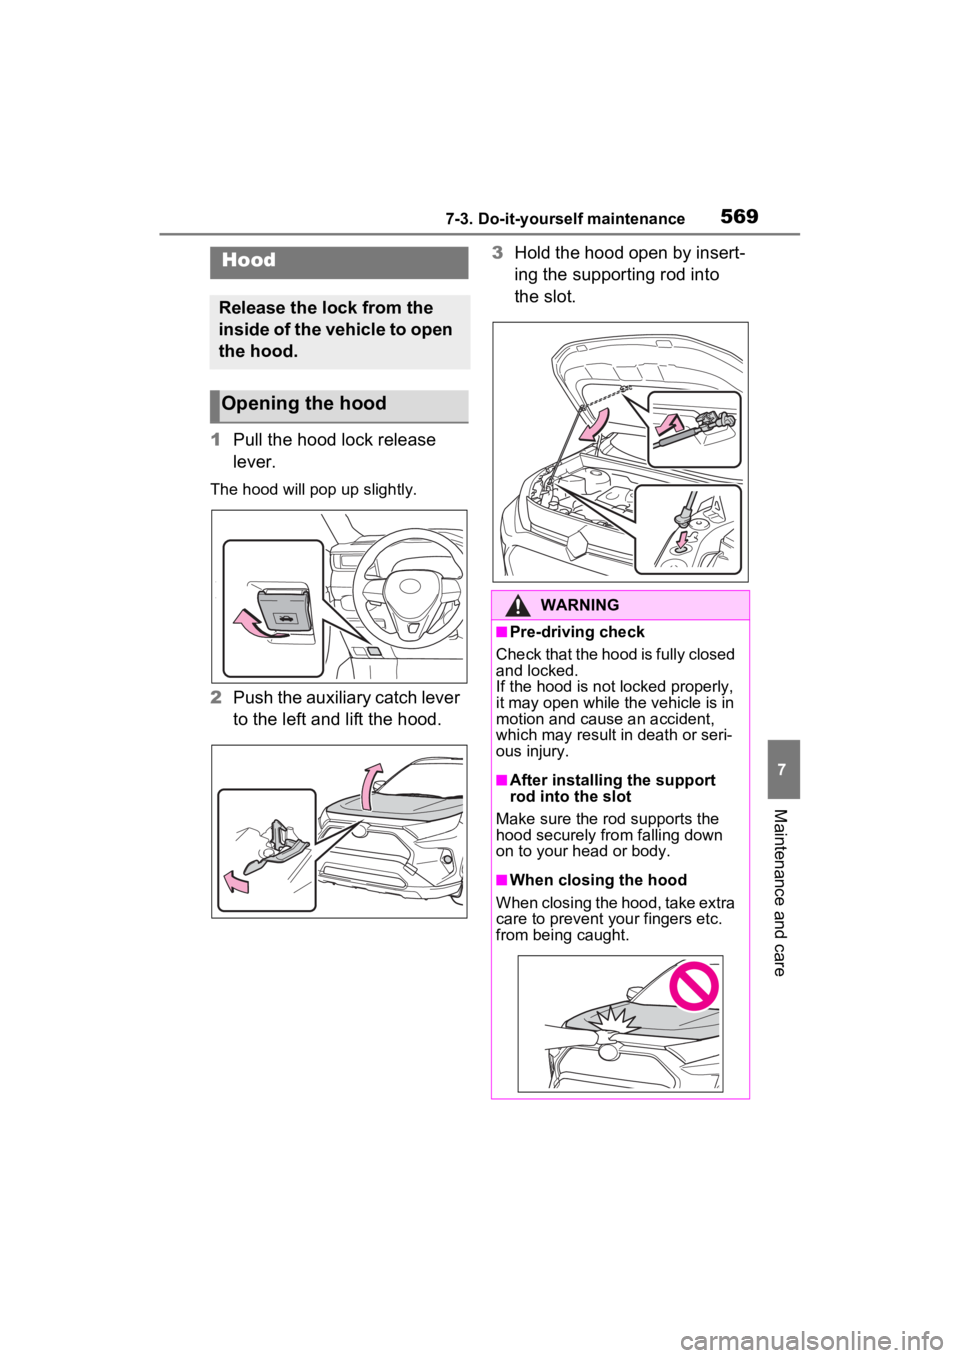
1Pull the hood lock release
lever.
The hood will pop up slightly.
2Push the auxiliary catch lever
to the left and lift the hood. 3
Hold the hood open by insert-
ing the supporting rod into
the slot.
Hood
Release the lock from the
inside of the vehicle to open
the hood.
Opening the hood
WARNING
■Pre-driving check
Check that the hood is fully closed
and locked.
If the hood is not locked properly,
it may open while the vehicle is in
motion and cause an accident,
which may result i n death or seri-
ous injury.
■After installing the support
rod into the slot
Make sure the rod supports the
hood securely fro m falling down
on to your head or body.
■When closing the hood
When closing the hood, take extra
care to prevent your fingers etc.
from being caught.
Page 578 of 748
5787-3. Do-it-yourself maintenance
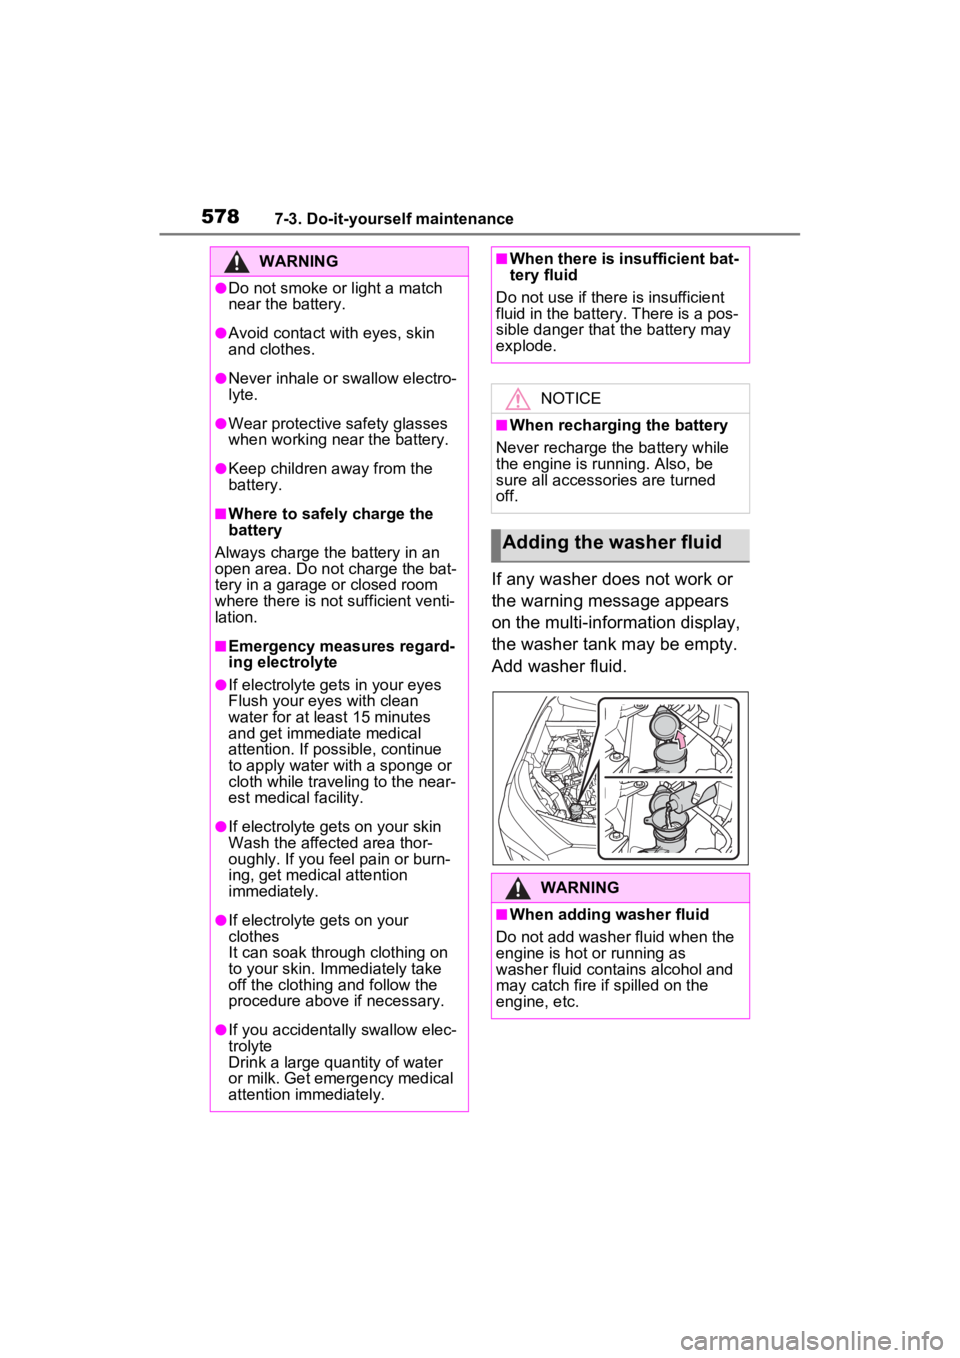
If any washer does not work or
the warning message appears
on the multi-information display,
the washer tank may be empty.
Add washer fluid.
WARNING
●Do not smoke or light a match
near the battery.
●Avoid contact with eyes, skin
and clothes.
●Never inhale or swallow electro-
lyte.
●Wear protective safety glasses
when working near the battery.
●Keep children away from the
battery.
■Where to safely charge the
battery
Always charge the battery in an
open area. Do not charge the bat-
tery in a garage or closed room
where there is not sufficient venti-
lation.
■Emergency measures regard-
ing electrolyte
●If electrolyte gets in your eyes
Flush your eyes with clean
water for at least 15 minutes
and get immediate medical
attention. If possible, continue
to apply water with a sponge or
cloth while traveling to the near-
est medical facility.
●If electrolyte gets on your skin
Wash the affected area thor-
oughly. If you feel pain or burn-
ing, get medical attention
immediately.
●If electrolyte gets on your
clothes
It can soak through clothing on
to your skin. Immediately take
off the clothing and follow the
procedure above if necessary.
●If you accidentally swallow elec-
trolyte
Drink a large quantity of water
or milk. Get emergency medical
attention immediately.
■When there is insufficient bat-
tery fluid
Do not use if ther e is insufficient
fluid in the battery. There is a pos-
sible danger that the battery may
explode.
NOTICE
■When recharging the battery
Never recharge the battery while
the engine is running. Also, be
sure all accessories are turned
off.
Adding the washer fluid
WARNING
■When adding washer fluid
Do not add washer fluid when the
engine is hot or running as
washer fluid contains alcohol and
may catch fire if spilled on the
engine, etc.
Page 582 of 748
5827-3. Do-it-yourself maintenance
■When rotating the tires (vehi-
cles with tire pressure warning
system)
Make sure that the engine switch is
OFF. If the tires are rotated while
the engine switch i s in ON, the tire
position informa tion will not be
updated. If this accidentally occurs,
either turn the engine switch to OFF
and then to ON, or initialize the sys-
tem after checking that the tire pres-
sure is properly adjusted.
Your vehicle is equipped with a
tire pressure warning system
that uses tire pressure warning
valves and transmitters to detect
low tire inflation pressure before
serious problems arise.
If the tire pressure drops
below a predetermined level,
the driver is warned by a
screen display and a warning
light. ( P.628)
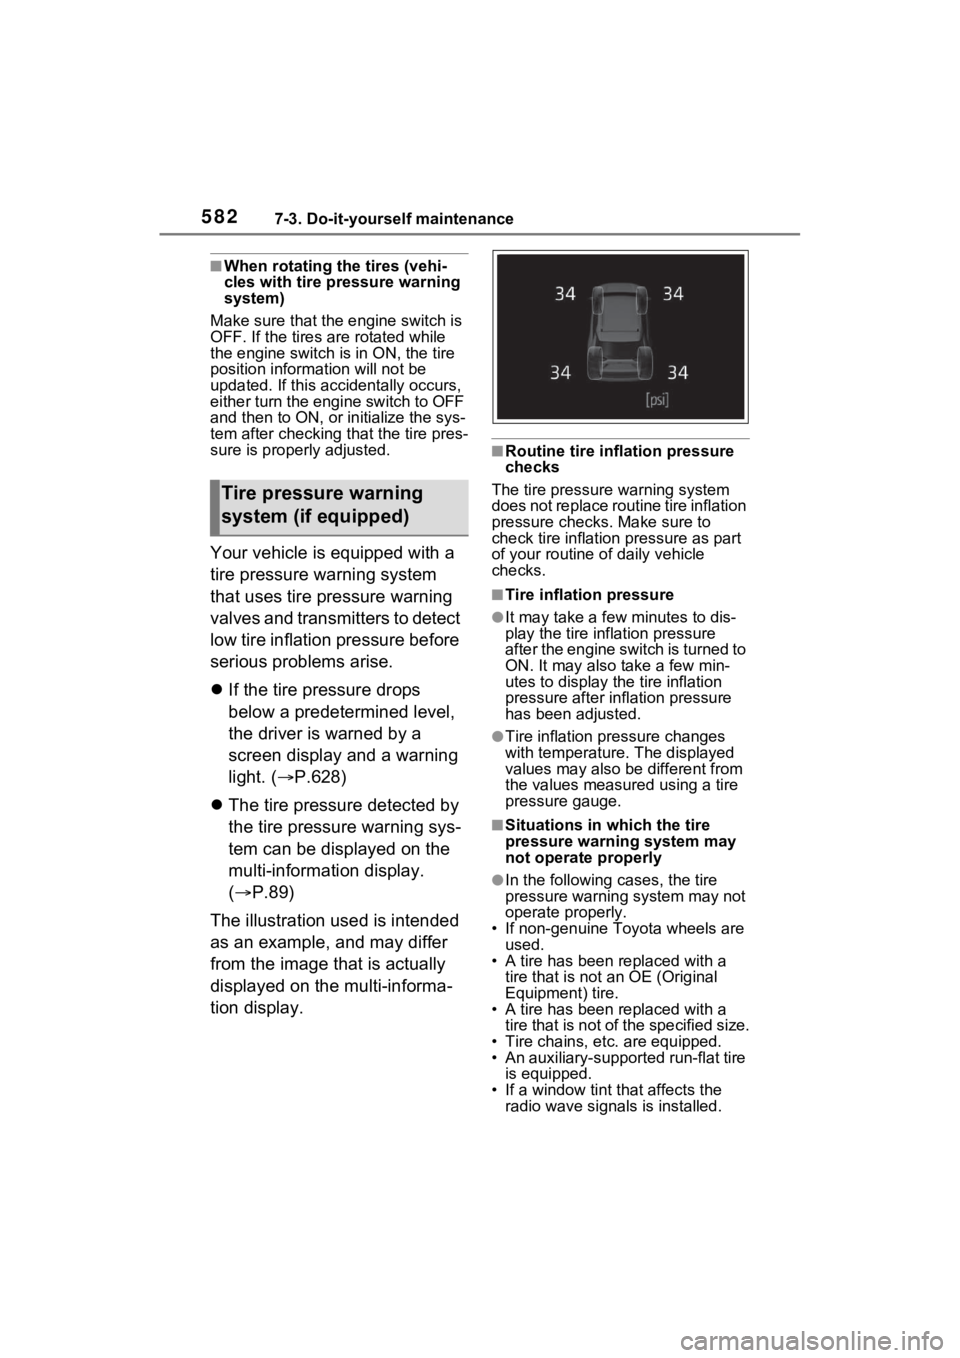
The tire pressure detected by
the tire pressure warning sys-
tem can be displayed on the
multi-information display.
( P.89)
The illustration used is intended
as an example, and may differ
from the image that is actually
displayed on the multi-informa-
tion display.
■Routine tire inflation pressure
checks
The tire pressure warning system
does not replace routine tire inflation
pressure checks . Make sure to
check tire inflation pressure as part
of your routine o f daily vehicle
checks.
■Tire inflation pressure
●It may take a few minutes to dis-
play the tire inflation pressure
after the engine switch is turned to
ON. It may also take a few min-
utes to display the tire inflation
pressure after infl ation pressure
has been adjusted.
●Tire inflation pressure changes
with temperature. The displayed
values may also be different from
the values measured using a tire
pressure gauge.
■Situations in which the tire
pressure warning system may
not operate properly
●In the following cases, the tire
pressure warning system may not
operate properly.
• If non-genuine Toyota wheels are used.
• A tire has been replaced with a tire that is not an OE (Original
Equipment) tire.
• A tire has been replaced with a tire that is not of the specified size.
• Tire chains, etc. are equipped.
• An auxiliary-support ed run-flat tire
is equipped.
• If a window tint that affects the radio wave signals is installed.
Tire pressure warning
system (if equipped)
Page 583 of 748
5837-3. Do-it-yourself maintenance
7
Maintenance and care
• If there is a lot of snow or ice on the vehicle, particularly around the
wheels or wheel housings.
• If the tire inflation pressure is extremely higher than the speci-
fied level.
• If wheels without tire pressure warning valves a nd transmitters
are used.
• If the ID code on the tire pressure warning valves and transmitters is
not registered in the tire pressure
warning computer.
●Performance may be affected in
the following situations.
• Near a TV tower, electric power plant, gas station, radio station,
large display, airpo rt or other facil-
ity that generates strong radio
waves or electrical noise
• When carrying a portable radio, cellular phone, cordless phone or
other wireless communication
device
If tire position information is not cor-
rectly displayed due to the radio
wave conditions, the display may be
corrected by driving and changing
the radio wave conditions.
●When the vehicle is parked, the
time taken for the warning to start
or go off could be extended.
●When tire inflation pressure
declines rapidly for example when
a tire has burst, the warning may
not function.
■Warning performance of the tire
pressure warning system
The warning of the tire pressure
warning system will change in
accordance with th e conditions
under which it was initialized. For
this reason, the system may give a
warning even if the tire pressure
does not reach a low enough level,
or if the pressure is higher than the
pressure that was adjusted to when
the system was initialized.
When replacing tires or wheels,
tire pressure warning valves and
transmitters must also be
installed.
When new tire pressure warning
valves and transmitters are
installed, new ID codes must be
registered in the tire pressure
warning computer and the tire
pressure warning system must
be initialized. ( P.586)
■When replacing the tires and
wheels
If the ID code of the tire pressure
warning valve and tr ansmitter is not
registered, the tire pressure warning
system will not work properly. After
driving for about 20 minutes, the tire
pressure warning light blinks for 1
minute and stays on to indicate a
system malfunction.
Installing tire pressure
warning valves and trans-
mitters (if equipped)
NOTICE
■Repairing or replacing tires,
wheels, tire pressure warn-
ing valves, transmitters and
tire valve caps
●When removing or fitting the
wheels, tires or the tire pressure
warning valves and transmit-
ters, contact your Toyota dealer
as the tire pressure warning
valves and transmitters may be
damaged if not handled cor-
rectly.
Page 584 of 748
5847-3. Do-it-yourself maintenance
■The tire pressure warning
system must be initialized
in the following circum-
stances:
When rotating the tires.
When changing the tire.
After registering the ID codes.
( P.586)
When the tire pressure warning
system is initialized, the current
tire inflation pressure is set as
the benchmark pressure.
■How to initialize the tire
pressure warning system
1 Park the vehicle in a safe
place and stop the engine for
20 minutes or more.
Initialization cannot be performed
while the vehicle is moving.
2Adjust the tire inflation pres-
sure to the specified cold tire
inflation pressure level.
( P.667)
Make sure to adjust the tire pres-
sure to the specifie d cold tire infla-
tion pressure level. The tire
pressure warning system will oper-
ate based on this pressure level.
3Start the engine.
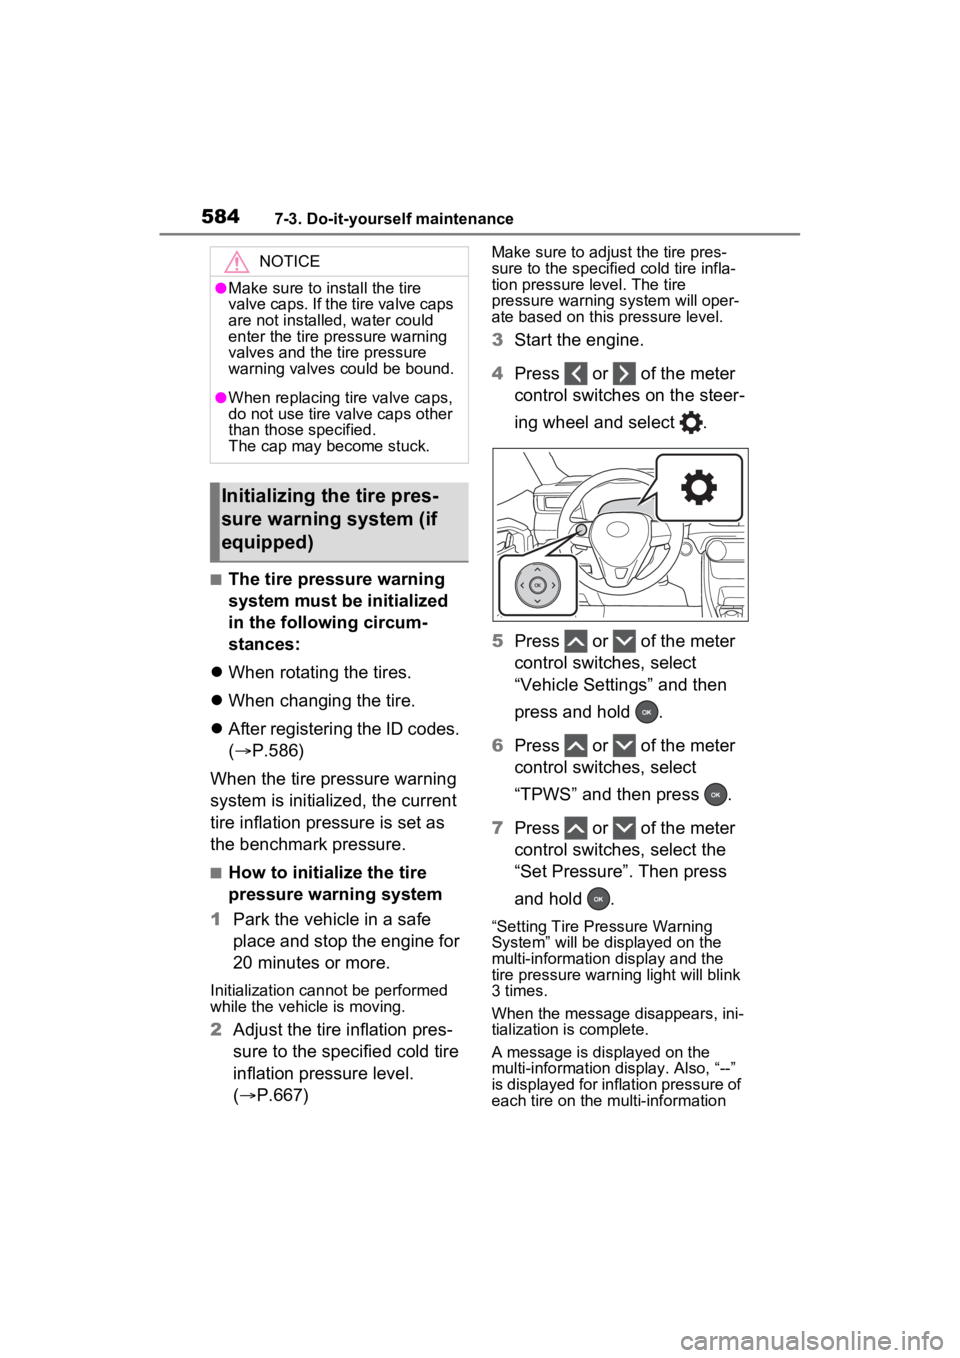
4 Press or of the meter
control switches on the steer-
ing wheel and select .
5 Press or of the meter
control switches, select
“Vehicle Settings” and then
press and hold .
6 Press or of the meter
control switches, select
“TPWS” and then press .
7 Press or of the meter
control switches, select the
“Set Pressure”. Then press
and hold .
“Setting Tire Pressure Warning
System” will be displayed on the
multi-information display and the
tire pressure warning light will blink
3 times.
When the message disappears, ini-
tialization is complete.
A message is displayed on the
multi-information di splay. Also, “--”
is displayed for inflation pressure of
each tire on the m ulti-information
NOTICE
●Make sure to install the tire
valve caps. If the tire valve caps
are not installed, water could
enter the tire pressure warning
valves and the tire pressure
warning valves could be bound.
●When replacing tire valve caps,
do not use tire valve caps other
than those specified.
The cap may become stuck.
Initializing the tire pres-
sure warning system (if
equipped)
Page 585 of 748

5857-3. Do-it-yourself maintenance
7
Maintenance and care
display while the tire pressure
warning system determines the
position.
8Drive straight (with occa-
sional left and right turns) at
approximately 25mph (40
km/h) or more for approxi-
mately 10 to 30 minutes.
When initialization is complete, the
inflation pressure of each tire will be
displayed on the multi-information
display.
Even if the vehicle is not driven at
approximately 25 mph (40 km/h) or
more, initializat ion can be com-
pleted by driving for a long time.
However, if initia lization does not
complete after driving for 1 hour or
more, park the vehicle in a safe
place for approximately 20 minutes
and then drive th e vehicle again.
■When initializing
●Initialization is performed while
driving at a vehicle speed of
approximately 25 mph (40 km/h)
or more.
●Make sure to carry out initializa-
tion after adjusting the tire inflation
pressure. Also, make sure the
tires are cold before carrying out
initialization or tir e inflation pres-
sure adjustment.
●The tire pressure warning system
can be initialized by yourself, but
depending on the driving condi-
tions and driving environment, ini-
tialization may take some time to
complete.
■The initialization operation
●If you have accidentally turned the
engine switch to OFF during ini-
tialization, it is not necessary to
restart the initia lization again as
initialization will restart automati-
cally when the engine switch has
been turned to ON for the next
time.
●If you accidentally perform the ini-
tialization when initialization is not
necessary, adjust the tire inflation
pressure to the s pecified level
when the tires are cold, and con-
duct initialization again.
●While the position of each tire is
being determined and the inflation
pressures are not being displayed
on the multi-information display, if
the inflation pressure of a tire
drops, the tire pressure warning
light will come on.
■If the tire pressure warning sys-
tem is not initia lized properly
●In the following situations, initial-
ization may take longer than usual
to be completed or may not be
possible. Normally, initialization
completes within approximately
30 minutes.
• Vehicle is not driven at approxi- mately 25 mph (40 km/h) or more
• Vehicle is driven on unpaved roads
• Vehicle is driven near other vehi-
cles and system cannot recog-
nize tire pressure warning valve
and transmitters o f your vehicle
over those of other vehicles.
• If the vehicle is driven in heavy traffic or another situation where
other vehicles are driven close by,
it may take time f or the system to
recognize the ti re pressure warn-
ing valve and transmitters of your
vehicle over those of other vehi-
cles.
If initialization does not complete
after driving for 1 hour or more, park
the vehicle in a safe place for
approximately 20 minutes and then
drive the vehicle again.
●If the vehicle is reversed during
initialization, the data up to that
point is reset, so p erform the ini-
tialization procedure again from
the beginning.
●In the following situations, initial-
ization will not be started or was
not completed properly and the