TOYOTA RAV4 2023 Owners Manual
Manufacturer: TOYOTA, Model Year: 2023, Model line: RAV4, Model: TOYOTA RAV4 2023Pages: 574, PDF Size: 17.31 MB
Page 351 of 574
3515-3. Using the storage features
5
Interior features
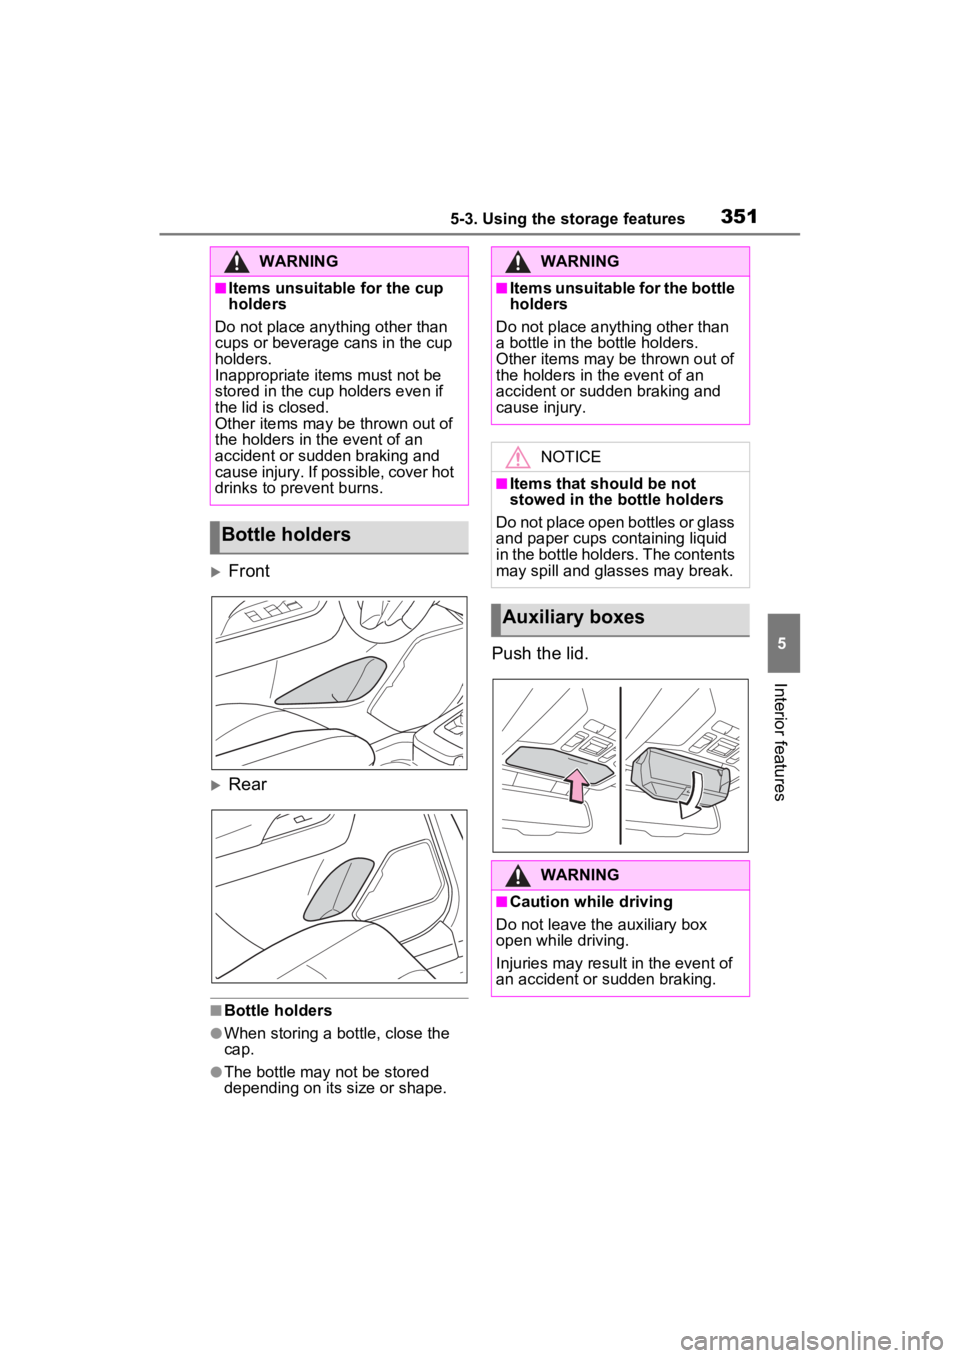
Front
Rear
■Bottle holders
●When storing a bottle, close the
cap.
●The bottle may not be stored
depending on its size or shape.
Push the lid.
WARNING
■Items unsuitable for the cup
holders
Do not place anything other than
cups or beverage cans in the cup
holders.
Inappropriate items must not be
stored in the cup holders even if
the lid is closed.
Other items may be thrown out of
the holders in the event of an
accident or sudden braking and
cause injury. If possible, cover hot
drinks to prevent burns.
Bottle holders
WARNING
■Items unsuitable for the bottle
holders
Do not place anyth ing other than
a bottle in the bottle holders.
Other items may be thrown out of
the holders in the event of an
accident or sudden braking and
cause injury.
NOTICE
■Items that should be not
stowed in the bottle holders
Do not place open bottles or glass
and paper cups containing liquid
in the bottle holders. The contents
may spill and glasses may break.
Auxiliary boxes
WARNING
■Caution while driving
Do not leave the auxiliary box
open while driving.
Injuries may resul t in the event of
an accident or sudden braking.
Page 352 of 574
3525-3. Using the storage features
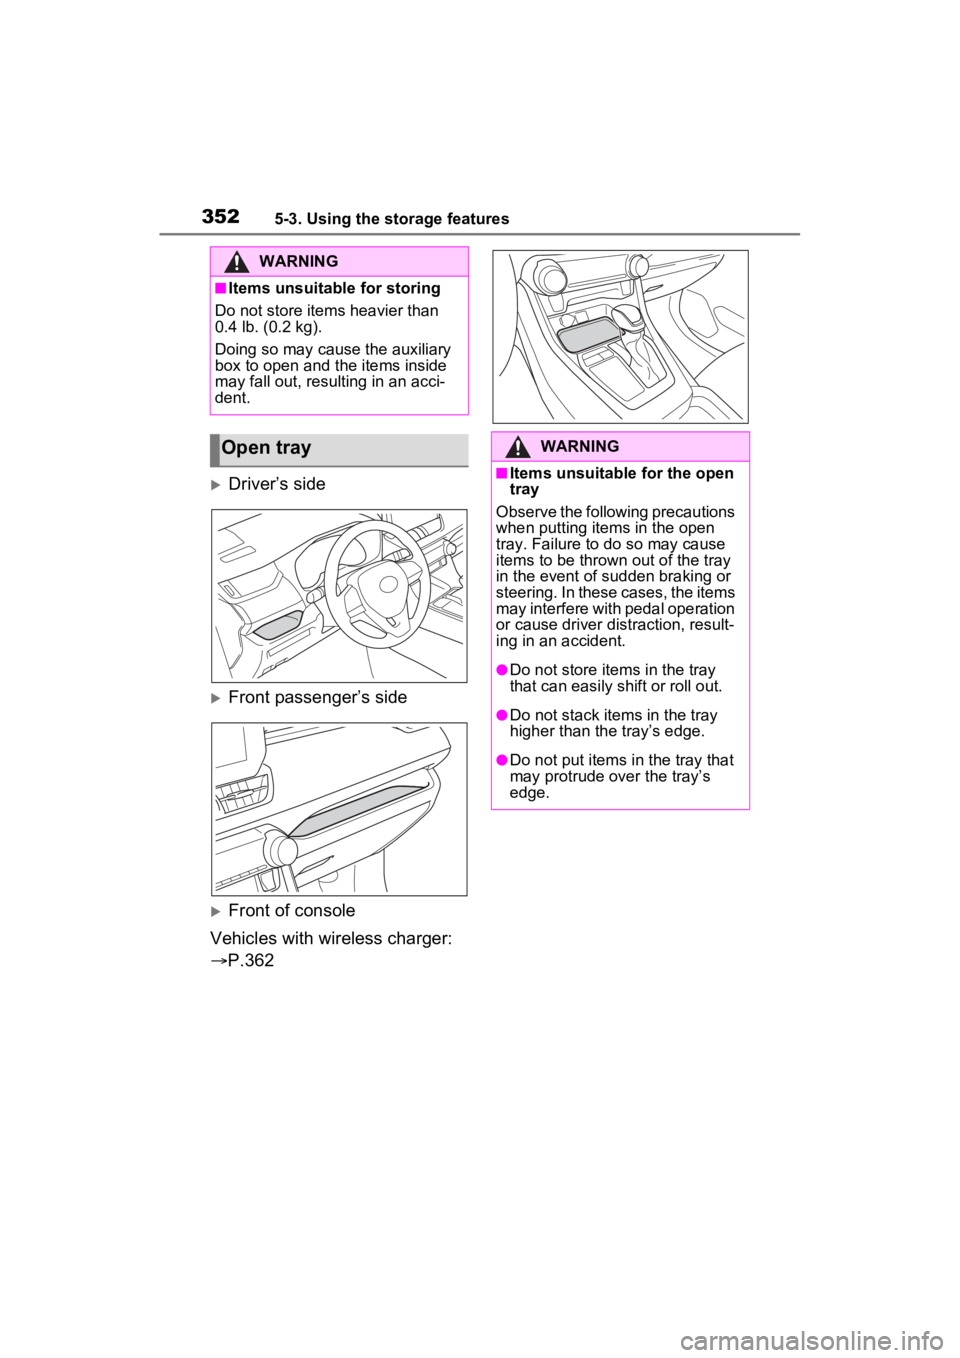
Driver’s side
Front passenger’s side
Front of console
Vehicles with wireless charger:
P.362
WARNING
■Items unsuitable for storing
Do not store items heavier than
0.4 lb. (0.2 kg).
Doing so may cause the auxiliary
box to open and the items inside
may fall out, resulting in an acci-
dent.
Open trayWARNING
■Items unsuitable for the open
tray
Observe the following precautions
when putting items in the open
tray. Failure to d o so may cause
items to be thrown out of the tray
in the event of s udden braking or
steering. In these cases, the items
may interfere with pedal operation
or cause driver distraction, result-
ing in an accident.
●Do not store ite ms in the tray
that can easily shift or roll out.
●Do not stack items in the tray
higher than the tray’s edge.
●Do not put items in the tray that
may protrude over the tray’s
edge.
Page 353 of 574
3535-3. Using the storage features
5
Interior features
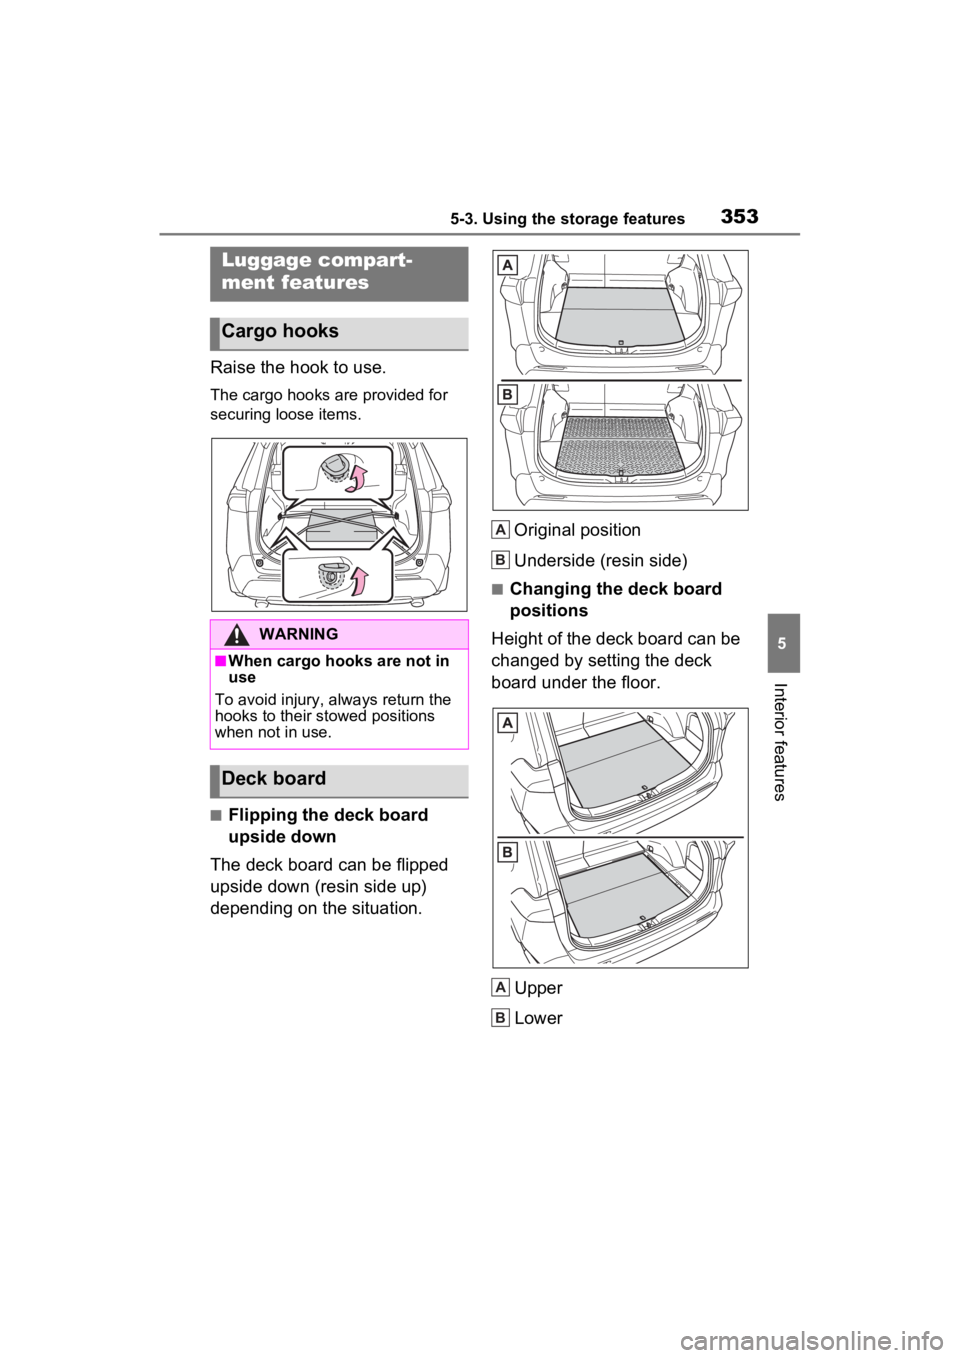
Raise the hook to use.
The cargo hooks are provided for
securing loose items.
■Flipping the deck board
upside down
The deck board can be flipped
upside down (resin side up)
depending on the situation. Original position
Underside (resin side)
■Changing the deck board
positions
Height of the deck board can be
changed by setting the deck
board under the floor.
Upper
Lower
Luggage compart-
ment features
Cargo hooks
WARNING
■When cargo hooks are not in
use
To avoid injury, always return the
hooks to their stowed positions
when not in use.
Deck board
A
B
A
B
Page 354 of 574
3545-3. Using the storage features
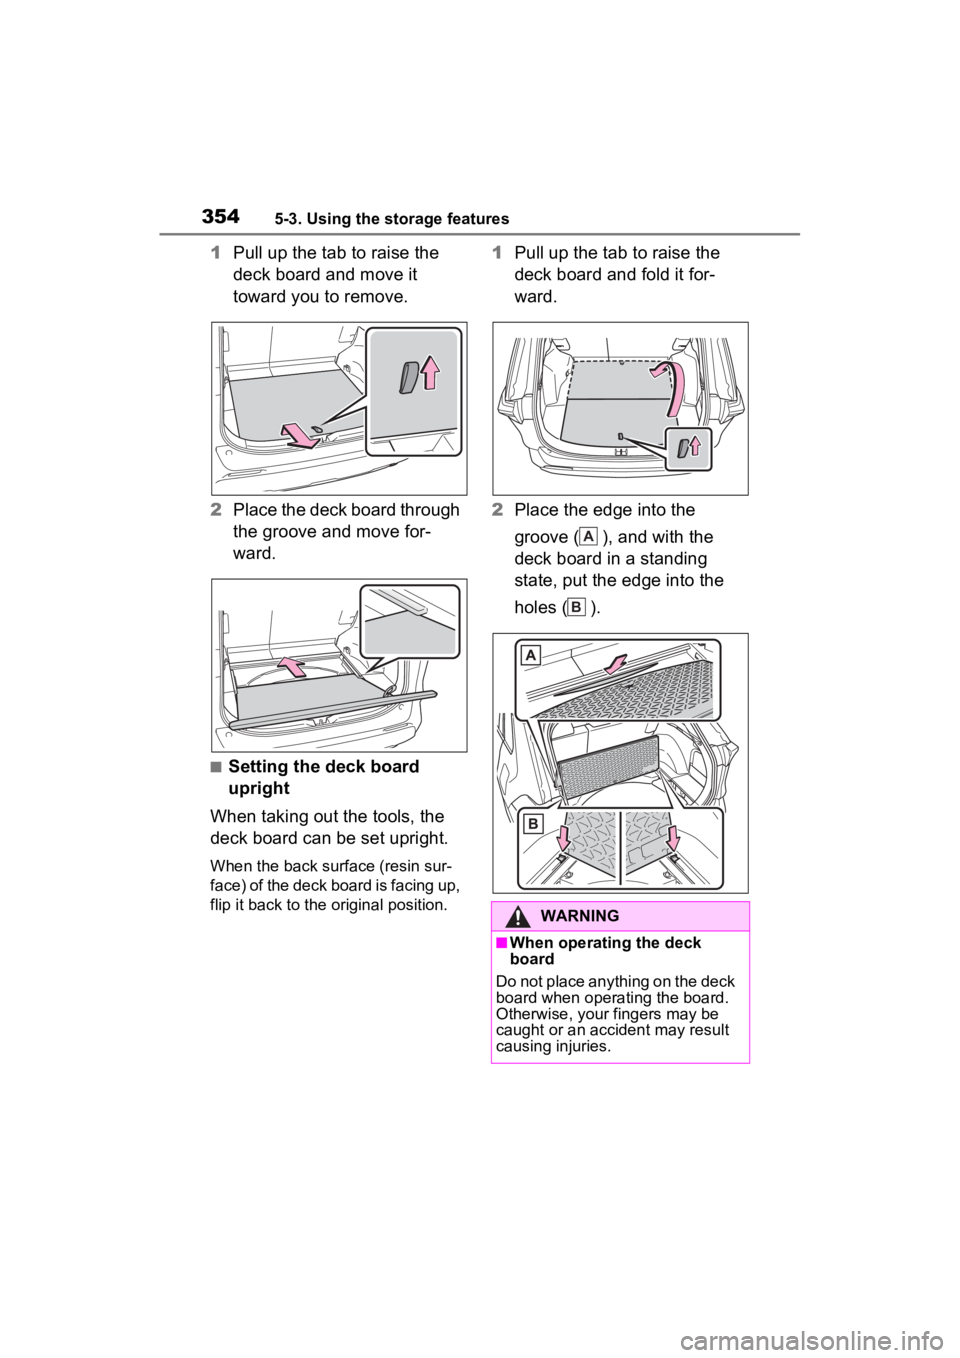
1Pull up the tab to raise the
deck board and move it
toward you to remove.
2 Place the deck board through
the groove and move for-
ward.
■Setting the deck board
upright
When taking out the tools, the
deck board can be set upright.
When the back surface (resin sur-
face) of the deck board is facing up,
flip it back to the original position.
1 Pull up the tab to raise the
deck board and fold it for-
ward.
2 Place the edge into the
groove ( ), and with the
deck board in a standing
state, put the edge into the
holes ( ).
WARNING
■When operating the deck
board
Do not place anything on the deck
board when operating the board.
Otherwise, your fingers may be
caught or an accident may result
causing injuries.
A
B
Page 355 of 574
3555-3. Using the storage features
5
Interior features
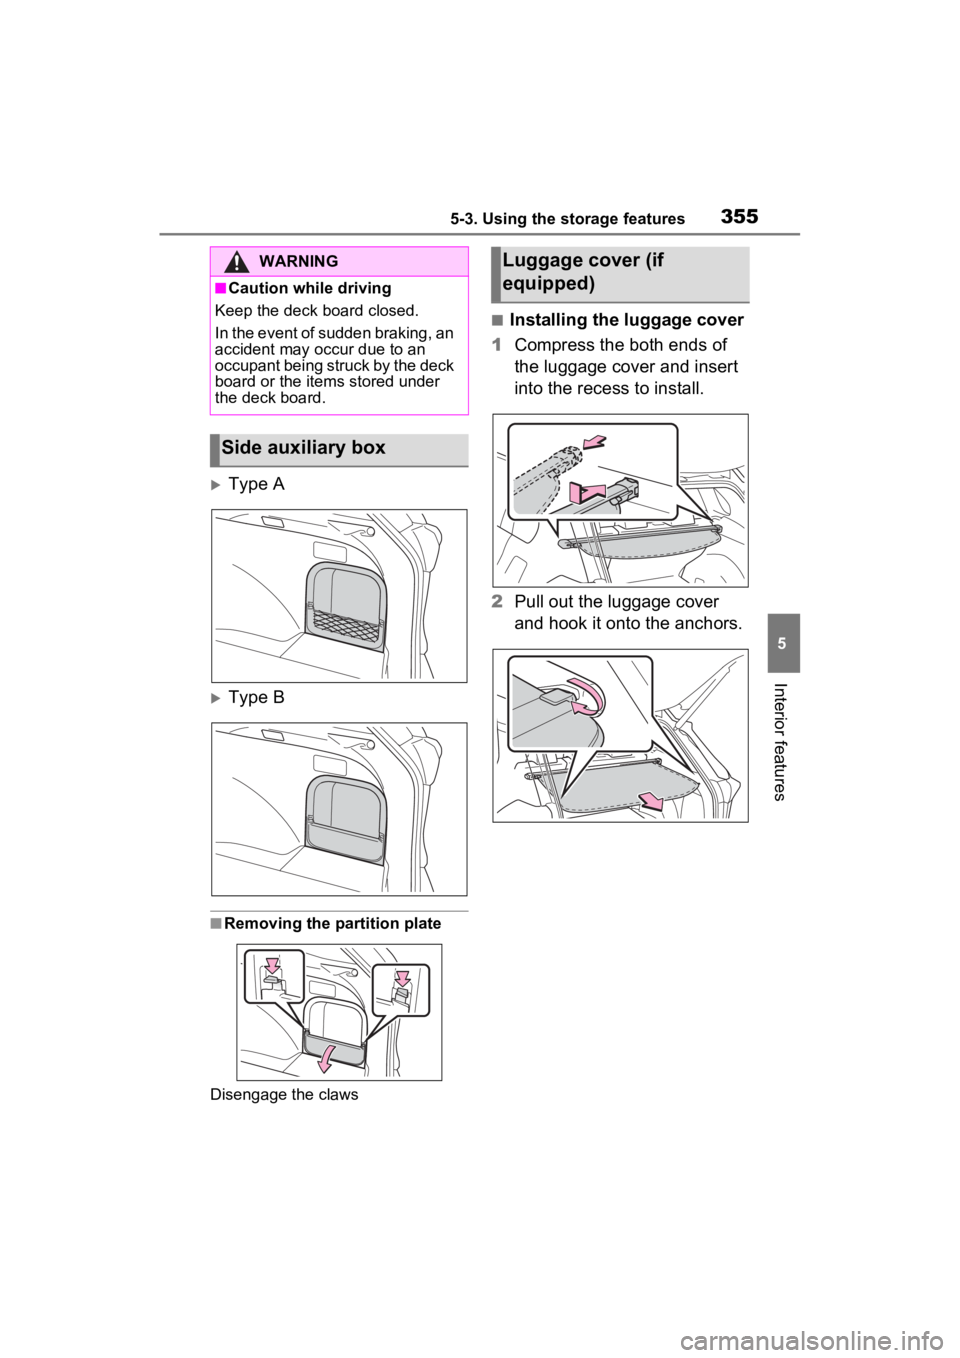
Type A
Type B
■Removing the partition plate
Disengage the claws
■Installing the luggage cover
1 Compress the both ends of
the luggage cover and insert
into the recess to install.
2 Pull out the luggage cover
and hook it onto the anchors.
WARNING
■Caution while driving
Keep the deck board closed.
In the event of sudden braking, an
accident may occur due to an
occupant being struck by the deck
board or the items stored under
the deck board.
Side auxiliary box
Luggage cover (if
equipped)
Page 356 of 574
3565-3. Using the storage features
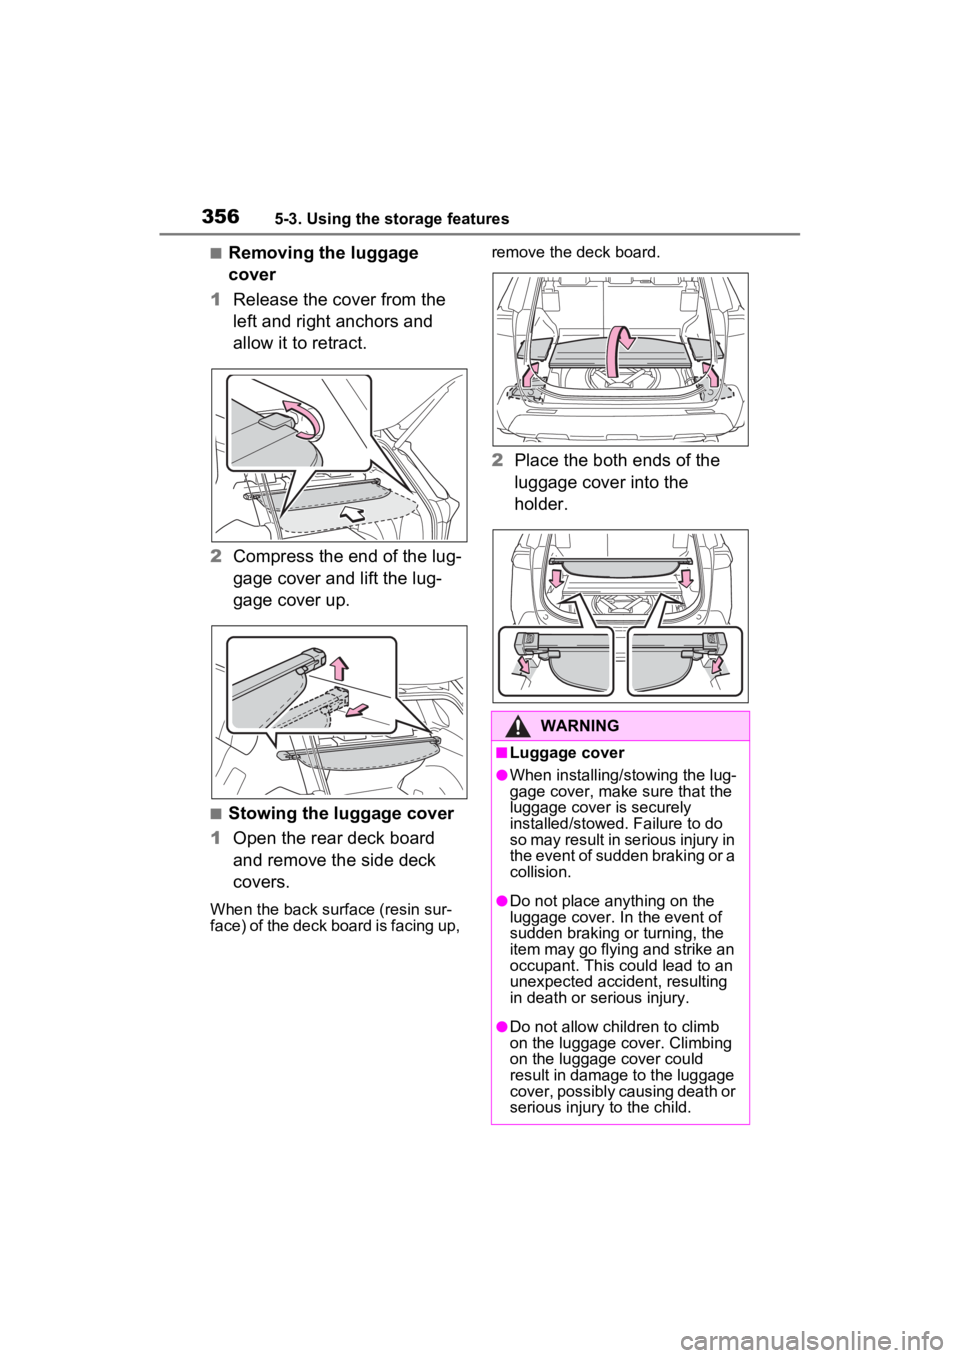
■Removing the luggage
cover
1 Release the cover from the
left and right anchors and
allow it to retract.
2 Compress the end of the lug-
gage cover and lift the lug-
gage cover up.
■Stowing the luggage cover
1 Open the rear deck board
and remove the side deck
covers.
When the back surface (resin sur-
face) of the deck board is facing up, remove the deck board.
2
Place the both ends of the
luggage cover into the
holder.
WARNING
■Luggage cover
●When installing/stowing the lug-
gage cover, make sure that the
luggage cover is securely
installed/stowed. Failure to do
so may result in serious injury in
the event of sudden braking or a
collision.
●Do not place anything on the
luggage cover. In the event of
sudden braking or turning, the
item may go flying and strike an
occupant. This could lead to an
unexpected accident, resulting
in death or serious injury.
●Do not allow children to climb
on the luggage cover. Climbing
on the luggage cover could
result in damage to the luggage
cover, possibly causing death or
serious injury to the child.
Page 357 of 574
3575-3. Using the storage features
5
Interior features
NOTICE
■To prevent damage to the lug-
gage cover
Do not place anything on top of
the luggage cover. When rolling
up the luggage cover, objects
may be caught in the cover, dam-
aging the cover and generating
noise.
Page 358 of 574
3585-4. Using the other interior features
5-4.Using the other interior features
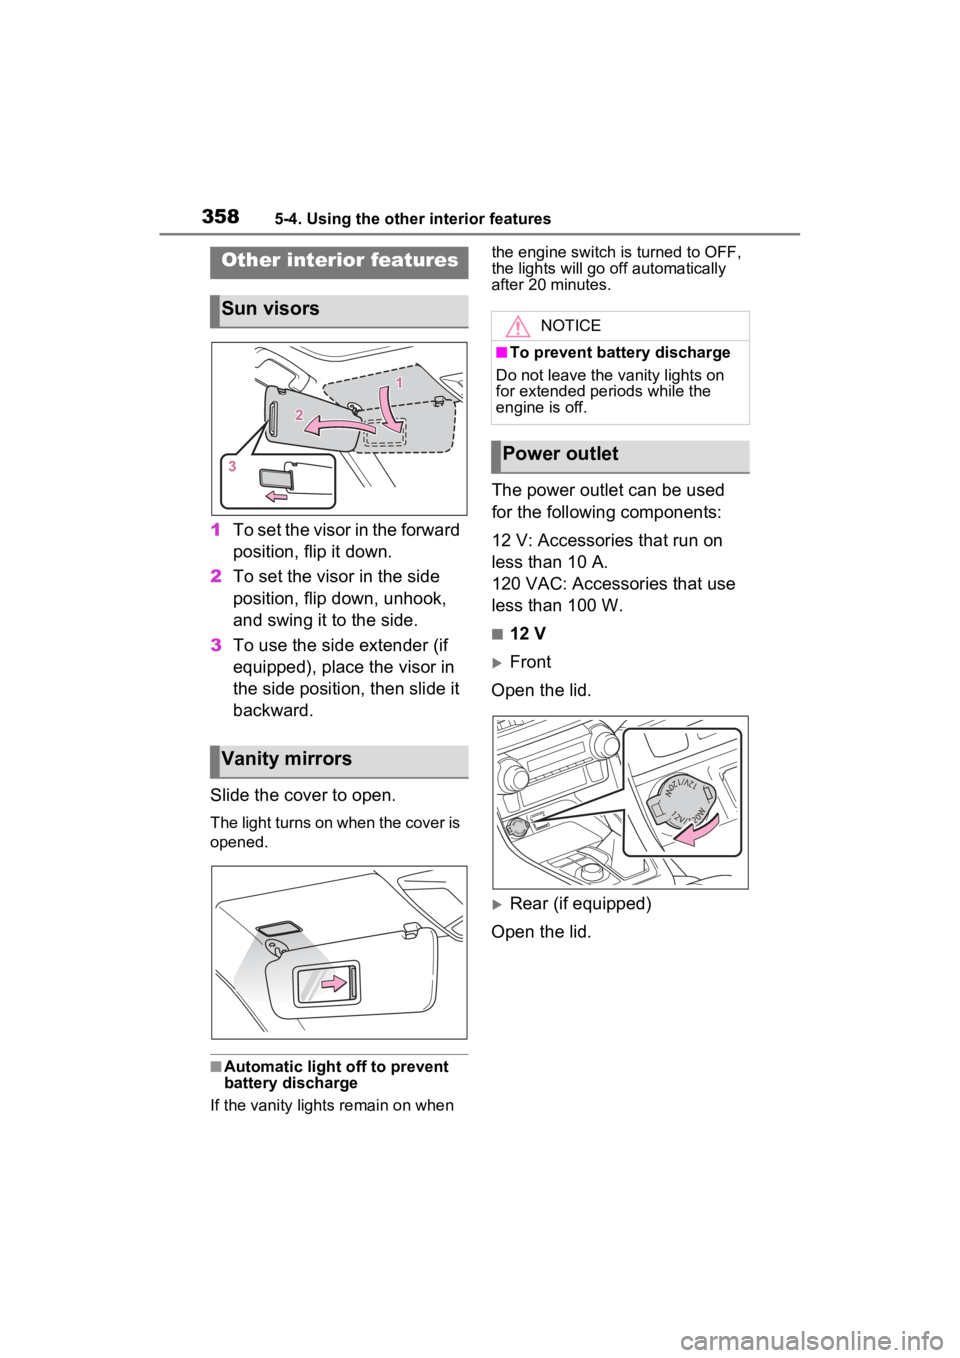
1To set the visor in the forward
position, flip it down.
2 To set the visor in the side
position, flip down, unhook,
and swing it to the side.
3 To use the side extender (if
equipped), place the visor in
the side position, then slide it
backward.
Slide the cover to open.
The light turns on when the cover is
opened.
■Automatic light off to prevent
battery discharge
If the vanity light s remain on when the engine switch is turned to OFF,
the lights will go off automatically
after 20 minutes.
The power outlet can be used
for the following components:
12 V: Accessories that run on
less than 10 A.
120 VAC: Accessories that use
less than 100 W.
■12 V
Front
Open the lid.
Rear (if equipped)
Open the lid.
Other interior features
Sun visors
Vanity mirrors
NOTICE
■To prevent battery discharge
Do not leave the vanity lights on
for extended periods while the
engine is off.
Power outlet
Page 359 of 574
3595-4. Using the other interior features
5
Interior features
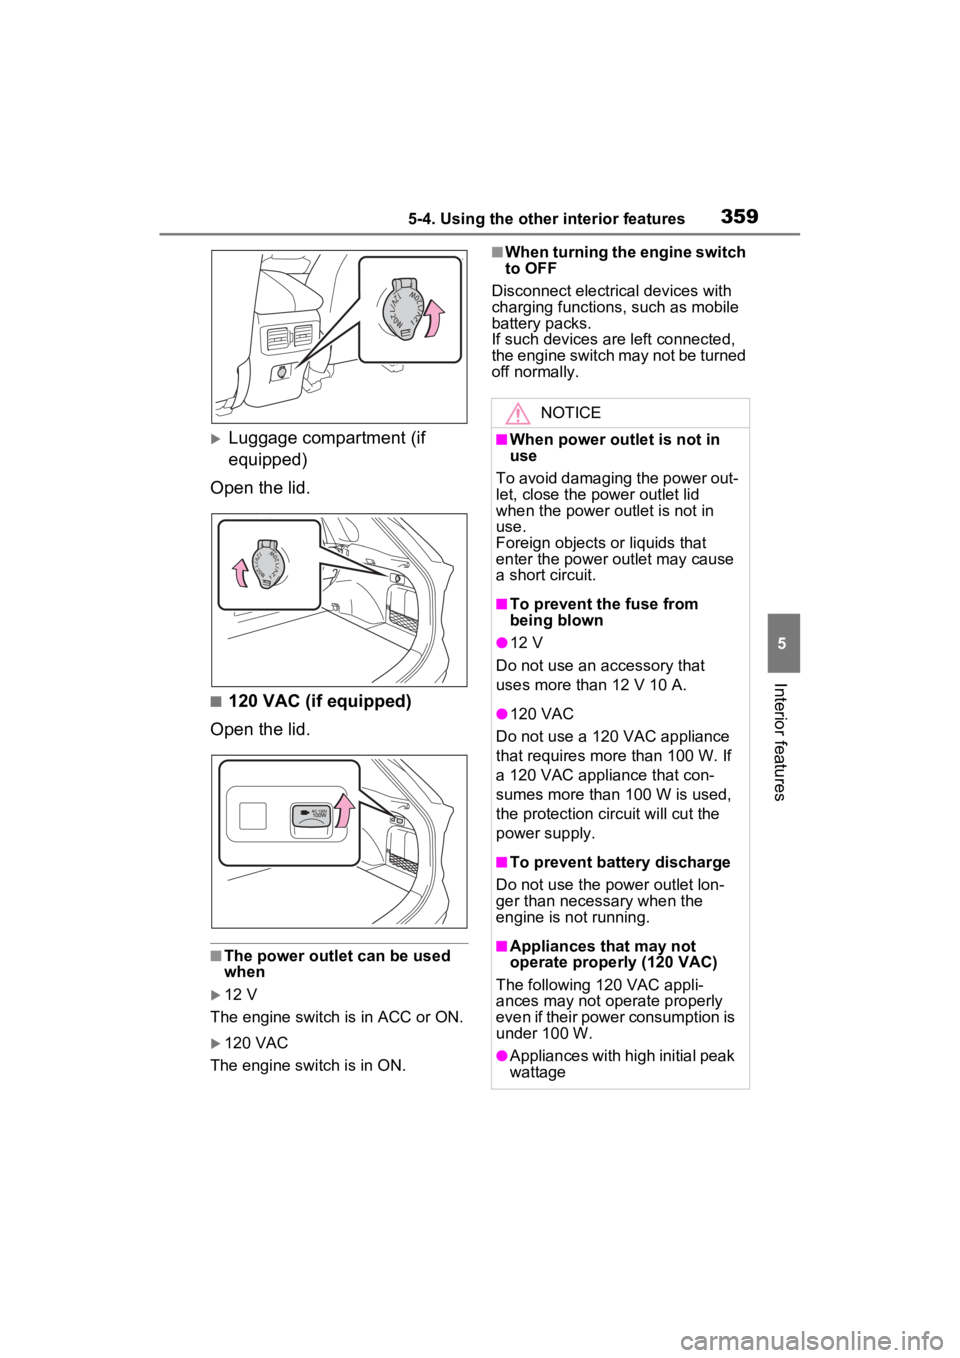
Luggage compartment (if
equipped)
Open the lid.
■120 VAC (if equipped)
Open the lid.
■The power outlet can be used
when
12 V
The engine switch is in ACC or ON.
120 VAC
The engine switch is in ON.
■When turning the engine switch
to OFF
Disconnect electrical devices with
charging functions, such as mobile
battery packs.
If such devices are left connected,
the engine switch may not be turned
off normally.
NOTICE
■When power outlet is not in
use
To avoid damaging the power out-
let, close the po wer outlet lid
when the power outlet is not in
use.
Foreign objects or liquids that
enter the power outlet may cause
a short circuit.
■To prevent the fuse from
being blown
●12 V
Do not use an accessory that
uses more than 12 V 10 A.
●120 VAC
Do not use a 120 VAC appliance
that requires more than 100 W. If
a 120 VAC appliance that con-
sumes more than 100 W is used,
the protection circuit will cut the
power supply.
■To prevent battery discharge
Do not use the p ower outlet lon-
ger than necessary when the
engine is not running.
■Appliances that may not
operate properly (120 VAC)
The following 120 VAC appli-
ances may not ope rate properly
even if their power consumption is
under 100 W.
●Appliances with high initial peak
wattage
Page 360 of 574
3605-4. Using the other interior features
The USB Type-C charging ports
are used to supply 3 A of elec-
tricity at 5 V to external devices.
The USB Type-C charging ports
are for charging only. They are
not designed for data transfer or
other purposes.
Depending on the external
device, it may not charge prop-
erly. Refer to the manual
included with the device before
using a USB charging port.
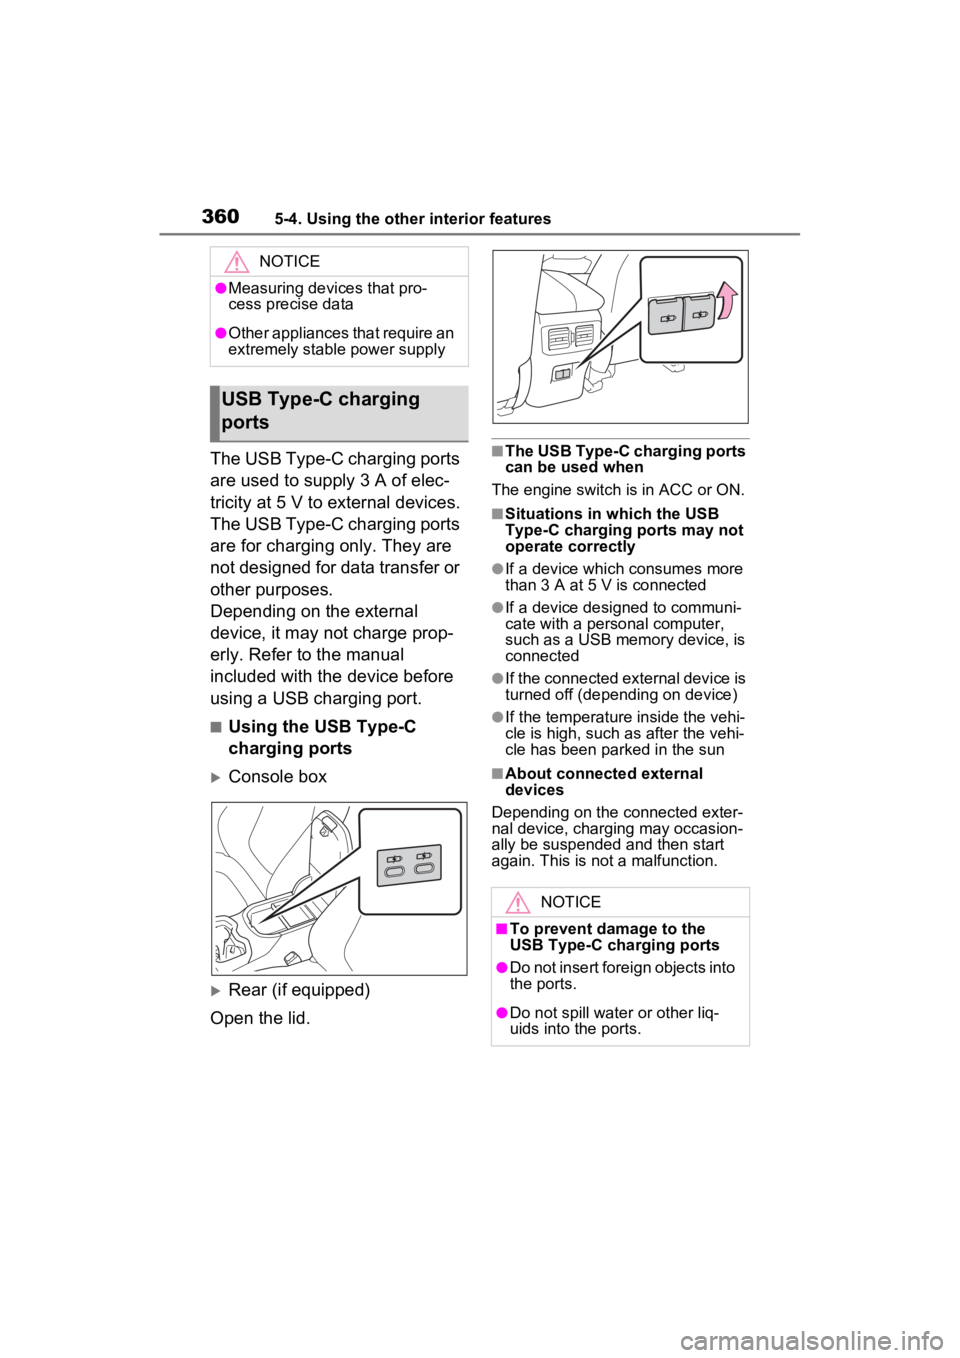
■Using the USB Type-C
charging ports
Console box
Rear (if equipped)
Open the lid.
■The USB Type-C charging ports
can be used when
The engine switch is in ACC or ON.
■Situations in which the USB
Type-C charging ports may not
operate correctly
●If a device which consumes more
than 3 A at 5 V is connected
●If a device designed to communi-
cate with a personal computer,
such as a USB memory device, is
connected
●If the connected external device is
turned off (depend ing on device)
●If the temperature inside the vehi-
cle is high, such as after the vehi-
cle has been parked in the sun
■About connected external
devices
Depending on the connected exter-
nal device, charging may occasion-
ally be suspended and then start
again. This is not a malfunction.
NOTICE
●Measuring devices that pro-
cess precise data
●Other appliances that require an
extremely stable power supply
USB Type-C charging
ports
NOTICE
■To prevent damage to the
USB Type-C charging ports
●Do not insert foreign objects into
the ports.
●Do not spill water or other liq-
uids into the ports.